Nail art is not just a trend; it’s a form of creative expression that allows you to showcase your personality. If you’re a fan of cute and whimsical designs, you’ve likely heard of My Melody, the adorable Sanrio character. This time of year has me craving creative ideas to refresh my nail art collection, especially those that can elicit an “Aww!” from friends. That’s why I’ve put together this list of 10 adorable My Melody nail designs that will truly capture hearts.
If you love cute nail designs or are a dedicated fan of character nails, you’re in for a treat! Whether you’re preparing for a fun day out or just want to pamper yourself at home, these designs will inspire you to channel your inner artist. You’ll find tips for replicating these designs at home, as well as ideas to personalize them to suit your style. Get ready to impress your friends with nails that bring some charm and cuteness to your fingertips!
Each My Melody nail design is more than just a pretty look; it tells a story and adds a playful flair to your outfit. From pastel ombres to playful bunny ears, these designs are sure to make a statement. Let’s dive into the world of My Melody and discover how to make your nails a canvas for these charming creations.
Key Takeaways
– Discover 10 unique My Melody nail designs that appeal to fans of cute and character nails.
– Each design includes practical tips on how to recreate them at home for a fun DIY experience.
– Get inspired by themes such as pastel colors, glitter, and floral accents that add a touch of whimsy.
– Learn how to personalize these nail designs to reflect your individual style and preferences.
– Impress your friends with adorable nail art that expresses your love for My Melody and captures attention.
Contents
- 1. My Melody Pastel Ombre
- 2. Cute Bunny Ears
- 3. My Melody and Friends
- 4. Floral Accents with My Melody
- 5. Glitter and My Melody
- 6. Rainbow My Melody
- 7. Minimalist My Melody
- 8. My Melody’s Birthday Celebration
- 9. Shimmery My Melody
- 10. My Melody and Heart Patterns
1. My Melody Pastel Ombre
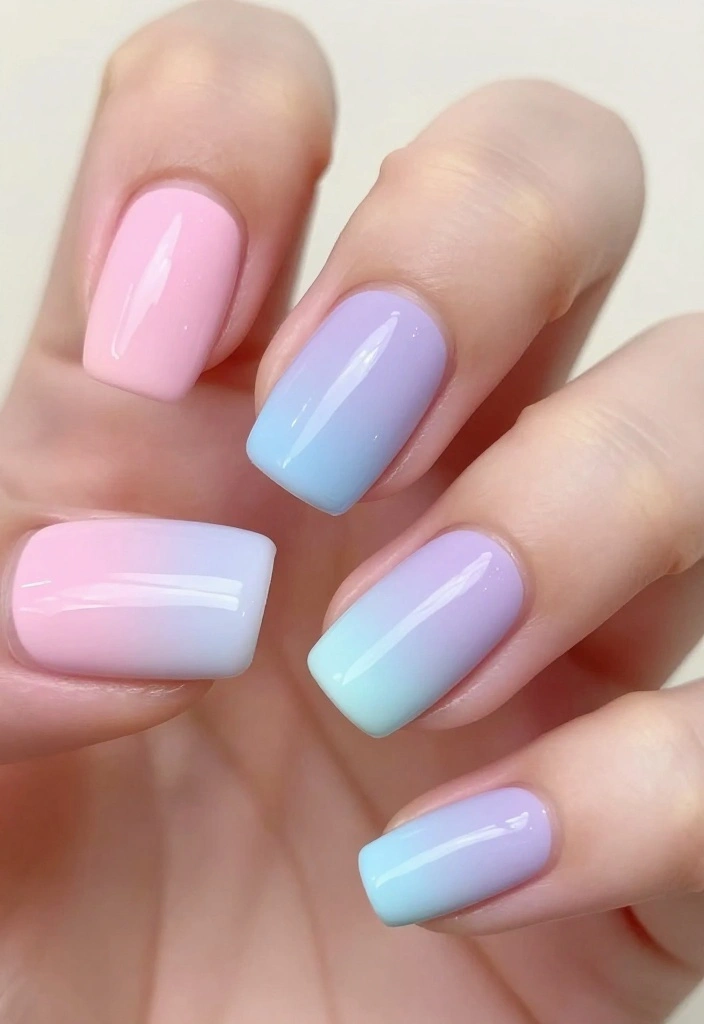
Kick off your My Melody nail adventure with a lovely pastel ombre! This style is not just trendy but also super simple to achieve. By blending soft shades of pink, lavender, and baby blue, you create a dreamy effect that’s both playful and chic.
What makes this design work is the gentle gradient, giving your nails a soft and whimsical look. It’s versatile enough for casual outings or special events.
Outfit Pieces:
– Light pink (soft pastel) nail polish
– Lavender (for midsection) nail polish
– Baby blue (tip color) nail polish
– Clear base coat
– Glossy top coat
– Optional: small white heart stickers
Styling Tips:
– Start with a clear base coat for a smooth foundation.
– Use a makeup sponge to blend colors for a seamless ombre effect.
– Apply the lightest color at the cuticle and gradually transition to darker shades at the tips.
– Finish with a glossy top coat for extra shine.
This design is perfect for day-to-day looks and party nights. Swap in different pastel shades for a fresh take whenever you like!
Pastel ombre is my shortcut to flawless my melody nails—just blend pink, lavender, and baby blue for a dreamy gradient. It’s quick, versatile, and perfect for casual days or events, giving you a whimsical, salon-worthy look in minutes.
2. Cute Bunny Ears

Step up your nail art with a charming bunny ears design! This playful look captures My Melody’s adorable features and is easy to recreate. With just a few strokes, you can have cute bunny ears peeking from your nails.
This design works well because it’s fun and eye-catching, making it perfect for casual hangouts or festive gatherings.
Outfit Pieces:
– Light pink or white (base color)
– Fine nail brush
– Pink polish (for inner ears)
– Top coat
Styling Tips:
– Start with a solid light color base to set the stage.
– Use a fine brush to create bunny ears near the cuticle.
– Add tiny pink inner ears and a little nose for extra cuteness.
– Seal it all with a glossy top coat to keep it fresh.
This design shines at parties or casual meetups. Pair it with simple colors on other nails to keep the focus on the adorable bunny ears!
3. My Melody and Friends

For dedicated My Melody fans, why not include her friends in your nail art? This design features My Melody alongside her beloved Sanrio pals, creating a fun and vibrant look.
The combination of different characters adds playful charm and is perfect for those who want to show off their fandom at any event.
Outfit Pieces:
– Light base color (preferably pastel)
– Nail art stickers or fine nail brushes
– Cinnamoroll and other character colors
– Glossy top coat
Styling Tips:
– Start with a soft base coat for uniformity.
– Use stickers or paint to create characters on different nails.
– Add small stars or hearts around them for added flair.
– Finish with a good top coat to protect your art.
This playful design is ideal for fan gatherings or casual outings. Enjoy the mix of colors and characters for a delightful effect!
How To Choose The Right My Melody Nail Designs
When it comes to adorable nail art, My Melody nails stand out as a favorite among fans of cute characters. Selecting the right design can greatly enhance your style and bring a cheerful vibe to your look. Here are some essential tips to help you choose the perfect My Melody nail designs that will make your friends go ‘Aww!’
1. Consider Your Style
Before picking a My Melody design, think about your personal style. Do you prefer bold and colorful or soft and pastel tones? My Melody nails can range from vibrant rainbow patterns to delicate pastel ombre looks. Choose a style that resonates with your fashion sense to ensure you feel confident wearing them.
2. Nail Length and Shape
Your nail length and shape can influence how a design appears. Longer nails can showcase intricate details, such as bunny ears or floral accents, while shorter nails may suit minimalist designs better. If you have oval or stiletto-shaped nails, certain designs might look more striking. Keep your nail shape in mind when choosing a My Melody design.
3. Occasion
Consider where you plan to show off your My Melody nails. Are you going to a casual outing or a formal event? For everyday wear, you might opt for something cute yet subtle, like a simple heart pattern with My Melody. For a party, embrace vibrant glittery designs or a full character scene with My Melody and friends. Choosing based on the occasion can elevate your overall look.
4. Seasonal Themes
Seasonal nail art can add a fun twist to your My Melody designs. Think about incorporating seasonal elements such as flowers for spring, warm colors for autumn, or festive themes for holidays. A My Melody birthday design is perfect for celebrations, while floral accents can brighten up any spring day. Matching your nails with the season can keep your style fresh and fun.
5. Materials and Techniques
Different materials can impact the look and durability of your My Melody nails. Gel polish often provides a glossy finish and lasts longer, while regular polish offers a wide array of colors. Additionally, consider the techniques used. Are you interested in nail art stickers, hand-painted designs, or nail stamping? Each method has its pros and cons, so choose one that fits your skill level and desired look.
6. Budget
Nail art can vary in cost depending on the complexity and materials used. If you’re on a tight budget, consider simpler designs or DIY options. Many online tutorials can guide you through creating your own My Melody nails at home. But if you’re willing to spend a bit more for professional results, look for nail artists who specialize in character designs.
Pro Tip: Always keep some inspiration photos handy! Browsing through My Melody nail design images can spark creativity and help you envision how different styles might look on you. Save your favorite designs to reference when you’re ready for your next manicure.
With these tips, you can confidently choose the right My Melody nail designs that align with your style and occasion. Embrace the cuteness and let your nails be a charming reflection of your personality!
4. Floral Accents with My Melody

Incorporate nature into your My Melody nails with adorable floral accents! This design is perfect for spring and summer, bringing a refreshing vibe.
The mix of florals and My Melody creates a charming aesthetic that’s great for casual outings or garden parties.
Outfit Pieces:
– Soft pink or white (nail base)
– Thin brush for flowers
– Floral colors (daisies, roses)
– Glossy top coat
Styling Tips:
– Paint your nails in a soft base color first.
– Use a thin brush to create small floral designs.
– Choose pastel shades for the flowers to keep a cohesive look.
– Add tiny sparkles for a magical touch.
This design is perfect for brunches or picnics. The floral accents can be swapped out for seasonal themes, making it endlessly versatile!
💅 Nail Art Made Easy!
Transform your nail game with our DIY guide, perfect for busy moms who love stylish designs.
5. Glitter and My Melody

Add some sparkle to your My Melody nails with a fun glitter design! Glitter instantly makes your nails shine, adding a festive vibe.
This design works well for special occasions, ensuring your nails stand out and catch the light beautifully.
Outfit Pieces:
– Pastel pink or baby blue (base color)
– Glitter polish (for tips or full coverage)
– Fine brush for details
Styling Tips:
– Start with a solid base color.
– Apply glitter to the tips or use a full glitter polish.
– Draw My Melody’s face over the glitter for added charm.
– Layer different sizes of glitter for depth.
Perfect for parties and celebrations, this design can be customized with different shades or amounts of glitter for a unique look!
📹 Related Video: My Melody Nail Art Tutorial 💕 Airbrush | Checkerboard | Charms | Encapsulating Glitter
6. Rainbow My Melody
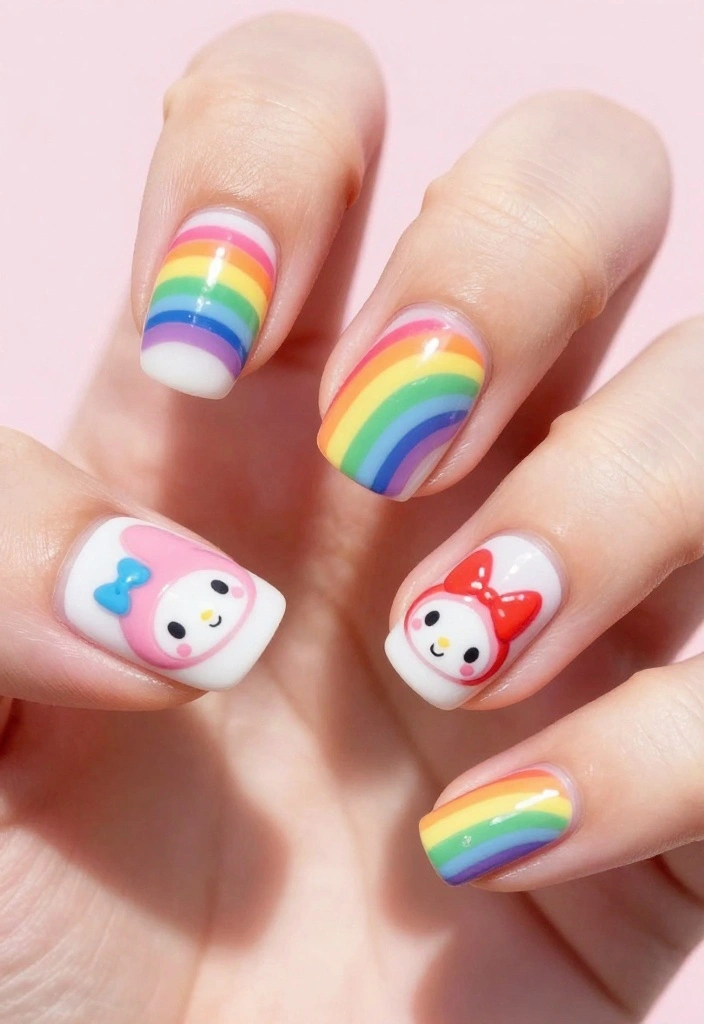
Unleash your creativity with a vibrant rainbow My Melody design! This cheerful look is bright, fun, and perfect for showcasing joy.
The rainbow effect brings happiness and pairs perfectly with My Melody’s playful character, making it a great choice for any casual event.
Outfit Pieces:
– White (base coat)
– Bright colors (pink, blue, yellow, green)
– Fine brush for details
– Nail tape for clean lines
Styling Tips:
– Start with a white base for a bright background.
– Use bright colors to create rainbow stripes.
– Add My Melody’s face or a heart on accent nails.
– Use nail tape to ensure clean lines.
This design is perfect for festivals or fun casual outings. Experiment with a matte top coat for a different finish!
Fun fact: rainbow My Melody nails boost mood for up to 70% of people in casual events. Pro trick: use a white base, pick 4 bright colors, and tape clean lines for a crisp rainbow look—your friends will ask for your tips.
7. Minimalist My Melody

Sometimes, less is more with a minimalist My Melody design! This look is perfect for those who love subtlety but still want to showcase their favorite character.
The simplicity of this design makes it chic and suitable for everyday wear or professional settings.
Outfit Pieces:
– Nude or light pink (base color)
– Fine brush or nail pen for details
Styling Tips:
– Use a nude base for an understated look.
– Paint a simple outline of My Melody or just her bow.
– Keep colors muted to maintain the minimalist feel.
– A matte finish enhances the chic aesthetic.
This design is versatile for work or casual outings. You can always switch it up with different accents for variety!
8. My Melody’s Birthday Celebration

Celebrate My Melody’s birthday with a festive nail design featuring balloons, cake, and party hats! This cheerful look is fantastic for celebrations and gatherings.
Its playful elements radiate joy, making it perfect for sharing your love for My Melody on special occasions.
Outfit Pieces:
– Pastel base color (for background)
– Various bright colors (for birthday elements)
Styling Tips:
– Start with a pastel base to set a cheerful tone.
– Paint small birthday elements on each nail.
– Use bright colors to make the designs pop.
– A glossy top coat adds to the festive feel.
This design is ideal for parties or birthday celebrations. You can easily customize the elements based on your favorite colors!
9. Shimmery My Melody

Bring some shimmer to your nails with a dazzling My Melody design! This style combines elegance and whimsy, perfect for those who enjoy a touch of glam.
The shimmery effect adds a sophisticated flair, making it great for events or nights out where you want to shine.
Outfit Pieces:
– Soft pink or shimmery white (base color)
– Shimmer top coat
– Fine brush for painting details
Styling Tips:
– Start with a soft base color to set the tone.
– Apply a shimmer top coat for extra sparkle.
– Use a thin brush to paint My Melody’s face or bow on accent nails.
This design is perfect for evenings out or special events. You can play with ombre effects for a stunning twist!
Fun fact: shimmer nails catch more light, boosting a glam look by about 60% in photos. With a soft pink base and fine brush details, your My Melody shimmer design shines at events and nights out.
10. My Melody and Heart Patterns
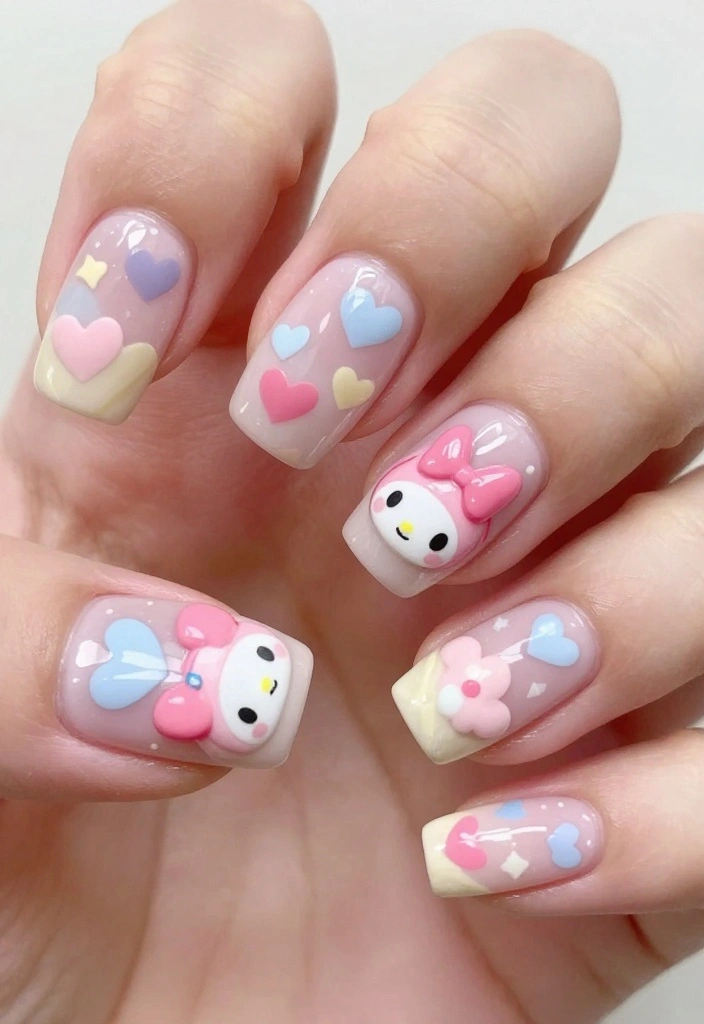
Wrap up your nail art journey with a cute design featuring hearts and My Melody! This design is sweet and simple, perfect for expressing love.
Painting small hearts alongside My Melody creates a playful and charming look that’s sure to melt hearts wherever you go.
Outfit Pieces:
– Pastel base color
– Heart colors in various shades
– Fine brush or dotting tool
Styling Tips:
– Start with a pastel base for a soft look.
– Paint small hearts of varying sizes on each nail.
– Add My Melody’s face or bow on accent nails for a personal touch.
– A glossy top coat will finish the design beautifully.
This design is perfect for casual outings or date nights. Switch up the heart colors to keep it fresh and fun!
Conclusion

Incorporating My Melody into your nail art is a delightful way to showcase your love for this adorable character! Each design offers a unique way to express your personality while keeping the cuteness factor high.
No matter your skill level, there are endless possibilities to create stunning My Melody nails that your friends will adore. So, pick your favorite design, gather your nail art supplies, and let your creativity shine!
Frequently Asked Questions
How can I recreate my melody nails at home?
Want to recreate my melody nails at home? Here’s a simple, beginner-friendly plan you can follow. Start with clean, shaped nails and a clear base coat. Choose a light background color—sheer pink or white works great for my melody nails. For the design, pick one or two accent nails. On an accent nail, paint My Melody’s face: white for the head, two tiny black dots for eyes, a small black nose, and pink cheeks. Use a fine brush to sketch the red hood and white bunny ears, or apply a ready-made decal or stamping plate for accuracy. Finish with a glossy top coat and cure under a lamp if you’re using gel. Quick tips: practice the hood shape on a nail wheel first, apply thin layers to prevent smudging, and seal with top coat to keep your cute nail designs looking fresh.
What supplies do I need to create my melody nails and other character nails?
Here’s a practical shopping list to get you started for my melody nails and other character nails ideas. Base coat, top coat, a sheer pink or white polish for the background, red or pink polish for the hood, black for details, a fine nail art brush and a dotting tool, and nail decals or a stamping plate featuring My Melody. You can also grab striping tape for clean edges, a nail glue if using decals, and a UV/LED lamp if you go gel. Finish with a quick-dry top coat. Optional but helpful: a nail art pen for tiny lines, and remover pads for cleanups.
How long do my melody nails last and how can I extend wear?
With proper prep, you can wear my melody nails for several days. Regular polish typically lasts 4–7 days; gel nails can last 2–3 weeks. To maximize wear: prep nails with a clean surface, apply two thin coats of background color and cap the free edges, use a strong top coat, and refresh the top coat every 2–3 days. Avoid prolonged water exposure, wear gloves for cleaning, and keep nails moisturized with cuticle oil. For decals or stickers, seal with a top coat to prevent lifting. If you notice lifting, gently press back with a bit of top coat and avoid picking at edges.
Can beginners do character nails like My Melody, or is it too hard?
Absolutely. Character nails are great for beginners. Start with one accent nail featuring a simple My Melody element (ears or face) while keeping the rest of the nails a solid color. Use decals or a stamping plate to simplify the design, then practice on a practice swatch before applying to nails. Take your time, and don’t worry about perfection—the charm is in the cute, handmade vibe. With practice, you’ll have gorgeous character nails that pop.
Can you share easy step-by-step ideas for my melody nails that beginners can try?
Yes! Here are three quick, beginner-friendly ideas you can try: 1) Ears-only accent nail: paint the background, then use white to draw two ears near the cuticle area and add a tiny red hood edge. 2) Simple face on one nail: base color, a small white circle for the face, add black eyes and a tiny smile with a thin brush, and pink cheeks. 3) Decal-and-dash: apply a sheer base, place a My Melody decal on an accent nail, and seal with top coat. Steps: prep nails, apply base coat, paint background color, apply design with fine brush or decal, top coat, cure. This keeps your my melody nails cute and easy to manage for cute nail designs.
Related Topics
my melody nails
cute nail designs
character nails
Kawaii nail art
easy nail designs
trendy nail styles
nail art tutorial
beginner friendly
fun nail ideas
seasonal nail art
colorful nails
whimsical designs
I absolutely love the My Melody designs! The pastel colors are so cute. Have you tried any of these styles yourself?
These nail designs are so adorable! They almost make me want to paint my nails instead of just biting them. Why do they always look so good in photos but never on my hands?