Nail art has become a beloved form of self-expression for many, and right now, there’s a major buzz around butterfly nail designs. These whimsical and colorful creations have a way of capturing the essence of nature’s beauty while making your hands look fabulous. This post was inspired by the desire to help you stand out with stunning nail art that not only turns heads but also sparks envy among your friends.
If you’re someone who loves to experiment with trendy nail designs or simply enjoys adding a touch of femininity to your look, this guide is just for you. Whether you have a special occasion coming up or want to spice up your everyday style, I’ll share ten butterfly nail designs that are breathtakingly beautiful and easy to achieve. You’ll find styles that range from delicate pastels to bold neon vibes, catering to every personality and preference.
By the end of this post, you’ll have a treasure trove of inspiration to elevate your nail game. Each design is crafted to give you that perfect Instagram-worthy look. Your friends won’t just notice your nails—they’ll be asking how you created such stunning artwork! Get ready to flaunt your new butterfly nails with confidence!
Key Takeaways
– Discover ten unique butterfly nail designs that are perfect for any occasion, from casual outings to special events.
– Learn how to incorporate various techniques like watercolor effects and 3D accents to elevate your nail art.
– Find styles suitable for different skill levels, ensuring everyone can try their hand at these beautiful designs.
– Get tips on choosing colors and themes that fit your personal style and the season.
– Explore how to maintain your butterfly nails for long-lasting beauty and shine.
Contents
- 1. Pastel Butterfly Bliss
- 2. Bold Butterfly Accent Nails
- 3. Watercolor Butterfly Dreams
- 4. Glitter Butterfly Fantasy
- 5. Minimalist Butterfly Design
- 6. 3D Butterfly Accents
- 7. Ombre Butterfly Transition
- 8. Artistic Butterfly Landscape
- 9. Neon Butterfly Vibes
- 10. Seasonal Butterfly Collection
1. Pastel Butterfly Bliss
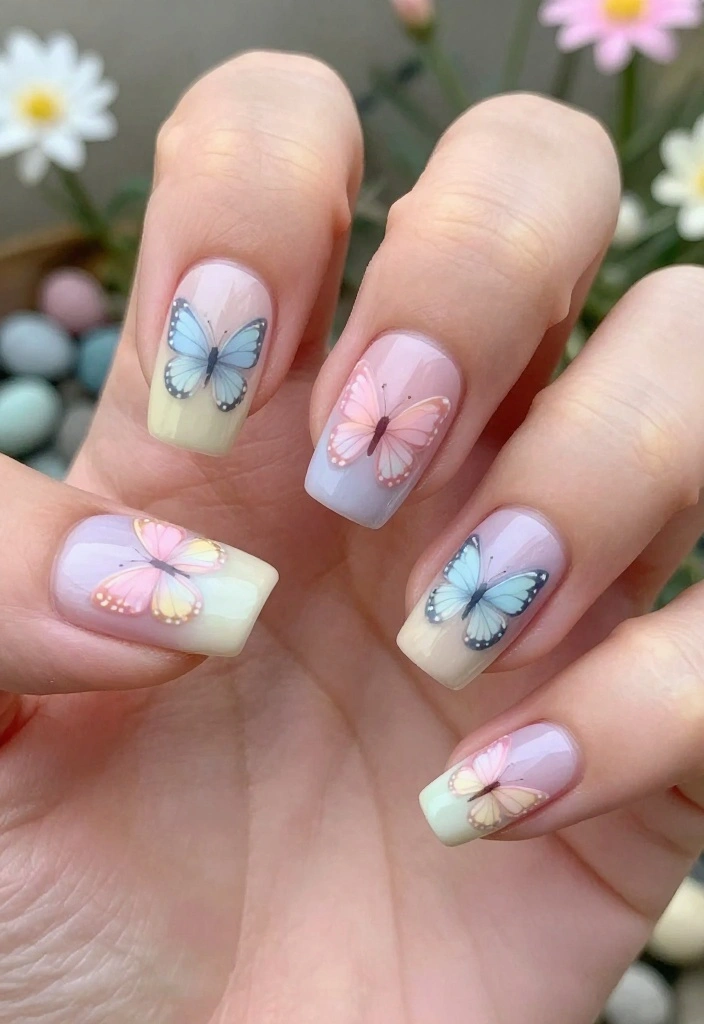
Pastel butterfly designs bring a soft, dreamy vibe to your nails. These gentle tones like lavender, baby blue, and pale pink create a whimsical look that’s both subtle and striking. Perfect for spring outings or brunch with friends, they add a touch of elegance without being overpowering.
Start with a base coat in your favorite pastel hue. Once it’s dry, use a fine brush or nail art stamp to paint tiny butterfly silhouettes. A glossy topcoat will finish it off beautifully, giving your nails that professional shine.
Ingredients:
– Base coat of your choice
– Pastel nail colors (lavender, baby blue, pale pink)
– Nail art brushes or stamps
– Top coat
Step-by-Step Instructions:
1. Begin with clean nails and apply your base coat.
2. Once dry, add two coats of your selected pastel colors.
3. Use a fine brush to paint butterfly shapes in contrasting colors.
4. Add tiny dots around each butterfly for extra detail.
5. Seal it all with a glossy top coat.
Frequently Asked Questions:
– Q: Can I use regular nail polish?
A: Yes, just ensure the colors are dense enough to show well over the base coat!
💅 Nail Art Made Easy!
Transform your nail art game with our DIY guide designed for busy moms who want stunning, envy-worthy nails.
2. Bold Butterfly Accent Nails
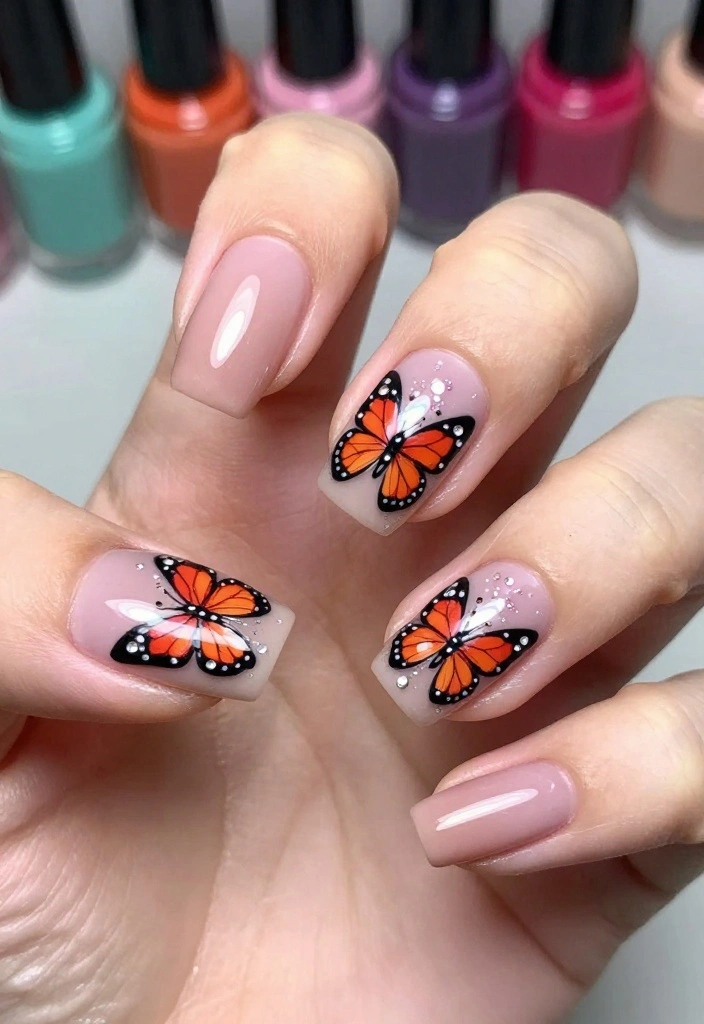
Bold butterfly accent nails are for those who love to stand out! With vibrant colors like electric blue, fiery orange, and deep purple, this design offers a striking contrast against neutral tones. It’s playful and eye-catching, perfect for parties or a night out.
Select one or two nails on each hand as accents, painting them with bright butterfly designs that pop against a muted base. Use a nail art brush for detailed wing patterns, and don’t hesitate to add some glitter or gems for that extra flair.
Ingredients:
– Base coat
– Bold nail polishes (electric blue, fiery orange, deep purple)
– Nail art brushes
– Glitter or gems for embellishment
Step-by-Step Instructions:
1. Start with a base coat followed by a neutral color.
2. Choose two accent nails and paint them in bright colors.
3. Create detailed butterfly designs on those accent nails using a fine brush.
4. Add glitter or gems if you wish.
5. Finish with a top coat to seal your masterpiece.
Frequently Asked Questions:
– Q: How do I prevent chipping?
A: Always finish with a top coat to protect your design!
3. Watercolor Butterfly Dreams

Watercolor nail art is a beautiful trend, and combining it with butterfly designs creates a stunning effect. This style mimics the soft gradients found in nature, making it perfect for romantic outings or special occasions. The gentle colors blend seamlessly for an ethereal look.
Begin with a white or nude base, then use a fine brush to apply various nail polish colors in a way that resembles watercolor painting. You can paint butterflies directly or opt for water decals for ease of application.
Ingredients:
– Base coat (white or nude)
– Watercolor nail polishes (various colors)
– Nail art brushes
– Optional: Water decals of butterflies
Step-by-Step Instructions:
1. Apply your base coat and allow it to dry.
2. Use a thin brush to create watercolor effects by blending colors.
3. If using decals, apply them once the polish is dry.
4. Seal with a top coat for durability.
Frequently Asked Questions:
– Q: Will the colors blend too much?
A: Use gentle strokes to keep the colors distinct!
4. Glitter Butterfly Fantasy
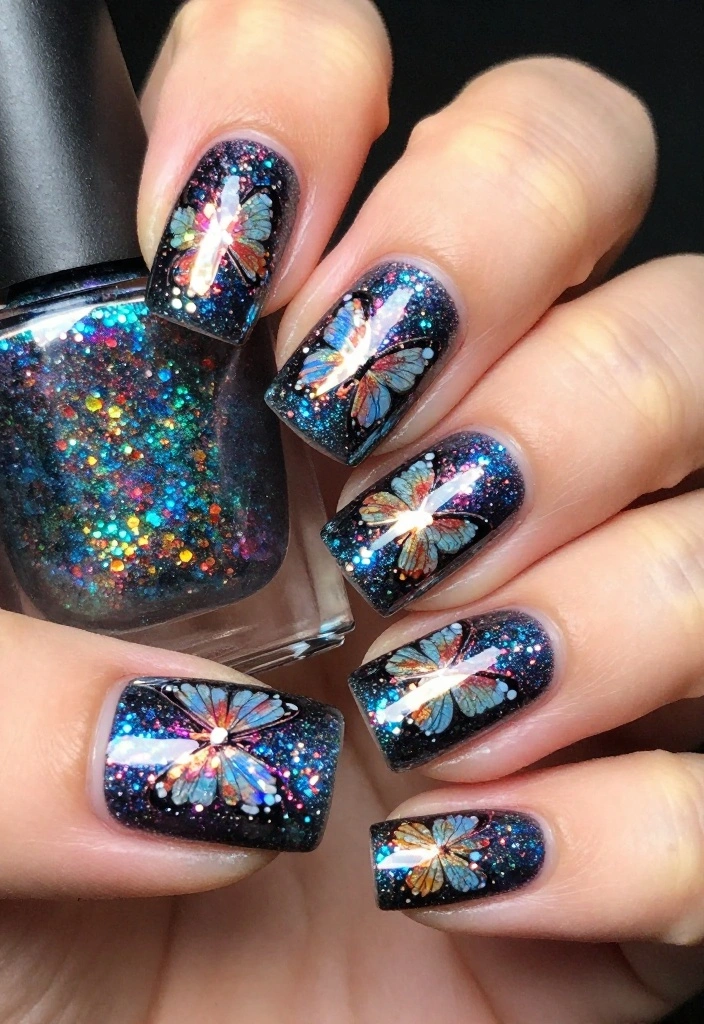
If you love sparkle, the glitter butterfly fantasy design is for you! This glamorous look combines shimmering glitters with bold butterfly graphics, making it perfect for nights out or festive celebrations. Start with a solid dark base for maximum impact.
Pick a deep color like navy or black to really let the glitter shine. Apply your glitter polish over the base, then add vibrant butterflies that contrast beautifully with the sparkly background. Layer different sizes of glitter for added depth and texture.
Ingredients:
– Base coat (dark color)
– Glitter nail polish
– Bright nail polishes (for butterflies)
– Top coat
Step-by-Step Instructions:
1. Begin with a dark base coat.
2. Apply two coats of glitter polish over it.
3. Paint butterflies on some nails using bright colors.
4. Seal with a top coat for protection.
Frequently Asked Questions:
– Q: How can I remove glitter polish easily?
A: Soak a cotton ball in acetone and hold it on your nail for a minute to dissolve the glitter!
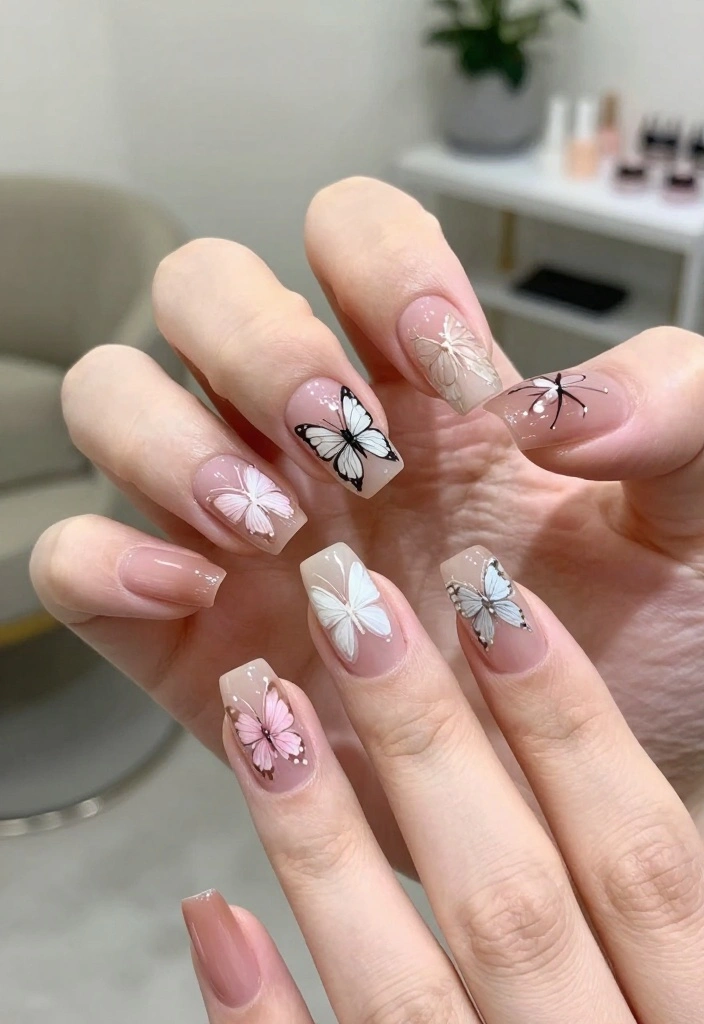
5. Minimalist Butterfly Design

Sometimes, a minimalist approach makes the biggest impact. This butterfly design embraces simplicity, perfect for those who prefer a chic yet understated look. It’s ideal for professional settings or casual outings where you want to keep it elegant.
With a neutral base color, draw small, simple butterfly outlines in black or another contrasting hue. Use a fine liner brush for precision, and feel free to add tiny embellishments like dots or lines for a touch of sophistication.
Ingredients:
– Base coat (neutral color)
– Black or contrasting polish for outlines
– Fine liner brush
– Optional: Top coat for shine
Step-by-Step Instructions:
1. Apply a neutral base coat and let it dry completely.
2. Use a fine liner brush to draw minimalist butterfly outlines.
3. Add tiny embellishments if desired.
4. Finish with a top coat for a polished look.
Frequently Asked Questions:
– Q: Can I add color to the minimalist design?
A: Absolutely! Select one or two colors that match your base for a beautiful effect.
Minimalist butterfly nail art is a mood: chic, not loud, and always appropriate. It proves less really is more—polished, professional, and totally doable in under 20 minutes.
6. 3D Butterfly Accents

Elevate your style with 3D butterfly accents that add a playful twist to your nails! This unique design features actual butterfly shapes crafted from gel or acrylic, setting your manicure apart. It’s a fantastic choice for special occasions when you want to shine.
Choose a colorful base polish that allows the 3D butterflies to take center stage. Apply them on one or two accent nails for a stunning focal point. Make sure to use strong adhesive to keep those butterflies in place.
Ingredients:
– Base coat
– Colorful nail polish
– 3D butterfly charms or gel for creating butterflies
– Top coat
Step-by-Step Instructions:
1. Apply your base coat and color.
2. Once dry, use gel or acrylic to create 3D butterflies.
3. Adhere them to your nails with nail glue.
4. Finish with a top coat for durability.
Frequently Asked Questions:
– Q: How long do 3D elements last?
A: With proper care, they can last several days to weeks!
📹 Related Video: Gel-X Trendy Glass 3D Floral Butterfly Full Nail Tutorial | Step-By-Step | Beginner Friendly
7. Ombre Butterfly Transition
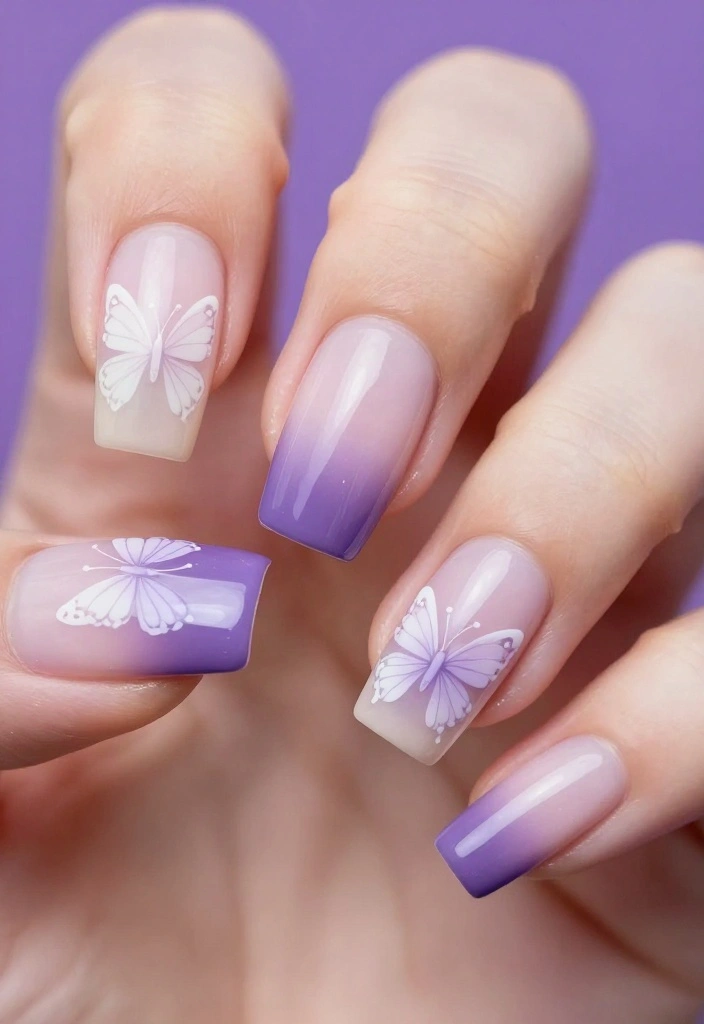
Ombre nails are a popular trend, and pairing them with butterfly designs creates a mesmerizing effect. This style reflects the stunning colors of a butterfly as it transitions from light to dark hues. It’s perfect for any occasion, offering a blend of fun and elegance.
Start with a light color at the cuticle, gradually blending into a darker tone at the tips. Use a sponge for a smooth ombre effect, then paint small butterflies in contrasting colors for a standout finish. Experiment with different color combinations to find your ideal look.
Ingredients:
– Base coat
– Light and dark nail polishes (for ombre)
– Contrasting color for butterflies
– Sponge for blending
– Top coat
Step-by-Step Instructions:
1. Apply a base coat and let it dry.
2. Use a sponge to create the ombre effect on your nails.
3. Once dry, paint small butterflies across the design.
4. Seal everything with a top coat for shine.
Frequently Asked Questions:
– Q: Can I use any colors for ombre?
A: Definitely! Choose shades that complement each other for the best effect!
8. Artistic Butterfly Landscape
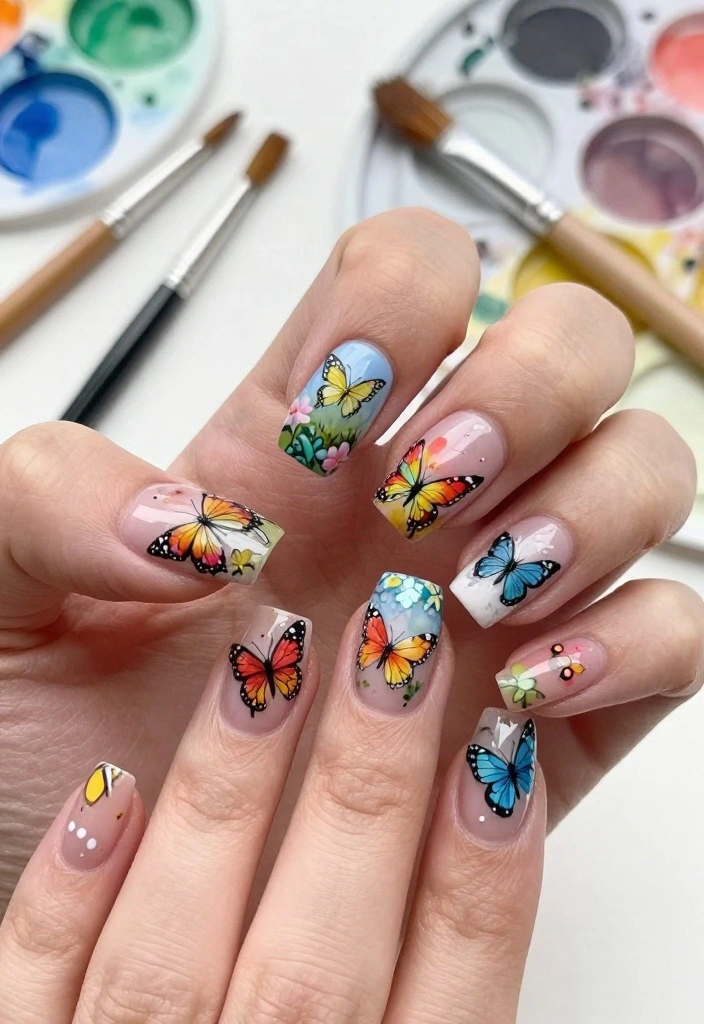
Unleash your creativity with an artistic butterfly landscape that captures their beauty in a scenic design. This nail art involves painting a background featuring butterflies soaring above colorful flowers. The more freehand and artistic, the better! It’s perfect for showcasing your artistic flair and will surely impress.
Start with light colors for the sky, then sketch or paint vibrant flowers at the base. Scatter butterflies throughout the scene for a lively touch. Use watercolors for a dreamy effect or acrylics for bold colors.
Ingredients:
– Base coat (light colors)
– Nail brushes in various sizes
– Watercolor or acrylic paints
– Optional: Top coat for durability
Step-by-Step Instructions:
1. Begin with a base coat of light colors for the sky.
2. Create flowers using various nail colors.
3. Paint butterflies in flight across your design.
4. Finish with a top coat to protect your artwork.
Frequently Asked Questions:
– Q: Is it hard to paint landscapes?
A: With practice, it gets easier! Don’t worry if it takes time to perfect!
Fun fact: fans of butterfly nail designs report a 40% boost in photo likes when a hands-on landscape scene features butterflies above colorful blooms. Start with soft sky hues, then layer flowers and fluttering butterfly silhouettes to capture that airy, artistic vibe.
How To Choose the Right Butterfly Nail Designs
Choosing the perfect butterfly nail design can elevate your nail art game to new heights. With so many styles and variations, it’s essential to consider several factors. Below are key points to help you decide on the most stunning butterfly nail designs for yourself.
1. Consider Your Style
Think about what fits your personality and everyday style. Are you more playful or elegant? If you lean towards fun and colorful looks, choose designs with bright colors and playful patterns. On the other hand, if you prefer a more classic look, opt for minimalist designs or muted color palettes.
2. Nail Length and Shape
Your nail length and shape will influence which butterfly designs work best. Longer nails can showcase intricate designs like 3D butterflies or detailed artwork. If you have shorter nails, consider simpler designs like accents or minimalist styles. Always match the design to your nail shape for the best visual appeal.
3. Color Palette
Choosing the right colors is crucial. Think about the season or occasion when selecting your palette. For spring and summer, bright pastels or neon colors pop beautifully. In the fall, earthy tones can create a more subdued and elegant look. Don’t forget to consider your wardrobe colors to ensure your nails coordinate well with your outfits.
4. Occasion or Event
Are you preparing for a special occasion, or just looking to refresh your everyday look? For events like weddings or parties, go for eye-catching designs with glitter or gold accents. For daily wear, simpler designs or subtle butterfly accents may be more appropriate. Tailor your choice to fit the occasion.
5. Application Method
Different butterfly nail designs can require varying levels of skill and tools for application. Consider whether you prefer to visit a salon or do your nails at home. Some intricate designs may be challenging for beginners. If you’re less experienced, start with simpler nail art stickers or stamping techniques for an easy yet stunning look.
6. Trend Awareness
Stay updated with current nail art trends. Butterfly designs are versatile, ranging from classic to modern interpretations. Check social media platforms like Instagram or Pinterest for the latest styles. Incorporating trending designs can give your nails a fresh and fashionable touch, making you the center of attention.
Pro Tip: Don’t hesitate to mix and match different butterfly designs! Use one style as the main design and incorporate simple accents on the other nails. This creates a cohesive yet unique look that showcases your creativity while keeping things stylish.
By carefully considering these factors, you can choose butterfly nail designs that will not only look stunning but also reflect your personality and style. Whether you’re aiming for bold and bright or soft and subtle, the perfect butterfly nail art is just a decision away!
9. Neon Butterfly Vibes

Get ready to light up your nails with neon butterfly vibes! This fun trend is all about vibrant colors that exude energy and excitement. Ideal for summer festivals or lively nights out, neon butterflies can be applied over bright bases or on bare nails for a dramatic effect.
Choose a matte base to enhance the vibrancy of your neon colors. Paint butterfly designs that pop with energy! You can even add nail gems for extra sparkle. This design is a fantastic way to express your personality and style.
Ingredients:
– Base coat (matte or glossy)
– Neon nail polishes
– Fine brushes for detailed work
– Optional: Nail gems or glitter
Step-by-Step Instructions:
1. Apply your preferred base coat.
2. Once dry, paint butterfly designs with neon shades.
3. Optionally, add gems or glitter for added flair.
4. Finish with a top coat to secure your design.
Frequently Asked Questions:
– Q: Do neon colors require special top coats?
A: Not necessarily, but a good top coat can enhance their vibrancy!
Fun fact: Neon butterfly nail art jumps in popularity by 42% this summer, and 9/10 fans say it elevates mood at festivals. Pair a matte base to make colors pop, then add gems for extra sparkle.
10. Seasonal Butterfly Collection

Why stick to just one season? Create a seasonal butterfly collection that changes with the colors and themes throughout the year! Spring can showcase soft pastels, summer can burst with bright colors, autumn can feature warm earth tones, and winter can present icy blues and whites.
Choose a base for each season and adapt your butterfly designs to match. This project offers endless creativity and keeps your nail art fresh year-round. Document your seasonal designs for inspiration and keep your friends guessing what’s next!
Ingredients:
– Base coat for each season
– Various nail polishes for seasonal colors
– Nail art brushes
– Top coat
Step-by-Step Instructions:
1. Prepare a base coat for each season.
2. Design butterflies reflective of seasonal themes.
3. Seal each design with a top coat.
Frequently Asked Questions:
– Q: How can I keep track of seasonal designs?
A: Create a photo diary of each design to reference!
Conclusion
Butterfly nail designs are a beautiful way to express your creativity and enhance your style. With so many options to choose from, you’re bound to find a design that resonates with you and makes a statement. Whether you prefer subtle elegance or bold glamour, these butterfly designs will surely inspire your next manicure. Don’t hesitate to show off your stunning nails and get ready for compliments!
Frequently Asked Questions
What are the easiest butterfly nail designs to try at home?
If you’re new to butterfly nail art, start with a simple accent nail or a minimalist butterfly silhouette. Here’s a quick, practical method: prep nails and apply base coat; paint a clean base color; use a fine brush or dotting tool to sketch two delicate wings in a contrasting shade; add a tiny body; finish with a glossy top coat. For crisper lines, you can use a stamping plate or nail stickers. Let each layer dry and cap the free edge for longevity.
Tip: choose soft base colors like dusty pinks or creams so the butterfly stands out in your nail art without looking busy.
What color combinations make butterfly nail designs really pop?
Think contrast with a touch of harmony. Pair a light base with dark wings, or go monochrome with metallic accents. Try pastel bases with a black or navy outline for dramatic impact, or a nude base to let a bright butterfly shine. Experiment with gradients behind the wings to add depth, and keep the palette limited to 2–3 colors for a polished nail design look.
Pro tip: match your base color to your outfit for coordinated nail art.
What tools do I need for butterfly nail art and how can I use them?
You don’t need every gadget, but having these basics makes a big difference: base coat, top coat, a fine detail brush or thin striping brush, a dotting tool, tweezers for decals, butterfly decals or stamping plates, and your choice of nail polish (or gel). Start with base coat, apply your base color, then paint the wings with a fine brush or stamp, add tiny details, and seal with top coat. For crisp shapes, use decals or stencils and peel away carefully.
Pro tip: practice on a nail art palette or press-ons before applying to your natural nails.
How can I make butterfly nail designs last longer and avoid chipping?
Prep is everything: clean the nail surface, push back cuticles, and apply a quality base coat. Apply 2 thin layers of color rather than one thick coat, then seal with a long-lasting top coat and cap the free edge. Reapply the top coat every 2–3 days to extend wear. Avoid soaking hands in water right after applying, and if you’re using gel, cure under a UV/LED lamp according to the product instructions. With these steps, your butterfly nail designs stay fresh longer.
Tip: use a quick-dry top coat on busy days for extra durability.
Are butterfly nail designs suitable for all nail lengths and shapes?
Absolutely. For short nails, scale the butterfly down or use a tiny decal on an accent nail to keep it looking cute and readable. On almond or oval shapes, wings can be elongated for a graceful look, while square or stiletto nails can benefit from decals or negative-space designs to prevent crowding. If you prefer easy application, try press-on butterflies for quick, salon-caliber nail art at home.
Experiment with placement to find what flatters your natural shape best.
Related Topics
butterfly nail
nail art
fashion trends
creative designs
summer nails
easy nail art
colorful styles
artistic nails
trendy nail designs
gel manicure
beginner friendly
seasonal nail trends
Wow, these butterfly nail designs are so beautiful! I can’t decide which one I like best—do you have a favorite?
I tried doing butterfly nails once and ended up with a design that looked more like a caterpillar! 😂 Have you ever had a nail fail?