The holiday season is here, and with it comes a wave of festive cheer! If you’re anything like me, you’re probably craving a bit of sparkle and fun in your life. There’s something magical about Christmas that makes you want to embrace all things bright and colorful, especially when it comes to your nails. This post is all about celebrating that festive spirit with 12 easy DIY Christmas nails that will make you feel like a holiday queen!
Whether you’re heading to a holiday party or just want to bring some cheer into your everyday life, these nail designs are perfect for you. If you love easy nail art or are on the lookout for DIY holiday nails that will impress without taking hours of your time, you’re in the right place. I’ve gathered a collection of fun, creative designs that are both simple and festive. You’ll discover how to add a personal touch to your holiday look and share your festive spirit with everyone around you.
Get ready to unleash your inner artist! These nail art ideas are not only easy to follow but also perfect for all skill levels. You’ll find that each design can be done with just a few tools and some holiday cheer. Let’s dive into these jolly creations that promise to spread the Christmas spirit, one fabulous nail at a time!
Key Takeaways
– Discover 12 unique Christmas nail designs that are easy to create and perfect for the holiday season.
– Each design requires minimal materials, making them accessible for everyone.
– Enjoy step-by-step instructions that guide you through the nail art process, regardless of your skill level.
– Find inspiration for your holiday parties or cozy nights at home, ensuring your nails are as festive as your spirit.
– Add a personal touch to your holiday look, enhancing your style while spreading cheer to those around you.
Contents
- 1. Classic Christmas Red and Green
- 2. Snowy White Tips
- 3. Glittery Gold Stars
- 4. Christmas Tree Nail Art
- 5. Gingerbread Man Delight
- 6. Santa’s Sleigh
- 7. Candy Cane Stripes
- 8. Winter Wonderland Ombré
- 9. Jolly Holly
- 10. Holiday Lights
- 11. Elegant Silver Snowflakes
- 12. Festive Patchwork
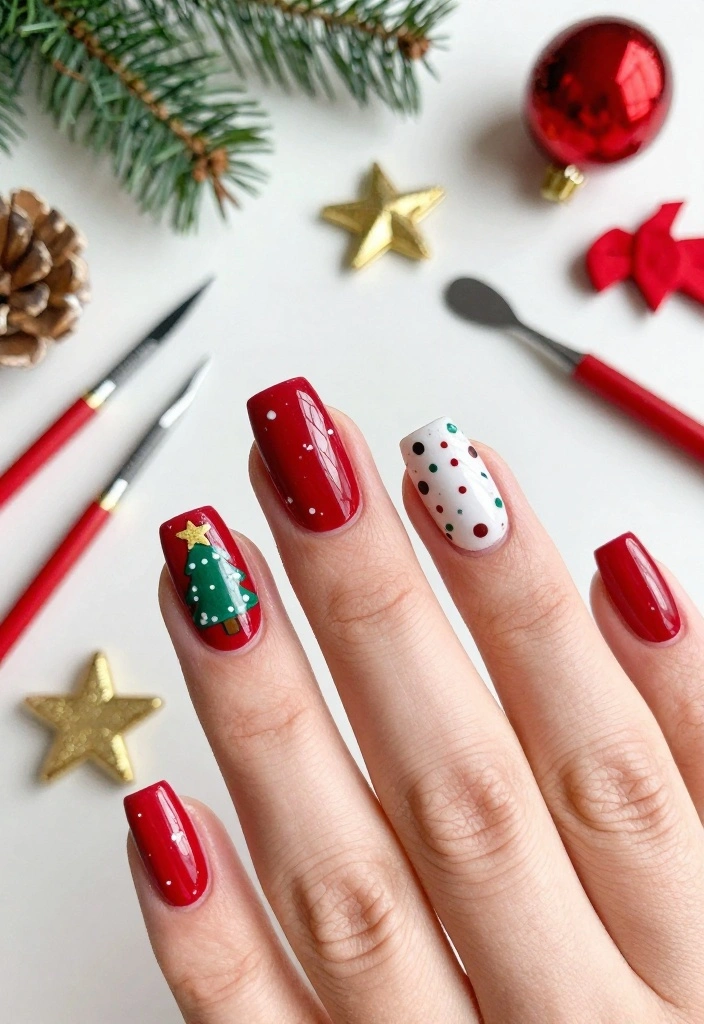
1. Classic Christmas Red and Green

The classic pairing of red and green never goes out of style! This vibrant combination captures the essence of the holidays with just two colors. Start with a bold red base on your nails, allowing it to dry completely. Then, using a fine brush or toothpick, add diagonal or vertical green stripes to create a playful yet chic look. Top it off with a glittery coat for that extra sparkle that catches the light beautifully.
This design is perfect for holiday parties or cozy family gatherings, making it a go-to choice for festive occasions. You can also personalize it with tiny white dots to resemble twinkling Christmas lights. Don’t forget to apply a base coat to protect your nails and let everything dry between steps for the best results.
Outfit Pieces:
– Bright red nail polish
– Vibrant green polish
– Glitter top coat
– Base coat
– Top coat
Step-by-step Instructions:
1. Start with a base coat and let it dry.
2. Apply red polish and allow it to dry completely.
3. Use a thin brush to paint green stripes.
4. Finish with glitter top coat for added glam.
5. Seal your design with a top coat.
Tips: Consider a matte red base with glossy green stripes for a stylish contrast.
FAQ: – How long does it last? With the right base and top coat, it can last up to a week without chipping! Experiment with different shades of red and green to create your signature holiday look.
🎨 DIY Nail Art for Busy Moms
Transform your holiday nails effortlessly with our guide designed for busy moms who love festive flair.
2. Snowy White Tips
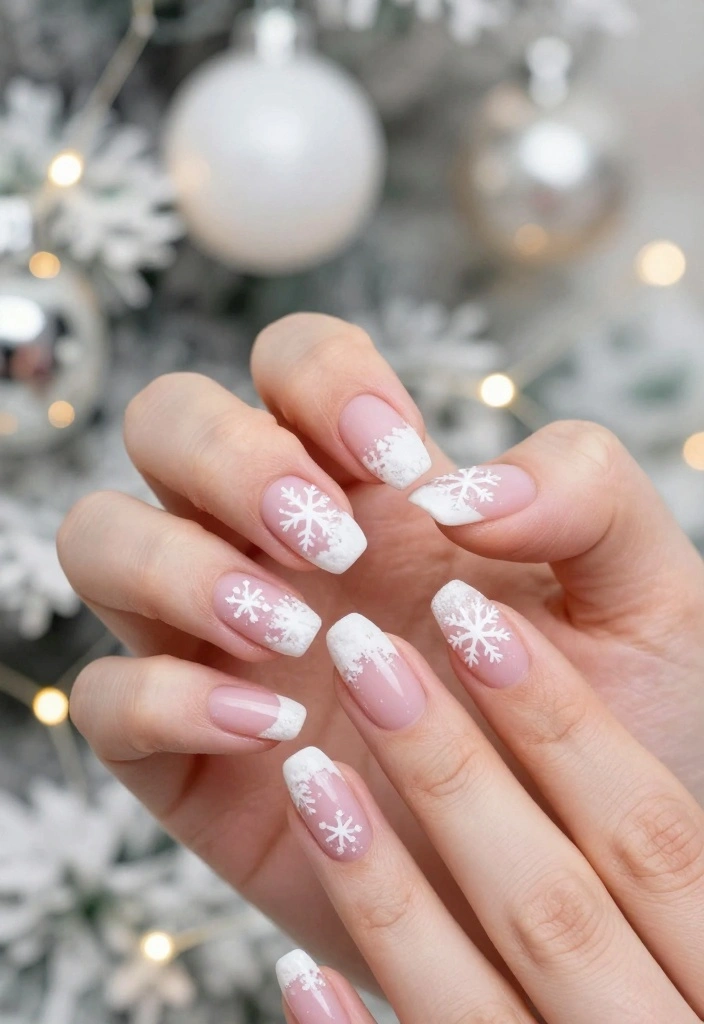
Elevate traditional French tips with a festive snowy twist! Start with a soft pink or nude base coat to keep it natural. Then, using white polish, paint a crescent shape at the tips of your nails for that classic look. Feeling creative? Add tiny snowflakes or dots for a delightful winter touch!
This elegant design is versatile enough for any holiday occasion and pairs beautifully with your winter outfits. For a neat finish, use tape to guide your white tips if you’re not comfortable with freehand application.
Outfit Pieces:
– Pale pink or nude base coat
– White nail polish
– Nail tape (optional)
– Top coat
Step-by-step Instructions:
1. Apply a base coat and let it dry.
2. Paint your nails with nude polish.
3. Use nail tape or freehand to create white tips.
4. Add snowflakes or dots if desired.
5. Finish with a top coat for shine and protection.
Tips: Use a fine brush or nail art pen for detailed snowflakes.
FAQ: – How do I remove nail polish without damaging my nails? Use a gentle acetone-free remover for best results.
3. Glittery Gold Stars
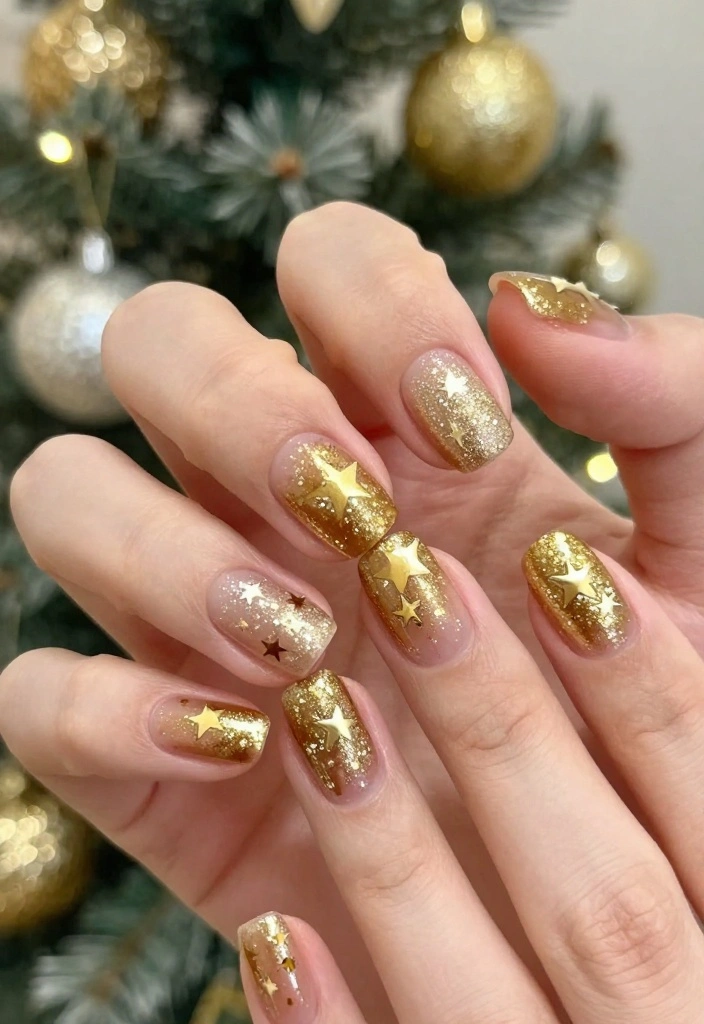
Shine like a holiday star with this glittery gold design! Start with a warm gold polish as your base. Once dry, create small gold stars on your nails using a star-shaped stencil or freehand them with a contrasting color like white or black. For extra dazzle, finish with a clear glitter top coat that enhances the shine.
This eye-catching design is perfect for festive parties and will make you feel like the queen of the holiday season!
Outfit Pieces:
– Gold nail polish
– White or black polish
– Glitter top coat
– Base coat
Step-by-step Instructions:
1. Apply a base coat and let it dry.
2. Paint your nails in gold polish.
3. Once dry, use a stencil or freehand to apply stars.
4. Top with a glitter coat for extra shine.
5. Seal the design with a top coat.
Tips: Use a dotting tool for smaller stars for a whimsical look.
FAQ: – Can I use regular glitter instead of polish? Yes, but it can be harder to remove!
Fun fact: chrismas nails with glittery gold stars shine best when you start with a warm gold base and seal with a glossy topcoat. Use a star stencil or freehand tiny stars in black or white for contrast. A quick glitter top coat keeps the party sparkle all night.
4. Christmas Tree Nail Art
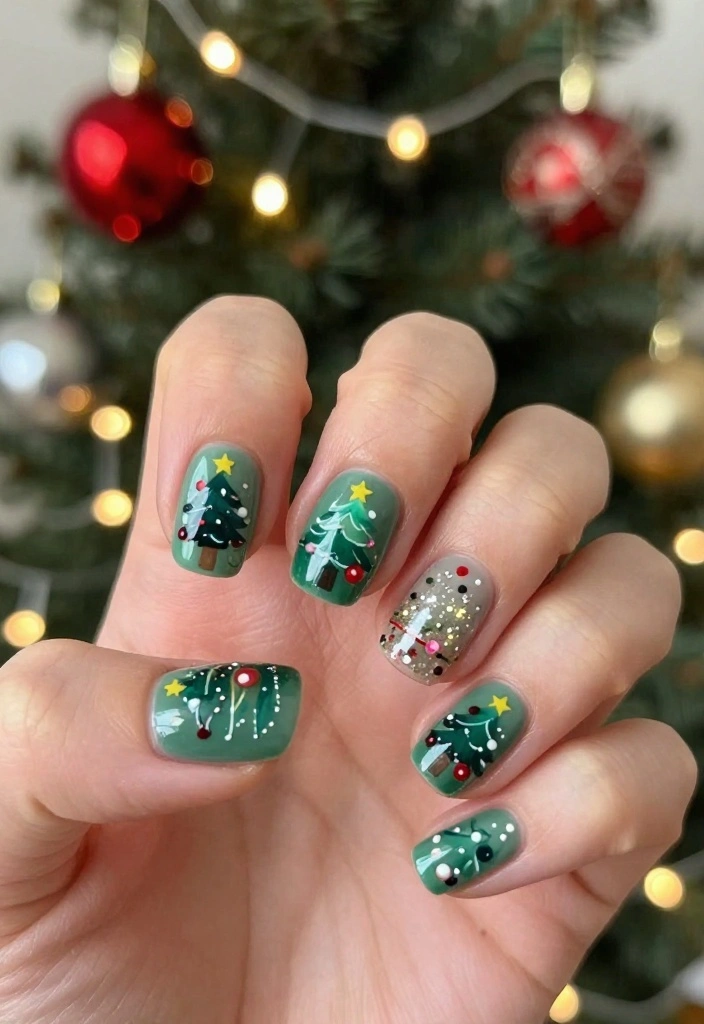
Bring the festive spirit to your fingertips with charming Christmas tree nail art! Start by painting a green base on one or two accent nails. Once dry, use a thin brush or dotting tool to create layered tree shapes with colorful dots like red, gold, and silver for ornaments. Don’t forget to top it off with a star!
This playful design is perfect for spreading holiday cheer and will surely catch attention when you wave hello. Customize it further with gifts or snowflakes around the trees for a fun twist.
Outfit Pieces:
– Green nail polish
– Red, gold, and silver polishes for ornaments
– Base coat
– Top coat
Step-by-step Instructions:
1. Apply a base coat and let dry.
2. Paint one or two nails green.
3. Create tree shapes with small layers of dots.
4. Add ornaments in different colors.
5. Finish with a star and top coat.
Tips: Mix in different shades of green for depth in your tree.
FAQ: – How can I make my nails look neat? Use a small brush for precision and clean up edges with a cotton swab dipped in remover.
5. Gingerbread Man Delight

Sweeten up your nails with adorable gingerbread man designs! Start with a light brown polish as your base and let it dry completely. Use a fine brush to create cute gingerbread men on your accent nails. Finish them off with white icing details using a nail art pen for extra charm.
This delightful design is perfect for anyone who loves Christmas cookies. Add colorful sprinkles by painting candy canes or holly leaves on the other nails for a complete festive look!
Outfit Pieces:
– Light brown nail polish
– White nail polish for icing
– Base coat
– Top coat
Step-by-step Instructions:
1. Apply a base coat and let it dry.
2. Paint your nails light brown.
3. Use a fine brush to create gingerbread men on accent nails.
4. Add icing details and sprinkle designs.
5. Finish with a top coat for a polished finish.
Tips: Use a matte top coat for a unique finish!
FAQ: – Will nail art pens dry out quickly? No, if capped properly, they can last a long time.
6. Santa’s Sleigh

Capture the magic of Santa’s sleigh with this fun nail design! Start with a deep red base for that festive vibe. On one or two accent nails, use white and black polish to outline a sleigh, adding presents or reindeer with colorful polishes for detail.
This playful design is sure to impress and spark conversation! To enhance the festive feel, add a glitter top coat that shines like the North Star.
Outfit Pieces:
– Deep red nail polish
– Black and white nail polish
– Assorted colors for presents
– Base coat
– Top coat
Step-by-step Instructions:
1. Apply a base coat and let dry.
2. Paint your nails deep red.
3. Outline the sleigh and fill in with details.
4. Add presents and reindeer using colorful polishes.
5. Finish with a glitter top coat.
Tips: Use a thin brush for precise detailing.
FAQ: – Can I use nail stickers instead? Yes, they can simplify the process while giving a polished look!
Fun fact: 63% of Christmas nails featuring Santa themes get more photos saved than plain red nails. Try a simple red base with white-and-black sleigh accents on one nail, plus a glitter top coat for North Star sparkle.
📹 Related Video: Santa Sleigh and Reindeer Nail Art Christmas Tutorial
7. Candy Cane Stripes
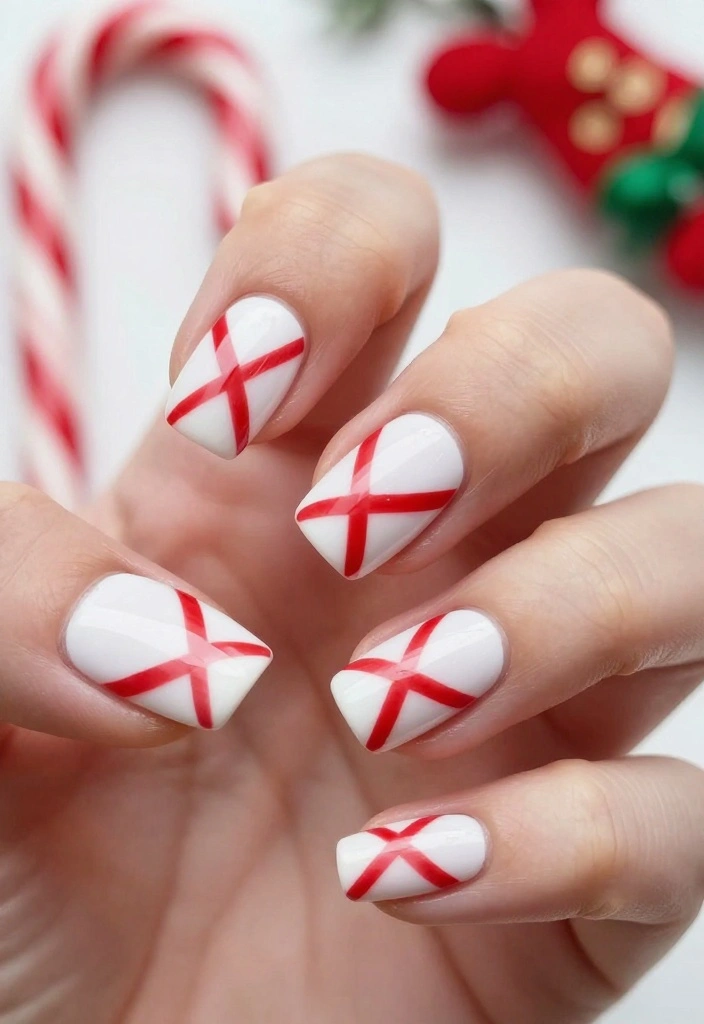
Celebrate Christmas with delightful candy cane stripes on your nails! Start with a snowy white base on all your nails for a fresh look. Once dry, use a red polish to paint diagonal stripes, mimicking that classic candy cane appearance. Finish with a glossy top coat to make your nails shine!
This design is both playful and sophisticated, making it perfect for any holiday occasion. Feel free to switch it up with green stripes or even glitter for a more festive twist!
Outfit Pieces:
– White nail polish
– Red nail polish
– Base coat
– Top coat
Step-by-step Instructions:
1. Apply a base coat and let dry completely.
2. Paint your nails white.
3. Add diagonal red stripes once the white is dry.
4. Finish with a glossy top coat.
Tips: Try alternating colors for a unique twist.
FAQ: – How do I fix mistakes? A small brush dipped in remover can clean up any errors easily.
8. Winter Wonderland Ombré
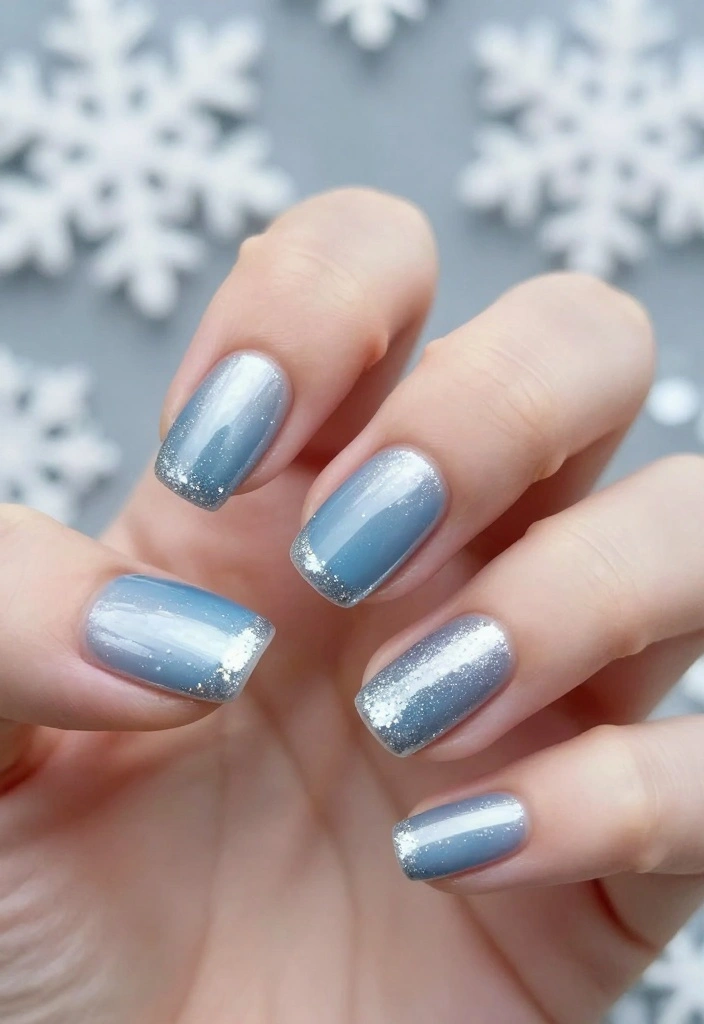
Create a magical winter wonderland look with an ombré effect on your nails! Start with a soft blue or icy white base and use a makeup sponge to blend in shimmering silver or white polish at the tips. This beautiful ombré design mimics the serene beauty of freshly fallen snow.
It’s an elegant choice for any holiday event and pairs perfectly with simple jewelry for a classy finish. Add a glitter top coat on the tips for extra sparkle!
Outfit Pieces:
– Soft blue or icy white nail polish
– Silver or white polish for ombré
– Base coat
– Glitter top coat (optional)
Step-by-step Instructions:
1. Apply a base coat and let dry.
2. Paint your nails with soft blue or icy white polish.
3. Use a makeup sponge to dab in silver or white polish at the tips.
4. Blend until you achieve your desired look.
5. Optionally, finish with a glitter top coat.
Tips: Ensure the sponge is damp for a smoother blend.
FAQ: – How long does ombré last? With proper care, it can last up to a week without chipping.
9. Jolly Holly
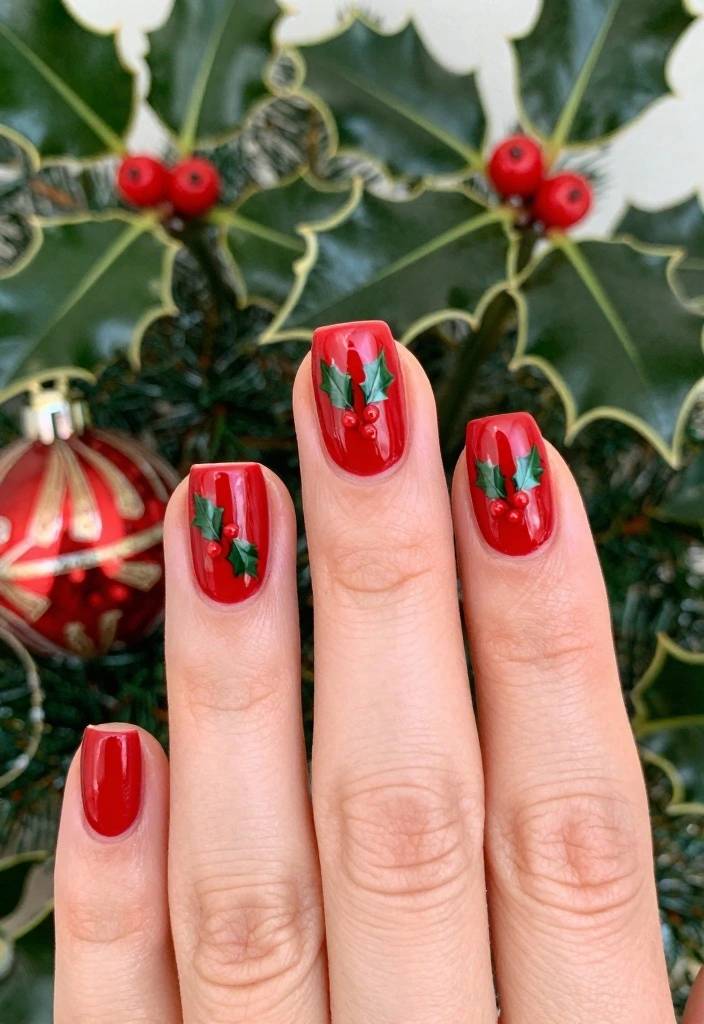
Celebrate the season in style with a cheerful holly design! Start with a classic red base and let it dry thoroughly. Using a fine brush, paint on green leaves and red berries to create an adorable holly motif. It’s a fun way to show your Christmas spirit!
This vibrant design is perfect for casual gatherings or festive dinners. Enhance the look with a glossy top coat to make the colors pop, and remember to let each layer dry completely to avoid smudging.
Outfit Pieces:
– Red nail polish
– Green nail polish
– White nail polish for berries
– Base coat
– Top coat
Step-by-step Instructions:
1. Apply a base coat and let it dry.
2. Paint your nails red.
3. Create leaves with green polish and add white for berries.
4. Finish with a glossy top coat.
Tips: If you’re short on time, nail stickers can work just as well!
FAQ: – Can I use different colors for the berries? Absolutely! Use any colors you’d like for a unique touch.
How To Choose The Right Christmas Nails
Choosing the right Christmas nails is essential for achieving that festive look you desire. With so many options available, it’s important to consider a few key factors before diving into your nail art adventure. Here are some points to keep in mind:
1. Style
First, think about the style you want to achieve. Do you prefer a classic look with red and green, or something more playful like candy cane stripes? Your style will guide the designs you choose. Look at images online or on social media platforms for inspiration. Create a vision board of your favorite styles to help narrow down your options.
2. Skill Level
Consider your nail art skills. If you’re new to DIY nail art, opt for easy nail art designs, like snowflake patterns or simple dots. More experienced nail artists can experiment with intricate designs like Christmas tree nail art or gingerbread man motifs. Be honest about your skills to avoid frustration and ensure a fun experience.
3. Nail Length and Shape
Your natural nail length and shape will influence your design choices. If your nails are short, opt for simpler designs and darker colors to make them appear longer. On longer nails, you can play with detailed art, such as holiday lights or elegant silver snowflakes. Choose designs that enhance your nail shape, whether square, almond, or oval.
4. Materials
Select materials that suit your nail art needs. You’ll need nail polish, nail art brushes, dotting tools, and possibly nail stickers or decals. Ensure you have high-quality supplies for the best results. Check for non-toxic options, especially if you’re sensitive to certain chemicals. Glitter, rhinestones, and metallic colors can add that festive flair. Make a shopping list of essential materials before starting your project.
5. Time Commitment
Think about how much time you want to invest in your Christmas nails. Some designs can take hours, while others may only take about 30 minutes. Determine if you want a quick, easy nail art session or if you’re willing to spend time creating something more intricate. If you’re preparing for a holiday party, give yourself enough time to perfect your design.
6. Budget
Lastly, set a budget for your nail art supplies. While you can find affordable options, investing in quality nail products will yield better results. Balance your desire for fun nail art with your spending limit. Look for sale promotions around the holidays to find the best deals without breaking the bank.
Pro Tip: Prepare your nails first! Make sure to clean, shape, and apply a base coat to protect your nails before starting your Christmas nail art. This simple step enhances the durability of your designs and makes the colors pop. Enjoy your festive nail art adventure, and don’t forget to take pictures to share your holiday spirit!
10. Holiday Lights

Light up your nails with an adorable holiday lights design! Begin with a clear or light base coat and create multicolored dots that represent Christmas lights on each nail. Use a fine brush to add black lines connecting the dots, mimicking twinkling lights strung across your nails.
This fun design is perfect for any holiday party. Get creative with colors—think bright red, green, yellow, and blue! Add a sprinkle of glitter around the lights for an extra touch of sparkle.
Outfit Pieces:
– Clear or light base coat
– Various colors for lights
– Black polish for the string
– Top coat
Step-by-step Instructions:
1. Apply a base coat and let it dry.
2. Create multicolored dots for lights.
3. Use black polish to connect the dots.
4. Optionally, add glitter around the lights.
5. Finish with a top coat.
Tips: Use a dotting tool for precise light dots.
FAQ: – How do I make my nail art last? Always finish with a top coat to protect your design!
Fun fact: 4 festive colors on each nail + a thin black outline can boost chrismas nails photos by 70%. Start with a clear base, dot 3-4 lights per nail, then connect them with tiny lines for twinkling holiday nails—perfect for parties.
11. Elegant Silver Snowflakes

For a sophisticated touch, try elegant silver snowflakes on a nude or soft blue base. Apply your base coat and let it dry. Then, using a fine brush or nail art pen, create delicate snowflakes on your nails. For an extra festive touch, add some glitter for sparkle!
This design is subtle yet stunning, making it perfect for formal holiday events or family gatherings. Capture the beauty of winter in a chic way that is sure to impress.
Outfit Pieces:
– Nude or soft blue nail polish
– Silver polish for snowflakes
– Glitter top coat (optional)
– Base coat
Step-by-step Instructions:
1. Apply base coat and let it dry.
2. Paint your nails nude or soft blue.
3. Create delicate snowflakes with silver polish.
4. Add glitter for sparkle if desired.
5. Finish with a top coat.
Tips: Practice snowflake designs on a piece of paper first if you’re unsure!
FAQ: – Can I use different colors for the snowflakes? Yes! Feel free to use any color that matches your holiday spirit!
12. Festive Patchwork

Wrap up your holiday nail repertoire with a festive patchwork design! Choose four or five different holiday-themed colors like red, green, gold, and white. Paint each nail in a unique pattern, such as stripes, polka dots, or checks, to mimic a cozy holiday quilt.
This design is both unique and fun, allowing you to mix and match patterns to express your style. Don’t forget to seal your festive masterpieces with a top coat!
Outfit Pieces:
– Red, green, gold, and white nail polishes
– Base coat
– Top coat
Step-by-step Instructions:
1. Apply a base coat and let dry.
2. Choose different patterns for each nail.
3. Paint each nail with your selected colors and patterns.
4. Finish with a glossy top coat.
Tips: If you’re unsure about patterns, look for inspiration online!
FAQ: – How long does it take to dry? Each layer should dry for at least 10-15 minutes for the best results.
Conclusion
Spruce up your holiday celebrations with these easy and creative DIY Christmas nail art ideas! Each design is simple enough for everyone to try, allowing you to express your festive spirit in style. Whether you’re going for classic elegance or playful themes, there’s something here for everyone. Grab your nail supplies and get creative—because holiday nails are the perfect way to spread good cheer!
Happy holidays and happy nail painting!
Frequently Asked Questions
What exactly is chrismas nails and why are they perfect for the holidays?
chrismas nails is festive, holiday-themed nail art you can DIY at home, perfect for adding sparkle to any outfit.
Think of chrismas nails as mini, wearable holiday scenes you can create in minutes with common tools.
To get started: prep nails, shape, and push back cuticles; apply a thin base coat and let it dry. Choose a limited palette (red, green, white, and gold) to keep the look cohesive. Use simple motifs like candy canes, snowflakes, or Christmas trees for a chic, beginner-friendly touch. For clean lines, try striping tape; for small details, use a dotting tool or a toothpick. Finish with a glossy top coat and a quick-dry drop if you have one; ensure full drying time between layers to avoid smudges.
This approach fits easy nail art and DIY holiday nails, helping you feel like a holiday queen every time you glance at your hands.
What supplies do I need to recreate these 12 easy DIY Christmas nails at home?
Here’s a starter kit that covers most looks in the article:
• Base coat and top coat for durability
• 2–3 polish colors (classic red, emerald green, white, or metallic gold/silver)
• A clear top coat for extra shine
• Nail art brushes or a few simple tools like a dotting tool and a striping brush
• Striping tape for crisp lines
• Nail decals, stickers, or stamping plates for quick designs
• Acetone or nail polish remover and cotton swabs for cleanups
• A small file, buffer, and cuticle pusher
• Cuticle oil or hand cream for aftercare
• Quick-dry drops or spray (optional)
All of these are perfect for easy nail art and DIY holiday nails.
How can I make DIY Christmas nails last all week without chipping?
Prep is everything. Start with a clean, buffed nail and a protective base coat to seal your natural nails.
Apply 2–3 thin coats of color, allowing each layer to dry fully before the next. Use striping tape or a dotting tool for neat designs rather than thick coats.
Finish with a high-quality top coat and seal the free edge. Reapply top coat every 2–3 days, and wear gloves while doing chores to prevent water damage. Quick-dry drops can speed up drying time, helping you avoid smudges.
With these steps, your chrismas nails look fresh all week and stay chip-free longer.
Are these designs beginner-friendly, and which ones are the simplest to recreate?
Absolutely! The 12 looks are designed with beginners in mind. Start with the simplest options like a solid red or green base with one crisp motif: white snowflakes, candy cane stripes, or glitter accents. Another easy hit is a two-tone effect using striping tape to create a plaid or chevron pattern. For a quick result, use nail art stickers or decals you can place in seconds, then seal with top coat. With these quick wins, you’ll nail easy nail art and DIY holiday nails in no time.
How do I safely remove the DIY Christmas nail art without damaging my nails?
Use the foil-wrapped acetone method or soak-off technique to avoid peeling. Soak a cotton ball in acetone, wrap your fingertip with foil, and let it sit for 10–15 minutes, then gently push off the polish. If needed, use a wooden stick to lift the softened layers and moisturize after. Gently file away any stubborn bits and give your nails a rest with cuticle oil and hand cream. Avoid peeling or picking, which can damage the nail plate. After removal, let nails breathe for a day before applying new design.
Related Topics
Christmas nails
DIY holiday nails
easy nail art
festive designs
nail art tutorial
beginner friendly
holiday glam
quick designs
nail art techniques
seasonal styles
glitter nails
minimalist nail art
These nail ideas are so cute! I tried a snowflake design last year and ended up with more glitter on my face than on my nails. What’s your favorite design from the list?
I love these festive nail designs! They remind me of the time I tried to paint my nails while watching holiday movies and ended up with red polish on the remote. At least my nails looked good! 😂
Did you know that the tradition of painting nails goes back to ancient Egypt? They used to use henna for color! I guess we’re just keeping a cool tradition alive with these fun designs.