Winter is here, and with it comes the perfect opportunity to showcase your style through stunning nail art. While cozy sweaters and warm drinks are essential for the season, we all know that a fresh manicure can elevate any winter look. I’ve been craving creativity this time of year, and there’s no better way to express that than through snowflake nail art. Whether you’re a seasoned nail artist or just looking for some fun ideas to try out at home, this post is for you.
If you love unique nail designs that capture the essence of winter, you’re in for a treat! I’ve gathered 12 breathtaking snowflake nail art ideas that are sure to inspire your next manicure. From elegant and understated to bold and colorful, there’s something for everyone. You’ll get tips and tricks to create these designs yourself or ideas to share with your nail technician. Get ready to step out this winter with nails that sparkle as much as the snow!
Let’s dive into these stunning snowflake nail art ideas, and I promise you won’t want to miss #5!
Key Takeaways
– Discover 12 unique snowflake nail art designs perfect for winter, catering to various styles and preferences.
– Explore ideas ranging from minimalistic to bold, ensuring there’s a design for every personality and occasion.
– Learn tips on achieving these stunning looks, whether you’re doing your nails at home or getting them done at a salon.
– Find inspiration that ties holiday cheer into your nail designs, making them suitable for festive gatherings or everyday wear.
– Embrace your creativity with designs that combine color, texture, and art to make your nails stand out this winter.
Contents
- 1. Frosted Elegance
- 2. Glittery Wonderland
- 3. Minimalist Snowflakes
- 4. Bold and Bright
- 5. Rainbow Snowflakes
- 6. A Touch of Gold
- 7. Ombre Snowflakes
- 8. Holiday Sweater Design
- 9. Frosty French Tips
- 10. Artistic Watercolor Snowflakes
- 11. Mixed Media Snowflakes
- 12. Snowflake Ombre Glitter
1. Frosted Elegance
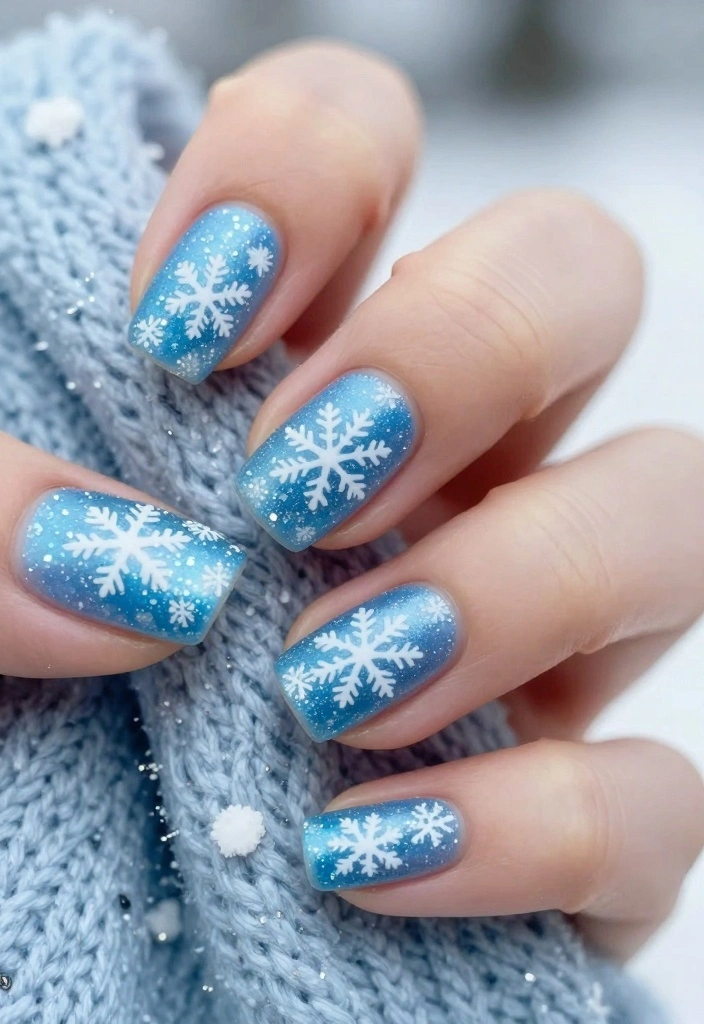
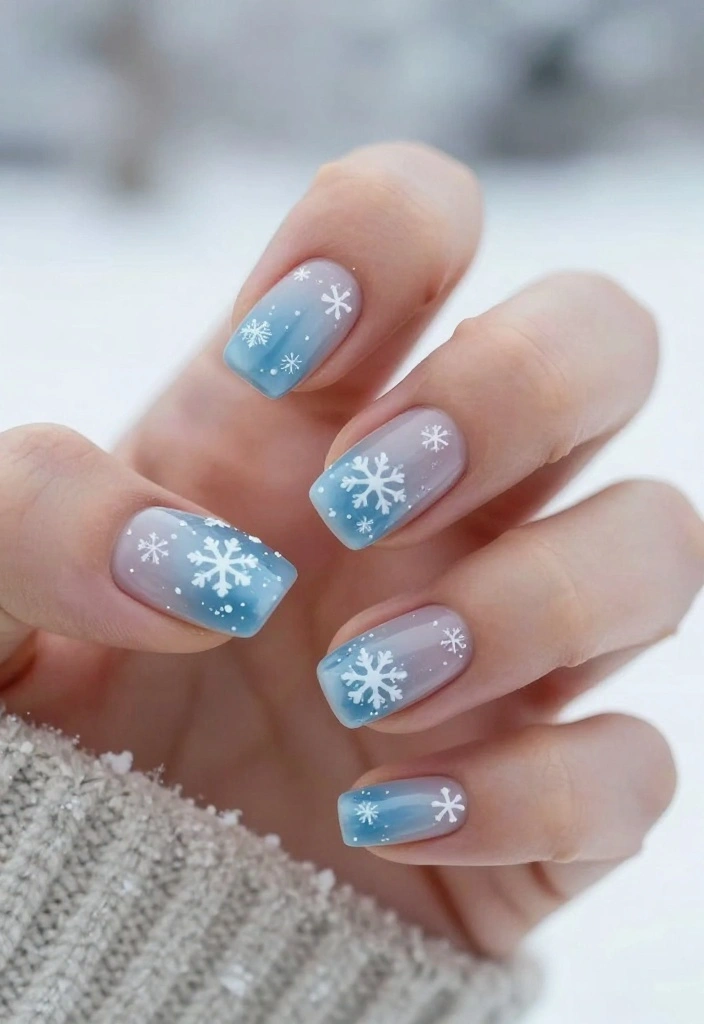
If you’re after a look that exudes sophistication, frosted elegance is your go-to design. The combination of a soft, icy blue base paired with delicate white snowflakes, lightly dusted with glitter, creates a frosty allure that shines at holiday gatherings. This design is chic yet understated, making it ideal for both casual and festive occasions.
To achieve this enchanting look, begin with a light blue nail polish as your base. Once that layer is dry, use a thin nail art brush to carefully paint small snowflakes with white polish. Finish by applying a clear top coat sprinkled with fine glitter for that frosty touch.
– Base Color: Light icy blue
– Snowflake Color: White
– Finish: Glitter top coat
For the best results, ensure your base coat is completely dry before adding the snowflake details for a clean and polished finish.
Frequently Asked Questions:
– What if I don’t have a nail art brush? You can easily use a toothpick or a fine-tipped dotting tool!
– How can I remove glitter polish easily? Soak a cotton ball with nail polish remover and press it against the glittered nail for a minute before wiping it off.
Fun fact: 73% of winter snowflake nail art photos gain more saves when they feature a frosted ice-blue base with white snowflakes. Keep the look subtle with a delicate glitter dust for holiday gatherings—effortless chic, all season.
2. Glittery Wonderland
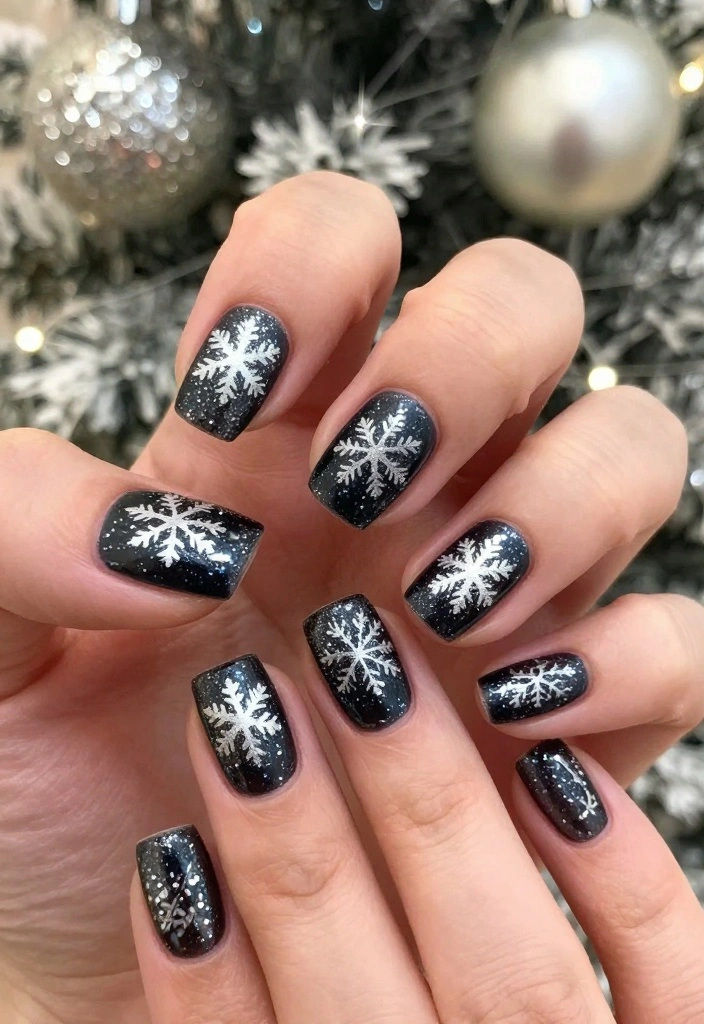
Elevate your winter style with a glittery wonderland design. Picture a deep midnight blue or bold black base adorned with large, glittery snowflakes that dazzle with every movement. This look is all about making a dramatic statement, perfect for parties and celebrations!
To create this stunning effect, start with a rich, dark base color. Once dry, apply larger snowflake stickers or use metallic silver polish to draw intricate snowflakes, emphasizing their size and shape. A chunky glitter top coat will add depth and extra sparkle.
– Base Color: Dark blue or black
– Snowflake Color: Metallic silver
– Finish: Chunky glitter top coat
For an even bolder effect, layer the glitter top coat while the base color is still slightly tacky to ensure better adherence.
Frequently Asked Questions:
– Can I use this design for New Year’s Eve? Absolutely! The glittery aspect makes it perfect for the celebration.
3. Minimalist Snowflakes
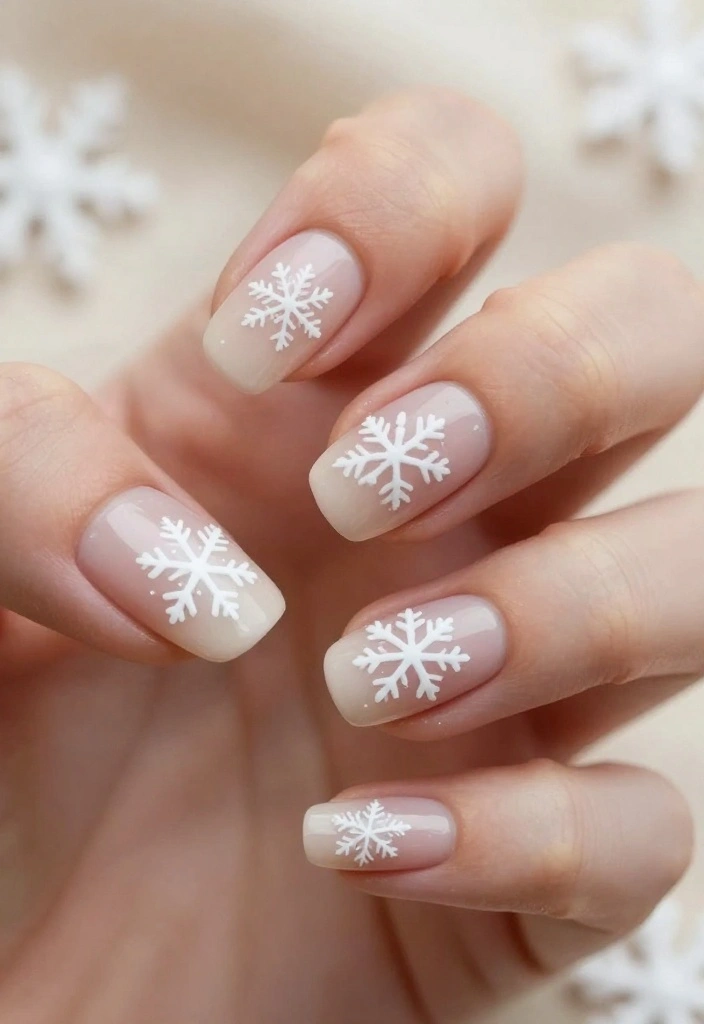
Simplicity shines through with minimalist snowflakes. This style features tiny, delicate white snowflakes set against a nude or soft pink background, striking the perfect balance between elegance and winter charm. It’s ideal for those who want to keep things subtle yet festive for everyday wear.
To create this look, start with a nude or soft pink base. Once dry, use a fine brush or dotting tool to paint small, simple snowflakes. Remember, less is more – aim for just one or two snowflakes per nail for a chic finish.
– Base Color: Nude or soft pink
– Snowflake Color: White
– Finish: Matte or glossy top coat
Keep your lines smooth and thin for a refined aesthetic. A matte top coat can add a contemporary twist to this classic design.
Frequently Asked Questions:
– What if I want to add color? You can definitely use a pastel base for a fun pop while still keeping it minimalistic.
How To Choose the Right Snowflake Nail Art Designs
Choosing the perfect snowflake nail art for winter can be a fun yet overwhelming task. With so many designs and styles available, it’s essential to know what suits your taste, lifestyle, and nail type. Here’s a helpful guide to simplify the selection process.
1. Design Style
Consider what kind of look you want to achieve. Do you prefer something subtle and elegant, like minimalist snowflakes, or something bold and colorful, like rainbow snowflakes? Think about your personal style and how the design will complement your winter wardrobe. If you’re attending a holiday party, a glittery wonderland design might be a great fit, while everyday wear could benefit from a simple frosty elegance.
2. Nail Length and Shape
Your nail length and shape greatly affect the design options available to you. For longer nails, intricate designs like artistic watercolor snowflakes can work beautifully. On shorter nails, opt for simpler designs like frosty French tips or minimalist snowflakes. If you’re unsure, almond or oval shapes provide a versatile canvas for various designs.
3. Colors and Themes
Winter colors often evoke feelings of warmth and coziness. Stick to cool colors like icy blues, whites, and silvers for a classic winter look. If you wish to add a pop of color, consider incorporating shades of red or green for a festive touch. Remember, the color palette should reflect your personal aesthetic and the vibe you want to exude during the season.
4. Occasion
Think about where you plan to showcase your snowflake nail art. For casual outings, you might choose fun and playful designs, like mixed media snowflakes. For formal events, more sophisticated options like a touch of gold or ombre snowflakes can elevate your look. Always keep the occasion in mind when selecting your design to ensure it fits perfectly.
5. Skill Level
Assess your nail art skills or consider hiring a professional. If you’re just starting with nail art, simpler designs like frosty French tips or minimal snowflakes might be best. For those more experienced, feel free to experiment with complex patterns like artistic watercolor snowflakes or holiday sweater designs. Know your comfort zone to avoid frustration.
6. Nail Art Products
Choosing the right products can make a significant difference in achieving your desired look. Gel polish can provide a long-lasting finish, while regular polish offers a quicker application. Consider using nail art brushes, dotting tools, or even stickers for more intricate designs. Invest in quality items that will enhance your nail art experience.
Pro Tip: If you’re new to nail art, start with a small design on just a few nails. This approach allows you to practice and gain confidence without overwhelming yourself. Once you feel comfortable, you can replicate the look on all your nails or experiment with more intricate designs!
By considering these factors, you can confidently choose the perfect snowflake nail art that fits your style and occasion. Enjoy expressing your creativity this winter with stunning nail designs!
4. Bold and Bright
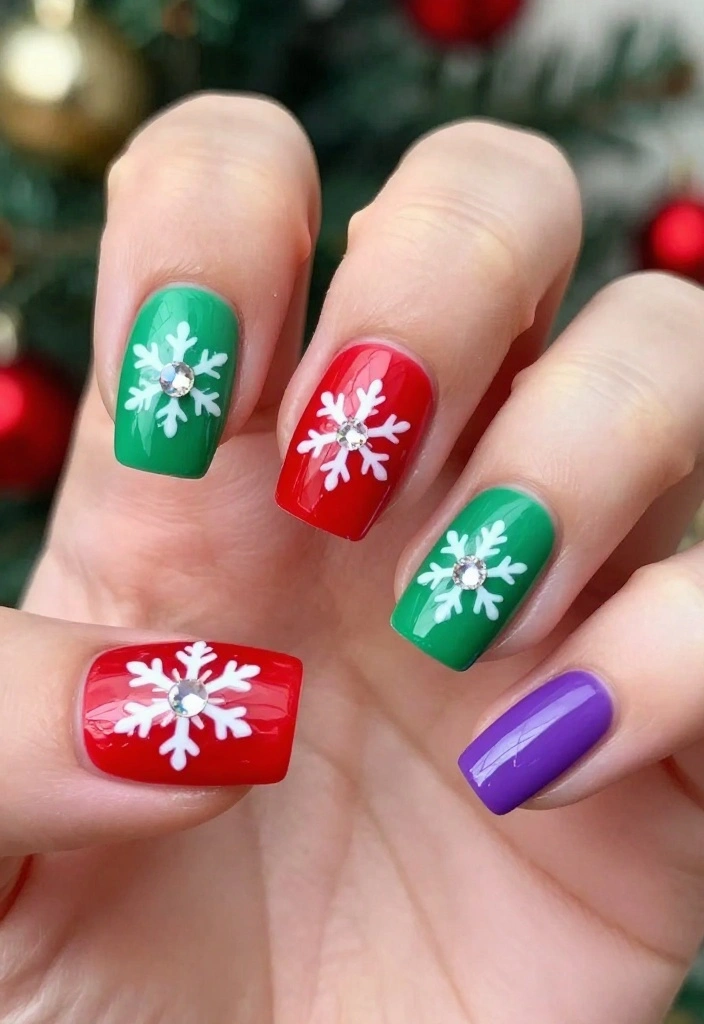
Make a statement with bold and bright snowflake nails! This design features vibrant colors like red, green, or purple as a base, perfect for those who love to stand out. The contrast with white snowflakes creates a lively and energetic look that’s fun and festive!
Start with a bright base color, ensuring it dries completely before moving on. Use white polish to create large, bold snowflakes on each nail. For added flair, consider placing rhinestones in the center of the snowflakes for a stunning effect.
– Base Color: Bright red, green, or purple
– Snowflake Color: White
– Finish: Glossy top coat with rhinestones
To achieve a professional look, use nail tape to create clean lines or shapes before painting the snowflakes.
Frequently Asked Questions:
– Can I mix different colors for each nail? Definitely! Have fun with different combinations for a wild winter look.
5. Rainbow Snowflakes
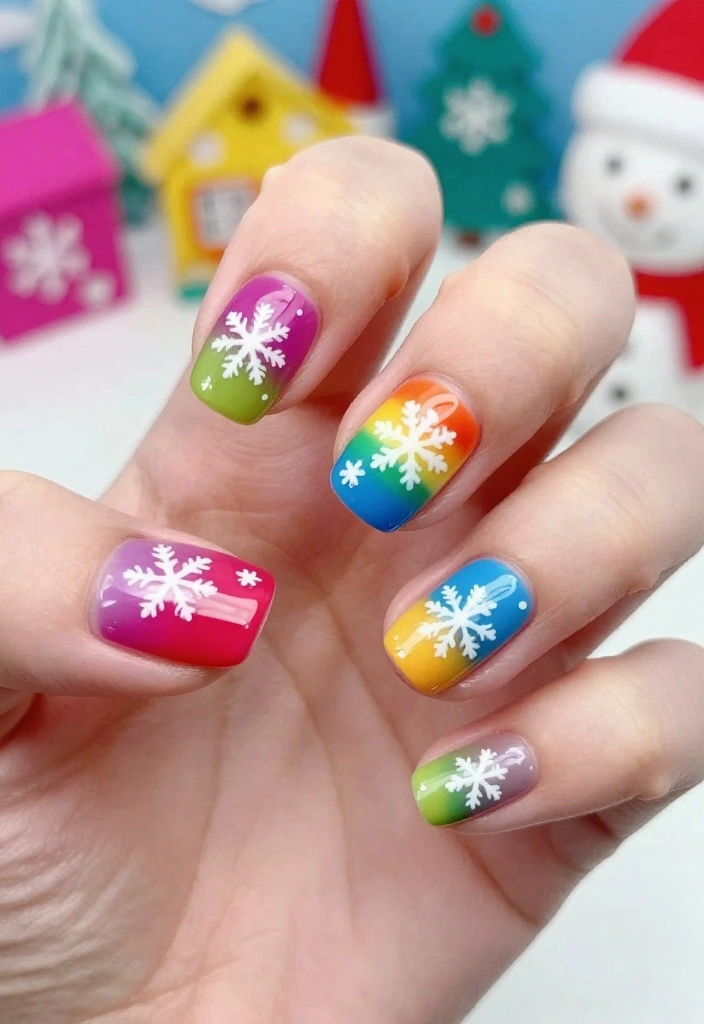
Brighten your winter days with rainbow snowflakes! This design bursts with color, showcasing each nail in a different hue while maintaining a cohesive snowflake theme. It’s a whimsical choice that’s perfect for those who love to express their creativity!
To create this cheerful look, paint each nail a different color from the rainbow spectrum. Then, use white polish to paint tiny snowflakes on each nail. Mixing different sizes of snowflakes can add a playful twist to your look.
– Base Colors: Red, orange, yellow, green, blue, purple
– Snowflake Color: White
– Finish: Glossy top coat
A thin brush is essential for getting those delicate snowflake designs just right, and feel free to mix shades for extra depth.
Frequently Asked Questions:
– Can I use glitter for the snowflakes? Yes! Adding glitter can enhance the rainbow effect, making it even more festive.
💅 Nail Art Made Easy!
Unlock your creativity this winter with our DIY Nail Art Guide, perfect for busy moms who love stunning nails.
6. A Touch of Gold
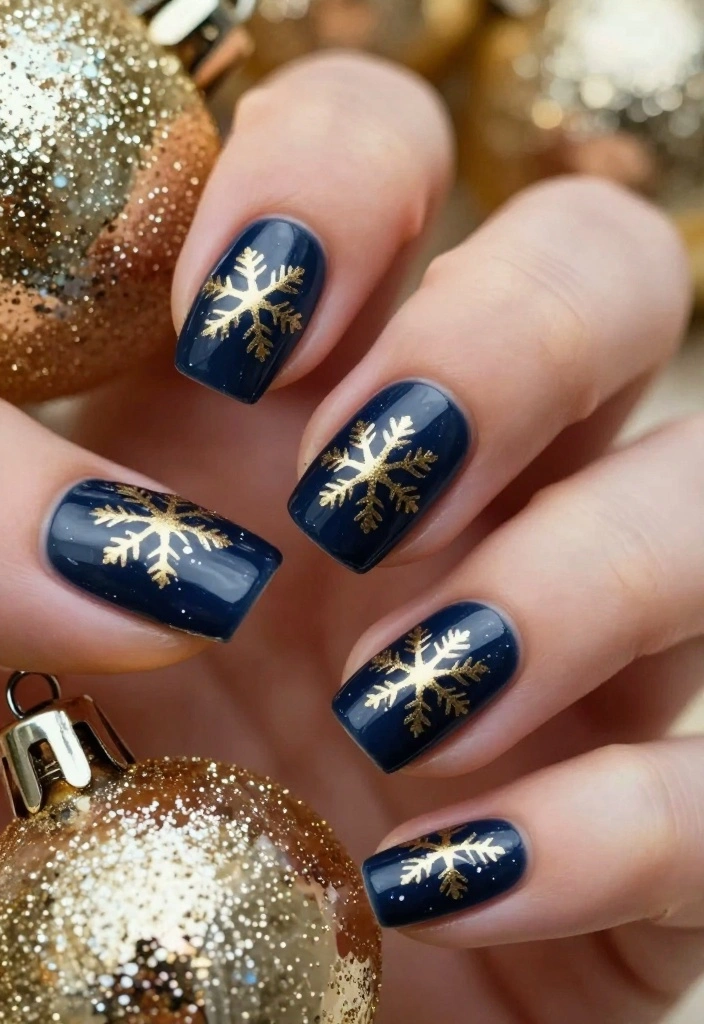
Introduce a touch of luxury with gold accents! Using a classic navy or deep green base, you can create exquisite snowflakes in metallic gold, striking a balance between elegance and festive flair. This design is perfect for those special occasions where you want to shine.
Begin with your dark base color and allow it to dry completely. Then, carefully paint intricate snowflakes with gold nail polish. The shimmering gold against the dark background creates a mesmerizing effect that captures attention.
– Base Color: Navy or deep green
– Snowflake Color: Metallic gold
– Finish: Glossy top coat
If you want to add a background pattern, use striping tape to create clean lines for a polished finish.
Frequently Asked Questions:
– What occasions are best for this design? It’s perfect for holiday parties or formal events where you want to make a statement!
📹 Related Video: Easy Christmas Nails | Silver & Gold Snowflake Nail Art Tutorial Design
7. Ombre Snowflakes
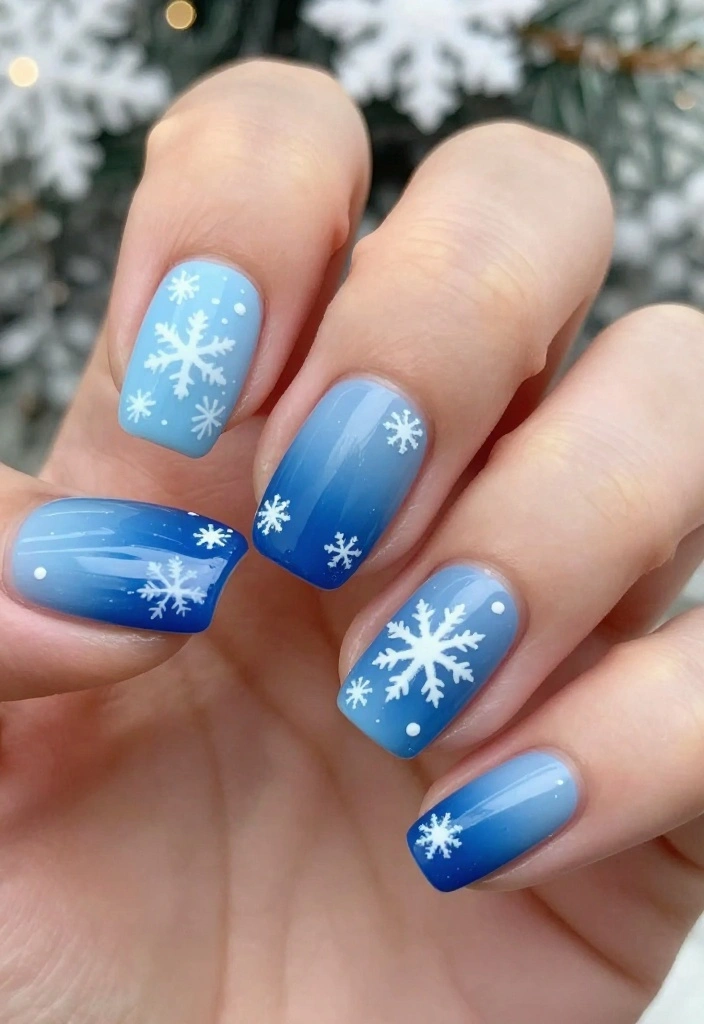
Add a trendy twist with ombre snowflakes! This style seamlessly blends shades, creating a gradient effect that’s both stylish and eye-catching. Choose a light-to-dark blue palette or any other colors that evoke winter vibes.
To bring this look to life, use a sponge to apply your chosen colors in an ombre effect on your nails. Once dry, add delicate white snowflakes on top. The gradient adds depth, allowing the snowflakes to stand out beautifully.
– Base Colors: Light blue fading to dark blue
– Snowflake Color: White
– Finish: Glossy top coat
Ensure you blend the colors well when sponging to achieve a smooth and seamless look.
Frequently Asked Questions:
– Can I use other colors besides blue? Absolutely! Feel free to experiment with any color combinations you love.
Ombre snowflake nail art proves that tiny gradients can transform your nails into a chic winter canvas. With a soft blue gradient and white snowflakes, you’ll get a pro look in minutes—perfect for busy fashion lovers.
8. Holiday Sweater Design
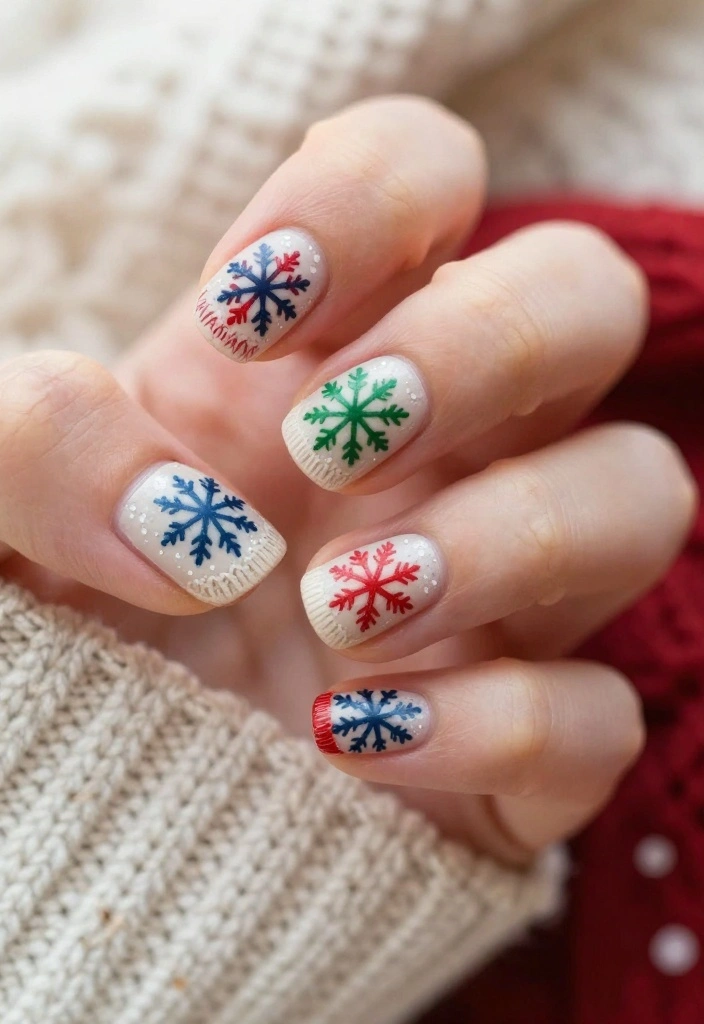
Capture the essence of cozy winter nights with a holiday sweater nail art design! This unique concept blends snowflakes with sweater patterns, evoking warmth and comfort. It’s a playful look that’s perfect for the cold season.
Start with a nude or cream base and paint festive sweater patterns across your nails, incorporating snowflakes into the design. Use colors like red, green, or blue to recreate that cheerful holiday spirit. The result is a fun and comfy style that resonates with winter vibes.
– Base Color: Nude or cream
– Pattern Colors: Red, green, or blue
– Finish: Matte top coat to mimic sweater texture
For precise lines, use a nail art brush, and don’t hesitate to mix patterns for added charm!
Frequently Asked Questions:
– Is this design difficult? It can be tricky, but with practice, you’ll gain confidence in your technique!
Fun fact: 68% of nail art fans pair snowflake nail art designs with holiday sweater patterns for a cozy-winter vibe. It’s a quick, wearable trend—start with a nude base, add festive sweater motifs, and sprinkle in snowflakes for instant charm.
9. Frosty French Tips
Put a seasonal spin on a classic with frosty French tips! Instead of the usual white tip, opt for icy blue or silver, adding tiny snowflakes for a chic touch. This design is perfect for anyone who prefers elegance without the extravagance.
Start with a neutral base and carefully paint icy blue or silver tips. Add delicate snowflakes on the tips for that frosty detail. It’s a simple yet sophisticated winter style that suits various occasions.
– Base Color: Neutral or soft pink
– Tip Color: Icy blue or silver
– Snowflake Color: White or silver
– Finish: Glossy top coat
A clear guide or tape can help you create clean lines for your French tips.
Frequently Asked Questions:
– Can I use glitter for the tips? Absolutely! Glittery tips can add extra sparkle to your nails.
10. Artistic Watercolor Snowflakes
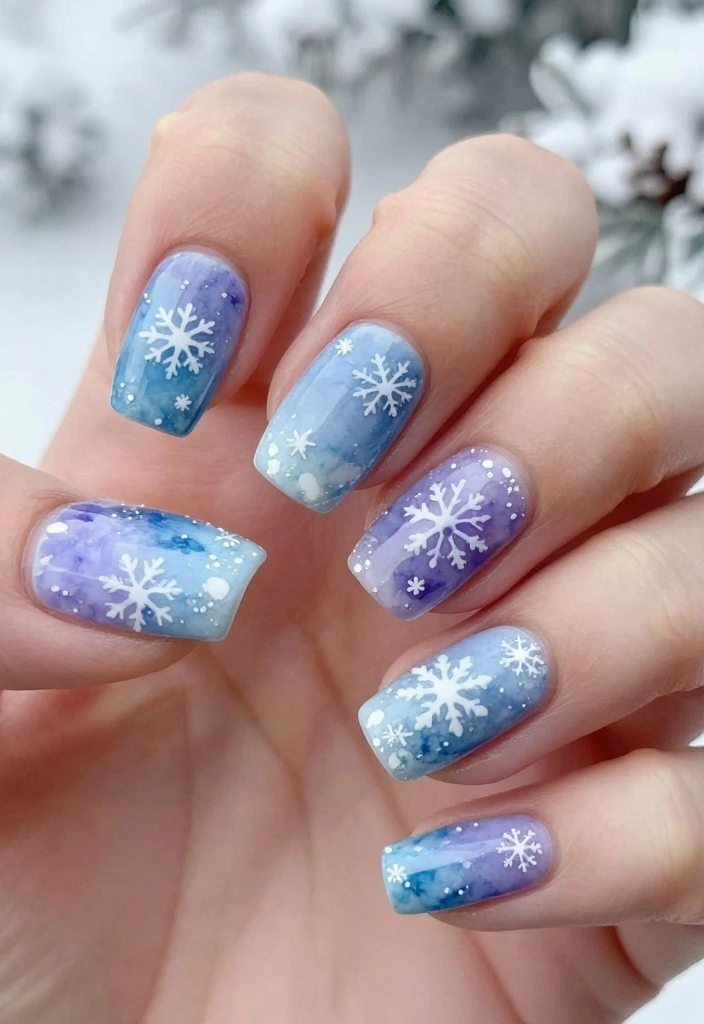
For a more artistic flair, consider watercolor snowflakes! This technique creates a dreamy, washed-out effect using varying shades of blues, purples, and whites for an abstract design. It’s perfect for those who enjoy letting their creativity shine through.
To achieve this look, apply a base coat and then use a watercolor technique to blend colors directly on your nails. Once dry, add a few snowflakes in white polish for added charm. This abstract style is a beautiful way to celebrate winter!
– Base Colors: Mix of blues, purples, and whites
– Snowflake Color: White
– Finish: Glossy top coat
Experiment with different color combinations for your watercolor effect, and use a fine brush to create your snowflakes.
Frequently Asked Questions:
– Is this difficult? It requires some practice but can be very rewarding!
11. Mixed Media Snowflakes
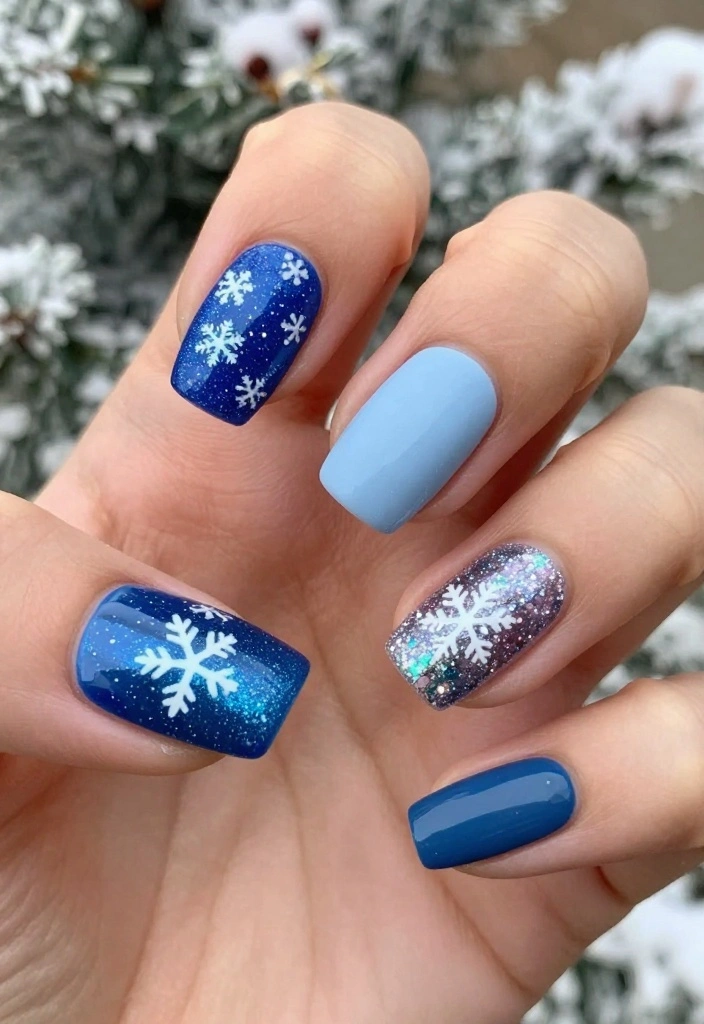
Why limit yourself to one technique? The mixed media snowflake design embraces various techniques, such as glitter, matte, and glossy finishes, for a unique nail art experience. This eclectic approach keeps your style fresh and exciting!
Select your base colors and incorporate different textures for each nail. For instance, one nail can showcase a matte color with glitter snowflakes, while another can be glossy with a simple design. This variety makes your nail art truly stand out.
– Base Colors: Various shades of your choice
– Snowflake Color: White or metallic
– Finish: A mix of matte and glossy top coats
Planning your design beforehand will ensure a cohesive look across all your nails.
Frequently Asked Questions:
– Can I use different colors for snowflakes? Yes! Feel free to experiment with different shades to make your snowflakes pop!
12. Snowflake Ombre Glitter
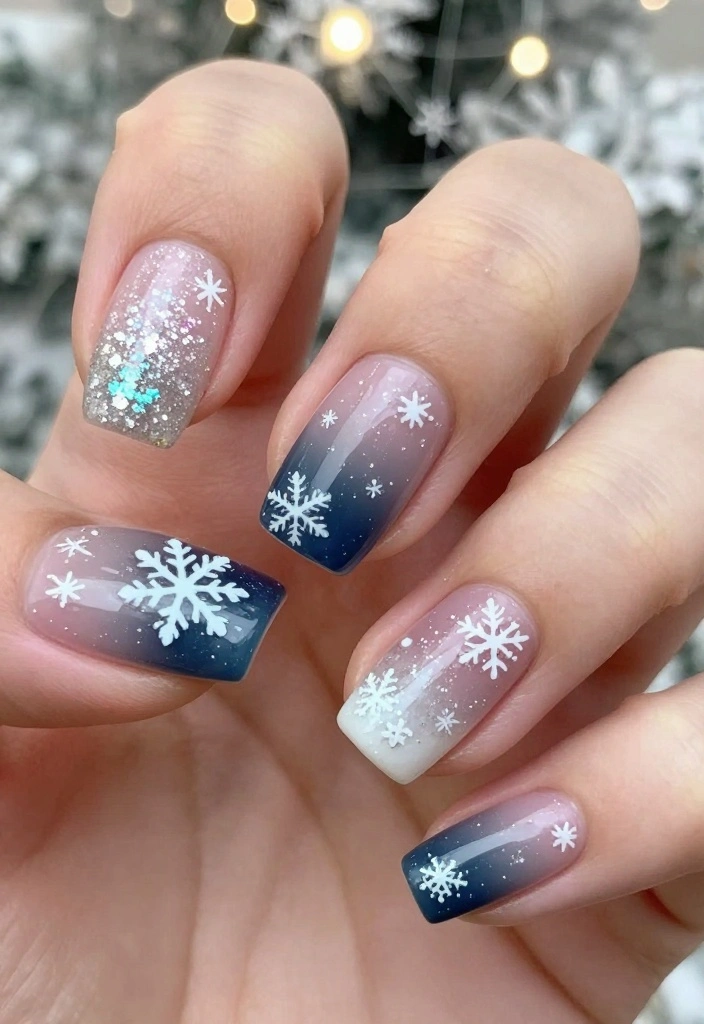
Finish strong with snowflake ombre glitter nails! This design beautifully combines the allure of an ombre effect with the sparkle of glittery snowflakes. It’s a statement look that perfectly captures the essence of winter fun!
Begin with a light color at the cuticle, gradually darkening to a deep shade toward the tips. Once dry, paint white snowflakes on top and finish with a glitter top coat for that dazzling effect. This combination is not only mesmerizing but also suitable for any winter occasion!
– Base Colors: Light to dark gradient (e.g., white to deep blue)
– Snowflake Color: White
– Finish: Glitter top coat
Use a sponge for the ombre effect to achieve a beautifully blended color transition.
Frequently Asked Questions:
– How can I ensure my ombre is smooth? Patience and practice are key; work slowly to blend the colors just right.
Conclusion
These snowflake nail art designs are just the beginning of your winter creativity! Whether you opt for the bold colors, elegant techniques, or whimsical touches, your nails can reflect the beauty of the season.
Give these ideas a try or let them inspire your own unique designs. Winter is all about creativity and fun, so don’t hesitate to let your personality shine through your nails!
Frequently Asked Questions
What is snowflake nail art, and why is it perfect for winter nails?
Snowflake nail art is a winter-appropriate manicure style that features delicate snowflake motifs on your nails. It’s perfect for winter nails because the motifs feel festive and chic while staying elegant.
To recreate, start with a crisp base color, use a thin brush or nail art pen to draw tiny snowflakes, and finish with a top coat for lasting shine. Practice the basic shapes on a practice nail or nail wheel before applying them to your nails for a cleaner look.
What supplies do I need to create snowflake nail art at home?
You don’t need a studio to do this at home—just gather a few essentials for snowflake nail art: a base coat, two or three nail colors (including white for the snowflakes), a thin brush or nail art pen, a dotting tool for perfect dots, top coat, remover, and cotton swabs for cleanups.
Optional extras: tape for clean edges, a stamping plate for precise snowflakes, and a small fan brush for soft gradients. Your toolkit sets the stage for beautiful nail designs every time.
How can I recreate the standout #5 snowflake nail art idea from the article?
The #5 design is a showstopper—here’s a simple way to recreate a similar look at home: start with a bold winter base color, paint delicate white snowflakes using a thin brush or stamping plate, add a metallic or glitter accent on one nail, and finish with a glossy top coat to lock in the shine.
If you’re new to snowflake nail art, begin with one feature nail and keep the others a solid color to mimic the striking contrast of the original idea. You’ll nail that wow factor in no time.
What are beginner-friendly techniques for drawing snowflakes on nails?
Beginner-friendly snowflakes are all about clean lines and symmetry. Start with a central stem on the nail, then add three to six branches at regular intervals. Use a dotting tool to place the small dots at the ends of branches, and keep your strokes light to avoid wobbly lines. Practice on a nail wheel first, then apply to your nails. Finish with a top coat to seal the design and prevent chipping.
How can I make snowflake nail art last longer during winter?
Maximize longevity with a proper prep and seal. Begin with a base coat, apply 1–2 thin layers of your color, and cap the free edge to prevent tip wear. Use a top coat and re-apply every 2–3 days, especially in cold, dry weather. Moisturize cuticles and avoid prolonged exposure to water to keep your nails looking fresh and the snowflake nail art intact.
Related Topics
snowflake nail art
winter nails
nail designs
festive nails
easy nail art
beginner friendly
holiday manicure
trendy nail styles
DIY nail art
cute nail ideas
seasonal nail trends
nail art techniques
These snowflake nail art ideas are so cute! I can’t wait to give them a try. Have you tried any of these designs yet?
I love the creativity you shared! I attempted nail art once, and let’s just say my snowflakes looked more like blobs. Why did the snowman call for a snowflake? Because he wanted to chill out!
Did you know that no two snowflakes are alike? It’s amazing how nature works! These nail designs really capture that uniqueness.