Winter is here, and with it comes the joy of holiday parties, cozy gatherings, and festive cheer. This time of year always reminds me of the little snowmen I used to build with my friends, complete with carrot noses and scarves. If you find yourself craving a touch of whimsy and fun in your holiday beauty routine, this post is for you.
In this guide, we’ll dive into the world of snowman nails, a delightful way to express your holiday spirit. Whether you’re a nail art enthusiast or a beginner looking to try something new, I’ve pulled together 14 festive ideas that are cute, creative, and guaranteed to make you the star of every holiday party. Get ready to embrace the magic of winter with designs that will have everyone talking about your nails!
From classic snowman faces to sparkling accents, these holiday nail art designs will inspire you to showcase your festive flair. You’ll discover a range of styles, ensuring there’s something for everyone. So grab your nail polish and let’s get started on creating winter designs that bring joy and a sparkle to your celebrations!
Key Takeaways
– Discover 14 unique snowman nails designs perfect for festive occasions, from classic faces to 3D elements.
– Explore various styles, including minimalist and ombre options, to suit different tastes and skill levels.
– Learn tips on adding interactive or glittery accents to elevate your nail art game and make your designs stand out.
– Get inspired by themes that incorporate holiday elements, helping you create cohesive looks for your parties.
– Find practical advice on using nail art stickers and hand-painted designs to achieve eye-catching results without needing advanced skills.
Contents
- 1. Classic Snowman Faces
- 2. Sparkly Snowman Accents
- 3. Cute Snowman with Accessories
- 4. Ombre Snowman Nails
- 5. Minimalist Snowman Design
- 6. Snowman Family Nails
- 7. 3D Snowman Elements
- 8. Holiday-themed Snowman Nails
- 9. Snowman with Glittery Snowflakes
- 10. Interactive Mood Snowman Nails
- 11. Snowman Nail Art Stickers
- 12. Hand-Painted Snowman Scenes
- 13. Mixed Media Snowman Nails
- 14. Festive Snowman Nail Art with A Twist
1. Classic Snowman Faces

A classic snowman face brings a joyful spirit to your nails during the winter season. This design features a playful snowman set against a soft pastel backdrop, making it a charming addition to any festive outfit. With its cheerful vibe, it suits gatherings from cozy family dinners to holiday parties effortlessly.
Outfit Pieces:
– Light blue or white base polish
– White polish for the snowman
– Fine nail art brush
– Black and orange nail polish
– Red or green polish for a scarf
Styling Tips:
– Start with a base coat to protect your nails.
– Choose a light background color and let it dry completely.
– Use the nail art brush to paint the snowman, focusing on a round body.
– Add simple facial features and a bright scarf for extra flair.
– Seal your design with a glossy top coat for lasting shine.
This design is easily customizable; you can create multiple snowmen or experiment with different colors. It’s perfect for spreading holiday cheer and bringing smiles to everyone around you.
2. Sparkly Snowman Accents

Transform your snowman nails into a dazzling spectacle with sparkly accents! This design begins with a shimmering silver or white base, setting the scene for a standout snowman on your ring finger. The combination of icy blue and glittering polish creates a festive atmosphere that’s ideal for holiday celebrations where you aim to shine.
Outfit Pieces:
– Shimmering silver or white base polish
– Icy blue or frosty white nail polish
– Dotting tool for precision
– Rhinestones for added sparkle
– Glitter polish for extra shine
Styling Tips:
– Apply your base coat and let it dry thoroughly.
– Paint your selected base color and allow it to set.
– Use the dotting tool to create the snowman on your ring finger.
– Adorn the snowman with rhinestones for buttons and a scarf.
– Finish with a coat of glitter polish on the remaining nails.
Layering glitter adds to the festive feel, and a top coat ensures everything stays intact. This design is perfect for those who love to stand out at holiday events.
📹 Related Video: Swarovski Crystal Snowman Nail Art | Day 11!
3. Cute Snowman with Accessories
Bring your snowman to life with delightful accessories! This playful design allows you to showcase creativity by painting hats, scarves, and adorable buttons on your snowman. With a bright base color that complements the snowman, this nail art is sure to add a cheerful touch to any winter gathering.
Outfit Pieces:
– White base polish
– Assorted colors for accessories (red, blue, green)
– Fine nail art brush for detailing
Styling Tips:
– Start with a base coat and allow it to dry completely.
– Paint the snowman on one or two nails, focusing on fun details.
– Add colorful accessories like a beanie or mittens for charm.
– Paint the other nails in vibrant colors that pop.
– Seal the design with a glossy top coat for durability.
This design is versatile and fun, perfect for brightening up any winter day while showcasing your creative flair.
Pro Tip: Adding tiny hats and scarves to snowman nails makes your manicure feel festive even before you step outside. With a white base and pops of red, blue, or green, these little accessories turn simple nails into standout snowman nails.
🎨 Nail Art Made Easy!
Transform your busy days into festive nail art moments with our DIY guide designed for joyful creativity and quick results.
4. Ombre Snowman Nails

Ombre snowman nails add a trendy twist to classic winter designs! The gradient effect, transitioning from light blue at the cuticle to pure white at the tips, creates a chic backdrop for a whimsical snowman. This elegant approach is perfect for those wanting a sophisticated touch during the holiday season.
Outfit Pieces:
– Light blue polish for the base
– White polish for the ombre effect
– Makeup sponge for blending
– Fine nail art brush for detailing
Styling Tips:
– Apply a light blue base coat and let it dry completely.
– Use a makeup sponge to dab white polish onto the tips for the ombre effect.
– Once dry, paint a small snowman on one nail for a whimsical detail.
– Finish with a glossy top coat to smooth and seal the design.
This design is not only sophisticated but also allows for creativity with color combinations, making it a standout choice for winter events.
Fun fact: Ombre snowman nails can take as little as 5 minutes to master using a makeup sponge to blend light blue into white. That gradient backdrop keeps the snowman design elegant and ready for any holiday party.
5. Minimalist Snowman Design

For those who appreciate simplicity, a minimalist snowman design is the way to go! This understated look features a nude base coat with a small snowman painted in the center, using just a few brush strokes for the face. It’s elegant yet festive, making it a perfect match for any casual holiday gathering.
Outfit Pieces:
– Nude or soft pink polish for the base
– White polish for the snowman
– Black and orange polish for details
Styling Tips:
– Apply a nude base coat and let it dry thoroughly.
– Use white polish to create a simple snowman in the center of the nail.
– Add tiny dots for eyes and a line for a mouth using black and orange polishes.
– Seal with a matte or glossy top coat for an elegant finish.
This design is perfect for those who want to keep it subtle while still showcasing holiday spirit. Feel free to add tiny snowflakes around your snowman for extra charm.
6. Snowman Family Nails

Celebrate the festive season with a snowman family design! This creative idea allows you to paint multiple snowmen on your nails, each with its personality and style. With a light blue or white base, this playful design symbolizes togetherness and joy, perfect for family gatherings or holiday celebrations.
Outfit Pieces:
– Light blue or white base polish
– Various colors for snowman accessories
– Fine nail art brush for detailing
Styling Tips:
– Apply a base coat and let it dry completely.
– Paint a unique snowman on each finger, varying sizes for a family effect.
– Use colorful accessories to distinguish each snowman.
– Finish with a glossy top coat for a polished look.
Vibrant colors will make each snowman stand out, creating a fun and festive atmosphere for holiday gatherings.
7. 3D Snowman Elements

Elevate your snowman nails with stunning 3D elements! This design uses small charms and nail stickers to add dimension and texture to your nails. Starting with a matte white base, you can attach fluffy pom-poms or tiny scarves that transform your nails into an interactive experience, making them the center of attention at any party.
Outfit Pieces:
– Matte white base polish
– 3D charms or stickers
– Glitter polish for embellishments
Styling Tips:
– Apply a matte white base and let it dry thoroughly.
– Secure 3D elements onto your nails with nail glue.
– Sprinkle glitter around for extra sparkle and depth.
– Finish with a top coat to ensure everything stays in place.
This playful design is perfect for those who want their nails to stand out and showcases a fun, creative approach to holiday nail art.
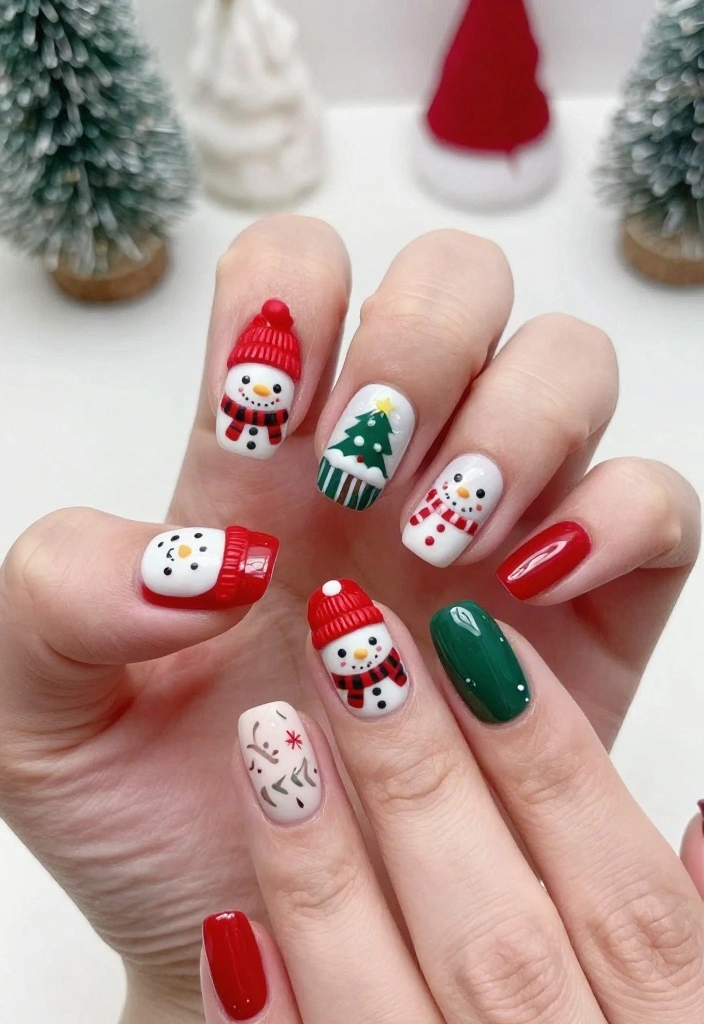
8. Holiday-themed Snowman Nails

Combine holiday motifs with your snowman designs for a festive flair! This lively approach incorporates Christmas trees, stars, and ornaments alongside your cheerful snowman. The deep green or red base creates a stunning contrast, making your snowman pop and capturing the essence of the holiday season beautifully.
Outfit Pieces:
– Deep green or red base polish
– White polish for the snowman
– Assorted colors for holiday decorations
Styling Tips:
– Apply your base coat and let it dry completely.
– Paint the snowman on one or two nails, focusing on details.
– Add holiday-themed accents like trees and ornaments for extra cheer.
– Seal everything with a top coat for durability.
This design is perfect for spreading holiday cheer and works wonderfully with glitter polish to enhance the festive vibe.
How To Choose the Right Snowman Nails for Your Holiday Look
When it comes to holiday nail art, choosing the right snowman nails can make all the difference in your festive outfit. With so many styles and designs available, it can be tricky to pick the perfect set that reflects your personality and holiday spirit. Here are some tips to help you select the best snowman nails for your holiday parties.
1. Consider Your Style
Think about your personal style when choosing snowman nails. Do you prefer a classic look or something more fun and whimsical? Classic snowman faces work well for a more traditional vibe, while designs with 3D elements can add a playful twist. Select a style that represents you and complements your holiday outfits.
2. Color Scheme
Your color choices can make or break your nail design. Traditional colors like white, blue, and red often evoke a winter wonderland feel. However, consider using glittery or pastel shades for a modern edge. You can also mix colors to create an ombre effect, giving your snowman nails a unique flair. Think about how these colors will match with your holiday attire.
3. Nail Length and Shape
The length and shape of your nails can influence the overall appearance of your snowman design. For longer nails, intricate designs like hand-painted scenes or snowman families work beautifully. If you have shorter nails, go for minimalist designs or snowman nail art stickers that won’t overwhelm your look. Always choose a style that suits your nail length and shape.
4. Special Features
Think about which special features you want to incorporate into your nails. Options like interactive mood snowman nails or glittery snowflakes can add an exciting dimension to your design. If you love texture, consider 3D snowman elements that stand out. Choose features that resonate with your personality and that you’ll enjoy showing off at holiday gatherings.
5. Time and Budget
Your budget can also impact your choice. Hand-painted designs may cost more and take longer to create than simple nail art stickers. If you’re in a rush or on a budget, opt for simpler designs that you can manage at home. Consider how much time you can dedicate to nail art before selecting a design.
6. Seasonal Trends
Stay updated on current seasonal trends to ensure your snowman nails are stylish and relevant. Look for popular designs on social media or nail art blogs to inspire your choice. Whether it’s a new twist on classic designs or fresh color combos, keeping up with trends can help you make a chic statement during the holiday season.
Pro Tip: If you’re unsure about which design to pick, start with nail wraps or stickers. They offer an easy way to experiment with different looks without a long-term commitment. You can change them out easily to match your mood or outfit!
Choosing the right snowman nails doesn’t have to be overwhelming. By considering your style, colors, nail length, special features, budget, and current trends, you can find the perfect design to make a statement at every holiday party. Happy decorating! 🎉
9. Snowman with Glittery Snowflakes

Enchant your nails with a snowman surrounded by glittery snowflakes! This design begins with a soft blue or silver base, creating the perfect backdrop for a whimsical snowman. Delicate snowflakes painted around the snowman, dusted with glitter, add a sparkling touch that captures the beauty of a winter wonderland, making it ideal for holiday parties.
Outfit Pieces:
– Soft blue or silver base polish
– White polish for the snowman
– Glitter polish for highlighting details
Styling Tips:
– Apply your base coat and let it dry thoroughly.
– Paint the snowman in the center of your nails.
– Use a thin brush to create snowflakes around the snowman.
– Add glitter to the snowflakes for an enchanting effect.
– Seal everything with a shiny top coat for longevity.
Varying sizes of snowflakes add an interesting dynamic to your design, making it a captivating choice for winter celebrations.
Fun fact: using 3 coats of a soft blue base makes the snowman pop against glittery snowflakes. For best sparkle, dab on a touch of silver glitter at the tips of the snowflakes and seal with top coat. Snowman nails win holiday parties with a winter-wonder vibe.
10. Interactive Mood Snowman Nails
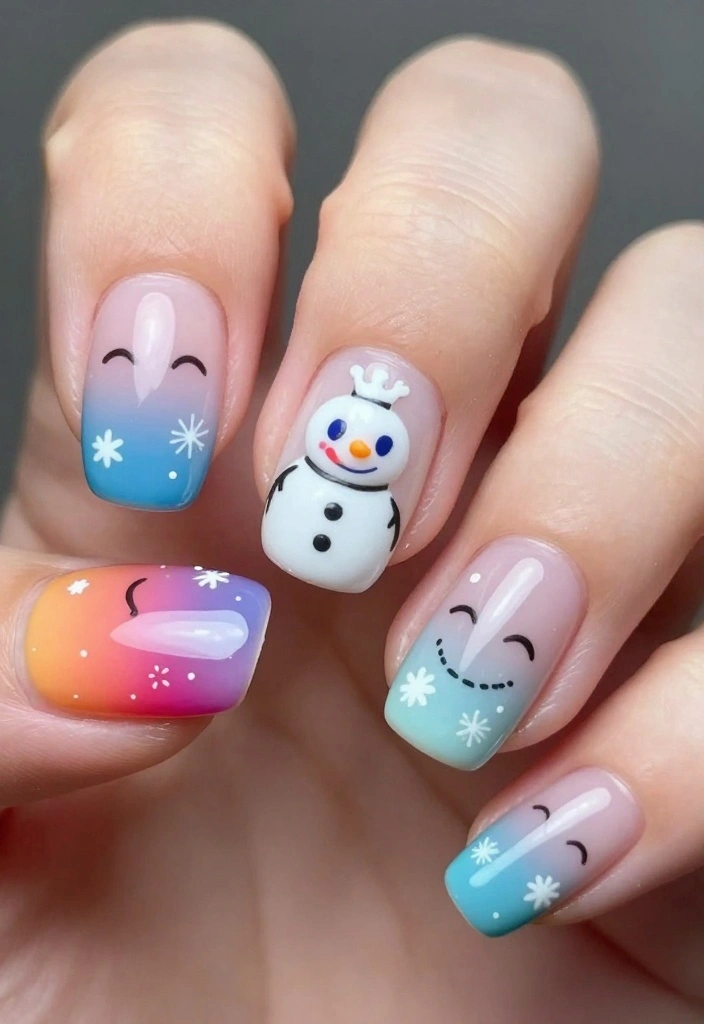
Get playful with interactive mood snowman nails that change color! Using mood-changing nail polish, you can create an exciting design that shifts with temperature changes. A base coat of mood polish forms the foundation, and a snowman painted on top creates an engaging experience that is sure to be a conversation starter at holiday gatherings.
Outfit Pieces:
– Mood-changing nail polish
– White polish for the snowman
– Fine nail art brush for detailing
Styling Tips:
– Apply a base coat of mood polish and allow it to dry completely.
– Create your snowman using white polish.
– Add facial details with a fine brush for personality.
– Finish with a top coat to protect your design.
This unique approach will definitely grab attention, making your nails a fun focal point at any event.
11. Snowman Nail Art Stickers

For a quick and adorable snowman design, nail art stickers are the perfect solution! These fun decals allow you to achieve a festive look without the need for intricate painting. Start with a soft white or pastel base, then press the snowman stickers onto your nails. Adding glitter or colorful dots around the stickers enhances the charm and makes for a fabulous holiday-ready manicure.
Outfit Pieces:
– Base color polish (white or pastel)
– Snowman nail art stickers
– Glitter or colored dot stickers for embellishments
Styling Tips:
– Apply your chosen base coat and let it dry thoroughly.
– Position the snowman stickers on your nails as desired.
– Add glitter or colored dots around the stickers for extra flair.
– Finish with a top coat to ensure longevity.
Choose stickers that match your personal style, and balance multiple stickers across your nails for a cohesive look that shines at holiday parties.
12. Hand-Painted Snowman Scenes

Unleash your artistic side with hand-painted snowman scenes! This intricate design can turn your nails into a winter wonderland, featuring snowmen amidst snowy landscapes. Start with a smooth base coat and use fine brushes to create scenes filled with snow-covered trees and sparkling stars. This artistic approach will certainly impress at any holiday party and showcases your creative flair beautifully.
Outfit Pieces:
– Smooth base coat polish
– Assorted colors for painting scenes
– Fine brushes for detailing
Styling Tips:
– Apply a base coat and let it dry thoroughly.
– Use fine brushes to paint detailed snowman scenes on your nails.
– Incorporate additional elements like trees or stars for depth.
– Finish with a glossy top coat to protect your artwork.
Planning your design ahead of time will yield the best results, and ensuring each layer is dry before adding more detail will help maintain clarity in your art.
13. Mixed Media Snowman Nails

Embrace your creativity with mixed media techniques to craft a unique snowman nail design! By combining various finishes like glitter, matte, and glossy elements, you can achieve an eclectic look. Start with a matte base and add glossy snowmen or metallic accents for contrast, making this design perfect for adventurous DIY nail artists.
Outfit Pieces:
– Matte base polish
– Glossy or metallic polishes for snowmen
– Glitter or embellishments for added texture
Styling Tips:
– Apply a matte base and let it dry completely.
– Use glossy polish for snowmen on some nails for contrast.
– Incorporate glitter or metallic elements for added flair.
– Finish with a top coat to secure everything in place.
Experimentation with different finishes will lead to a mixed media masterpiece that showcases your individual style.
14. Festive Snowman Nail Art with A Twist

Put a modern twist on traditional snowman designs by incorporating fresh elements! Consider using unconventional colors or patterns, such as bright pinks or abstract shapes, to create a snowman that stands out. This creative approach challenges holiday nail art norms and opens up endless possibilities for your unique expression.
Outfit Pieces:
– Unconventional colors for snowman design
– Base coat polish
– Fine brushes or nail striper for detailing
Styling Tips:
– Apply your base coat and let it dry thoroughly.
– Use unconventional colors to paint your snowman for a bold look.
– Add fun patterns or shapes around it for a creative flair.
– Seal with a top coat to protect your nails.
Don’t hesitate to mix colors and patterns; think outside the box to find your unique snowman style this season!
Conclusion

With these 14 festive snowman nail designs, you’re bound to be the star of every holiday party!
Whether you prefer sparkle, simplicity, or creativity in your nail art, there’s a snowman design that fits your style. Remember to have fun experimenting with colors and techniques to make your nails truly unique. Happy nail painting and enjoy the festive season!
Frequently Asked Questions
What exactly are snowman nails and how can I recreate a stunning festive look for the holidays?
Snowman nails are playful winter designs that feature a tiny snowman on one or more nails, perfect for holiday nail art. To recreate a stunning festive look, start with a clean base and a crisp white layer, then paint a snowman with a black hat, eyes, and buttons, add an orange carrot nose, and finish with a colorful scarf. Use a fine brush or dotting tool for details, or opt for decals to keep lines neat. Seal with a glossy top coat to make it last through holiday parties, and try one accent nail with a full snowman scene while keeping others simple to fit your winter designs theme.
What tools and supplies do I need to create snowman nails for holiday nail art?
Gather a few basics to nail snowman nails like a pro. You’ll want a good base coat and top coat, white polish, black for the eyes and buttons, orange for the carrot nose, and your choice of scarf colors. Add a fine detail brush or dotting tools, nail art brushes, and maybe nail stickers or decals for easier precision. If you don’t have a steady hand, you can use stamping plates or decals to achieve clean snowman shapes. Finish with a hydrating cuticle oil to keep your manicure looking fresh. This setup works great for holiday nail art and winter designs across multiple nails.
How can I combine snowman nails with other winter designs for a cohesive holiday manicure?
Start with a unifying color palette like navy, white, and silver so every nail feels part of the same story. You can keep most nails simple with solid white or pale blue, then turn one or two nails into full snowman scenes. Add tiny snowflakes, plaid accents, or glitter along the tips to echo winter designs without competing with the snowman. If you prefer a more dramatic look, use an accent nail with a mini snowman and keep the rest with subtle holiday nail art like holly leaves or candy canes. The key is balance and consistency with your holiday nail art theme.
How long do snowman nails designs last and what steps help them endure through holiday events?
With proper prep, snowman nails can last about 5-7 days or longer, depending on your nail health and top coat. Start with a strong base coat, cure time if using gel, and finish with a durable top coat, reapplying every couple of days. Avoid long water exposure and use gloves for chores. Hydrate nails and cuticles, and if you’re using decals, seal edges with top coat to prevent lifting. Quick touch-ups with matching polish can fix chips without ruining the vibe. This ensures your snowman nails stay fresh during holiday nail art sessions and winter designs events.
Are there beginner-friendly snowman nails ideas and step-by-step tips to achieve a flawless finish?
Absolutely. Start with a simple white base on all nails, then pick one accent nail to add a small snowman using a dotting tool for the eyes and buttons, and a tiny orange dot for the carrot nose. Use tape or a stencil to outline the snowman shape if you’re not confident with freehand. You can also opt for decals or stickers to get clean lines fast. Finish with a glossy top coat and a quick-dry spray. With practice you can expand into more complex snowman nails featuring scarves, hats, or wintry landscapes, all thriving with holiday nail art and winter designs themes.
Related Topics
snowman nails
holiday nail art
winter designs
festive nails
nail art tutorial
beginner friendly
creative designs
seasonal nail art
easy techniques
party ready nails
trendy nail art
winter fashion
These snowman nails are absolutely adorable! I can already picture my friends’ faces when they see my festive nails at the holiday party. What nail art are you planning to try?
I love how creative these snowman designs are! I tried to paint a snowman on my nails once, but it ended up looking more like a melted snowman. At least it was a warm winter look, right?
Did you know that the first snowman dates back to the Middle Ages? It’s amazing how something so simple can bring so much joy during the holidays!
These nail ideas remind me of the time I tried to do my own holiday nail art and ended up with glitter everywhere! My cat thought it was a new toy. Has anyone else had a nail art mishap?