The holiday season is upon us, and with it comes a delightful opportunity to express your festive spirit through nails Christmas designs. If you’ve been searching for ways to add a touch of joy and creativity to your holiday look, you’re in for a treat! This post is designed to inspire you with 14 easy nail art ideas that you can try at home. Whether you’re hosting a holiday party, attending a family gathering, or simply want to feel festive, these designs will elevate your style effortlessly.
If you adore seasonal nail art and enjoy getting creative, you’ll find plenty to love here. From classic motifs like candy canes and Christmas trees to whimsical touches like Santa Claus faces and reindeer antlers, each design is perfect for those who want to bring a bit of holiday cheer to their fingertips. You don’t need to be a nail art expert; these easy tutorials are perfect for beginners and busy individuals alike. Each idea is not only fun but also quick to create, ensuring you can enjoy the holiday season without spending hours on your nails.
Get ready to explore these fantastic nail designs that are so easy, you’ll want to try them all! You’ll leave this post with fresh ideas that will inspire your holiday look and impress your friends and family. Let’s dive into this festive nail art adventure!
Key Takeaways
– Discover 14 easy nail designs perfect for the holiday season, including ideas like Candy Cane Swirls and Christmas Tree Tips.
– Each design comes with simple tutorials to ensure you can recreate them easily, even if you’re a beginner.
– Explore festive themes that capture the spirit of Christmas, making it easy to express your holiday cheer.
– These designs are great for any occasion, whether you’re attending parties or just want to add a splash of fun to your everyday look.
– Get tips on materials and tools you might need, plus suggestions on how to personalize each design to make it uniquely yours.
Contents
- 1. Candy Cane Swirls
- 2. Christmas Tree Tips
- 3. Glitter Snowflakes
- 4. Festive French Manicure
- 5. Santa Claus Faces
- 6. Reindeer Antlers
- 7. Ornaments Galore
- 8. Elf Inspired
- 9. Winter Wonderland
- 10. Holiday Lights
- 11. Gingerbread Houses
- 12. Mistletoe Magic
- 13. Snowy Mountains
- 14. Christmas Sweater Patterns
1. Candy Cane Swirls

Embrace the holiday spirit with delightful candy cane swirls on your nails! This design captures the classic red and white stripes, adding a festive flair to your look. It’s a cheerful way to celebrate the season and will surely bring joy to anyone who sees it.
Why It Works: The playful contrast of bright red and crisp white creates a fun, eye-catching pattern that embodies holiday cheer. This design is versatile, making it perfect for parties, family gatherings, or simply spreading festive joy.
Outfit Pieces:
– Bright red nail polish
– White nail polish
– High-gloss top coat
– Nail art brush or striping tape
Styling Tips:
– Start with a base coat to protect your nails.
– Use a thin brush for precision when painting stripes.
– Create diagonal or wavy stripes for a whimsical look.
– Finish with a glossy top coat for extra shine.
The candy cane swirls are perfect for holiday gatherings and festive events. Swap out the red for green for a different holiday vibe, or add glitter for extra sparkle!
📹 Related Video: 🎄CANDY CANE Peppermint Swirl Christmas Nail Art – Sugared Ice & Snowflakes ❄️
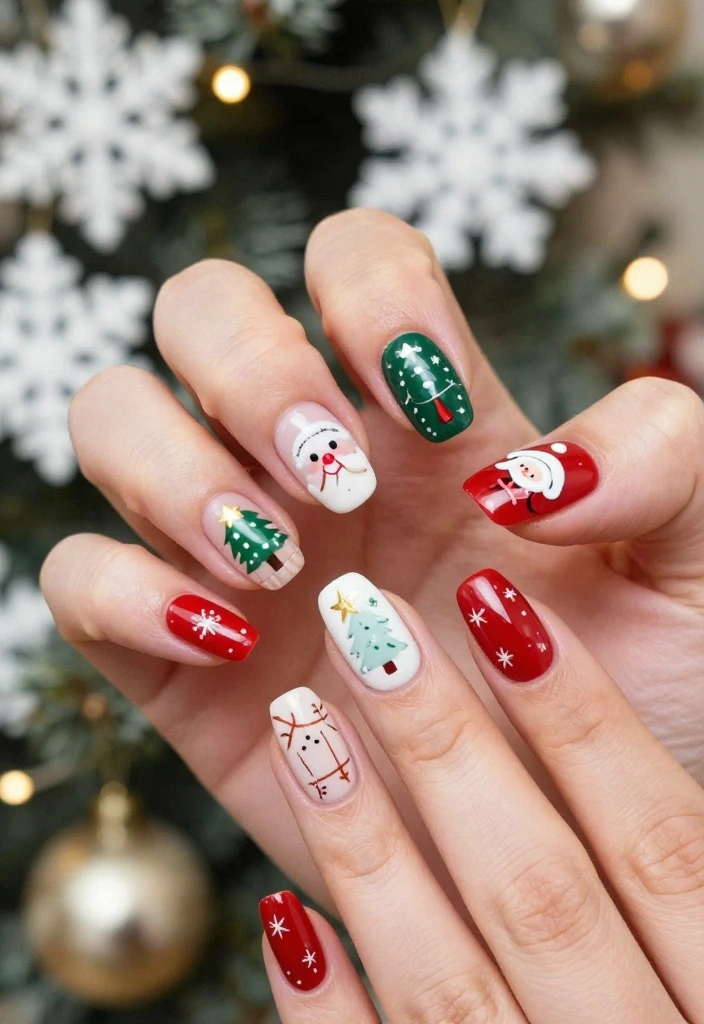
2. Christmas Tree Tips
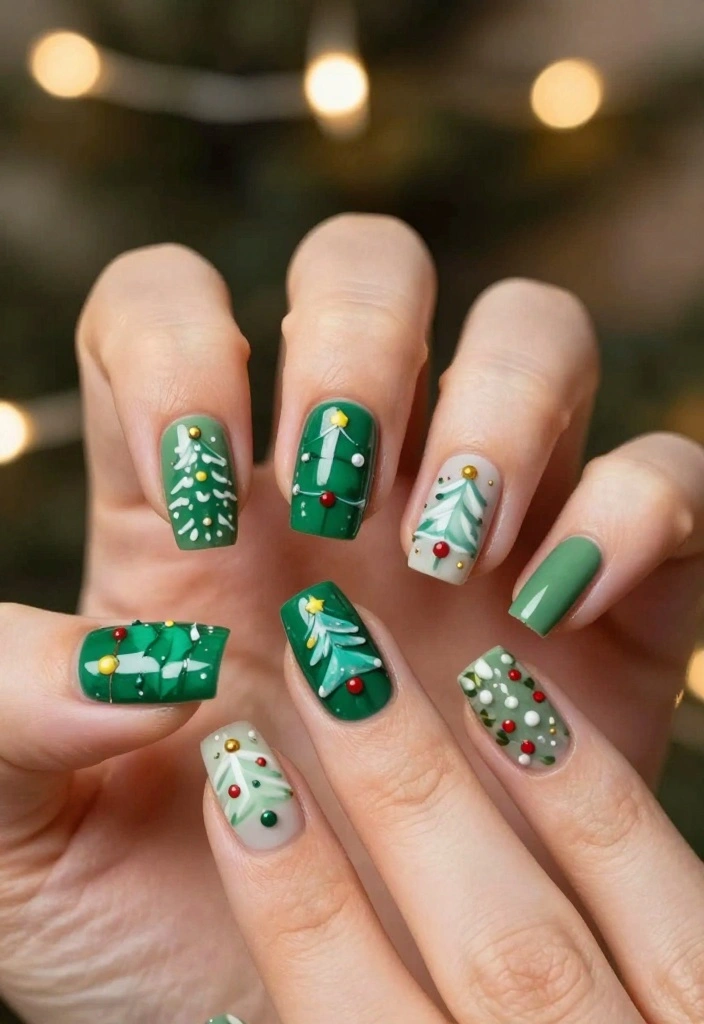
Turn your nails into charming little Christmas trees with this festive design! Start with a solid green base, then add lighter shades for texture and tiny decorations for that holiday sparkle. Each nail can showcase a unique tree, making your manicure a canvas for creativity.
Why It Works: This design is cheerful and captures the essence of holiday decorating. It’s a fun way to express your creativity while celebrating the season.
Outfit Pieces:
– Dark green nail polish
– Light green polish for texture
– Red and gold polishes for ornaments
– Top coat
Styling Tips:
– Let each layer dry before adding more details to avoid smudging.
– Use a dotting tool for precise ornament placement.
– Experiment with different colors for a more vibrant tree.
This design is perfect for holiday parties and gatherings. Customize your trees with different ornaments for a unique touch!
Fun fact: For nails christmas designs, using three green shades creates depth—start with a solid green base, add lighter textures, and tiny decorations. It’s quick, festive, and totally shareable.
3. Glitter Snowflakes

Capture the enchanting beauty of winter with glitter snowflakes on your nails! Start with a frosty light blue or pastel white base and create delicate snowflakes using white polish. Adding glitter enhances the winter wonderland feel, making this design a showstopper.
Why It Works: This design embodies the delicate essence of winter and adds a touch of sparkle to your look. Ideal for anyone wanting to showcase their love for the season in a chic way.
Outfit Pieces:
– Light blue or white nail polish
– White polish for snowflakes
– Fine glitter
– Top coat
Styling Tips:
– Use a matte base for a sophisticated look or a glossy top coat for shine.
– Ensure the base color is completely dry before adding snowflakes to avoid smudging.
– Consider adding additional glitter for a more festive touch.
Perfect for holiday celebrations, this design can easily transition from casual outings to elegant winter events!
4. Festive French Manicure
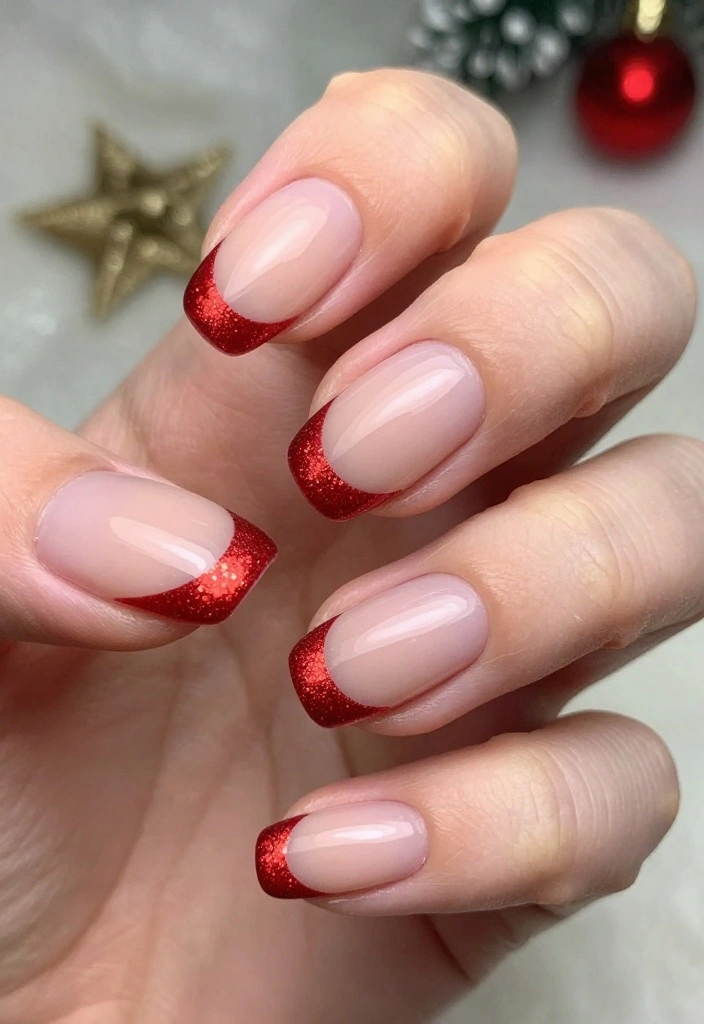
Give the classic French manicure a festive twist with vibrant red or sparkling gold tips! Pair them with a soft nude or white base for an elegant yet holiday-ready look. This design is simple yet sophisticated, making it suitable for any festive occasion.
Why It Works: This modern take on a classic style keeps your nails chic while embracing the holiday spirit. It’s versatile enough for both casual and formal events.
Outfit Pieces:
– Nude or white base polish
– Red or gold nail polish for tips
– Top coat
Styling Tips:
– Use a high-quality top coat for lasting shine.
– For precision, use tape to create clean lines for the tips.
– Consider adding glitter to the tips for an extra festive touch.
This design is ideal for holiday parties, office gatherings, or any celebration where you want to look polished yet festive!
💅 Easy Nail Art for Moms
Transform your holiday nail game with our quick DIY guide designed for busy moms who love festive flair.
5. Santa Claus Faces
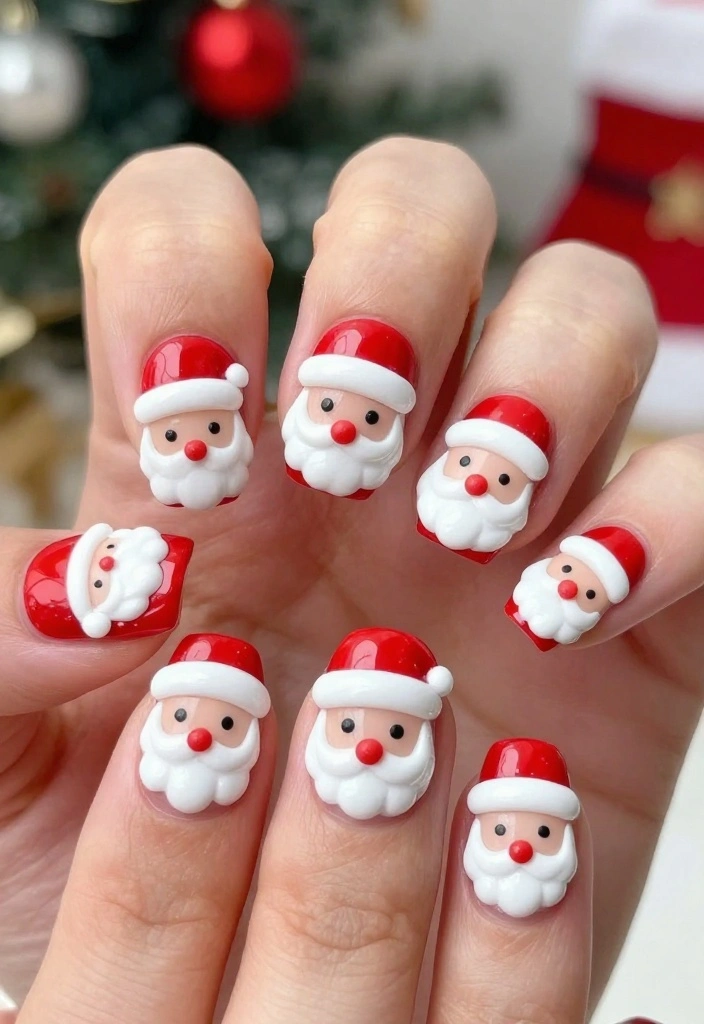
Bring the jolly spirit of Santa Claus to your nails with this fun design! Start with a bright red or white base and create Santa’s faces complete with his iconic hat and cheerful expression. This playful design is perfect for spreading holiday cheer!
Why It Works: These adorable Santa faces are not only cute but also evoke a sense of joy and warmth during the holidays. It’s a creative way to showcase your festive spirit.
Outfit Pieces:
– Red or white nail polish
– Black and white polish for facial features
– Top coat
Styling Tips:
– Use a fine brush for detail work on Santa’s face.
– Don’t stress about perfection; a quirky design adds charm!
– Finish with a top coat to protect your artwork.
Ideal for holiday parties and family gatherings, this design is sure to bring smiles to everyone around you!
6. Reindeer Antlers
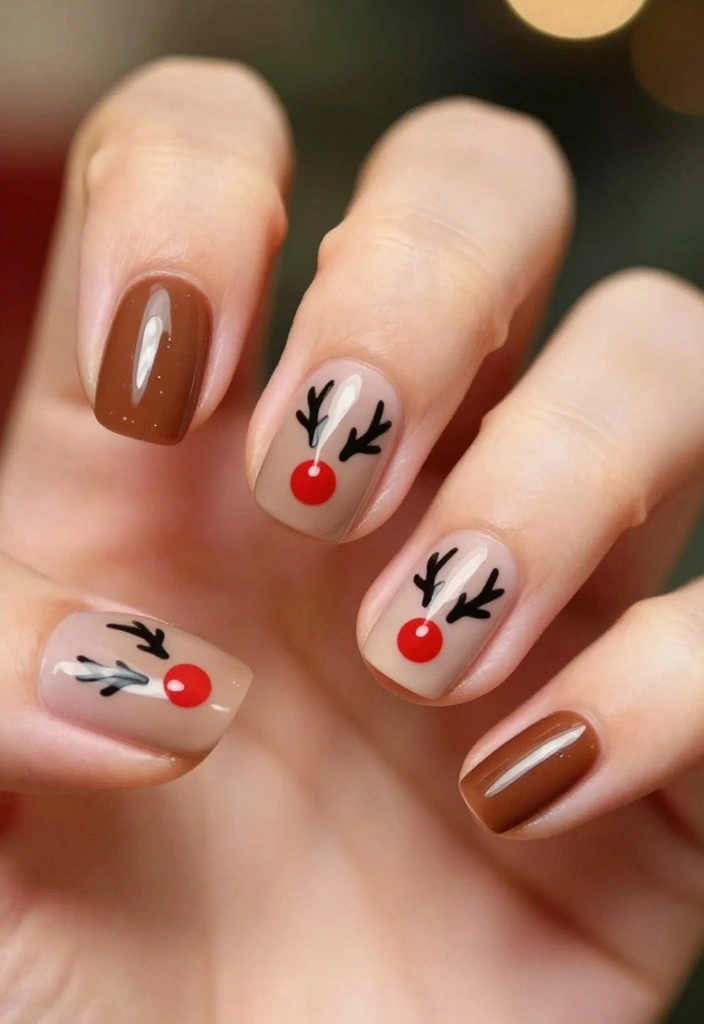
Celebrate the holiday season with charming reindeer antlers on your nails! Start with a neutral or brown base and draw simple antler shapes at the tips. A festive red dot for Rudolph’s nose adds the perfect finishing touch.
Why It Works: This design is adorable and easy to create, making it a fantastic way to embrace the holiday spirit. It’s bound to bring a smile to anyone who sees your nails!
Outfit Pieces:
– Neutral or brown nail polish
– Black polish for antlers
– Red polish for Rudolph’s nose
– Top coat
Styling Tips:
– Use a thin brush for clean lines when drawing antlers.
– Consider adding a sparkly top coat for extra holiday shine.
– Feel free to get playful with the shape of the antlers!
This design is perfect for festive celebrations and casual holiday outings. It’s a sweet nod to the season that everyone will love!
Reindeer antlers on your nails are a playful, easy way to hype your holiday style. With a neutral base and simple antler tips, plus a red Rudolph nose, you get chic, share-worthy nails—perfect for nails christmas designs.
7. Ornaments Galore

Celebrate the beauty of Christmas decorations with colorful ornaments on your nails! Start with a soft white or light blue base, and then create bright ornaments using a dotting tool or small brush. This design is a joyful way to show your love for the festive season!
Why It Works: The vibrant colors and playful patterns capture the essence of holiday cheer, making your nails a delightful topic of conversation.
Outfit Pieces:
– White or light blue nail polish
– Bright colors for ornaments
– Dotting tool or small brush
– Top coat
Styling Tips:
– Use multiple layers of polish for depth and texture.
– Don’t hesitate to mix colors for a more festive look.
– Add strings or glitter for a more detailed design.
This eye-catching nail art is perfect for holiday parties and events, showcasing your festive spirit beautifully!
How To Choose the Right Christmas Nail Designs
Choosing the perfect Christmas nail designs can elevate your holiday spirit and make your festive gatherings even more fun. Here are some key points to consider when selecting your nails Christmas designs this season:
1. Consider Your Skill Level
Before diving into nail art, think about your nail painting skills. If you’re a beginner, opt for simpler designs like dots, stripes, or solid colors. If you’re more experienced, you can explore intricate designs like snowflakes or Santa faces. Knowing your abilities helps ensure you’ll enjoy the process and achieve beautiful results.
2. Choose a Theme
Christmas offers a variety of themes, from traditional to modern. Do you prefer classic colors like red, green, and white, or are you drawn to metallics and glitter? Decide if you want your nails to reflect a specific theme, like candy canes or winter wonderlands. This will guide your color choices and design elements, making the selection more cohesive.
3. Think About Colors
Selecting the right colors is crucial for your nail designs. Festive colors like red, green, gold, and silver are popular, but consider adding unique shades like icy blue or deep purple for a twist. You can also mix and match colors for more playful designs. Remember to choose colors that complement your outfits or the events you’ll attend during the holidays.
4. Time and Effort
Some designs require more time and precision than others. If you’re short on time, stick with quick designs like glitter tips or a simple festive French manicure. More elaborate designs like gingerbread houses or Christmas sweaters will take longer and require patience. Be realistic about the time you have available for nail art to avoid feeling rushed.
5. Nail Length and Shape
Your nail shape and length can impact how designs look. Long nails offer more space for intricate art, while short nails can be more suited for simple designs. If you have almond-shaped nails, you might want to try designs that highlight their shape, such as diagonal stripes or floral accents. Choose designs that complement your nail style for the best effect.
6. Materials and Tools
Lastly, ensure you have the right materials. Nail polish, nail art brushes, dotting tools, and stickers can make your process smoother. If you’re using glitter or 3D decorations, make sure you have a good top coat to seal your designs. Having the proper tools can significantly enhance the quality of your work and make application easier.
Pro Tip: Always practice a design on a piece of paper before applying it to your nails. This gives you a chance to refine your technique and work out any kinks before your nails become your canvas.
By considering these aspects, you’ll be able to select nails Christmas designs that reflect your personality, fit your schedule, and look amazing throughout the holiday season. Happy decorating!
8. Elf Inspired
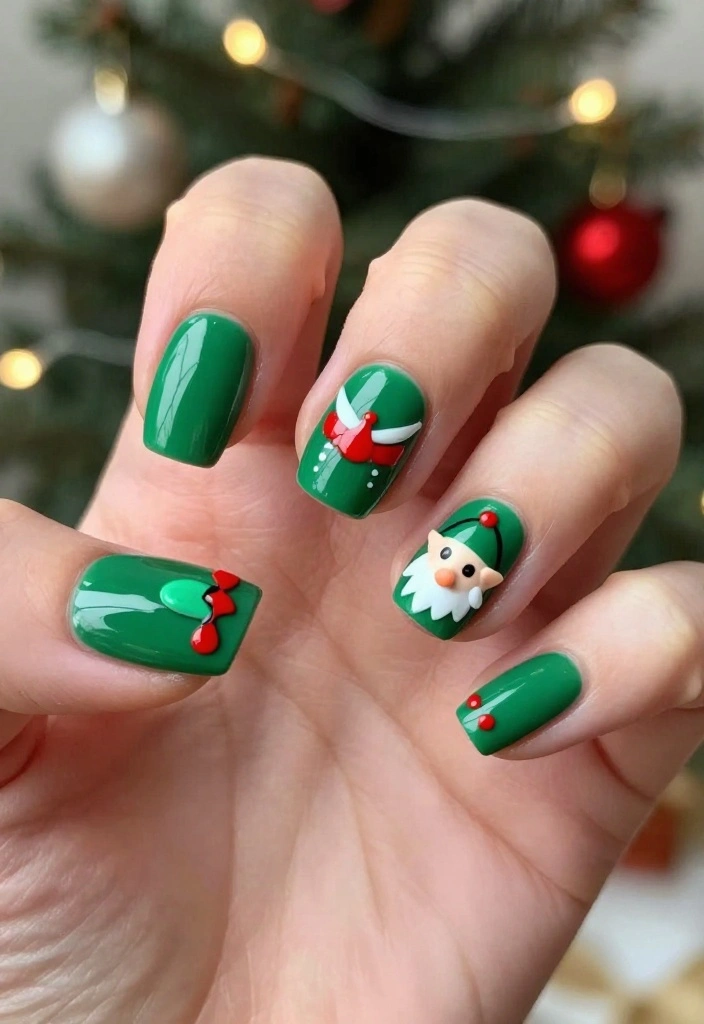
Bring whimsy to your holiday nails with elf-inspired designs! Start with a bright green base and add red polish for a hat or belt on select nails. Tiny details like buttons or jingle bells add a charming touch.
Why It Works: This playful design captures the cheerful essence of the season, perfect for anyone looking to add a fun twist to their holiday style.
Outfit Pieces:
– Bright green nail polish
– Red polish for accents
– Gold or silver polish for buttons
– Top coat
Styling Tips:
– Use a fine brush for detailed accents.
– Ensure the base color is completely dry before adding designs.
– Mix and match designs for a unique look!
This delightful design is ideal for holiday gatherings and casual celebrations, letting your playful side shine through!
9. Winter Wonderland
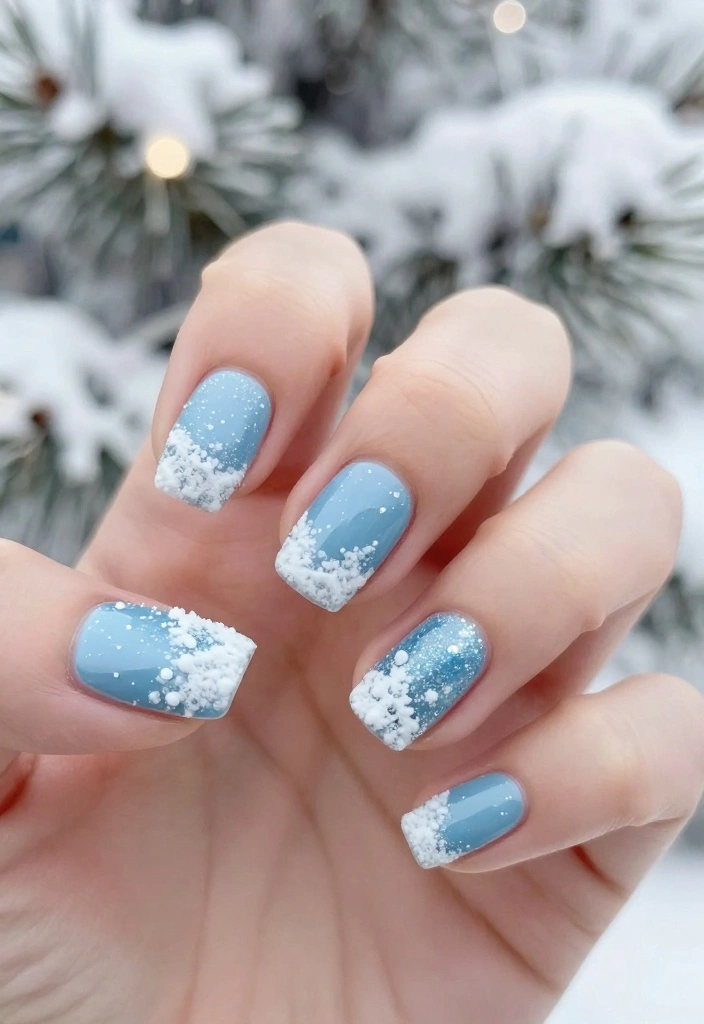
For winter lovers, this winter wonderland nail design is a must-try! Start with a soft blue base and use a sponge to dab on white polish, creating a snowy landscape. Finish with glitter for a sparkling effect.
Why It Works: This design captures the serene beauty of winter, allowing you to showcase your love for the season in a stunning way.
Outfit Pieces:
– Soft blue nail polish
– White polish for snow
– Glitter for sparkle
– Top coat
Styling Tips:
– Experiment with various shades of blue for added depth.
– Let each layer dry completely to prevent smudging.
– Use a sponge for a textured effect.
This design is perfect for winter-themed events and gatherings, celebrating the beauty of the season on your nails!
Fun fact: 70% of nail art lovers say winter wonderland designs boost festive vibes instantly. A soft blue base with snowy white textures creates nails that look DIY-friendly and chic for nails christmas designs you can try tonight.
10. Holiday Lights
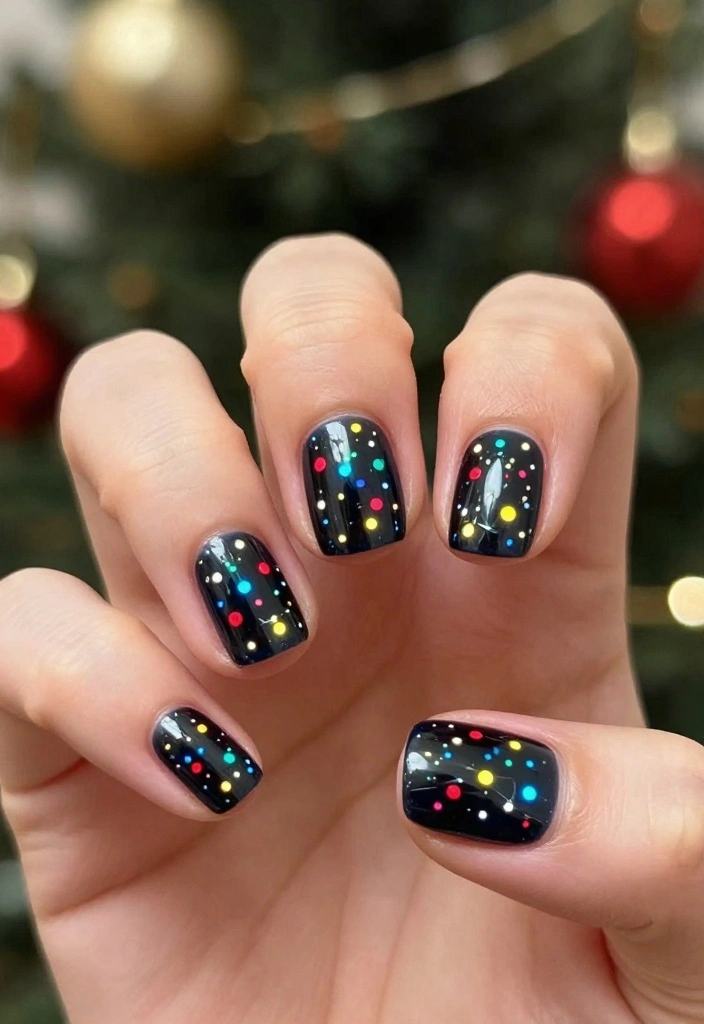
Light up your nails with a design inspired by twinkling holiday lights! Start with a dark base like black or navy, and once dry, paint colorful dots to mimic lights strung along a line. This vibrant design is perfect for festive night outings!
Why It Works: The playful representation of Christmas lights adds a fun touch to your nails, capturing the spirit of holiday celebrations.
Outfit Pieces:
– Dark base color nail polish (black or navy)
– Bright colors for lights
– Top coat
Styling Tips:
– Use various colors for the lights to mimic real light strings.
– Create slightly irregular shapes for a more authentic look.
– A matte top coat can give an interesting texture!
This design is perfect for parties and nighttime events, letting your nails shine as brightly as the holiday lights!
11. Gingerbread Houses
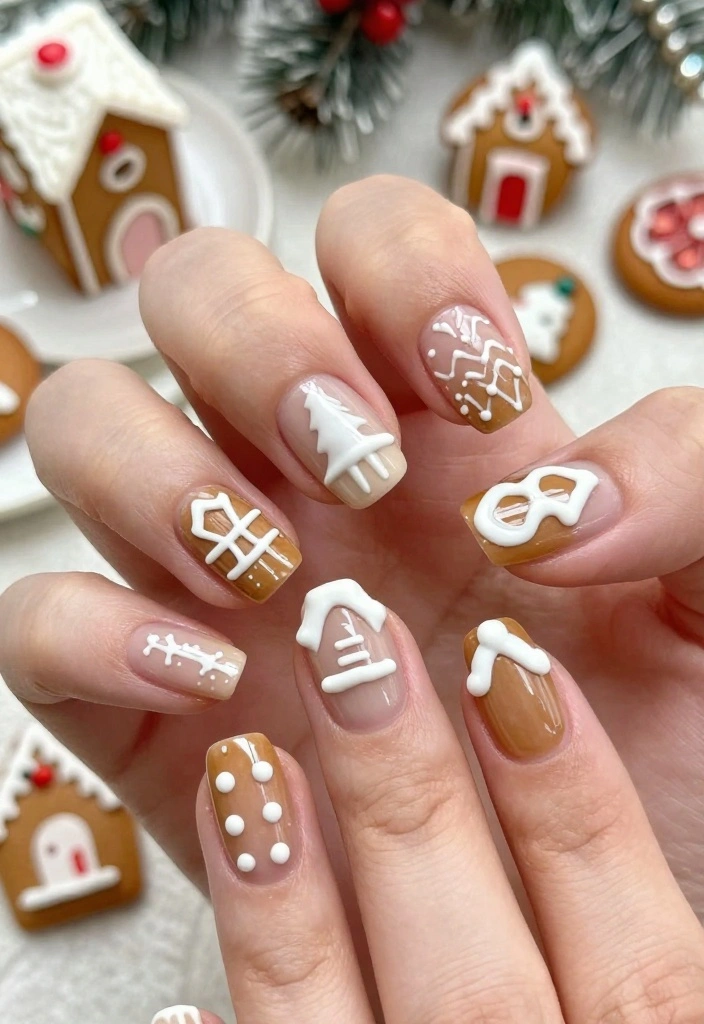
Celebrate the joy of Christmas baking with adorable gingerbread house nails! Start with a light brown base and paint tiny gingerbread houses using white icing and colorful candy dots. This sweet design is perfect for baking enthusiasts!
Why It Works: Gingerbread houses are a delightful symbol of the season, and having them on your nails adds a charming and festive touch.
Outfit Pieces:
– Light brown nail polish
– White polish for icing
– Bright colors for candy
– Top coat
Styling Tips:
– Embrace a whimsical approach; perfection isn’t necessary!
– Let each layer dry before adding details to avoid smudging.
– Use a fine brush for detailed decorations.
This design is fantastic for holiday gatherings, showcasing your festive baking spirit in a fun way!
12. Mistletoe Magic
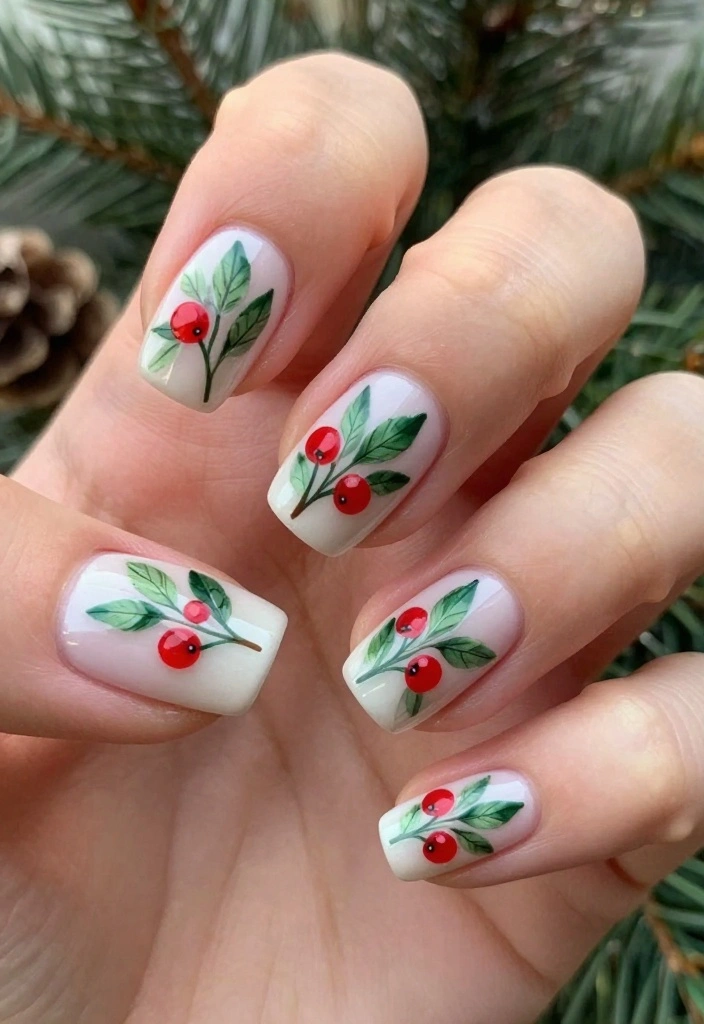
Add some mistletoe magic to your nails with this romantic design! Start with a soft white or pale pink base, then create mistletoe leaves and berries using green and red polish. This fresh design is ideal for any holiday occasion.
Why It Works: The mistletoe design is elegant and a lovely nod to holiday romance, making it perfect for festive gatherings.
Outfit Pieces:
– White or pale pink nail polish
– Green polish for leaves
– Red polish for berries
– Top coat
Styling Tips:
– Use a steady hand for clean details.
– Ensure each layer is fully dry before adding more accents.
– Consider adding a glittery top coat for extra sparkle.
This enchanting design is perfect for holiday parties or romantic evenings, adding a touch of elegance to your look!
13. Snowy Mountains

For those who adore winter landscapes, snowy mountains on your nails are a unique design! Start with a deep blue or gray base and paint mountain shapes in white, adding sparkle for snow caps. This design beautifully captures the serenity of winter.
Why It Works: This artistic representation of winter showcases your love for the season in a creative way.
Outfit Pieces:
– Deep blue or gray nail polish
– White polish for mountains
– Sparkly top coat (optional)
Styling Tips:
– Use a sponge for blending colors and adding depth.
– Take your time; allow each layer to dry for the best results.
– Consider adding glitter for a sparkling effect.
This design is perfect for winter events and gatherings, letting you showcase your artistic flair!
14. Christmas Sweater Patterns

Wrap your nails in cozy Christmas sweater patterns for a festive look! Start with a solid base color like red or green, then create fun designs like snowflakes or reindeer using white or contrasting colors. This design is a warm nod to holiday traditions!
Why It Works: The playful patterns evoke holiday warmth and creativity, making them perfect for celebrating the season in style.
Outfit Pieces:
– Red or green nail polish for base
– White or contrasting colors for patterns
– Top coat
Styling Tips:
– Use a thin brush for detailed patterns.
– Mix and match designs across your nails for variety.
– Consider adding glitter for a festive touch.
This cozy design is ideal for holiday gatherings, showcasing your festive spirit while keeping your style chic!
Conclusion
With so many easy and delightful nail designs, your Christmas spirit will shine as bright as the holiday lights! From Santa faces to elegant winter scenes, there’s no limit to the creativity you can express on your nails this season. Don’t forget to share your festive styles with friends and family – after all, nail art is all about creativity and joy. Which design are you excited to try? Happy holidays and happy nail painting!
Frequently Asked Questions
What are some of the easiest nails christmas designs I can try from this list?
This collection is full of nails christmas designs that are beginner-friendly. Try classic candy cane stripes, a snowy snowflake accent, a tiny Christmas tree made with dots, or a red base with a gold glitter tip.
How to do candy cane stripes: paint a red or white base, place thin tape to create the stripes, carefully pull off the tape, and seal with a top coat.
Finish with a quick-dry top coat to keep your seasonal nail art intact.
Are these looks suitable for beginners, and what easy tutorials should I follow to recreate them at home?
Absolutely—these looks are designed to be beginner-friendly and doable with common tools. Gather a few basics: base coat, top coat, a red/green polish, a dotting tool or toothpick, and nail stickers or tape.
Look for easy tutorials that break each design into 4–6 steps, show close-ups, and include drying times. Start with simple accents first, then level up as you gain confidence.
Remember to work in thin layers for the cleanest seasonal nail art results.
What color combos and finishes work best for seasonal nail art during Christmas?
Classic pairings that pop on this topic include red, green, and gold with a glossy finish, or white with metallic accents for a snowy vibe. For a modern twist, try a green base with a gold glitter tip or a red base with silver stars.
Finish matters—glossy looks feel traditional, while a matte finish gives a chic, contemporary seasonal nail art vibe.
Keep colors in thin layers to avoid dulling the details.
How can I make Christmas nail designs last longer and prevent chipping?
Prep is everything: start with a good base coat to protect natural nails. Apply 2 ultra-thin coats of color rather than one thick coat, and cap the tips to seal the edge.
Finish with a high-quality top coat and reapply every 2–3 days to combat chips. Avoid soaking in hot water for the first 24 hours after painting, and hydrate cuticles with oil to keep nails looking fresh in your seasonal nail art.
Can these Christmas nail designs be adapted for short nails or other nail shapes?
Definitely. Short nails can still nail the look—opt for bold, simple designs like candy cane stripes, a single snowflake, or a tiny Christmas tree sticker. Use easy tutorials that focus on scale and spacing so patterns don’t look crowded.
Adjust line thickness, tilt accents toward the tip, and choose smaller decals to fit your nail length while staying on-trend with nails christmas designs and seasonal nail art.
Related Topics
nails christmas designs
seasonal nail art
easy tutorials
holiday nail art
festive designs
beginner friendly
quick nail art
simple techniques
Christmas manicure
trendy nail designs
DIY nail art
colorful nails
These nail designs look so festive! I can’t wait to try the candy cane stripes. Have you ever had a design go totally wrong on you?
I love the idea of easy nail art for Christmas! Last year, I tried to do snowflakes, and it looked more like a bunch of weird stars. Why is nail art always a bit like finger painting for adults?
Did you know that the tradition of painting nails dates back to ancient Egypt? It’s cool to think how long people have been getting creative with their nails! What design are you excited to try first?
These designs are so inspiring! I remember one Christmas when I tried to paint my nails like Christmas lights, and I ended up with more paint on my hands than the nails. It was a colorful disaster, but we all had a good laugh!