Nail art is one of those creative outlets that never goes out of style. Whether you’re gearing up for a special occasion or just want to add a splash of fun to your day, experimenting with new nail art designs can elevate your look. Lately, I’ve found myself obsessing over easy-to-master nail art designs that can fit into even the busiest of schedules. The desire to get creative without spending hours at a salon inspired me to compile this list just for you.
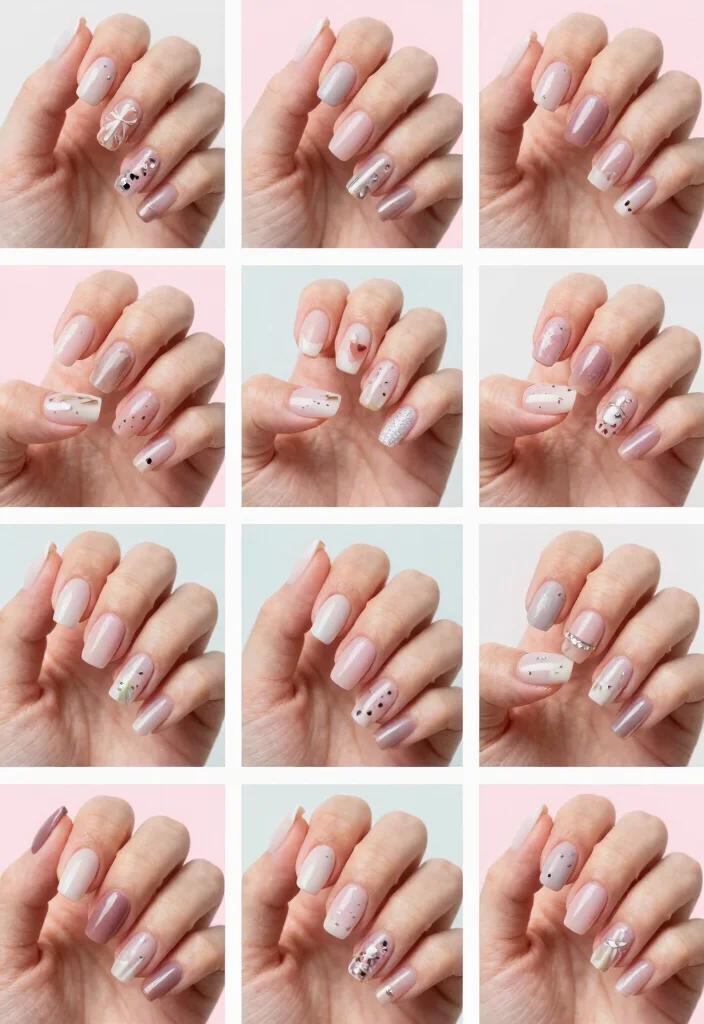
If you’re a fashion enthusiast, a DIY lover, or simply someone who enjoys expressing your personality through your nails, this post is tailored for you. You don’t need to be a professional to achieve stunning nail art looks. What you’ll find here are 14 new nail art designs that are not only eye-catching but also simple enough to master in minutes. Each design comes with detailed instructions that you can easily follow, ensuring that your nails look fabulous without the fuss.
Prepare to unleash your inner artist! You’ll gain access to a variety of designs, from ombre effects to playful animal prints. These ideas are perfect for any occasion, whether you’re heading to a party or just want to treat yourself to a little self-care. Let’s dive into these easy, quick-to-follow nail art designs that will have you flaunting your stunning nails in no time.
Key Takeaways
– Discover 14 new nail art designs that are quick and simple, perfect for anyone short on time.
– Each design includes easy-to-follow instructions, ensuring you can recreate them with minimal effort.
– Explore a variety of styles, including ombre, floral, and animal prints, to suit your personal style.
– These nail art ideas are not just beautiful; they offer a fun way to express your creativity.
– Mastering these techniques will save you time and money, allowing you to enjoy salon-quality nails at home.
Contents
- 1. Ombre Delight
- 2. Minimalist Lines
- 3. Floral Fantasy
- 4. Glitter Bomb
- 5. Marble Magic
- 6. Neon Pop
- 7. Textured Textiles
- 8. Animal Print
- 9. Color Blocking
- 10. Retro Dots
- 11. Stained Glass
- 12. Watercolor Wonders
- 13. Glitter Stripes
- 14. Gradient French Tips
1. Ombre Delight
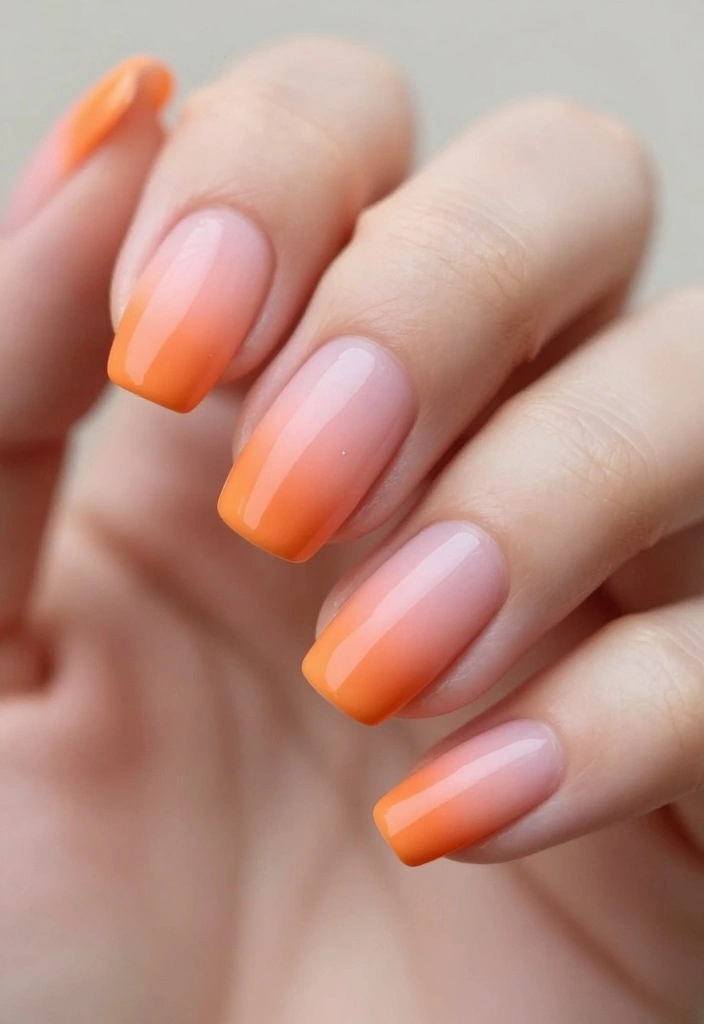
Ombre nails are a classic favorite that offers endless customization possibilities! By blending two or more colors from the tip to the cuticle, you create a stunning gradient effect that catches the eye. This look works especially well with contrasting shades like pink and orange or a beautiful blue palette, making it perfect for any occasion.
Outfit Pieces:
– Base coat of your choice
– Light pink or peach polish as the base color
– Dark orange or coral for the ombre effect
– Optional: a makeup sponge for blending
– Top coat for a glossy finish
Styling Tips:
– Apply a thin layer of base coat to protect your nails.
– Use a makeup sponge to dab on the darker color, blending gently for a smooth transition.
– Finish with a top coat to enhance shine and longevity.
– Experiment with different color combinations for a unique look!
Ombre nails are easy to master and look chic for work, parties, or casual outings. You can swap colors to match your outfit or season for a fresh take every time.
📹 Related Video: DOs & DON’Ts: Ombré Nails | how to do ombré nails with regular polish
2. Minimalist Lines
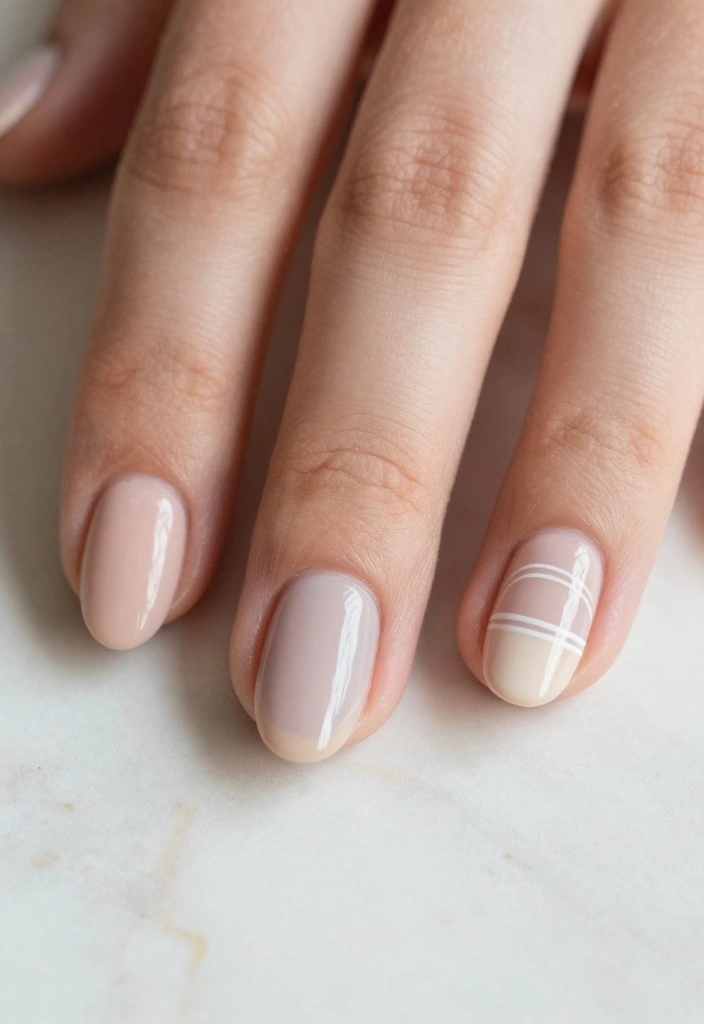
For a sleek and modern aesthetic, minimalist nails are the way to go! Simple lines and dots can create a sophisticated and chic design that’s both classy and understated. A neutral base paired with a few accent colors makes this look versatile for both work and casual outings.
Outfit Pieces:
– Nude or light beige base coat
– Thin black or dark blue polish for lines
– Optional: a dotting tool or nail tape
– Top coat to seal the design
Styling Tips:
– Start with a clean base of nude polish for elegance.
– Use tape to create straight lines or geometric shapes for precision.
– Add dots in a contrasting color for added interest.
– Seal everything with a top coat to keep the design intact.
Minimalist nails are perfect for a polished look at work or casual meet-ups. Try different color combinations to keep your style fresh and exciting!
How To Choose the Right Nail Art Supplies
When diving into the world of nail art, having the right supplies is essential to creating stunning designs. With so many options available, it can be overwhelming to know where to start. Here are key points to consider when selecting nail art supplies:
1. Quality of Nail Polish
Choose high-quality nail polishes that offer rich pigmentation and durability. Look for brands known for their long-lasting formulas and vibrant colors. Consider whether you prefer gel, regular, or matte finishes. Gel polish provides a longer wear time, while traditional polish is easier to remove.
2. Tools for Application
Invest in essential tools like brushes, dotting tools, and nail art pens. These will make your DIY projects easier and more precise. Brushes come in various shapes and sizes, perfect for different designs. Dotting tools are great for creating polka dots or intricate patterns. A good quality nail art pen can help you with fine details.
3. Nail Art Accessories
Explore a variety of nail art accessories such as stickers, gems, and stamping plates. These add unique flair to your designs. Nail stickers are user-friendly and come in many styles, while gems can bring a touch of glamour. Stamping plates allow you to create complex designs easily.
4. Base and Top Coats
Don’t forget to include base and top coats in your selection. A base coat protects your nails from staining and helps polish adhere better. A high-quality top coat seals your design, giving it a glossy finish and extending its wear. Look for quick-drying options to speed up your nail art process.
5. Personal Style and Trends
Consider your personal style when choosing colors and designs. Are you a fan of bold and bright colors, or do you prefer understated elegance? Staying updated with nail art trends can inspire your choices. Websites and social media platforms like Pinterest and Instagram are fantastic sources for current designs that you can try.
6. Budget
Lastly, think about your budget. Nail art supplies range from affordable to high-end. Set a budget that works for you and prioritize essential items first. You can always expand your collection over time as you experiment and develop your skills.
Pro Tip: Start with a basic kit that includes essential polishes, tools, and accessories. As you get more comfortable with nail art, you can gradually add more items to your collection. This way, you won’t feel overwhelmed and can focus on mastering new designs!
With these tips, you’re now ready to choose the right nail art supplies that fit your needs. Happy painting!
3. Floral Fantasy

Floral designs are a lovely way to bring nature to your nails! Ideal for spring and summer, this nail art is easy to create using vibrant polish and a dotting tool. You can design everything from delicate daisies to bold roses, making it a fun way to express your personality.
Outfit Pieces:
– Light pink or pale blue base color
– Various shades for flowers (yellow, red, white)
– Green polish for leaves
– Dotting tool for flower creation
– Top coat for a glossy finish
Styling Tips:
– Start with a light base for a fresh look.
– Use a dotting tool to create flower petals with small dots.
– Add tiny green leaves to enhance the floral design.
– Always let each layer dry before adding more polish to avoid smudging.
This floral fantasy is lively and perfect for outdoor events, brunches, or casual gatherings. Mix and match colors for a unique garden-inspired look!
💅 Nail Art Made Easy!
Transform your busy days with quick and stunning nail art designs every mom can master in minutes!
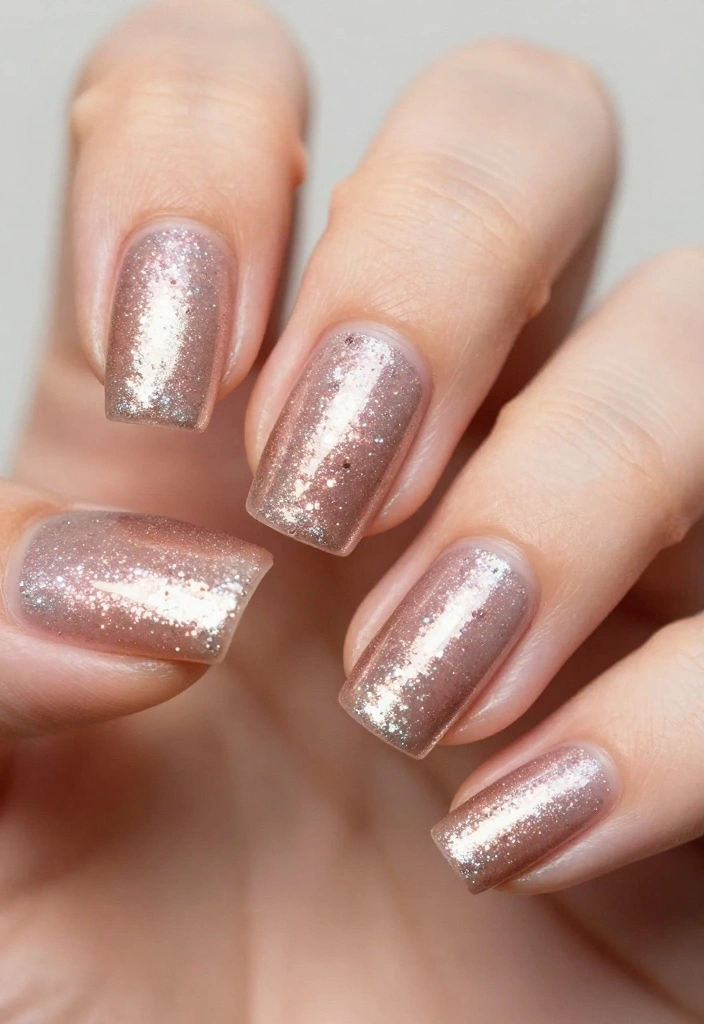
4. Glitter Bomb
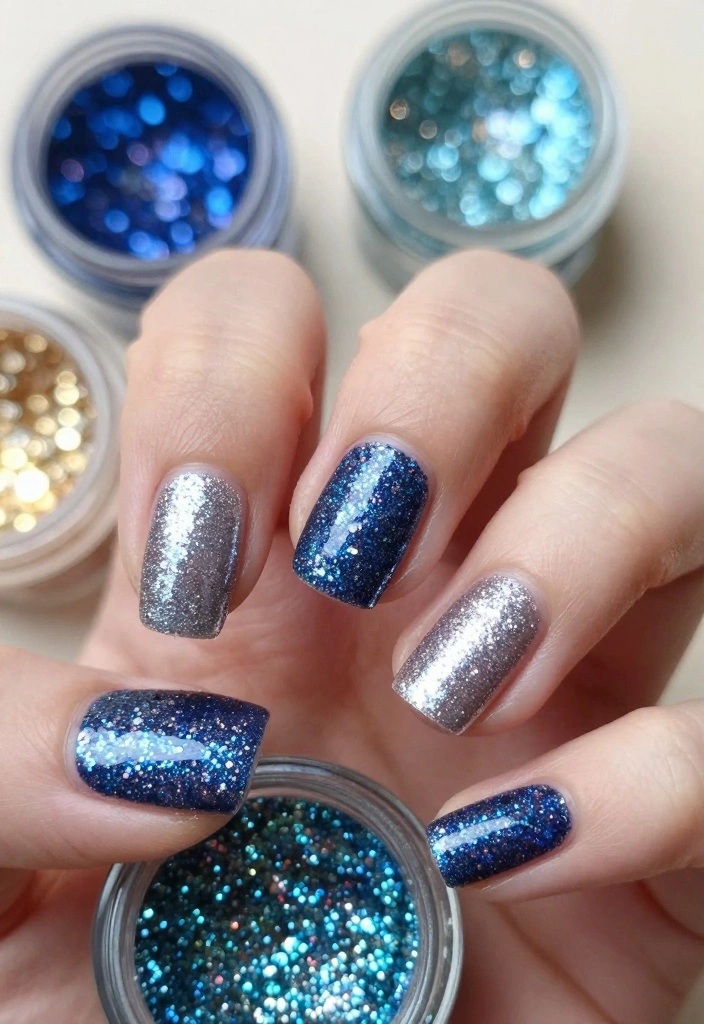
Get ready to shine with a glitter bomb design! This dazzling look is perfect for festive occasions and parties. You can opt for an all-over glitter effect or create a stunning gradient that sparkles beautifully in the light.
Outfit Pieces:
– Solid base color (black, white, or any color you love)
– Glitter polish (gold, silver, or colored)
– Top coat for shine and durability
Styling Tips:
– Apply a solid base coat and let it dry completely.
– Use a sponge for a gradient effect, applying more glitter at the tips.
– Clean up any excess glitter around your nails for a polished look.
– Finish with a top coat to smooth everything out and add shine.
Glitter nails are a fabulous way to express your fun side, ideal for parties and celebrations. Customize your glitter colors to match your outfit for a cohesive look!
Fun fact: this new nail art design shines 2x brighter in festive lighting, making every outfit pop. To maximize shine, apply a thin base, layer glitter in a gradient, and seal with a durable top coat.
5. Marble Magic
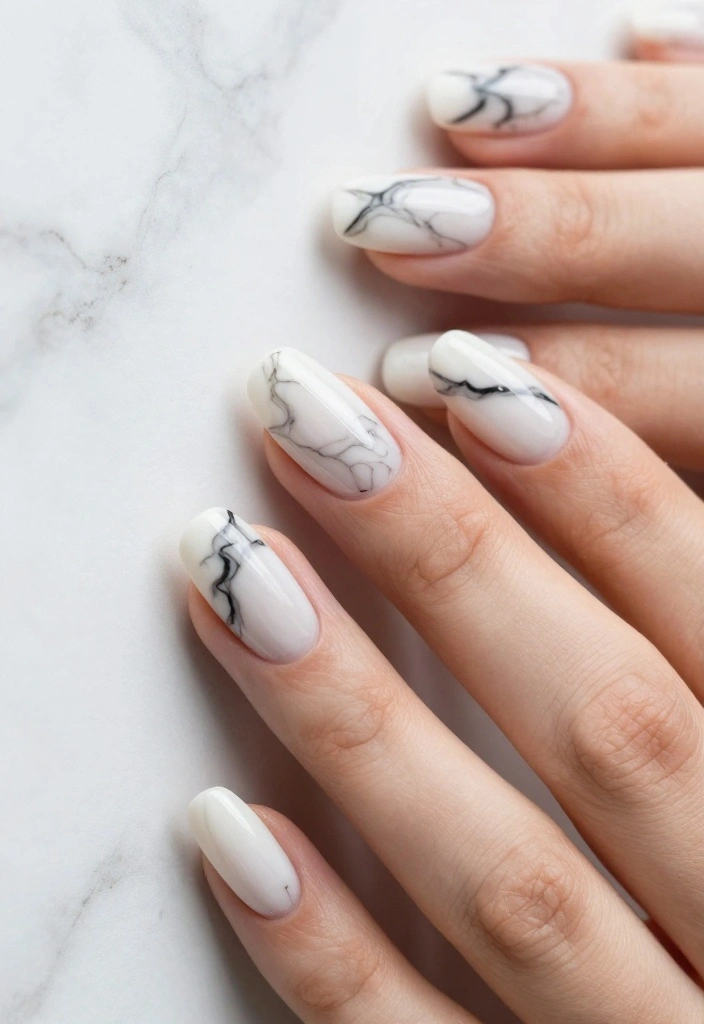
Marble nails offer a chic and sophisticated vibe, mimicking the beauty of natural marble stone. This design is surprisingly easy to achieve and is perfect for classy nights out or special events.
Outfit Pieces:
– Light gray or white base coat
– Dark gray or black polish for marbling
– Thin brush for swirls
– Top coat for a polished finish
Styling Tips:
– Apply a light base coat for a clean canvas.
– Use a thin brush to create swirling lines with darker polish.
– Gently swirl the colors together for a natural marbled effect.
– Seal it with a top coat to enhance durability.
Marble nails are unique and stylish for upscale events or date nights. Feel free to play with different color combinations for a fresh twist!
6. Neon Pop
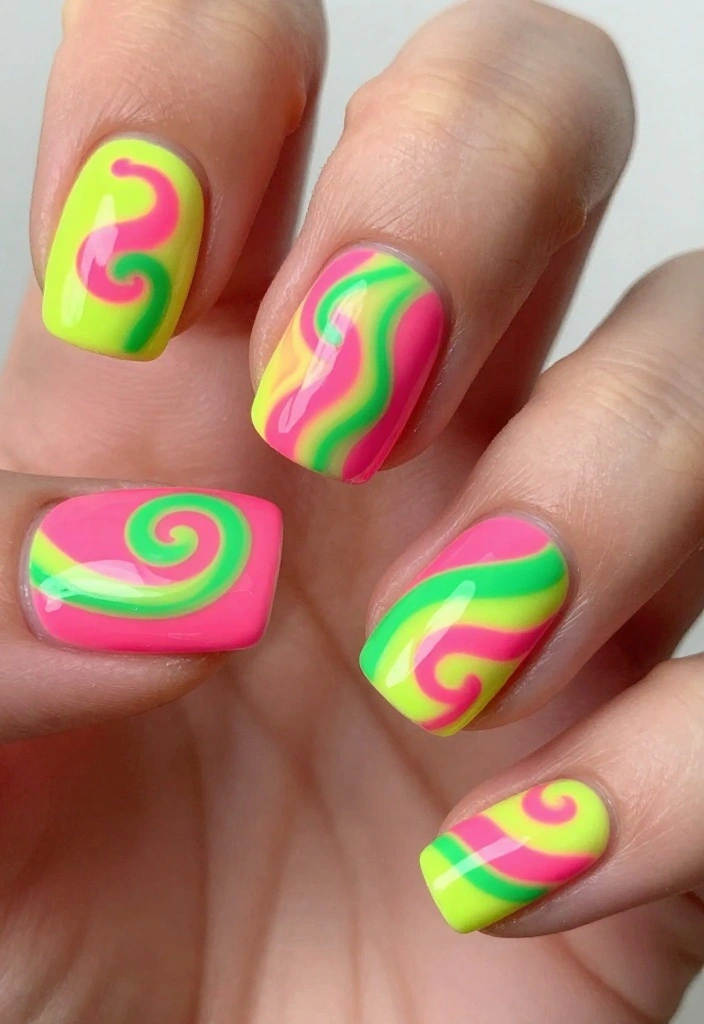
Neon nail art is all about bold, bright colors that demand attention! Perfect for those who love to stand out, this design can be used alone or in exciting patterns. It’s a fun way to add a splash of color to your summer wardrobe.
Outfit Pieces:
– White base coat for vibrancy
– Neon shades (pink, green, yellow, orange)
– Optional: tape for patterns
– Top coat for shine
Styling Tips:
– Start with a white base to make neon colors pop.
– Apply one or two coats of your chosen neon shades.
– Use tape to create fun patterns or a sponge for a tie-dye effect.
– Seal everything with a glossy top coat.
Neon nails are perfect for festivals, beach trips, or any fun outing. Mix and match colors to create your own vibrant masterpiece!
7. Textured Textiles
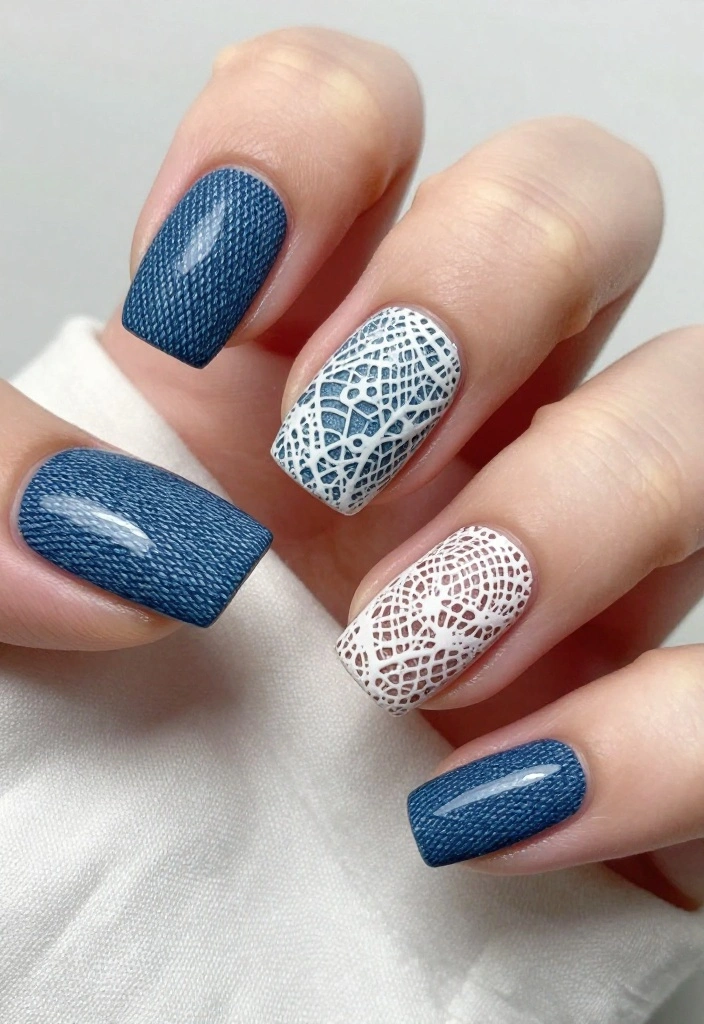
Textured nails bring a unique flair to your manicure, inspired by various fabrics like denim and lace. This creative design adds dimension and interest, making it stand out beautifully.
Outfit Pieces:
– Base color of your choice
– Darker shades for texture (for denim: dark blue; for lace: white)
– Optional: nail stamping plate for patterns
– Top coat for a polished finish
Styling Tips:
– Choose a base color that complements your fabric inspiration.
– Use a sponge to create a textured denim look.
– Stamp on lace patterns for elegance.
– Seal everything with a top coat for a refined finish.
This design is perfect for creative souls who want to express their individuality. It’s great for casual outings or even a night out with friends!
8. Animal Print
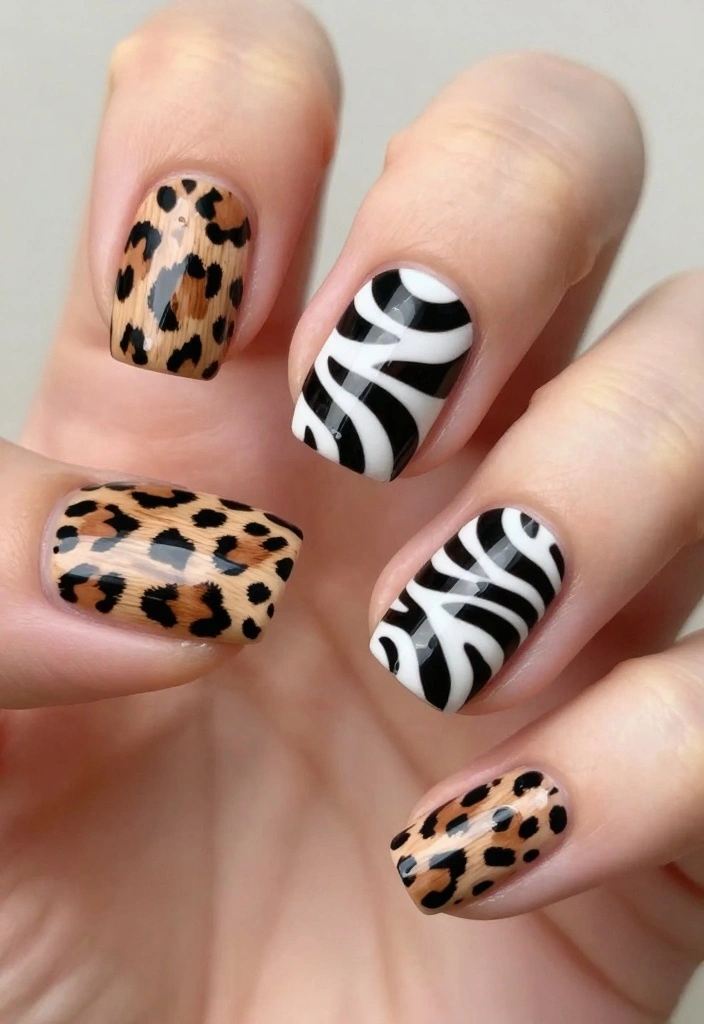
Animal prints are always in vogue! Whether it’s leopard spots or zebra stripes, this playful design makes a bold statement. It’s perfect for those who want to express their wild side while keeping it chic.
Outfit Pieces:
– Neutral base color (beige or taupe)
– Contrasting colors for patterns (black, brown, or vibrant colors)
– Fine brush for detailing
– Top coat for a polished look
Styling Tips:
– Begin with a neutral base for a stylish backdrop.
– Use a fine brush to create your animal print patterns.
– Feel free to mix different animal prints for a fun twist.
– Seal with a top coat for longevity.
Animal print nails are perfect for any fun event or night out. Customize colors to match your outfit for a cohesive look!
9. Color Blocking
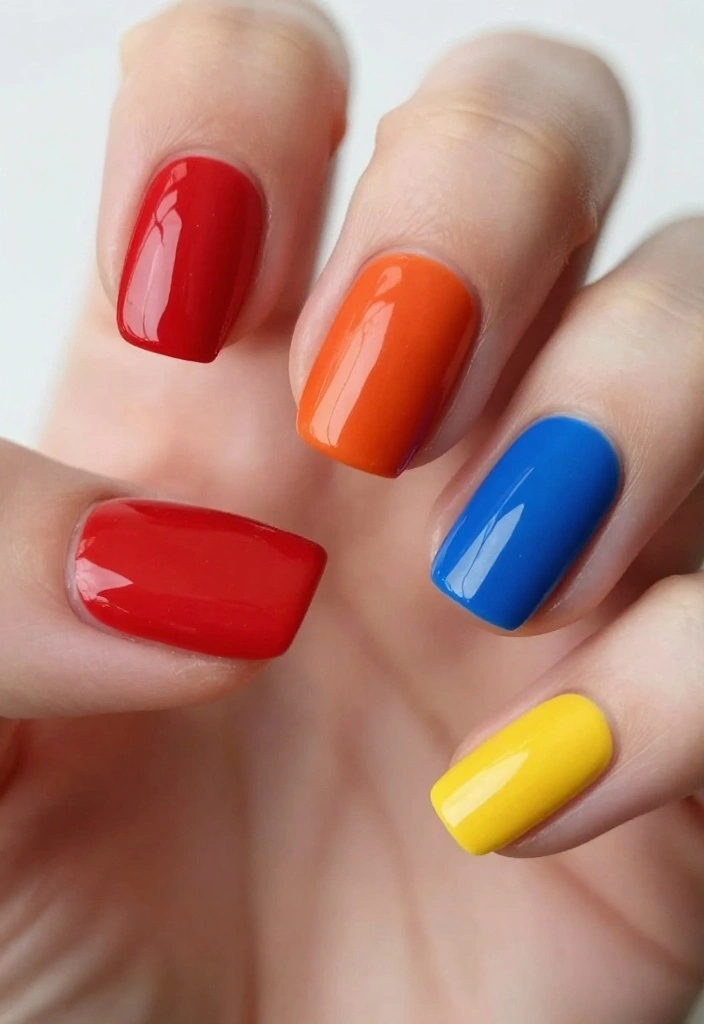
Color blocking is all about combining bold hues in a creative way to make your nails pop! This design allows for mixing and matching colors and patterns, leading to a unique, eye-catching style.
Outfit Pieces:
– Light base coat (white or pastel)
– Bold colors for blocks (red, blue, yellow)
– Tape for outlining sections
– Top coat for a smooth finish
Styling Tips:
– Start with a light base to let colors shine.
– Use tape to create clean sections for different colors.
– Fill in the sections with contrasting bold shades.
– Finish with a top coat to seal the design.
This modern design is perfect for making a fashion statement at parties or casual outings. Experiment with your favorite color combinations!
Color blocking is your shortcut to a bold, polished look. Start with a light base, add bright blocks, and you’ve created a new nail art design you can master in minutes—practice with tape, perfect the edges, wow in seconds.
10. Retro Dots
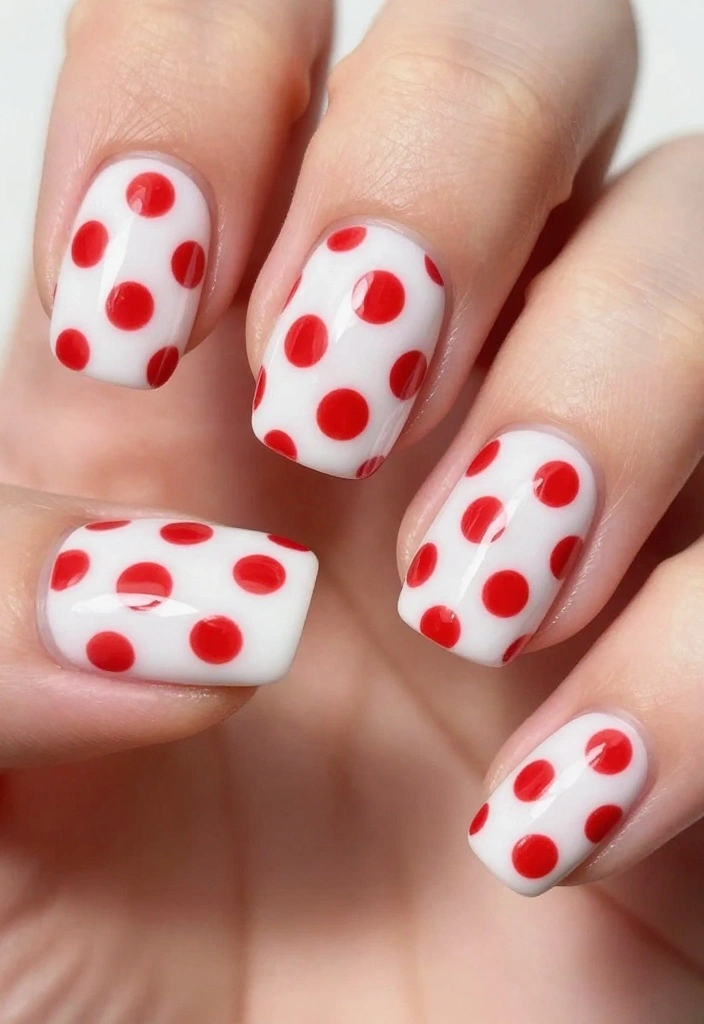
Embrace retro vibes with playful polka dots! This classic nail art can be tailored to any color combination you like, offering a cheerful and vintage-inspired look.
Outfit Pieces:
– Solid base color of your choice
– Contrasting colors for dots (red, blue, yellow)
– Dotting tool or toothpick for precision
– Top coat for protection
Styling Tips:
– Start with a solid base color for a fresh start.
– Use a dotting tool to create dots in a contrasting color.
– You can cover all nails or just accent a few.
– Seal with a top coat for lasting wear.
Polka dot nails are perfect for parties or casual gatherings, adding a playful touch to any outfit. Mix and match colors for an even brighter look!
Polka-dot perfection proves a new nail art design can be quick and chic. Start with a solid base, then use a dotting tool to place retro dots in minutes. Practice a few color combos and you’ll enjoy a cheerful, vintage vibe that lasts.
11. Stained Glass
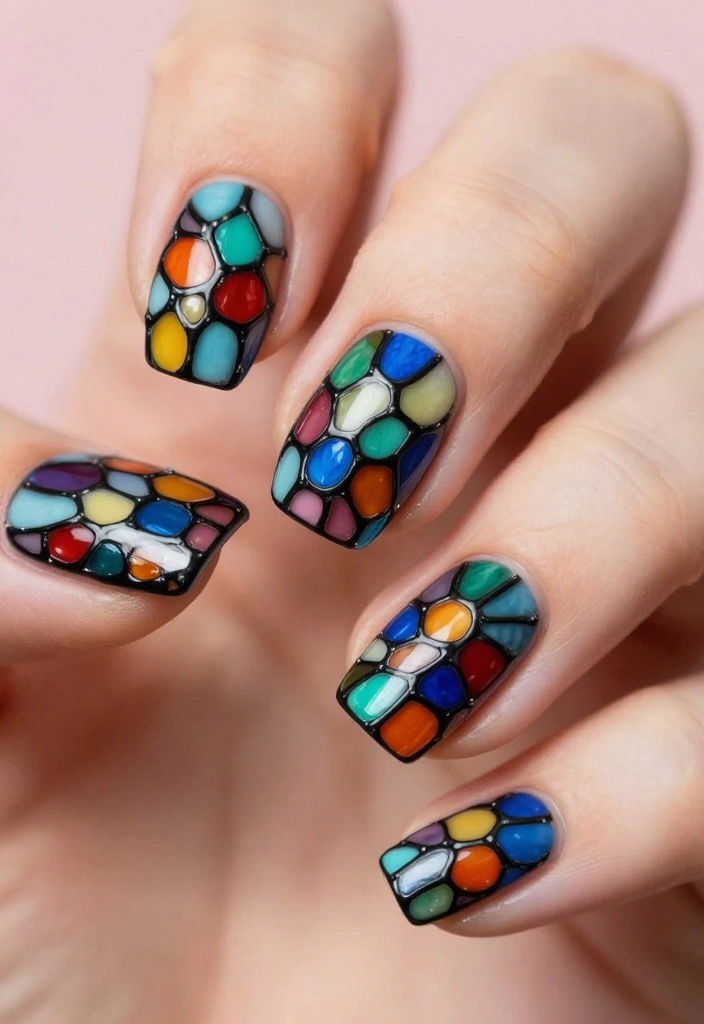
Stained glass nails are a vibrant way to bring artistry to your fingertips! This design mimics the beauty of stained glass windows, making it perfect for those who love a splash of color.
Outfit Pieces:
– Clear or pastel base coat
– Black polish for outlines
– Bright colors (red, blue, green) for filling
– Top coat for a glossy finish
Styling Tips:
– Start with a clean base for clarity.
– Use a thin brush for outlining sections in black polish.
– Fill in the sections with bright colors for a stained glass effect.
– Finish with a top coat for durability and shine.
This artistic design is great for special events or whenever you want to impress. Take your time to create unique patterns for a personal touch!
12. Watercolor Wonders
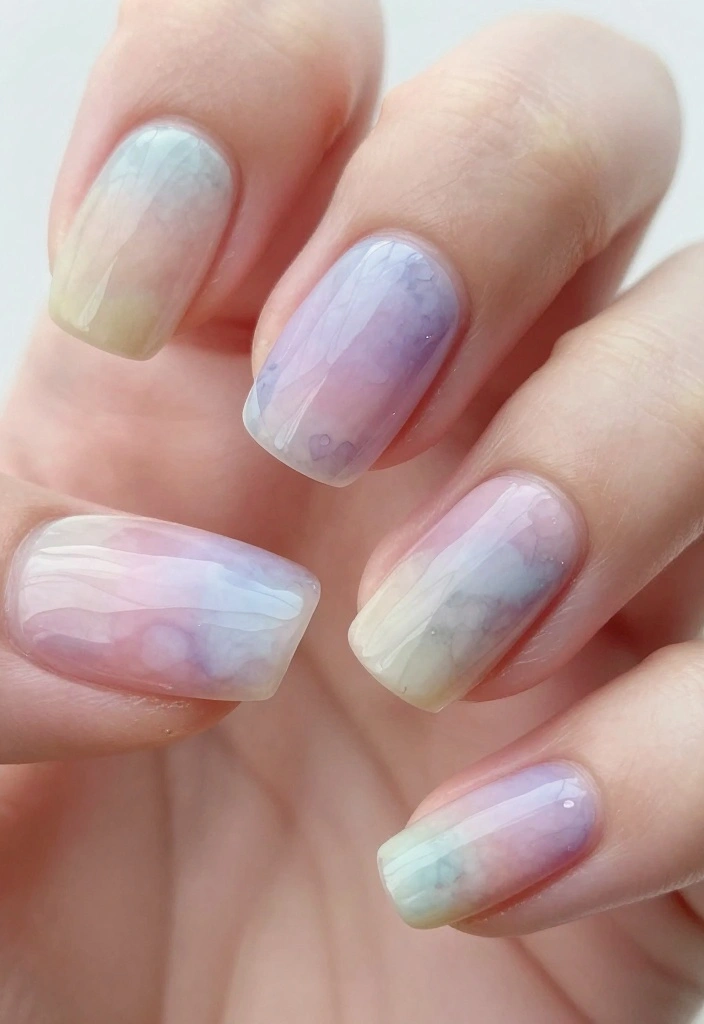
Watercolor nails offer a soft and blended color effect, creating a dreamy look. This design is perfect for those who appreciate delicate styles and enjoy mixing hues without harsh lines.
Outfit Pieces:
– White base coat for a clean look
– Various nail polish colors for blending
– Small brush for application
– Top coat for a smooth finish
Styling Tips:
– Start with a white base for a light background.
– Apply thin layers of diluted polish in different colors.
– Blend colors together while they’re still wet for a watercolor effect.
– Seal with a top coat to smooth everything out.
This whimsical design is great for parties or any occasion where you want a soft, romantic vibe. Experiment with different colors for a stunning visual!
13. Glitter Stripes
If you love sparkle, glitter stripes are a fun and glamorous nail design! Simple yet striking, this look is perfect for casual wear and special occasions alike.
Outfit Pieces:
– Base coat of your choice
– Glitter polish (gold, silver, or any color you prefer)
– Tape for clean lines
– Top coat for a polished finish
Styling Tips:
– Start with a base coat and let it dry completely.
– Use tape to outline where you want the glitter stripes.
– Fill in the sections with glitter polish for a fun effect.
– Carefully remove the tape and finish with a top coat.
Glitter stripes add a touch of glam to any look, making them perfect for parties or festive celebrations. Play around with different colors for a unique style!
14. Gradient French Tips
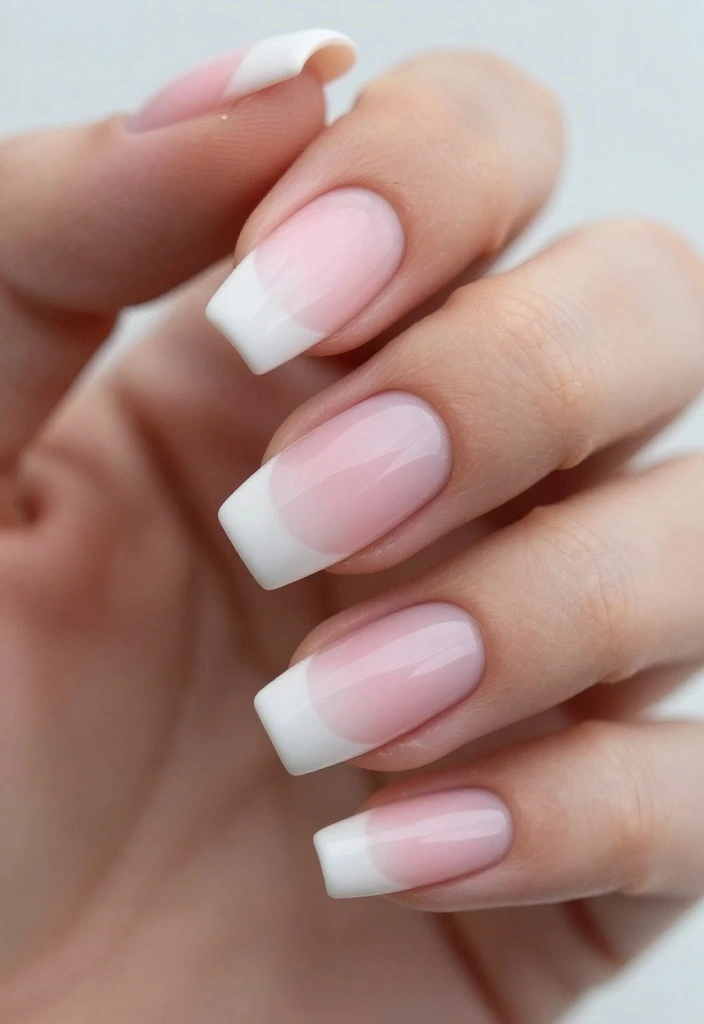
Give the classic French manicure a fun twist with gradient tips! This modern take combines elegance with a playful feel, and it’s surprisingly easy to achieve.
Outfit Pieces:
– Nude base coat for a natural look
– Chosen colors for gradient (pink, purple, or any favorite shades)
– Makeup sponge for blending
– Top coat to finish
Styling Tips:
– Start with a nude base for a clean foundation.
– Use a sponge to dab on your chosen colors at the tips.
– Blend the colors into the base for a seamless transition.
– Seal with a top coat for added shine.
This stylish design is great for any event, adding a modern touch to your nails. Feel free to experiment with multiple colors for a unique gradient effect!
Conclusion
Nail art is a fantastic way to express yourself and have fun with your style. The designs shared here are not just trendy but also easy to recreate, making them perfect for anyone looking to step up their nail game.
With just a few supplies and some creativity, you can master these looks in no time. Embrace your inner artist and enjoy the journey of creating stunning nails that truly reflect your personality!
Frequently Asked Questions
What are the easiest new nail art design ideas I can master in minutes?
Looking for a new nail art design you can master in minutes? Start with a clean, dry nail and apply a thin layer of base coat for a smooth surface.
Choose a base color you love, then add a simple pattern: one dot near the cuticle, a stripe across the nail using tape, or a single accent nail with a contrasting shade. Use a dotting tool or a bobby pin for dots and a striping brush or tape for clean lines.
Finish with a fast-drying top coat and let nails dry completely. These steps are DIY and easy to follow, perfect for quick, head-turning nails.
What tools do I need for DIY nail art that’s easy to follow?
Here’s a minimal kit for DIY nail art that’s easy to follow:
Base coat and top coat for longevity
Two or more nail colors you love
A dotting tool or a toothpick/bobby pin for dots
A thin striping brush or nail-art tape for lines
Remover, cotton pads, and a cleanup brush for neat edges
Optional: nail-art stickers or decals for quick designs
Vent out time or a small fan to speed dry.
How can I recreate some of the 14 designs at home without professional skills?
Most of the posted designs can be done with simple tricks. Start by practicing on a nail wheel, then pick one design and follow a quick plan: prep nails; apply base color; add pattern with dots or lines; cleanup edges; seal with top coat.
Use tape for crisp lines, a dotting tool for dots, and decals for intricate patterns without freehand painting. Finish with a second top coat for durability. This keeps nail art approachable and easy to follow for beginners.
How long do these quick nail art designs last and how should I care for them?
With proper prep and a good top coat, these designs can last 4–7 days or more.
Tips: apply thin, even layers; let each layer dry fully; reapply top coat every 2–3 days; avoid hot water and harsh cleansers for the first 24 hours; use gloves for chores; store polishes upright and close caps tightly to prevent thickening.
For removal, use a gentle acetone-free remover and moisturize cuticles afterward. These tips help you keep your new nail art design looking fresh longer.
Which beginner-friendly new nail art design ideas deliver the biggest wow with minimal effort?
Here are crowd-pleasing, beginner-friendly ideas from the new nail art design lineup that deliver wow without the fuss:
– Polka dot nails using a dotting tool or bobby pin
– Negative-space nails with a simple stencil or tape pattern
– One-color base with a metallic stripe or foil accent
– Minimalist marble using a damp sponge technique with two colors
All of these are DIY, easy to follow, and you can complete them in under a few minutes per hand. Pick 1-2 elements and practice patience for clean results.
Related Topics
nail art
DIY nail designs
easy nail art
beginner friendly
quick nail designs
trendy nail styles
minimalist nail art
colorful patterns
seasonal nail art
5-minute nail art
nail design tutorial
affordable nail art
These nail art designs look so fun! I can’t believe I could master them in minutes. What’s your favorite design to try first?
I tried a similar design last week, and let me tell you, my cat thought my nails were toys! Have you ever had a funny mishap while doing your nails?
Did you know that nail art has been around since ancient Egypt? They used different colors to show social status! It’s amazing how far we’ve come, right?
I once tried to do nail art while watching a movie, and I ended up with popcorn all over my nails instead! It was a messy but funny experience. Anyone else had a similar nail fail?