Are you ready to take your nail game to the next level? If you’ve been searching for eye-catching ways to enhance your pointed nails, you’re in the right place. Pointed nails are a bold statement, and with the right embellishments, they can truly shine. I created this post because I’ve noticed how much people love to express themselves through their manicures, and pointed nails offer endless possibilities.
This guide is for anyone who loves fashion and wants to stand out. Whether you are a nail art novice or a seasoned pro, you’ll find ideas that spark inspiration. Friends will definitely be envious of your unique style after you try out some of these stunning ideas. From chic colors to intricate designs, I’ve pulled together 14 fabulous concepts that will make your pointed nails the talk of the town. Get ready to shine with some amazing nail jewelry and embellishments that can elevate your look!
In this post, you’ll discover the latest trends and techniques to enhance your pointed nails effortlessly. Each idea is designed to help you express your personality while keeping your manicure fresh and exciting. Let’s dive into the world of stunning pointed nail designs that will leave you and your friends in awe!
Key Takeaways
– Explore bold color combinations that can make your pointed nails pop and stand out in any crowd.
– Discover stunning nail jewelry options that add a touch of glam and luxury to your manicure.
– Learn how to incorporate glitter and glam elements that will give your nails a sparkle that catches the light beautifully.
– Find out about trending seasonal themes to keep your nail game fresh and aligned with the changing seasons.
– Get inspired by personal touches and unique designs that reflect your style and set you apart from the rest.
Contents
- 1. Bold Color Combinations
- 2. Stunning Nail Jewelry
- 3. Glitter and Glam
- 4. Marble Effect
- 5. Floral Designs
- 6. Geometric Patterns
- 7. Velvet Finish
- 8. Metallic Accents
- 9. Crystal Embellishments
- 10. Dip Powder Nails
- 11. Seasonal Themes
- 12. Artistic Brush Strokes
- 13. French Tip Revival
- 14. Personal Touches
1. Bold Color Combinations
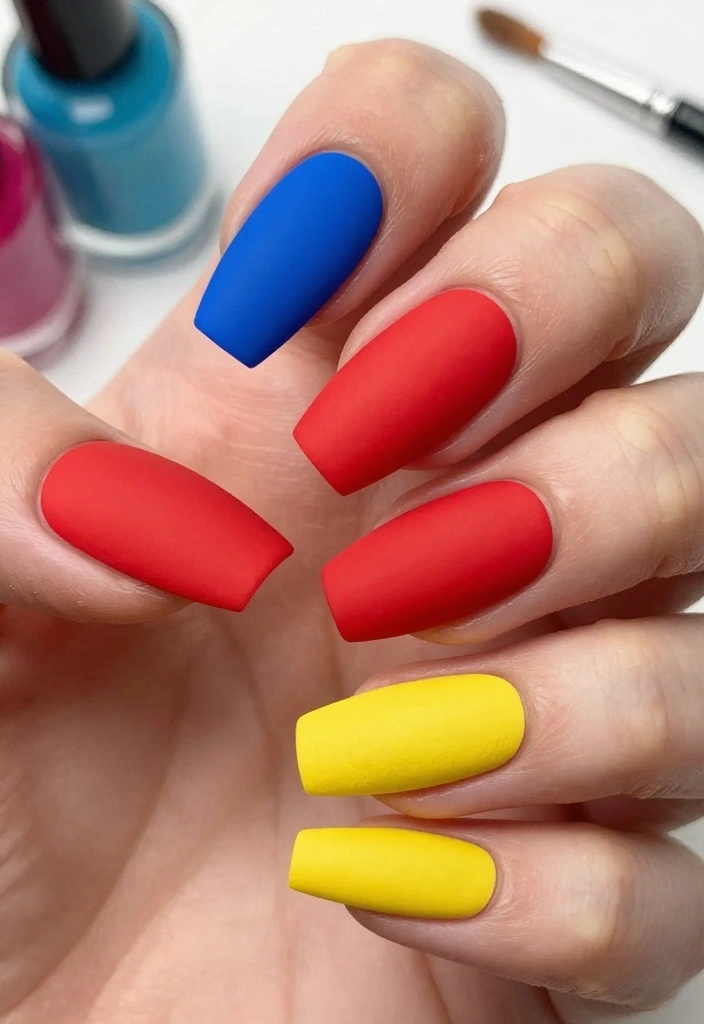
Dare to bring your pointed nails to life with daring color combinations that capture attention. Pair vibrant reds with deep blacks, or mix playful neon shades for an energetic vibe. The sharp edges of pointed nails are ideal for showcasing bold hues that make a statement.
This eye-catching look works by contrasting colors to create a striking visual impact. You can layer shades for a unique finish or even play with ombre effects that transition from dark to light.
To achieve bold colors:
– Choose colors that complement each other beautifully.
– Apply a glossy topcoat for a polished finish.
– Explore matte finishes for a contemporary edge.
– Use nail stencils for precise designs.
Don’t forget to prep your nails well by buffing and using a strong base coat to avoid any staining!
2. Stunning Nail Jewelry

Nail jewelry is the trendy way to elevate your pointed nails! By adding rings, chains, or decorative pieces, your nails can transform from simple to stunning. Nail rings that wrap around your fingers are especially fashionable, adorned with gems for a touch of sparkle.
When using nail jewelry, aim for balance. One or two pieces can enhance your design without overwhelming it. Consider matching the jewelry to your outfit or eye makeup for a cohesive and stylish look.
Jewelry ideas to explore:
– Minimalist rings that fit neatly on the nail.
– Bejeweled accents that dangle from the tips.
– Delicate chains connecting multiple nails.
– Charms that showcase your personality.
With nail jewelry, be prepared for compliments and conversations to flow!
Fun fact: Adding 1-2 nail jewelry pieces can instantly elevate pointed nails, making your manicure appear up to 30% more chic. Keep pieces balanced—avoid clutter, and match gems to your outfit for a cohesive look.
3. Glitter and Glam

Glitter is an essential ingredient for adding glam to your pointed nails! Whether you go for a full-on glitter explosion or subtle sparkles, glitter instantly elevates your look. Choose fine glitter for elegance or chunky pieces for a fun pop.
To get this dazzling effect, start with a base color and apply a clear polish before adding glitter. Tap off any excess to keep your nails neat. A solid top coat will lock in the sparkle and keep your manicure fresh for longer.
Glitter application tips:
– Mix various glitter shapes and sizes for an eye-catching design.
– For a gradient effect, apply more glitter towards the nail tips.
– Use a matte topcoat for a modern surprise.
Keep a mini brush handy for any stray glitter cleanup!
💅 Nail Art Made Easy!
Transform your nail game with this DIY guide designed for busy moms who love stunning nails.
4. Marble Effect

The marble effect brings an elegant touch to your pointed nails, mimicking the beauty of natural stone. This trend involves blending colors to create stunning swirls that resemble marble patterns. You can stick to classic shades like white and gray or opt for vibrant hues for a modern twist.
To create the marble look, start with a base color, then layer on contrasting shades using a thin brush or sponge, swirling them together. It’s all about fluid movement for a natural appearance.
Tips for achieving the marble effect:
– Use lighter colors as a base for a clean backdrop.
– Apply a glossy topcoat for a polished finish.
– Experiment with color combinations for a unique style.
While this technique may take some practice, the stunning results are worth the effort!
5. Floral Designs

Floral designs add a beautiful touch to your pointed nails, perfect for spring and summer vibes. From delicate blossoms to bold flowers, these designs contrast beautifully with the sharpness of pointed nails.
To create floral nail art, start with a neutral base color, then use nail brushes or dotting tools to craft your flower designs. Don’t hesitate to mix colors for petals and leaves for added depth.
Floral nail art tips:
– Use a thin brush for intricate petal details.
– Explore different flower types like daisies or roses.
– Incorporate gold or metallic accents for glamour.
Floral nails are versatile and perfect for weddings or outdoor gatherings!
6. Geometric Patterns
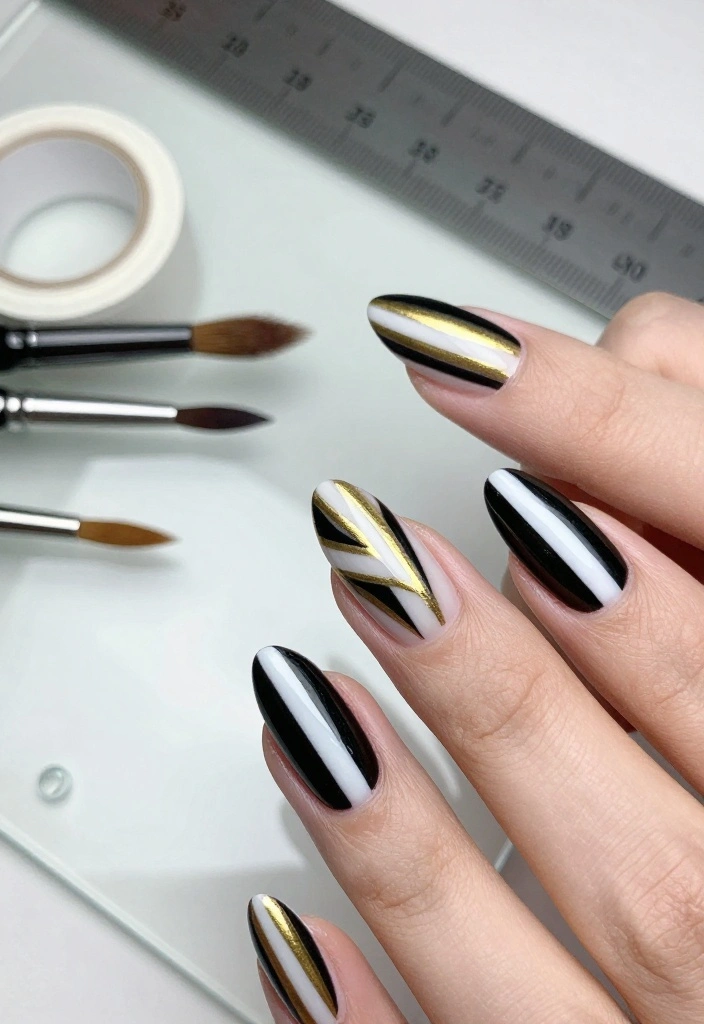
Geometric patterns unleash your creativity on pointed nails, offering a modern and edgy look. With sharp lines and shapes like triangles or squares, these designs can be as bold or subtle as you like.
To craft geometric designs, nail tape will be your best ally! Outline shapes with tape before filling in sections with your chosen colors. After removing the tape, seal your design with a topcoat for a sleek finish.
Geometric design tips:
– Use thin brushes for precise details.
– Experiment with negative space for a trendy twist.
– Consider matte topcoats for a chic look.
Geometric patterns are perfect for those who want a sophisticated and artistic touch!
📹 Related Video: Black & Pink florar geometric nails art tutorial / Eveline Cosmetics
7. Velvet Finish
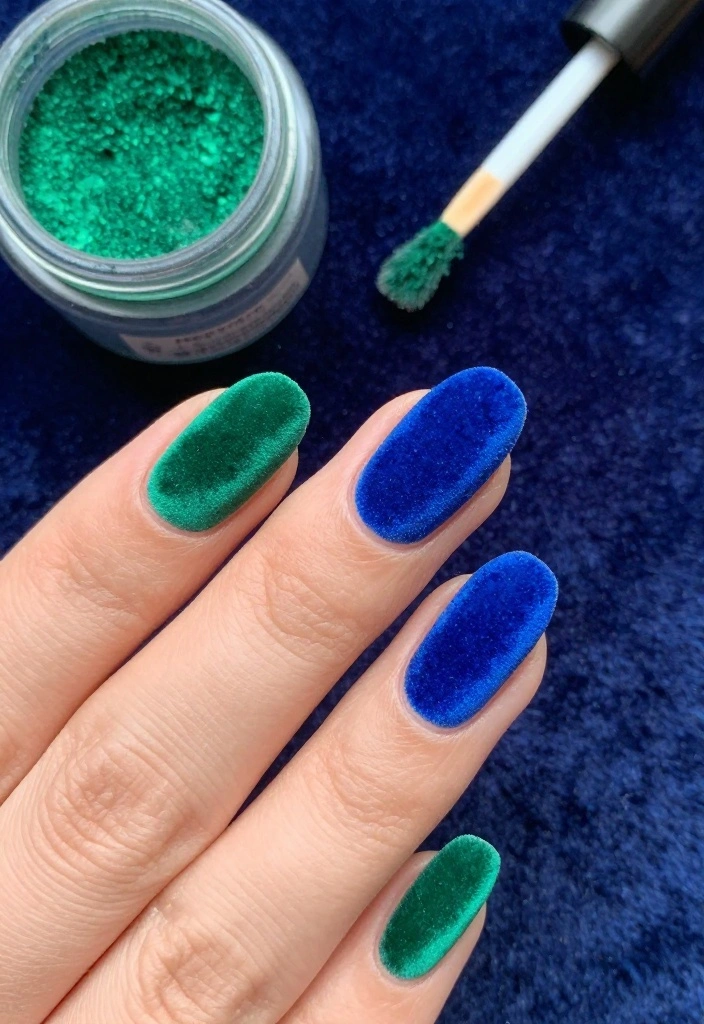
The velvet finish is a luxurious trend that adds unique texture to your pointed nails. This soft matte look can be achieved with special velvet powders, giving your nails an irresistible plush appearance.
Start by applying a base coat, then while the polish is still wet, sprinkle the velvet powder on top and seal with a topcoat. The result is a velvety texture that feels as good as it looks.
Velvet finish tips:
– Choose bold colors for maximum impact.
– Experiment with different powder textures for varied effects.
– Always apply a topcoat for protection and longevity.
This finish is perfect for those who appreciate elegance mixed with creativity!
8. Metallic Accents

Metallic accents can elevate your pointed nails with a stylish, futuristic flair. Shades like gold, silver, or holographic can make your manicure pop, enhancing both simple and intricate designs.
You can use metallic foils, striping tape, or metallic nail polish to create stunning finishes. For best results, consider gel polish for a reflective shine.
Metallic tips:
– Pair metallic shades with matte colors for contrast.
– Use foils for intricate, eye-catching designs.
– Keep cuticles moisturized for an overall polished look.
These chic metallic accents are ideal for parties, nights out, or any occasion when you want to shine!
9. Crystal Embellishments

Crystal embellishments add a luxurious touch to your pointed nails, making them truly eye-catching for any event. Tiny crystals, rhinestones, or gems can be strategically placed to catch the light and enhance your design.
Apply crystals using nail glue, spacing them evenly for a balanced look. You can create patterns like floral designs or stars for extra flair.
Crystal tips:
– Mix different crystal sizes for an exciting effect.
– Select colors that complement your nail polish.
– Use a topcoat to secure the crystals in place.
These embellished nails are perfect for special occasions, weddings, or whenever you want to indulge yourself!
How To Choose Nail Jewelry for Your Pointed Nails
Choosing the right nail jewelry can elevate your pointed nails to a new level. With so many options available, it’s essential to consider several factors to ensure you select pieces that both enhance your style and suit your lifestyle. Let’s break down the key selection criteria.
1. Style & Design
Before anything, think about your personal style. Do you lean toward minimalistic designs or bold statement pieces? Nail jewelry comes in various styles, such as rings, chains, and gems. Consider how these pieces will complement the shape of your pointed nails. If you prefer something subtle, opt for delicate rings that won’t overpower your look. For a more dramatic effect, larger embellishments can make your nails the focal point.
2. Material
The material of your nail jewelry matters a lot. Common materials include metal, acrylic, and even gems. If you have sensitive skin, look for hypoallergenic materials like surgical steel or titanium to avoid irritation. If you’re going for a more luxurious look, gold or silver-plated pieces can add a refined touch. Make sure whatever material you choose can withstand wear and tear while still looking fabulous.
3. Size & Fit
Nail jewelry comes in various sizes, so it’s crucial to find pieces that fit well. Too tight, and you risk discomfort; too loose, and they could fall off. Measure your nail width and choose jewelry that complements the size of your nails. Many nail jewels come with adjustable features, which can be a great option if you want versatility. Always prioritize comfort; you want to show off your nails without worrying about your accessories.
4. Occasion
Consider when and where you’ll wear your nail jewelry. Are you looking for everyday wear or something special for an event? For daily use, go for more practical options that won’t get in the way of your daily activities. If it’s for a special occasion like a wedding or a party, you can choose more elaborate designs that stand out. Think about the dress code of the events you’ll be attending and select your nail jewelry accordingly.
5. Budget
Nail jewelry can range from affordable to high-end pieces. Set a budget before you start shopping to narrow down your choices. Don’t forget to consider the longevity of your investment; sometimes spending a little more on high-quality pieces can save you money in the long run. Look for sales or discounts to find great deals without sacrificing quality.
6. Care & Maintenance
Finally, it’s important to think about how much maintenance your nail jewelry will require. Some materials are more prone to tarnishing or damage than others. If you are busy and prefer low-maintenance options, look for jewelry that is easy to clean and durable. Consider how often you’re willing to clean and care for your pieces before making your final decision.
Pro Tip: When trying out nail jewelry, don’t hesitate to mix and match! Combining different styles can create a unique look that truly represents your personality. Just ensure that all pieces you select work well together to create a cohesive appearance. Remember, the goal is to make your pointed nails the star of the show! 🌟
10. Dip Powder Nails

Dip powder nails have gained popularity thanks to their durability and vibrant color options. This technique involves dipping your nails into colored powders, resulting in a stronger finish compared to traditional polish.
Ideal for pointed nails, dip powder can create stunning ombre effects or solid color looks. With a variety of finishes like matte and shiny, the application is quick and lasts for weeks without chipping.
Dip powder tips:
– Use high-quality dip powders for the best results.
– Have a professional apply for flawless results.
– Always finish with a topcoat to protect your design.
With dip powder nails, enjoy long-lasting, beautiful pointed nails without frequent touch-ups!
Fun fact: Dip powder nails can last 3–4 weeks with minimal chipping, especially on pointed nails. It’s quick to apply and lets you rock bold ombre or solid shades in one session.
11. Seasonal Themes

Celebrate the seasons with themed nail art that reflects nature’s beauty. From autumn leaves to winter snowflakes, there are countless ways to express each season on your pointed nails.
For autumn, think warm tones and leaf motifs. Winter may call for icy blues with snowflake designs, while spring can showcase pastel floral art. Summer might inspire bright colors with sunny themes.
Seasonal nail art tips:
– Use seasonal colors as base or accent shades.
– Incorporate small charms or stickers that match the theme.
– Regularly update your designs to keep your nails fresh!
Seasonal themes add exciting variety to your nail game!
Fun fact: 3 quick seasonal themes can transform pointed nails from simple to season-ready in under 15 minutes. Try autumn leaves, icy winter snowflakes, and pastel spring florals for everyday wow.
12. Artistic Brush Strokes

Artistic brush strokes on pointed nails create stunning abstract designs. This technique mimics a painter’s canvas, allowing your creativity to shine. Whether you prefer bold strokes or fine lines, this form of art is all about personal expression.
To achieve this look, use a thin brush to apply colors in dynamic patterns across the nail. You can blend shades, use contrasting colors, or even add glitter for extra interest.
Brush stroke tips:
– Opt for high-quality polishes for smooth application.
– Experiment with different brush sizes for unique effects.
– Embrace the beauty of imperfection; abstract art is about freedom!
Artistic strokes are a fun way to showcase your personality and style!
13. French Tip Revival

The classic French tip has been revitalized with modern twists, making it ideal for pointed nails. Instead of the traditional white tips, try colorful ends, glittery finishes, or intricate designs along the tips. This trend combines timeless elegance with contemporary style, perfect for any occasion.
To achieve this look, start with a light base and carefully paint your tips with bold colors or glitter. Use nail tape for unique shapes at the tips.
French tip tips:
– Steady your hand for clean lines; practice improves precision!
– Experiment with different tip shapes—feel free to break the mold.
– Keep your nails well-groomed for a polished finish.
The modern French tip lets you express your individuality while maintaining chic elegance!
14. Personal Touches

Personal touches on your pointed nails make them truly yours. Whether it’s a meaningful symbol, your initials, or a design inspired by a favorite quote, these details bring unique charm to your manicure. Maybe you’ll want a small design representing your favorite animal or a musical note to reflect your passion.
The possibilities are endless, and the key is to let your personality shine. Use stickers, stamps, or hand-paint your designs for a custom look.
Personal touch tips:
– Think about what represents you best—interests or favorite things.
– Use fine brushes for detailed designs if painting by hand.
– Take time to plan your design for the best outcome.
Your pointed nails are a canvas for self-expression, so let your creativity flow!
Conclusion

Pointed nails are a fabulous way to express your unique style, and with these stunning ideas, you can enhance your manicure game to the max! From bold colors and floral designs to luxurious embellishments, the options are truly endless. Remember, the key to beautiful nails is creativity and confidence. Don’t be afraid to mix and match these trends to find what speaks to you the most.
With these tips, your pointed nails are sure to impress and spark some serious envy among your friends!
Frequently Asked Questions
What are the best ways to style pointed nails with nail jewelry and embellishments?
When styling pointed nails with nail jewelry and embellishments, start with a clean canvas. Choose pieces that suit your nail length—tiny rhinestones and micro studs look chic on shorter points, while delicate chains or charms can shine on longer ones.
Prep your nails: lightly buff, push back cuticles, and apply a solid base coat. Attach pieces with a small amount of clear nail glue or cure them in gel, then seal everything with a strong top coat to prevent snagging. Finish with moisturizer and hand cream. Pro tip: coordinate your polish color with the embellishment for a cohesive look, and resist overloading a single nail to avoid crowding.
Which embellishments suit pointed nails for a chic everyday look?
For everyday style, stick to subtle embellishments like tiny metallic studs, micro rhinestones, or minimalist decals on pointed nails. Place a single stone near the base or tip for a focal point, or run a thin line of glitter along the edge for a modern silhouette. Choose colors that complement your polish—rose gold, silver, or clear crystals work with most outfits. Keep the rest clean to preserve practicality and avoid snagging on fabrics.
How can I apply nail jewelry safely on pointed nails?
To apply nail jewelry safely on pointed nails, gather a precise nail glue, a fine tweezer, and a strong top coat. Start with clean, dry nails and shape them into a sharp pointed style. Apply a thin base coat and allow it to dry. Pick up the embellishment with tweezers, dot a tiny amount of glue, and press it onto the nail for 10–15 seconds. If using gel, cure according to your lamp’s instructions, then seal with a top coat and cure again. Finish with a quick-dry top coat for extra durability. Removal: soak in acetone, avoid prying, and moisturize afterward.
What care tips help pointed nails and nail jewelry last longer?
Keep your pointed nails looking fresh by wearing gloves when cleaning, limiting prolonged water exposure, and reapplying a top coat every 3–4 days. Be gentle with fabrics and avoid snagging or picking. If you notice lifts, visit a pro for repair. Strengthen nails with cuticle oil and a hand cream, and avoid harsh chemicals that can dull embellishments.
What nail designs pair best with pointed nails for a glamorous look?
Try designs that accent the sharp shape without overpowering it. Options include: negative-space tips with a thin line of embellishments along the edge; a refined French mani with a metallic smile line; metallic foil accents or a gradient glitter only on the tips; or simple matte pointed nails with a single bold rhinestone. Keep color palettes cohesive with your wardrobe—blacks, navies, blush pinks or nude tones work beautifully. For extra drama, mix a subtle gloss with a matte top coat on alternate nails.
Related Topics
pointed nails
nail accessories
nail jewelry
embellishments
fashion trends
manicure ideas
statement nails
beginner friendly
easy designs
glam nails
nail art
seasonal styles
I love these ideas! I’ve been looking for ways to jazz up my nails for my friend’s wedding next month. Do you think glitter would clash with a flowy dress?
These nail designs are so cute! I tried a similar one once, but I ended up looking like I had a paint spill on my hands. At least my cat thought I was fancy!
Did you know that pointed nails were popular in ancient Egypt? It’s so cool how trends come back around. I might just have to channel my inner Cleopatra!
I remember the first time I tried pointed nails; I felt like a total queen! I ended up getting them stuck in my hair though. Lesson learned: avoid long hair when trying new nail shapes!
For anyone trying these styles at home, my tip is to use a good base coat to make your polish last longer. Your nails will thank you, and so will your friends when they see how fab they look!