Are you ready to add a touch of elegance to your nail game? Emerald nails have taken the fashion world by storm, and for good reason. Their rich, green hue exudes sophistication and charm, making them the perfect choice for any occasion. Whether it’s a casual outing or a formal event, emerald nails can elevate your look instantly. That’s why I put together this guide—it’s all about helping you, yes you, master the art of DIY emerald nail designs.
If you’re someone who loves expressing yourself through nail art but feels intimidated by complex techniques, don’t worry. This post is tailored specifically for beginners like you who want to dive into the world of DIY nail art without feeling overwhelmed. With my easy-to-follow tutorials, you’ll discover that creating stunning emerald nails is not only achievable but also a fun and rewarding experience.
Get ready to unleash your creativity! I’ve compiled 15 simple emerald nail designs that anyone can master. Each design is not only beautiful but also allows you to experiment with various tools and techniques. You’ll have everything you need to impress yourself and your friends, with designs that are chic, eye-catching, and absolutely perfect for any occasion.
Key Takeaways
– Variety of Designs: Explore 15 unique emerald nail designs that cater to all skill levels, providing plenty of options for your next manicure.
– Beginner-Friendly Tutorials: Each design comes with easy-to-follow steps, ensuring you can confidently create stunning looks without prior experience.
– Materials You’ll Need: Get a rundown of essential tools and products to stock up on for successful DIY nail art sessions.
– Styling Tips: Learn how to personalize your emerald nails with accents, colors, and finishes that reflect your individual style.
– Confidence Boost: Gain the skills to impress yourself and others, enhancing your self-expression through beautiful, hand-crafted nail designs.
Contents
- 1. Classic Emerald Gloss
- 2. Emerald Ombre
- 3. Glittering Emerald Accents
- 4. Geometric Emerald Design
- 5. Matte Emerald Finish
- 6. Emerald and Gold Foil
- 7. Emerald Floral Art
- 8. Emerald Stripes
- 9. Emerald Dots
- 10. Emerald with Negative Space
- 11. Emerald Marble Effect
- 12. Emerald Foil Accents
- 13. Confetti Emerald Nails
- 14. Emerald Heart Tips
- 15. Emerald Glitter Fade
1. Classic Emerald Gloss

A glossy emerald manicure is a staple that never goes out of style. This look highlights the deep, rich hue of emerald, making your nails look polished and elegant. Just a simple coat of emerald polish topped with a shiny finish elevates your look effortlessly.
Start with clean nails and apply a base coat.
Use a high-quality emerald polish to cover each nail evenly.
Allow the polish to dry completely before adding a glossy top coat.
Optional: Add a few rhinestones on the accent nail for some flair!
This design suits any occasion, from casual outings to formal events. The glossy finish ensures your nails are always well-groomed and chic.
2. Emerald Ombre

Ombre nails are trendy, and emerald shades bring a unique twist to this style. The gradient effect of dark to light green creates a stunning visual that’s both playful and sophisticated. This design is simple yet impactful, making it a great addition to your nail art repertoire.
Apply a base coat and let it dry.
Paint the tips of your nails with a deep emerald polish.
Next, use a makeup sponge to dab a lighter green shade toward the base of the nails for a blended look.
Seal with a topcoat to lock in the design.
This ombre effect shines in any season, adding depth to your nails and drawing attention with its eye-catching transition.
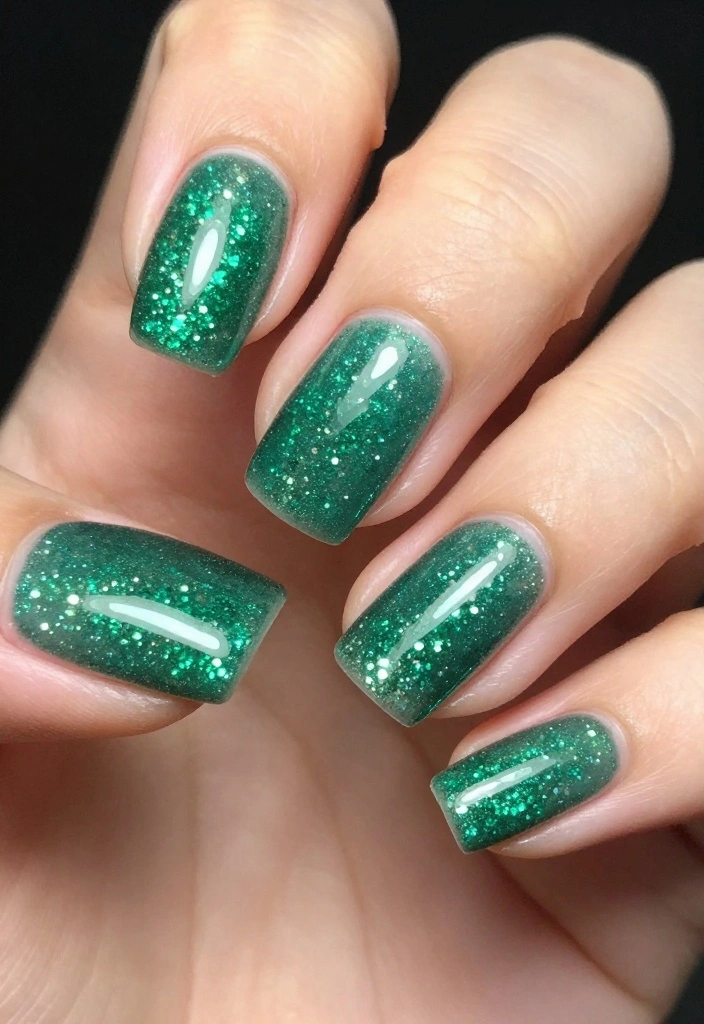
3. Glittering Emerald Accents

Sparkle is always a good idea, especially with emerald nails. Adding glitter transforms a simple design into something fabulous and eye-catching. This look is perfect for parties or whenever you want to make a statement with your manicure.
Begin with a base coat and a coat of solid emerald polish.
Once dry, apply a glitter top coat to just a few of your nails for a chic accent.
You can also create a glitter gradient by dabbing glitter polish from the tips towards the base.
This design beautifully combines glam and elegance, making your nails stand out and reflect light in a stunning way.
Fun fact: A glitter top coat on just 2–3 emerald nails creates a bold party-ready look in minutes. Start with a base emerald polish, then dab glitter from the tips toward the base for a chic gradient.
💅 Nail Art Made Easy!
Discover quick and stylish nail art techniques perfect for busy moms who love DIY beauty.
How To Choose The Right Tools for DIY Emerald Nails
When diving into the world of DIY emerald nails, having the right tools can make all the difference. Whether you’re a beginner or looking to refine your skills, choosing the right products will help you achieve those stunning emerald nail designs effortlessly. Here’s a guide to help you select the best tools to create your masterpiece.
1. Nail Polish Selection
Choosing the right emerald nail polish is essential. Look for a high-quality formula that provides good coverage. Brands that specialize in vibrant colors often have emerald shades that pop. Testing a few brands might help you find one that dries quickly and lasts longer without chipping.
2. Base and Top Coats
A strong base coat protects your natural nails and ensures your emerald polish adheres well. Opt for a base coat that fills ridges and prevents staining. For the top coat, choose one that adds a glossy finish or a matte effect, depending on your desired look. A good top coat not only enhances the beauty of your design, but it also prolongs its wear.
3. Nail Art Tools
Invest in a few nail art tools for more intricate designs. Dotting tools, striping brushes, and nail tape can help you create detailed patterns. If you’re into nail art, precision tools give you the control needed to achieve professional-looking designs at home. Consider starting with a basic set and adding to it as you gain confidence.
4. Nail Accessories
Explore various nail accessories like glitter, foils, and stickers to enhance your emerald nails. These add-ons can transform a simple design into something eye-catching. Ensure the accessories you choose complement the emerald polish you’ve selected. For example, gold foil pairs beautifully with emerald, giving it a luxurious touch.
5. UV/LED Lamp
If you plan to use gel polish for your emerald nail designs, a UV or LED lamp is a must. This tool cures the gel polish and ensures it doesn’t smudge. Choose a lamp that is compatible with your gel polish brand for the best results. A lamp with both UV and LED options gives you versatility for various types of products.
6. Nail Care Products
Taking care of your nails post-manicure is crucial. Consider investing in cuticle oil and hand cream to keep your nails and hands hydrated. A good nail care routine not only improves the health of your nails but also enhances the overall appearance of your nail art.
Pro Tip: Always do a patch test with any new products to avoid allergic reactions. Make sure to read the instructions carefully, especially for products like UV lamps and nail polish removers.
With the right tools in hand, you’re on your way to creating beautiful DIY emerald nails that stand out. Don’t hesitate to experiment and find what works best for you. Each tool can help you achieve different looks and refine your techniques. Happy nail painting!
4. Geometric Emerald Design

Geometric designs are modern and fun, especially when paired with a rich emerald base. Using tape, you can create sharp lines and unique shapes that elevate your nail art game. This design is a fantastic way to show off your creativity while keeping things chic.
Apply a base coat and paint your nails in emerald polish.
Once dry, use nail tape to create geometric shapes (like triangles or stripes).
Paint over the tape with contrasting colors (white or gold works beautifully!) and wait for it to dry before peeling off the tape.
This artistic design is customizable, allowing you to play with different colors and shapes, making it as unique as your style.
📹 Related Video: 🔥Get Ready To Be Wowed By This Easy Geometric Nail Tutorial. #shorts
5. Matte Emerald Finish
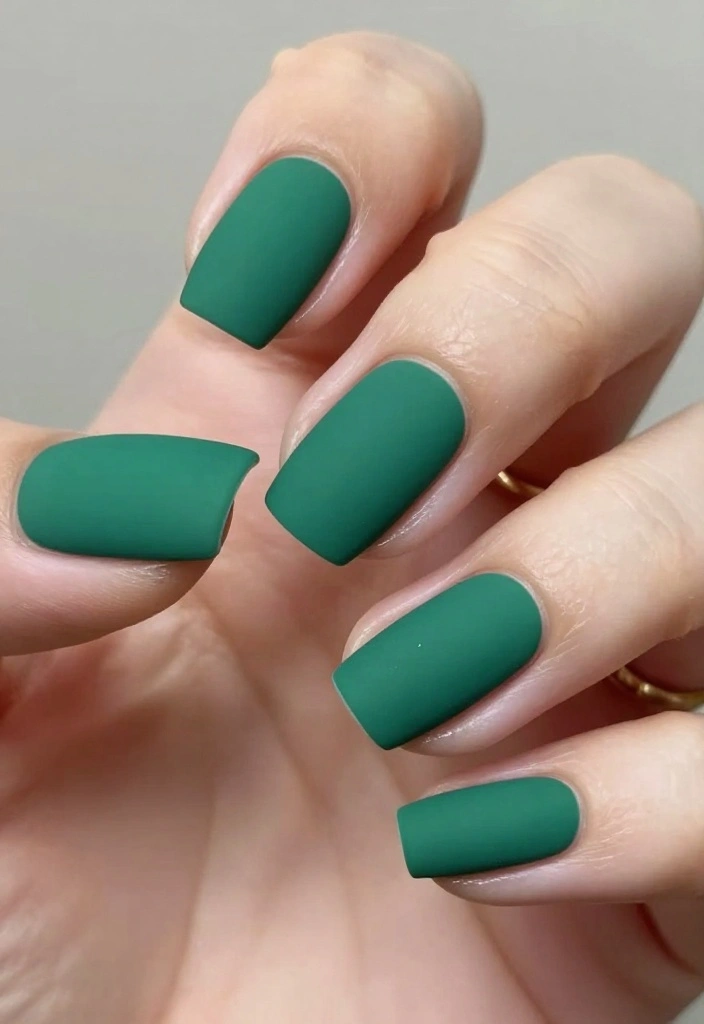
Matte nails are stylish and sophisticated, giving a cool vibe to your emerald polish. The velvety finish adds a modern twist to your manicure, making it perfect for both casual and professional settings.
Start with a base coat, followed by two coats of emerald polish.
Once dry, finish with a matte top coat for that velvety effect.
Optional: Use a glossy top coat on just the tips for a dramatic contrast.
This design is ideal for a night out or a polished day at the office, allowing you to stand out with a unique look that’s both trendy and memorable.
Fun fact: matte emerald nails retain a velvety, sophisticated look for days, especially with 2 coats and a matte top coat. Pro tip: add a glossy top coat on the tips for a dramatic contrast that pops.
6. Emerald and Gold Foil

Combining emerald with gold foil creates a luxurious and eye-catching design. This elegant look is perfect for special occasions or nights out when you want to impress.
Apply your base coat and two coats of emerald polish.
Once dry, use a nail brush to apply small pieces of gold foil onto your nails (you can add it randomly or in specific patterns).
Seal with a top coat for durability.
This design adds an ornate touch to your nails, reflecting light beautifully and enhancing your overall style.
7. Emerald Floral Art
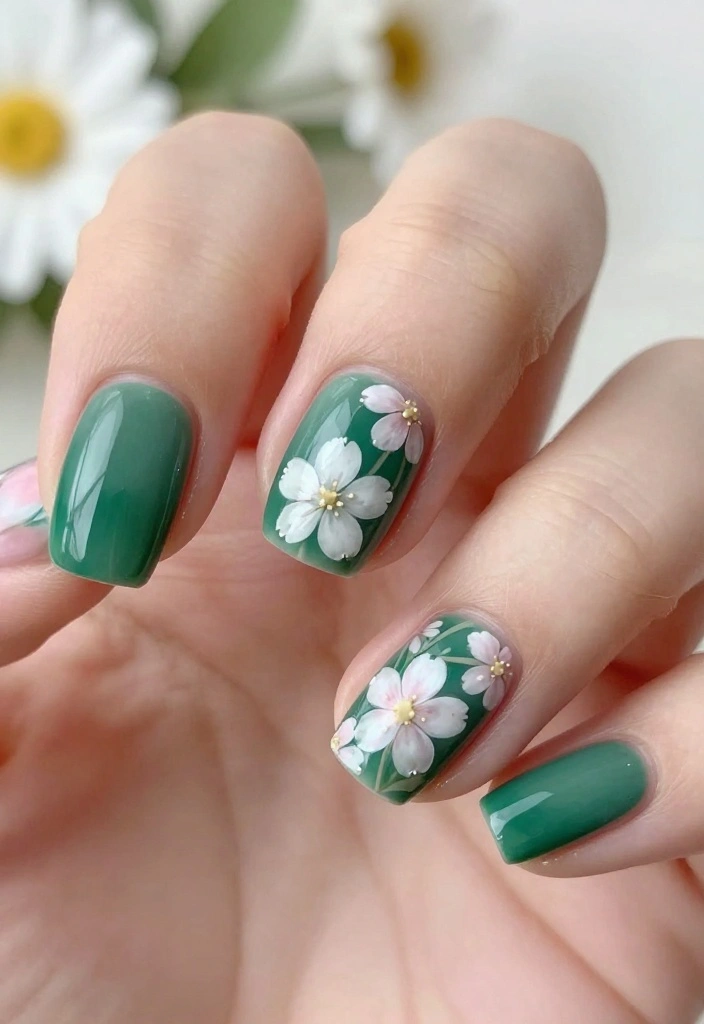
Bring a fresh and charming touch to your nails with emerald floral designs. This style is not only lovely but also easy to create, making it perfect for those who enjoy nature-inspired nail art.
Paint your base coat and let it dry completely.
Use a fine nail brush or nail art pen to draw small floral patterns with white or pastel colors on top of the emerald polish.
Add tiny dots for flower centers, and seal with a top coat.
This versatile design can be customized for any season, allowing you to express your creativity and love for floral patterns.
8. Emerald Stripes
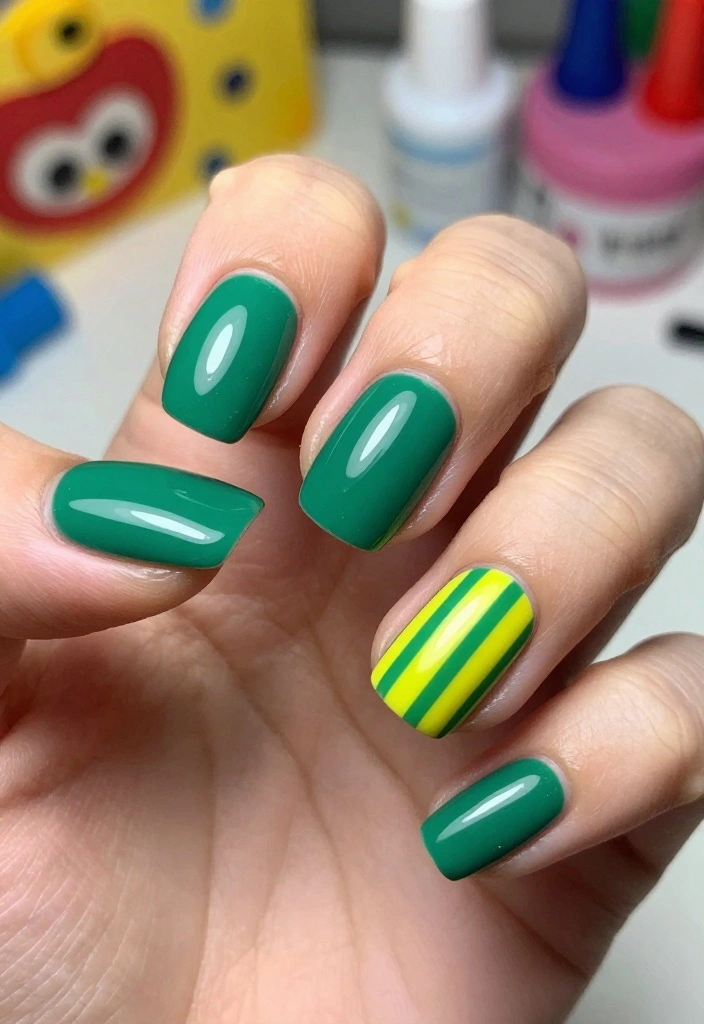
Stripes are a bold way to enhance your emerald nails, adding a chic and playful element. This design is simple yet striking, perfect for any occasion where you want to stand out.
Paint your nails with a solid coat of emerald polish.
Once dry, use striping tape to create straight lines across the nails.
Paint over the exposed areas with a contrasting color (like white or gold). Remove the tape before the polish dries for sharp lines!
This design easily elevates a casual look, allowing you to mix thick and thin stripes for a fun, unique effect.
9. Emerald Dots

Polka dots are always a playful choice, and when paired with emerald polish, they create a fun and cheerful look. This design is super easy, making it ideal for beginners.
Paint your nails with a base coat of emerald polish.
Once dry, use a dotting tool to add white or silver dots on top of the emerald base.
Create patterns with the dots for a fun effect, and finish with a top coat.
This design is perfect for any occasion, providing a playful way to express your personality through nail art.
10. Emerald with Negative Space
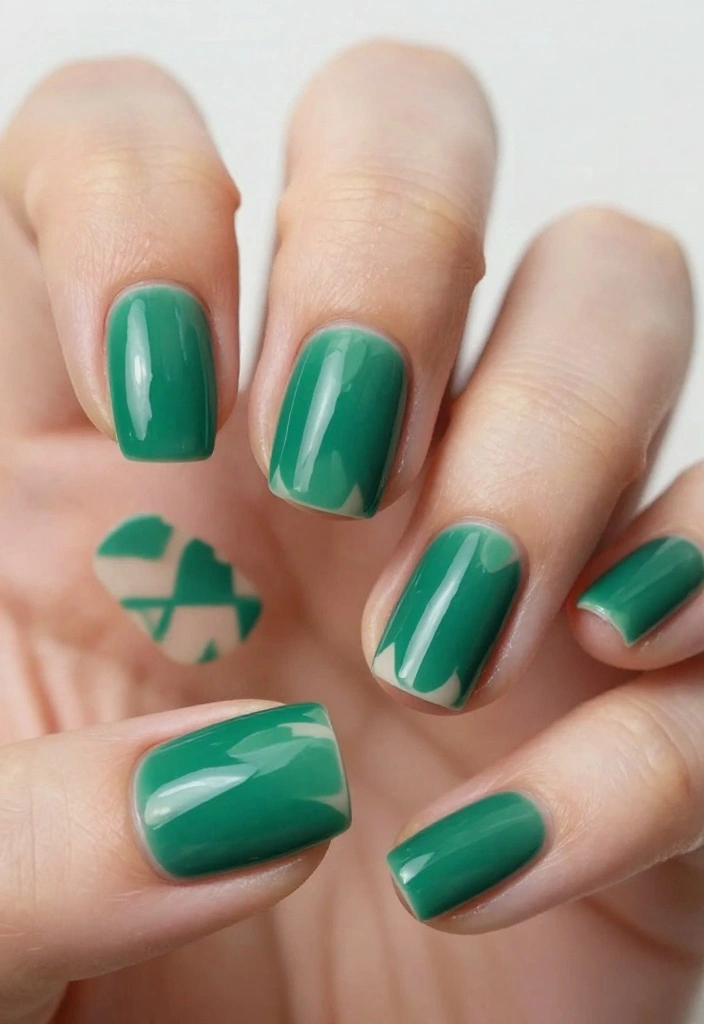
Negative space nail art is trendy and chic, allowing your natural nail to peek through. An emerald design with negative space offers a modern twist that stands out beautifully.
Start with a clean base coat on your nails.
Paint your nails in emerald polish, but leave parts of the nail bare (like half-moons or stripes).
Seal with a glossy or matte top coat depending on your preference.
This minimalist design is perfect for those who appreciate simplicity, creating a striking look that’s effortlessly stylish.
11. Emerald Marble Effect
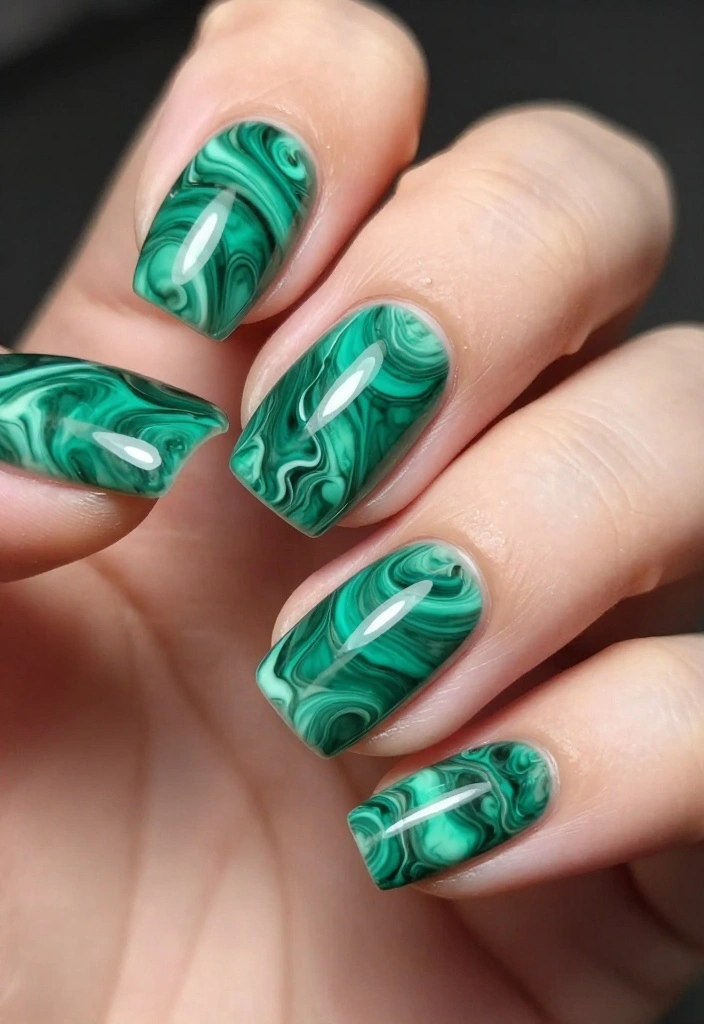
Marble nails have a luxurious vibe, and creating an emerald marble effect is easier than you might think. This design adds depth and sophistication to your nails without requiring extensive skills.
Apply a base coat and let it dry.
Use a small brush or a toothpick to swirl darker and lighter greens together on your nails, creating a marble effect.
Top it off with a glossy top coat to enhance the shine.
This technique allows you to experiment with different shades and create a unique design that resembles natural stone, making your nails truly stand out.
12. Emerald Foil Accents
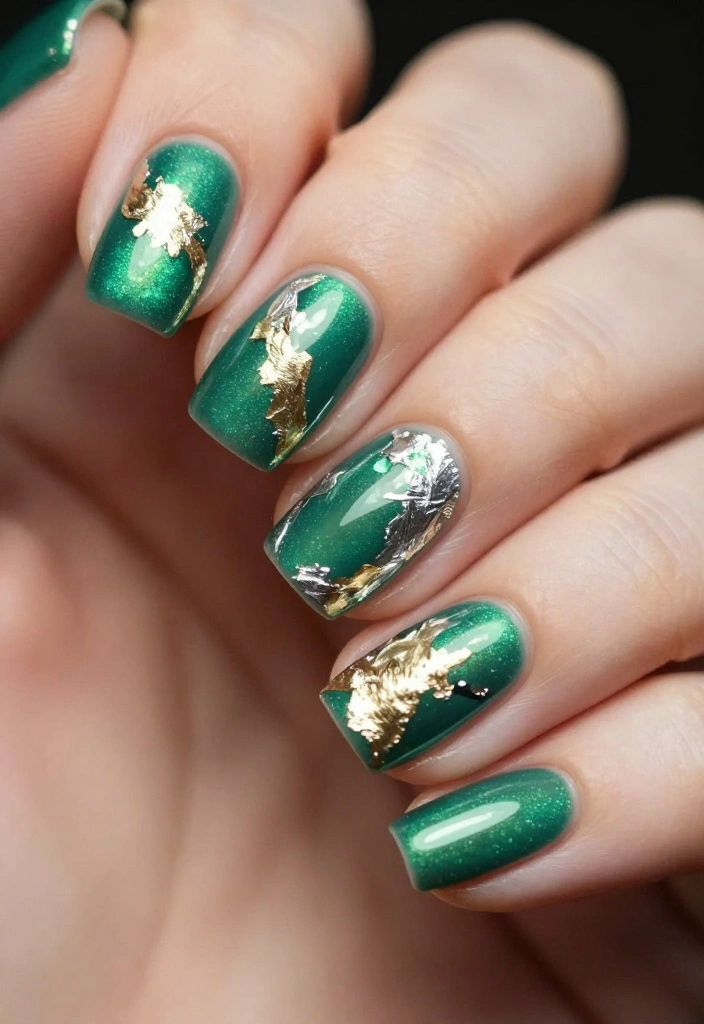
Foil accents add a designer touch to your emerald nails, creating an elegant and chic finish. This style is ideal for special occasions or adding a bit of glam to your everyday look.
After painting your nails emerald, cut small pieces of gold or metallic foil.
Apply a layer of clear polish on the sections you want to cover with foil and press the foil onto the wet polish.
Seal everything with a top coat to keep the foil in place.
This design adds a luxurious feel to your manicure, ensuring your nails shine and stand out in any setting.
13. Confetti Emerald Nails
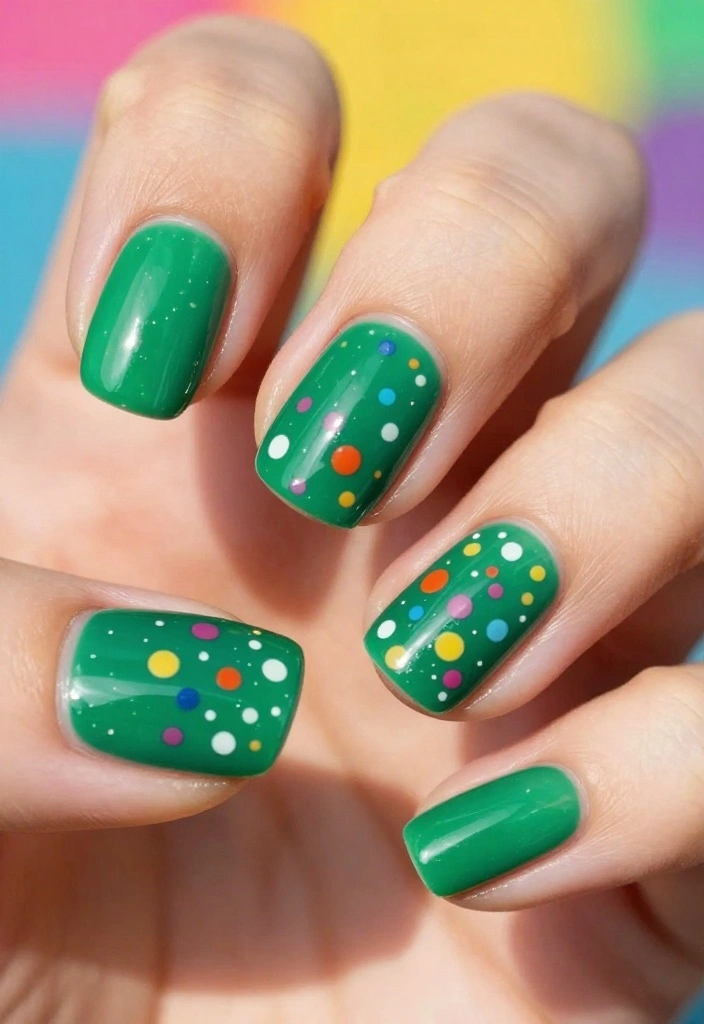
Confetti nails bring a playful and festive vibe, perfect for celebrations. Using emerald as your base color, this design is sure to make your nails pop with creativity.
Start with a base coat of emerald polish.
Once dry, use a dotting tool to apply small dots of colorful confetti polish in fun patterns.
Finish with a clear top coat to seal the design.
This playful style allows for creativity and personalization, making it a fun way to showcase your personality at parties and gatherings.
Emerald nails make every celebration feel like a glow-up. Confetti dots on a rich emerald base are your shortcut to party-ready mani without the fuss. Grab a dotting tool, add color, seal with top coat, and flaunt it.
14. Emerald Heart Tips
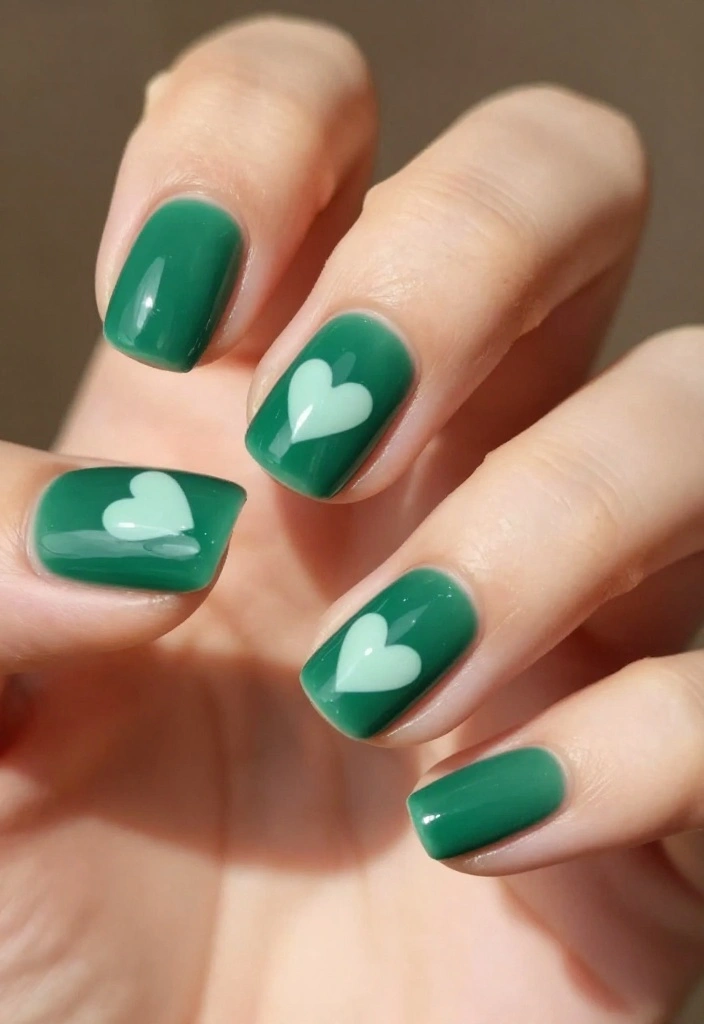
Heart tips are a charming and sweet design that lets you express your personality. With emerald as your base, this design is ideal for romantic occasions or when you want to add a touch of love to your look.
Paint your nails with a solid coat of emerald polish.
Once dry, use a fine brush to create heart shapes at the tips with a contrasting color (like white or red).
Seal with a top coat for a long-lasting finish.
This romantic twist on a classic design is perfect for date nights or special events when you want to feel extra special.
15. Emerald Glitter Fade
The glitter fade design combines elegance with a hint of fun, making it an excellent choice for any occasion. This style showcases emerald polish at the base while transitioning into sparkling glitter at the tips.
Begin with a base of emerald polish.
At the tips, gently dab on glitter polish to create a fading effect.
Blend the edges to ensure a smooth transition, then finish with a top coat.
This design is versatile, allowing you to switch up the glitter colors, adding a festive touch that’s perfect for parties or a night out.
Conclusion

Emerald nails offer a fabulous way to express yourself through nail art. Whether it’s a classic glossy look or a playful glitter fade, there’s something for everyone in these designs.
These easy DIY ideas empower you to unleash your creativity and master fabulous nail art, regardless of your skill level. Don’t be afraid to experiment with the styles that resonate with your vibe. Happy nail painting!
Frequently Asked Questions
What are the easiest emerald nails designs for beginners?
Starting with a solid emerald color on all nails is the simplest way to begin. You can then level up with a single accent nail using a diagonal stripe or a gold foil edge. Quick steps:
Prep nails, apply base coat, paint two thin coats of emerald polish, add the accent with striping tape, and finish with top coat. If you’re using gel, cure between coats. These beginner-friendly emerald nails are easy to master with basic nail tutorials.
What tools and supplies do I need for a do it yourself emerald nails manicure?
Gather a base coat, emerald nail polish (or gel), top coat, striping tape, a dotting tool or toothpick, a clean-up brush, acetone, lint-free wipes, a nail file and buffer, and a cuticle pusher. This simple kit keeps your do it yourself emerald nails on track and makes following nail tutorials easier.
How can I prep nails to make emerald nails last longer?
Start with clean, shaped nails and push back cuticles. Wipe with alcohol and dry well. Apply a sticky base coat, then two thin coats of emerald polish, finishing with a top coat. For gel, cure between coats. Reapply top coat every 3–5 days and wear gloves during chores to protect the finish.
Can emerald nails be done with regular polish, or is gel required for best results?
Yes, you can create gorgeous emerald nails with regular polish, but gel tends to last longer and resist chipping. If you’re starting with regular polish, use a fast-drying top coat and thinner coats, and consider a quick-dry spray. If you want longer wear and shine, follow a nail tutorials that show how to use a gel system or practice with a UV/LED lamp.
What are some beginner-friendly emerald nails designs I can try after mastering a solid color?
Try an accent nail with a diagonal tape design, a gold foil stripe, or a simple marble swirl using white on one nail. You can also dot tiny stones along the cuticle line or create a minimalist negative-space design. Each option works with emerald nails and you can follow nail tutorials for step-by-step guidance.
Related Topics
emerald nails
DIY nail art
nail tutorials
easy designs
beginner friendly
nail techniques
affordable beauty
trendy nails
quick nail art
colorful nails
do it yourself
manicure ideas
These emerald nail designs are stunning! I tried a DIY manicure last weekend, and let’s just say, my dog was my biggest critic. Do you think I should stick to painting my nails or just let him take over?
I love how easy these designs look! I once tried to paint my nails with a glitter polish and ended up looking like I had a glitter explosion on my hands. Why is it that glitter seems to get everywhere?
Did you know that emerald is the birthstone for May? I think these nail designs would make a great gift for someone with a May birthday!
These designs are so pretty! I remember the first time I tried to do nail art—I ended up with more polish on my skin than on my nails! Have you ever had a nail fail like that?
If you’re trying these designs, I recommend using a good base coat first. It really helps the color pop and keeps your nails from staining!