Thanksgiving is that special time of year when we gather with friends and family, sharing delicious food while reflecting on all we’re grateful for. As autumn’s vibrant colors fill our surroundings, it’s easy to feel inspired by the beauty of the season. This year, I’ve been craving a way to express that festive spirit on my nails. If you’re someone who loves to showcase your style and celebrate the holidays through creative nails, then this post is just for you.
I’ve pulled together 16 stunning Thanksgiving nail designs that capture the essence of fall. Whether you’re a nail art novice or a seasoned pro, these designs will add a festive touch to your holiday celebrations. From cozy sweater patterns to vibrant autumn palettes, there’s something here for everyone. Get ready to elevate your nail game with ideas that are not only delightful but also perfect for any Thanksgiving gathering!
Key Takeaways
– Discover 16 unique Thanksgiving nail designs that reflect the warmth and beauty of autumn colors.
– Find inspiration from various themes, including cozy patterns, nature motifs, and popular holiday symbols.
– Explore designs like “Pumpkin Spice Delight” and “Thanksgiving Turkeys,” perfect for setting a seasonal mood.
– Learn tips on how to easily create these designs at home, making your nail art both fun and accessible.
– Enjoy a mix of simple and intricate styles, ensuring there’s something to suit every skill level and personal preference.
Contents
- 1. Pumpkin Spice Delight
- 2. Autumn Leaves
- 3. Golden Harvest
- 4. Thanksgiving Turkeys
- 5. Cozy Sweater Patterns
- 6. Rustic Wood Textures
- 7. Cranberry Bliss
- 8. Maple Leaf Motifs
- 9. Simple Thanksgiving Plaid
- 10. Thanksgiving Harvest Basket
- 11. Warm Tones Ombre
- 12. Berry Pie Design
- 13. Harvest Moon
- 14. Acorn Artistry
- 15. Thanksgiving Greetings
- 16. Falling Acorns
1. Pumpkin Spice Delight

Embrace the beauty of fall with the Pumpkin Spice Delight nail design. This fun look showcases a rich burnt orange base paired with elegant white swirls that evoke the creamy topping of your favorite seasonal latte. It’s a delightful blend of warmth and charm, ideal for bringing festive joy to your Thanksgiving celebrations!
To create this style, start with a solid burnt orange polish as your base. Once it dries, use a fine nail art brush to paint whimsical white swirls. For an extra touch of sparkle, sprinkle on some gold glitter, capturing the light beautifully. This design is a cozy nod to the season!
Steps:
1. Apply a base coat to protect your nails.
2. Paint your nails with burnt orange polish.
3. Once dry, create white swirls on top.
4. Finish with a topcoat for shine.
5. Optional: Add gold glitter for a festive flair.
Tips:
Use a dotting tool for well-defined swirls and ensure your base color is fully dry before adding the details. Don’t forget to seal it with a top coat for lasting wear.
2. Autumn Leaves
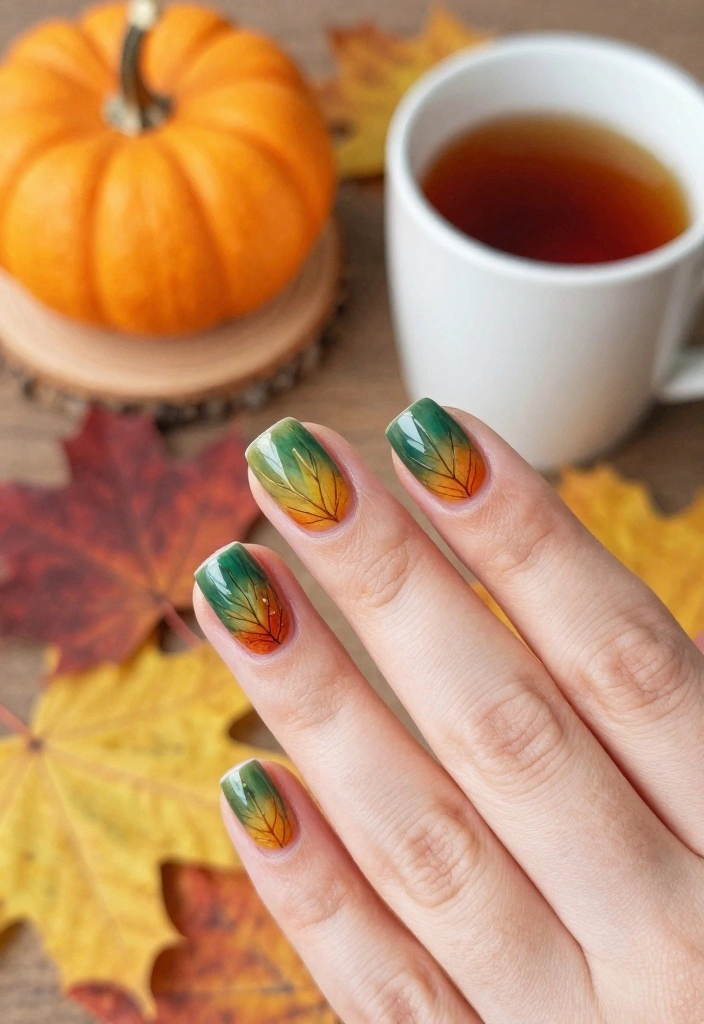
Capture the essence of fall with the Autumn Leaves nail design. This beautiful style combines deep greens, warm oranges, and soft browns, mimicking the stunning colors of nature during this season. It’s a perfect way to celebrate Thanksgiving while showcasing your love for autumn!
Start with a nude base coat to let the vivid colors shine. Use a sponge to dab on shades of green and burnt orange for a stunning gradient effect that resembles the canopy of autumn trees. Then, with a detailed brush, add leaf shapes using brown polish. This elegant design is versatile enough for any Thanksgiving gathering!
Steps:
1. Apply a nude base coat.
2. Use a makeup sponge to blend green and burnt orange shades.
3. Once dry, paint leaf shapes with brown polish.
4. Seal with a topcoat for durability.
Tips:
A matte top coat can enhance the earthy vibe of this design, perfectly aligning with the fall theme.
3. Golden Harvest
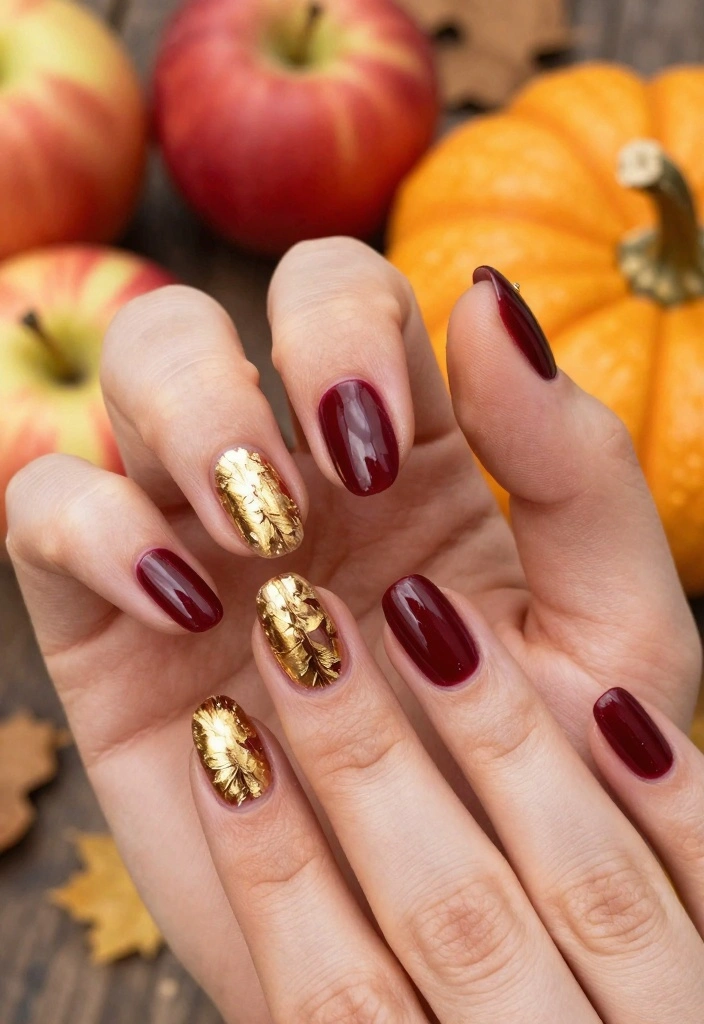
Celebrate the harvest season with the Golden Harvest nail design. This striking look combines rich golds and deep reds to reflect the abundance of autumn crops. It’s a fantastic choice for those wanting to add a touch of glam to their Thanksgiving festivities!
Begin with a deep burgundy as your base. Once that dries, apply pieces of shimmering gold foil for a luxurious finish. This design is eye-catching and sophisticated, making it a standout choice for holiday parties or family get-togethers. Friends and family will surely admire your nails!
Steps:
1. Apply a base coat for protection.
2. Paint your nails with deep burgundy polish.
3. Once dry, randomly add pieces of gold foil.
4. Finish with a glossy top coat.
Tips:
Use tweezers for precise placement of the gold foil, allowing it to dry completely before applying the top coat.
💅 Nail Art Made Easy!
Transform your busy schedule with this DIY Nail Art Guide designed for moms who love stylish nails.
4. Thanksgiving Turkeys

Nothing captures the spirit of Thanksgiving like adorable turkey nail art. This playful design is not only festive but also a fun way to celebrate the holiday, making it a great conversation starter at your gatherings!
Start with a soft brown base coat, and use a dotting tool to paint cute turkey faces with shades of brown, orange, and yellow. Add colorful feathers using vibrant autumn hues. This cheerful design is especially perfect if you’re celebrating with family or kids!
Steps:
1. Paint nails with a soft brown base coat.
2. Use a dotting tool to create turkey faces in brown, orange, and yellow.
3. Add details like eyes and feathers in contrasting colors.
4. Seal with a top coat.
Tips:
Practice drawing the turkey face on paper first to perfect your technique before creating it on your nails.
5. Cozy Sweater Patterns
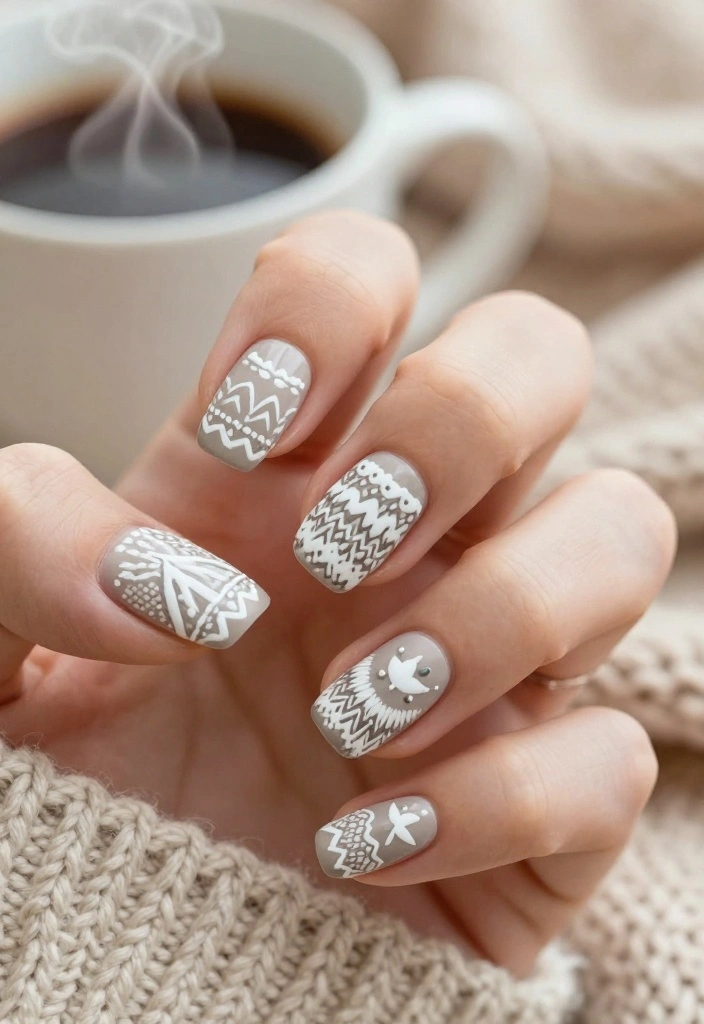
Wrap your nails in warmth with cozy sweater patterns that reflect the essence of fall. This design brings the comfort of your favorite knitwear right to your fingertips!
Begin with a neutral base coat, then use white or cream polish to create intricate sweater-like patterns, such as cable knits or fair isle designs. This nail art is perfect for a chic yet understated Thanksgiving look, complementing all your fall outfits beautifully!
Steps:
1. Apply a neutral base coat.
2. Using a fine nail brush, create sweater patterns with white polish.
3. Let it dry, then finish with a matte top coat.
Tips:
Use tape to create straight lines for a clean finish, and ensure everything is completely dry before applying the top coat.
6. Rustic Wood Textures
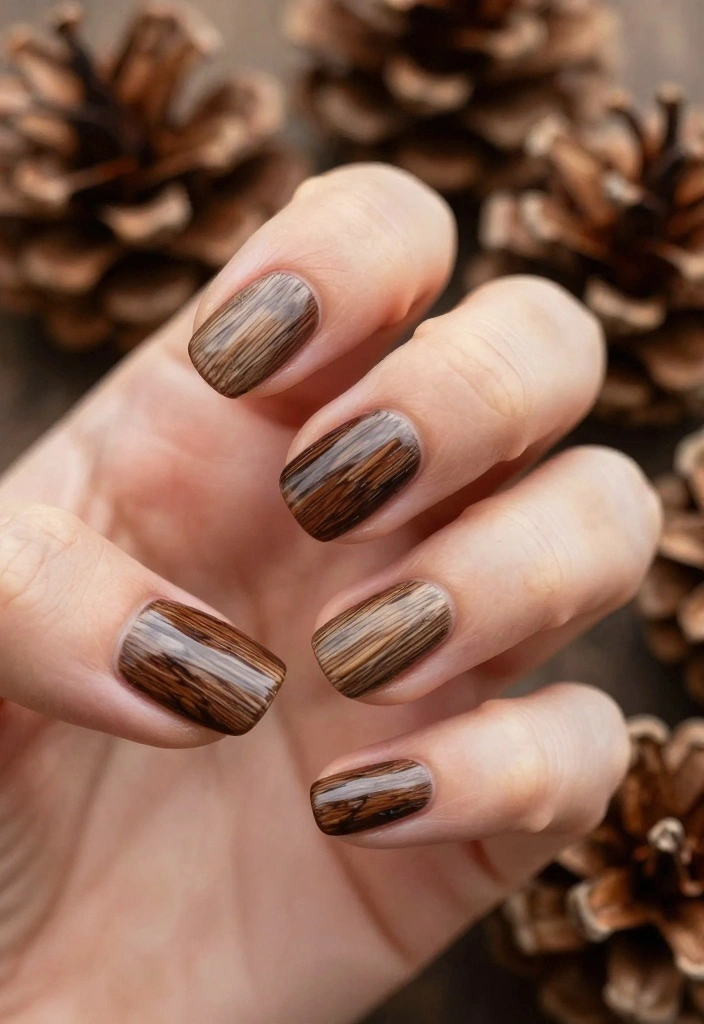
Bring the beauty of the outdoors to your nails with rustic wood texture designs. This style mimics the look of weathered wood, providing an earthy vibe that resonates with the autumn season.
Choose a deep brown or gray base and use a nail art brush to create wood-like lines and knots. This unique design is surprisingly easy to achieve, making it perfect for nature lovers who want a simple yet stylish look!
Steps:
1. Apply a dark brown or gray base coat.
2. Use a fine brush to create lines and knots resembling wood.
3. Finish with a glossy top coat.
Tips:
Layer a lighter or darker shade on top of the base coat for added depth before adding the wood details.
Fun fact: you can nail a rustic wood look in under 5 minutes with a dark brown base and a fine brush. It’s one of the easiest thanksgiving nail designs that still feels artsy and outdoorsy.
📹 Related Video: Wood Look with Sharpies
7. Cranberry Bliss
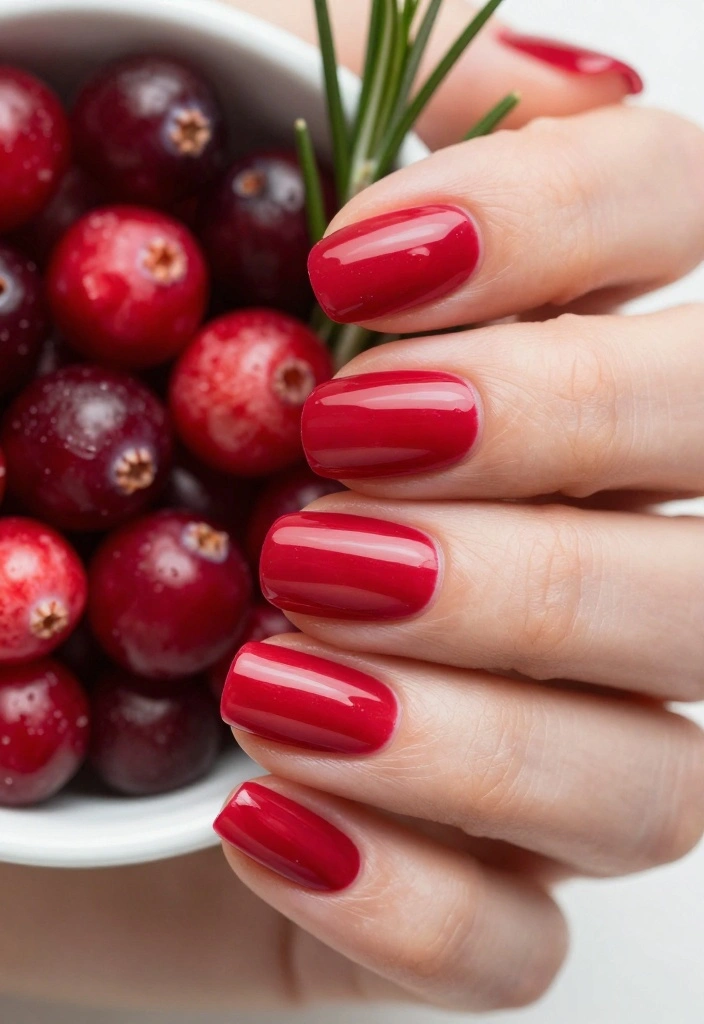
Inspired by the delightful flavors of cranberry sauce, the Cranberry Bliss nail design is perfect for anyone wanting a pop of color this Thanksgiving. This design showcases a bright cranberry-colored base adorned with shiny accents that reflect the tangy fruit.
Start with a vibrant cranberry red polish, and finish with a glossy top coat to achieve that delectable shine. Add small gold embellishments or nail gems for an extra festive sparkle! This design is both fun and sophisticated.
Steps:
1. Apply a base coat.
2. Paint your nails with cranberry red polish.
3. Add gold embellishments if desired.
4. Finish with a high-gloss top coat.
Tips:
Experiment with the placement of embellishments to find a style that suits you best.
How To Choose the Right Thanksgiving Nail Designs
Choosing the perfect Thanksgiving nail designs can really enhance your holiday spirit. With so many styles and colors to pick from, it’s essential to consider a few key factors that will help you select the most suitable designs for you. Here are some tips to guide you through the process:
1. Think About the Theme
Consider the overall theme of your Thanksgiving celebration. Are you going for a cozy, rustic vibe or something more elegant? For a rustic feel, you might choose designs featuring autumn leaves or wood textures. If your gathering is more formal, elegant patterns like warm tones ombre or golden harvest designs could be a better fit.
2. Choose Your Color Palette
The autumn palette is rich and diverse, ranging from deep oranges and browns to vibrant reds and golds. When selecting your nail colors, think about what will complement your outfit and the décor of your Thanksgiving table. Nail designs with cranberry tones or pumpkin spice colors are always a hit during this season. Mixing and matching shades can create a unique look that captures the essence of fall.
3. Assess Your Nail Length and Shape
The length and shape of your nails can significantly influence your design choices. Longer nails provide a beautiful canvas for intricate designs like Thanksgiving turkeys or acorn artistry, while shorter nails might benefit from simpler, cleaner designs like plaid. Make sure to select designs that suit the natural shape and length of your nails to achieve the best effect.
4. Consider Your Skill Level
If you’re planning to do your nails yourself, think about your skill level. Some designs, like falling acorns or cozy sweater patterns, might require a bit more technique to execute. If you’re a beginner, you might want to focus on simpler designs or consider using nail stickers or stencils to create a polished look without the stress.
5. Budget for Nail Art Supplies
Nail art can be done on various budgets depending on whether you want to go for professional salon treatment or DIY at home. If you’re doing it yourself, invest in quality nail polishes, brushes, and tools. You can also look for affordable kits that include everything you need. If you’re opting for a salon, check the prices for intricate designs to avoid surprises.
6. Plan Ahead for Time
Lastly, consider how much time you have before the holiday. Some designs can be quick and easy, while others require more time and patience. If you’re short on time, opt for quicker designs like Thanksgiving greetings or a simple Thanksgiving plaid. If you have a few extra days, you might enjoy experimenting with more detailed designs like a Thanksgiving harvest basket.
Pro Tip: Save some inspiration by taking screenshots or saving photos of your favorite designs on your phone or a mood board. This way, you’ll have a clear idea when it’s time to get started!
By considering these factors, you can confidently choose Thanksgiving nail designs that not only express your style but also celebrate the essence of fall. Enjoy the process of creating beautiful nails that reflect the joy and warmth of the season!
8. Maple Leaf Motifs
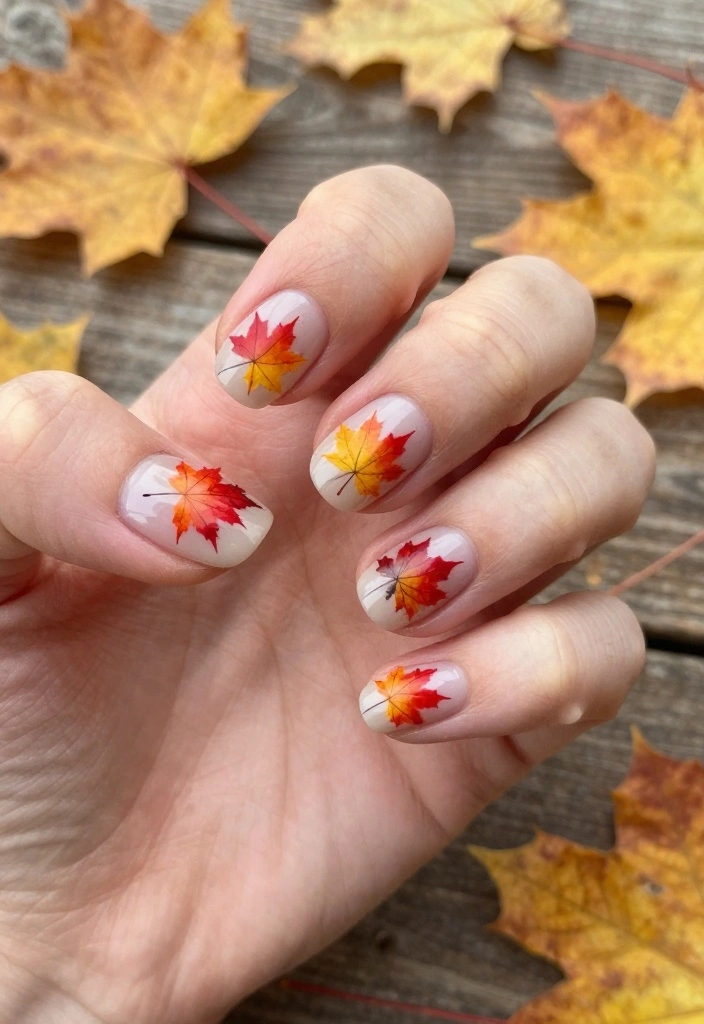
Honor the beauty of fall with lovely maple leaf motifs on your nails. This design features the vibrant colors of leaves in shades of red and yellow, perfectly capturing the autumn spirit.
Begin with a nude or soft brown base, then paint various colored leaves using a fine brush. This design is both elegant and playful, making it a wonderful choice for Thanksgiving gatherings. Adding gold accents can elevate the chic factor!
Steps:
1. Apply a nude or soft brown base coat.
2. Using a fine brush, paint maple leaves in red and yellow.
3. Optionally, add gold accents for a glam touch.
4. Seal with a top coat.
Tips:
Use a dotting tool to create smaller leaves for added detail and variety.
9. Simple Thanksgiving Plaid
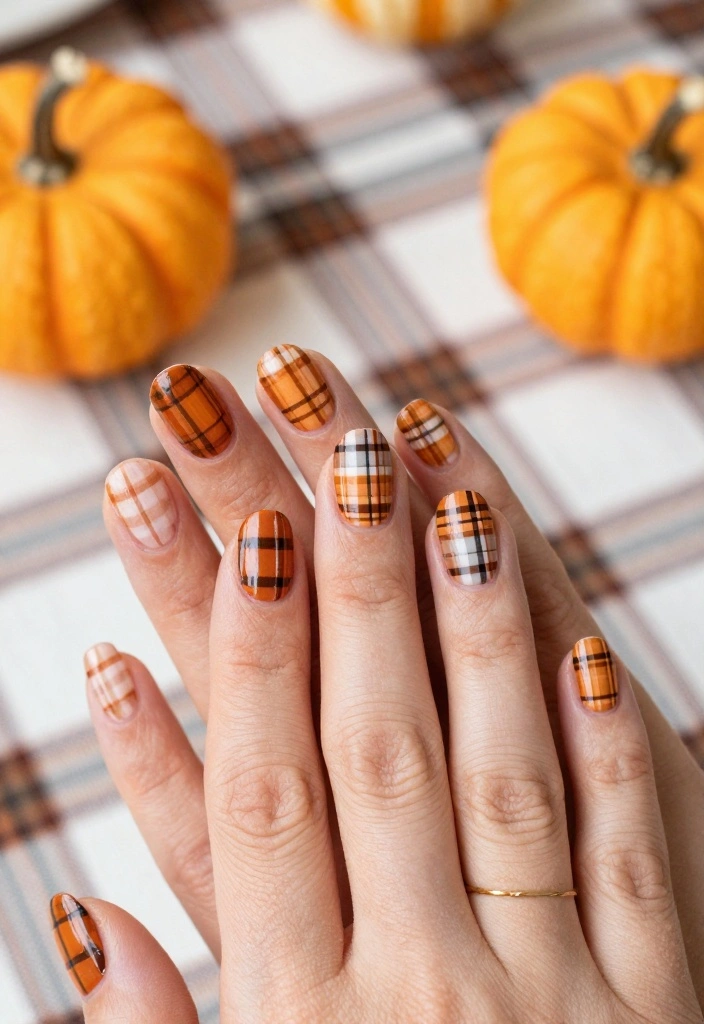
Plaid designs aren’t just for clothing! This Simple Thanksgiving Plaid nail design offers a classic and stylish look that’s easy to create. Perfect for fall, it combines warm tones of brown, orange, and cream.
After applying a neutral base coat, use tape to section off your nails and paint different plaid patterns in various colors. This versatile design is suitable for any Thanksgiving gathering and can be dressed up or down effortlessly!
Steps:
1. Apply a neutral base coat.
2. Use tape to create sections and paint different colors in each.
3. Remove the tape carefully once dry.
4. Finish with a top coat.
Tips:
Be sure to let each color dry thoroughly before applying the tape for cleaner, crisp lines.
10. Thanksgiving Harvest Basket
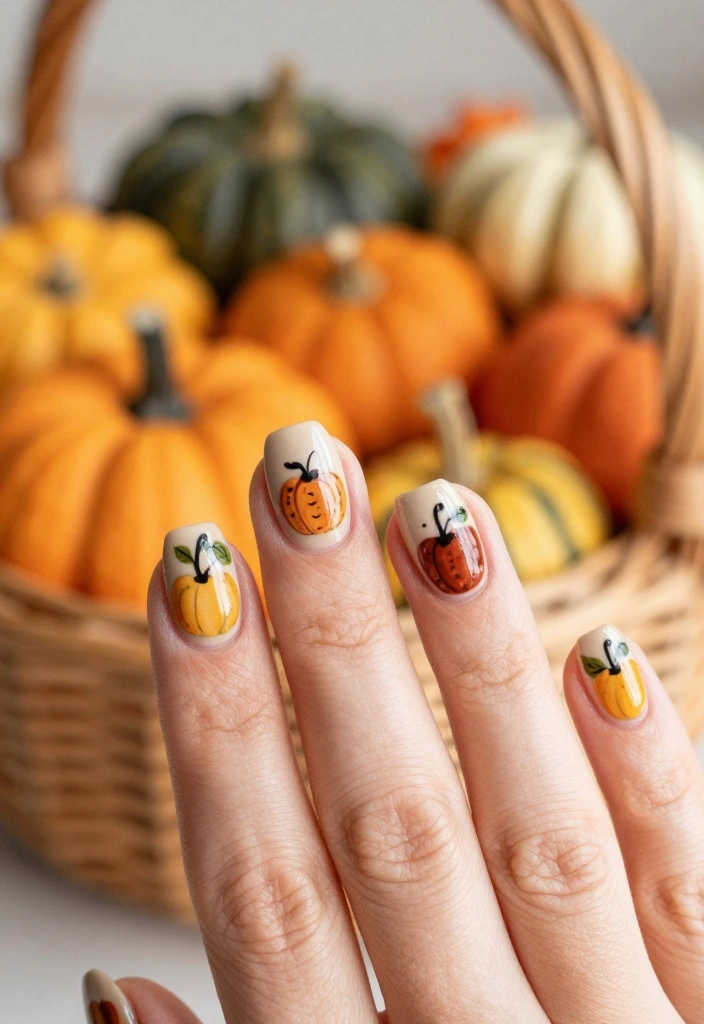
Celebrate the bounty of the season with the Thanksgiving Harvest Basket nail design. This charming nail art features elements of a harvest basket, complete with colorful fruits and vegetables.
Start with a beige or light brown base to represent the basket. Then, using a fine brush, paint vibrant fruits like apples and pumpkins for a playful touch. This design is perfect for adding a festive spirit to your Thanksgiving celebrations!
Steps:
1. Apply a beige base coat.
2. Use a fine brush to paint fruits and veggies in bright colors.
3. Seal with a top coat for durability.
Tips:
Choose colors that reflect your favorite harvest fruits for a personal touch that makes this design uniquely yours.
11. Warm Tones Ombre
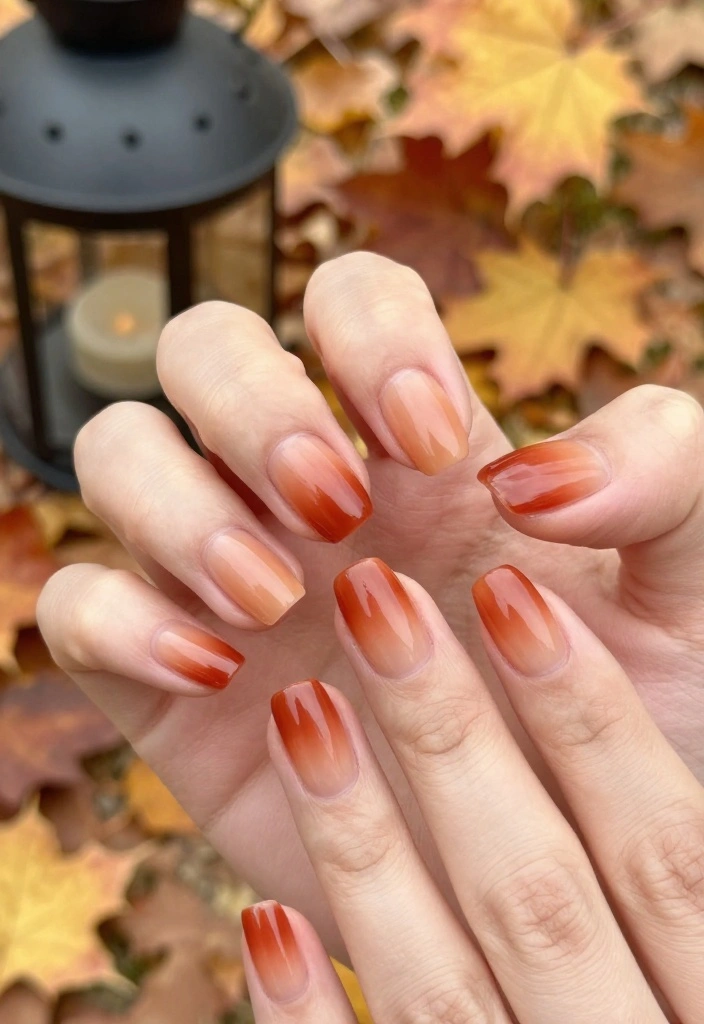
Ombre nails are trendy and a wonderful way to celebrate Thanksgiving with a warm tones ombre design. This style blends soft, warm autumn colors like burnt oranges, yellows, and browns.
Begin with a light nude base and use a makeup sponge to blend your chosen shades from the tips to the base of your nails. This gradient effect is stunning and embodies the beauty of the fall season!
Steps:
1. Apply a nude base coat.
2. Use a makeup sponge to blend warm autumn colors.
3. Finish with a glossy top coat.
Tips:
Feel free to experiment with different color combinations until you find your perfect fall blend.
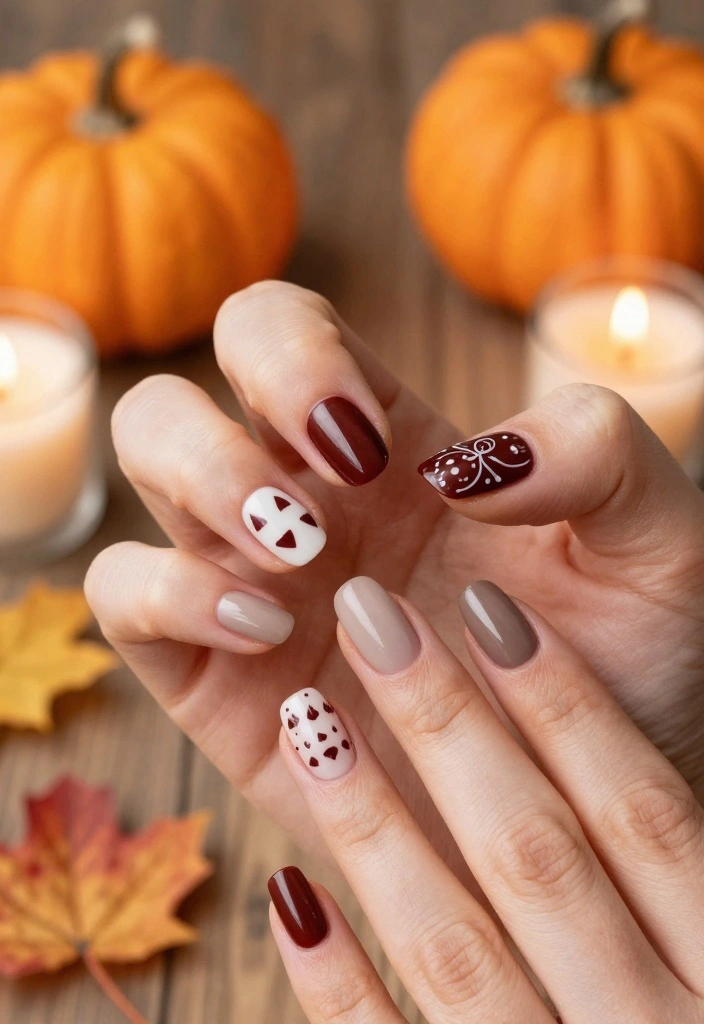
12. Berry Pie Design
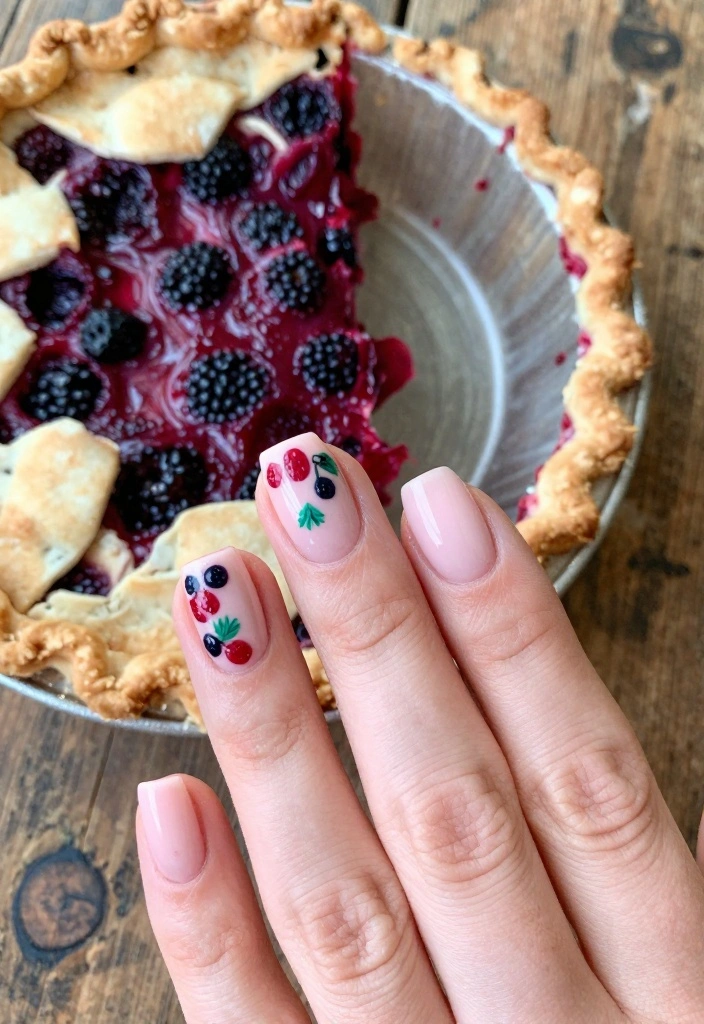
Celebrate your love for Thanksgiving pies with the Berry Pie Nail Design! This charming and whimsical design features a berry pie theme that is both cute and festive.
Start with a soft pink base to represent the pie crust, then add berry details using dots of red and purple polish. You can even create lattice patterns to mimic a real pie! This fun design is sure to be a conversation starter at any Thanksgiving gathering!
Steps:
1. Apply a soft pink base coat.
2. Use a dotting tool to create berry shapes in red and purple.
3. Add lattice details with a fine brush.
4. Seal with a top coat.
Tips:
Try different berry colors for a unique twist on this delightful design!
Fun fact: 68% of Thanksgiving photos get more likes when nails echo the season with berry-pie-inspired designs. For your thanksgiving nail designs, start with a soft pink crust and berry dots, then add a lattice touch for real-pie vibes.
13. Harvest Moon
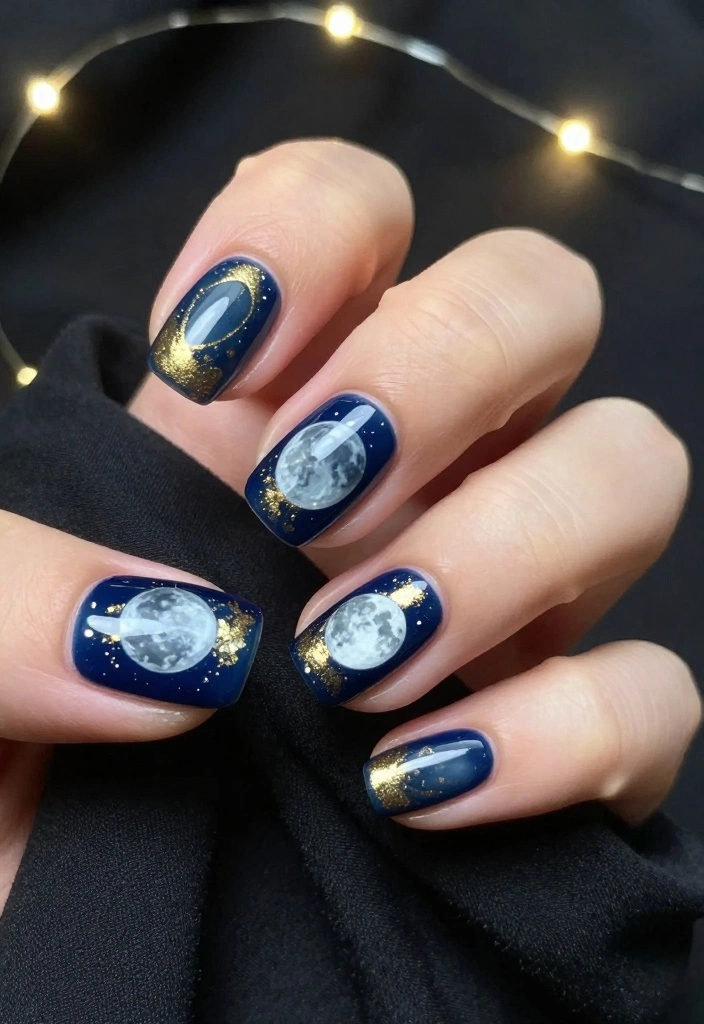
Embrace the magic of the harvest moon with this elegant nail design. Combining deep navy blue with shimmering gold or silver, this design reflects the beauty of autumn nights.
Paint your nails with a deep navy base, then use a fine nail brush to add crescent moons or stars in gold or silver. This enchanting design is perfect for evening Thanksgiving gatherings, adding a touch of sparkle to your look!
Steps:
1. Apply a navy base coat.
2. Use a fine brush to paint crescent moons and stars.
3. Finish with a glossy top coat for shine.
Tips:
Add a few rhinestones for an extra glam touch that will truly stand out!
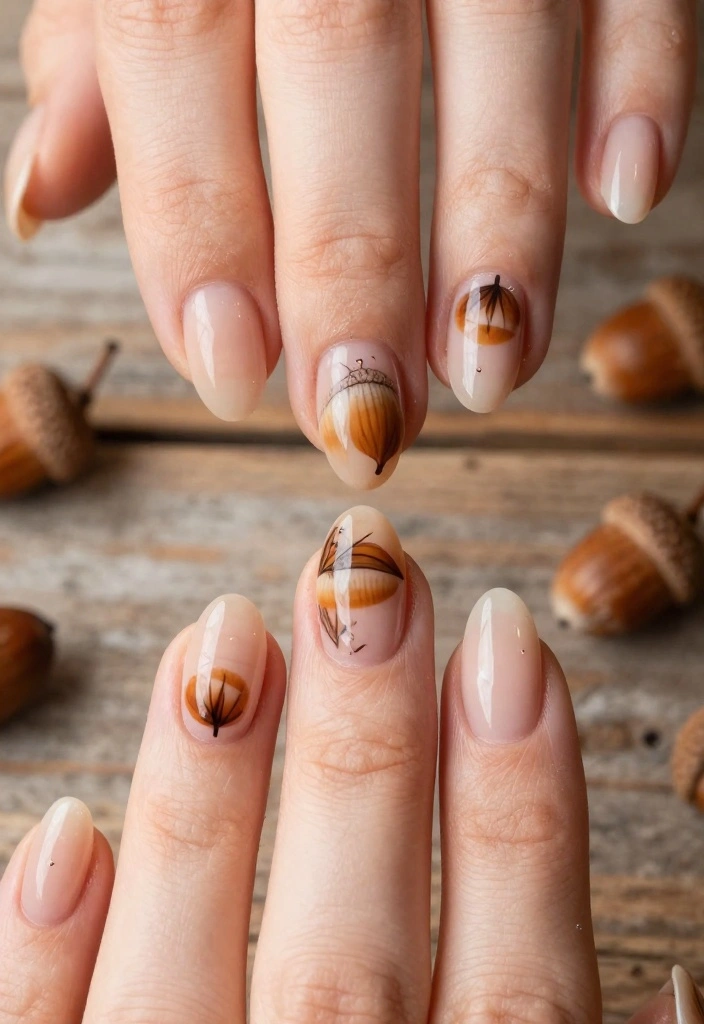
14. Acorn Artistry
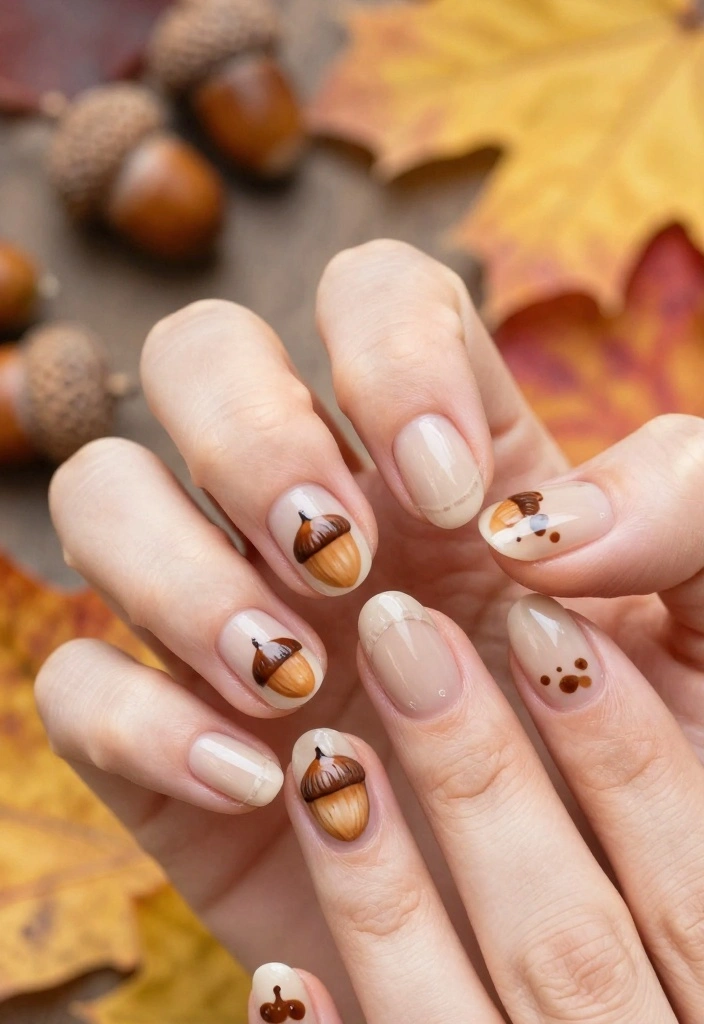
Celebrate the small yet charming details of fall with the Acorn Artistry design. This adorable nail art features cute acorns and falling leaves, perfect for embracing the season’s spirit.
Start with a soft beige base coat, then use tiny brushes to paint delightful acorns and leaves in warm autumn colors. This playful yet stylish design makes a great addition to your Thanksgiving nail art collection!
Steps:
1. Apply a soft beige base.
2. Paint acorns and leaves using a fine brush.
3. Seal with a top coat for protection.
Tips:
Use a dotting tool for tiny details like the acorn caps to enhance the overall effect!
15. Thanksgiving Greetings
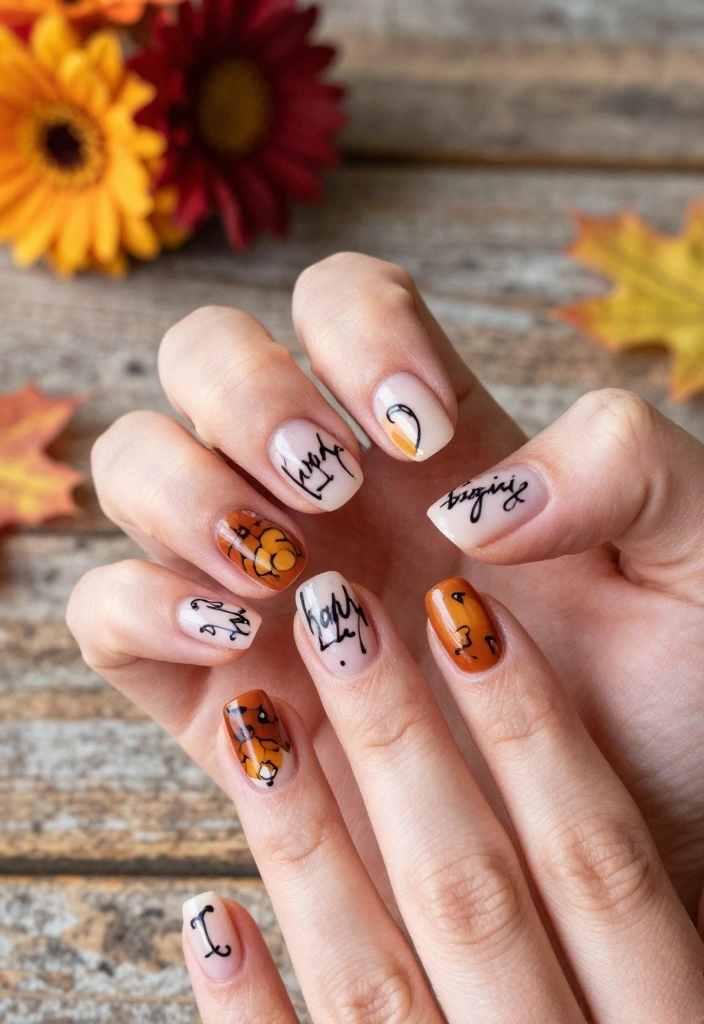
Send a heartfelt message of gratitude with the Thanksgiving Greetings nail design. This unique nail art features words like ‘Grateful’ or ‘Thankful,’ adding a personal touch to your Thanksgiving look.
Choose a base color that complements your outfit, and use a fine nail art brush to carefully write your chosen word on each nail. This design is not only stylish but also meaningful, making it ideal for family gatherings!
Steps:
1. Apply a base coat in your favorite color.
2. Using a fine brush, paint your chosen word on each nail.
3. Finish with a top coat for durability.
Tips:
Practice writing on paper first to ensure you achieve the desired look before doing it on your nails.
16. Falling Acorns
Wrap up your Thanksgiving nail designs with the Falling Acorns design, which captures the beauty of autumn with acorns gently falling to the ground. This design is simple yet stunning, embodying nature’s charm.
Start with a nude or light brown base, then paint delicate acorns in warm browns and golds. This understated yet beautiful design is perfect for minimalistic nail art lovers who still want to celebrate the season!
Steps:
1. Apply a nude or light brown base coat.
2. Use a fine brush to paint acorns in warm shades.
3. Finish with a top coat.
Tips:
Keep it simple and allow the beauty of the acorn details to shine on their own!
Keep your Thanksgiving nail designs simple with Falling Acorns—a nude base and tiny acorns in warm browns. It’s understated, chic, and quick, so you can glow through the feast without skipping the seasonal vibe.
Conclusion
Thanksgiving is all about celebrating the season, and what better way to do that than with beautiful nail art that reflects the richness of fall? From playful turkey designs to elegant autumn colors, these 16 Thanksgiving nail designs offer something for everyone.
As you gather with friends and family this holiday, let your nails shine just as brightly as the joy in your heart. Explore these designs, get creative, and don’t forget to share your favorites with loved ones!
Frequently Asked Questions
What are the best thanksgiving nail designs that capture the autumn vibe?
For thanksgiving nail designs that capture the autumn vibe, start with an autumn palette of pumpkin orange, burgundy, moss green, cream, and metallic gold. Try a muted ombre base, then add a tiny leaf motif on an accent nail using a fine brush or stamping plate, or create a chic plaid by layering thin lines in coordinating shades. Quick how-to: 1) apply base coat; 2) paint base color; 3) use tape or a stamping plate to apply the design; 4) seal with a top coat. On shorter nails, keep the leaf or plaid small on one nail; on longer nails, you can extend the design across two or three nails for drama. Pro tips: prep nails, push back cuticles, clean edges with a brush dipped in remover, and finish with a durable top coat to extend wear. For an extra creative nails twist, add a touch of gold foil or subtle glitter.
How can I tailor thanksgiving nail designs for different nail lengths and shapes?
Whether your nails are short, medium, or long, you can rock thanksgiving nail designs. For short nails, keep the motif small—think a single leaf accent or tiny plaid on one nail. For medium nails, try a subtle gradient with a dotting tool leaf on an index nail. For long nails, go bigger with a full plaid pattern or a cluster of leaves across multiple nails. Shape matters: square or squoval nails give clean lines for precise details, while almond elongates motifs. Use a fine brush or a stamping plate, and stick to colors from the autumn palette for maximum contrast. Finish with a durable top coat and a quick-dry top coat between layers to prevent smudges.
What supplies are essential to create stunning thanksgiving nail designs at home?
To DIY stunning thanksgiving nail designs at home, you’ll want: a reliable base coat and top coat; several shades from the autumn palette (pumpkin, burgundy, olive, cream, gold); a fine nail art brush, a dotting tool, and thin striping tape or a stamping plate for clean lines; nail stickers or decals with leaf or plaid patterns; and optional gold foil or fine glitter for extra flair. Have a quick-dry spray or drops on hand, and keep cotton swabs for tidy edges. Quick setup: choose your base color, apply base coat, apply color layers, add design with tape/brush/stamping, then seal with top coat. For shorter nails, use simpler decals; for longer nails, you can layer more complex designs.
How can I switch up thanksgiving nail designs for Thanksgiving vs. everyday fall wear?
Want designs that work for Thanksgiving but also look great all fall? Choose finishes and scale accordingly. Use a matte top coat for a modern take or keep a satin/gossamer finish for softer look. Keep within the warm autumn palette and avoid heavy chrome; for everyday wear, swap a large leaf motif for a small accent on one nail and keep lines crisp with tape. With a simple neutral base, you can wear these nails from morning coffee to post-dinner photos. For extra versatility, add or remove glitter on accents depending on the occasion.
What maintenance tips help my thanksgiving nail designs last through the holiday season?
Keep your thanksgiving nail designs looking fresh with these tips: start with a solid base coat to protect nails, use a high-quality top coat and reapply every 2-3 days, seal the free edge of each nail, and avoid long hot water soaks right after a fresh manicure. Use cuticle oil daily to keep nails hydrated, and consider wearing gloves for chores like washing dishes or cleaning. Finally, store stamping plates, brushes, and decals properly to prevent them from drying out. A quick touch-up with clear polish on tips can extend wear without dulling the design.
Related Topics
thanksgiving nail designs
autumn palette
fall nail art
creative nails
easy designs
festive manicure
seasonal trends
beginner friendly
nail art techniques
pumpkin spice nails
glitter accents
quick nail styles
I love all the Thanksgiving nail designs you shared! They really capture the cozy vibes of fall. Which one do you think would go best with a pumpkin pie outfit?
These nail designs are so cute! I tried doing some turkey nails last year, but they ended up looking more like cartoon chickens. Guess I should stick to the simpler ones!
Did you know that the tradition of Thanksgiving nails really took off in the last decade? It’s amazing how trends can change so quickly! I can’t wait to try some of these designs.
Thanks for the inspiration! Last Thanksgiving, I attempted a leaf design, and it turned out so messy that I jokingly called it ‘abstract art.’ At least it made everyone laugh!