The holidays are upon us, and there’s no better way to show your festive spirit than with some funky Christmas nails. If you’re anything like me, this time of year has you craving fun and creativity, especially when it comes to your nails. The sight of twinkling lights and cheerful decorations outside inspires a desire to bring that same joy to your fingertips. That’s why I created this guide. It’s packed with DIY nail designs that will brighten your holiday season and impress your friends and family.
If you’re someone who loves to express your personality through nail art, then this post is just for you. Whether you’re a seasoned nail enthusiast or just starting out, these designs are easy to achieve and require minimal tools. You don’t need to be a professional nail artist to create stunning holiday looks. I’ve gathered 18 ideas that are whimsical, fun, and perfect for the holiday season. Get ready to bring some sparkle and cheer to your nails!
By the end of this post, you’ll have a treasure trove of creative nail art ideas at your fingertips. From festive reindeer and candy cane stripes to cheerful snowmen and Christmas trees, these designs will help you celebrate the holidays in style. Let’s dive in and make your nails the talk of the holiday party!
Key Takeaways
– Discover 18 unique DIY funky Christmas nail designs that are easy to create, making your holiday season more festive.
– Each design requires common materials, ensuring that you can get started without needing to find specialty items.
– From playful snowmen to glittery Christmas trees, there’s a design for every holiday vibe and personality.
– Detailed tips and tricks are included for each nail art idea, making it simple for anyone to follow along.
– These designs not only enhance your holiday spirit but also offer a fun activity to share with friends and family.
Contents
- 1. Santa and His Sleigh
- 2. Christmas Tree Glitter
- 3. Snowman Delight
- 4. Candy Cane Stripes
- 5. Festive Reindeer
- 6. Gingerbread Man
- 7. Winter Wonderland
- 8. Holiday Lights
- 9. Nutcracker Ballet
- 10. Ornaments Galore
- 11. Polar Bear Fun
- 12. Frosty Snowflakes
- 13. Mistletoe Kisses
- 14. Holiday Wreaths
- 15. Christmas Sweater Patterns
- 16. Jolly Gingerbread Houses
- 17. Christmas Baubles
- 18. New Year Countdown
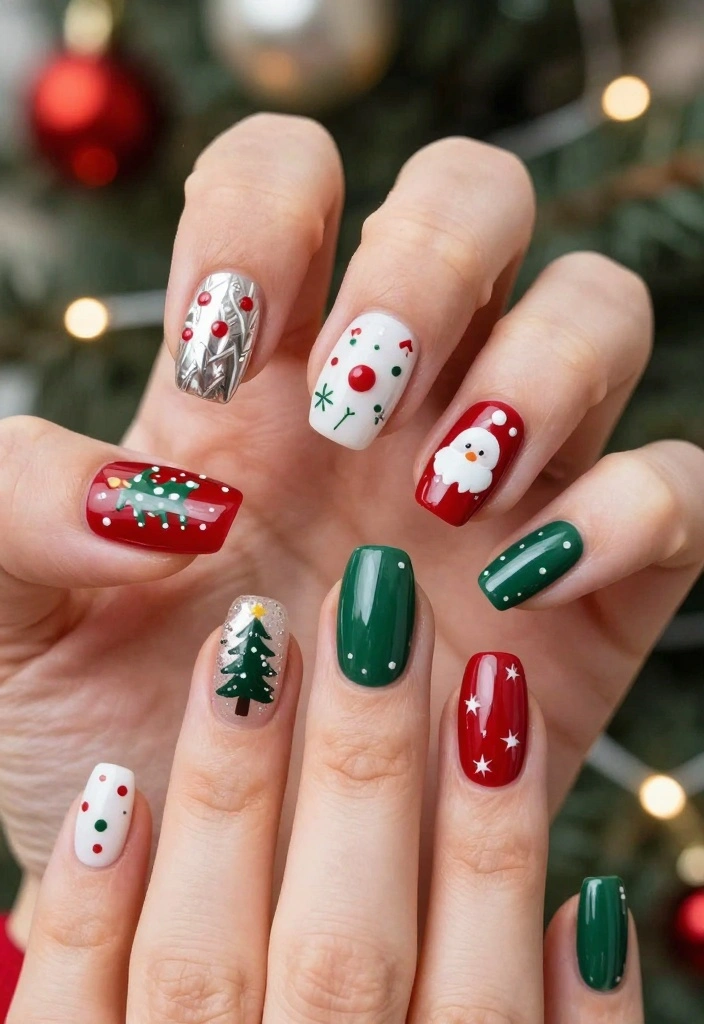
1. Santa and His Sleigh
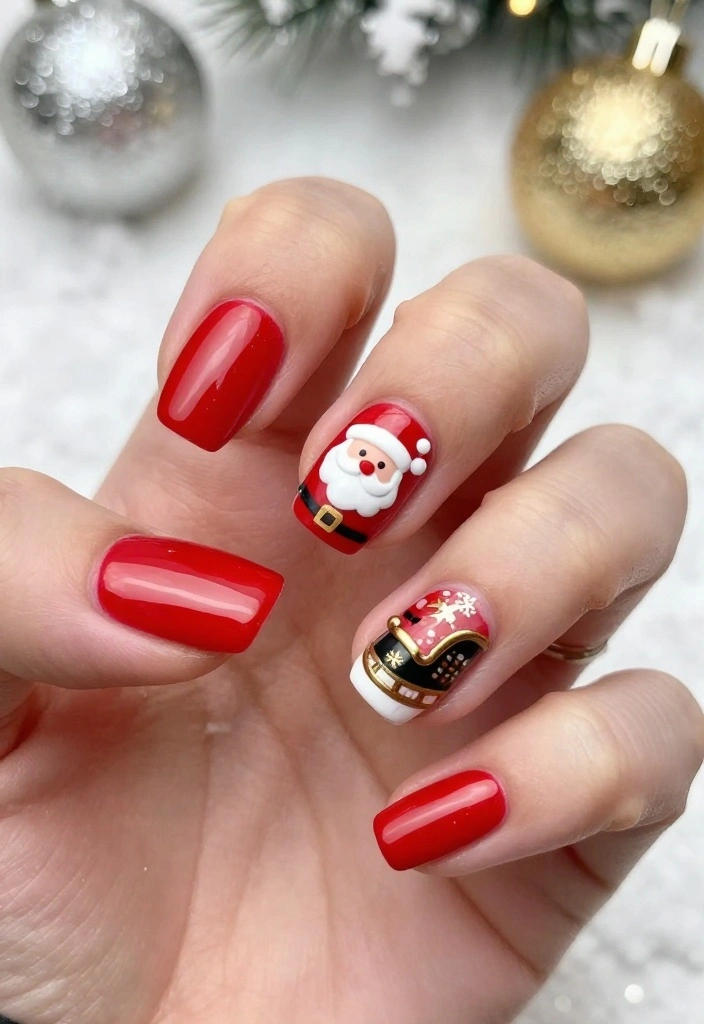
Start your festive nail journey with a design featuring the iconic Santa and his sleigh! This cheerful look brings holiday spirit right to your fingertips. The combination of a vibrant red and sparkling gold creates a playful theme that captures the essence of Christmas cheer.
Use a white base coat for a clean canvas, then paint the rest of your nails bright red to mimic Santa’s outfit. The sleigh can be brought to life with bold gold or silver polish, adding that magical sparkle. Don’t forget to detail Santa’s face and a reindeer in the sleigh using a fine brush for precision. Seal your design with a glossy top coat for a shiny finish!
Consider using nail tape for those crisp lines. Investing in detail brushes will help you achieve those intricate, tiny designs. This festive nail art is perfect for holiday parties and gatherings!
2. Christmas Tree Glitter
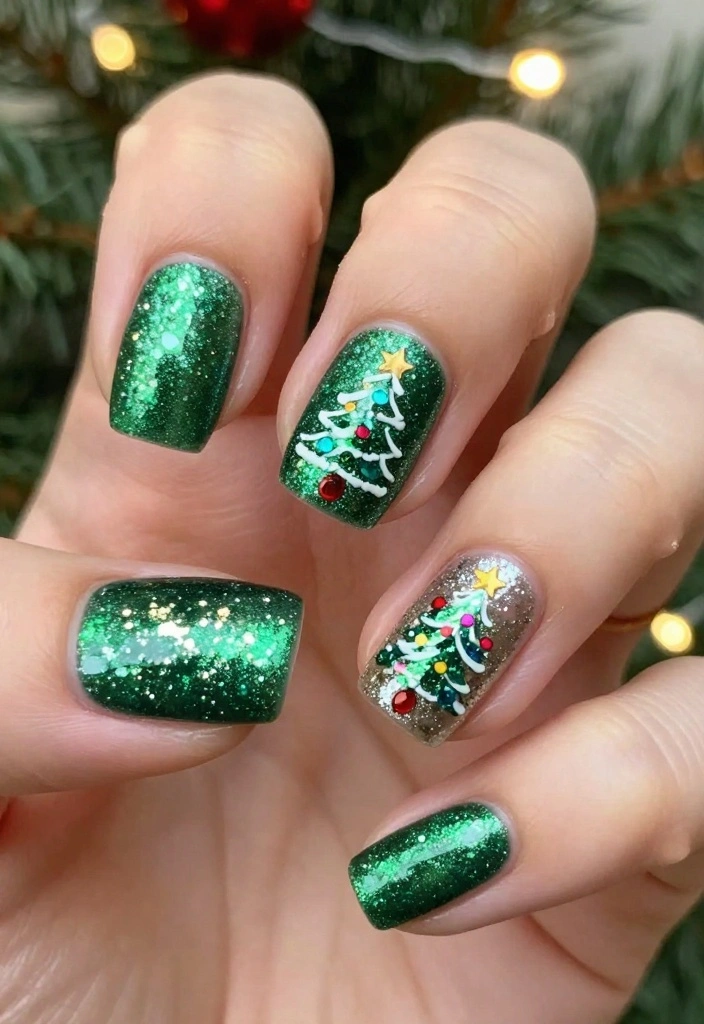
Bring the joy of Christmas trees to your nails with this fun design! The rich green hues combined with sparkling glitter evoke the festive spirit. This look is versatile, making it suitable for casual gatherings or elegant holiday parties.
Start with a deep green base coat that captures the essence of a Christmas tree. Once dry, use a fine brush to create tree shapes on your accent nails with a lighter green or even a shimmering gold. For that extra festive touch, sprinkle fine glitter on top of the wet polish! Add star stickers or paint yellow stars atop your trees for a lovely finishing touch.
Experiment with varying shades of green to add depth. Don’t hesitate to include colorful dots as ornaments for a lively pop of color!
3. Snowman Delight

Craft a whimsical snowman scene on your nails that radiates warmth and joy! This playful design is a delightful way to celebrate winter. Perfect for holiday gatherings, it brings a smile to everyone who sees it.
Begin with a light blue or soft white base coat that resembles a chilly winter sky. Create your snowmen on an accent nail using white polish, adding colorful hats and scarves for charm. Tiny black beads can represent the eyes and buttons, while a sprinkle of glitter mimics falling snow, completing your winter wonderland look!
To create perfect circles for your snowmen, a dotting tool is your best friend. This fun design is sure to bring cheer to your holiday festivities!
📹 Related Video: Snowman Nail Art Tutorial 3 ways!
How To Choose Funky Christmas Nails for Your DIY Holiday Nail Art
Choosing the right funky Christmas nails for your holiday nail art can be a fun and creative process! Here’s a simple guide to help you get started with your DIY nail designs.
1. Nail Length
Think about the length of your nails. Shorter nails might be easier to manage if you’re new to nail art. They can also be less prone to chipping. If you prefer more canvas space for your designs, longer nails can give you that extra room for creativity.
2. Nail Shape
Nail shape is another key factor. Popular shapes include square, oval, and almond. Each shape can give a different vibe to your funky designs. For example, almond nails can make your nail art look elegant, while square nails offer a more modern look. Choose a shape that matches your style and the designs you want to create.
3. Color Palette
Select a color palette that fits the Christmas theme. Traditional red, green, and gold are classic choices. You can also mix in fun colors like blue or pink for a funky twist. Look for nail polishes that are festive and vibrant. You might even consider glitter or metallic finishes to add some sparkle to your designs!
4. Nail Art Tools
Having the right tools will make your DIY process easier. Essential tools include nail brushes, dotting tools, and striping tape. These will help you create detailed designs like snowflakes or candy canes. You might also want to invest in a good top coat to seal your designs and make them last longer.
5. Design Inspiration
Take some time to browse for design inspiration. Websites like Pinterest or Instagram are great for finding funky Christmas nail ideas. Look for designs that you can replicate at home. Consider starting with simpler designs if you’re a beginner, then move on to more complex ones as you gain confidence.
6. Practice on Fake Nails
Before you go all out on your nails, practice on fake nails or nail tips. This allows you to refine your technique without the risk of making mistakes on your actual nails. You can experiment with colors and patterns until you feel ready to transfer your designs to your real nails.
Pro Tip: Don’t forget to prep your nails before starting any design! Clean, buff, and apply a base coat to ensure better adherence of nail polish and designs. This step is essential for achieving a long-lasting and vibrant look.
With these tips, you’re ready to dive into DIY funky Christmas nails that are not only stylish but also fun to create! Enjoy the process, and let your creativity shine this holiday season!
4. Candy Cane Stripes

Nothing embodies Christmas quite like candy canes! This design is a festive twist that’s both simple and stylish. It works beautifully for holiday parties or cozy family gatherings.
Start with a crisp white base coat, allowing it to dry fully. Then, using red polish, create diagonal stripes across each nail. For added flair, alternate between candy cane stripes and solid red nails for a fun effect. Finish with a glossy top coat to seal the design and enhance its festive look!
For clean lines, a striping brush is a must. Nail tape can also help you achieve professional-looking stripes with ease!
Did you know candy cane stripes can be polished in under 15 minutes? With funky christmas nails, a crisp white base and simple red diagonals create a festive, high-impact look. Pro tip: mix striped and solid nails for instant party-ready nails.
🎨 Nail Art Made Easy!
Transform your DIY nail designs with our guide, perfect for busy moms who love creativity and style.
5. Festive Reindeer
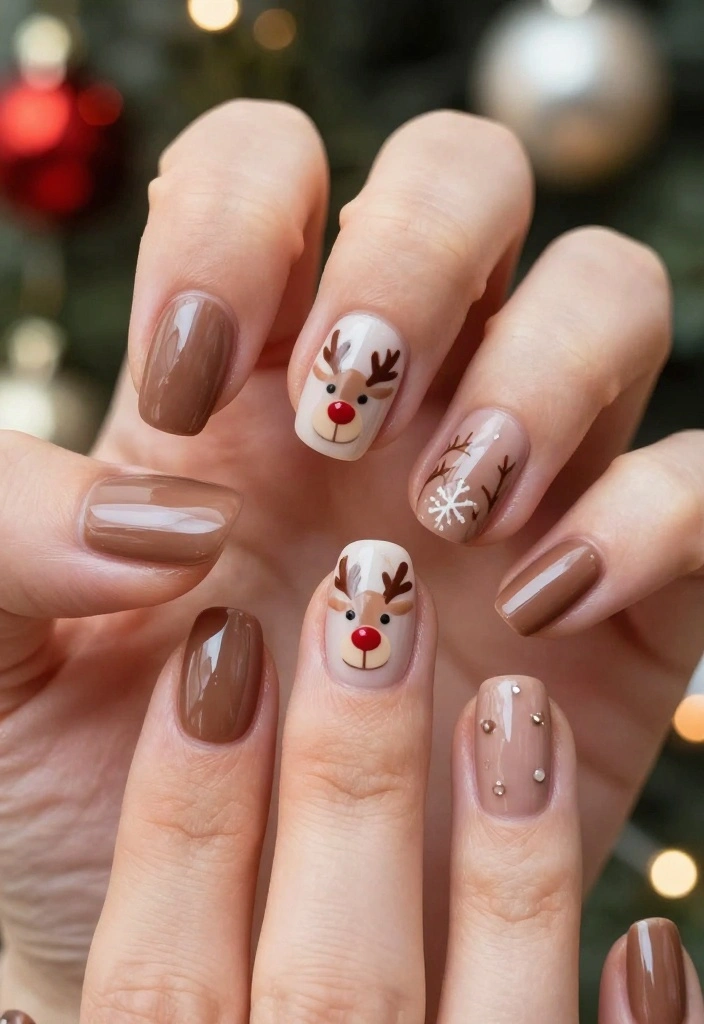
Capture the holiday spirit with adorable reindeer nail art! This playful design is perfect for spreading cheer during the festive season. It’s a delightful way to showcase your holiday spirit.
Start with a soft brown base coat, emulating the reindeer’s fur. On your accent nails, use white polish to create cute reindeer faces, adding antlers with darker brown or black polish. Tiny dots for the eyes and noses can be created with a dotting tool for precision. Finish with a glossy top coat to make those charming faces pop!
Feel free to experiment with different expressions for each reindeer to add a whimsical touch. Consider using glitter polish for an extra festive flair!
6. Gingerbread Man
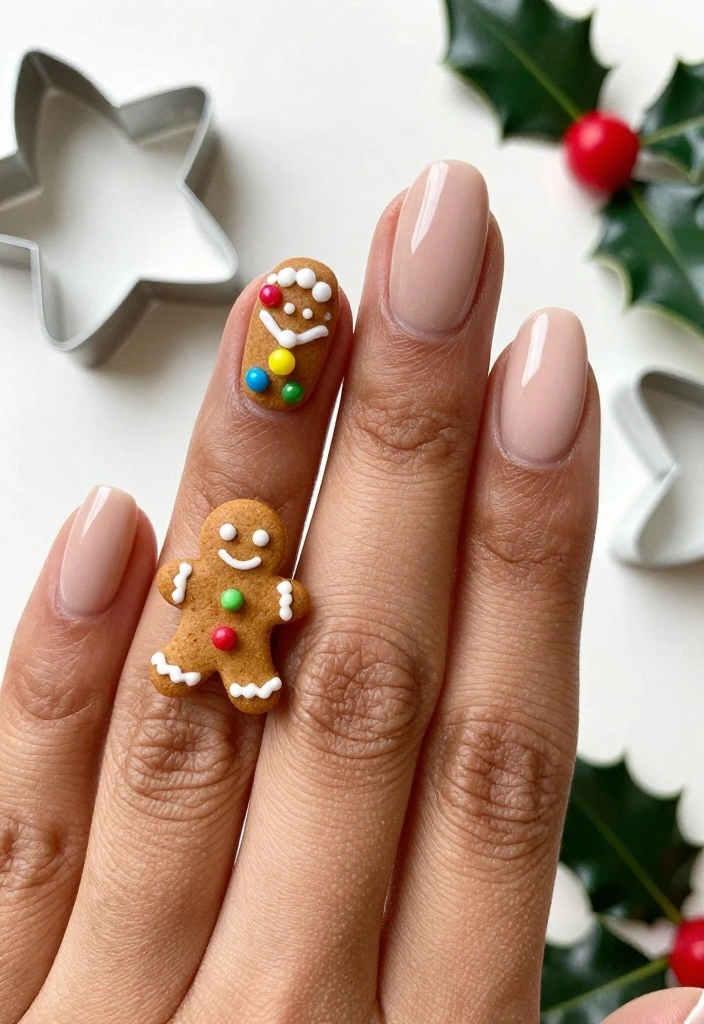
Infuse sweetness into your holiday nails with gingerbread designs! This charming look is perfect for any festive celebration. It’s a fun way to show off your holiday spirit.
Start with a nude base coat to represent the gingerbread cookie. Once dry, use brown polish to shape a gingerbread man on your accent nail, adding colorful buttons and icing with bright polishes. Tiny beads can create a delightful 3D effect! Top it off with a matte finish for an authentic cookie feel.
For fine detailing on your gingerbread man, a toothpick works wonders. You can add a glossy top coat to other nails for a fun contrast!
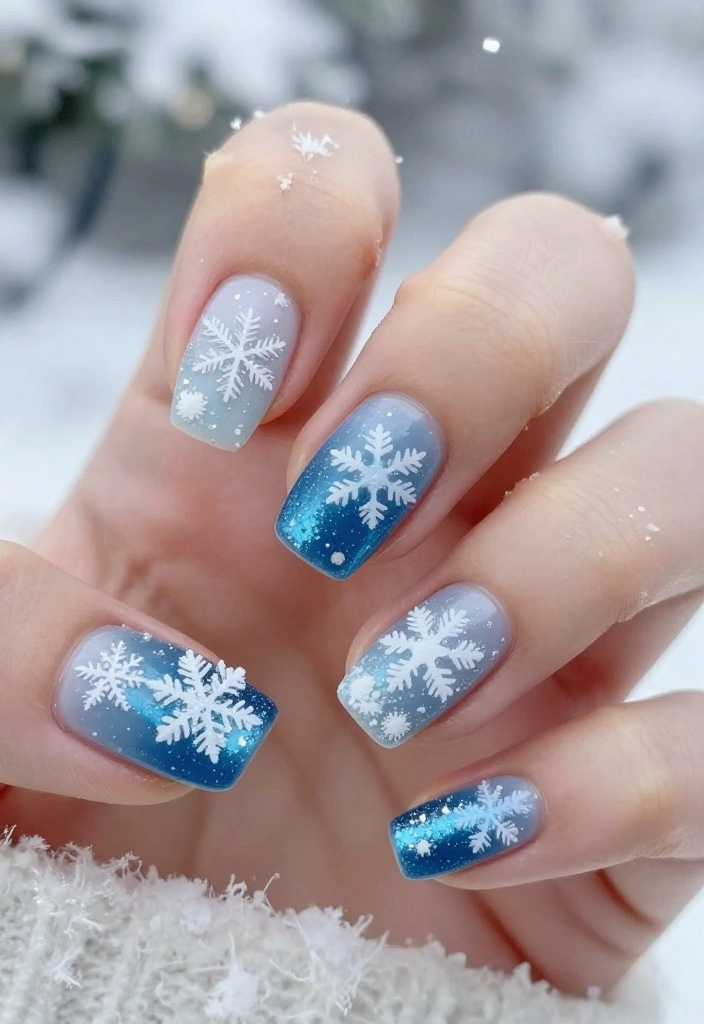
7. Winter Wonderland
Celebrate the beauty of winter with a stunning winter wonderland nail design! This elegant look is perfect for festive occasions and adds a touch of grace to your holiday style.
Begin with a soft blue base coat to create a serene backdrop of a snowy sky. Use white polish to draw delicate snowflakes on your accent nails with a fine brush. Layer some glitter on top for that sparkling snow effect, enhancing the overall elegance of the design!
For perfect snowflakes, a star-shaped tool or even a toothpick can help you create intricate designs. Mixing different sizes of snowflakes adds visual interest and charm!
8. Holiday Lights

Brighten your holiday spirit with colorful nail designs inspired by festive lights! This lively look is perfect for parties and gatherings. It captures the joy of the season in a fun way.
Start with a neutral base coat and use a fine brush to create wavy lines that represent string lights. Choose vibrant colors like reds, blues, and greens for the lights. A glossy top coat will enhance the brightness of your lights!
For perfect circles representing light bulbs, a dotting tool is a great choice. You can also alternate nail shapes for an added playful twist!
9. Nutcracker Ballet

Honor the classic holiday performance with Nutcracker-themed nail art! This charming design adds a touch of elegance and creativity to your festive look. It’s perfect for holiday soirées and gatherings.
Start with a light pink or cream base coat. On your accent nails, illustrate the Nutcracker or ballet slippers with soft pastels and bold colors. Tiny details like the Nutcracker’s face and costumes can be painted with a fine brush for added flair.
A steady hand is essential for this intricate design. Don’t hesitate to mix colors for vibrant costumes that reflect the holiday spirit!
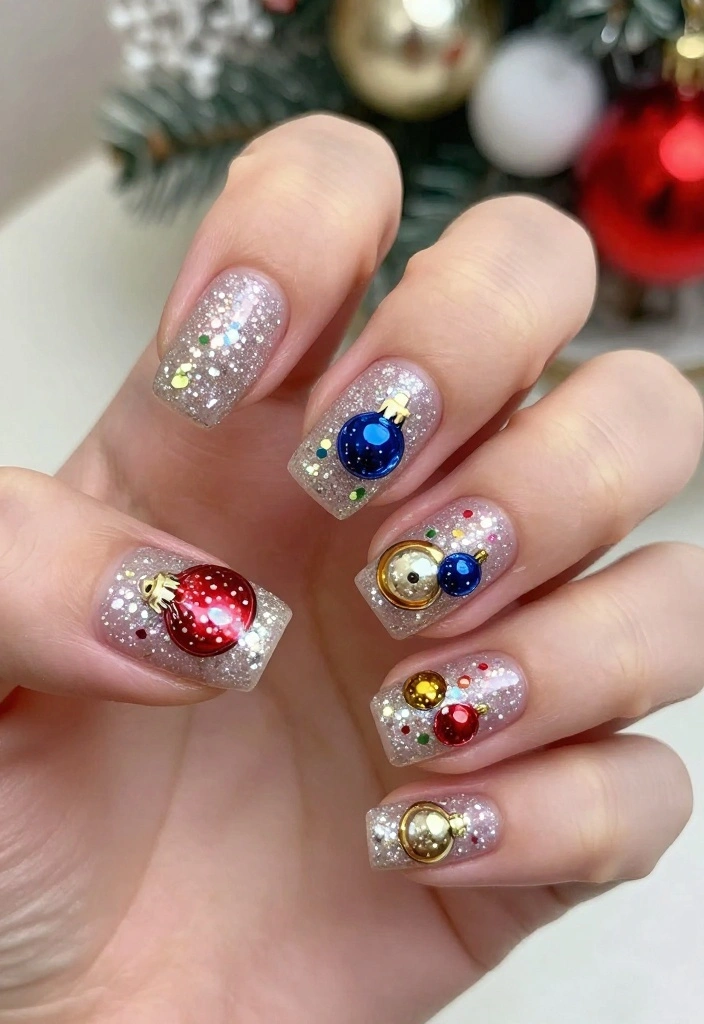
10. Ornaments Galore
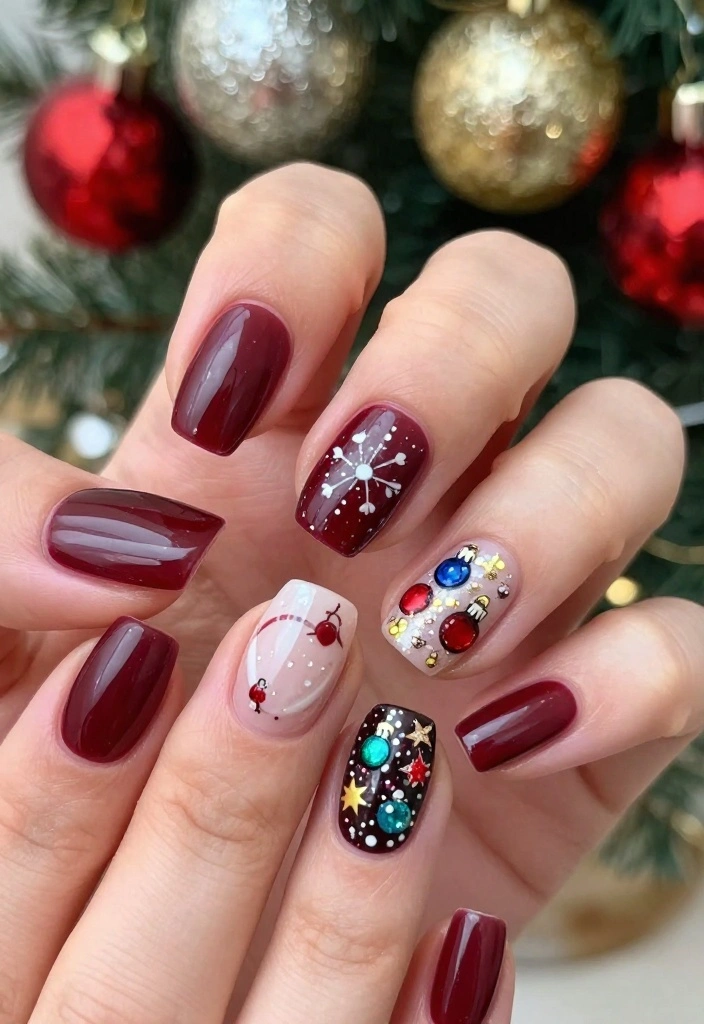
Deck your nails with festive ornaments inspired by your favorite holiday decorations! This lively design adds fun and joy to your holiday look. Perfect for parties and celebrations, it captures the essence of the season.
Begin with a deep red or green base coat. On your accent nails, create various ornament shapes using a fine brush, incorporating classic holiday colors like gold, silver, and blue. Adding glitter and tiny dots will mimic sparkling lights, enhancing the festive feel!
Using tape can help you achieve perfect circular shapes for your ornaments. Mixing matte and glossy finishes adds texture and visual interest!
11. Polar Bear Fun
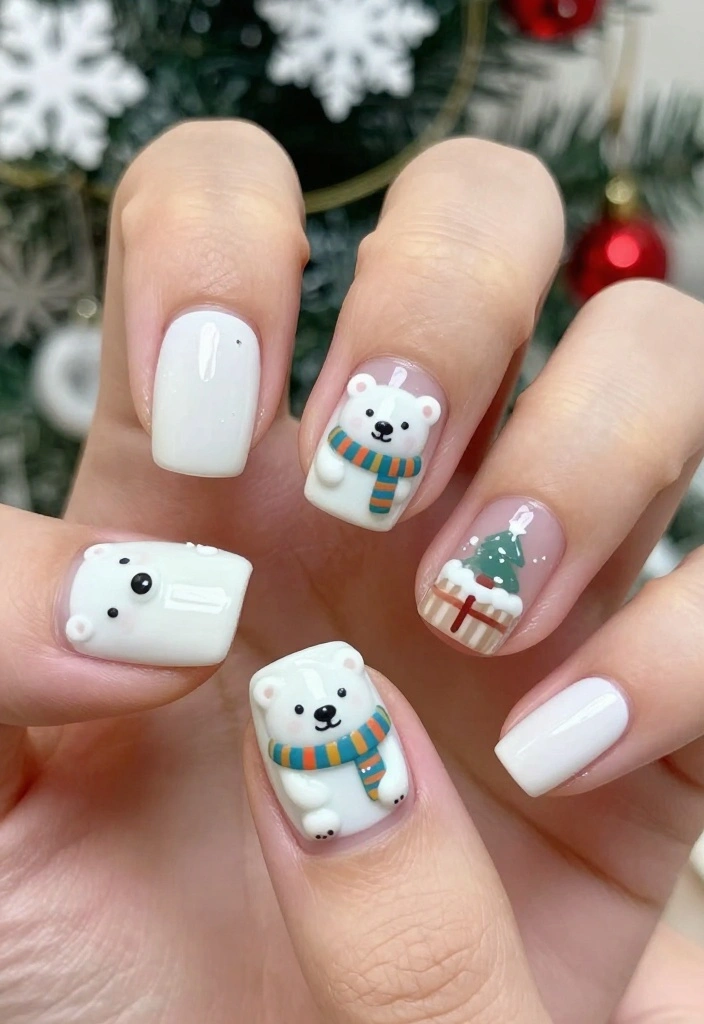
Add a touch of cuteness to your nails with adorable polar bear designs! This playful look is perfect for all ages, making it a delightful choice for the holiday season.
Start with a white base coat to evoke a snowy feel. Create polar bears on your accent nails using white polish for the body, and black for the eyes and nose. A colorful scarf can enhance the charm of your design!
A dotting tool is great for crafting distinct eyes and noses. A sprinkle of glitter can represent snowflakes, making your design even more enchanting!
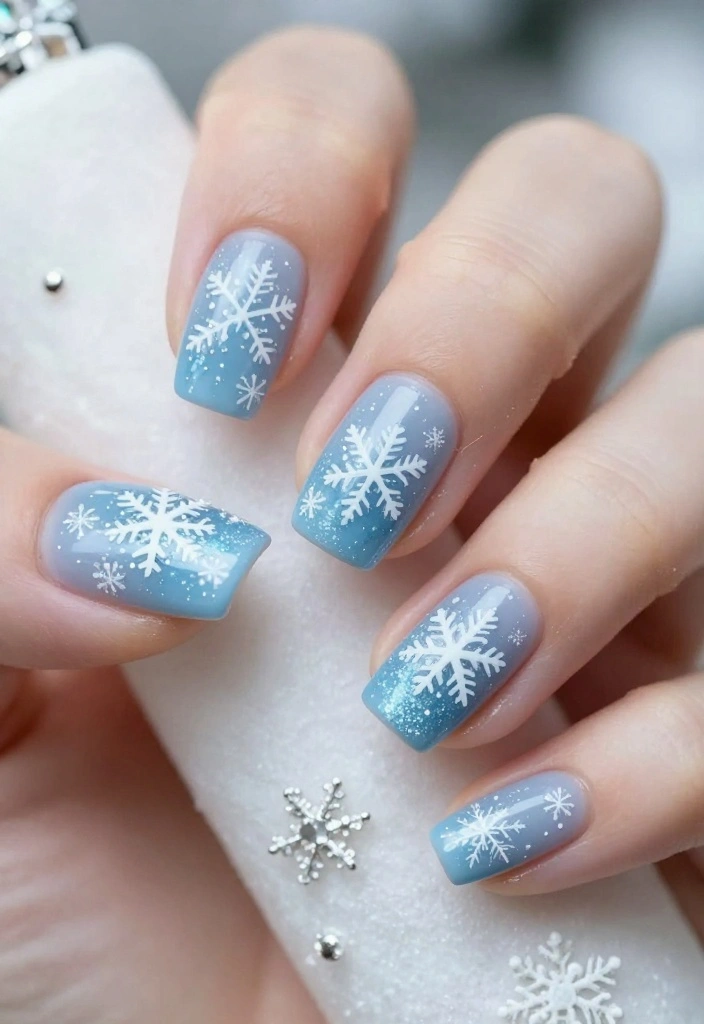
12. Frosty Snowflakes
Create a captivating frosty look with delicate snowflakes on your nails! This sophisticated design is perfect for holiday parties and gatherings, offering a touch of elegance.
Start with a gradient blue base coat that transitions from light to dark, resembling a winter sky. Once dry, use white polish to draw intricate snowflakes on your nails. Adding glitter gives a beautiful frosty effect, enhancing the overall charm of the design!
Experiment with various sizes and styles of snowflakes to create a unique look. A matte top coat can add an extra cool touch to finish this wintery design!
Fun fact: a gradient blue base makes your frosty snowflake nails look like a winter sky, perfect for funky christmas nails. Pro tip: mix snowflake sizes and a touch of glitter for instant frosty drama that lasts all season.
13. Mistletoe Kisses
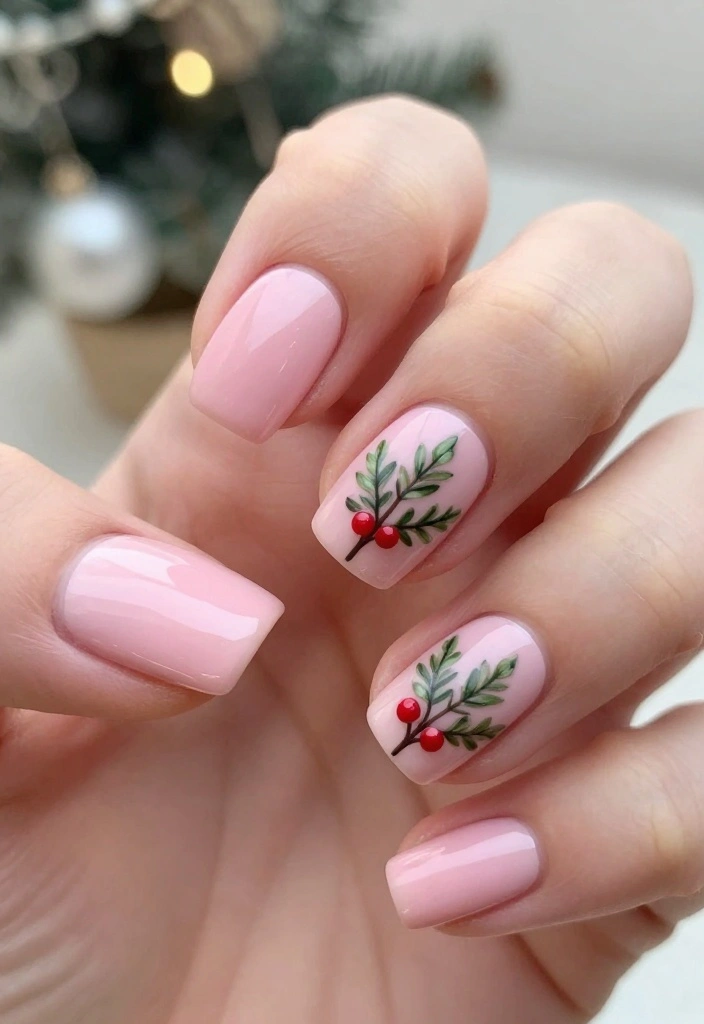
Spread some love this holiday season with a lovely mistletoe nail design! This sweet look embodies the spirit of the holidays and is ideal for gatherings with friends and family.
Begin with a soft pink base coat. On your accent nails, depict mistletoe using green polish for the leaves and tiny red dots for the berries. This simple yet charming design captures the essence of the holiday season beautifully!
To mimic the shine of fresh mistletoe, a glossy top coat adds a lovely finish. Keep the designs straightforward for a clean and elegant look!
DIY Funky Christmas Nails make mistletoe moments feel personal. This soft pink base with green leaves and red berries is perfect for holiday gatherings; add a glossy top coat, and your mani says ‘fun and festive’ without saying a word. Quick, approachable, and totally phone-photo ready.
14. Holiday Wreaths

Embrace the festive spirit of wreaths with delightful nail art! This cheerful design is perfect for any holiday gathering, adding a touch of joy to your look.
Start with a deep green base coat that represents the lushness of evergreens. Create wreaths on your accent nails using darker green polish for the base, and colorful dots for decorations. Tiny red bows add the perfect pop of color!
A toothpick can help achieve precise designs for your wreaths. Layering colors can create a more vibrant and eye-catching look!
15. Christmas Sweater Patterns

Transform your nails into cozy Christmas sweaters with playful patterns! This charming design brings a warm and festive vibe, perfect for holiday celebrations. It’s a fun way to showcase your holiday spirit.
Start with a neutral base coat. Choose a contrasting color like red or green to create knit patterns on your accent nails. Use a dotting tool to make small hearts, snowflakes, or intricate shapes reminiscent of your favorite holiday sweater.
Incorporate various shades for depth and richness in your patterns. A matte top coat enhances the cozy, knitted look beautifully!
16. Jolly Gingerbread Houses
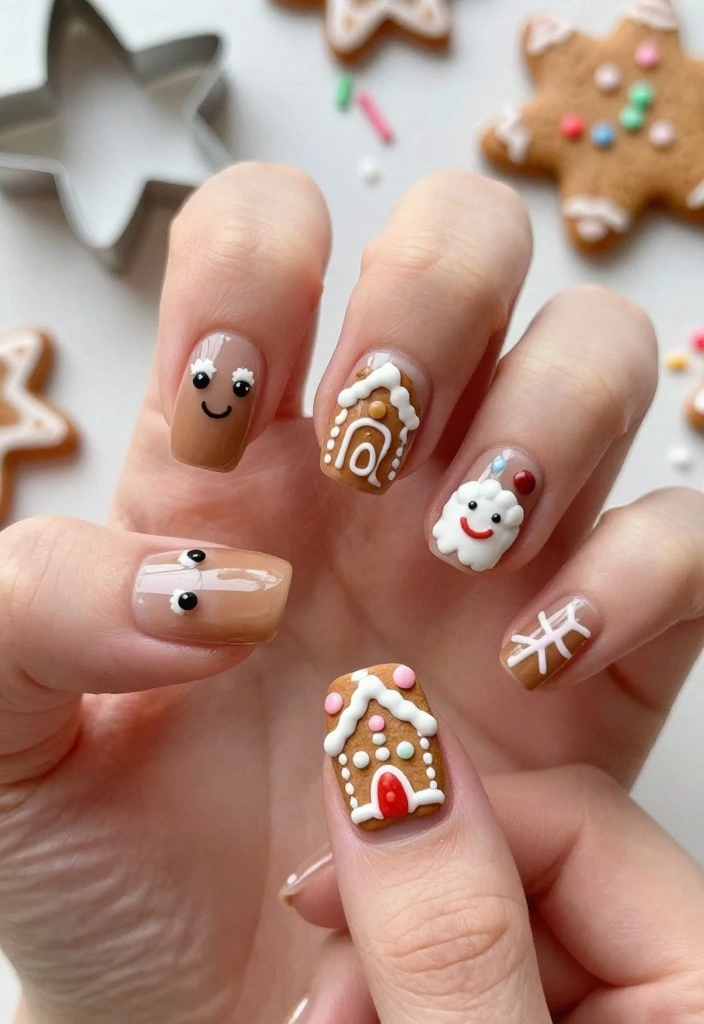
Unleash your creativity with festive gingerbread house designs on your nails! This delightful look captures the magic of holiday baking and is perfect for any festive gathering.
Begin with a nude or light brown polish that mimics gingerbread. Create charming house shapes on your accent nails, using colorful polish for details like windows and candy decorations. Tiny beads or glitter can simulate candy decorations for a fun 3D effect!
This sweet design will surely make your nails the highlight of the room!
17. Christmas Baubles
Shine bright with Christmas bauble designs that add a touch of glamour to your nails! This chic look is perfect for holiday parties and celebrations, capturing the festive spirit beautifully.
Start with a glittery base coat or a solid color of your choice. On your accent nails, paint various bauble shapes using metallic or sparkling polishes. Adding details like glitter and tiny dots gives depth to your baubles!
Mixing up shapes, such as round, heart, or star, adds a playful twist to your design. A glossy top coat will enhance the shine of those festive baubles!
18. New Year Countdown

Celebrate the New Year in style with countdown nail designs! This fun look sets the tone for your festivities, making it perfect for ringing in the New Year.
Use a dark navy or black base to represent the night sky. On your accent nails, paint colorful fireworks or the numbers counting down to midnight. This design adds a festive flair, ideal for your New Year’s celebrations!
Glitter polish can imitate sparkling fireworks, making your nails shine brightly. Experiment with different colors to make your countdown design pop!
Conclusion
With these 18 funky Christmas nail designs, you can spread holiday cheer right at your fingertips!
Experiment with colors, patterns, and techniques that resonate with your style, making your nails a festive statement this season.
Don’t hesitate to share your creations with friends and family. Your nails can be the perfect conversation starter during holiday gatherings!
Frequently Asked Questions
What are the easiest DIY techniques to create funky christmas nails at home?
Getting started with funky christmas nails at home can be quick and fun. Start with a clean base, pick 2-3 colors from your holiday palette, and use tape or a dotting tool for easy shapes. Try candy cane stripes with striping tape, polka dots with a dotting tool, or a glitter accent nail for extra pop. This do it yourself approach is perfect for holiday nail art and helps you build confidence for bigger designs later.
Grab a quick-dry top coat to seal everything and keep your look fresh for days.
What supplies do I need to start DIY funky christmas nails on a budget?
To start do it yourself funky christmas nails on a budget, you don’t need fancy gear—just a few essentials. A clear base coat and a solid top coat, 2-3 festive polishes (red, green, white or metallic), and a simple nail art tool like a dotting tool or a bobby pin. Add striping tape for clean lines and a small brush for details. You can swap expensive sets for affordable bottles and still get striking holiday nail art results.
Pro tip: use what you already have at home and layer colors to stretch your palette.
How can I make holiday nail art last longer and resist chipping?
Want your funky christmas nails to last longer? Prep is king: push back cuticles, lightly buff the surface, and apply a thin base coat. Apply 1-2 coats of color, then a long-lasting top coat, sealing the tips with each layer. Let layers dry fully and avoid hot water for a few hours after painting. A durable top coat between layers and a quick-dry spray can help prevent chips during holiday nail art sessions.
Touch up any chips as they appear and finish with cuticle oil to keep nails healthy.
Which funky christmas nail designs are easiest for beginners to try?
Here are beginner-friendly options for funky christmas nails that look great without too much practice: candy cane stripes, color-blocked nails with clean lines, polka dots or simple snowflakes, a tiny tree silhouette, and a glitter or chrome accent nail. Start with a solid base color, use tape for the lines, and add simple shapes with a dotting tool or skinny brush. You’ll create festive holiday nail art that’s easy to replicate and customize.
Practice on a few swatches first and have fun with it.
Can I create funky christmas nails with regular polish, or do I need gel?
Can you do funky christmas nails with regular polish, or do you need gel? Regular polish totally works and is perfect for quick, do it yourself projects. Gel can last longer, but it requires a UV lamp and special remover. If you only have regular polish, seal your design with a strong top coat and reapply as needed to prevent chips. For extra longevity in holiday nail art, avoid soaking hands in water right after painting and cap the edges with each layer.
If you love long-lasting looks, you can explore gel options later, but you can absolutely rock funky christmas nails with normal polish today.
Related Topics
funky christmas nails
holiday nail art
DIY nail designs
beginner friendly
easy nail art
festive designs
quick tips
creative nails
nail art techniques
seasonal nail trends
do it yourself
colorful patterns
These nail designs are so cute! I can’t wait to try the snowman one. Have you ever tried doing your nails while watching a holiday movie? It can get a bit messy, but totally fun!
I love these ideas! I once tried to do a reindeer design and ended up with a nail that looked more like a potato. What do you call a reindeer with bad manners? Rude-olph!
Did you know that the tradition of decorating nails for Christmas goes back to ancient times? It’s so cool to see how styles have changed! Can’t wait to share these ideas with my friends.