Christmas is just around the corner, and that means it’s time to deck the halls and glam up your festive look. If you’re like me, the holiday season has you craving something special for your nails that’s both chic and fun. There’s a certain magic in subtly stunning nude Christmas nails that can elevate your holiday outfits without overwhelming them. Whether you’re sipping cocoa by the fire or attending a lively holiday party, the right nail art can make you feel like the queen of holiday glam!
This post is for all you DIY nail art enthusiasts, whether you’re a seasoned pro or just starting out. If you love expressing your creativity with your nails and want to impress friends and family, you’re in for a treat. I’ve pulled together 18 easy nail art ideas that are not only stylish but also simple enough to do at home. Each design is perfect for capturing the holiday spirit while keeping it classy and understated. So grab your nail polish and let’s get crafting some festive looks that will have everyone admiring your hands!
Get ready to dive into a world of designs that blend elegance with holiday cheer. From sparkly tips to charming snowflakes, you’ll find inspiration in every idea. You’ll learn how to achieve these looks with minimal fuss, making sure your holiday preparations don’t turn into a stressful chore. Let’s get started on making your nails the talk of the town this season!
Key Takeaways
– Explore 18 easy nail art designs that combine elegance and holiday spirit, perfect for at-home DIY enthusiasts.
– Learn how to create stunning nude Christmas nails with simple techniques that anyone can master.
– Each design features practical tips and tricks to achieve a professional look without the salon price.
– The styles range from classic and subtle to fun and festive, catering to different tastes and occasions.
– Get inspired to express your holiday cheer through your nails while keeping your style chic and sophisticated.
Contents
- 1. Classic Nude with Silver Glitter Tips
- 2. Matte Nude with Gold Foil Accents
- 3. Nude Ombre with Snowflake Nail Art
- 4. Nude Nails with Red Accent Design
- 5. Sparkly Nude and Green Tree Nail Art
- 6. Nude with Candy Cane Stripes
- 7. Nude with Jewel Accent Nails
- 8. Festive Glitter Fade on Nude Base
- 9. Nude Nails with Festive Poinsettias
- 10. Subtle Nude with Dots and Dashes
- 11. Nude with Holiday Lettering
- 12. Glitter Snowfall on Nude
- 13. Simple Nude with Tiny Holly Designs
- 14. Nude with Wreath Nail Art
- 15. Geometric Nude with Gold Lines
- 16. Velvet Nude with Rhinestone Accents
- 17. Nude Nails with Minimalist Star Designs
- 18. Glossy Nude with Metallic Accents
1. Classic Nude with Silver Glitter Tips

Kick off your holiday nail looks with a classic nude base and sparkling silver glitter tips. This design strikes the perfect balance between understated elegance and festive flair. The clean nude shade sets a refined tone, while the glitter tips add just the right amount of sparkle for celebrations.
To achieve this beauty, start with two coats of your favorite nude polish for a smooth finish. Then, take a fine silver glitter polish and gently brush it onto the tips, blending it for a soft gradient effect. Finish with a top coat to create a polished look that also elongates your fingers.
Use a makeup sponge for precise glitter application to enhance the effect!
Ingredients:
– Nude nail polish
– Silver glitter polish
– Top coat
Step-by-Step Instructions:
1. Apply a base coat to protect your nails.
2. Paint two layers of nude polish.
3. Allow to dry and then use a sponge to apply silver glitter to the tips.
4. Seal with a top coat.
FAQs:
– How long does this design last? With a good top coat, it can last up to a week.
2. Matte Nude with Gold Foil Accents

Elevate your holiday nails with matte nude polish and eye-catching gold foil accents. This stunning combination brings a touch of luxury while retaining a chic vibe. The matte finish adds depth to your nails, while the gold foil provides a striking contrast that catches the light beautifully.
Begin by applying a matte nude polish to your nails. Once it’s dry, use a top coat to adhere small pieces of gold foil randomly across your nails for a whimsical look. This design is perfect for making a statement without being overly flashy.
Be sure to let the base polish dry completely before applying the foil for best results!
Ingredients:
– Matte nude nail polish
– Gold foil
– Top coat
Step-by-Step Instructions:
1. Apply a base coat.
2. Paint two layers of matte nude polish.
3. Once dry, apply a top coat and gently press on pieces of gold foil.
4. Finish with another top coat for durability.
FAQs:
– Can I use regular gold polish instead of foil? Yes, but you won’t achieve the same textured effect.
📹 Related Video: Sepia Serpent |Nude Matte Snakeskin Gold Foil| Glow in the Dark Set
3. Nude Ombre with Snowflake Nail Art
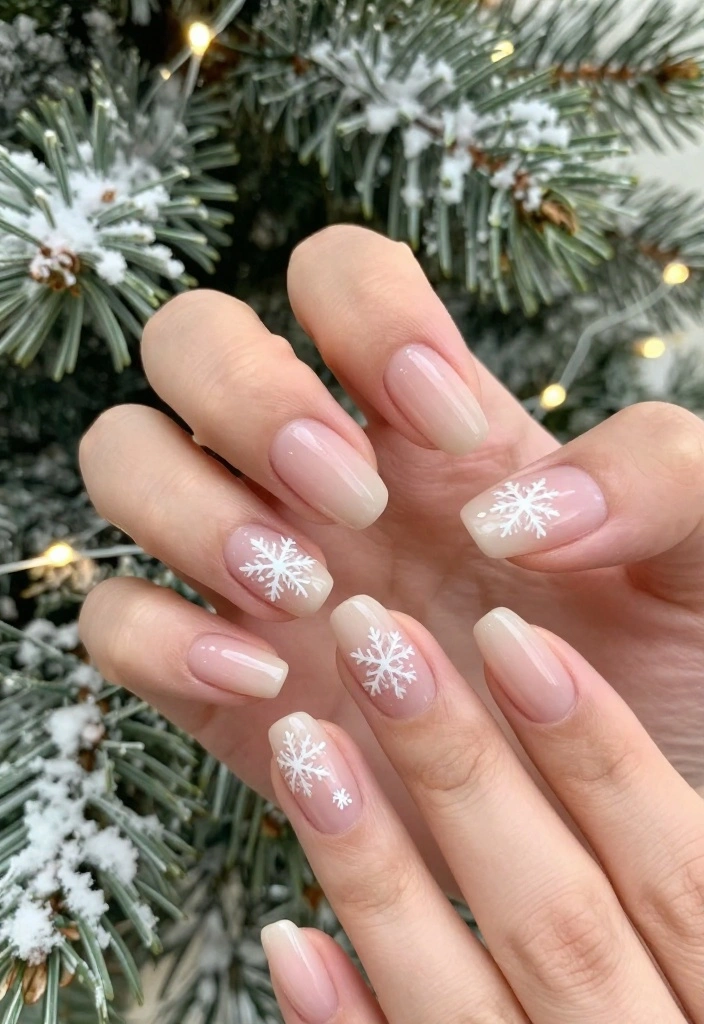
Bring the joy of winter to your nails with a nude ombre effect paired with delicate snowflake designs. This charming look captures the essence of the season while keeping your style chic and festive. The soft gradient gives your nails a dreamy quality, perfect for holiday gatherings.
Start with a nude base and blend in a lighter shade towards the tips. Once dry, use a fine brush to paint tiny snowflakes on one or two accent nails. Finish with a top coat to protect your festive artwork. This design is both playful and elegant, making it suitable for any occasion.
A dotting tool can help create perfect snowflake shapes!
Ingredients:
– Nude nail polish
– White or light nude polish
– Nail art brush
– Top coat
Step-by-Step Instructions:
1. Apply a base coat.
2. Paint two layers of nude polish.
3. Use a makeup sponge to blend a lighter shade towards the tips.
4. Once dry, create snowflakes on accent nails.
5. Seal with a top coat for shine and longevity.
FAQs:
– How do I create the ombre effect? Use a makeup sponge to dab on the lighter color gradually for blending.
💅 DIY Nail Art Made Easy
Transform your holiday nails effortlessly with our guide tailored for busy moms who love glam.
4. Nude Nails with Red Accent Design

Add a festive touch with nude nails featuring bold red accents. This classic holiday combination is perfect for those who want to celebrate without going overboard. The mix of nude and red is striking yet elegant, making it a great choice for any festive occasion.
Start with a nude base on all nails, then apply a bold red polish on one or two accent nails. You can create fun designs like stripes, dots, or hearts to keep it playful while maintaining a classy vibe. This way, you can incorporate holiday spirit without overwhelming your look.
Striping tape can help achieve cleaner lines for your designs!
Ingredients:
– Nude nail polish
– Red nail polish
– Striping tape (optional)
– Top coat
Step-by-Step Instructions:
1. Apply a base coat to protect your nails.
2. Paint two layers of nude polish.
3. Apply red polish on chosen accent nails.
4. Use striping tape for designs, if desired.
5. Finish with a top coat.
FAQs:
– What if I want to add more designs? Feel free to add glitter or other holiday symbols for a fun twist!
5. Sparkly Nude and Green Tree Nail Art

Celebrate the holiday season with sparkly nude nails featuring cute green Christmas trees! This playful design is perfect for spreading joy while keeping your look chic. The nude base serves as a lovely canvas for the vibrant green trees, making it a delightful choice for festive gatherings.
Start by painting all your nails with a nude polish. Once dry, use a thin brush to create small tree shapes on a couple of accent nails with green polish. Add tiny shimmers or stars on top for extra whimsy. A top coat will keep everything bright and shiny throughout the holiday season.
Consider adding a tiny gold star on top of each tree for added charm!
Ingredients:
– Nude nail polish
– Green nail polish
– Gold or glitter polish
– Top coat
Step-by-Step Instructions:
1. Apply a base coat for protection.
2. Paint two layers of nude polish.
3. On accent nails, use green polish to paint tiny Christmas trees.
4. Add glitter or gold polish for decoration.
5. Seal with a top coat.
FAQs:
– Can I use other colors for trees? Absolutely! Try different colors for a fun twist!
How To Choose the Perfect Nude Christmas Nails
Choosing the right nude Christmas nails can enhance your holiday glam while keeping it classy. Here’s a simple guide to help you select the perfect design to match your festive spirit.
1. Nail Shape
Consider your preferred nail shape. Common choices are square, oval, almond, and stiletto. Each shape can influence the style of nail art you can create. For instance, almond shapes can give a more elegant vibe, while stiletto shapes can add a touch of drama. Know your preference to help narrow down your options.
2. Base Color
Nude nails come in various shades, from light beige to deeper taupe. Choose a color that complements your skin tone. A perfect match can enhance your overall look. Test a few shades on your nails before deciding. A good rule of thumb is to try a shade that’s one or two tones lighter or darker than your natural nail color.
3. Nail Art Design
Determine what type of nail art you want. For a festive touch, think about adding holiday-themed designs like snowflakes, Christmas trees, or candy canes. You can keep it simple with dots or stripes, or go bold with glitter and foils. Sketch out your ideas or use nail art apps for inspiration, ensuring your design matches the vibe you want to portray.
4. Quality of Products
Invest in quality nail products. Look for nail polishes that are chip-resistant and have a good finish. Brands that offer vegan or cruelty-free options can be a plus if you prefer ethical choices. Always read reviews and check ingredient lists to ensure that you’re using safe products that won’t damage your nails.
5. Tools You’ll Need
To achieve the best results, gather your tools. You’ll need a base coat, nude nail polish, top coat, nail art brushes, dotting tools, and any additional nail art accessories you plan to use. Having the right tools will make the application process smoother and more enjoyable.
6. Budget Consideration
Finally, factor in your budget. Nail art can range from inexpensive to quite luxurious. Set a budget for how much you’re willing to spend on products and tools. Keep an eye out for sales or bundles to save money while still getting the quality you want.
Pro Tip: Start with simple designs if you’re new to DIY nail art. You can gradually try more complex styles as you gain confidence. Remember, practice makes perfect, and don’t be afraid to experiment!
By following these steps, you’ll be well on your way to choosing the perfect nude Christmas nails that suit your style and elevate your holiday look. Enjoy the process and let your creativity shine!
6. Nude with Candy Cane Stripes

Capture the sweetness of Christmas with nude nails adorned in candy cane stripes. This charming design is perfect for those who want a festive touch without going overboard. The red and white stripes against the nude create a cheerful vibe, bringing holiday spirit right to your fingertips.
Start with a nude base, then use red and white striping polish to create diagonal stripes across your nails. You can choose to go bold with all nails or opt for one accent nail for a subtler approach. Finish with a top coat to keep your stripes crisp and clean throughout the season.
Ensure your base coat is completely dry to prevent any smudging during application!
Ingredients:
– Nude nail polish
– Red striping polish
– White striping polish
– Top coat
Step-by-Step Instructions:
1. Apply a base coat to protect your nails.
2. Paint two layers of nude polish.
3. Use red and white striping polishes to create diagonal stripes.
4. Finish with a top coat for durability.
FAQs:
– How can I make the stripes look cleaner? Using striping tape can help create clean and even lines!
7. Nude with Jewel Accent Nails

Make a statement with stunning nude nails paired with jewel-tone accent nails. This glamorous look is ideal for holiday parties where you want to shine bright. The nude base allows the jewel tones to pop, transforming your nails into a striking focal point.
Start with a nude polish on all nails. Choose a few accent nails to paint in rich jewel tones like emerald, sapphire, or ruby. Once dry, you can enhance your design with rhinestones or gems for added sparkle. Seal everything with a top coat for a glossy finish that lasts throughout your celebrations.
Select gems that match your outfit for a cohesive look!
Ingredients:
– Nude nail polish
– Jewel-tone nail polishes
– Rhinestones or gems
– Top coat
Step-by-Step Instructions:
1. Apply a base coat to protect your nails.
2. Paint two layers of nude polish.
3. On accent nails, apply jewel-tone polish and let dry.
4. Place rhinestones or gems on wet polish or use nail glue for adherence.
5. Seal everything with a top coat.
FAQs:
– What if I don’t have rhinestones? You can use glitter for a similar effect!
8. Festive Glitter Fade on Nude Base

Infuse some festive sparkle into your look with a glitter fade on a nude base! This design is perfect for those who want a hint of glitz without overwhelming their style. The gradual fade of glitter adds a touch of holiday magic while remaining elegant and sophisticated.
Begin by painting your nails with nude polish and allowing it to dry completely. Next, using a glitter polish, apply it predominantly at the tips, gently fading it down towards the base for a beautiful gradient effect. Seal with a top coat for long-lasting shine.
A sponge can help achieve a softer transition between the glitter and the nude base!
Ingredients:
– Nude nail polish
– Glitter nail polish
– Top coat
Step-by-Step Instructions:
1. Apply a base coat for protection.
2. Paint two layers of nude polish and let dry.
3. Use a sponge to apply glitter at the tips and blend downwards.
4. Finish with a top coat for shine and durability.
FAQs:
– Will this design last? Yes, especially with a good top coat!
9. Nude Nails with Festive Poinsettias

Bring the beauty of the holiday season to your nails with festive poinsettia designs on a nude base. This charming nail art captures the spirit of Christmas while allowing you to showcase your creativity in an elegant way. The combination of nude and vibrant colors creates a striking contrast.
Start with a nude base coat, applying a second layer for a rich finish. Once dry, use a fine brush to paint tiny poinsettia flowers on selected accent nails with red and green polish. A touch of gold in the center can elevate the design even further. Finish with a top coat to protect your artwork.
Keep the design simple for ease; practicing a few times can help you gain confidence!
Ingredients:
– Nude nail polish
– Red and green polish
– Gold polish
– Top coat
Step-by-Step Instructions:
1. Apply a base coat to protect your nails.
2. Paint two layers of nude polish.
3. Use a fine brush to create poinsettia flowers on accent nails.
4. Add gold centers to the flowers.
5. Finish with a top coat for durability.
FAQs:
– Can I use other flower designs? Yes, feel free to try different holiday flowers!
Did you know that 2 simple layers of a nude base make intricate poinsettias pop without overwhelming the nail? With 5 minutes of practice, you can master festive nude Christmas nails that look chic on any holiday outfit.
10. Subtle Nude with Dots and Dashes

For a chic and understated look, try subtle nude nails adorned with simple dots and dashes. This minimalist design is ideal for those who want elegance without too much fuss during the festive season. The simplicity of this design allows for versatility, making it suitable for any occasion.
Paint your nails with a nude base, and once dry, use a dotting tool or fine brush to create tiny dots and dashes in contrasting colors like white or gold. This design is easy enough for beginners while still being stylish. Finish with a top coat to enhance the look and ensure durability.
Keep the designs asymmetrical for a trendy and modern feel!
Ingredients:
– Nude nail polish
– Contrast polish (white or gold)
– Dotting tool or fine brush
– Top coat
Step-by-Step Instructions:
1. Apply a base coat for protection.
2. Paint two layers of nude polish.
3. Use a dotting tool to create dots and dashes on your nails.
4. Seal with a top coat for a clean finish.
FAQs:
– Can I use other designs instead of dots? Absolutely! You can experiment with various shapes.
11. Nude with Holiday Lettering

Add a personal touch to your nails with holiday lettering on a nude base. This charming design allows you to express seasonal greetings while staying stylish. It’s perfect for holiday parties where you want to make a statement without being over the top.
Start with your nude polish on all nails. Once dry, pick a contrasting color like white or gold to write simple holiday phrases or single words like ‘Joy’ or ‘Noel’ on a couple of accent nails. This unique touch makes your nails festive and personal. Seal with a top coat for protection.
A fine brush will help you achieve more precise lettering!
Ingredients:
– Nude nail polish
– White or gold polish
– Fine brush
– Top coat
Step-by-Step Instructions:
1. Apply a base coat to protect your nails.
2. Paint two layers of nude polish.
3. Write your holiday phrases on accent nails with contrasting polish.
4. Seal everything with a top coat.
FAQs:
– What if my handwriting isn’t great? Practice on paper first!
12. Glitter Snowfall on Nude

Capture the magic of winter with a glitter snowfall effect on nude nails. This enchanting design gives the illusion of sparkling snowflakes against a warm nude base, making it ideal for the holiday season. It’s a beautiful way to embrace the winter wonderland without losing your chic style.
Begin with a nude polish as your base. After it dries, use a clear or shimmery glitter polish to create dots or streaks, simulating snowfall over your nails. This elegant design is simple enough for beginners to recreate at home. Seal with a top coat for a polished finish.
Be playful with your glitter placement for a more organic look!
Ingredients:
– Nude nail polish
– Clear or shimmery glitter polish
– Top coat
Step-by-Step Instructions:
1. Apply a base coat for protection.
2. Paint two layers of nude polish.
3. Using glitter polish, create snow-like effects on your nails.
4. Finish with a top coat for shine and longevity.
FAQs:
– Does the glitter need to be a specific type? No, any glitter polish works!
13. Simple Nude with Tiny Holly Designs

Celebrate the season with simple nude nails featuring tiny holly designs. This classic look is understated yet festive, making it perfect for everyday wear during the holidays. The combination of nude with bright green and red creates a beautiful contrast that captures the holiday spirit.
Start with a nude polish on all nails. Once dry, use a fine brush to create small holly leaves and berries on a couple of accent nails. Green for the leaves and red for the berries will pop against the nude background. Finish with a top coat to ensure longevity and shine.
Keep the designs simple for a cleaner, more sophisticated look!
Ingredients:
– Nude nail polish
– Green and red polish
– Fine brush
– Top coat
Step-by-Step Instructions:
1. Apply a base coat to protect your nails.
2. Paint two layers of nude polish.
3. Use a fine brush to create holly designs on accent nails.
4. Seal everything with a top coat.
FAQs:
– Do I need to be an expert to do this? Not at all! Just take your time and practice.
14. Nude with Wreath Nail Art

Show off your holiday spirit with nude nails adorned with beautiful wreath designs. This creative nail art pairs perfectly with any outfit while adding a festive touch. The combination of nude with colorful wreaths is charming and cheerful, making it a delightful choice for the season.
Begin by painting your nails with a nude polish. Once dry, use a fine brush to create tiny wreaths with green polish for the leaves and red for the berries. A touch of gold or glitter in the center can add extra flair. A top coat will keep your designs looking fresh throughout the holidays.
Use a dotting tool for the berries to enhance precision!
Ingredients:
– Nude nail polish
– Green and red polish
– Gold or glitter polish
– Top coat
Step-by-Step Instructions:
1. Apply a base coat to protect your nails.
2. Paint two layers of nude polish.
3. Create tiny wreaths with green polish on accent nails.
4. Add red berries and gold glitter for detail.
5. Finish with a top coat for shine and durability.
FAQs:
– How do I make the wreaths? Start with tiny half-circles and add leaves around the edges.
15. Geometric Nude with Gold Lines
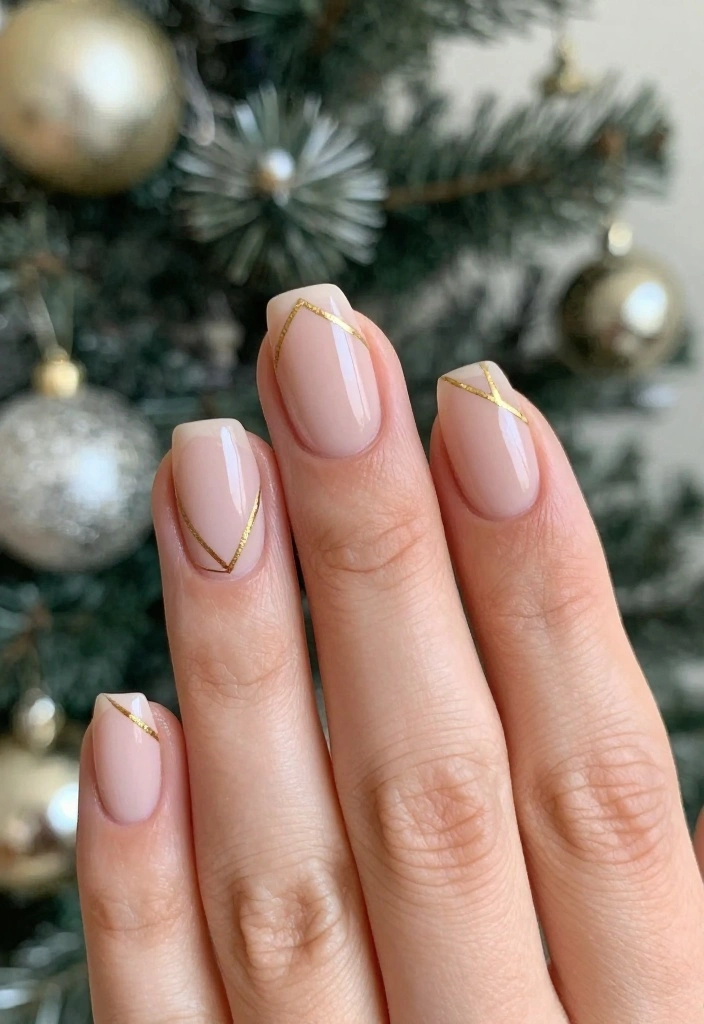
For a trendy holiday look, try geometric nude nails with elegant gold lines. This modern design is chic and stylish while remaining suitable for festive occasions. The nude base allows the geometric patterns to stand out, making your nails a true fashion statement.
Start by painting your nails with a nude base and allow it to dry completely. Use a fine brush or striping tape to create geometric patterns with gold polish on a couple of accent nails. Triangles, lines, or chevrons add sophistication to your look. Seal everything with a top coat for a flawless finish.
Keep it simple for a more classic look, or get creative with shapes and patterns to express your style!
Ingredients:
– Nude nail polish
– Gold polish
– Striping tape (optional)
– Top coat
Step-by-Step Instructions:
1. Apply a base coat to protect your nails.
2. Paint two layers of nude polish.
3. Using striping tape or a fine brush, create geometric designs on accent nails.
4. Finish with a top coat for shine and durability.
FAQs:
– Can I use other colors for lines? Yes, feel free to experiment with different colors.
16. Velvet Nude with Rhinestone Accents

Indulge in luxury with velvet nude nails adorned with sparkling rhinestone accents. This glamorous design is perfect for holiday parties where you want to make a statement. The matte finish of the nude polish paired with the shiny rhinestones creates a stunning contrast that captures attention.
Begin with a velvet matte nude polish as your base. Once dry, strategically place small rhinestones at the base or across your accent nails for added sparkle. This design beautifully balances elegance and fun, making it a top pick for festive celebrations. Finish with a top coat to keep everything in place.
Nail glue can help secure the rhinestones for a longer-lasting hold!
Ingredients:
– Velvet nude nail polish
– Rhinestones
– Top coat
Step-by-Step Instructions:
1. Apply a base coat to protect your nails.
2. Paint two layers of velvet nude polish.
3. Once dry, use nail glue to apply rhinestones to accent nails.
4. Seal with a top coat for shine and durability.
FAQs:
– How long will the rhinestones last? With proper application, they can last up to a week.
Fun fact: Velvet matte nude nails with rhinestones elevate nude Christmas nails and pop in photos at holiday parties. Pro tip: place tiny rhinestones at the base for a subtle, luxe accent that lasts all season.
17. Nude Nails with Minimalist Star Designs

Celebrate the season with a minimalist approach by adding simple star designs to nude nails. This design keeps things stylish while embracing the holiday spirit. The understated elegance of the nude polish pairs perfectly with the tiny stars, creating a refined yet festive look.
Apply a nude base coat and allow it to dry completely. Using a fine brush, create tiny stars on one or two accent nails with white or gold polish. This design is subtle yet festive, making it perfect for those who prefer a more minimalist style during the holidays. Seal with a top coat to maintain the integrity of your designs.
Keep the stars small for a chic and modern touch!
Ingredients:
– Nude nail polish
– White or gold polish
– Fine brush
– Top coat
Step-by-Step Instructions:
1. Apply a base coat to protect your nails.
2. Paint two layers of nude polish.
3. Create tiny star designs on accent nails with a fine brush.
4. Seal everything with a top coat for durability.
FAQs:
– Can I use other designs instead of stars? Absolutely! Try different shapes if you’d like.
Fun fact: 65% of holiday nail pics get more saves when they feature nude polish with tiny white or gold stars. Keep it minimalist: 1-2 accent nails make the look elegant and Pinterest-worthy.
18. Glossy Nude with Metallic Accents

Wrap up your holiday glam with glossy nude nails enhanced by metallic accents. This trendy design combines sophistication with a bit of edge, making it perfect for the fashion-forward individual this season. The shine of the nude polish paired with metallic details creates a striking look that stands out.
Start with a glossy nude polish applied to all nails. Once dry, use a fine brush to add metallic accents in gold, silver, or copper on selected nails. You can create abstract designs, lines, or tiny shapes for a unique touch. Seal everything with a top coat to keep your nails looking pristine throughout the holidays.
Experiment with different metallic colors to create a personalized look that reflects your style!
Ingredients:
– Glossy nude nail polish
– Metallic nail polish
– Top coat
Step-by-Step Instructions:
1. Apply a base coat for protection.
2. Paint two layers of glossy nude polish.
3. Use metallic polish to create designs on accent nails.
4. Finish with a top coat for shine and durability.
FAQs:
– How do I remove metallic accents? Use a good nail polish remover designed for glitter or metallics.
Conclusion

With these 18 easy DIY nude Christmas nail ideas, you’re all set to showcase your holiday flair while keeping it chic and sophisticated! From classic designs to playful accents, there’s something for everyone to enjoy. Don’t hesitate to mix and match styles or add your personal touch. After all, your nails are an extension of your style! Embrace the holiday spirit and let your nails shine bright this season.
Happy crafting, and may your holidays be filled with joy and beautiful nails!
Frequently Asked Questions
What exactly are nude christmas nails and how can I recreate them at home?
nude christmas nails are a chic, understated base look using a nude polish with subtle holiday accents to feel festive without shouting color.
To recreate at home, pick a nude shade that matches your skin tone, then add a small holiday touch like a white snowflake dot, a delicate gold foil line, or a tiny red accent on a single accent nail. This keeps the look elegant and easy for a easy nail art session and is perfect for a holiday DIY vibe.
Finish with a glossy top coat and cap the free edge for lasting wear.
What supplies do I need to create nude christmas nails at home?
To nail nude christmas nails at home, you need a solid set of basics for easy nail art and a polished holiday DIY vibe: base coat, nude sheer and deeper nude shades, top coat, a small selection of nail art tools (dotting tool, striping brush), striping tape, gold foil or micro foil, rhinestones or tiny red/green accents, cotton swabs, remover, cuticle oil. Optional add-ons include a white polish for tiny snowflakes and a fine liner brush for delicate lines. Choose long-wearing formulas for durability and a fast-dry top coat for quick results.
Set up a clean workspace and let each layer dry to prevent smudges—this is essential for nude christmas nails when you want a neat finish.
Can you walk me through a simple at home method for nude christmas nails?
Here is a simple at home method to create nude christmas nails: prep nails, apply a base coat, paint two coats of nude base and let dry, do a minimal art on one nail using a dotting tool or striping brush, add gold foil bits for festive flair, apply top coat and seal the edges, clean up edges with remover. This approach is perfect for easy nail art and a classy holiday DIY look.
How can I customize nude christmas nails for different nail lengths and skin tones while staying on trend?
Nude christmas nails can be tailored to different nail lengths and skin tones while staying stylish. For short nails, use a slightly deeper nude to create the illusion of longer nails, and keep art minimal on one accent nail. For longer nails, you can add delicate patterns across a couple nails or a glossy French fade. To match skin tone, pick warm, neutral tones for deeper skin and cooler pink tones for lighter skin; test swatches on a nail wheel to choose the shade that flatters you. You can still incorporate holiday DIY touches like a tiny red berry accent or a metallic line to keep the look festive.
How long will DIY nude christmas nails last and how should I care for them or remove them safely?
With proper care your nude christmas nails can last about 5 to 10 days depending on wear. To maximize durability, apply in thin coats, seal the free edge, and finish with a top coat that resists chipping. Avoid long hot showers and heavy soaking; wear gloves for house chores to protect nails. Reapply top coat every 2 to 3 days for extra shine. For removal, use acetone to lift the nude base and art gently, or use the foil method if there is glitter; after removal, moisturize cuticles with oil.
Related Topics
nude christmas nails
holiday DIY
easy nail art
minimalist design
quick tips
festive nails
beginner friendly
nail art trends
5-minute manicures
glam nails
seasonal nail designs
DIY nail ideas
I love these DIY nail ideas! I tried a nude color last year and it made my hands look so classy. Which design are you thinking of trying first?
These nail designs are so cute! I once tried to do my own nails and ended up with more glitter on my face than on my nails. At least I sparkled all night! 😂
Did you know that the color nude can actually make your nails look longer? It’s true! I read that somewhere and it really worked for me.