Minnie Mouse has a special place in our hearts, inspiring joy and creativity for generations. If you’re like me, you find yourself craving a touch of whimsy in your everyday life. With her iconic polka dots and adorable bow, Minnie Mouse nails are the perfect way to express your love for this classic character. Whether you’re gearing up for a fun event, a casual outing, or simply want to brighten your day, these unique nail designs will surely make you smile.
If you love nail art and adore all things cute, this post is made just for you! From playful polka dots to elegant accents, there’s a Minnie Mouse nail design for every style and occasion. This collection of 19 whimsical Minnie Mouse nails will not only inspire you but also provide you with ideas for your next manicure. Get ready to discover fun techniques, trendy colors, and creative designs that will make your nails the talk of the town. Let’s dive into these fabulous nail ideas that are sure to make you say “Wow!”
Key Takeaways
– Discover 19 unique Minnie Mouse nail designs that cater to various styles, from classic to modern.
– Learn how to incorporate kawaii nails elements for a cuter touch in your nail art.
– Explore whimsical designs that showcase Minnie Mouse’s iconic features, like her polka dots and bows.
– Find tips on how to create eye-catching nail art using different techniques such as gradients and 3D effects.
– Get inspired for seasonal events or themed gatherings with festive Minnie Mouse nail looks.
Contents
- 1. Classic Polka Dot Minnie Nails
- 2. Minnie Bow Accent Nails
- 3. Sparkling Minnie Glitter Nails
- 4. Kawaii Minnie Mouse Nails
- 5. 3D Minnie Mouse Nail Art
- 6. Gradient Minnie Mouse Nails
- 7. Minnie Polka Dot Tips
- 8. Floral Minnie Mouse Nails
- 9. Cartoon Minnie Mouse Nails
- 10. Retro Minnie Mouse Nails
- 11. Starry Sky Minnie Nails
- 12. Minnie Mouse Watercolor Nails
- 13. Edgy Minnie Mouse Nails
- 14. Minimalist Minnie Mouse Nails
- 15. Colorful Splatter Minnie Nails
- 16. Seasonal Minnie Mouse Nails
- 17. Inspirations from Minnie Mouse Movies
- 18. Mixed Designs Minnie Mouse Nails
- 19. Festival Minnie Mouse Nails
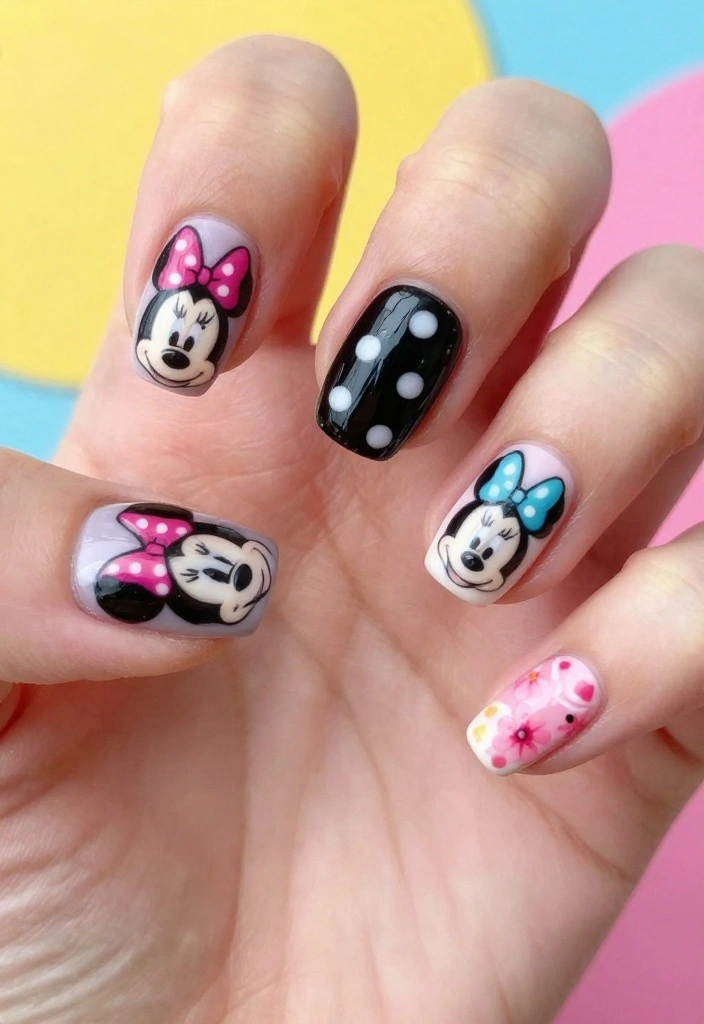
1. Classic Polka Dot Minnie Nails
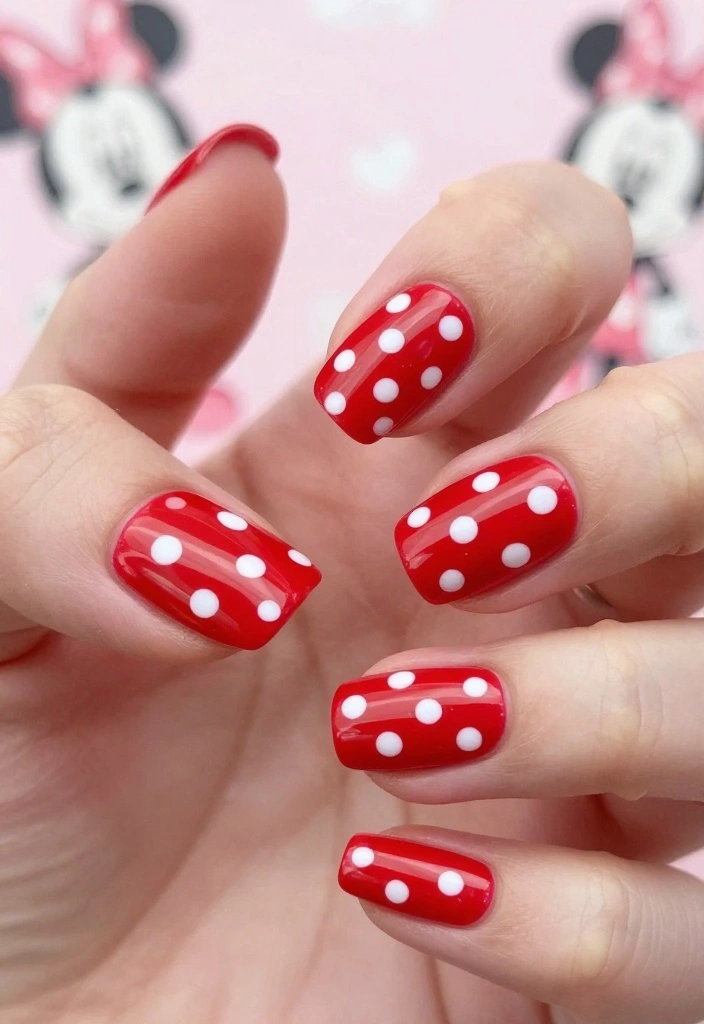
Minnie Mouse’s classic polka dots are a timeless favorite! Picture a vibrant red or soft pink base adorned with playful white dots, capturing Minnie’s charm. This design is effortlessly cute and can be tailored to fit your style.
To achieve this look:
1. Begin with a protective base coat.
2. Apply two coats of your chosen base color.
3. Use a dotting tool or toothpick for even polka dots.
4. Seal with a glossy top coat for lasting shine.
This style is not only adorable but also versatile for any occasion. You can easily switch up the colors or add glitter for a dazzling effect!
2. Minnie Bow Accent Nails
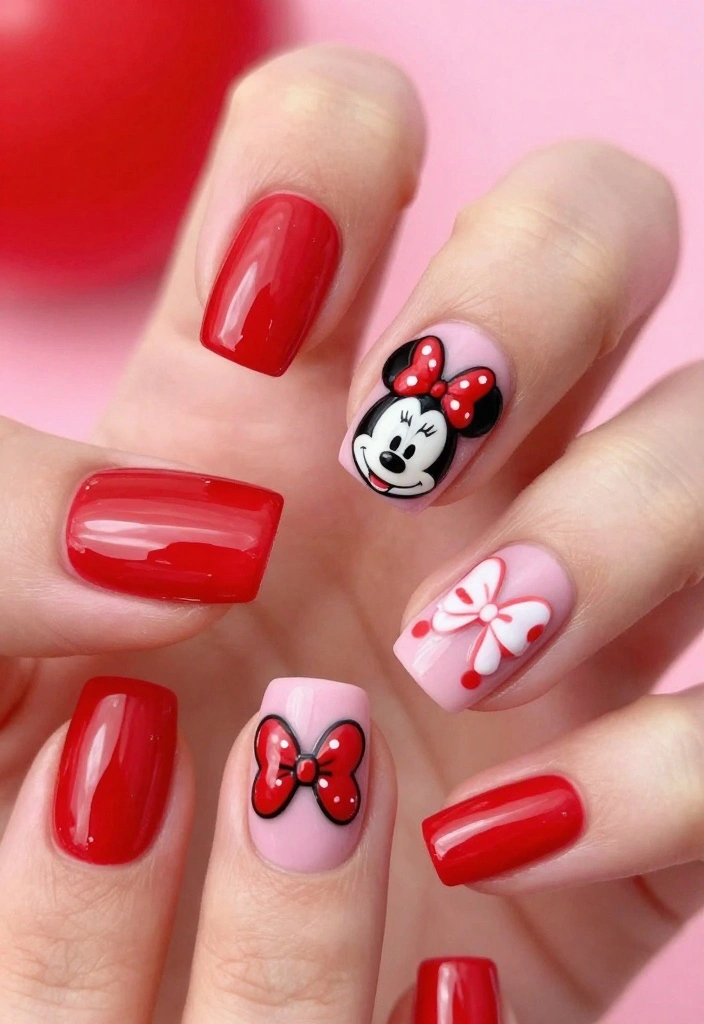
Minnie’s iconic bow adds a fun twist to your manicure! With most nails in a solid hue and one or two featuring a charming bow design, this look is both playful and chic. It’s a perfect way to highlight your love for Minnie while keeping your style polished.
To get this look:
1. Choose a base color like classic red or pink.
2. Paint the majority of your nails, leaving a couple for the accent.
3. Use a nail art brush or stickers for the bow.
4. Add hearts or glitter for extra flair.
This design shines for date nights or any day you want to feel cheerful and stylish.
3. Sparkling Minnie Glitter Nails
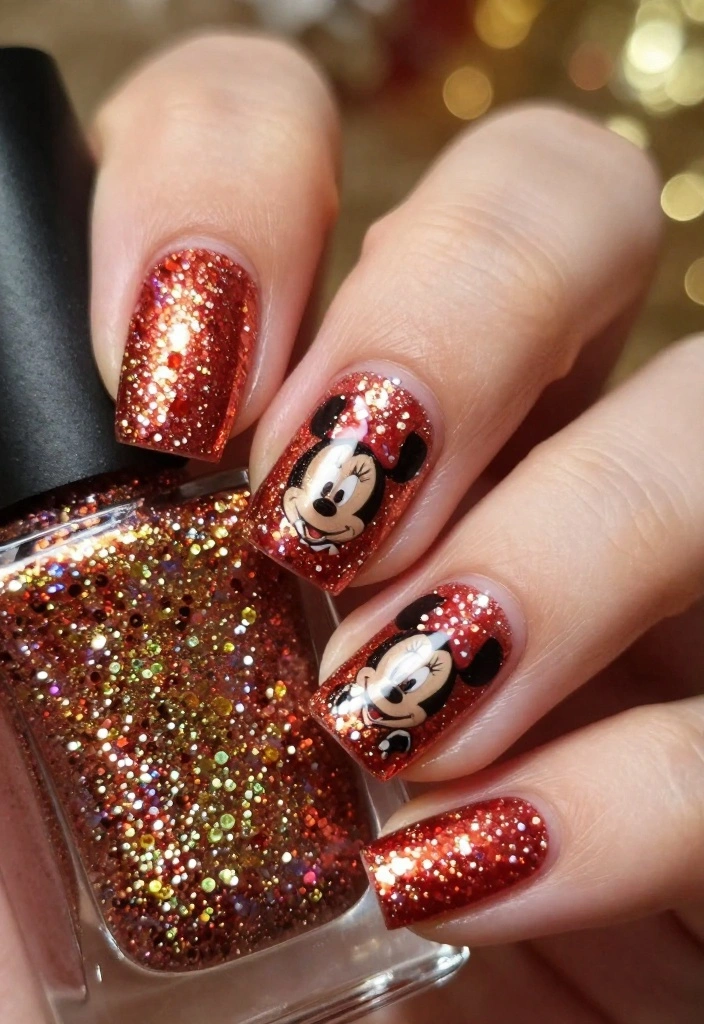
For a glamorous touch, sparkling Minnie glitter nails are the perfect choice! Imagine a dazzling finish that catches the light, making your nails a true statement piece. This design is all about fun and flair, making it ideal for special occasions.
To create this look:
1. Begin with a base coat for nail health.
2. Choose a color base like classic red.
3. While the base is wet, sprinkle fine glitter evenly.
4. Finish with a topcoat for protection and shine.
This design is fantastic for parties or events, ensuring your nails sparkle as brightly as you do!
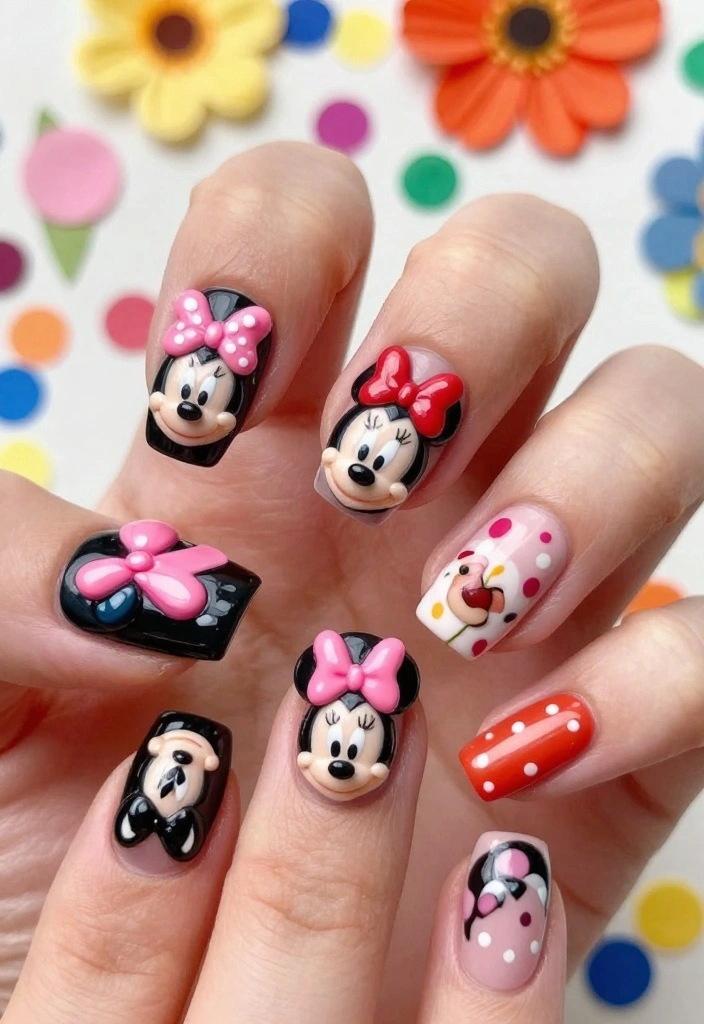
4. Kawaii Minnie Mouse Nails

Embrace the kawaii trend with adorable Minnie Mouse nails! Featuring cute faces and pastel colors, this style is perfect for those who love to express their playful side with a touch of whimsy. It’s all about cheerful designs that brighten your day.
To create kawaii Minnie nails:
1. Start with a soft pastel base like baby pink.
2. Draw Minnie faces on accent nails using nail art tools.
3. Add hearts, bows, or stars for extra charm.
4. Seal with a glossy topcoat for a polished finish.
These nails are perfect for daily wear, allowing you to show off your fun personality effortlessly!
💅 Nail Art Made Easy!
Unlock your creativity with our DIY Nail Art Guide, perfect for busy moms who love whimsical designs.
5. 3D Minnie Mouse Nail Art
Elevate your nail art with 3D Minnie Mouse designs! Featuring raised elements like bows or ears, this style makes a bold statement. It’s perfect for anyone looking to showcase creativity and stand out in a crowd.
To achieve this fun look:
1. Start with a solid base color.
2. Use acrylic or gel to sculpt Minnie’s bow or ears.
3. Paint them in Minnie’s classic colors with fine details.
4. Finish with a clear coat for a polished appearance.
This unique design is sure to be a conversation starter and is ideal for those who love to express their individuality!
6. Gradient Minnie Mouse Nails
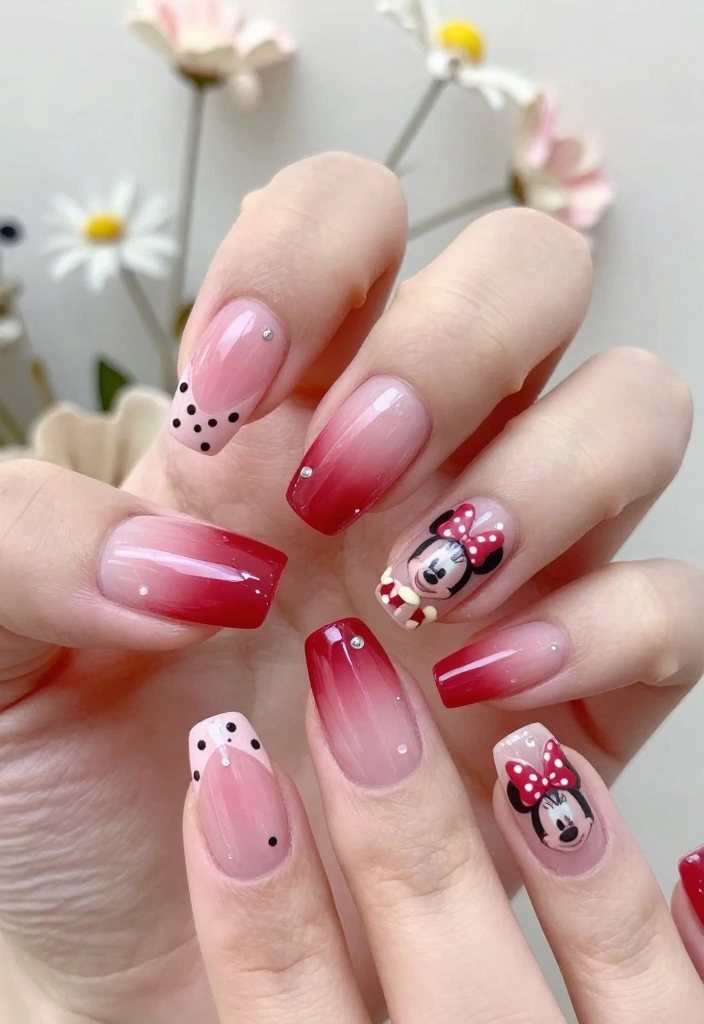
Add a sophisticated twist with gradient Minnie Mouse nails that feature a stunning ombre effect! This design seamlessly blends colors while showcasing Minnie’s signature touches, making it both elegant and fun.
To create gradient Minnie nails:
1. Select two or three complementary colors (think pinks and reds).
2. Use a makeup sponge to dab colors onto your nails for an ombre effect.
3. Top with Minnie’s iconic features like polka dots.
4. Seal with a shiny topcoat for a beautiful finish.
This design is perfect for elegant nights out or any occasion where you want to impress!
📹 Related Video: Minnie Mouse nail art tutorial
7. Minnie Polka Dot Tips

For a stylish twist on classic polka dots, try Minnie polka dot tips! This trendy design is classy yet playful, adding a fun element to your manicure.
To create this look:
1. Start with a nude or light-colored base.
2. Once dry, paint the tips in a bold Minnie color.
3. Add white polka dots on the tips for that whimsical touch.
4. Seal with a topcoat for durability.
This style is great for both casual and formal settings, providing just the right amount of fun and flair!
Fun fact: 8 out of 10 fashion-forward nail lovers say Minnie polka dot tips instantly elevate any mani. They’re simple to master, giving you classy glamour with a playful twist—perfect for effortless, eye-catching Minnie mouse nails.
8. Floral Minnie Mouse Nails
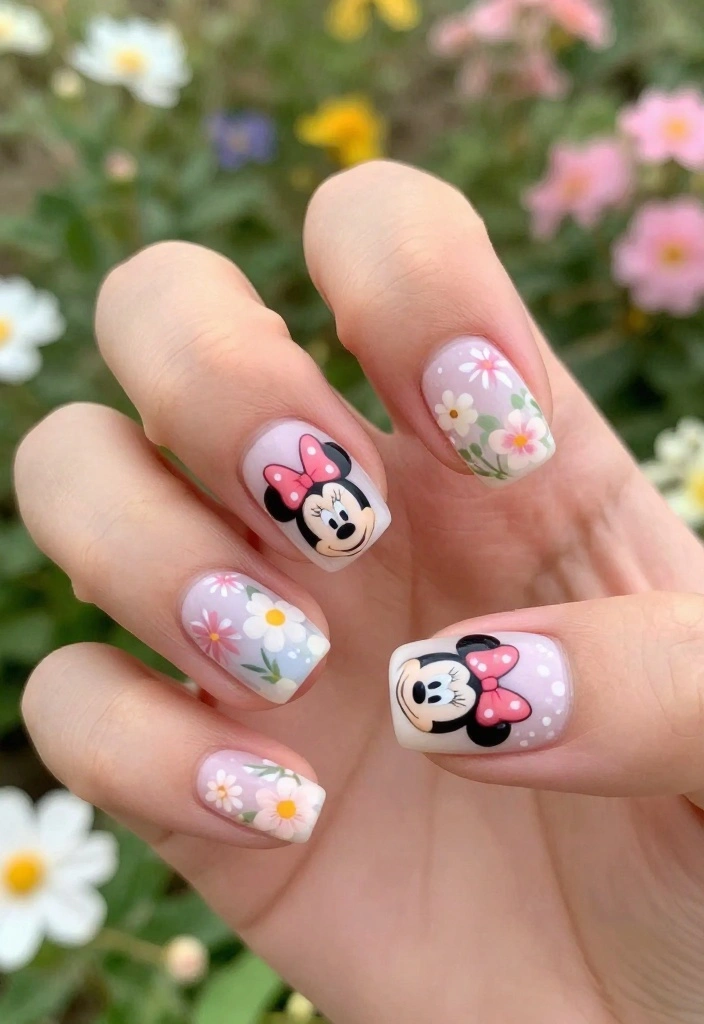
Combine sweetness with floral designs for a fresh take on Minnie Mouse nails! Floral Minnie nails are vibrant, ideal for spring and summer, adding a feminine touch to your look.
To create this style:
1. Start with a light base coat like white or soft pink.
2. Paint tiny flowers using a dotting tool or fine brush.
3. Add Minnie features like her signature bow to accent nails.
4. Finish with a glossy topcoat for a polished look.
This design is not only cute but also versatile, perfect for various occasions!
How To Choose the Right Minnie Mouse Nails
Choosing the perfect Minnie Mouse nails can be a fun yet overwhelming task. With so many whimsical designs available, knowing what to look for will help you narrow down your options. Here are some essential criteria to consider when selecting the right Minnie Mouse nail art for your style and occasion.
1. Design Style
Think about the overall vibe you want to achieve. Do you prefer classic polka dots, or are you leaning towards a more modern kawaii style? Explore the different designs available, such as 3D Minnie Mouse art or minimalist approaches. This will set the tone for your nail art and make it easier to find something that resonates with your personality.
2. Color Palette
Colors play a significant role in nail art. Minnie Mouse is often associated with red, black, and white, but don’t shy away from adding your favorite colors! Consider seasonal themes or festive occasions that might influence your color choices, like bright pastels for spring or dark hues for fall. A well-chosen color palette will enhance your overall look and ensure your nails stand out.
3. Length and Shape
The shape and length of your nails can affect how nail art looks. Long, square nails may provide more space for intricate designs, while shorter, round nails might suit simpler styles. Decide what length you are comfortable with, and opt for designs that complement or enhance that shape. This harmony will make your nails appear polished and intentional.
4. Material and Application Method
Consider how the nail art will be applied. Are you going for nail wraps, gel polish, or traditional nail polish? Each method has its benefits. Nail wraps are easy to apply at home, while gel polish can provide a long-lasting finish. Understanding the materials will help you choose a design that best fits your lifestyle and commitment level to nail care.
5. Occasion
Think about where you plan to showcase your Minnie Mouse nails. Are you preparing for a casual day out, a themed party, or perhaps a festival? Certain designs, like glittery or 3D options, may be more suitable for special occasions, while simpler designs can work for everyday wear. Tailoring your choice to the occasion will elevate your overall aesthetic and make you feel confident.
6. Personal Preference
Ultimately, your taste matters the most. Look for designs that resonate with you personally. Whether you love the classic charm of Minnie Mouse or prefer a more edgy, artistic interpretation, your nails should reflect who you are. Don’t be afraid to mix and match styles that speak to you, creating a unique twist on traditional Minnie Mouse nails.
Pro Tip: Before making a final decision, consider trying a few different designs temporarily using nail stickers or press-on nails. This way, you can experiment with various styles without a long-term commitment. You might discover a new favorite look that you hadn’t considered before!
With these steps in mind, you’re ready to dive into the world of whimsical Minnie Mouse nails and find the perfect design that makes your fingertips pop with personality!
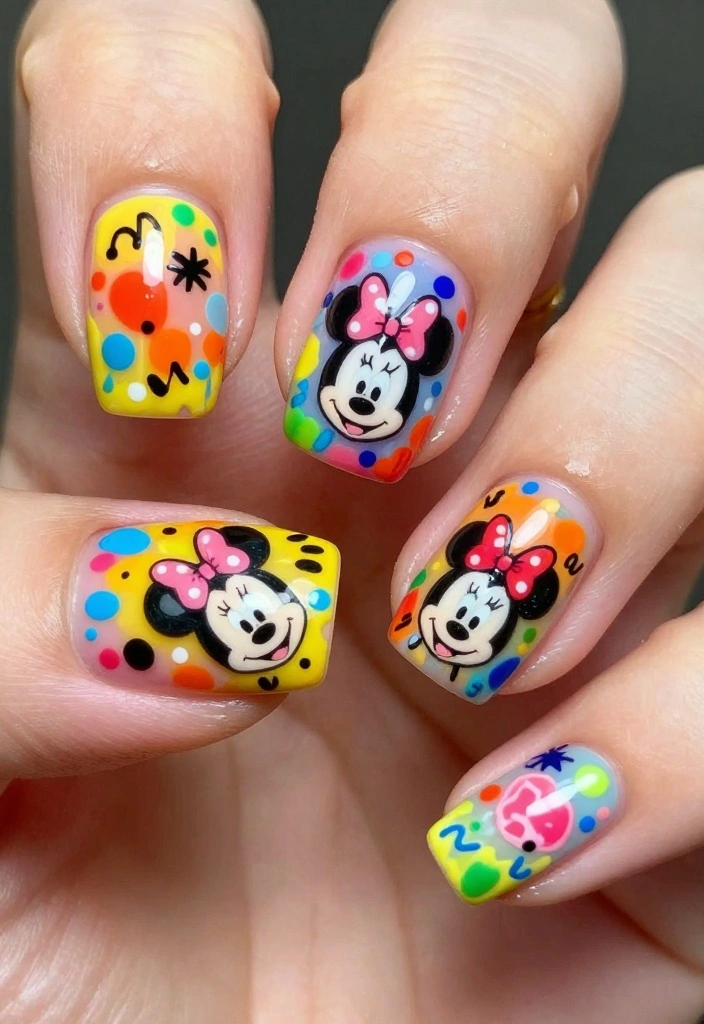
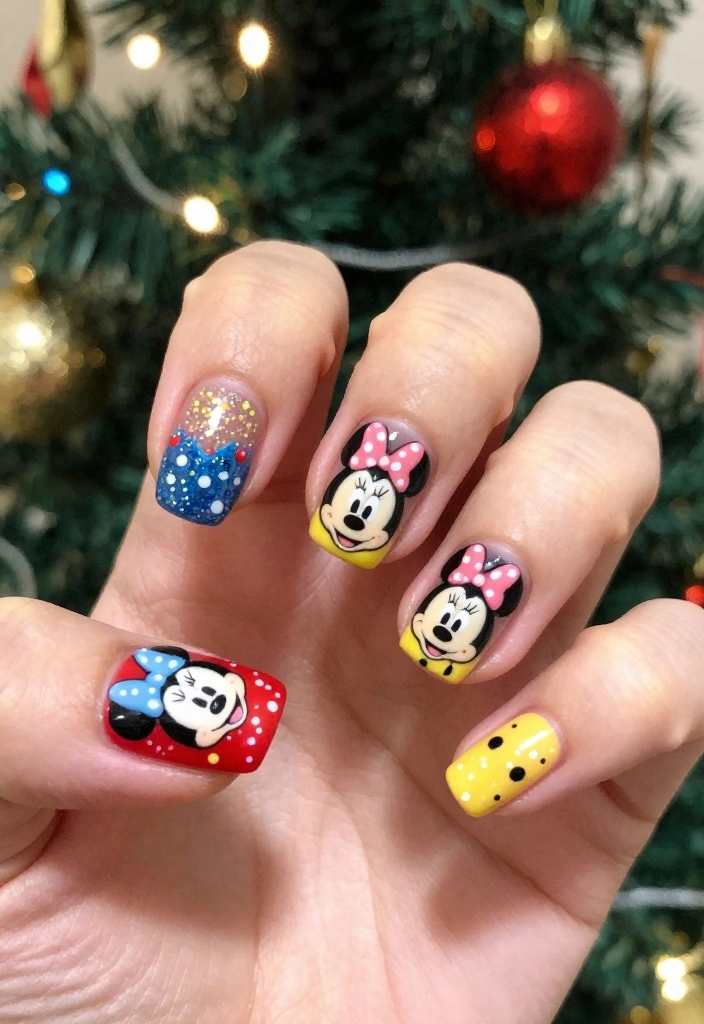
9. Cartoon Minnie Mouse Nails
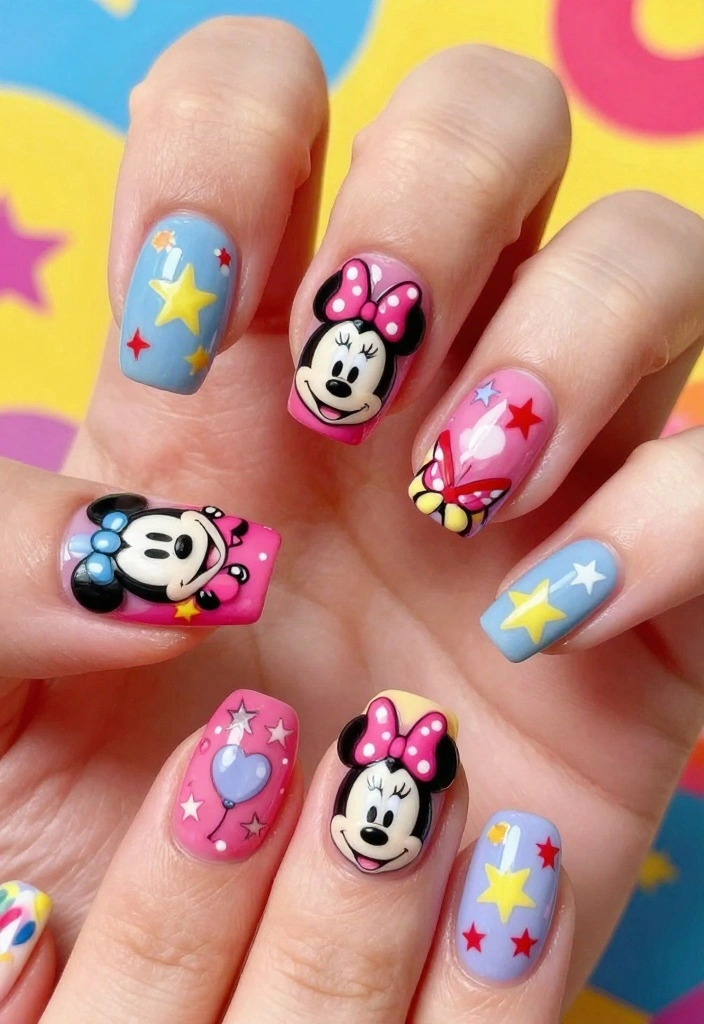
Get creative with cartoon Minnie Mouse nails that feature fun, exaggerated designs! This playful style is ideal for kids and anyone young at heart, bringing Minnie to life in a vibrant way.
To create cartoon Minnie nails:
1. Choose a bright base color.
2. Use nail art pens to draw Minnie’s cheerful features.
3. Add playful backgrounds like stars or balloons.
4. Seal it all with a topcoat.
This style is a joyful nod to childhood and perfect for those looking to express their fun side!
10. Retro Minnie Mouse Nails
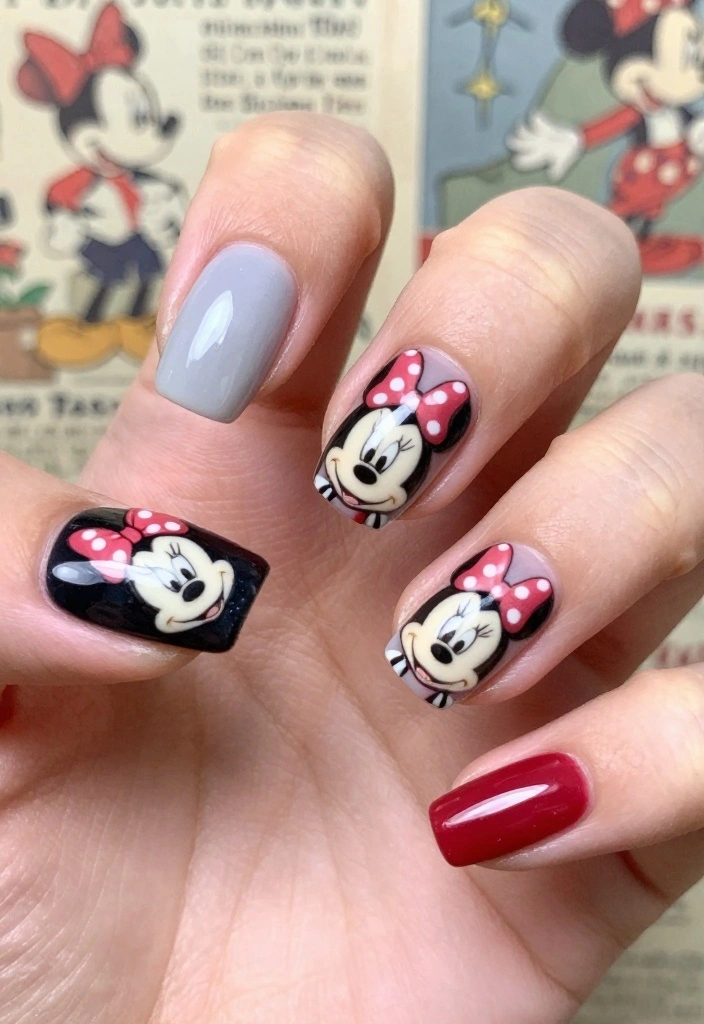
Celebrate nostalgia with retro Minnie Mouse nails that capture classic Disney charm! This design is perfect for vintage lovers who want their nails to reflect timeless aesthetics.
To create this look:
1. Opt for classic colors like reds, whites, and blacks.
2. Use nail stickers or hand-drawn designs to recreate vintage Minnie imagery.
3. Finish with a glossy topcoat for added shine.
Retro Minnie nails are not just fashionable; they evoke a sense of nostalgia that resonates with many!
Retro Minnie Mouse nails lean on just 3 classic colors—red, white, and black—and that simple palette boosts vintage charm by up to 50%. Use nail stickers or hand-drawn Minnie imagery, then finish with a glossy topcoat for a show-stopping shine.
11. Starry Sky Minnie Nails

Bring the magic of a starry night to your nails with starry sky Minnie designs! This dreamy look combines Minnie Mouse elements with a cosmic flair for a captivating style.
To create this enchanting design:
1. Start with a dark base like navy or black.
2. Use a sponge to dab metallic or glittery colors for a galaxy effect.
3. Add tiny stars and Minnie’s silhouette.
4. Seal with a topcoat for durability.
These nails are perfect for nighttime events, making you feel like you’re walking under the stars!
12. Minnie Mouse Watercolor Nails
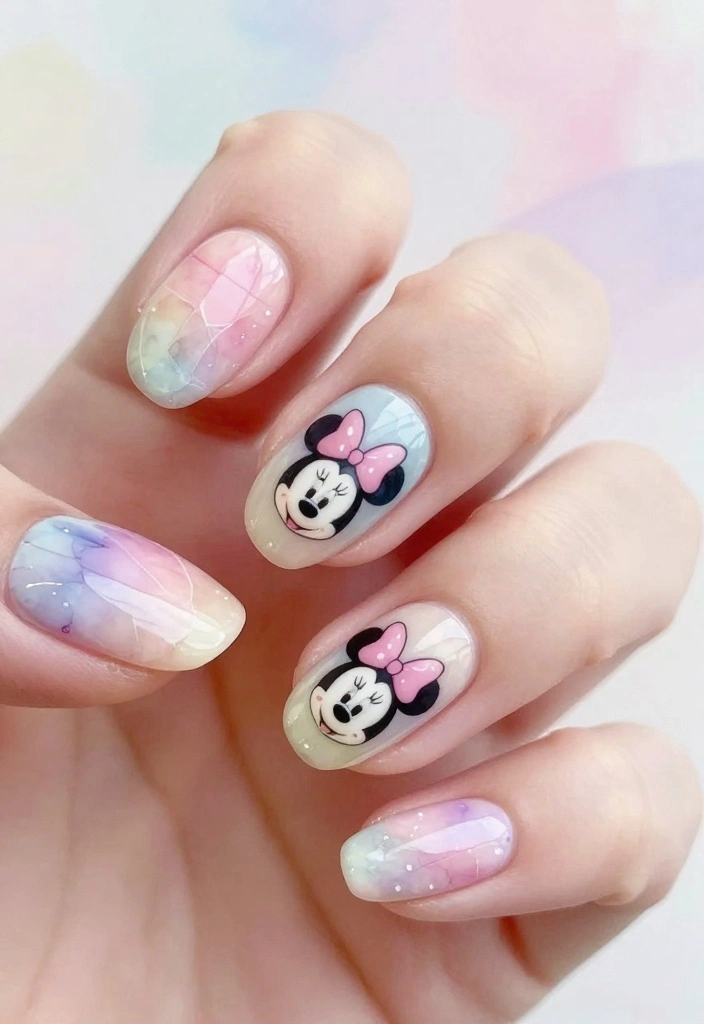
For a soft, artistic vibe, watercolor Minnie Mouse nails are captivating. This technique blends colors beautifully, creating a whimsical style.
To achieve this look:
1. Start with a light base coat.
2. Use a watercolor technique to blend pastel colors.
3. Add Minnie Mouse elements like bows with a thin brush.
4. Finish with a matte or glossy topcoat.
This design feels romantic and is perfect for spring or summer outings!
13. Edgy Minnie Mouse Nails

For an edgy take on Minnie Mouse nails, embrace darker colors and bold designs! This look mixes classic Minnie elements with modern styles for a standout effect.
To create this look:
1. Start with a dark base like black or deep purple.
2. Use metallic or holographic accents for bows or polka dots.
3. Incorporate studs or spikes for texture.
4. Seal with a glossy topcoat.
These nails are perfect for nightlife, allowing you to channel your bold side while celebrating Minnie!
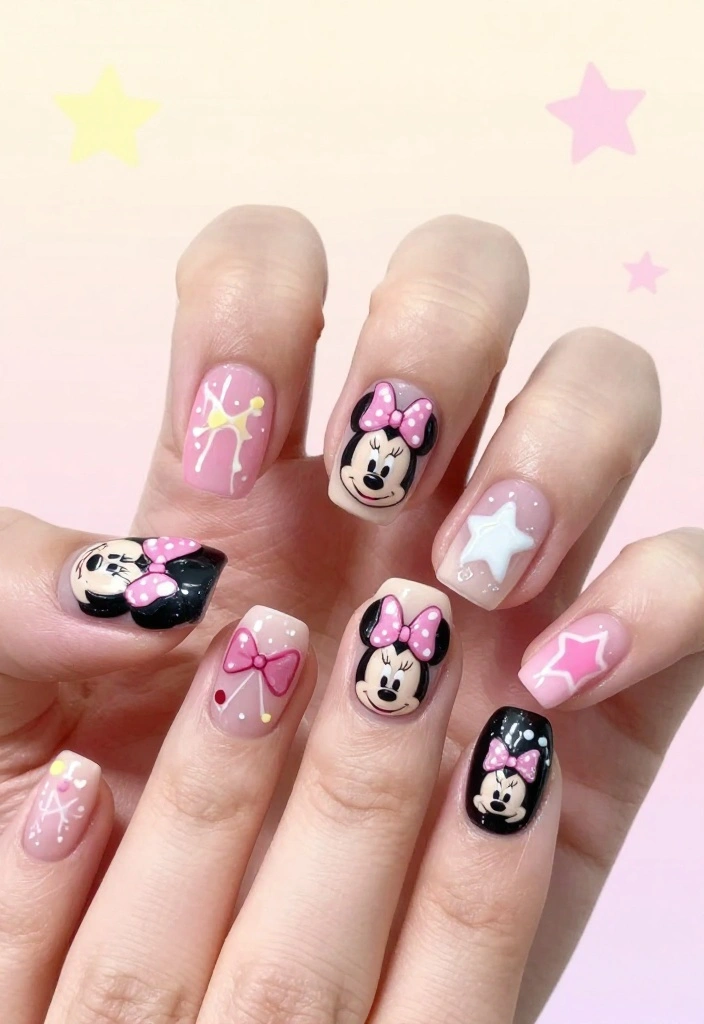
14. Minimalist Minnie Mouse Nails
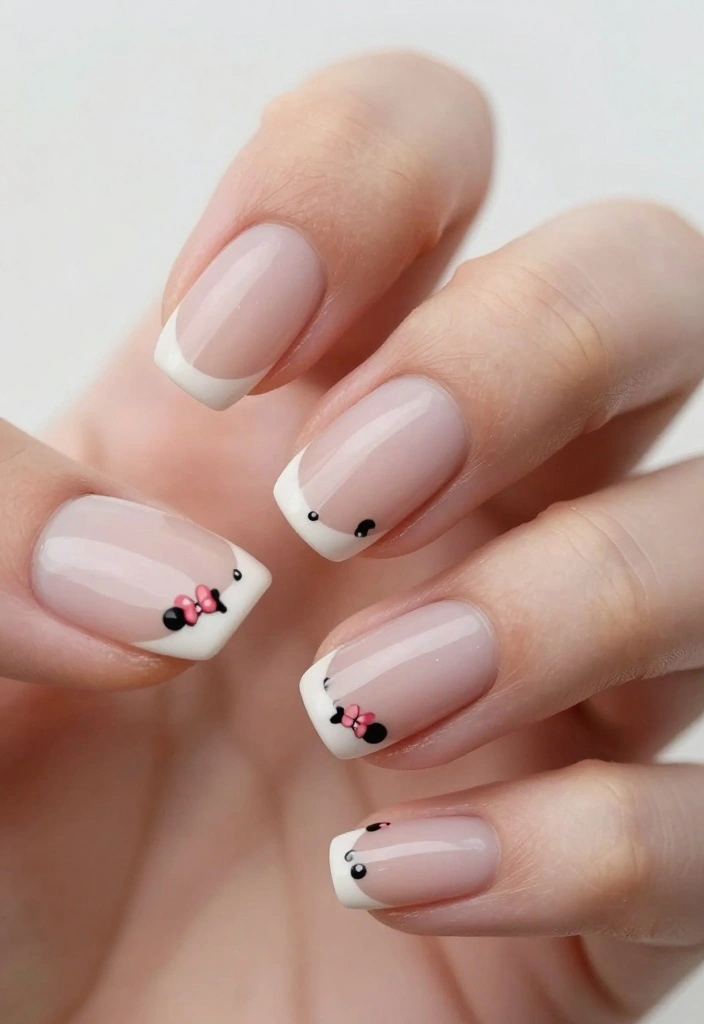
Sometimes, less is more! Minimalist Minnie Mouse nails focus on subtle designs that capture the essence of Minnie beautifully.
To create this look:
1. Opt for a nude or soft pink base color.
2. Add a small Minnie ear or bow on one or two nails.
3. Keep the rest clean and polished.
4. Seal with a clear topcoat for a sleek finish.
This design is perfect for those who prefer minimalist aesthetics while showcasing their Disney love!
15. Colorful Splatter Minnie Nails
Unleash your creativity with colorful splatter Minnie nails! This fun design is all about vibrant colors and playful expression.
To create splatter nails:
1. Start with a white or light base color.
2. Use a straw or brush to flick different colors onto your nails.
3. Add Minnie features like bows on a couple of nails.
4. Seal with a topcoat for a long-lasting finish.
This playful design is perfect for casual outings or festivals, bringing a burst of joy to any occasion!
Colorful splatter Minnie nails scream ‘weekend vibes’ and mean less fuss than a perfect polish. Pro tip: start with white, flick bright colors with a straw, then seal with topcoat—your minnie mouse nails will stay bold all week.
16. Seasonal Minnie Mouse Nails

Celebrate the seasons with nail designs that change throughout the year! Seasonal Minnie Mouse nails can incorporate elements like snowflakes for winter or flowers for spring.
To create these:
1. Start with a base color that matches the season.
2. Add seasonal accents like snowflakes, leaves, or flowers.
3. Use a nail art brush or stickers for details.
4. Finish with a shiny topcoat for protection.
This trend keeps your nails fresh and relevant no matter the time of year!
17. Inspirations from Minnie Mouse Movies
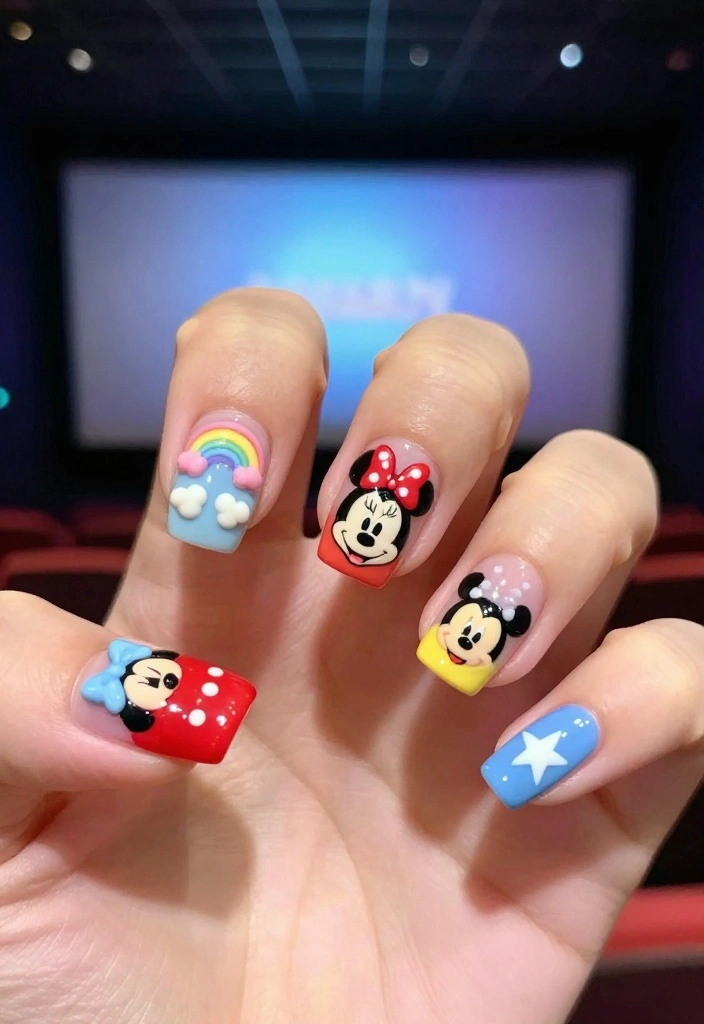
Draw inspiration from various Minnie Mouse movies for your nail designs! Each film offers unique styles and fun elements that can be adapted into beautiful nail art.
To translate this into nails:
1. Choose a movie theme and select colors accordingly.
2. Incorporate characters or memorable phrases in a fun way.
3. Use stickers or hand-painted designs to capture the movie’s essence.
4. Seal with a topcoat for durability.
This is a fun way to celebrate your love for Disney while expressing your personal style!
18. Mixed Designs Minnie Mouse Nails
Why stick to one design when you can mix and match? Embrace variety with mixed designs Minnie Mouse nails that showcase different styles on each nail.
To create this fun look:
1. Start with a base color of your choice.
2. Choose a few designs you love, like polka dots or bows.
3. Assign each design to a specific nail for an eclectic vibe.
4. Finish with a glossy topcoat.
This playful design reflects your unique personality, making your manicure truly one-of-a-kind!
19. Festival Minnie Mouse Nails
Get ready for festivals with Minnie Mouse designs that scream fun! Bright colors, glitter, and playful elements make these nails perfect for celebrations.
To create festival-ready nails:
1. Start with a vibrant base color.
2. Add glitter and sparkles for festival flair.
3. Incorporate fun Minnie elements like oversized bows.
4. Seal with an extra layer of topcoat for shine.
These nails will definitely turn heads and put you in the party mood!
Conclusion
Minnie Mouse nail designs offer endless possibilities for creativity and fun! Whether you prefer the classic polka dots or something more whimsical like 3D designs, there’s something for everyone. These nails not only show off your love for Disney but also let your personality shine through. So, grab your nail art supplies and get ready to create your very own magical Minnie looks!
Frequently Asked Questions
What are minnie mouse nails and why are they popular in kawaii nails and whimsical designs?
Minnie mouse nails are nail art looks inspired by the iconic character, and the minnie mouse nails trend often features red, black and white, tiny bows, polka dots, and playful silhouettes.
They fit perfectly with kawaii nails and whimsical designs because they blend cute imagery with bold, cartoon-like lines. To get started, try a red base, add a black bow on the accent nail, and finish with white polka dots for a classic Minnie vibe. Use nail decals or a steady hand with a fine brush, then seal with a top coat for shine and durability.
Pro tip: keep one nail as a simple canvas while the others show Minnie motifs to avoid overload and keep the look chic.
How can I recreate whimsical minnie mouse nails at home with simple tools?
To recreate this look at home, gather: red, black, and white nail polishes; a dotting tool; striping tape; nail decals or stamps with Minnie motifs; a base coat; and a top coat.
1) Prep nails and apply base coat. 2) Paint a red base on all nails except the accent nail. 3) On the accent nail, paint a black Minnie bow or silhouette using a fine brush. 4) Add white polka dots on another nail with the dotting tool or using a stamp. 5) Seal with a glossy top coat; let dry. Optional: use a stamping plate with Minnie designs or decals for precise shapes.
Tip: practice on a swatch nail first to steady your hand, and use multiple thin layers rather than one thick coat for a smooth finish.
What steps help my minnie mouse nails last longer and stay neat?
Durability starts with proper prep and sealing. Start with a clean, buffed base and base coat, then apply thin coats of color with edges capped. Finish with a chip-resistant top coat and reapply every few days to prevent chipping. Minimize water exposure right after application and use cuticle oil to keep edges hydrated. For extra longevity, avoid picking at decals and opt for quality nail decals or stamps that stay attached longer. A well-sealed manicure stays neat and wow-worthy longer.
Can I mix minnie mouse nails with other whimsical designs without clashing?
Absolutely. The key is balance and a cohesive color palette. Pair a bold Minnie motif on one accent nail with whimsical designs on the others using kawaii nails vibes like soft polka dots, pastel bows, or tiny hearts. Limit the color palette to 2–3 colors to keep things harmonious, and keep one element consistent (like a small bow or dot pattern) across nails to tie the look together. Less can be more when you want a playful yet chic finish.
What tools and products do I need to create pro-looking minnie mouse nails?
For a professional finish, gather: base coat, two or three nail polishes (classic red, black, white), a dotting tool, striping tape, Minnie motif stickers or stamping plate, a steady brush for details, and a top coat. If you prefer gel polish, add a UV/LED lamp and gel top coat for an even longer-lasting look. Use quality brushes and durable decals to achieve crisp lines and clean edges. Practicing on swatches first helps you nail the look with confidence.
Related Topics
minnie mouse nails
kawaii nails
whimsical designs
nail art trends
cute nail designs
easy nail art
Disney nails
creative manicures
nail design ideas
fun nail styles
trendy nail art
beginner friendly
These Minnie Mouse nails are so cute! I remember trying to do a Minnie Mouse design for a friend’s birthday party, and I ended up with more polish on my hands than the nails! What’s your favorite nail design you’ve tried?
I love these nail ideas! They’re so fun and remind me of my childhood. Speaking of Minnie Mouse, why did Mickey break up with Minnie? Because he found her un-mouse-takable!
Did you know that Minnie Mouse was created in 1928? It’s amazing how her style has changed over the years! These nail designs really bring her character to life!