Are you looking to spice up your nail game? Gel nail art designs have taken the beauty world by storm, offering a fun and creative outlet for anyone who loves to express themselves through their manicures. We’ve all been there, scrolling through social media and feeling a bit envious of those stunning nail designs that seem too complex to recreate. That’s why I created this post—to inspire you with 20 fun gel nail art designs that are not only eye-catching but also achievable for everyone, regardless of skill level.
If you’re a nail art enthusiast or someone just dipping your toes into the world of manicures, this guide is for you. You might be a busy mom, a college student, or a working professional who wants to add a little flair to their look without spending hours at the salon. You care about creativity and style, and you want nails that reflect your personality without the stress of complicated techniques.
In this post, you’ll find a collection of easy gel nail art designs that anyone can master. Each design is not only fun but also perfect for any occasion, whether you’re going to a party, a casual outing, or just want to feel fabulous at home. Get ready to turn heads and make your friends a little jealous with your new nail skills!
Key Takeaways
– Discover 20 gel nail art designs that are fun and easy to recreate, perfect for nail art beginners and enthusiasts alike.
– Each design comes with a unique style, from Rainbow Swirls to Minimalist Lines, catering to various tastes and occasions.
– Learn how to gather the necessary materials and tools for gel nail art, making the process straightforward and enjoyable.
– Gain confidence with step-by-step instructions that will help you master each nail design without feeling overwhelmed.
– Enjoy the satisfaction of creating beautiful nail art at home, allowing for personal expression and creativity without a salon visit.
Contents
- 1. Rainbow Swirl
- 2. Geometric Patterns
- 3. Floral Accents
- 4. Confetti Nails
- 5. Minimalist Lines
- 6. Ombre Effect
- 7. Animal Prints
- 8. Glitter Galaxy
- 9. Color Block
- 10. Beach Vibes
- 11. Metallic Shine
- 12. Seasonal Hues
- 13. Tie-Dye Fun
- 14. Heartfelt Love
- 15. Sparkly Stone Accents
- 16. Cute Cartoon Characters
- 17. Abstract Art
- 18. Sweet Dots
- 19. Classic French Tip with a Twist
- 20. Neon Burst
1. Rainbow Swirl

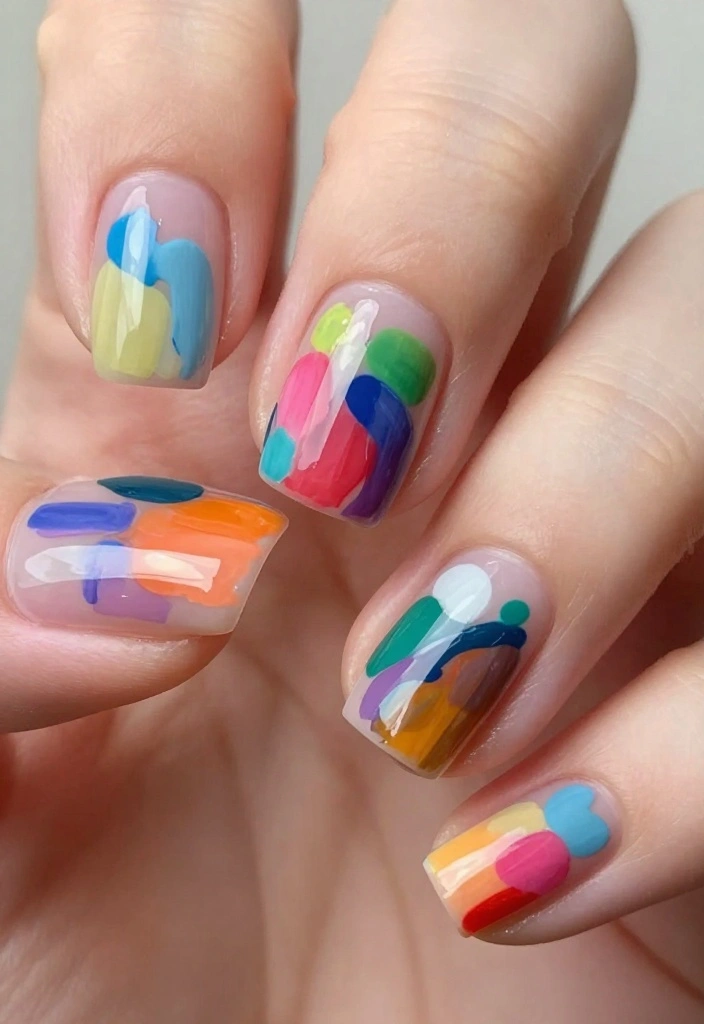
Rainbow Swirl is the perfect burst of color for your nails! This design combines a clear base coat with a whimsical white layer, setting the stage for a vibrant array of gel polishes in red, orange, yellow, green, blue, and purple. The swirling patterns you create will blend beautifully, giving a stunning gradient effect that radiates joy.
This design works wonders for summer events, parties, or any occasion where you want to stand out.
Outfit Pieces:
– Clear base coat
– White gel polish for the base layer
– Bright gel nail polishes (red, orange, yellow, green, blue, purple)
– Glossy top coat
Styling Tips:
– Use a thin nail art brush for precision when swirling colors.
– Consider adding dots along the swirls with a dotting tool for extra flair.
– Ensure each layer dries properly to maintain the integrity of the design.
This nail art design is ideal for summer parties or festive gatherings. You can easily switch it up by changing the color palette to match any season!
2. Geometric Patterns
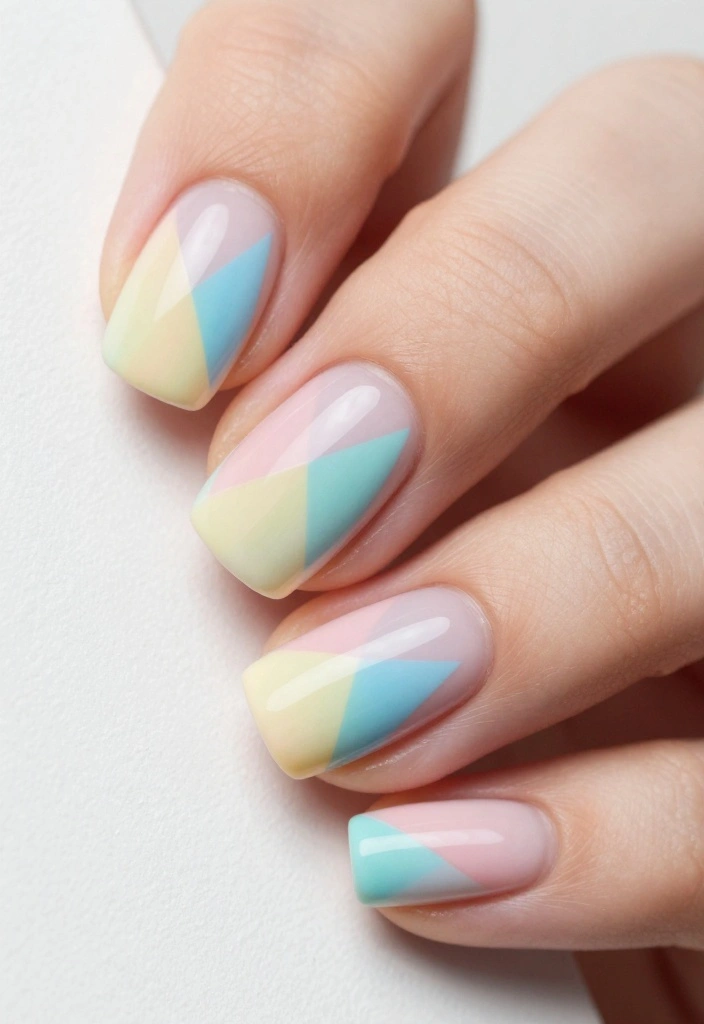
Elevate your nail game with Geometric Patterns. Start off with a soft pastel base, like mint green or blush pink, for a chic backdrop. Using striping tape, create sharp angles and shapes on your nails, filling them in with bold colors like bright yellow or cobalt blue. This playful contrast makes your nails pop and look super modern.
Perfect for casual outings, office wear, or art-inspired events, this design is versatile and eye-catching.
Outfit Pieces:
– Soft pastel gel polish (mint green or blush pink)
– Striping tape
– Contrasting gel colors (bright yellow, cobalt blue)
– Top coat for shine
Styling Tips:
– Ensure your base color is completely dry before applying tape to avoid smudging.
– Use a thin brush for filling in shapes for the cleanest look.
– Mix and match colors for a more personalized touch.
This design is adaptable for any occasion. You can even experiment with different shapes and colors for a unique twist!
3. Floral Accents

Add a touch of nature with Floral Accents on your nails. Begin with a nude or light pink base coat to set a delicate foundation. With a fine brush, paint tiny flowers on accent nails using white polish for petals and a contrasting color for the centers. Adding small dots around the flowers enhances the overall design, creating a fresh and lively look.
This charming design is perfect for spring outings, casual gatherings, or whenever you want to feel feminine and pretty.
Outfit Pieces:
– Nude or light pink gel polish for the base
– White polish for flower petals
– Contrasting color for flower centers
– Top coat for a glossy finish
Styling Tips:
– Use a dotting tool for creating tiny dots around the flowers to add depth.
– Experiment with different colors for the flower centers to make them stand out.
– Keep your brush steady to achieve clean lines for petals.
This design is wonderfully versatile for various occasions. You can easily switch up the colors to fit any season or mood!
💅 Nail Art Made Easy!
Transform your nail art skills with this DIY guide perfect for busy moms who want stunning nails effortlessly.
4. Confetti Nails

Get ready to celebrate with Confetti Nails! Choose a bright base color like hot pink or electric blue to set the stage. After applying a clear gel polish, sprinkle colorful confetti flakes on top to create a festive vibe. Sealing everything with a top coat ensures your fun design lasts.
This playful look is ideal for parties, birthdays, or any joyful gathering where you want to shine.
Outfit Pieces:
– Bright gel polish (hot pink or electric blue)
– Clear gel polish
– Colorful confetti flakes
– Top coat for sealing
Styling Tips:
– Use a mix of small and large confetti for added visual interest.
– Make sure your base color is fully dry before adding the confetti.
– Apply the confetti while the top coat is still wet for better adhesion.
This design is perfect for any celebration. You can easily swap the base color or confetti to match different themes!
5. Minimalist Lines

For a chic and modern look, try Minimalist Lines. Start with a neutral base polish that complements your skin tone. Once dry, use a thin brush to create sleek lines in black or gold. You can opt for a diagonal line on one nail or a cross-hatch effect for an elegant touch.
This design is perfect for work, formal events, or whenever you need a polished appearance without being over the top.
Outfit Pieces:
– Neutral gel polish for the base
– Black or gold polish for lines
– Top coat for that glossy finish
Styling Tips:
– Keep your lines as thin as possible for a refined effect.
– Practice your brush strokes on paper first for confidence.
– Use a small brush with acetone to correct any mistakes easily.
This minimalist design is adaptable for any occasion. You can experiment with different colors for the lines to switch up the look!
6. Ombre Effect
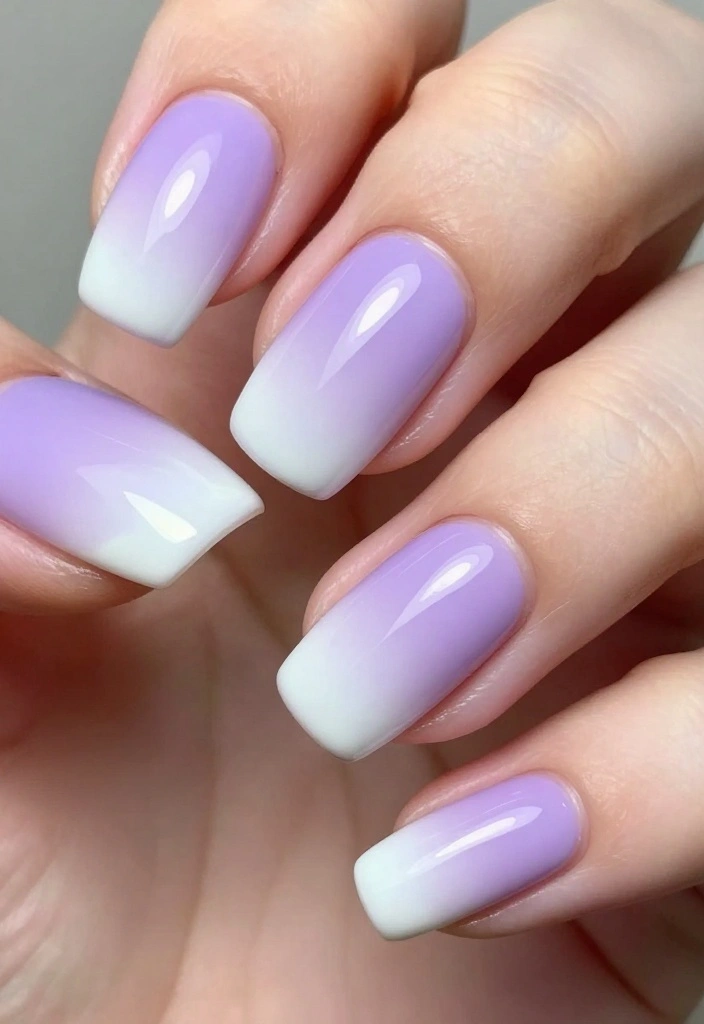
Embrace a timeless trend with the Ombre Effect. Select two complementary gel colors, like a soft lavender and white, to create a dreamy gradient. Start with the lighter shade as your base coat, then use a makeup sponge to dab the darker color onto the tips, blending down for a seamless transition.
This stunning design is perfect for special occasions, date nights, or any fancy event where you want your nails to shine.
Outfit Pieces:
– Soft lavender gel polish for the base
– White gel polish for blending
– Makeup sponge for application
– Top coat for a smooth finish
Styling Tips:
– Experiment with different colors for a unique ombre effect.
– Be sure to blend thoroughly for a flawless look.
– Apply the top coat carefully to maintain the gradient’s integrity.
This design offers endless possibilities. You can change up the colors to suit your mood or season!
📹 Related Video: 4 WAYS TO OMBRÉ WITH GEL POLISH | Nailsbykamin
7. Animal Prints

Unleash your wild side with Animal Prints on your nails! Start with a beige or neutral base, providing a perfect canvas for your creativity. Using a thin brush, create fun animal spots or stripes in a darker shade like brown or black. You can also simplify the process with stamping plates for clean results.
This edgy design is perfect for casual outings, parties, or whenever you want to make a bold statement.
Outfit Pieces:
– Beige or neutral gel polish for the base
– Dark gel polish (brown or black) for animal prints
– Optional: stamping plates for easy application
– Top coat for a polished finish
Styling Tips:
– Practice your animal print technique on paper first for better results.
– Ensure your base is completely dry before adding designs.
– Use a small brush for precise detailing.
This design is adaptable for all occasions. You can switch up the colors to create your own unique look!
How To Choose the Right Gel Nail Art Designs
Choosing the perfect gel nail art design can elevate your style and make a statement. With so many options available, it’s essential to find a design that suits your personality and lifestyle. Here are some criteria to consider when selecting gel nail art designs:
1. Personal Style
Think about what reflects your personality. Are you playful, elegant, or edgy? Your gel nail art should mirror who you are. If you love bright colors, consider designs like Neon Burst or Rainbow Swirl. If minimalism is your vibe, go for Minimalist Lines or Classic French Tip with a Twist.
2. Occasion
Different designs work best for various events. For casual outings, fun designs like Confetti Nails or Cute Cartoon Characters may fit the bill. For formal occasions, consider more sophisticated styles like Floral Accents or Metallic Shine. Always match your nail art to the event to create a cohesive look.
3. Skill Level
Assess your nail art skills. If you are a beginner, start with easier designs like Sweet Dots or Ombre Effect. These are fun and manageable. If you are more experienced, try something intricate like Abstract Art or Glitter Galaxy to showcase your talents. Choose designs that match your comfort level to avoid frustration.
4. Nail Length and Shape
Your nail length and shape can affect how certain designs look. Longer nails offer more canvas space for elaborate designs. If you have shorter nails, opt for simpler designs that won’t overwhelm your look. Geometric Patterns or Animal Prints can work well on shorter nails, keeping them stylish without being too busy.
5. Seasonal Trends
Consider the season when choosing your gel nail art. Bright colors and fun patterns are perfect for summer, while deeper hues and cozy designs fit the fall. Look at current seasonal trends to get ideas. Seasonal Hues can reflect the colors of the leaves in autumn or the vibrant shades of spring flowers.
6. Nail Health
Lastly, think about your nail health. If your nails are damaged or brittle, be cautious with intricate designs that require a lot of filing or products. Focus on nurturing your nails first. Once they are ready, you can explore fun gel nail art designs without worry.
Pro Tip: Keep a nail art inspiration board. Save pictures of designs you love. This will help you choose the right design when you’re ready to get creative.
By following these guidelines, you can find gel nail art designs that not only look fabulous but also express your unique style! Whether you’re aiming for fun, fierce, or fabulous, there’s a design out there that’s perfect for you. Enjoy the process of exploring different styles, and remember, your nails can be a canvas for your creativity!
8. Glitter Galaxy

Take your nails on an interstellar journey with a Glitter Galaxy design! Start with a deep blue or black base for a cosmic backdrop. Once dry, dab various shades of glitter polish using a sponge to mimic stars and planets. Add extra sparkle with silver dots to complete your galaxy look.
This dreamy design is perfect for parties, night outs, or whenever you want to add some glam to your nails.
Outfit Pieces:
– Deep blue or black gel polish for the base
– Various glitter polishes in different colors
– Makeup sponge for application
– Top coat for sealing
Styling Tips:
– Mix different colors of glitter for a more dynamic look.
– Blend the glitter well for a seamless transition.
– Use a top coat to keep the design intact and shiny.
This design is great for any event. You can customize the colors to match your outfit or mood!
Glow up your night-out nails with a Glitter Galaxy twist—it’s easier than it looks. Dab glitter onto a sponge, blend different shades, then seal with top coat for shine that lasts—gel nail art designs that wow without the mess!
9. Color Block
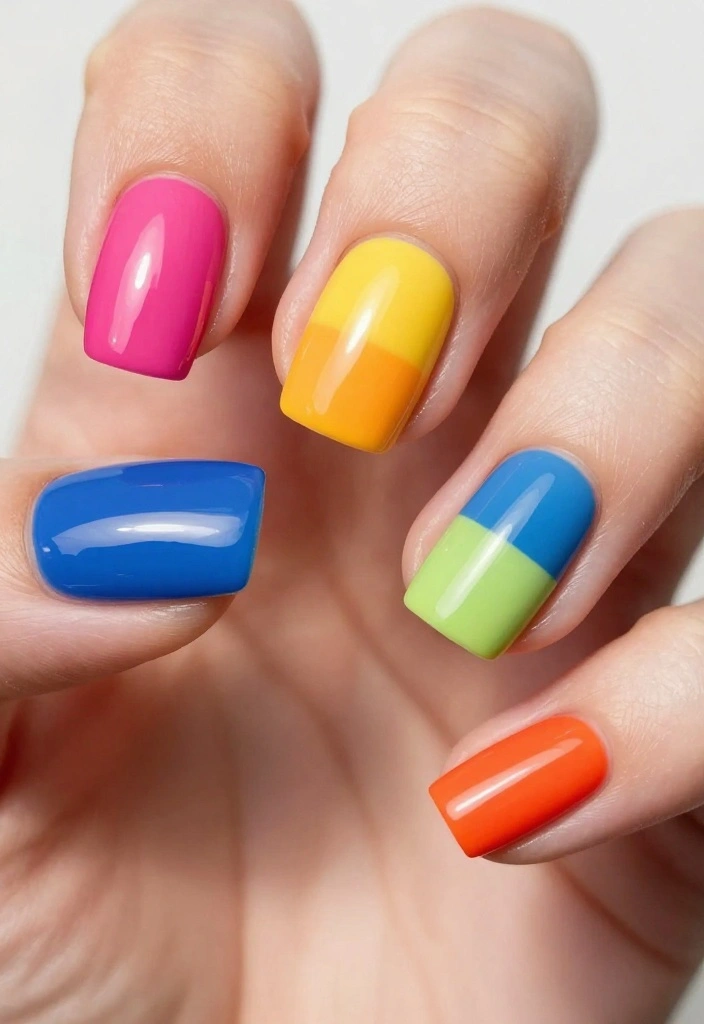
Get creative with Color Block nails! Choose two or three complementary bold colors to make a vibrant statement. After applying a clear base coat, use tape to section off parts of your nails, filling each block with a different color for a playful effect.
This modern design is ideal for casual events, summer outings, or any time you want to add some fun to your look.
Outfit Pieces:
– Clear base coat
– Two or three bold gel colors that complement each other
– Tape for sectioning
– Top coat for a glossy finish
Styling Tips:
– Use contrasting colors for a more striking effect.
– Ensure each color is completely dry before removing the tape.
– Experiment with different shapes for unique patterns.
This design is versatile for various occasions. You can easily switch colors to match different seasons or themes!
10. Beach Vibes
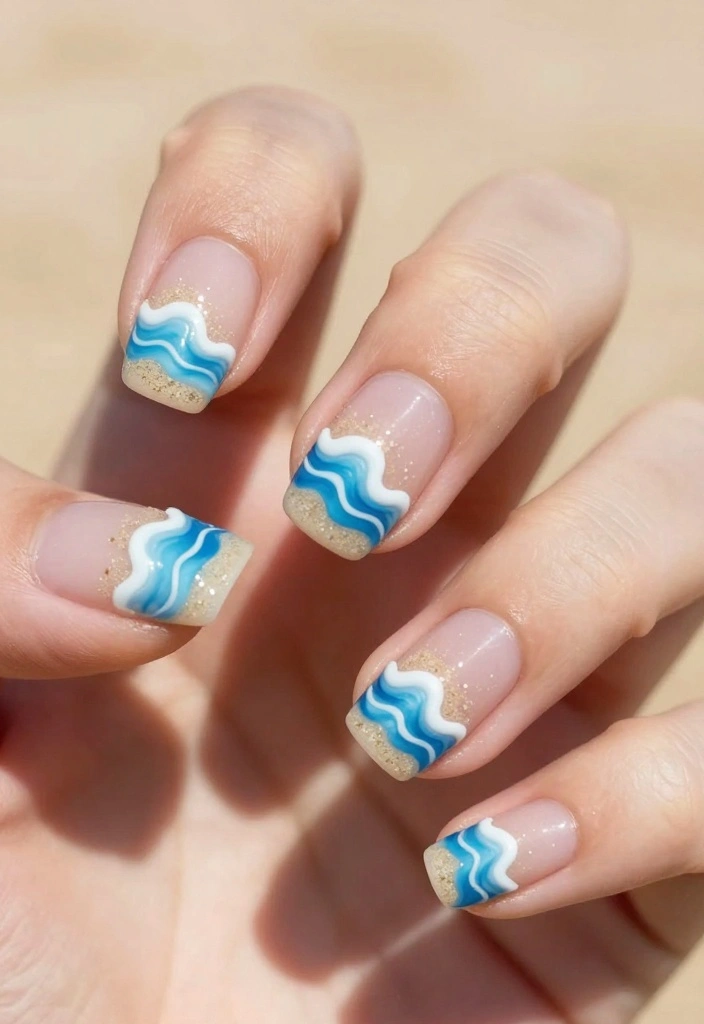
Capture the essence of summer with Beach Vibes nails. Begin with a soft sand-colored base, then use a light blue polish to create wave patterns. Add white polish for the foamy ocean edge, and finish with tiny painted umbrellas or palm trees on an accent nail for that coastal feel.
This fun design is perfect for beach parties, summer festivals, or any occasion that calls for a little sun and fun.
Outfit Pieces:
– Soft sand-colored gel polish for the base
– Light blue gel polish for waves
– White polish for foamy edges
– Fine brush for details (umbrellas or palm trees)
– Top coat for a polished finish
Styling Tips:
– Use a toothpick for tiny details like umbrellas or palm trees.
– Ensure each layer dries completely before applying the next.
– Add sparkles to the waves for a fun, sunlit effect.
This design is great for any summer event. You can easily swap the colors to fit the season!
11. Metallic Shine

Add a touch of luxury to your nails with Metallic Shine. Choose a metallic gel polish like silver, gold, or rose gold as your base. You can keep it simple for an elegant look or add contrasting designs for an extra flair. This shiny finish will undoubtedly turn heads and impress your friends.
This design is perfect for special occasions, parties, or any time you want to feel glam.
Outfit Pieces:
– Metallic gel polish (silver, gold, or rose gold)
– Optional contrasting color for designs
– Top coat for a glossy finish
Styling Tips:
– Opt for a matte top coat for a trendy twist on the metallic finish.
– Ensure the base is completely dry before adding any designs.
– Keep the design minimal for a sleek look.
This nail art is versatile for any occasion. You can mix and match metallics with other colors for a unique twist!
12. Seasonal Hues

Celebrate the seasons with Seasonal Hues nails! Use colors that reflect the time of year, like earthy reds and oranges for autumn or icy blues and whites for winter. Apply your base color, then add simple designs like leaves or snowflakes on accent nails to showcase your seasonal spirit.
This festive design works beautifully for seasonal gatherings, holidays, or just to embrace the changing weather.
Outfit Pieces:
– Seasonal gel colors (earthy reds/oranges or cool blues/whites)
– Simple design colors for accents (like white for snowflakes)
– Top coat for sealing
Styling Tips:
– Get inspired by seasonal flowers or foliage when choosing your colors.
– Use a steady hand for clean designs.
– Layer colors for depth and interest.
This design is perfect for any time of year. You can adapt the colors and designs to fit the season’s mood!
13. Tie-Dye Fun

Bring back the retro vibes with Tie-Dye Fun nails! Start with a white base coat, then use a sponge to dab on a mix of bright colors, blending them together for that iconic tie-dye effect. Think vibrant shades like pink, blue, and yellow for an eye-catching look.
This playful design is perfect for festivals, casual outings, or whenever you want to showcase your fun side.
Outfit Pieces:
– White gel polish for the base
– Bright gel polishes (pink, blue, yellow)
– Makeup sponge for application
– Top coat for a shiny finish
Styling Tips:
– Use multiple colors for a more dynamic tie-dye look.
– Don’t hesitate to mix and match colors to create unique designs.
– Seal with a top coat for a vibrant, long-lasting finish.
This design is adaptable for any occasion. You can easily switch colors to match your outfit or mood!
14. Heartfelt Love

Express your affection with Heartfelt Love nails! Start with a light pink or red base, then use a fine brush to paint tiny hearts in various colors. This charming design is perfect for date nights, Galentine’s celebrations, or just to show yourself some love.
Finish with a top coat for extra shine and durability.
Outfit Pieces:
– Light pink or red gel polish for the base
– Various color polishes for hearts
– Top coat for a glossy finish
Styling Tips:
– Use a toothpick for creating smaller, delicate hearts.
– Don’t be afraid to mix colors for a playful touch.
– Add glitter for an extra sparkle to your hearts.
This design is versatile for romantic occasions. You can easily adapt the colors for different holidays or celebrations!
Heartfelt Love nails prove that small, colorful hearts say volume. When you pair light pink or red gel polish with a fine brush, your gel nail art designs become instant mood boosters for date nights and Galentine’s gatherings.
15. Sparkly Stone Accents

Elevate your nail game with Sparkly Stone Accents! Choose a base color like soft pink or light blue and let it dry completely. Then, apply a gem or rhinestone on one or two accent nails for a glamorous touch. The combination of sparkly stones with a smooth polish creates an eye-catching effect.
This design is perfect for special occasions, parties, or whenever you want to add some bling to your look.
Outfit Pieces:
– Soft pink or light blue gel polish for the base
– Gems or rhinestones for accents
– Top coat for sealing
Styling Tips:
– Use a small amount of nail glue for securing stones firmly.
– Be sure to let your base color dry fully before adding stones.
– Add more stones for a more dramatic effect.
This design is great for any event. You can switch the base color to match your outfit or mood!
16. Cute Cartoon Characters

Show off your playful side with Cute Cartoon Characters nails! Start with a neutral base coat, then use a fine brush to draw your favorite cartoon characters on each nail. This fun design is perfect for casual outings, friend hangouts, or whenever you want to express your fun personality.
Finish with a top coat for durability and shine.
Outfit Pieces:
– Neutral gel polish for the base
– Various colors for cartoon characters
– Top coat for a polished finish
Styling Tips:
– Practice your designs on paper before applying them to your nails.
– Don’t stress about perfection; embrace the fun nature of the design.
– Consider using nail stickers for a quick and easy alternative.
This design is great for any casual occasion. You can easily switch characters to match your mood or favorite shows!
17. Abstract Art
For the creative at heart, Abstract Art nails are the perfect canvas! Start with a solid base color and use random brush strokes in various colors to create your own masterpiece. This design celebrates individuality and can look different on everyone, making it truly unique.
Seal it with a top coat to keep your art intact.
Outfit Pieces:
– Solid gel polish for the base
– Various gel colors for abstract strokes
– Top coat for sealing
Styling Tips:
– Don’t overthink it; just let your brush flow naturally.
– Mix and match colors for a vibrant effect.
– Use a sponge for added texture if desired.
This design is perfect for any occasion. You can customize the colors to match your outfit or personal style!
18. Sweet Dots

Add a cute touch with Sweet Dots nails! Choose a pastel base color like lavender or baby blue and let it dry. Then, use a dotting tool or the end of a bobby pin to create colorful dots on top. You can arrange them in patterns or randomly for a whimsical feel.
This charming design is perfect for casual outings, spring events, or whenever you want to bring some cheer to your look.
Outfit Pieces:
– Pastel gel polish for the base
– Various bright gel polishes for dots
– Dotting tool or bobby pin for application
– Top coat for sealing
Styling Tips:
– Mix different sizes of dots for a fun, playful effect.
– Ensure each layer dries fully before adding dots.
– Feel free to use any rounded tool for creating dots.
This design is adaptable for any occasion. You can easily switch the colors to fit any season or event!
19. Classic French Tip with a Twist

Reinvent a classic with the Classic French Tip with a Twist. Start with a nude base coat and use a bold color for the tips, such as teal or coral! You can also incorporate fun designs, like diagonal lines or a hint of glitter, to modernize the look. This design is chic yet fresh, making it suitable for any occasion.
Outfit Pieces:
– Nude gel polish for the base
– Bold gel polish for tips (teal or coral)
– Optional: glitter or design for added flair
– Top coat for sealing
Styling Tips:
– Use striping tape for clean lines on the tips.
– Make sure your base coat is completely dry before adding tips.
– Experiment with designs to personalize your look.
This design is perfect for any event. You can easily change the tip color to match your outfits for a fresh look!
Fun fact: switching from a nude base to bold tips like teal or coral can boost optical length and confidence by about 40% in photos. A little glitter or diagonal lines takes the Classic French Tip with a Twist from chic to wow in minutes.
20. Neon Burst
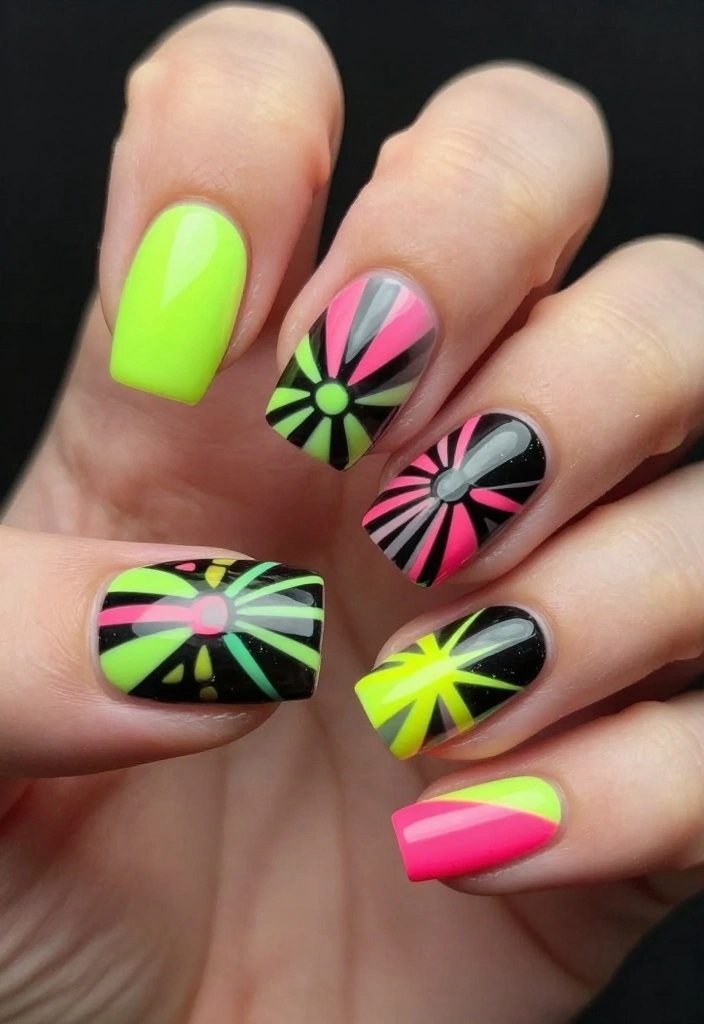
Make a bold statement with Neon Burst nails! Choose a bright neon base color like hot pink or electric yellow to catch everyone’s eye. Once dry, use black polish to create fun geometric designs or wild swirls. This design is all about fun and energy and will light up any room.
This vibrant style is perfect for parties, summer festivals, or whenever you want to stand out from the crowd.
Outfit Pieces:
– Neon gel polish (hot pink or electric yellow)
– Black gel polish for designs
– Top coat for a glossy finish
Styling Tips:
– Use a UV light to cure your gel for the best results.
– Experiment with different shapes and patterns for a unique twist.
– Seal everything with a top coat to keep the design vibrant.
This design is great for any fun occasion. You can mix and match neon colors for an even more playful effect!
Conclusion
Nail art is an incredible way to express yourself and have fun! With these 20 fun gel nail art designs, there’s no limit to the creativity you can unleash.
Whether you’re a seasoned pro or just starting out, each design offers an opportunity to play around with colors and styles. So, gather your supplies, invite some friends over for a nail art session, and watch the compliments pour in!
Frequently Asked Questions
What are some easy gel nail art designs I can start with today?
Here are some easy gel nail art designs you can start with today: simple polka dots, color-block blocks, stripes, negative-space tips, and a twist on the classic French tip.
How to do it: prep nails (push back cuticles, file, buff), apply a thin base coat and cure under your UV/LED lamp, apply your main color in thin layers and cure, add the design with a gel brush or dotter, cure again, seal with a top coat and cure, then wipe with cleanser and moisturize the cuticles. Tips: keep layers thin for best results and practice on one accent nail first. This keeps the look fun and easy to master.
What tools and supplies do I need to create gel nail art designs at home?
Starting with the right tools makes all the difference for gel nail art designs. Essentials: a base coat, a top coat, 1-4 gel polish colors that mix well, a UV/LED lamp, gel cleanser or 70% isopropyl alcohol, lint-free wipes, a nail file and buffer, cuticle pusher, a dotting tool, a striping brush or nail tape, and optional rhinestones or decals.
Pro tips: choose a small color set to keep fun and easy to manage, and practice designs on a silicone nail mat before applying to real nails. Store polishes upright to avoid thickening.
How can I make gel nail art designs last longer and prevent chipping?
Long-lasting gel nail art designs come from good prep and layering. Start with clean, dry nails; push back cuticles; buff shine; apply a thin base coat and cure; apply color in thin layers and cap the free edge; finish with a sturdy top coat and cure. Avoid soaking nails in water for 24-48 hours after application and wear gloves for chores to prevent chips. Re-apply or refresh the top coat every 3-4 days for extra durability. A quick wipe with a lint-free wipe after curing helps remove tacky residue and keeps the shine.
How do I remove gel nail art designs safely without damaging my nails?
Safe removal is key for healthy nails. Do not peel gel off. File the shiny top layer to break the seal, then soak or wrap in acetone for 10-15 minutes until the gel softens. Gently lift with an orangewood stick and repeat if needed. Wash nails, moisturize cuticles, and apply a nourishing oil. If the gel is stubborn, consider a professional removal to minimize damage. This keeps your natural nails strong for your next gel nail art designs session.
How can I choose colors and patterns for gel nail art designs that fit my style and occasion?
Be intentional with color and pattern choices for gel nail art designs. Start with a base color you love and select 1-2 coordinating accent shades. Consider your skin tone, season, and the event. Keep patterns simple at first—dots, stripes, or a half-moon French tip are fun and easy. Plan a cohesive theme across nails, or reserve one accent nail to test new ideas. Practice on tips or swatches before applying to your nails to avoid surprises.
Related Topics
gel nail art
nail designs
beginner friendly
fun nail art
easy techniques
trendy nails
colorful designs
party nails
DIY nail art
quick designs
creative manicures
nail art for beginners
These nail designs look amazing! I’m definitely going to try the one with the flowers. Do you have any tips for making the colors pop more?
I love these ideas! I tried doing gel nails once, and let’s just say I ended up with more paint on my hands than on my nails! What a mess! 😂