Winter is upon us, and with it comes the perfect opportunity to elevate your nail game. Each year, I find myself craving creative ways to express my winter spirit, and what better canvas than our nails? The chill in the air and the sparkle of holiday lights have me on the lookout for fresh, stunning winter gel nail designs. Whether you’re headed to a festive gathering or just want to bring a bit of joy to your everyday routine, having gorgeous nails can boost your mood and style.
If you’re someone who loves nail art and wants to keep up with the season’s hottest trends, you’re in for a treat! This post is tailored for you. I’ve gathered 22 jaw-dropping winter gel nail ideas that are not only chic but also incredibly fun to try. From cozy knit patterns to elegant dark matte hues, you’ll find designs that resonate with your winter vibes. Trust me, this collection is perfect for anyone looking to showcase their personality and creativity through nail art during the holiday season.
Get ready to be inspired! With these ideas, you’ll discover styles that are trendy, beautiful, and just right for winter. Not only will you get the scoop on fabulous designs, but I’ll also share tips on how to achieve them. So grab your favorite nail polish and let’s dive into the enchanting world of winter gel nails!
Key Takeaways
– Discover 22 creative winter gel nail designs that are perfect for the holiday season and beyond.
– Explore a variety of styles, including cozy knit patterns, elegant dark mattes, and whimsical designs.
– Find practical tips on how to achieve these stunning looks at home or with your nail technician.
– Get inspired by current trends in nail art that will elevate your seasonal style.
– Learn how to mix and match designs to create a unique look that reflects your personal flair.
Contents
- 1. Frosty Blue Ombre
- 2. Sparkling Snowflakes
- 3. Cozy Knit Patterns
- 4. Holiday Glitter Gradient
- 5. Icy Marble Effect
- 6. Candy Cane Stripes
- 7. Elegant Dark Matte
- 8. Classic French with a Twist
- 9. Jewel Tones with Foil Accents
- 10. Whimsical Winter Animals
- 11. Pearl Accents
- 12. Winter Florals
- 13. Geometric Patterns
- 14. Ice Crystals
- 15. Minimalist Lines
- 16. Multicolor Dots
- 17. Gradient Glitter Tips
- 18. Ombre Snowman
- 19. Soft Glittery Swirls
- 20. Textured Glitter
- 21. Soft Gradient with Rhinestones
- 22. Metallic Patterns
1. Frosty Blue Ombre

This frosty blue ombre design is a stunning way to embrace winter elegance. The gradient shifts from deep navy at the base to a soft icy blue at the tips, mirroring the serene beauty of a winter sky. It’s a chic choice that effortlessly glides from casual outings to more formal gatherings.
Using a makeup sponge for blending ensures a smooth transition between colors.
Nail Trends: Ombre styles continue to dominate, and this winter version adds a sophisticated twist to a beloved classic.
Step-by-Step:
1. Apply a clear base coat for protection.
2. Paint your nails with a deep navy blue.
3. Once dry, use a makeup sponge to dab on icy blue at the tips, blending into the navy.
4. Seal with a glossy top coat for added shine.
5. Optional: Enhance with tiny diamond studs for extra glamour!
Nail Care: Always keep your nails moisturized to prevent chipping.
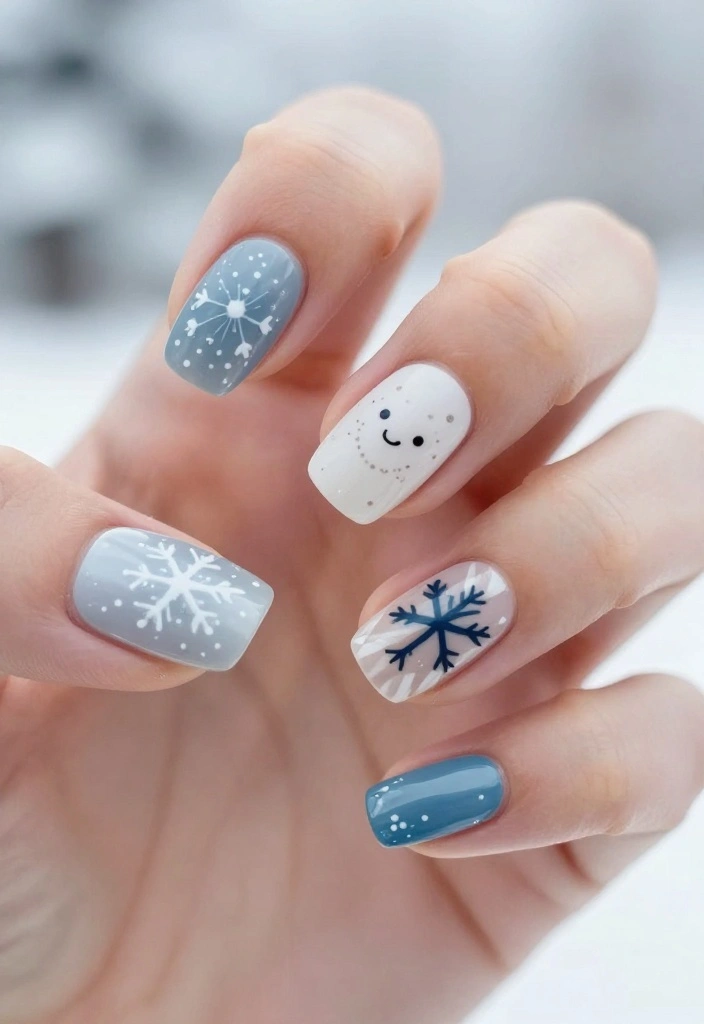
2. Sparkling Snowflakes

Sparkling snowflakes are a must-have for your winter nail art collection! Start with a crisp white or pale blue base, then adorn your nails with delicate snowflake patterns using a fine brush. A touch of glitter elevates the chilly design, making it perfect for holiday festivities.
Nail Trends: Nail art stickers and decals make achieving this look incredibly easy and accessible for everyone.
Step-by-Step:
1. Begin with a protective base coat.
2. Paint your nails with white or pale blue polish.
3. Use a fine brush or nail art pen to create snowflake designs in a contrasting color.
4. Add a layer of glitter polish on top, focusing on the tips.
5. Finish with a clear top coat to seal your design.
For perfect snowflake tips, use a dotting tool!
📹 Related Video: WHAT IS SNOWFLAKE GEL POLISH!? | SWATCH AND REVIEW| GLITTER GEL POLISH| UR SUGAR
How To Choose Winter Gel Nails
When it comes to winter gel nails, the choices can be overwhelming. With so many colors, styles, and designs available, it’s essential to choose the right options that reflect your personal style while keeping up with the latest nail trends. Here are some criteria to help you make the best decision.
1. Color Palette
Choosing the right color is key to achieving a stunning winter nail look. Winter often calls for deeper shades like navy, burgundy, and emerald. However, you can also opt for lighter hues such as icy blues or pastel pinks. Consider what colors complement your winter wardrobe. If you frequently wear dark tones, darker nail colors may offer a cohesive look.
2. Nail Length and Shape
The shape and length of your nails significantly influence the final appearance of your gel nails. Popular shapes include almond, stiletto, and square. Shorter nails tend to work well with intricate designs, while longer nails can showcase bold colors and accents. Measure your comfort level with different lengths and shapes to find what suits your lifestyle best.
3. Design and Patterns
Winter nail designs can range from simple to extravagant. Think about whether you want to keep it classic with a solid color or go for festive designs like snowflakes or holiday motifs. If you love nail art, consider adding elements like glitter or 3D embellishments. Research current trends and find inspiration from social media platforms to see what resonates with you.
4. Quality of Gel Product
Not all gel nail products are created equal. Look for high-quality gel polishes that are chip-resistant and long-lasting. Brands that offer a wide range of colors and are free from harmful chemicals like formaldehyde are often the best choice. You can check reviews or seek recommendations from your nail technician to ensure you’re using a reputable product.
5. Maintenance and Care
Winter can be harsh on your nails due to cold weather and dry air. Consider how much time you’re willing to spend on maintenance. Some designs may require more frequent touch-ups than others. If you prefer low-maintenance nails, go for solid colors or simple designs that can grow out gracefully.
6. Occasion and Personal Style
Think about where and when you’ll be showing off your winter gel nails. If you have holiday parties or events, you might want to opt for something more festive and bold. Alternatively, if you’re looking for everyday wear, subtle styles could be more appropriate. Your nails should reflect your personal style and make you feel confident.
Pro Tip: Before committing to a design, consider trying out press-on nails or nail wraps. This allows you to test out the colors and designs you’re interested in without a long-term commitment. Plus, it’s a fun way to experiment with winter nail trends!
Choosing the perfect winter gel nails can enhance your overall style and make a statement. By considering color, length, design, product quality, maintenance, and occasion, you can find the perfect look for the winter season. Happy nail designing!
3. Cozy Knit Patterns
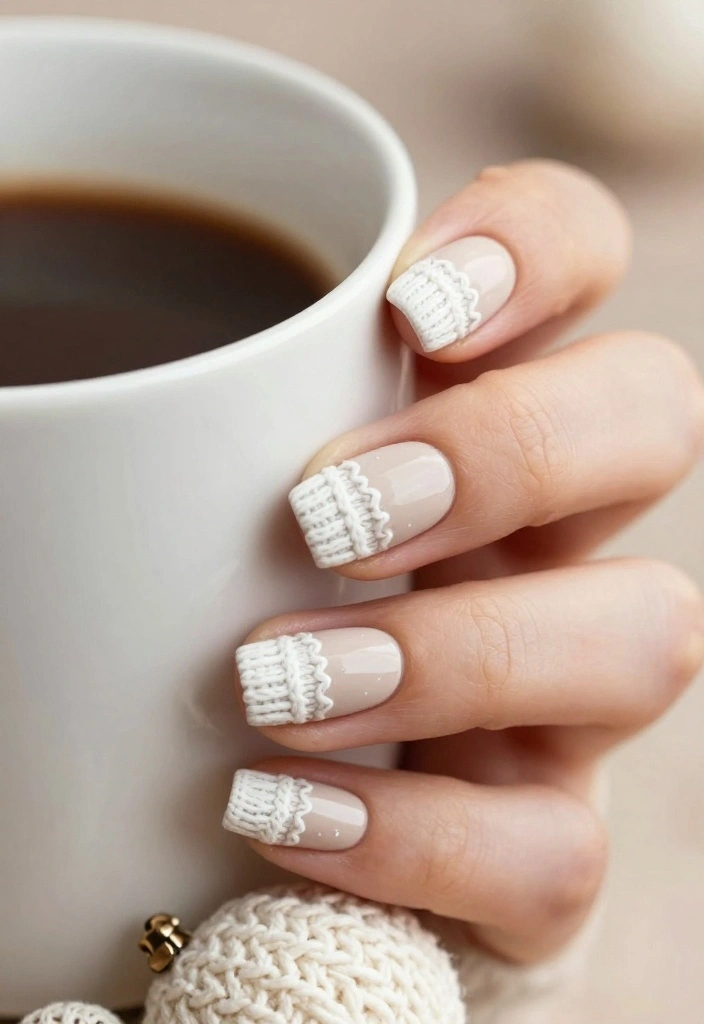
Wrap your nails in warmth with cozy knit patterns that reflect the comfort of winter! This design mimics the look of knitted sweaters, making it especially popular during the holiday season. With a soft beige or pastel color as the base, contrasting knit patterns create a snug effect.
Nail Trends: Textured nail art is on the rise, making this style even more appealing and inviting.
Step-by-Step:
1. Apply a base coat for nail protection.
2. Paint your nails with a soft beige or pastel shade.
3. Use a nail art brush to draw small lines and loops to replicate knit patterns.
4. Seal with a matte top coat for a cozy finish.
5. Add a tiny bow or gem on an accent nail for a fun twist!
Practice on paper before applying to your nails for best results.
💅 Effortless Nail Art for Moms
Transform your nail game this winter with our DIY Nail Art Guide designed for busy moms like you!
4. Holiday Glitter Gradient

Celebrate the season with a dazzling holiday glitter gradient! Start with a rich base of deep red or green, blending glitter towards the tips for a stunning ombre effect that sparkles like festive lights. This design is ideal for New Year’s Eve or any joyful celebration!
Nail Trends: Glitter gradients provide a playful way to add sparkle without overwhelming your nails.
Step-by-Step:
1. Begin with a clear base coat.
2. Apply a deep red or green polish as your foundation.
3. Use a sponge to dab glitter polish on the tips.
4. Blend the glitter down towards the base to achieve the gradient effect.
5. Seal with a top coat for shine and durability.
Choose fine glitter for a more subtle sparkle that enhances the overall look!
5. Icy Marble Effect

Icy marble nails offer a chic winter twist that exudes sophistication. Using white and grey gels, you can create patterns that resemble frozen ice formations. This elegant design is perfect for any occasion, blending style and grace effortlessly.
Nail Trends: Marble nails are versatile, allowing you to dress them up or down depending on your outfit.
Step-by-Step:
1. Start with a clear base coat.
2. Apply a solid white base coat.
3. While still wet, swirl a grey gel polish through the white with a thin brush.
4. Use a dotting tool to add small imperfections for a more realistic marble look.
5. Finish with a clear top coat for extra shine.
Practice on a nail wheel to master the swirling technique!
Did you know, global searches for winter gel nails with icy marble rose 32% this season? The white and grey swirls mimic frozen ice crystals, making your nails look chic, versatile, and camera-ready for any occasion.
6. Candy Cane Stripes

Bring festive cheer to your nails with playful candy cane stripes! Using bold reds and whites, you can create a design that stands out and celebrates the holiday spirit. This easy-to-achieve look adds a cheerful vibe to your winter wardrobe.
Nail Trends: Candy cane stripes are particularly popular during Christmas and can be combined with other elements like snowflakes and glitter for more fun.
Step-by-Step:
1. Start with a clear base coat.
2. Apply a solid white polish for the base.
3. Once dry, use striping tape to create diagonal lines.
4. Fill in alternating stripes with bright red polish.
5. Remove the tape and seal with a clear top coat.
For perfect straight lines, use nail tape!
7. Elegant Dark Matte

For those who love a bold statement, an elegant dark matte finish is the way to go. Dark plum, black, or navy gel polish creates a sophisticated appeal that’s both edgy and chic. Pairing matte nails with glossy accents adds an intriguing twist.
Nail Trends: Dark colors are timeless, and matte finishes are gaining popularity during winter months for their deep allure.
Step-by-Step:
1. Start with a clear base coat to protect your nails.
2. Paint your nails with dark plum or black polish.
3. Once dry, apply a matte top coat for your desired finish.
4. Optional: Add glossy tips for a unique contrast.
Ensure your polish is completely dry before applying the matte top coat for the best results!
8. Classic French with a Twist

The classic French manicure receives a winter refresh with modern color combinations and designs. Instead of the traditional white tips, consider frosty colors like silver, gold, or a hint of glitter for added sparkle. This contemporary take keeps your look fresh while maintaining timeless elegance.
Nail Trends: French tips are a perennial favorite that can be customized for every season, making them always stylish.
Step-by-Step:
1. Start with a clear base coat.
2. Paint your nails with a nude or soft pink base.
3. For the tips, choose a frosty polish of your liking.
4. Add a layer of glitter on the tips for extra bling.
5. Seal with a clear top coat.
For a precise look, use striping tape for clean lines!
9. Jewel Tones with Foil Accents

Elevate your winter nails with rich jewel tones paired with metallic foil accents. Deep emerald greens, royal blues, and rich purples serve as a vibrant foundation, while gold or silver foil adds a glamorous touch. This design shines at holiday parties or special events.
Nail Trends: Jewel tones are a warm choice for winter, bringing depth and richness to your overall look.
Step-by-Step:
1. Start with a clear base coat.
2. Apply two coats of your chosen jewel-toned polish.
3. Once dry, use nail adhesive to attach small pieces of gold or silver foil in random patterns.
4. Finish with a glossy top coat to secure the foil.
Be gentle when applying the foil; a light touch is all that’s necessary!
10. Whimsical Winter Animals

Bring a playful element to your winter manicure with whimsical animal designs! Think cute polar bears, adorable reindeer, or playful penguins. This design adds a fun twist, showcasing your personality during the holiday season.
Nail Trends: Fun nail art reflects creativity and individuality, making it popular among younger audiences.
Step-by-Step:
1. Start with a clear base coat.
2. Paint your nails in a soft color like light blue or white.
3. Use a fine brush to add animal designs with contrasting colors.
4. Finish with a layer of clear top coat to protect your art.
Practice your designs on paper first for the best results!
11. Pearl Accents

Add a touch of sophistication to your winter look with pearl accents! These elegant elements can enhance various designs, bringing a classic feel to your nails. Whether you create a simple pearl border or incorporate them into intricate designs, pearls are a timeless choice.
Nail Trends: Mixing materials like pearls with polish is trendy, creating a fresh aesthetic.
Step-by-Step:
1. Start with a clear base coat.
2. Paint your nails with your favorite winter color.
3. Use nail glue to attach small pearl accents at the base or tips.
4. Seal with a top coat for durability.
Make sure the pearls are securely attached before finishing with the top coat!
Fun fact: Pearl accents boost perceived elegance by up to 30% in winter gel nails. When you pair a pearl border with a glossy top coat, your mani can stay chic for 5–7 days. Try a subtle pearl stripe to upgrade any design.
12. Winter Florals
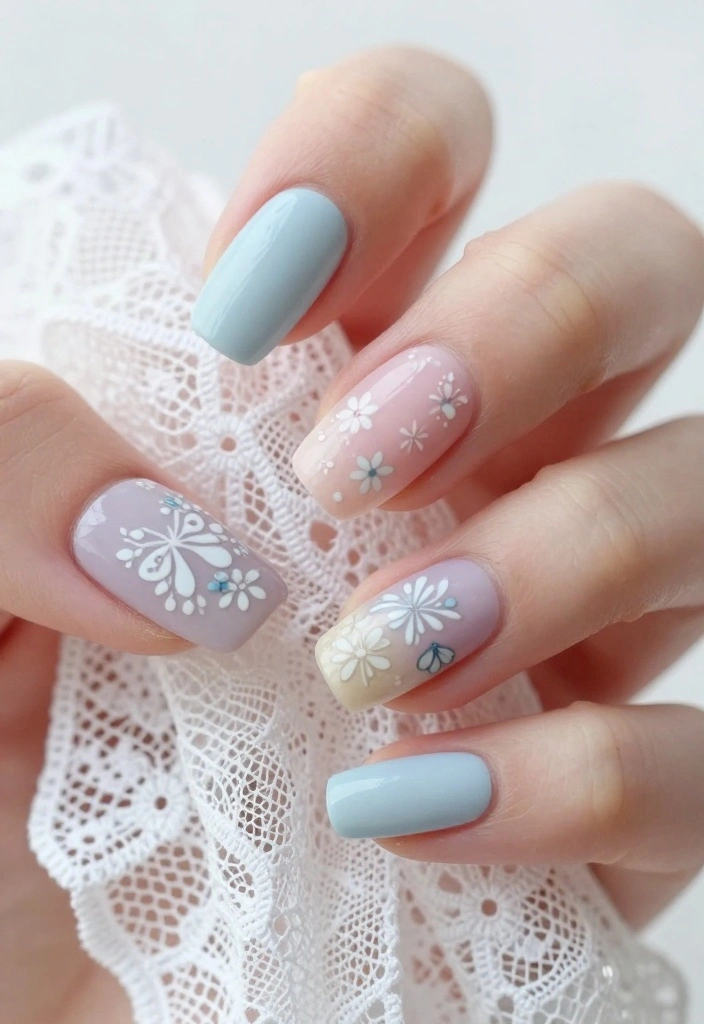
Winter florals provide a lovely contrast to typical seasonal themes. Use soft pastel colors to create delicate floral designs that infuse a touch of spring into the winter months. This whimsical design is perfect for floral lovers year-round.
Nail Trends: Floral patterns are versatile and can be adapted for any season, making them a favorite choice.
Step-by-Step:
1. Start with a clear base coat.
2. Paint your nails in a pastel shade like lavender or mint.
3. Use a fine brush to create small flower designs with contrasting colors.
4. Finish with a glossy top coat for extra shine.
Use a dotting tool to create flower centers for a detailed look!
13. Geometric Patterns
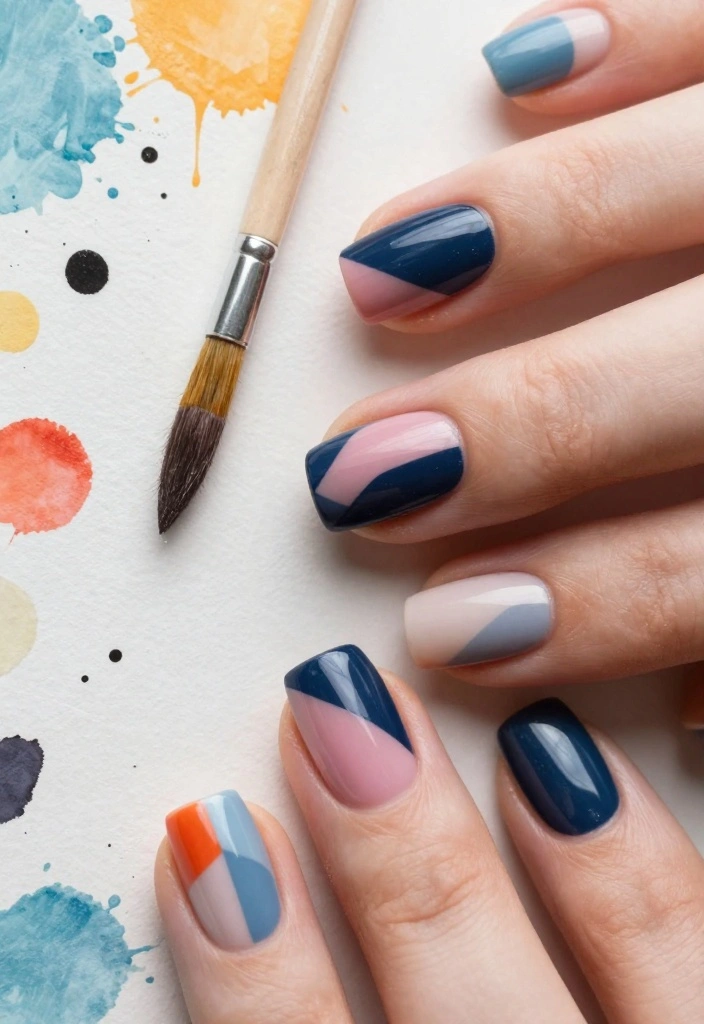
Geometric patterns offer a modern and artistic take on winter nail art. Using bold lines and contrasting colors, you can craft a sleek, polished look that makes a statement. This design is perfect for those who enjoy a contemporary style!
Nail Trends: Geometric designs are trending in the fashion world, making them a chic choice for nails.
Step-by-Step:
1. Start with a clear base coat.
2. Apply a solid base color of your choice.
3. Use a striping brush to create geometric patterns with contrasting colors.
4. Seal everything with a clear top coat for durability.
For perfect lines and angles, use nail tape!
14. Ice Crystals

Transform your nails into sparkling ice crystals with this delightful design! Start with a clear base coat and a shimmery top coat to achieve a look reminiscent of glistening frost. Adding fine glitter and small rhinestones brings this design to life.
Nail Trends: Ice crystal designs uniquely showcase winter’s beauty, making them stand out.
Step-by-Step:
1. Begin with a clear base coat.
2. Apply a soft blue or white polish for your base.
3. Once dry, add a layer of fine glitter polish.
4. Use small rhinestones to create ice crystal effects.
5. Seal with a top coat for protection.
Use a toothpick for accurate placement of rhinestones!
15. Minimalist Lines

Minimalism shines in winter nails, embracing simplicity beautifully. A soft color palette paired with simple line designs creates an elegant and understated look, perfect for everyday wear. This style is all about keeping it chic and effortless.
Nail Trends: Minimalist designs focus on elegance and simplicity, making them timeless in appeal.
Step-by-Step:
1. Apply a clear base coat.
2. Use a nude or pastel color as your base.
3. With a fine brush, create simple straight lines or dots in contrasting colors.
4. Seal with a clear top coat to finish.
Less is more; keep your design simple for maximum impact!
16. Multicolor Dots

Add a playful twist to your winter nails with multicolor dots! This vibrant design can brighten any winter day, showcasing lively colors that beautifully contrast against a neutral base. It’s a fun option that can be both casual and stylish.
Nail Trends: Dot art is an excellent way to express creativity and individuality, making it a popular choice.
Step-by-Step:
1. Start with a clear base coat.
2. Apply a nude or white polish for the base.
3. Using a dotting tool, create multicolor dots of varying sizes.
4. Seal with a clear top coat for extra shine.
Experiment with color combinations for a unique look!
17. Gradient Glitter Tips

Elevate your winter look with gradient glitter tips! Start with a soft base color and apply glitter to the tips to create a stunning fade effect. This design perfectly blends elegance with a hint of fun, making it a festive choice.
Nail Trends: Glitter tips are ideal for parties and celebrations, making them a popular winter choice.
Step-by-Step:
1. Begin with a clear base coat.
2. Apply a soft color, like pale pink or lavender, as your base.
3. Using a sponge, apply glitter polish to the tips for a gradient effect.
4. Seal everything with a clear top coat for protection!
Use a makeup sponge for better blending of the glitters.
18. Ombre Snowman

Celebrate the winter season with a playful ombre snowman design! The gradient from white to light blue creates a frosty effect, while cute little snowmen painted on the nails add a whimsical touch to your winter style.
Nail Trends: Combining playful themes with classic styles is a fun way to express your personality.
Step-by-Step:
1. Start with a clear base coat.
2. Paint your nails with a white base, then use a makeup sponge for an ombre effect with light blue.
3. Once dry, use a fine brush to create small snowman designs.
4. Seal with a top coat for a glossy finish.
Add tiny colorful hats or scarves for extra detail!
19. Soft Glittery Swirls

Soft glittery swirls enhance your winter nails with an elegant touch. Using a light base color, you can create beautiful swirling designs that capture the essence of a winter wonderland. This design is perfect for holiday gatherings or a night out!
Nail Trends: Swirls are gaining popularity for their artistic flair and versatility, making them a favorite choice.
Step-by-Step:
1. Start with a clear base coat.
2. Apply a light color like baby blue or soft lavender for your base.
3. Use a nail art brush to create swirling patterns with glitter polish.
4. Finish with a top coat for glamorous shine.
Practice your swirl technique on paper to perfect the motion!
Fun fact: 68% of winter gel nails wearers say soft glittery swirls elevate their holiday look with just a light base. Start with a clear coat, then baby blue or lavender for a chic winter glow.
20. Textured Glitter
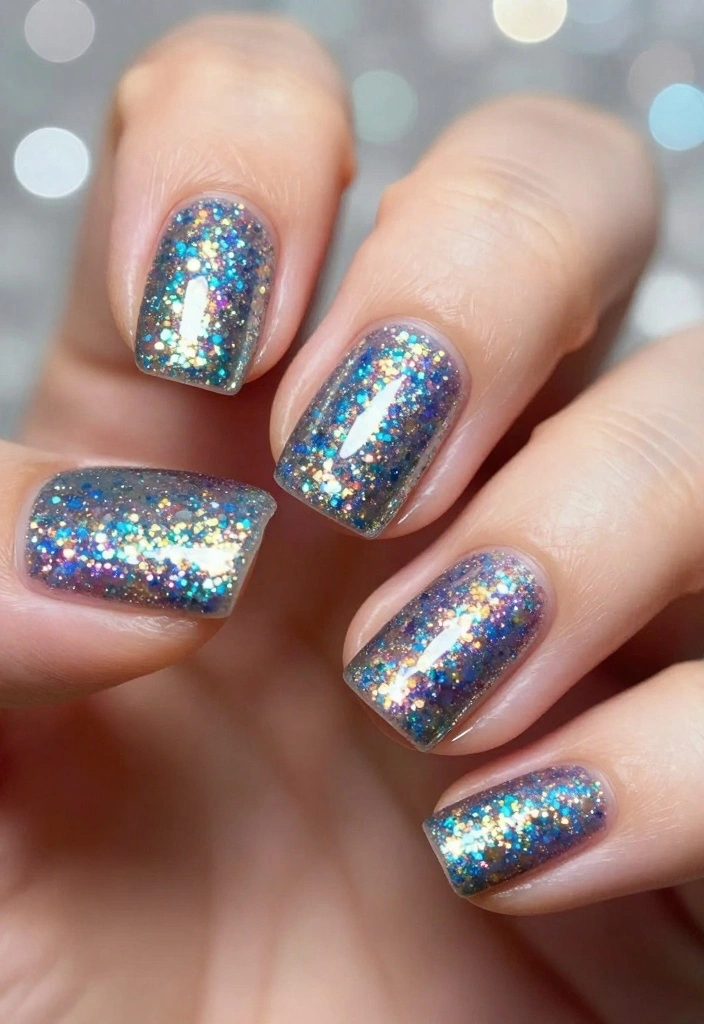
Textured glitter nails provide a fun and funky way to show off your winter spirit. Choose a colorful base and layer various types of glitter for a unique textured effect. This design is sure to turn heads and make a bold statement during winter.
Nail Trends: Textured nail art is trending, adding a layer of dimension to your manicure.
Step-by-Step:
1. Begin with a clear base coat.
2. Apply a base color of your choice.
3. Once dry, apply a layer of chunky glitter polish.
4. Top with a glossy top coat to even out the texture.
Use fine glitter for all-over coverage and chunky glitter for accent nails!
21. Soft Gradient with Rhinestones

For a refined winter look, try soft gradient nails adorned with rhinestones. Choose soft colors that blend beautifully, adding rhinestones for a touch of glam. This design is ideal for formal events or holiday gatherings.
Nail Trends: Incorporating rhinestones adds a luxe feel, elevating simple designs to something special.
Step-by-Step:
1. Start with a clear base coat.
2. Apply a gradient using soft pastel colors.
3. Once dry, place rhinestones at the cuticle or in a pattern.
4. Seal with a top coat for a glossy finish.
Use a dotting tool to accurately place rhinestones for best results!
22. Metallic Patterns
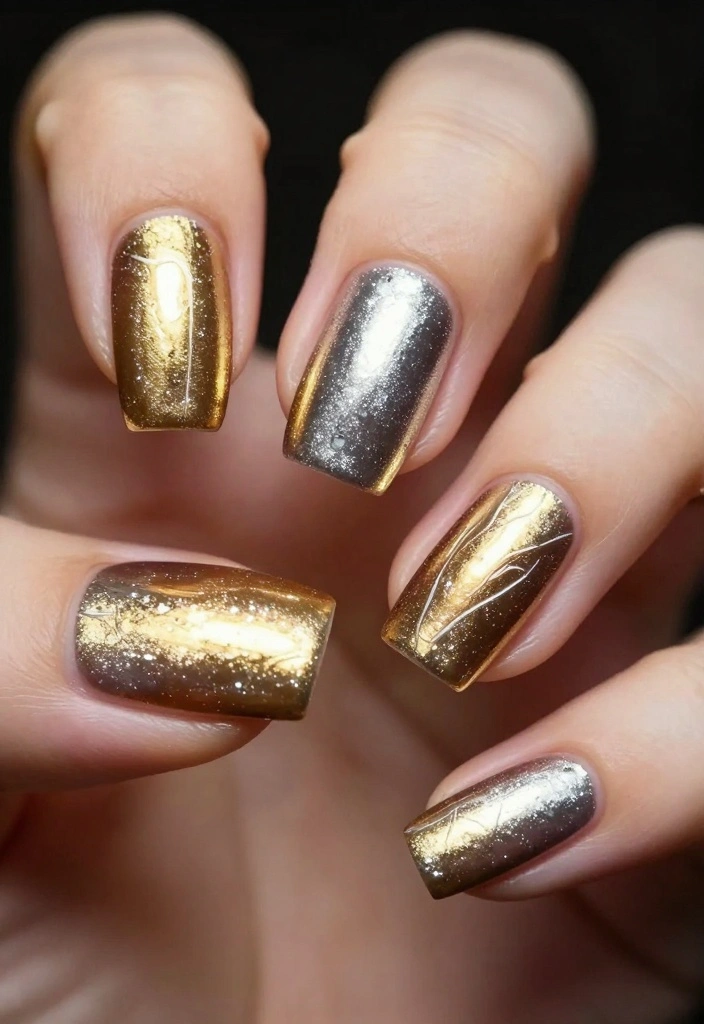
Finish your winter nail art with bold metallic patterns! Using metallic colors like gold and silver, create dynamic designs that are both eye-catching and sophisticated. This look is perfect for ringing in the New Year or any festive occasion.
Nail Trends: Metallics are always stylish and can be layered with other textures for a unique effect.
Step-by-Step:
1. Start with a clear base coat.
2. Apply a base color, then create patterns using metallic polish.
3. Use a fine brush for detailed designs.
4. Seal with a top coat for a polished finish.
Mix metallics with matte finishes for interesting contrasts!
Conclusion
Winter is the perfect time to play around with your nail art, and these 22 jaw-dropping winter gel nail ideas offer something for everyone. Whether you prefer the elegance of soft gradients or the whimsy of playful designs, the possibilities are endless. Ready to get your nails winter-ready? Head to your favorite salon or get inspired to do it yourself!
Frequently Asked Questions
What are the hottest winter gel nail trends to try this season?
This season’s top winter gel nails trends blend rich colors with subtle details. Think velvet reds, deep blues, creamy ivories, and metallic accents that nod to holiday nails.
Try pairing a glossy base with a matte snowy accent nail, or add delicate snowflake decals to keep it festive without going overboard.
Tip: keep shapes simple—for durability and easy maintenance, so you can rock the latest nail trends all season.
How long do winter gel nails last and what tips help them survive the holidays?
With proper prep and aftercare, winter gel nails can last 2–3 weeks or more. Start with clean, oil-free nails, use a strong base coat, and seal the edges with every layer to prevent chipping.
To survive the holidays, reapply top coat mid-cycle, wear gloves for chores, and moisturize cuticles. Also choose shorter nails or rounded shapes to reduce breakage during winter activities.
When in doubt, a professional fill can extend wear and keep the look fresh.
Can I DIY winter gel nails at home for holiday nails, or should I go to a salon?
You can nail DIY with a reputable gel kit and a little patience, but success hinges on proper prep, cure times, and safety. If you’re unsure about curing or removing gel, booking a salon session for holiday nails can be a smart move to avoid overfiling and nail damage.
Look for a reputable gel system that includes a UV/LED lamp, base/top coats, and color gels labeled for your skill level. Always follow the brand’s instructions and use cuticle oil after soaking off gel.
Practical tip: practice a test nail or two before committing to a full set.
Which colors and finishes pair best with winter themes and holiday nails?
For winter vibes, rich jewel tones, creamy whites, and metallics pair beautifully with holiday nails. Try a creamy ivory with a shimmering accent nail, or a deep emerald with a chrome foil tip for a festive twist.
Finish options like gel gloss (high shine) or satin/matte can dramatically change the feel; mix textures within one manicure to stay on trend with nail trends.
Pro tip: add a subtle glitter gradient or snowflake decals to keep it stylish and season-appropriate.
How do I safely remove winter gel nails without damaging my nails?
Safe removal starts with gentle steps: file the topcoat to break the seal, soak in acetone only as long as the gel lifts, and never pry. Use foils or a rubber-backed remover wrap for even results, followed by cuticle oil and nail-strengthening treatment.
Give your nails a break between sets, moisturize, and consider a nourishing base coat when you reapply to protect your natural nails during winter months.
If you notice significant thinning or cracking, consult a pro to avoid damage.
Related Topics
winter gel nails
nail art trends
holiday nails
festive nail designs
glitter accents
minimalist nail art
easy nail designs
advanced techniques
colorful winter nails
nail care tips
trendy nail styles
seasonal nail looks
I absolutely love these nail ideas! I tried a snowy design last year for a holiday party, and it was a hit! Which one do you think would be the easiest for a beginner like me?
These winter gel nails are giving me life! I once tried to do a snowflake design, but it turned into a snowman instead—who knew my nails could be so creative? 😂
Did you know that gel nails can last up to three weeks without chipping? That’s way longer than my last New Year’s resolution! These ideas are too cute to resist!
These designs are amazing! I remember trying a glittery one for a family event, and everyone kept asking where I got them done. It felt like I was wearing a piece of art!
If you’re trying these nail ideas, make sure to use a good top coat to keep them shiny and lasting longer. Trust me, it makes a huge difference!