As the holiday season approaches, I’ve found myself craving all things festive. The twinkling lights, the scent of pine, and of course, the chance to show off some fabulous nail art! Christmas is the perfect time to express your creativity, and one of the easiest ways to do that is through your nails. With so many trendy Christmas nails to explore, I couldn’t resist putting together this guide to help you find your perfect holiday look.
If you’re someone who loves nail art and wants to bring some holiday spirit to your fingertips, you’re in for a treat. Whether you’re planning a cozy gathering or a festive party, these designs will have you covered. I’ve curated a list of 22 stunning Christmas nail ideas that are fun, chic, and sure to impress. Each design is perfect for capturing the essence of the season while showcasing your unique style.
Get ready to dive into a world of creativity! From classic red and green combinations to playful patterns that will make you smile, you’ll find something that resonates with your holiday vibe. Let’s explore these trendy Christmas nails that you absolutely need to try before the New Year arrives!
Key Takeaways
– Discover 22 trendy Christmas nail designs that will enhance your holiday spirit and style.
– Explore various themes, including glittery finishes, cozy patterns, and whimsical characters.
– Get inspiration for both classic looks and playful designs suitable for any festive occasion.
– Learn about different techniques and materials you can use to achieve these trendy nail art styles.
– Find tips on how to incorporate these designs into your holiday festivities without breaking the bank.
Contents
- 1. Glittery Red and Gold
- 2. Snowy White Elegance
- 3. Festive Green and Red Stripes
- 4. Sleek Matte Black and Gold
- 5. Playful Candy Cane
- 6. Classic French with a Festive Twist
- 7. Winter Wonderland
- 8. Cozy Knitted Sweater Design
- 9. Ombre Holiday Fade
- 10. Festive Character Nails
- 11. Gold Foil Accents
- 12. Holiday Glitter Bomb
- 13. Elegant Red and White Swirls
- 14. Charming Christmas Lights
- 15. Pretty in Pink Christmas
- 16. Nutcracker Nail Art
- 17. Geometric Holiday Nails
- 18. Winter Floral Nails
- 19. Festive Marbled Nails
- 20. Whimsical Reindeer
- 21. Classic Plaid Pattern
- 22. Seasonal Fruit and Spice
1. Glittery Red and Gold

The festive duo of red and gold creates an eye-catching nail design that embodies the spirit of Christmas. A rich, glossy red base paired with sparkling gold tips creates a look that’s both glamorous and joyful. This design is ideal for holiday parties or festive family gatherings, where you want to shine bright and celebrate the season with style.
Outfit Pieces:
– Deep red nail polish (high-shine)
– Gold glitter nail polish (fine glitter for tips)
– Clear top coat (for shine)
– Optional: holiday-themed nail art stickers (like stars or snowflakes)
Styling Tips:
– Start with a base coat for smooth application and protection.
– Allow the red polish to dry completely before adding glitter to prevent smudging.
– Create a gradient effect by applying more glitter at the tips and less as you move down.
– Use nail art stickers to personalize your design for extra charm.
This design is perfect for any festive occasion, and you can easily swap out the gold for silver if you prefer a cooler tone.
2. Snowy White Elegance

A snowy white nail design captures the essence of winter in a fresh and elegant way. This chic style features a smooth white base adorned with delicate silver snowflakes, giving a serene and classy look. It’s the perfect choice for holiday parties or winter weddings, adding a touch of sophistication to your ensemble.
Outfit Pieces:
– Crisp white nail polish (opaque)
– Silver nail art pen (for detailing)
– Optional matte top coat (for a unique finish)
Styling Tips:
– Prep your nails with a base coat to extend wear.
– Ensure the white polish is fully dry before adding snowflakes for precision.
– Use the silver pen for intricate designs like snowflakes or stars.
– Apply a matte top coat for a modern twist if desired.
This design effortlessly combines elegance and winter charm, making it suitable for both casual and formal holiday events.
3. Festive Green and Red Stripes

Celebrate the holidays with a playful and vibrant green and red striped nail design. This fun look uses alternating stripes to capture the essence of Christmas cheer, making it an exciting choice for any festive gathering. It’s an easy yet bold way to express your holiday spirit while showcasing your creativity.
Outfit Pieces:
– Bright green nail polish (for the base)
– Classic red nail polish (for the stripes)
– Striping tape (for clean lines)
– Clear top coat (for a glossy finish)
Styling Tips:
– Start with a base coat for nail health and longevity.
– Apply the green polish and allow it to dry before using tape for stripes.
– Carefully place striping tape to create even lines, then fill in with red polish.
– Seal your design with a top coat for added shine and durability.
This festive design is perfect for holiday parties, and you can switch it up with different colors for a unique twist.
4. Sleek Matte Black and Gold

For a modern and edgy holiday look, consider a striking matte black base with shiny gold accents. This design beautifully contrasts matte and metallic finishes, making it perfect for the fashion-forward individual. It’s an ideal choice for upscale holiday parties or New Year’s Eve celebrations, where you want to stand out with flair.
Outfit Pieces:
– Matte black nail polish (for the base)
– Gold metallic nail polish (for accents)
– Base coat (for protection)
– Top coat (for sealing)
Styling Tips:
– Start with a base coat to ensure a smooth application.
– Allow the matte black polish to dry completely before adding gold details.
– Create accent designs like tips or simple shapes with the gold polish.
– Finish with a glossy top coat for contrast between matte and shine.
This design is perfect for holiday galas, and you can easily switch the matte black for a deep burgundy for a richer look.
🎨 Nail Art Made Easy!
Transform your busy holiday schedule with our DIY Nail Art Guide designed for stylish moms on the go!
5. Playful Candy Cane

Embrace a whimsical holiday spirit with playful candy cane nails. This fun design features classic red and white stripes reminiscent of the beloved treat, providing a cheerful and festive vibe. It’s a delightful choice for family gatherings or holiday celebrations, sure to bring smiles all around.
Outfit Pieces:
– Bright red nail polish (for the stripes)
– Crisp white nail polish (for the base)
– Optional: green polish (for holly accents)
– Clear top coat (for a glossy finish)
Styling Tips:
– Start with a base coat to protect your nails.
– Apply white polish as a base color and allow it to dry.
– Use a thin brush or striping tape for even red stripes across the nail.
– If desired, add tiny green dots for a holly effect.
– Seal with a top coat for a polished finish.
This playful design is perfect for holiday cheer, and you can mix in glitter for added sparkle.
📹 Related Video: How to: 5 Ways To Do Candy Canes Nails || NAIL ART 101
6. Classic French with a Festive Twist

Revitalize the classic French manicure with a festive touch! By swapping out the typical white tips for glittery red or gold, you can easily elevate your look for the holiday season. This sophisticated design is perfect for those who want to maintain elegance while celebrating the festivities.
Outfit Pieces:
– Sheer pink or nude polish (for the base)
– Glittery red or gold polish (for tips)
– Clear top coat (to finish)
Styling Tips:
– Begin with a base coat for protection.
– Apply a sheer pink or nude polish and let it dry thoroughly.
– Carefully paint the tips with glittery polish for that festive flair.
– Seal with a top coat for an extra shine that lasts.
This design is excellent for holiday parties, and you can easily switch the glitter for a bold color for an unexpected twist.
7. Winter Wonderland

Capture the magic of winter with a serene winter wonderland nail design. A soft blue base adorned with shimmering white glitter mimics the beauty of freshly fallen snow. It’s a lovely option for holiday celebrations or winter events, bringing a touch of tranquility to your festive look.
Outfit Pieces:
– Soft blue nail polish (for the base)
– White glitter polish (for accents)
– Optional snowflake nail art stickers (for embellishment)
– Clear top coat (for sealing)
Styling Tips:
– Start with a base coat for nail protection.
– Paint your nails with the soft blue polish and let it dry completely.
– Apply the white glitter while the blue is still tacky for better adherence.
– Add snowflake stickers for extra winter charm.
– Finish with a top coat for a lasting shine.
This design is perfect for winter gatherings, and you can swap the blue for a soft lavender for a unique seasonal look.
Winter can feel chaotic, but your nails can stay serene. These Winter Wonderland nails show that trendy christmas nails work with a soft blue base and white glitter—easy, chic, and perfect for any holiday event.
8. Cozy Knitted Sweater Design

Channel the warmth of your favorite knit sweater with this cozy nail design. Featuring a nude or soft pastel base with white or cream threads mimicking knit patterns, this style is both festive and inviting. It’s a great choice for holiday gatherings, adding a comfy, homey feel to your look.
Outfit Pieces:
– Nude or soft pastel nail polish (for the base)
– White or cream nail art polish (for the knit effect)
– Clear top coat (for a smooth finish)
Styling Tips:
– Apply a base coat for protection.
– Paint your nails with the nude or pastel polish and let them dry.
– Use a thin brush to create crisscross patterns that resemble knitting.
– Finish with a top coat for a polished look.
This design is perfect for cozy nights in, and you can easily add glitter for a festive touch.
I swear, cozy knitted sweater nails are the secret to trendy christmas nails that feel like a warm hug. With a nude base and white knit lines, it’s chic, homey, and totally holiday-ready on fingertips.
How To Choose Trendy Christmas Nails
Choosing the right trendy Christmas nails can elevate your holiday spirit and make your festive gatherings even more joyful. With so many styles and designs available, it’s essential to consider a few key factors to ensure you pick the perfect nail art for the season. Here’s how to make your selection easier:
1. Consider Your Style
Think about your personal style. Do you lean toward classic elegance, or are you more into fun and quirky designs? A classic red and gold glitter set can exude sophistication, while playful candy cane stripes might reflect a more whimsical side. Knowing your style helps narrow down your choices significantly.
2. Think About the Occasion
Different occasions call for different nail designs. If you’re attending a formal party, sleek matte black with gold accents could be ideal. For a casual holiday gathering, consider festive character nails or cozy knitted sweater designs. Match your nails to the vibe of the event for a flawless look.
3. Evaluate Your Nail Length
Your nail length plays a huge role in what designs will work best. Longer nails can accommodate intricate designs like winter florals or elegant red and white swirls. Shorter nails may benefit from simpler patterns like classic French tips with a festive twist or charming Christmas lights. Make sure the design complements your nail length for the best effect.
4. Choose Your Color Palette
Colors can set the mood for your holiday nail art. Traditional Christmas colors like red, green, and gold are always in style, but you can also explore pastel shades or even blues and whites for a winter wonderland vibe. Consider your wardrobe and accessories to find colors that will coordinate well and help you shine this season.
5. Nail Art Complexity
Think about how complicated you want your nail art to be. Are you comfortable with intricate designs requiring skilled application, or do you prefer something straightforward that you can do at home? If you’re new to nail art, start with easier designs like festive marbled nails or gold foil accents before trying more elaborate options.
6. Budget Considerations
Nail art can range from budget-friendly at-home kits to professional salon services that might have a higher price tag. Determine how much you’re willing to spend. If you’re going for salon-quality designs, factor in the cost of appointments. For DIY enthusiasts, investing in quality nail polish and tools can yield stunning results without breaking the bank.
Pro Tip: If you’re unsure about committing to a specific design, consider using nail wraps or press-on nails. They come in various trendy Christmas styles and can be easily removed or changed, allowing you to mix up your look throughout the holiday season!
9. Ombre Holiday Fade
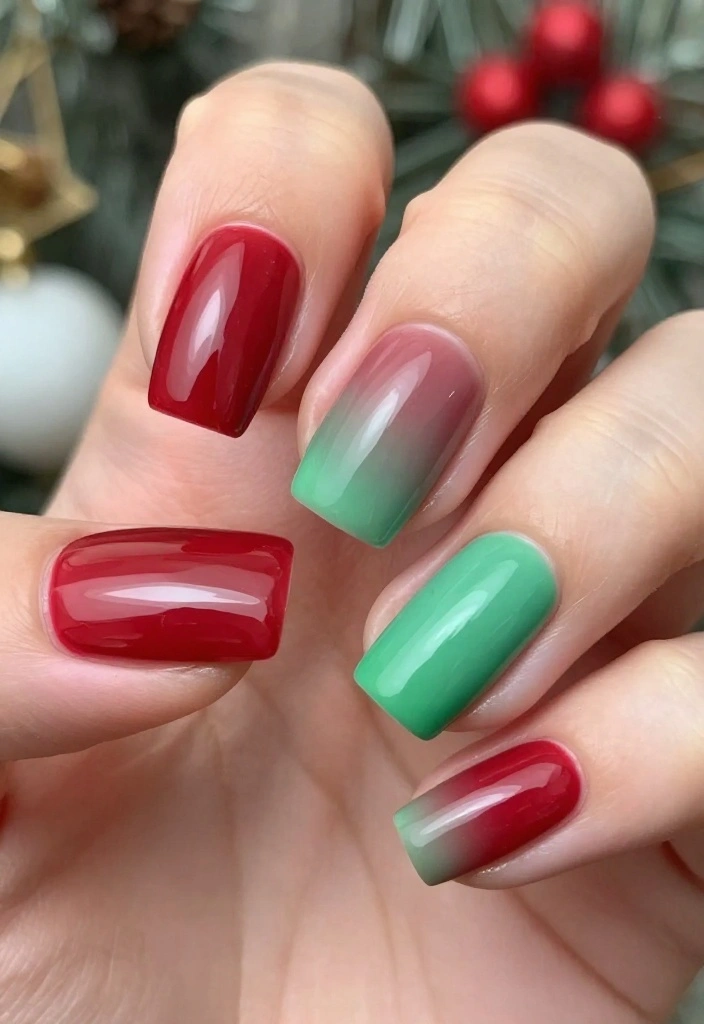
Ombre nails offer a trendy way to incorporate holiday colors subtly. A gradient that transitions from a deep red to a soft green or gold creates an understated yet festive appearance. This design is ideal for any holiday occasion, providing a chic twist on traditional festive colors.
Outfit Pieces:
– Red nail polish (for the base)
– Green or gold nail polish (for the ombre)
– Makeup sponge (for blending)
– Clear top coat (to finish)
Styling Tips:
– Start with a base coat to protect your nails.
– Paint the nail with red polish and let it dry.
– On a makeup sponge, apply red and green or gold polishes side by side.
– Dab the sponge onto your nails in a tapping motion to blend the colors.
– Finish with a top coat for a smooth and shiny look.
This design is perfect for holiday parties, and you can choose different color combinations for a personalized touch.
Did you know that 62% of holiday nail looks lean on subtle ombre fades? A red-to-green or gold gradient makes ‘trendy christmas nails’ feel chic without shouting festive. Pro tip: blend with a makeup sponge for a smooth transition and longer wear.
10. Festive Character Nails

Bring your favorite holiday characters to life with playful nail designs! From Santa to snowmen, this creative approach allows you to showcase your personality and festive spirit. It’s a fun way to celebrate the season during family gatherings or holiday events, making your nails a conversation starter.
Outfit Pieces:
– Various nail polish colors (for characters)
– Fine brushes (for detail work)
– Clear top coat (for protection)
Styling Tips:
– Start with a base coat for nail health.
– Paint your nails with a solid color base of your choice.
– Once dry, use fine brushes to paint your favorite holiday characters.
– Add details as needed for a polished finish.
– Seal with a top coat to protect your artwork.
This playful design is perfect for holiday cheer, and you can mix and match characters to create a unique look!
11. Gold Foil Accents

Elevate your nail game with luxurious gold foil accents! This design combines a classic red or green base with shimmering gold details, creating a glam look that’s perfect for the holidays. It’s an elegant choice for holiday parties, where you want your nails to shine as bright as your holiday spirit.
Outfit Pieces:
– Red or green nail polish (for the base)
– Gold foil (for accents)
– Clear top coat (for sealing)
Styling Tips:
– Start with a base coat for protection.
– Paint your nails with your chosen base color and let it dry.
– Cut the gold foil into small pieces and apply them to wet polish or use a top coat to adhere.
– Seal the design with a top coat for a glossy finish.
This design adds a touch of luxury to your holiday celebrations, and you can switch the base color to a dark blue for a rich effect.
12. Holiday Glitter Bomb

If you adore all things sparkly, this glitter bomb design is your perfect match! Cover your nails in a dazzling array of glitter using festive colors like red, green, gold, and silver. This eye-catching design will certainly draw attention and spread holiday cheer at any celebration.
Outfit Pieces:
– Various colors of glitter polish (for a mix)
– Optional base color (for added depth)
– Clear top coat (to finish)
Styling Tips:
– Start with a base coat to protect your nails.
– Apply a base color if desired, and allow it to dry.
– Layer different glitter polishes to achieve full coverage.
– Finish with a top coat for a smooth finish and to keep the glitter intact.
This design is sure to sparkle at holiday gatherings, and you can mix in a matte top coat for an unexpected twist.
13. Elegant Red and White Swirls

Swirling patterns can bring a unique elegance to your holiday nails. With a rich red base, creating white swirls or marbling adds sophistication and festive flair. This design is perfect for any holiday event, combining festive colors with a graceful touch.
Outfit Pieces:
– Rich red nail polish (for the base)
– White nail polish (for swirls)
– Nail art brush or dotting tool (for precision)
– Clear top coat (to seal)
Styling Tips:
– Start with a base coat for nail protection.
– Apply the red polish as a base and let it dry completely.
– Use a nail art brush to create swirling patterns with white polish.
– Seal the design with a top coat for a lasting finish.
This design is a chic way to celebrate the holiday season, and you can experiment with different swirl patterns for a personalized touch.
14. Charming Christmas Lights

Get festive with charming Christmas lights on your nails! This playful design features colorful dots strung across a dark base, resembling festive lights. It’s a creative and cheerful way to show off your holiday spirit at family gatherings and celebrations.
Outfit Pieces:
– Dark nail polish (black or navy for the base)
– Various colored nail polishes (for lights)
– Clear top coat (for sealing)
Styling Tips:
– Start with a base coat to ensure longevity.
– Paint your nails with the dark polish as a base color.
– Use a dotting tool to create small colorful dots for lights.
– Add tiny lines connecting the dots to mimic strings of lights.
– Finish with a top coat for a polished look.
This fun design is perfect for spreading holiday cheer, and you can customize the colors for a unique twist!
15. Pretty in Pink Christmas

Who says Christmas has to be all about traditional colors? Embrace a soft pink hue adorned with gold accents for a fresh and trendy holiday look. This design is perfect for those wanting to celebrate the season with a touch of femininity and style.
Outfit Pieces:
– Soft pink nail polish (for the base)
– Gold nail polish or foil (for accents)
– Clear top coat (for sealing)
Styling Tips:
– Start with a base coat for protection.
– Paint your nails with the soft pink polish and allow it to dry.
– Create designs using gold polish or apply gold foil for accents.
– Finish with a top coat for a sophisticated shine.
This design is perfect for holiday gatherings, and you can switch the pink for a bold red for a more traditional look.
16. Nutcracker Nail Art
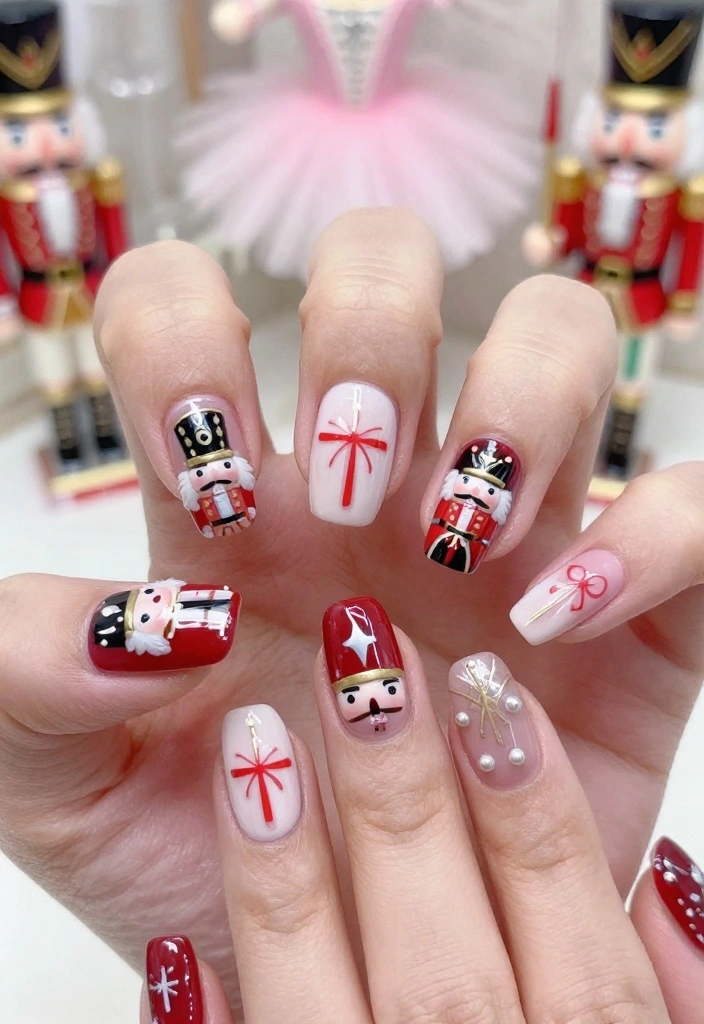
Nail designs inspired by the Nutcracker ballet are both artistic and festive. This design can feature various Nutcracker characters or a color palette reflecting the ballet’s enchanting theme. It’s a creative way to celebrate the holiday season with a unique twist!
Outfit Pieces:
– Various nail polish colors (for characters)
– Fine brushes (for detailing)
– Clear top coat (for protection)
Styling Tips:
– Start with a base coat to protect your nails.
– Paint your nails in a base color that reflects the Nutcracker theme.
– Use fine brushes to illustrate Nutcracker characters or festive designs.
– Add details as needed for a polished look.
– Seal with a top coat for longevity.
This whimsical design takes inspiration from holiday classics, making your nails a true work of art for the season!
17. Geometric Holiday Nails

Geometric shapes provide a modern twist to your holiday nail art while still feeling festive. By combining classic holiday colors like red, green, and white, you can create sharp lines and shapes for an eye-catching look. This design is perfect for those who appreciate contemporary aesthetics during the holiday season.
Outfit Pieces:
– Red nail polish (for the base)
– Green nail polish (for accents)
– White nail polish (for lines)
– Striping tape (for precision)
– Clear top coat (for sealing)
Styling Tips:
– Start with a base coat for nail health.
– Paint your nails with a solid base color.
– Use striping tape to create geometric shapes, filling them with different colors.
– Remove the tape once dry for clean lines.
– Finish with a top coat for a polished look.
These nails beautifully blend holiday cheer with modern artistry, making them ideal for festive celebrations!
18. Winter Floral Nails

Floral designs aren’t just for spring; embrace winter florals with delicate flower patterns in soft colors over a nude base. This elegant look adds a touch of nature to your holiday nails, making it a lovely choice for seasonal events.
Outfit Pieces:
– Nude nail polish (for the base)
– Various colored polishes (for flowers)
– Fine brush (for detail work)
– Clear top coat (for sealing)
Styling Tips:
– Start with a base coat to protect your nails.
– Apply a nude polish as a base and allow it to dry.
– Use a fine brush to paint delicate floral designs on your nails.
– Add leaves or small accents for more details.
– Finish with a top coat for durability.
This design is a stylish way to celebrate winter’s beauty, and you can easily switch colors for a different seasonal vibe.
19. Festive Marbled Nails

Marble nails bring a touch of elegance and sophistication to your holiday look. By using festive colors like red, green, and gold, you can create a beautiful marbled effect that is perfect for any holiday gathering. This design is chic and unique, making it a great conversation starter at parties.
Outfit Pieces:
– White nail polish (for the base)
– Red and green nail polishes (for marbling)
– Water (for the marbling technique)
– Clear top coat (to finish)
Styling Tips:
– Start with a base coat to protect your nails.
– Fill a small cup with water.
– Drop red and green polishes into the water, swirling them to create a marble effect.
– Dip your nails into the water to pick up the design.
– Finish with a top coat for a long-lasting look.
This marble design is a stunning way to showcase festive colors while keeping it elegant, making it perfect for any holiday event.
20. Whimsical Reindeer

Get playful with whimsical reindeer nail designs! Paint cute reindeer faces on accent nails while keeping the rest of your nails in solid holiday colors. This fun design captures the joyful spirit of the holidays and is sure to delight friends and family at gatherings.
Outfit Pieces:
– Brown nail polish (for the reindeer)
– White and black nail polishes (for details)
– Red polish (for the nose)
– Clear top coat (for protection)
Styling Tips:
– Start with a base coat for nail health.
– Paint your nails in a solid holiday color.
– On your accent nails, paint reindeer faces using brown, white, and black polish.
– Add a red dot for the nose for extra fun.
– Finish with a top coat to protect your art.
These whimsical reindeer nails are sure to bring smiles all around during the festive season, making them a delightful choice for holiday celebrations!
21. Classic Plaid Pattern
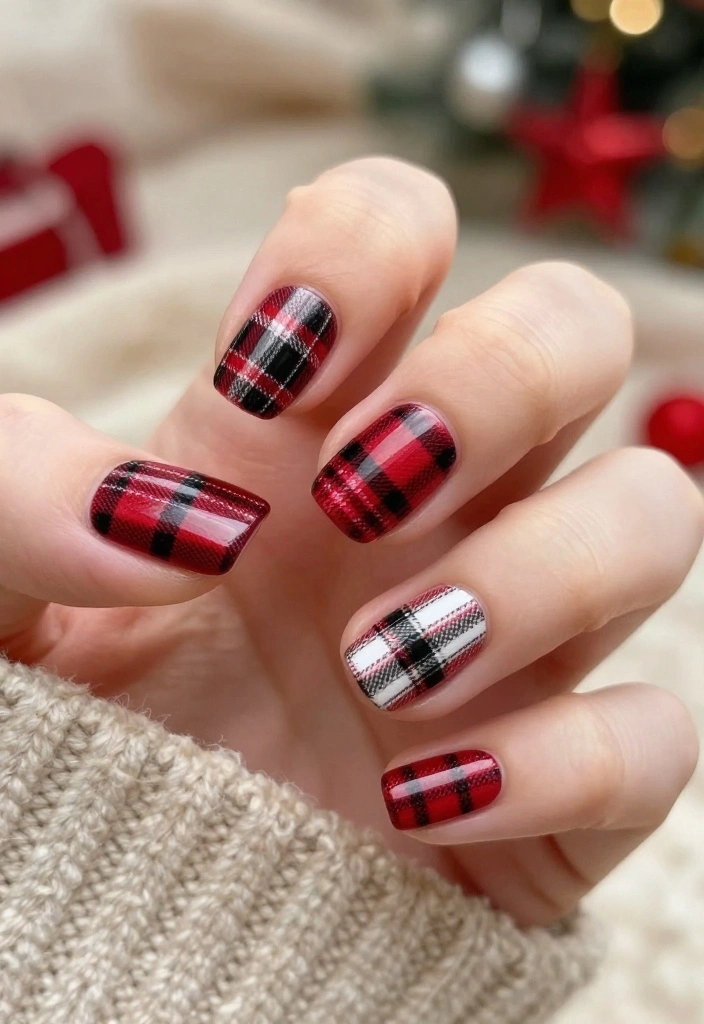
Plaid is a timeless pattern that adds warmth and coziness to your holiday nails. This design incorporates traditional Christmas colors like red and green, creating a festive feel that’s perfect for winter gatherings. It’s a charming way to celebrate the season while keeping your nails stylish.
Outfit Pieces:
– Red nail polish (for the base)
– Green nail polish (for accents)
– White nail polish (for plaid lines)
– Clear top coat (for sealing)
Styling Tips:
– Start with a base coat for protection.
– Paint your nails with a solid color as the base.
– Use a fine brush to create plaid patterns with alternating colors.
– Seal with a top coat to protect your design.
This plaid design is cozy and festive, making it ideal for holiday gatherings with friends and family, and you can easily switch colors for a fresh look.
22. Seasonal Fruit and Spice
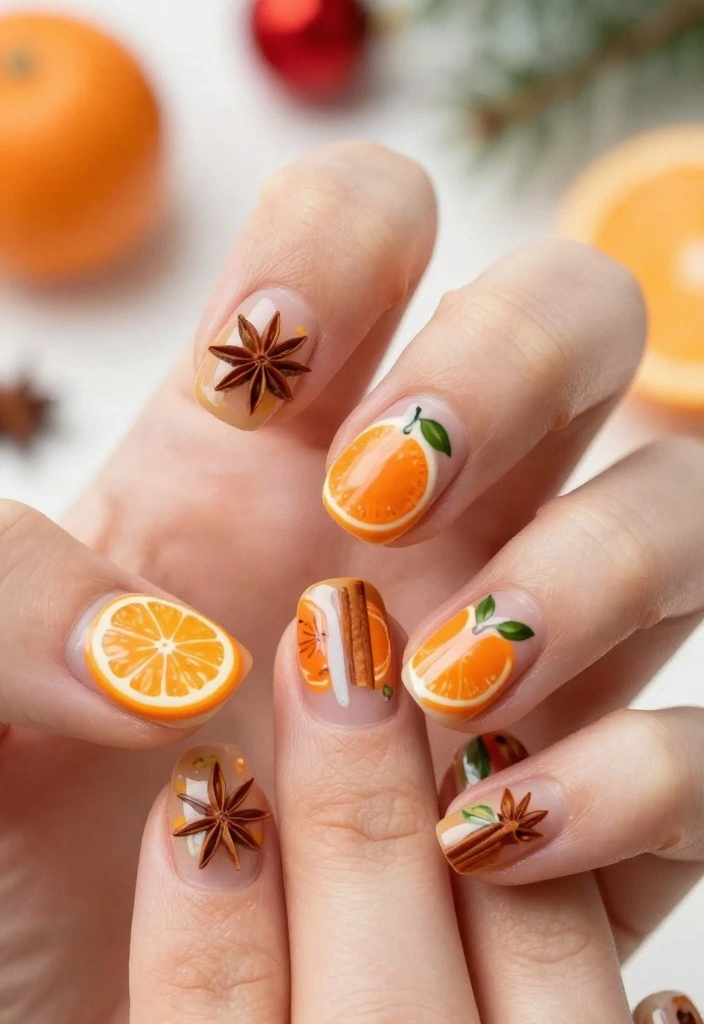
Celebrate the vibrant flavors of the holiday season with a fun nail design inspired by seasonal fruits and spices. Think oranges, cinnamon sticks, and cranberries for a delightful nail art concept that adds a fresh twist to traditional themes. This unique idea is sure to stand out at any festive celebration.
Outfit Pieces:
– Base color of your choice (for the background)
– Colored polishes for fruit and spice illustrations
– Fine brush (for detailing)
– Clear top coat (for sealing)
Styling Tips:
– Start with a base coat for protection.
– Paint your nails with a solid base color.
– Use colored polishes to create small fruit and spice illustrations.
– Add details for a polished look.
– Finish with a top coat for durability.
This design is a lively way to celebrate the flavors of the season while showcasing your creativity, perfect for holiday parties!
Conclusion

As the holiday season wraps up and the New Year approaches, these trendy Christmas nails are the perfect way to show off your festive spirit and creativity. Whether you prefer bold designs or elegant styles, there’s something for everyone in this list. Don’t hesitate to try these out and let your nails be a reflection of the joy and warmth of the season. Which design will you be rocking at your holiday gatherings?
Happy holidays and happy nail painting!
Frequently Asked Questions
What are the top trendy christmas nails looks this season and how can I recreate them at home?
Here are the top looks for trendy christmas nails this season and easy steps to recreate at home.
1) Classic red with white snowflakes and a hint of holo glitter: start with a clear base, apply two coats of red, add delicate white snowflakes with a thin brush or stamping plate, finish with a glossy top coat.
2) Candy cane stripes on an accent nail: apply a red base on all nails, tape off curved stripes on the accent nail, paint white, remove tape, seal with top coat.
3) Plaid nails: use fine nail art brushes to sketch thin lines in red, green, and gold over a neutral base or red; top coat to seal.
4) Metallic chrome with holiday decals: use chrome powder over a black or nude base and finish with a clear top coat; add tiny holiday decals for flair.
Pro tips: use a quality base coat and top coat to prevent chipping, cap the free edges, and allow each layer to dry fully. For salon-like results, try gel polish or press-on nails with these designs.
How can I design nail art for a festive yet professional holiday party?
To keep things festive but professional, start with a neutral or deep wine base and add a single statement element like a gold foil tip or a minimalist snowflake on one nail.
Steps: choose base color, plan one accent nail, use nail tape or stencils for clean lines, apply thin layers of top coat, finish with a long lasting sealant.
Alternative: try a classic French tip with metallic gold or chrome finish; or use matte red with a glossy holiday accent for contrast.
Care: avoid heavy glitter on all nails to maintain a polished look at work and reapply top coat after 3–4 days to keep shine.
Which colors and finishes help boost the holiday spirit on nails?
Colors like rich red, emerald green, gleaming gold, and icy white instantly evoke holiday spirit on nails.
Finish ideas: glossy classics for a traditional vibe, metallic chrome for a modern edge, and subtle glitter for festive sparkle.
Pro combo examples: red with gold foil, green with silver glitter, or nude base with white snowflakes and a red accent nail.
Tip: pick 2-3 shades you love and stick to a cohesive palette to keep things on-trend and wearable with nail art.
Are beginner friendly designs for trendy christmas nails that are quick to do?
Absolutely—these designs are beginner friendly and quick to nail.
Ideas: candy cane accent nail, single snowflake on a neutral base, or simple red manicure with one dipped glitter nail.
How-to: prep and base color, use striping tape or dotting tool for clean lines, seal with top coat.
Time tips: with a steady hand, most looks take 20–40 minutes; practice on a plastic nail wheel first, then go for real nails. For durability, consider a gel base if possible.
How long do these trendy christmas nails last and how can I keep them from chipping during the holidays?
With proper prep and care, trendy christmas nails can last 7–14 days, depending on application method.
Prep matters: clean nails, push back cuticles, buff surface, use a good base coat, and cap the free edges.
Application tips: apply thin, even coats and allow thorough drying between layers; if you use gel, cure fully and finish with a top coat.
Care: wear gloves for dishwashing, avoid soaking nails in hot water, reapply a clear top coat every 2–3 days, and touch up chipping areas promptly.
Removal: soak off gently or have a pro remove to protect natural nails.
Related Topics
trendy christmas nails
nail art
holiday spirit
festive designs
glitter nails
easy nail art
beginner friendly
minimalist nails
seasonal styles
advanced techniques
colorful nail designs
quick nail ideas
I love all these nail ideas! I tried a glittery red last year and it made me feel super festive. Which one are you thinking of trying first?
These nails are so cute! I tried a Santa design last year, but it looked more like a confused potato. At least I had fun with it!
Did you know that the tradition of painting nails dates back to 3000 BC in ancient China? Crazy how long people have been getting creative with their nails!