The holiday season is upon us, and that means festive cheer is everywhere! This time of year always reminds me of cozy gatherings and sparkling decorations. If you’re someone who loves to express your creativity, especially through seasonal nails, this post is just for you.
I put this together because I know how much joy a fresh set of nails can bring to your holiday spirit. Whether you’re hosting family dinners, attending holiday parties, or simply enjoying a cozy night in, having gorgeous nails can add a fun touch. Here are 25 festive DIY nail ideas that are colorful, cheerful, and perfect for celebrating the season at home. Plus, trust me—Nail #12 is a must-see!
Get ready to unleash your inner artist! You’ll find designs that range from classic reds and golds to whimsical winter wonderlands. Not only will these ideas elevate your holiday style, but they will also give you the chance to bond with friends or family over a fun DIY nail session at home. So, grab your nail polish, and let’s dive into these creative designs that are sure to spread some holiday joy!
Key Takeaways
– Discover 25 festive nail designs perfect for celebrating the holiday season at home. Each design brings a unique flair to your seasonal nails.
– Get inspired by ideas like Classic Red and Gold and Winter Wonderland that capture the spirit of the holidays.
– Nail #12, featuring Festive Wreaths, is a standout design that adds a cheerful touch to your nail art collection.
– Consider doing these DIY nails with friends or family for a fun and creative way to bond during the holidays.
– Get practical tips on colors, techniques, and tools needed to recreate these festive looks effortlessly.
Contents
- 1. Classic Red and Gold
- 2. Winter Wonderland
- 3. Candy Cane Stripes
- 4. Festive Glitter Ombré
- 5. Holiday Sweater Patterns
- 6. Snowy Pines
- 7. Reindeer Antlers
- 8. Silver and Blue Starry Night
- 9. Gingerbread Cookies
- 10. Christmas Lights
- 11. Metallic Gold Foil
- 12. Festive Wreaths (A Must-See!)
- 13. Polar Bears
- 14. Jolly Santa Faces
- 15. Christmas Ornaments
- 16. Nutcracker Ballet
- 17. Mistletoe Kisses
- 18. New Year’s Fireworks
- 19. Holiday Cherries
- 20. Holiday Gifts
- 21. Holiday Spirit
- 22. Twinkling Stars
- 23. Cozy Mittens
- 24. Poinsettia Flowers
- 25. Rustic Wood Finish
1. Classic Red and Gold

You can’t go wrong with the timeless pairing of red and gold for the holidays. This vibrant combo radiates festive spirit, making it a perfect choice for any celebration. It’s easy to create at home, and the results are stunning—ideal for both casual gatherings and formal events.
Start by applying a protective base coat. Then, paint your nails a luscious crimson as the primary color. Once it’s dry, add delicate gold accents using a thin brush or dotting tool. You can create charming gold stripes or sprinkle a bit of glitter for added flair. For an eye-catching twist, consider a matte topcoat over the red and a glossy one over the gold accents.
Outfit Pieces:
– Crimson nail polish (rich and glossy)
– Gold metallic polish (or glitter for accents)
– Optional: matte topcoat for red
– Optional: glossy topcoat for gold
Styling Tips:
– Ensure each layer dries completely before moving on to the next for the best results.
– Use a clear gel topcoat to enhance shine and longevity.
Perfect for holiday parties, office celebrations, or festive family gatherings. You can easily switch out gold for silver for a modern touch or pair with holiday-themed accessories for extra charm.
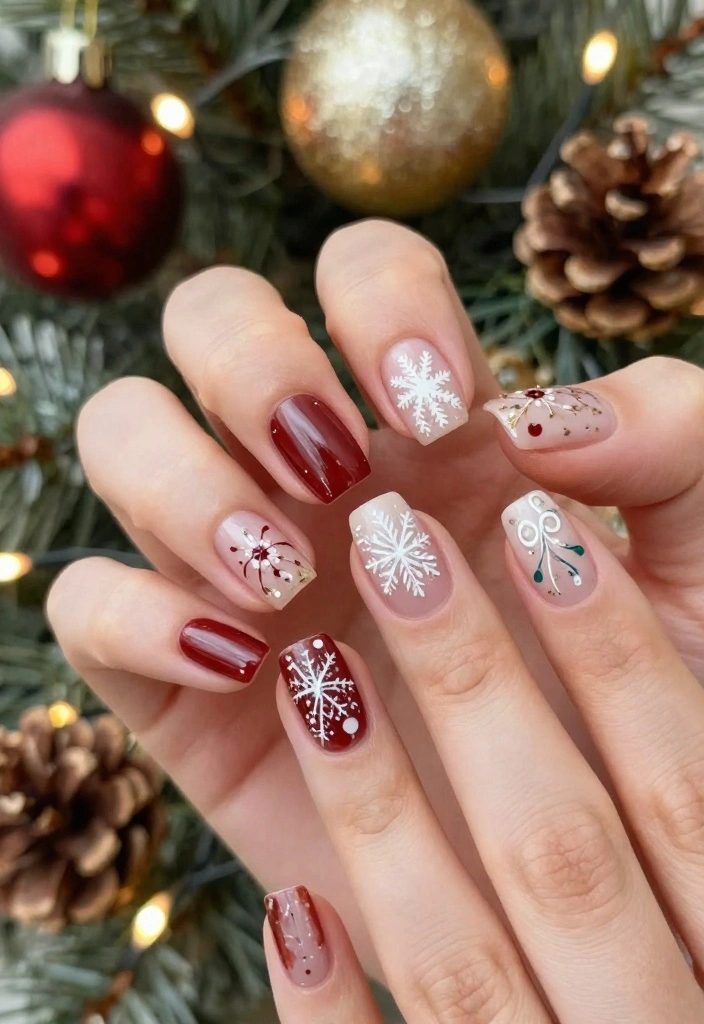
2. Winter Wonderland

Embrace the beauty of winter with icy blue and white nail art that captures the essence of a serene snowy landscape. This design is perfect for casual holiday events and adds a touch of frosty elegance to your look. It’s simple yet striking, making it an ideal choice for anyone wanting to celebrate the season.
Begin with a base coat, followed by a light blue polish for the main color. Once it’s dry, use white polish to create whimsical snowflakes or a snowdrift design at the tips of your nails. A layer of holographic polish can add that magical sparkle reminiscent of fresh snow.
Outfit Pieces:
– Light blue nail polish (soft and creamy)
– White nail polish (for snowflakes)
– Holographic glitter polish (for sparkle)
Styling Tips:
– A fine brush works wonders for detailed snowflake designs.
– Quick-dry topcoats help prevent smudging while you work.
This design shines for winter gatherings, cozy nights in, or festive outings. Feel free to swap light blue for silver or lavender for a unique twist on the winter theme.
3. Candy Cane Stripes

Add a playful twist to your holiday nails with a fun candy cane stripe design. This festive look is perfect for family gatherings or holiday parties, bringing a sweet vibe to your nails. It’s easy to achieve and sure to make a statement during the holiday season.
Start with a clean base coat and apply a crisp white polish as your foundation. Once it’s fully dried, use red polish to create diagonal stripes across each nail. For an extra touch, consider adding shimmering glitter at the tips to mimic the sparkle of candy canes.
Outfit Pieces:
– White nail polish (for a clean base)
– Bright red nail polish (for stripes)
– Optional: green or gold glitter (for accents)
Styling Tips:
– Load your brush well with polish for sharp, clean lines.
– A quick-dry topcoat helps to secure your design and prevent smudges.
This design is festive and fun, perfect for holiday celebrations. You can easily adapt it by alternating colors or adding solid accents for a more dynamic look.
4. Festive Glitter Ombré

Shine bright this holiday season with an eye-catching glitter ombré nail design. This style is versatile enough for both formal events and casual gatherings. It adds a festive touch to any outfit, making your nails the center of attention.
Begin with a nude or soft pink base coat and let it dry. Next, apply glitter polish starting from the tips of your nails and blend it down towards the base for a gorgeous ombré effect. Choose gold or silver glitter to keep the festive vibe alive. Don’t forget to layer the glitter for the best result!
Outfit Pieces:
– Nude or soft pink nail polish (for a subtle base)
– Gold or silver glitter polish (for the ombré effect)
– Glossy topcoat (to seal and shine)
Styling Tips:
– A makeup sponge can help you achieve a flawless ombré look.
– Use a glossy topcoat for a polished finish that enhances the sparkle.
This design is perfect for holiday parties or New Year celebrations. You can easily switch the base color for a more dramatic effect or incorporate different glitter shades for a personalized touch.
💅 Nail Art Confidence Boost
Unlock your creativity with our DIY Nail Art Guide designed for busy moms who love festive nails.
5. Holiday Sweater Patterns

Capture the cozy spirit of the holidays with sweater-patterned nails! This charming design is perfect for chilly evenings spent by the fire or holiday gatherings with loved ones. It brings warmth and style to your festive look.
Start with a base coat, then choose warm colors like burgundy, deep green, or soft cream for your nails. Once dry, use a fine nail brush to paint patterns reminiscent of knitted sweaters, like snowflakes or classic holiday motifs. For an added touch, a matte topcoat can give your nails that cozy appearance.
Outfit Pieces:
– Burgundy nail polish (rich and inviting)
– Deep green or cream polish (for variety)
– Fine nail brush (for detailed patterns)
– Optional: matte topcoat (for a sweater-like finish)
Styling Tips:
– Take your time with the patterns; precision leads to a polished look.
– If unsure about your design, practice on a fake nail first.
This design is perfect for holiday get-togethers and family celebrations. You can add stickers for a quicker application or use different colors for a fun twist.
6. Snowy Pines

Bring the tranquil beauty of nature to your nails with a snowy pines design. This serene look is perfect for the winter season and adds a peaceful touch to your holiday celebrations. It’s a great way to express your love for nature while staying festive.
Begin with a matte green base coat. Once it’s dry, use white polish to create pine trees on a few accent nails. You can sprinkle a hint of glitter for a snowy effect, making your design sparkle like freshly fallen snow.
Outfit Pieces:
– Matte green nail polish (for a natural base)
– White nail polish (for tree designs)
– Glitter polish (for a snowy finish)
Styling Tips:
– A thin brush is essential for the intricate details of the trees.
– Experiment with different tree sizes for a more dynamic look.
This design is wonderful for cozy winter nights or holiday gatherings. You can easily swap the colors for a brighter twist or add embellishments for extra flair.
📹 Related Video: Snowy Pine Cones Nail Art Tutorial
7. Reindeer Antlers

Add a playful twist to your holiday nails with a reindeer antler design! This quirky style is perfect for Christmas parties or simply to spread holiday joy. It’s both fun and festive, making it a delightful choice for any celebration.
Start with a brown or taupe base coat. Once dried, use a fine brush to draw simple antlers on your accent nails. Add tiny red dots for noses and even little eye details for an adorable touch. For extra sparkle, consider a glitter accent nail to keep things festive.
Outfit Pieces:
– Brown or taupe nail polish (for the base)
– Red polish (for noses)
– Fine nail brush (for antler details)
– Optional: glitter polish (for accent nails)
Styling Tips:
– A steady hand helps for those delicate details.
– Use a toothpick for small dots to maintain precision.
This design is sure to bring smiles at holiday gatherings. You can easily add more colors or patterns for a unique twist tailored to your style.
How To Choose the Right Seasonal Nail Designs for the Holidays
Choosing the perfect seasonal nail designs to celebrate the holidays at home can bring joy and creativity to your festive season. With a wide range of styles and techniques available, you’ll want to be strategic about your choices. Here are some key factors to consider when selecting your DIY holiday nail designs:
1. Nail Length
Your nail length plays a crucial role in determining which designs will look best. Shorter nails often suit simpler designs, like solid colors or minimalistic patterns, while longer nails can handle more intricate artwork, such as holiday scenes or detailed characters. If you have shorter nails, consider opting for holiday colors or simple patterns to keep them looking chic and festive.
2. Skill Level
Be honest with yourself about your nail art skills. If you’re a beginner, start with simpler designs that require fewer steps, like candy cane stripes or classic red and gold. More advanced techniques, such as ombré effects or detailed winter landscapes, are better suited for those with experience. Choose designs that match your comfort level to avoid frustration, and remember, practice makes perfect!
3. Nail Polish Quality
The type of nail polish you use matters. High-quality polishes often have better pigmentation and staying power. Look for brands that offer quick-drying formulas and long-lasting wear, especially if you’re preparing for holiday gatherings. If you’re aiming for unique finishes like glitter or metallic, ensure your selected polishes blend well together and provide good coverage in fewer coats.
4. Theme and Color Palette
Decide on a theme that resonates with your holiday spirit. Whether you prefer classic Christmas colors like red, green, and gold, or a winter wonderland theme with blues and whites, your color palette will guide your design choices. You might want to match your nails with your holiday outfits or decorations to create a cohesive look. Consider using glitter, matte, or glossy finishes to enhance your chosen theme.
5. Time Commitment
Think about how much time you want to invest in your nail art. Some designs, like a simple solid color or a quick dotting technique, can be done in a matter of minutes. Others, like intricate reindeer antlers or festive wreaths, may require more time and patience. Plan accordingly, especially if you have holiday events coming up. Allocate a quiet evening to fully enjoy the process and create your festive nails without feeling rushed.
6. Versatility
Consider how versatile your chosen designs will be. Opt for designs that can last through various holiday celebrations or even into the New Year. Classic colors and patterns, like metallic gold foil or snowflakes, can be worn beyond a single occasion, giving you more value for your effort. If you want to change things up, look for designs that can be layered with different colors or finishes.
Pro Tip: Experiment with nail art stickers or stencils for added ease! They can help you achieve intricate designs without needing advanced skills.
By considering these factors, you will be well-equipped to select the perfect seasonal nail ideas that celebrate the holidays beautifully. Whether you’re going for simplicity or full-on glam, the right approach will help ensure your nails look stunning and festive all season long! 🎉💅
8. Silver and Blue Starry Night

Transform your nails into a dreamy starry night with silver and blue hues! This elegant design captures the magic of winter nights, making it perfect for any occasion. It’s striking and sophisticated, ideal for festive events or a night out.
Start with a deep blue polish as your base. Once dry, use silver polish or nail stickers to create stars and constellations. For a dramatic effect, sprinkle on some holo glitter to mimic the twinkling stars in the night sky.
Outfit Pieces:
– Deep blue nail polish (for a rich base)
– Silver polish or stickers (for stars)
– Holo glitter (for added sparkle)
Styling Tips:
– A toothpick can help you create precise star designs.
– Layer different shades of blue for added depth in your design.
This design is perfect for holiday parties or elegant gatherings. You can easily switch the base color or add more stars for a celestial touch.
9. Gingerbread Cookies

Indulge in the sweetness of the season with gingerbread cookie-inspired nails! This playful design is perfect for holiday events and brings a delightful touch to your festive spirit. It’s charming and whimsical, making it a must-try during the holidays.
Start with a warm brown nail polish for your base. Once dry, use white polish to create icing designs and add tiny details like buttons and hearts. For an added touch, a glossy topcoat can give a freshly baked cookie look.
Outfit Pieces:
– Warm brown nail polish (for the cookie base)
– White nail polish (for icing details)
– Optional: colorful polishes (for additional decorations)
Styling Tips:
– A fine brush is essential for intricate icing designs.
– Quick-dry topcoats are key to avoid smudging.
This design is fun and festive, perfect for holiday gatherings. You can easily mix in colorful accents for a vibrant twist or use stickers for a quick finish.
10. Christmas Lights

Light up your nails with a vibrant Christmas lights design! This cheerful style will brighten up any holiday gathering and bring festive joy. It’s playful and fun, making it a great choice for parties or casual get-togethers.
Start with a black or dark blue base coat to make the colors pop. Once dry, use a variety of bright colors to create little light bulbs and strings across your nails. For added depth, use a thin brush to draw the strings connecting the bulbs, and finish with a glossy topcoat for extra shine.
Outfit Pieces:
– Black or dark blue nail polish (for a striking base)
– Bright neon polishes (for the lights)
– Optional: fine brush (for string details)
Styling Tips:
– Use bright neon colors for a playful effect.
– A dotting tool can help create perfect light bulb shapes.
This design is sure to be a conversation starter at holiday events. You can easily incorporate glitter for an extra festive flair or switch out the background color for a unique twist.
11. Metallic Gold Foil
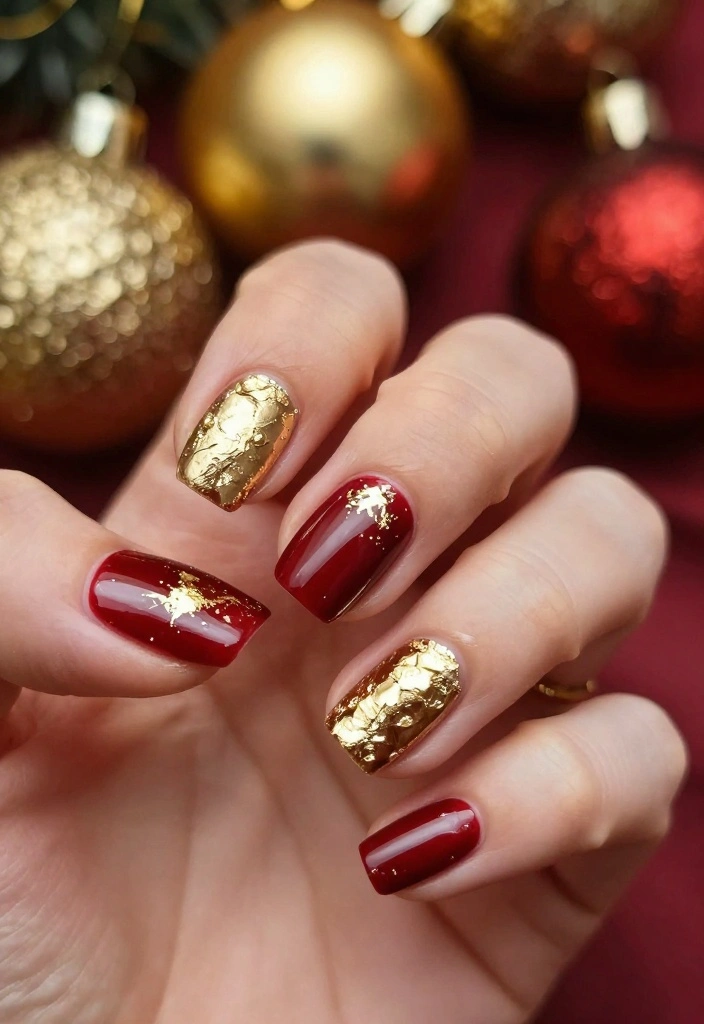
Elevate your holiday vibes with chic metallic gold foil nails! This design is perfect for those who want a luxurious look while keeping things simple. It’s eye-catching and elegant, making it suitable for festive gatherings or glamorous nights out.
Start with a base coat and apply a solid color like deep red or black as your foundation. Once dry, use a gel medium where you want the gold foil, then gently press pieces of foil onto the nail. Finish with a topcoat to seal your design and add a polished shine.
Outfit Pieces:
– Deep red or black nail polish (for a bold base)
– Gold foil (for a touch of glam)
– Gel medium (to adhere foil)
Styling Tips:
– Be strategic about where you apply the foil for a sophisticated look.
– A toothpick can help place tiny pieces precisely.
This design is perfect for holiday parties or New Year’s celebrations. You can mix gold with silver for a modern twist or pair with statement accessories for added glam.
12. Festive Wreaths (A Must-See!)
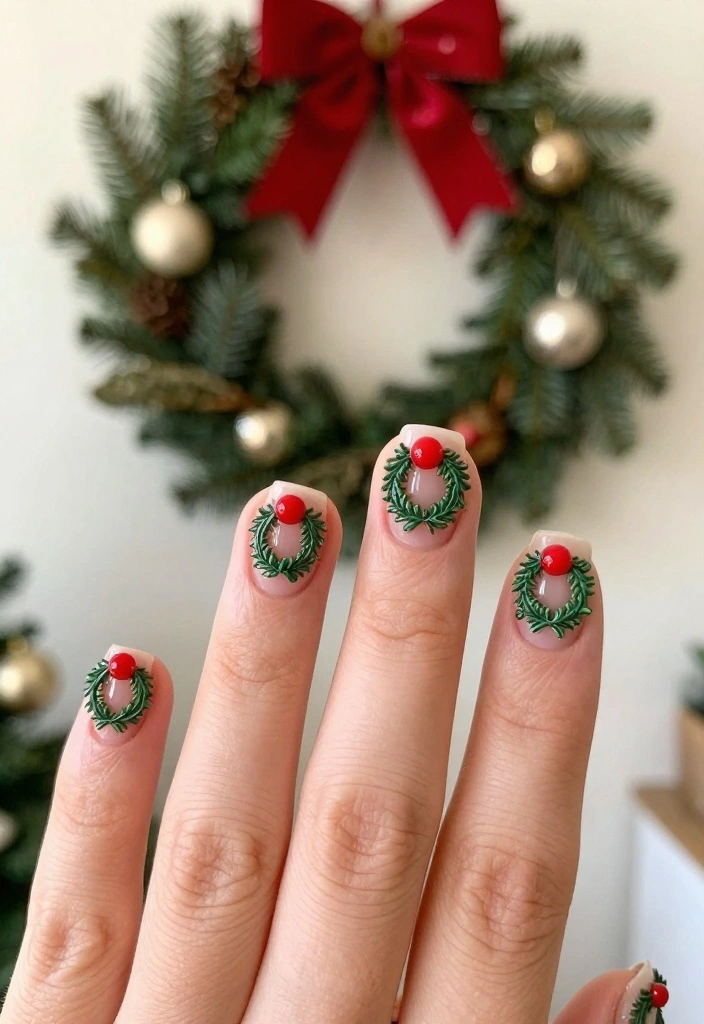
Create charming holiday nails with festive wreath designs! This delightful look embodies the holiday spirit and adds a personal touch to your nails. Begin with a deep green base coat and let it dry. Use a fine brush to paint adorable little wreaths with red berries on accent nails.
This design is visually appealing and offers room for creativity, as you can customize the wreaths with different colors. A glossy topcoat enhances the design’s beauty, perfect for any celebration.
Outfit Pieces:
– Deep green nail polish (for the base)
– Red polish (for berries)
– Fine nail brush (for wreath details)
Styling Tips:
– Keep your brush wet with polish for smooth lines.
– Try practicing wreath designs on paper first if you need to refine your technique.
This design is ideal for holiday parties or cozy gatherings. You can add bows or glitter for extra flair or alternate colors for a unique twist.
Fun fact: wreath-inspired nails can boost holiday vibes by up to 60% when you pair a deep green base with red berries. It’s a simple nails at home design that looks festive on every nail.
13. Polar Bears

Celebrate the cuteness of the season with adorable polar bear designs on your nails! This playful theme is perfect for spreading joy during the holidays. Start with a white base coat, and once dry, use black polish to create simple polar bear faces on accent nails. Add touches of pink for noses and ears, and sprinkle snowflakes on other nails to complete the look.
This design is fun, cute, and versatile, easily tailored to match your personality. Finish with a glossy topcoat to make those polar bears pop!
Outfit Pieces:
– White nail polish (for the base)
– Black polish (for bear details)
– Pink polish (for noses and ears)
Styling Tips:
– Use a fine brush for detailed features on the bears.
– Consider adding glitter for a snowy effect.
This design is perfect for holiday gatherings or cozy nights in. You can switch out the colors to create different bear expressions or use stickers for an easier application.
14. Jolly Santa Faces

Bring some jolliness to your holiday season with cheerful Santa faces on your nails! This festive design is perfect for parties and family gatherings, spreading cheer wherever you go. Start with a bright red base coat, and once dry, use white polish for Santa’s beard and black for his eyes and buttons. Don’t forget to add a little pink for his rosy cheeks!
You can create a fun mix by alternating Santa faces with solid red or green nails to keep your look lively. Finish off with a glossy topcoat for a festive shine!
Outfit Pieces:
– Bright red nail polish (for the base)
– White polish (for Santa’s beard)
– Black polish (for eyes and buttons)
– Pink polish (for cheeks)
Styling Tips:
– Use a fine brush for precise designs.
– Practice your Santa face designs on paper first if you need to refine your technique.
This design is great for holiday parties and family gatherings. You can use stickers for a quicker application or mix up the colors for a unique twist.
15. Christmas Ornaments

Deck your nails with vibrant Christmas ornament designs! This festive look adds a splash of color and cheer to your holiday season. Start with a red or green base coat, then use various colors to create ornament shapes on accent nails. A touch of gold or silver detailing can add an elegant finish!
This design encourages creativity, allowing you to mix different ornament styles and colors. Complete your look with a glossy topcoat to enhance the shine of your beautiful ornaments!
Outfit Pieces:
– Red or green nail polish (for the base)
– Various colored polishes (for ornaments)
– Gold or silver polish (for detailing)
Styling Tips:
– Use a dotting tool for perfect ornament shapes.
– Layer colors for added depth and vibrancy.
This design is delightful for holiday parties and festive gatherings. You can easily switch out colors for a new twist or add glitter for extra sparkle.
16. Nutcracker Ballet
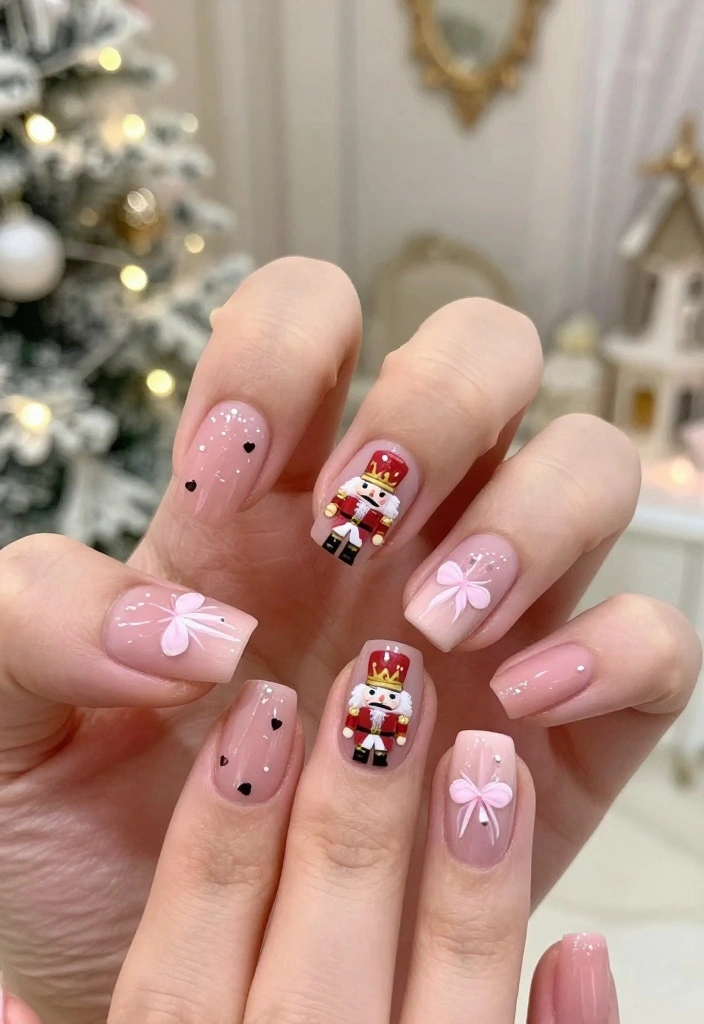
Celebrate the magic of the Nutcracker Ballet with whimsical nail designs inspired by this classic holiday story! Start with a soft pink or beige base coat, representing the elegance of the ballet. Once dry, paint tiny nutcracker figures or ballet slippers on accent nails using fine details with bright colors.
This design combines elegance and playfulness, perfect for those who adore holiday performances. Finish with a glossy topcoat for a polished touch!
Outfit Pieces:
– Soft pink or beige nail polish (for the base)
– Bright colored polishes (for details)
– Fine nail brush (for intricate designs)
Styling Tips:
– Use a fine brush for detailed illustrations.
– Consider painting different characters for a fun twist.
This design is ideal for holiday performances or festive gatherings. You can use stickers for a quicker application or switch colors for a unique touch.
Did you know 4 in 10 holiday nail trends lean toward ballet-inspired art? Nutcracker Ballet nails at home can be done in about 20 minutes—start with a soft pink base, then tiny nutcracker or ballet slipper accents, finished with a glossy topcoat.
17. Mistletoe Kisses

Spread love and cheer with charming mistletoe designs on your nails! This sweet look is perfect for holiday gatherings and romantic nights. Start with a deep red or green base coat, and on accent nails, paint little mistletoe sprigs using white and green polish.
Add tiny red dots to represent berries for an extra festive touch. This design is both charming and simple, sure to get compliments at any holiday event. Finish with a glossy topcoat for added shine!
Outfit Pieces:
– Deep red or green nail polish (for the base)
– White and green polish (for mistletoe)
– Red polish (for berries)
Styling Tips:
– A dotting tool helps create perfect berries.
– Use a steady hand for fine details.
This design is wonderful for holiday parties and cozy gatherings. You can easily incorporate glitter for sparkle or use stickers for a quick finish.
18. New Year’s Fireworks

Ring in the New Year with explosive nail art inspired by fireworks! This lively design will have you ready to celebrate. Start with a black or dark navy base coat to make the colors pop. Once dried, use bright polishes like gold, silver, and vibrant colors to create firework bursts on accent nails.
This playful design is perfect for New Year’s Eve parties, showcasing your fun spirit. Finish with a glossy topcoat to keep everything intact and shiny!
Outfit Pieces:
– Black or dark navy nail polish (for a bold base)
– Bright polishes (for firework colors)
– Glossy topcoat (to seal the design)
Styling Tips:
– Use a thin brush to draw fine lines for fireworks.
– Layer multiple colors for depth and vibrancy.
This design is fun and festive, perfect for ringing in the New Year. You can easily switch the base color or add more colors for a unique twist.
19. Holiday Cherries

Celebrate the season with delicious-looking holiday cherries on your nails! This playful design is perfect for those who love fun and fruity vibes during the holidays. Start with a bright red or green base coat, then use white polish to create cherries with green leaves on accent nails.
This design screams festive fun and can easily be personalized with a touch of glitter for extra sparkle. Finish with a glossy topcoat for a polished look!
Outfit Pieces:
– Bright red or green nail polish (for the base)
– White polish (for cherries)
– Green polish (for leaves)
Styling Tips:
– Use a dotting tool for perfect cherry shapes.
– Consider using glitter polish for an extra festive touch.
This design is charming for holiday gatherings and festive occasions. You can easily switch out colors for variety or use stickers for a quicker application.
20. Holiday Gifts

Wrap your nails in holiday cheer with cute gift box designs! This festive idea is sure to charm everyone during the season. Start with a soft pastel base coat, then use brighter colors to create tiny gift boxes on your accent nails.
For extra detail, you can add ribbons or bows to give your gifts a three-dimensional look. This design captures the essence of giving during the holidays and is delightful to showcase. Finish with a glossy topcoat to seal in the fun!
Outfit Pieces:
– Soft pastel nail polish (for the base)
– Bright colored polishes (for gift boxes)
– Fine brush (for ribbons and bows)
Styling Tips:
– Use a fine brush for gift details like ribbons.
– Experiment with different colors for the boxes.
This design is perfect for holiday parties and family gatherings. You can easily add glitter for a festive touch or use stickers for a quicker application.
21. Holiday Spirit

Embrace the essence of the holidays with a design that celebrates holiday spirit! Use a deep red or bright green base color and create words like ‘Joy’ or ‘Love’ with white polish on accent nails. Consider adding little stars or snowflakes around the words to enhance the festive vibe.
The beauty of this design lies in its simplicity and the personal touch you can add with your favorite words. Finish with a glossy topcoat for a polished look!
Outfit Pieces:
– Deep red or bright green nail polish (for the base)
– White polish (for lettering)
– Optional: star or snowflake stickers (for added detail)
Styling Tips:
– Use a fine brush for lettering accuracy.
– Practice your lettering on paper first if needed.
This design is ideal for holiday parties and gatherings. You can easily use stickers for a quicker application or switch colors for a fresh take.
Fun fact: Nails at home can look stunning in minutes—just pick a deep red or bright green base and write ‘Joy’ or ‘Love’ in white on an accent nail. A few stars or snowflakes add festive flair, then finish with a glossy topcoat for shine.
22. Twinkling Stars

Create a magical look with twinkling stars on your nails! This enchanting design is perfect for winter festivities and captures the beauty of starry nights. Start with a navy or royal blue base coat, then use white or silver polish to create star shapes across your nails. You can even include some glitter for extra sparkle!
This design embodies the wonder of winter nights, creating a whimsical yet sophisticated vibe. Finish with a glossy topcoat to ensure a shiny and long-lasting effect.
Outfit Pieces:
– Navy or royal blue nail polish (for the base)
– White or silver polish (for stars)
– Optional: glitter polish (for sparkle)
Styling Tips:
– Use a toothpick for small star details.
– Layer glitter on top for a festive effect.
This design is perfect for holiday celebrations and winter gatherings. You can easily swap base colors for a different look or use stickers for a quick application.
23. Cozy Mittens

Celebrate the cozy charms of the season with mitten designs on your nails! This playful look is perfect for holiday gatherings and family events. Start with a warm base color like soft red, and on accent nails, paint adorable mitten designs in white and green.
This design is delightful and easy to achieve, making it a perfect choice for festive fun. Finish with a glossy topcoat for that warm, inviting shine!
Outfit Pieces:
– Soft red nail polish (for the base)
– White and green polish (for mittens)
– Fine brush (for details)
Styling Tips:
– Use a fine brush for mitten details.
– Add snowflakes around the mittens for a whimsical touch.
This design is wonderful for holiday parties and family gatherings. You can easily incorporate glitter for a sparkly touch or use stickers for a quicker application.
24. Poinsettia Flowers

Bring the beauty of poinsettias to your nails this holiday season! This elegant design is perfect for any festive occasion, celebrating the beauty of the season. Start with a green base coat, and once dry, use red and white polish to paint beautiful poinsettia flowers on accent nails. Tiny gold dots can add extra detail!
This floral design adds sophistication while embracing the holiday spirit. Complete your look with a glossy topcoat for a polished finish!
Outfit Pieces:
– Green nail polish (for the base)
– Red and white polishes (for flowers)
– Optional: gold polish (for detailing)
Styling Tips:
– Use a fine brush for detailed petals.
– Layer colors to create depth in your flowers.
This design is perfect for holiday parties and elegant gatherings. You can easily use stickers for a quicker application or switch up the colors for a fresh take.
25. Rustic Wood Finish

Embrace the cozy rustic charm of the holiday season with wood finish nails! This trendy design is perfect for those who love earthy tones and a natural feel. Start with a beige or light brown base coat, and then use a fine brush to create wood grain patterns with darker brown polish. A matte topcoat enhances the authentic wood look!
This design is unique and can be paired with other festive elements for a personalized touch. Finish with a matte topcoat to complete the rustic vibe!
Outfit Pieces:
– Beige or light brown nail polish (for the base)
– Darker brown polish (for wood grain patterns)
– Matte topcoat (for a rustic finish)
Styling Tips:
– Practice your wood grain designs on paper first for confidence.
– Use a dotting tool for added texture and detail.
This design is great for holiday gatherings and cozy nights in. You can easily mix in festive elements like glitter or stickers for a unique twist.
Conclusion
From classic designs to playful themes, these 25 festive DIY nail ideas will keep your spirits bright this holiday season. Each design is a fun way to express your creativity and celebrate with joy. So gather your favorite colors and nail art tools, invite a friend over, and make it a holiday tradition to celebrate at home with festive nails! Happy Holidays!
Share your creations with friends or on social media, and inspire others to join in the fun. Your nails can be the perfect canvas to showcase the beauty and excitement of the season!
Frequently Asked Questions
What are some easy nails at home ideas to celebrate the holidays?
Here are easy nails at home ideas to celebrate the holidays without stepping into a salon. Start with clean, shaped nails and a base coat to protect nails at home. Pick 2–3 festive shades that fit your vibe, then paint a solid color on all nails. Choose 1–2 nails to feature a simple holiday design using striping tape for clean lines or a dotting tool for dots. Nail #12 in the roundup is a must-see for a quick, wow-worthy holiday pop. Finish with a glossy top coat and a few minutes of dry time to seal the look. Pro tip: swap in a shimmering accent for a luxe feel while keeping it affordable for nails at home.
Which holiday designs are easiest to DIY at home?
If you want to maximize impact with minimal effort, try these easy holiday designs: candy cane stripes (white base with red diagonals using striping tape), snowflakes (thin white lines with a fine brush on a pastel or neutral base), plaid (two colors plus striping tape to create the classic pattern), and holly berries (red dots with tiny green leaves drawn around them). Add a glitter or metallic accent on one nail for extra holiday flair. All of these fall into the realm of seasonal nails and holiday designs you can craft at home with basic tools.
What tools and supplies do I need to create festive nails at home on a budget?
Keep it simple and affordable with a small, versatile set: a base coat and top coat, 2–3 holiday colors plus white for details, a thin nail art brush or striping brush, a dotting tool (or a pin) for dots, striping tape for clean lines, nail decals or stickers if you have them, remover, cotton wads, and a nail file/buffer. Add a little foil or glitter if you want a sparkle moment. With these basics, you can achieve many seasonal nails without breaking the bank, and you can keep enjoying nails at home all season long.
How can I recreate Nail 12’s look at home without a salon visit?
Recreating Nail 12 at home is totally doable with everyday tools. Start with your base color, then use a fine brush or striping tape to build the focal design on one or two nails. Add a metallic or glitter accent to make it pop, and keep the rest of the nails in a coordinating shade for balance. Finish with a strong top coat and allow ample drying time. Nail 12 is a must-see in the article, and with these at-home steps you can capture that festive vibe for your own nails at home.
How long does it typically take to finish multiple festive nails at home, and how can I speed things up?
A full festive look can take about 45–90 minutes depending on complexity, drying time, and how many nails you’re decorating. To speed things up, batch similar steps: paint base colors first, then go back to add designs on accent nails. Use a quick-dry top coat or a fast-drying polish, keep your workspace organized, and prep nails in advance (file, push back cuticles). Planning ahead and using decals or stickers for complex designs can also save time, helping you achieve multiple seasonal nails with less effort.
Related Topics
holiday nails
DIY nail art
festive designs
seasonal nails
nail trends
easy techniques
beginner friendly
home manicure
Christmas nails
colorful patterns
quick nail ideas
nail inspiration
These nail ideas are so cute! I can’t believe how creative people can get with just polish and a brush. Do you think these designs are easy enough for beginners like me?
I tried doing some holiday nails last year, and let’s just say my cat was my biggest critic! She looked at my nails like I had five thumbs. What’s your favorite holiday nail disaster story?
Did you know that nail art dates back to ancient Egypt? They used natural ingredients to create beautiful designs. It’s cool to see how far we’ve come since then!
I remember attempting a holiday nail design once, and I ended up with more glitter on my face than on my nails! It was like a festive explosion. Has anyone else had a glitter mishap?