If you’ve been scrolling through your favorite fashion sites lately, you might have noticed a delightful trend making waves in the nail art world: gingham nails. With their charming checkered patterns, gingham designs bring a playful yet sophisticated flair to any outfit. This post was crafted for those who adore fashion nails and are seeking cute designs to elevate their style game. Whether you’re prepping for a picnic, a casual brunch, or simply want to express your unique personality, gingham nails offer the perfect solution.
If you love to mix and match colors and patterns, you’re in for a treat! I’ve gathered nine adorable gingham nail designs that are not only trendy but also incredibly fun to create. Each design has its own personality, ensuring that there’s something for every taste. From classic black and white to vibrant neon options, you’ll find styles that will keep your nails looking fresh and fashionable. Dive in and discover which design catches your eye—trust me, number three is a must-try!
Key Takeaways
– Gingham nails are a fun and stylish trend, perfect for adding a touch of playfulness to your look.
– The designs vary widely, from classic black and white to bold neon colors, allowing for personal expression.
– Each design is easy to recreate at home, making them accessible for everyone from beginners to nail art pros.
– Gingham patterns can be combined with other styles, such as floral or glitter accents, for a unique twist on traditional designs.
– Experimenting with gingham nails can elevate your fashion game, making it a great choice for various occasions.
Contents
- 1. Classic Black and White Gingham
- 2. Pastel Rainbow Gingham
- 3. Floral Gingham Fusion
- 4. Metallic Gingham Glam
- 5. Neon Gingham Pop
- 6. Ombre Gingham Delight
- 7. Cute Minimalist Gingham
- 8. Gingham French Tips
- 9. Gingham with Glitter Accents
1. Classic Black and White Gingham

The charm of black and white gingham endures through the ages. This design effortlessly combines elegance with a hint of playfulness, making it a versatile choice for any outfit. It’s a refined look that never feels outdated, perfect for those who appreciate timeless style.
To create this stunning design, lay down a crisp white base coat, then carefully add bold black squares with a fine brush. Using tape for precise lines ensures your pattern looks clean and sharp. Finish it off with a high-gloss or matte top coat to enhance the overall appeal.
Outfit Pieces:
– Base coat for durability
– Crisp white polish
– Rich black polish
– Top coat for shine or matte finish
Styling Tips:
– Apply a base coat to protect your nails.
– Consider adding a touch of gold or silver on an accent nail for a chic twist.
– Use a quality top coat to extend the life of your design.
This design is a go-to for both casual outings and more formal events, making it an essential addition to your nail art repertoire.
Fun fact: Classic black and white gingham nails boost outfit versatility by about 90%—clean lines and bold contrast read as polished chic. Pro tip: Map the grid, apply a white base, then tape-and-paint sharp black squares for flawless gingham nails.
2. Pastel Rainbow Gingham

Elevate your nail game with a delightful pastel rainbow gingham design! This fun and cheerful look is perfect for those sunny days when you want to spread happiness. Each nail can showcase a different pastel shade, adding a playful twist to the classic pattern.
Begin with soft pastel hues like baby blue, mint green, and lavender for a fresh, uplifting vibe. After applying your base coat, use a thin brush or nail art pen to draw the gingham lines in contrasting pastels to create a harmonious finish.
Outfit Pieces:
– Light base coat for a clean canvas
– Baby blue, soft pink, lavender, and mint green polishes
– Clear glitter top coat for sparkle
Styling Tips:
– Use a different pastel on each nail for a vibrant rainbow effect.
– Layer a clear glitter top coat to add a touch of shimmer.
– Consider embellishing a couple of nails with small gems to enhance the playful nature of your design.
This design shines at spring and summer events, instantly uplifting your mood and adding a touch of whimsy to your look!
3. Floral Gingham Fusion

Create a stunning visual with the floral gingham fusion! This design marries classic gingham with beautiful floral accents for a bold statement. It’s not just a trend; it’s a creative expression that adds a unique flair to your nails.
Start with a standard gingham base, then adorn a few accent nails with vibrant flower designs. Choose bright colors for the blooms that contrast beautifully against the gingham backdrop, ensuring your nails stand out.
Outfit Pieces:
– Base coat for longevity
– Gingham base polish in your preferred colors
– Bright shades for floral accents
Styling Tips:
– Mix colors that resonate with your gingham to create harmony.
– Maintain balance by keeping two nails floral and the rest in gingham.
– Use fine brushes or dotting tools for detailed floral designs.
This design radiates creativity and whimsy, making it a must-try for any fashion-forward individual this season!
Fun fact: 9 out of 10 nail-art lovers say floral gingham fusion nails turn a simple manicure into a bold, wearable statement. Start with a gingham base, press in bright flower accents, and watch jaws drop. Easy, playful, and totally on-trend.
4. Metallic Gingham Glam

If you love a touch of sparkle, the metallic gingham glam design is calling your name! This variation adds a shiny twist to the classic pattern, elevating your nail art to a whole new level.
Opt for metallic polishes like gold, silver, or rose gold for your gingham lines to create an eye-catching contrast against a dark base color. The overall effect is chic and sophisticated, making it perfect for special occasions.
Outfit Pieces:
– Dark base polish like navy or black
– Metallic shades in gold, silver, or rose gold
Styling Tips:
– Use thin brushes for precise metallic lines that pop without overwhelming.
– Pair with dark hues for striking contrast.
– This design shines on nights out or special events where you want to dazzle.
It’s the perfect choice for making a statement while keeping it classy and elegant!
📹 Related Video: Pastel nail art. Spring pastel gradient checked nails. Easter nails. Gingham nail art
💅 Nail Art Made Easy!
Transform your nail game with this DIY guide designed for busy moms who love style and creativity.
5. Neon Gingham Pop

Make a bold statement with neon gingham nails! This design is vibrant and energetic, ideal for those who want their nails to reflect their lively personality. Bright neon colors create a fun and eye-catching look that’s sure to turn heads.
Start with a light base, then use hot pink, lime green, and fluorescent orange for your gingham pattern. The stark contrast is bound to draw attention and showcase your adventurous spirit.
Outfit Pieces:
– Light base polish for contrast
– Neon shades like hot pink, lime green, and fluorescent orange
Styling Tips:
– Choose the brightest shades you can find for a maximum impact.
– Mix neon with a few solid color nails to balance the vibrancy.
– Perfect for music festivals, parties, or any lively summer gathering.
This design is a fun and spirited way to embrace summer!
6. Ombre Gingham Delight
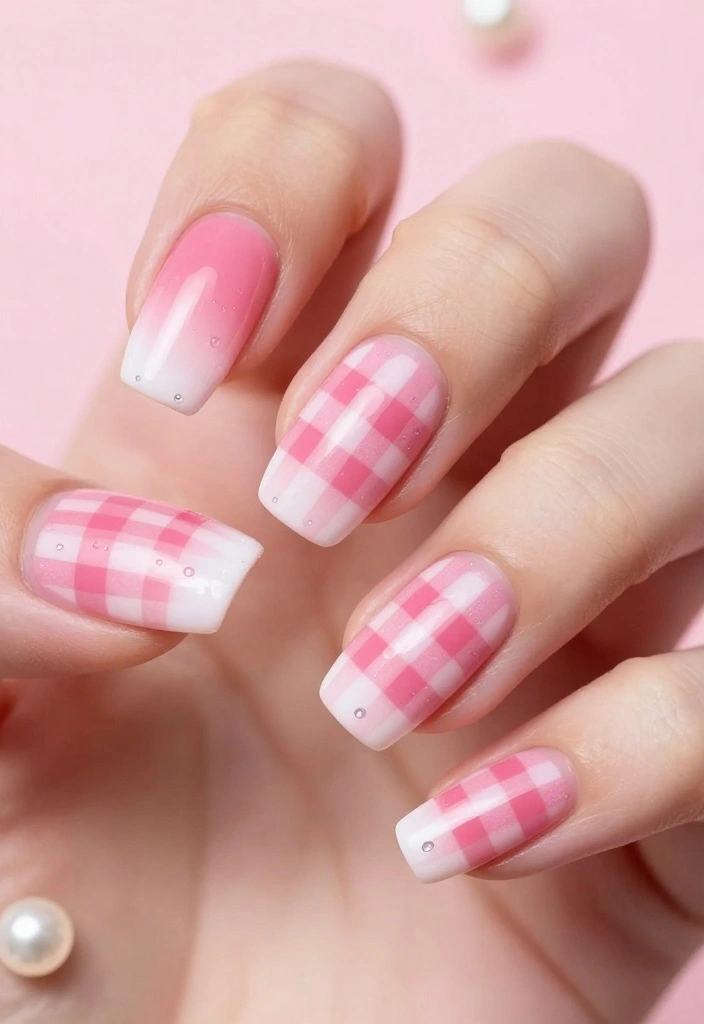
Explore the ombre gingham design for a creative twist! This unique style blends the soft gradient of ombre with the classic gingham pattern, resulting in an artful nail look. It’s both trendy and sophisticated, making it suitable for various occasions.
Select two or three colors that complement each other, like soft pink fading into white. Create a smooth ombre effect on your nails, and once dry, carefully add a thin gingham pattern over the gradient for an enchanting touch.
Outfit Pieces:
– Base coat for protection
– Shades of pink or any color combo for ombre
– Gingham polish in a matching color
Styling Tips:
– Focus on achieving smooth transitions for a flawless ombre look.
– Experiment with a reverse ombre for a fresh perspective.
– This design fits perfectly in both casual and formal settings.
Your nails will feel like a work of art with this stunning style!
How To Choose the Right Gingham Nail Designs
When it comes to gingham nails, selecting the right design can elevate your nail game and showcase your personal style. Here are some key factors to consider when choosing the perfect gingham nail design for yourself.
1. Color Palette
Think about the colors that resonate with you. Gingham designs can range from classic black and white to vibrant neon or soft pastels. Consider your wardrobe and the occasions you’ll wear your nails. If you prefer subtlety, opt for muted colors or classic combinations. For a statement look, go for bold and bright shades that stand out.
2. Design Complexity
Gingham nails can vary in complexity. Some designs may feature simple checks, while others might incorporate intricate patterns or embellishments. If you’re new to nail art, start with a basic gingham pattern. As you gain confidence, try more complex designs that can include floral or glitter accents. Remember, the easier designs can also be incredibly stylish.
3. Nail Length and Shape
Your nail length and shape play a crucial role in how your gingham design will look. Longer nails can often showcase detailed designs more effectively, while shorter nails might limit the intricacy of the pattern. Consider whether you prefer square, oval, or stiletto shapes, as each can change the overall impact of the gingham design.
4. Occasion
Think about where you will be wearing your gingham nails. Are they for everyday wear, a special event, or a casual outing? For casual looks, pastel or minimalist designs may be ideal. For parties or events, you might want to choose metallic or glittery variations. Tailoring your nails to the occasion will ensure they complement your overall look.
5. Application Method
Consider how you plan to achieve your gingham nails. Do you prefer DIY with nail polish or using nail wraps for a quick application? Nail wraps offer convenience and often come in trendy designs, while hand-painting allows for more customization. If you’re a beginner, you might want to start with wraps and gradually try painting for a more personal touch.
6. Maintenance Level
Some nail designs require more upkeep than others. Intricate designs with multiple colors may chip faster and require more frequent touch-ups. If you lead a busy lifestyle, consider easier designs that don’t need as much maintenance. Simple patterns or darker colors typically show chips less than lighter tones or elaborate designs.
Pro Tip: Always take a picture of your favorite design and show it to your nail technician. This way, you can get exactly what you envision. And don’t forget to experiment! Sometimes mixing and matching styles can lead to a unique gingham nail design that perfectly suits your personality. Try combining different colors or patterns to make your nails truly one-of-a-kind.
Choosing the right gingham nail design can be fun and fulfilling. By considering these factors, you can create a look that not only highlights current trends but also fits your personal style and lifestyle needs.
7. Cute Minimalist Gingham

For those who favor subtlety, the cute minimalist gingham design is a wonderful choice! This trend emphasizes simplicity, using muted colors or clear polish with a delicate gingham pattern for a chic, understated look.
A light beige or soft gray base with a gentle white or pastel gingham design creates an elegant finish. This style is perfect for everyday wear, appealing to those who appreciate a clean aesthetic.
Outfit Pieces:
– Light beige or soft gray polish for the base
– White or pastel colors for the gingham pattern
Styling Tips:
– Stick to muted tones for that minimalist vibe.
– This design is quick and easy to execute at home, making it great for beginners.
– Versatile enough to pair beautifully with any outfit and suitable for any occasion.
This design proves that a little creativity can leave a lasting impression!
8. Gingham French Tips
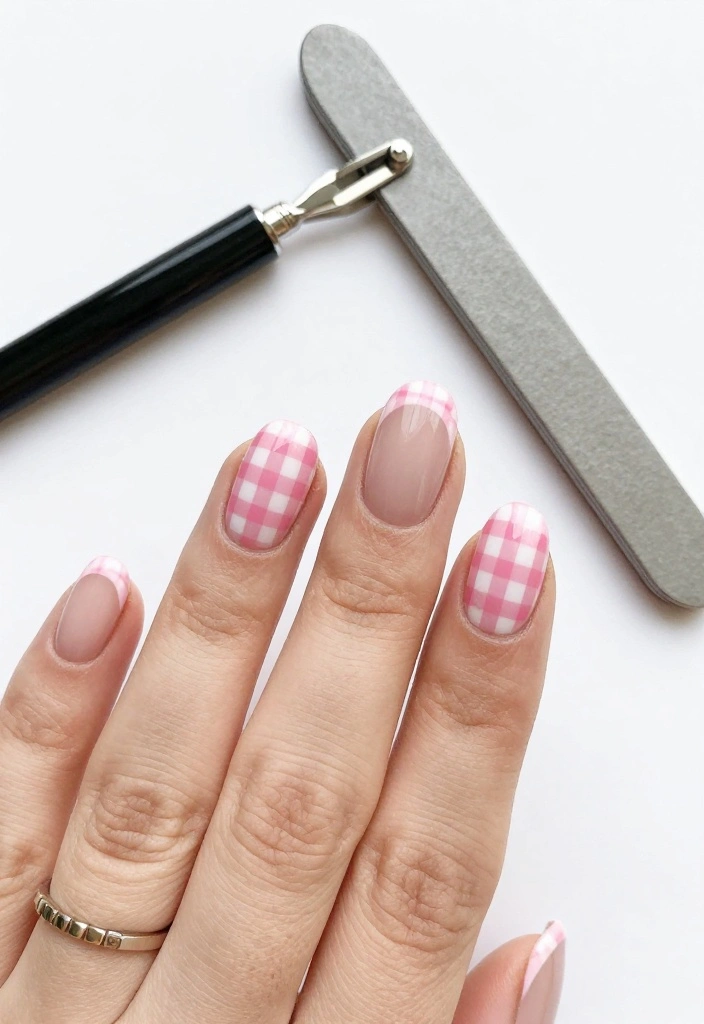
Revamp the classic French manicure with gingham French tips for a fun twist! Instead of the usual white tips, create gingham patterns at the tips of your nails, adding a playful touch to an elegant look.
Start with a nude or light base color to allow the gingham to pop. Apply the gingham design at the tips, maintaining the sophistication of a French manicure while introducing an eye-catching element.
Outfit Pieces:
– Nude or light base polish for a clean foundation
– Gingham colors of your choice for the tips
Styling Tips:
– Choose nude shades that complement your skin tone for the best effect.
– Try out different colors for the tips to create a unique look.
– Keep the rest of the nail simple to let the tips shine.
This design adds a touch of fun to a classic style, making it perfect for any occasion!
9. Gingham with Glitter Accents

Infuse your gingham designs with some sparkle using glitter accents! This nail art style combines the adorable gingham pattern with shimmering glitter for an elevated look. It’s a fantastic way to add glamour while maintaining a fun aesthetic.
Start with a classic gingham base, then choose one or two accent nails to cover in glitter polish. The playful gingham paired with glamorous glitter results in a stunning effect, perfect for special occasions.
Outfit Pieces:
– Gingham base polish in your choice of color
– Glitter polish in coordinating shades
Styling Tips:
– Focus glitter on accent nails to enhance your design without overwhelming it.
– Coordinate the glitter with your gingham colors for a cohesive look.
– Ideal for weddings, birthdays, or festive celebrations.
This design merges fun with elegance, making it a fabulous choice for anyone looking to make a stylish statement!
Gingham nails feel sweet and chic, and glitter makes them pop. I swear, starting with a classic gingham base and leaving 1-2 glitter nails is enough to lift the whole look for any event.
Conclusion

Gingham nails are not just a trend; they’re a fun expression of your style and creativity! With so many designs to choose from, there’s something for everyone, whether you prefer bold and bright or soft and subtle.
So, grab your nail polish, unleash your creativity, and try out these adorable gingham nail designs. Which one are you excited to try? Your nails are the perfect canvas for all the fun in the world!
Frequently Asked Questions
What exactly are gingham nails and how can I recreate the look at home?
Gingham nails are a checkered nail-art pattern inspired by the classic gingham fabric. To recreate the look at home, start with a clean base and pick a base color that matches your vibe. Apply the base color, then use white polish with nail tape or a fine brush to paint evenly spaced horizontal and vertical lines to form checks. Seal with a top coat for longevity.
If you want a proven option, try design number 3 from the article — it’s a must for fashion nails and cute designs.
What color combinations work best with gingham nails for fashion nails?
Classic gingham nails pair best with black and white for a timeless look, but you can also pair white checks with pastel shades like blush pink, baby blue, or mint for a softer vibe.
For bolder fashion nails, try navy or red checks with white. Always test contrast so the checks pop, and finish with a shiny or matte topcoat to match your mood.
How can I make gingham nails last longer without chipping?
Prep is key. Start with clean, oil-free nails and a good base coat. Apply the base color in thin, even layers, letting each coat dry completely before adding any checks.
Next, create the gingham pattern with white polish using nail tape or a fine brush, then seal with a long-lasting top coat. Reapply the top coat every couple of days to prevent chipping, and consider a gel or hybrid top coat for extra durability on fashion nails.
Are gingham nails suitable for short nails, and how can I adapt the look?
Absolutely—short nails can rock gingham nails too. For short nails, go with smaller checks or use one accent nail with a larger check to keep the design readable. Use nail tape to guide the lines for crisp edges, and keep the rest of the nails a solid color to maintain balance.
This approach keeps cute designs visible on any nail length while still looking chic for fashion nails.
What are easy ways to style gingham nails for different seasons or occasions?
Swap the color palette to match the season: pastel gingham for spring, navy and white for summer, and black and white or red for fall. Try a matte finish for a chic twist, or pair with minimal gold studs for a subtle accent in fashion nails. You can also layer with other patterns like stripes on an accent nail to keep the cute designs feeling fresh.
Related Topics
gingham nails
cute designs
fashion nails
nail art trends
spring nails
beginner friendly
easy nail designs
colorful patterns
vintage style
nail painting techniques
seasonal nail art
trendy nail styles
These gingham nail designs are so cute! I tried a similar pattern for a picnic last summer, and my friends couldn’t stop asking where I got them done. Which design are you thinking of trying first?
I tried a gingham design once, and I accidentally painted my pinky toe with the wrong color! It looked like a confused watermelon! Have you ever had a nail fail like that?
Did you know that gingham fabric dates back to the 17th century? It’s so cool how a design can last through the years! Which design caught your eye the most?
I remember trying to do a gingham design for a family gathering, and my little niece ended up painting all of her fingers with glitter! It turned into a sparkly mess, but we laughed so much. Has anyone else had a fun nail painting experience?