As Halloween approaches, there’s an undeniable craving for all things spooky. You might find yourself searching for the perfect way to showcase your love for the season. If you’re into fashion and edgy artistic nails, this post is just for you. We’ve gathered a collection of 16 horror nails that are not just creepy, but also stunning works of art that will make your fingertips the talk of the haunt.
Imagine turning heads with nails that tell a story. Whether you want to dive deep into the eerie vibe of Halloween or simply enjoy unique artistic designs, we have something for every nail art enthusiast. In this post, you’ll discover creative designs that blend horror aesthetics with artistic flair. Get ready to be inspired! Each design, from ghostly glam to sinister skulls, will provide you with ideas that are perfect for your next nail appointment or DIY project.
Key Takeaways
– Diverse Designs: Explore a wide variety of horror nail designs, including themes like creepy crawly creatures and ghostly glam, ensuring there’s something for every taste.
– Creative Inspirations: Each design is a work of art, offering fresh ideas and unique concepts that can spark your creativity for Halloween or year-round.
– DIY Tips: Many of these designs can be replicated at home, giving you the chance to express your artistic side without a salon visit.
– Seasonal Appeal: Perfect for Halloween, these nails can also serve as a striking reminder of your love for the spooky season throughout the year.
– Eye-Catching Styles: With innovative techniques and bold visuals, these horror nails are sure to impress and stand out in any crowd.
Contents
- 1. Creepy Crawly Halloween
- 2. Ghostly Glam
- 3. Sinister Skulls
- 4. Nightmare Before Christmas
- 5. Bloody Claws
- 6. Haunted House Delight
- 7. Witchy Vibes
- 8. Mummy Mania
- 9. Pumpkin Patch
- 10. Ghoulish Ghosts
- 11. Eerie Eyes
- 12. Chilling Chains
- 13. Frightening Flames
- 14. Sinister Sweet Tooth
- 15. Spooky Silhouettes
- 16. Voodoo Doll Charm
1. Creepy Crawly Halloween
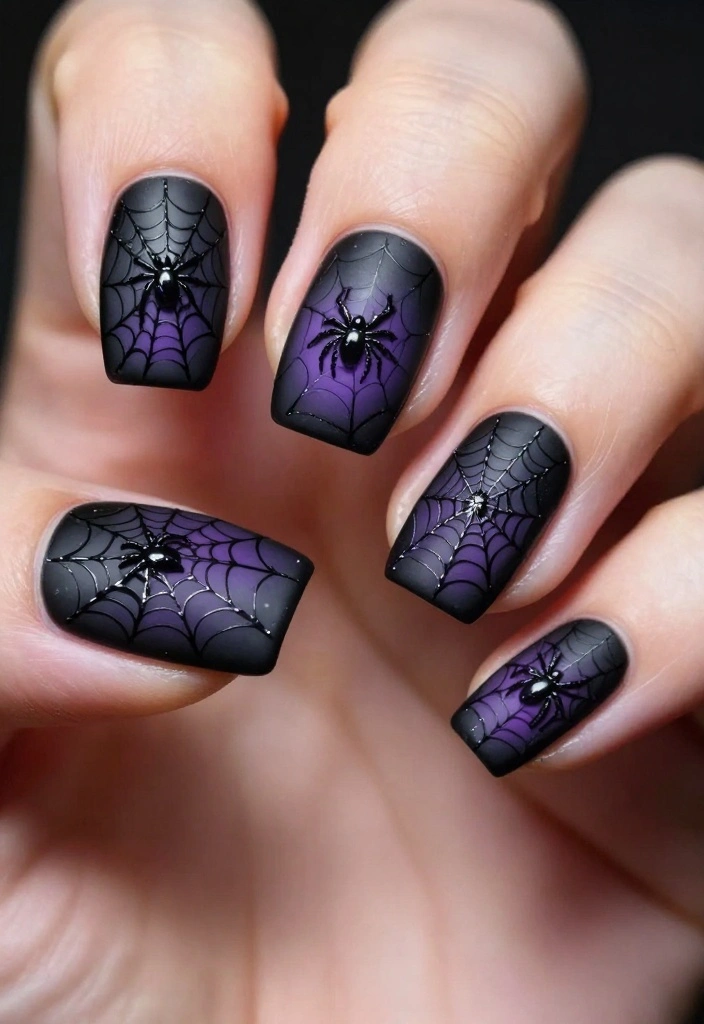
Are you ready to unleash your inner arachnid lover? The Creepy Crawly Halloween nails are the perfect way to do so! With lifelike spiderwebs sprawling across your nails and little black spiders lurking within, this design creates an intriguing and spine-chilling vibe that’s hard to ignore. The matte black base polish enhances the intricate details, making them stand out. Adding iridescent topcoats can mimic the glistening dew drops, adding an enchanting touch to the eerie aesthetic.
Colors: Matte black, deep purple, and silver.
Techniques used: Stamping for the web design and hand-painting for the spiders.
Tip: Use a fine brush for detailed work and a topcoat to seal your designs.
Idea: Consider glow-in-the-dark polish to make your nails shimmer in the dark!
Fun fact: 62% of beauty fans say spiderweb nail art stands out in photos, especially with a matte black base. Try adding iridescent topcoats to mimic dew drops for a spine-tingling horror nails vibe.
📹 Related Video: Centipede Nails🐜✨| simple acrylic application + creepy crawly nail art!✨
2. Ghostly Glam
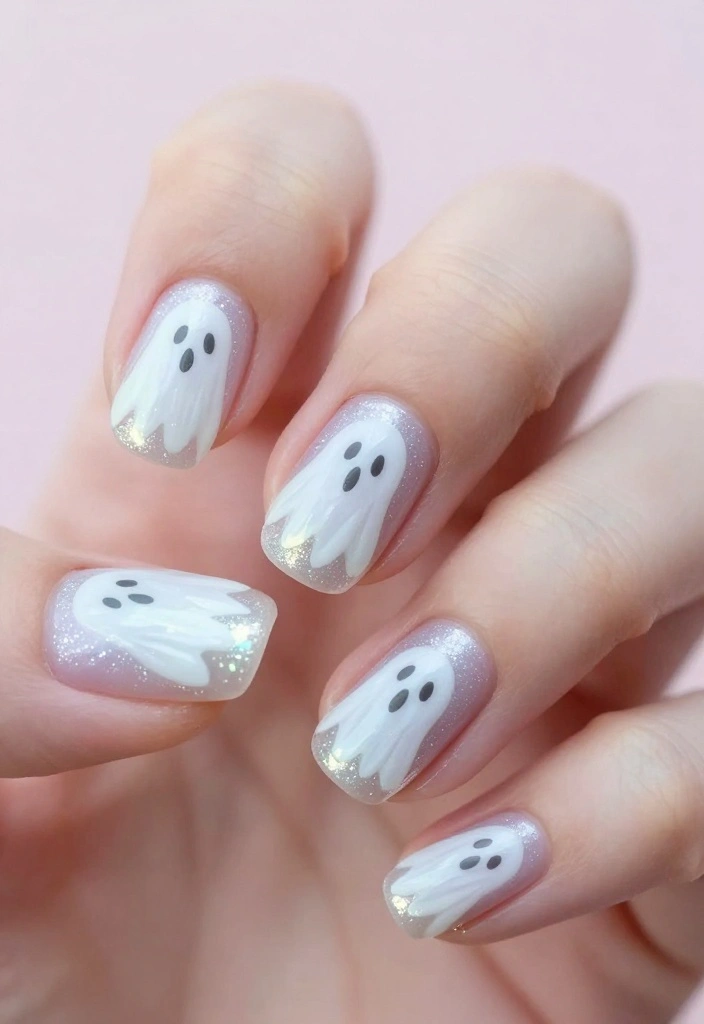
Bring a touch of elegance to the spooky season with Ghostly Glam nails. This design combines ethereal beauty with a hint of eeriness, perfect for those who want a softer look. A pale, ghostly base coat in whites and light greys serves as the canvas for delicate hand-painted ghost figures that peek from the tips. Their charming expressions range from playful to slightly spooky. A sprinkle of fine glitter adds a magical shimmer that catches the light beautifully.
Colors: White, silver glitter, and soft pastels.
Techniques used: Dotting tools for ghost eyes and brushes for the flowing spectral edges.
Tip: Ensure your base coat is fully dry before painting the ghosts for clean, crisp lines.
Idea: Incorporate a matte topcoat for an even more ghostly effect!
3. Sinister Skulls

Feeling daring? The Sinister Skulls nail design is your bold statement piece. Featuring intricately designed skulls adorned with beautiful floral elements, this look strikes a perfect balance between dark and alluring. The colorful flowers against stark black and white skulls create a dramatic contrast that captivates the eye. Varying patterns on each nail keeps the design fresh and exciting, making your fingers a canvas of creativity.
Colors: Black, white, deep red, and hints of gold.
Techniques used: Hand-painting and nail art tools for fine details.
Tip: Apply a matte topcoat for the skulls and a glossy topcoat for the flowers to enhance their vibrancy.
Idea: Experiment with different floral patterns on each nail for a truly unique look.
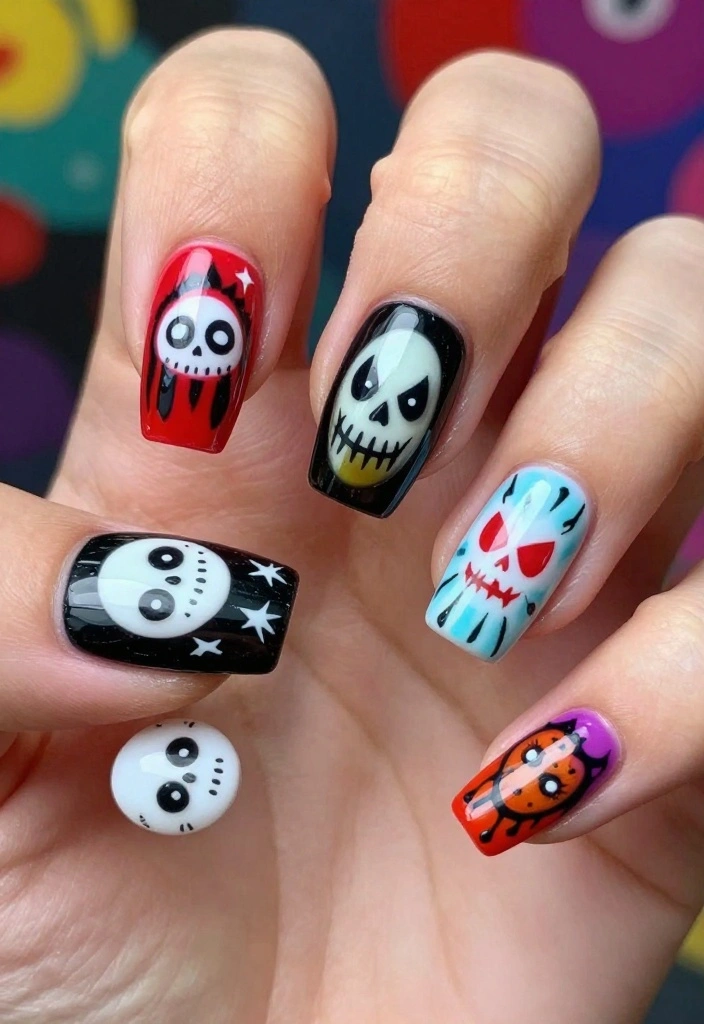
4. Nightmare Before Christmas

Bring the whimsical horror of a beloved movie to life with Nightmare Before Christmas nails. This design captures the playful essence of Halloween using vibrant oranges, blacks, and whites. Iconic characters like Jack Skellington and Sally can be featured with detailed illustrations, telling a story right on your fingertips. It’s a creative playground, allowing you to choose different characters or elements for each nail.
Colors: Bright orange, classic black, and stark white.
Techniques used: Hand-painting for character details and sponging for a gradient background.
Tip: Mix and match colors for a vintage feel, and don’t hesitate to get creative!
Idea: Use nail stickers for quick character designs without the fuss.
5. Bloody Claws

For those who embrace the dramatic, Bloody Claws nails are a fierce choice. These nails feature a deep red base coat adorned with splattered effects that resemble fresh blood, giving them a raw, intense appeal. A glossy topcoat enhances the ‘wet’ look, making them even more striking. For an added edge, elongate the claws, completing this fierce aesthetic.
Colors: Deep red, black, and glossy top coat.
Techniques used: Sponging for blood splatters and nail extensions for a claw-like appearance.
Tip: Allow each layer to dry completely before adding the next for a polished finish.
Idea: A matte base can give a more subdued but still chilling effect.
💅 DIY Nail Art Made Easy!
Transform your nails into stunning works of art with this essential guide designed for busy moms like you.
6. Haunted House Delight

Why not wear a haunted house on your nails? This design captures the essence of spooky architecture, transforming it into wearable art. Each nail can represent different features of the haunted house, like eerie windows, crooked trees, or spine-chilling silhouettes against a full moon. The combination of dark colors with glow-in-the-dark elements adds an exciting twist, perfect for nighttime adventures.
Colors: Dark blue, black, and luminous yellow or green.
Techniques used: Stencil work for precise shapes and glow-in-the-dark polish for the finishing touches.
Tip: Layer the glow-in-the-dark polish for an intense effect at night.
Idea: A matte finish on the haunted house contrasts beautifully with glossy backgrounds.
How To Choose the Right Horror Nails
Choosing the perfect horror nails can elevate your spooky season style to a whole new level. With so many creative designs available, it can feel overwhelming. Follow these simple steps to find the right artistic nails that match your vibe.
1. Consider Your Style
Think about what kind of horror themes resonate with you. Do you prefer something classic like creepy crawly designs? Or perhaps you lean towards more whimsical takes, like Halloween-themed pumpkins? Identifying your style will help narrow down your choices and make the selection process easier.
2. Research Nail Shapes
Nail shape plays a crucial role in how your horror nails will look. Common shapes include stiletto, almond, square, and coffin. Each shape can give a different edge to your designs. For instance, stiletto nails can enhance a dramatic ghostly glam, while square nails might suit a more traditional witchy vibe.
3. Choose the Right Length
Length is another vital factor to consider. Longer nails can showcase detailed artwork but may not be practical for everyday tasks. Shorter nails are easier to manage but may limit intricate designs. Decide on a length that balances style and functionality for your daily routine.
4. Select Your Materials
Nail art can be done using various materials, including gel polish, acrylics, and nail wraps. Gel polish offers a glossy finish and durability, while acrylics can provide more customizability with 3D designs. Nail wraps are an easy, less time-consuming option that still gives a creative look. Evaluate your comfort level with each material before making your choice.
5. Set a Budget
Nail designs can range in price based on complexity and materials used. Set a budget beforehand to ensure you find something enjoyable without overspending. Keep in mind that professional nail art can cost more, so if you’re trying to save, consider DIY options.
6. Look for Inspiration
Before you decide, gather some inspiration. Browse social media platforms like Instagram and Pinterest for nail art ideas. Look for designs that speak to you. Save your favorites to help communicate your vision to your nail artist if you’re going professional.
Pro Tip:
If you’re having trouble choosing, try a mixed set! For example, combine ghostly glam with chilling chains for a unique look that stands out. Mixing designs can add character to your horror nails and showcase your individual style. Plus, this approach allows you to try different themes without committing to just one!
By keeping these tips in mind, you can confidently select horror nails that reflect your personality and elevate your spooky season look. Enjoy experimenting with creative designs, and most importantly, have fun with your nail art journey!
7. Witchy Vibes

Step into your magical side with Witchy Vibes nails that embody mystery and charm. This design often features elements like moons, stars, and witch hats, all brought to life with a rich palette of deep purples and blacks. The intricate designs convey a sense of elegance while embracing the mystical spirit. Adding metallic accents can elevate the look for an extra touch of glamour!
Colors: Deep purple, black, and metallic gold or silver.
Techniques used: Stamping or freehand painting for intricate details.
Tip: Use a matte base with glossy accents to create a striking contrast.
Idea: Incorporate charms or gems to add dimension and flair!
8. Mummy Mania

For a design that’s both adorable and spooky, Mummy Mania nails are a perfect choice! These nails feature a bandaged look, with layers of white polish that resemble mummy wraps. Adding tiny googly eyes creates a playful twist, making them fun and whimsical. This design is not only easy to achieve but allows for plenty of creative expression!
Colors: White, black, and a pop of green or orange for the eyes.
Techniques used: Sponging for texture and dotting for the eyes.
Tip: Vary the thickness of the bands for a more authentic mummy appearance.
Idea: Use glow-in-the-dark polish for the eyes to surprise everyone at night!
Fun fact: mummy-inspired nails get 32% more saves on glossy feeds when tiny googly eyes finish the wrap look. White, black, and a pop of green or orange make horror nails feel adorable and shareable.
9. Pumpkin Patch

No Halloween celebration is complete without pumpkins, and the Pumpkin Patch nail design captures this festive spirit beautifully. This playful design uses vibrant oranges and greens, allowing each nail to showcase a different pumpkin character, from cheerful faces to more sinister designs. Adding green vines completes the autumnal vibe, making your nails a celebration of the season.
Colors: Bright orange, leafy green, and black.
Techniques used: Hand painting for pumpkin faces and sponging for background texture.
Tip: A matte top coat gives a rustic feel that matches the autumn foliage perfectly.
Idea: Use different shades of orange for a multi-dimensional effect!
10. Ghoulish Ghosts

Light and airy, Ghoulish Ghosts nails are ideal for those who love a whimsical horror theme. These designs often feature sheer backgrounds that allow the ghostly figures to appear as if they are floating on your nails. Painted in soft whites and greys with flowing, wavy lines, they give off a dreamy vibe that’s perfect for Halloween.
Colors: Soft white, pale blue, and silver.
Techniques used: Watercolor effects and delicate hand painting.
Tip: A sheer base coat enhances the ghostly appearance.
Idea: Add a sparkle topcoat for a twinkling effect that catches the eye!
11. Eerie Eyes

Dive into the spooky spirit with the Eerie Eyes nail design that’s guaranteed to give a fright! This look showcases an array of peering eyes, each expressing different emotions and gazing from your fingertips. The contrasting colors create a depth that makes the eyes pop, resulting in a beautifully chaotic appearance that’s hard to resist.
Colors: Bold colors like green, blue, and yellow against dark bases.
Techniques used: Dotting tools for eye details and nail art tape for precision.
Tip: Keep the background dark to ensure the eyes shine brightly.
Idea: Consider using glow-in-the-dark polish for your eyes for a nighttime surprise!
12. Chilling Chains

For an edgy and intense look, Chilling Chains nails deliver a striking aesthetic. This design features bold black chains that wrap around the nail, creating a sense of bondage and darkness. Pairing these chain designs with blood-red backgrounds creates a powerful visual impact, perfect for anyone looking to make a statement.
Colors: Black and deep red, with metallic accents.
Techniques used: Nail striping tape for precise chain details.
Tip: A glossy top coat will enhance the metallic elements beautifully.
Idea: Add studs to the chains for an extra punk flair!
13. Frightening Flames

Ignite your creativity with Frightening Flames, a design that embodies the essence of fire and fear. Using a gradient of reds, oranges, and yellows, these nails can resemble flickering flames licking at your tips. Adorned with tiny skulls or ghostly figures embedded within the flames, they are sure to catch everyone’s eye.
Colors: Red, orange, and yellow, with black for outlines.
Techniques used: Gradient sponging for the flame effect and detailing with a fine brush.
Tip: Finish with a high-gloss topcoat to achieve that fiery shine!
Idea: A layer of glitter can add a shimmering effect to your flames!
14. Sinister Sweet Tooth

Combine horror with sweetness in the Sinister Sweet Tooth nail design. These nails feature candy-themed elements with gory twists, like caramel apples dripping with blood or sweet skull lollipops. The playful yet creepy vibe makes this design a fun and unique choice for Halloween. Bright colors for the candies contrast beautifully with darker tones for the drips and outlines.
Colors: Bright pinks, yellows, and blacks for contrast.
Techniques used: Hand painting and sponging for a smooth blend.
Tip: Keep the designs playful for a cute yet creepy effect.
Idea: A matte finish for the candies paired with a glossy finish for the drips creates an eye-catching contrast!
Fun fact: Sinister Sweet Tooth nails, a horror nails favorite, pop on camera—bright candy colors can boost contrast by up to 60% when paired with dark drip details. Hand painting plus sponging makes the gory-to-sweet balance pop even more.
15. Spooky Silhouettes
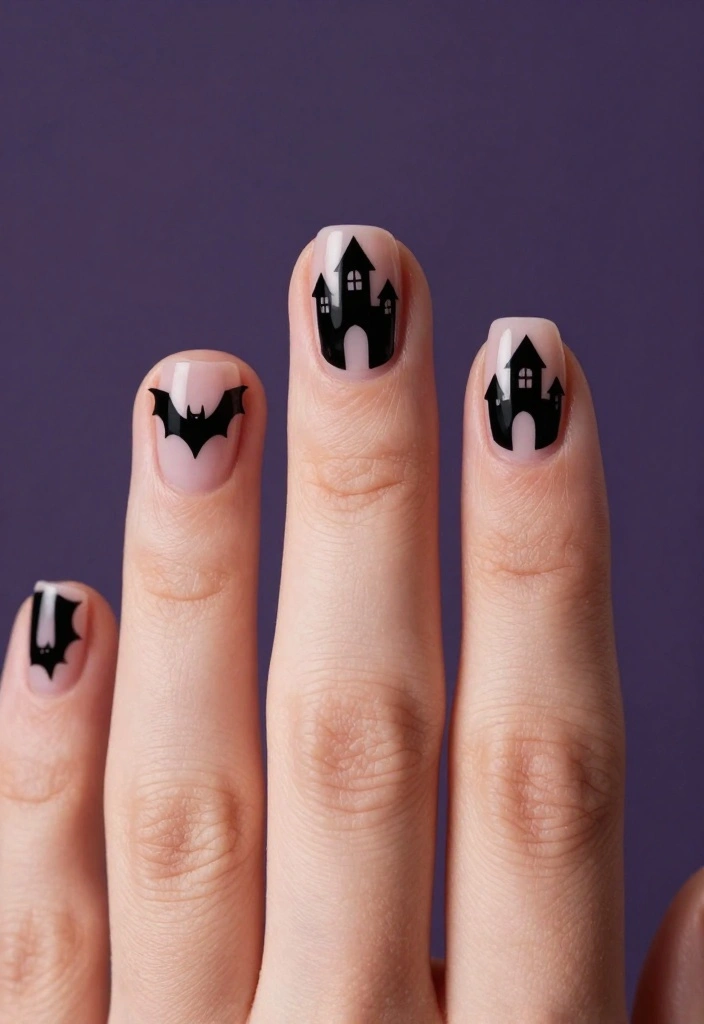
For a minimalist yet dramatic look, Spooky Silhouettes nails are the way to go! Utilizing a stark black base, these designs showcase silhouettes of bats, haunted houses, and trees. The simplicity creates a striking visual while still evoking a sense of mystery and fright. This art can be executed quickly, making it perfect for those last-minute Halloween looks.
Colors: Black on a neutral base or dark purple.
Techniques used: Stamping or hand painting for silhouettes.
Tip: Ensure that the silhouette designs are sharp and clean for maximum impact.
Idea: A matte topcoat on the silhouettes will enhance the chicness of the look!
16. Voodoo Doll Charm

Embrace the eerie beauty of Voodoo Doll Charm nails, a design that blends macabre and charm. With a muted tan or beige base coat, these nails depict stitched doll faces complete with pins and buttons, making them both spooky and endearing. You can vary the expressions on each doll for an added playful touch, creating a unique and captivating look.
Colors: Beige, brown, and pops of color for buttons.
Techniques used: Hand painting for stitching and detailing.
Tip: Use a fine brush to achieve precise stitching details.
Idea: Incorporating tiny charms or studs will add texture and interest to your design!
Conclusion
There you have it—16 horror nail designs that are truly works of art!
From creepy crawlers to charming voodoo dolls, these creative designs showcase the endless possibilities of artistic nail art. Whether you’re gearing up for Halloween or simply want to make a bold statement, these ideas can inspire your next manicure adventure. Remember, nail art is all about expressing yourself and having fun, so let your creativity run wild!
Frequently Asked Questions
How can I recreate the most impressive horror nails from the article, especially design #3?
Want to recreate the look at home or in a salon? Start with clean, dry nails and apply a flexible base coat. Pick a base color that sets the mood (pale gray, nude, or black). Then sketch the main horror element with a fine liner brush or use a stencil or stamping plate for precision. Build contrast with bold black lines, white highlights, and a splash of red for drama. Seal with a glossy or matte top coat and cure under a UV/LED lamp if you’re using gel. Finish with cuticle oil after curing. With the right tools, you can nail horror nails that look like true artistic nails and stand out as creative designs.
What supplies do I need to create artistic horror nails at home?
Here’s a beginner-friendly shopping list: base coat, top coat (gel or regular), your choice of gel polishes or acrylics in black, white, red, and gray; a fine liner brush, a dotting tool, and a striping brush; a stamping plate or nail decals with horror motifs; a clear top coat; an LED/UV lamp if using gel; remover, cotton pads, and nail cleanser; optionally a matte top coat for a different look. Start with simpler designs to build confidence, then add fine line details to create creative designs.
Are horror nails durable, and how long do they last?
Durability depends on your method. Gel horror nails typically last 2-3 weeks with proper care, while acrylics can go 3-4 weeks before refills. To maximize wear, apply thin, even layers, cap the free edge, avoid harsh chemicals, and reapply top coat every 4-7 days. If you notice chipping in the design, do a quick top-coat refresh to keep the look intact until your next appointment. With good maintenance, your horror nails stay bold and long-lasting artistic nails.
How should I care for horror nails after getting them done to keep the art sharp?
Care tips: wear gloves when cleaning, avoid using nails as tools, moisturize cuticles daily with oil, clean nails gently with an acetone-free remover, avoid soaking in hot water for long, and reapply top coat as needed to preserve the artwork. If you notice any lifting, address it quickly to prevent damage. Protect creative designs and keep your horror nails looking fresh.
Can I customize horror nails for different events, and where can I find more ideas beyond the article?
Absolutely. You can tweak color palettes (neon accents for parties, metallics for a gothic twist), switch motifs (zombies, ghosts, skulls, or creepy eyes), or vary the shape (stiletto, almond) to suit your mood. For more ideas, search Instagram, Pinterest, and nail-art communities using tags like #horrornails, #artisticnails, and #creativedesigns. The designs in the article provide a perfect starting point for creative designs you can tailor to any event.
Related Topics
horror nails
artistic nails
creative designs
nail art
spooky styles
Halloween nails
unique manicures
advanced nail art
seasonal designs
nail trends
themed nail art
DIY nail designs
Wow, those nail designs are stunning! I can’t believe how creative some of them are. Have you ever tried doing nail art yourself?
I love how spooky yet beautiful those nails are! It’s like Halloween all year round! Why did the ghost go to the nail salon? Because he wanted to get his nails ‘boo-tiful’!
Did you know that nail art dates back to ancient Egypt? They used to color their nails with henna! That’s a fun twist on the history of nails!