Summer is just around the corner, and that means it’s time to refresh your look! If you’ve been dreaming of the perfect manicure to match the sunny vibes, you’re in luck. I created this post to dive into the enchanting world of lily nails. These stunning floral styles capture the essence of summer and will have you turning heads wherever you go. With the right design, your nails can be a statement piece, reflecting the beauty of the season.
If you’re someone who loves expressing your personality through your nails, this one’s for you. Whether you’re lounging by the pool, attending a garden party, or just hanging out with friends, summer nails adorned with lilies can elevate your style effortlessly. I pulled together ten must-try lily nail looks that are fresh, fun, and perfect for any summer occasion. Trust me, you won’t want to miss #3 on this list!
From soft pastels to glittery accents, there’s something for everyone. So grab your favorite nail polish and let’s get inspired! You’ll find ideas that not only look fabulous but are also easy to recreate at home or bring to your nail salon. Get ready to embrace the warmth of summer with gorgeous lily nails that truly shine.
Key Takeaways
– Variety of Styles: Explore ten unique lily nail designs perfect for summer vibes, including soft pastels and bold colors.
– DIY-Friendly Options: Many of the looks can be easily executed at home, making them accessible for everyone.
– Enhance Your Look: Floral styles can elevate any summer outfit, adding a touch of fun and femininity.
– Perfect for Any Occasion: From casual outings to formal events, these nail designs are versatile for various summer occasions.
– Stay Trendy: Incorporate current nail art trends, ensuring you stay stylish and on-trend this summer.
Contents
- 1. Soft Pastel Lilies
- 2. Bold and Bright
- 3. Watercolor Lilies
- 4. Minimalist Floral
- 5. Tropical Vibes
- 6. Ombre Floral
- 7. Glittery Lilies
- 8. 3D Floral Art
- 9. Negative Space Flowers
- 10. Vintage Floral
1. Soft Pastel Lilies
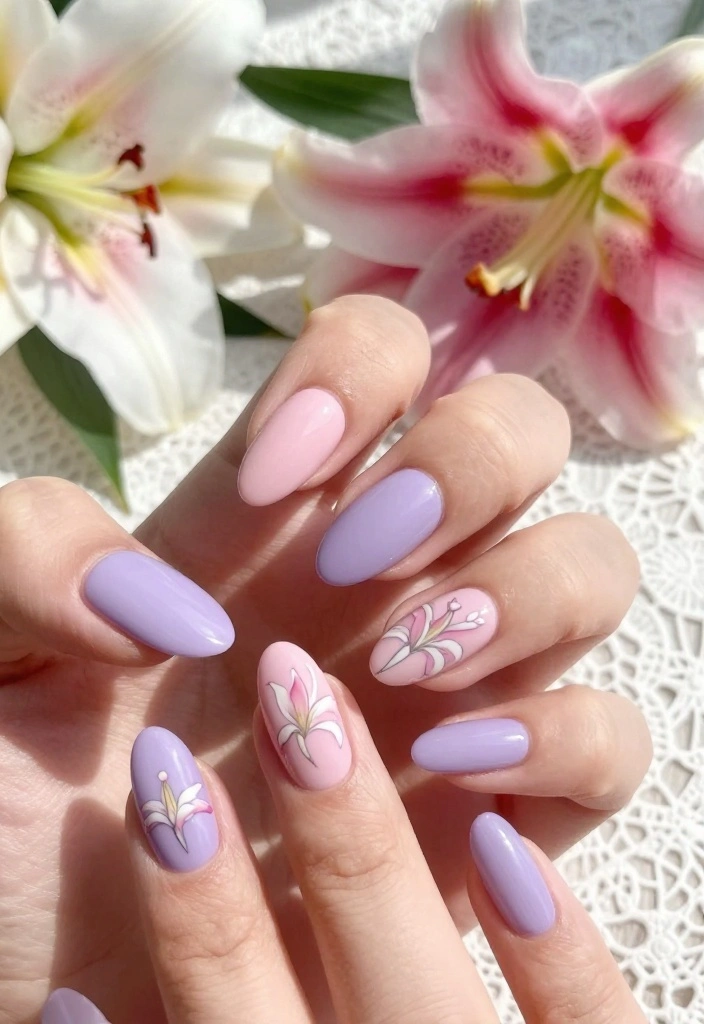
Soft pastel shades are the ultimate summer vibe. When you pair these gentle colors with delicate lily designs, it creates a serene and dreamy appearance. Think of baby pink, mint green, and light lavender—these colors evoke a calm atmosphere that’s perfect for any gathering or casual outing.
These pastels work beautifully due to their lightness, allowing the white lily designs to stand out without overwhelming your nails. Whether you’re at a brunch or enjoying a picnic, this look is effortlessly elegant.
Outfit Pieces:
– Base coat
– Soft pastel nail polishes (baby pink, mint green, light lavender)
– White and yellow nail polish for lily details
– Fine nail brush
– Glossy top coat
Styling Tips:
– Apply a protective base coat to keep your nails healthy.
– Use two coats of your pastel polish for an even and vibrant finish.
– With a fine brush, paint lily petals using white polish, layering yellow at the center for dimension.
– Finish with a glossy top coat to enhance the design and durability.
This look is perfect for day outings, casual gatherings, or any summer event. Swap in a slightly darker pastel for a bolder touch while keeping the delicate vibe intact.
Soft pastel lily nails bring a breeze of calm to summer events. Choose baby pink, mint, or lavender and let delicate lily designs pop without shouting. Pro tip: pair these shades with a quick top coat for long-lasting, kissable nails at brunch or picnics.
💅 Nail Art for Busy Moms
Transform your nails with easy, stylish designs perfect for summer vibes, even on a tight schedule!
2. Bold and Bright

If you’re a fan of striking looks, bold and bright lily nails are your go-to! Vibrant shades like fiery red, rich purple, and sunny yellow offer a stunning backdrop that’s sure to turn heads. This style is all about confidence, making it perfect for those who want their nails to be the center of attention.
This combination works because the contrast between the base color and lily accents creates a dynamic visual effect. It’s perfect for parties, nights out, or any occasion where you want to shine.
Outfit Pieces:
– Base coat
– Vibrant nail polishes (fiery red, rich purple, sunny yellow)
– Contrasting polish for lilies (hot pink or electric blue)
– Nail art brush
– Top coat (matte or glossy)
Styling Tips:
– Start with a protective base coat for longevity.
– Use a bold shade for your base and apply two coats for maximum impact.
– Create lily designs in contrasting colors for a striking effect.
– Finish with a top coat to add shine or a matte finish for an edgy look.
These nails are fantastic for celebrations, weekend outings, or any event where you want to express your vibrant personality. Consider swapping the base color for a classic black for an even bolder statement!
📹 Related Video: 🌸 Soft, Elegant & Stunning: 3D Glass Lily Nail Art Tutorial
How To Choose The Right Lily Nail Designs for Summer
Choosing the perfect lily nail design can elevate your summer style and keep your nails looking fresh and trendy. With so many options available, it can feel overwhelming. Here are some key factors to consider when selecting your lily nails for the summer season:
1. Color Palette
When it comes to summer nails, colors are crucial! Consider selecting vibrant shades that reflect the season’s energy. Think about pastel pinks, bright yellows, and bold greens. These colors not only embody the essence of summer but also provide a beautiful backdrop for floral designs. If you prefer something subtle, soft pastels can also create a charming look.
2. Nail Length and Shape
Your nail length and shape can significantly impact the final look of your lily nails. Longer nails often allow for more intricate designs, while shorter nails can still showcase beautiful floral patterns without being overwhelming. Popular shapes for summer include oval, almond, and square. Choose a shape that complements your personal style and feels comfortable for you.
3. Design Complexity
Consider how elaborate you want your lily nail design to be. For a simple, chic look, go for minimalist floral styles with a single lily on each nail. If you’re feeling adventurous, opt for 3D designs or intricate watercolor lily patterns. Remember, the more complex the design, the more time you’ll need for application, so plan accordingly!
4. Application Method
Nail art can be applied in various ways, including freehand painting, nail stickers, or stamping kits. If you’re new to nail art, nail stickers can be a great way to achieve a professional look with minimal effort. For those more experienced, freehand painting allows for unique, personalized designs. Consider which method aligns with your skills and available time.
5. Seasonal Trends
Stay ahead by incorporating current seasonal trends into your nail designs. For this summer, look for ombre floral styles, glittery finishes, or negative space designs. Following trends keeps your look fresh and exciting. You can find inspiration from social media platforms or beauty blogs showcasing popular summer nail art.
6. Personal Style
Ultimately, the best lily nail look is one that reflects your personal style. Whether you prefer bold statements or soft touches, let your creativity shine. Take the time to evaluate what colors and designs resonate with you most. Your nails are an extension of your personality, so choose a design that makes you feel confident.
Pro Tip:
Before committing to a design, you might want to practice on a nail practice wheel. This will help you visualize how different colors and styles work together. Plus, it can save you time and frustration when you finally do your nails!
With these key factors in mind, you’re ready to select your perfect summer lily nails. Whether you choose soft pastels or bold florals, enjoy expressing yourself through this fun and creative medium!
3. Watercolor Lilies
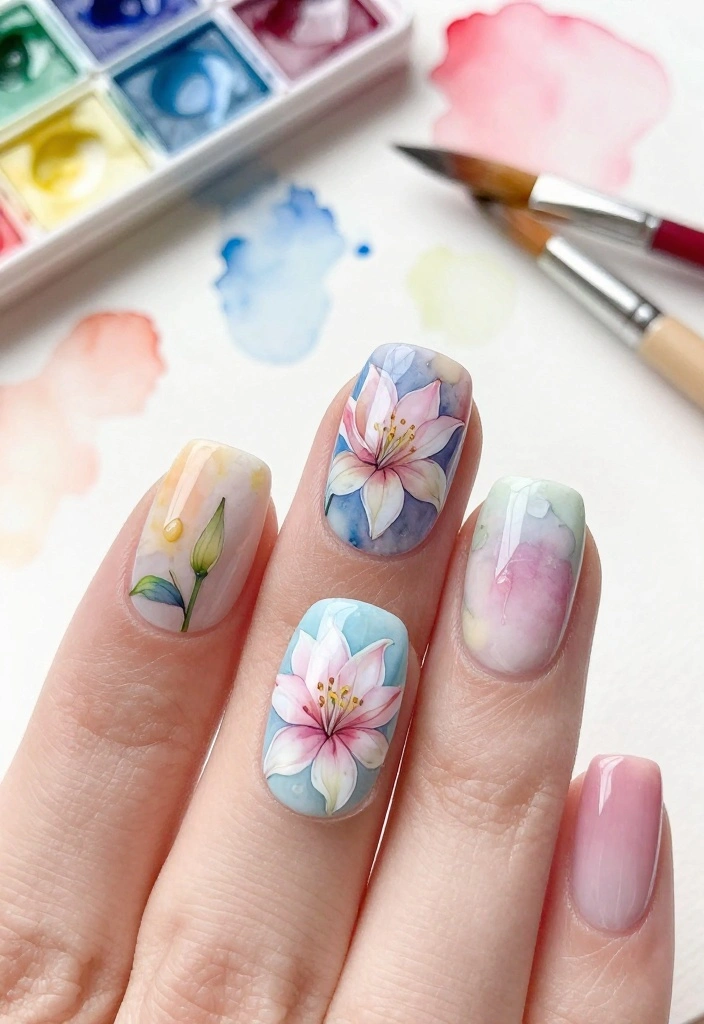
Watercolor nails are trending this summer, creating a soft and artistic lily design. This technique mimics the fluid brush strokes of watercolor paintings, allowing for a unique and ethereal look. The charm of this style lies in its unpredictability, making each nail a one-of-a-kind piece.
The blending of light colors creates a dreamy background that enhances the delicate lily outlines. This design is perfect for summer festivals, beach days, or any occasion where you want a relaxed but stylish appearance.
Outfit Pieces:
– Base coat
– Light-colored nail polishes (soft pink, pale blue, mint green)
– White polish for lily outlines
– Sponge or fine brush
– Glossy top coat
Styling Tips:
– Start with a base coat to protect your nails.
– Use a sponge to dab on your light colors for a blended effect.
– Allow your base to dry completely before outlining lilies with white polish.
– Seal your design with a glossy top coat for a polished finish.
This nail art is perfect for casual outings or summer events. Experiment with different color combinations to keep your look fresh and unique every time!
4. Minimalist Floral

Sometimes, simplicity speaks volumes! The minimalist floral look highlights just a few elegant lily designs against a neutral background, making it an ideal choice for those who prefer understated beauty. This style is perfect for office settings or casual outings where you want to maintain a chic appearance.
The muted base allows the bold lily color to shine, creating an eye-catching effect without overwhelming your nails. It’s a refined choice for any occasion where elegance is key.
Outfit Pieces:
– Base coat
– Neutral nail polish (nude, soft beige)
– Bold color for lilies (deep red or navy blue)
– Nail art brush
– Top coat (matte or glossy)
Styling Tips:
– Apply a base coat for protection and longevity.
– Choose a neutral base color to let the floral designs pop.
– Use a nail brush to create minimalist lily shapes on a couple of accent nails.
– Opt for a matte top coat for a modern finish or keep it glossy for a classic look.
This design is perfect for work events, brunches, or any occasion where you want to keep it chic yet stylish. Feel free to play with different colors to personalize your minimalist style!
5. Tropical Vibes
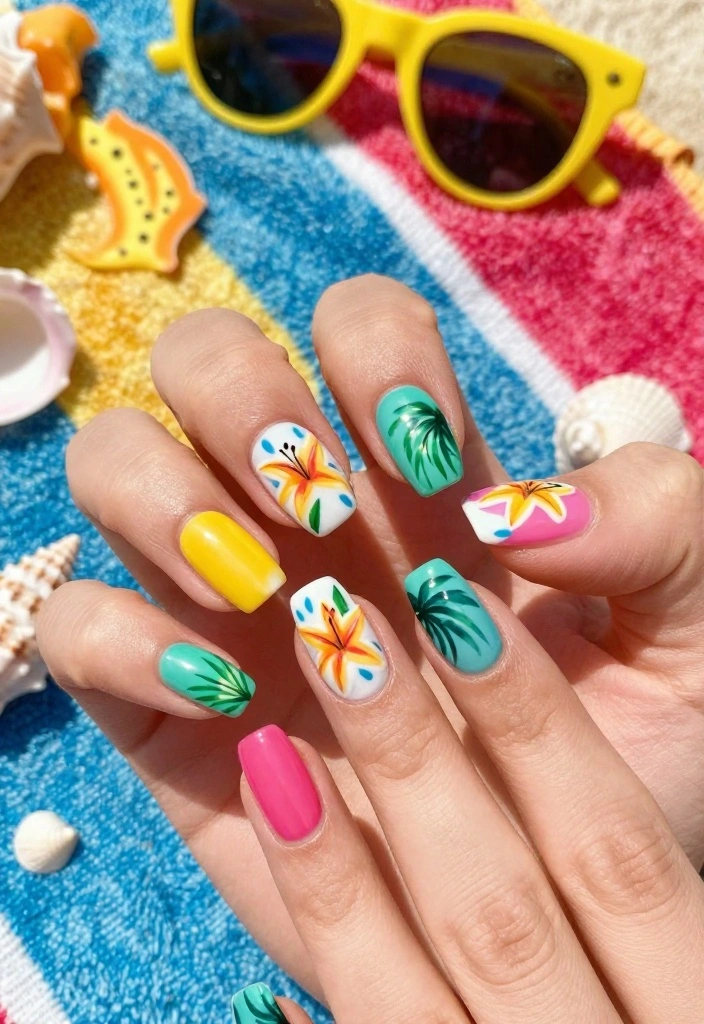
Bring a touch of the tropics to your nails with vibrant lily designs that exude summer fun! Bright greens, yellows, and corals create an energetic look, making it perfect for beach days or pool parties. This style adds a playful spirit to your summer wardrobe.
The lively colors work harmoniously to evoke a festive atmosphere, ideal for vacations or summer celebrations. Your nails will feel like a mini getaway wherever you go!
Outfit Pieces:
– Base coat
– Bright nail polishes (coral, teal)
– Dark green for leaves
– Yellow or pink for lilies
– Nail art brush
– Glossy top coat
Styling Tips:
– Apply a base coat to ensure healthy nails.
– Choose a bright base color to set the mood for your tropical look.
– Use darker green for leaves and layer bright colors for lilies.
– Seal your design with a glossy top coat to enhance brightness.
This design is a fantastic choice for beach outings, summer festivals, or any fun event. Don’t hesitate to mix and match colors for a truly vibrant nail experience!
6. Ombre Floral

Ombre nails create a stunning gradient effect, and adding floral designs elevates this look to something truly magical! The gradual color transition softens the contrast, resulting in a smooth blend that beautifully complements your floral accents. This style is perfect for those who love a touch of whimsy.
This design works well for any occasion, from casual meet-ups to more formal events, as it combines elegance with a playful touch.
Outfit Pieces:
– Base coat
– Two complementary nail polishes (light for base, dark for tips)
– Nail art brush for floral details
– Top coat
Styling Tips:
– Begin with a base coat to protect your nails.
– Use a makeup sponge to apply your ombre effect, blending colors towards the center.
– Once dry, paint delicate lilies at the tips for a cohesive look.
– Finish with a top coat to lock in your design.
This nail art is perfect for parties, date nights, or any occasion where you want to impress. Feel free to explore various color combinations to keep your look fresh and exciting!
7. Glittery Lilies

Who doesn’t love a little bling? Glittery lily nails are perfect for summer nights out, adding a glamorous touch to your floral designs. This look celebrates sparkle while enhancing the beauty of the lilies themselves.
The combination of a solid base color and glitter creates a dazzling effect that catches the light beautifully. It’s an excellent choice for parties, celebrations, or any evening event where you want to shine.
Outfit Pieces:
– Base coat
– Solid color nail polish (white, pale pink)
– Glitter polish (fine or chunky)
– Nail brush for lily details
– Top coat
Styling Tips:
– Start with a base coat to maintain nail health.
– Apply a solid color and let it dry completely.
– Layer on glitter polish for added sparkle, focusing on tips or the entire nail.
– Once dry, paint lilies on top and seal with a top coat.
This design is fantastic for summer parties, special events, or any night you want to feel extra fabulous. Don’t hesitate to mix glitter sizes for an even more dynamic look!
8. 3D Floral Art

Take your nail art to new heights with 3D floral designs! This trend showcases lily nails with added texture and depth, creating mini masterpieces that stand out beautifully. Perfect for special occasions, this design is sure to impress.
The dimensional aspect of 3D art captures attention and allows for unique expressions. It’s ideal for weddings, parties, or any event where you want to make a statement.
Outfit Pieces:
– Base coat
– Solid color nail polish
– Acrylic paint or gel for 3D effects
– Nail art tools for sculpting
– Rhinestones or beads (optional)
– Top coat
Styling Tips:
– Apply a base coat for protection and longevity.
– Paint your solid base color and allow it to dry completely.
– Use acrylic paint or gel to sculpt lily flowers, building layers for dimension.
– Optionally add rhinestones for flair and seal with a top coat.
This design is perfect for special occasions, making your nails a true conversation starter. Experiment with colors and shapes to create your own unique 3D look!
9. Negative Space Flowers
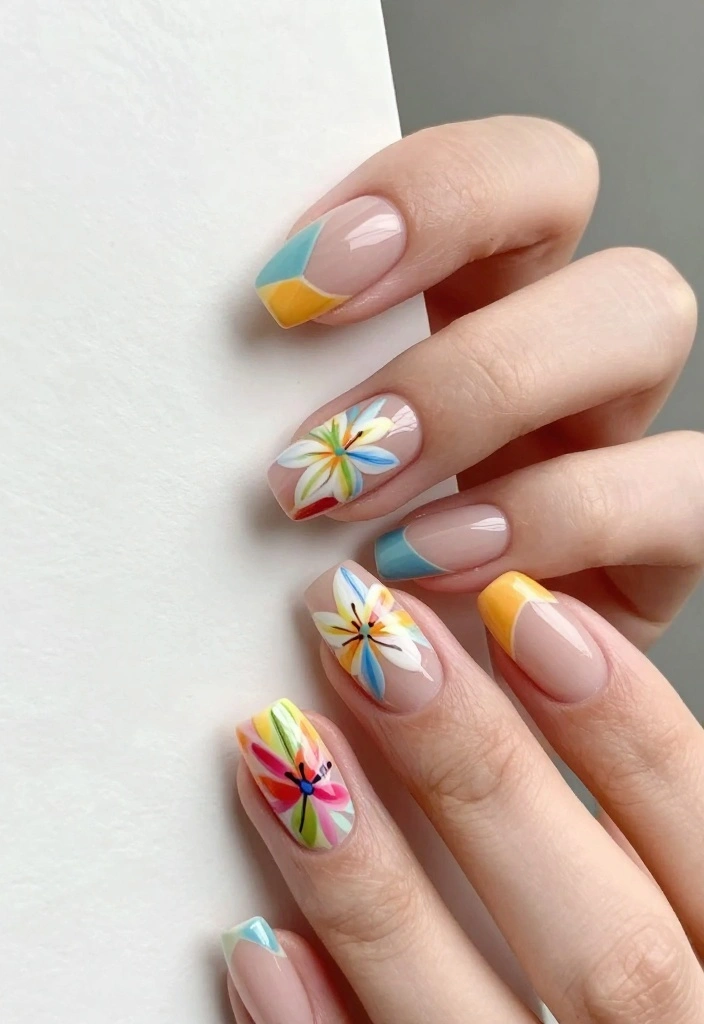
Negative space nails offer a modern twist on floral designs, letting your natural nail shine through while showcasing colorful lily accents. This technique creates a chic contrast that feels fresh and trendy. It’s perfect for those who appreciate minimalist aesthetics.
This style works well for both casual and formal occasions, making it versatile enough for any event. It’s a fun way to express creativity while keeping things sophisticated.
Outfit Pieces:
– Base coat
– Clear or nude nail polish
– Bright colors for flower sections
– Tape for geometric designs
– Nail art brush for lilies
– Top coat
Styling Tips:
– Start with a base coat to ensure healthy nails.
– Use tape to section off parts of your nails for precise designs.
– Paint desired colors in the sections, letting your natural nail peek through.
– Once dry, add lilies where desired and finish with a top coat.
This design is suitable for any occasion, from casual outings to chic events. Experiment with different geometric shapes to keep your look unique and exciting!
Fun fact: Negative space nails with lily accents can visually elongate the nail by up to 20%. This minimalist twist keeps your look fresh for casual days and formal nights, proving lily nails are surprisingly versatile.
10. Vintage Floral

Embrace retro charm with vintage floral nails that draw inspiration from classic designs! Soft, muted colors paired with intricate lily patterns evoke timeless elegance. This style is perfect for those who cherish nostalgia in their summer nails.
The combination of muted tones allows for detailed designs that pay homage to vintage aesthetics. It’s an excellent choice for garden parties, tea gatherings, or any event where you want to channel a classic vibe.
Outfit Pieces:
– Base coat
– Muted nail polishes (dusty rose, pale teal)
– Fine nail brush for details
– Textured top coat (optional)
Styling Tips:
– Begin with a base coat for protection.
– Paint your muted base color and let it dry.
– Use a fine brush to create detailed lily patterns, adding soft edges for depth.
– Optionally, apply a textured top coat to enhance the vintage feel.
This design works wonderfully for vintage-themed events, weddings, or any occasion where you want to showcase a classic style. Don’t hesitate to mix and match different vintage elements for a truly personalized look!
Vintage floral nails prove that soft, muted tones and lily patterns stay timeless. Pro tip: pair delicate lily nails with pastel shades for a retro vibe at garden parties and tea gatherings. Embrace nostalgia this summer and let your manicure be the subtle statement tying your outfit together.
Conclusion

From soft pastels to vibrant hues, these ten must-try lily nail looks will surely elevate your summer vibe! Whether you’re looking for something elegant, bold, or playful, there’s a floral design that perfectly fits your style. Don’t hesitate to share your nail art creations with friends or on social media—everyone loves a bit of nail inspiration!
So, grab your favorite colors and get those nails summer-ready. Which look will you try first? Let the floral fun begin!
Frequently Asked Questions
What exactly are lily nails, and why are they a perfect choice for summer nails?
Lily nails are nail looks inspired by the delicate petals and soft hues of lilies, giving you a fresh floral vibe that’s perfect for summer nails. They strike a balance between feminine charm and easy wearability on various lengths and shapes.
How to recreate: prep nails and apply a sheer base color like milky white or pale pink, then use a fine brush to paint lily petals in white with subtle pink shading and a touch of yellow at the center. Add tiny green leaves if you like, then seal with a glossy top coat to lock in the design.
Care tip: keep hands moisturized, avoid harsh solvents on the design, and reapply top coat every few days to maintain a blooming look all summer long.
How can I recreate the #3 lily nail look from the article, and what supplies do I need?
The #3 lily nail look combines a soft base with a refined lily motif. Gather these supplies: a sheer base color (baby pink or pale beige), white and pale yellow polish, a fine liner brush or detailing brush, a small dotting tool, stamping plate or decals for lilies if you prefer, top coat, and a nail art remover pen for cleanup.
Steps: 1) Prep nails and apply base; 2) Dry, then paint delicate lily petals using curved strokes; 3) Add a tiny yellow center and subtle green leaves; 4) Apply a glossy top coat and let cure if using gel. Pro tips: practice on a nail wheel first, and use tape to keep edges clean for a crisp finish.
Quick maintenance: avoid acetone on the design and moisturize your cuticles to keep the bloom looking fresh.
Which color combinations make lily nails pop for summer nails and floral styles?
For a bright summer vibe, pair lily nails with light pastels and clean whites. Try combos like a sheer pink base with white lilies and tiny gold accents, a mint base with white lilies, a lavender base with blush lilies, or a nude base with delicate green leaves.
Tips: use a sheer background to let the florals breathe, opt for stamping or fine-freehand petals for precision, and finish with a glossy top coat to maximize shine. These palettes align beautifully with floral styles and keep your look airy and seasonally on-trend.
How long do lily nail looks last and how can I keep them fresh through summer heat?
With proper prep and care, lily nails can last from about a week to two weeks with traditional polish, and 2-3 weeks with gel or hybrid formulas. To extend wear: use a quality base coat, apply thin, even layers, cap the free edge, and avoid prolonged exposure to hot water right after application. Reapply a top coat every 3-4 days to prevent chipping. Protect the delicate petals by wearing gloves for chores and keep cuticles hydrated with oil. With these tips, your lily nails stay vibrant through the heat of summer.
Can lily nails work on short nails or different nail shapes, and how should I adapt the floral style?
Absolutely—lily nails suit short nails and various shapes (square, oval, almond, stiletto). For short nails, opt for smaller blooms or a single accent lily on one nail, and consider negative space to keep the design readable. For longer nails and different shapes, follow the natural curves and use a fine brush or decals to create slender petals and subtle leaves. If you love variety, mix in a decal or stamping to keep the floral styles cohesive across all nails. Finish with a protective top coat for lasting shine.
Related Topics
lily nails
summer nails
floral styles
nail art
seasonal trends
easy designs
beginner friendly
trendy colors
manicure ideas
vibrant patterns
quick tips
must-try looks
I love the idea of trying out different nail looks for summer! I can’t wait to give #3 a shot—it’s so bright and fun! What colors are you all planning to try this season?
These nail designs are adorable! I tried a floral design once, but I ended up looking like I had a paint fight with my cat. Do you think I should stick to simpler styles?
Did you know that the average person spends about 4 hours a year just getting their nails done? It’s crazy how much time we dedicate to looking good! Which design do you think takes the longest?