Are you ready to dive into the world of green acrylic nails? With so many shades and styles to explore, you might find yourself craving a fresh look that stands out from the crowd. Whether it’s the allure of neon hues or the sophistication of pastel tones, there’s something magical about green acrylic nails that can brighten any day. I created this post to help you master your DIY nail game at home, ensuring that you can achieve stunning designs without the need for a salon visit.
If you’re someone who loves experimenting with your nails and enjoys the creativity that comes with nail application, this guide is just for you. From beginners to seasoned nail enthusiasts, you’ll find a wealth of tips and inspirations that cater to all skill levels. You’ll learn how to craft ten unique styles of green acrylic nails that are not only eye-catching but also embody your personal flair.
Get ready to discover an array of ideas that are fun, stylish, and absolutely perfect for any occasion. You’ll walk away with practical insights and inspiration to elevate your nail art game. Whether you’re prepping for a special event or just want to pamper yourself, these green acrylic nail designs will help you express your unique style and bring a little joy to your fingertips.
Key Takeaways
– Explore 10 distinct styles of green acrylic nails, from vibrant neon to elegant pastels, to suit any mood or occasion.
– Learn DIY tips for effective nail application, ensuring a professional look from the comfort of your home.
– Discover how to incorporate popular trends, like glitter and marble effects, into your nail designs for an added flair.
– Get practical advice on materials and tools you’ll need to create stunning green acrylic nails successfully.
– Unlock your creativity with seasonal inspirations, allowing you to adapt your nail designs throughout the year.
Contents
- 1. Neon Green Pop
- 2. Pastel Green Elegance
- 3. Emerald Glam
- 4. Green Marble Effect
- 5. Minty Fresh Designs
- 6. Green French Tips
- 7. Glittery Green Dream
- 8. Textured Accents
- 9. Botanical Nail Art
- 10. Seasonal Green Styles
1. Neon Green Pop
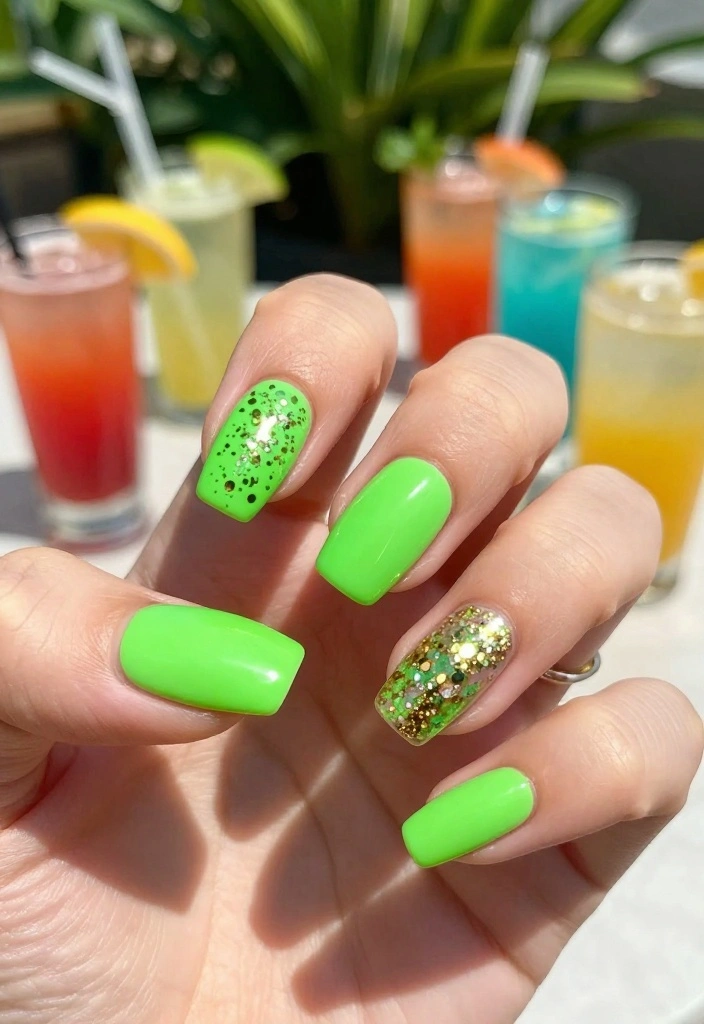
If you want to stand out, neon green is your go-to color! This vibrant hue grabs attention and is a fun choice for summer parties or lively nights out. The boldness of neon green adds an exciting element, making your nails the highlight of your look. For easy application, start with a base coat, followed by two layers of neon polish, and finish with a top coat for that high-shine finish.
– Consider a matte top coat for a trendy twist.
– Use clear nail tape to create eye-catching geometric designs.
– Pair with gold or silver nail art to elevate the glam factor.
With neon green, your nails can truly shine as the ultimate accessory!
📹 Related Video: NEON GREEN ACRYLIC NAILS
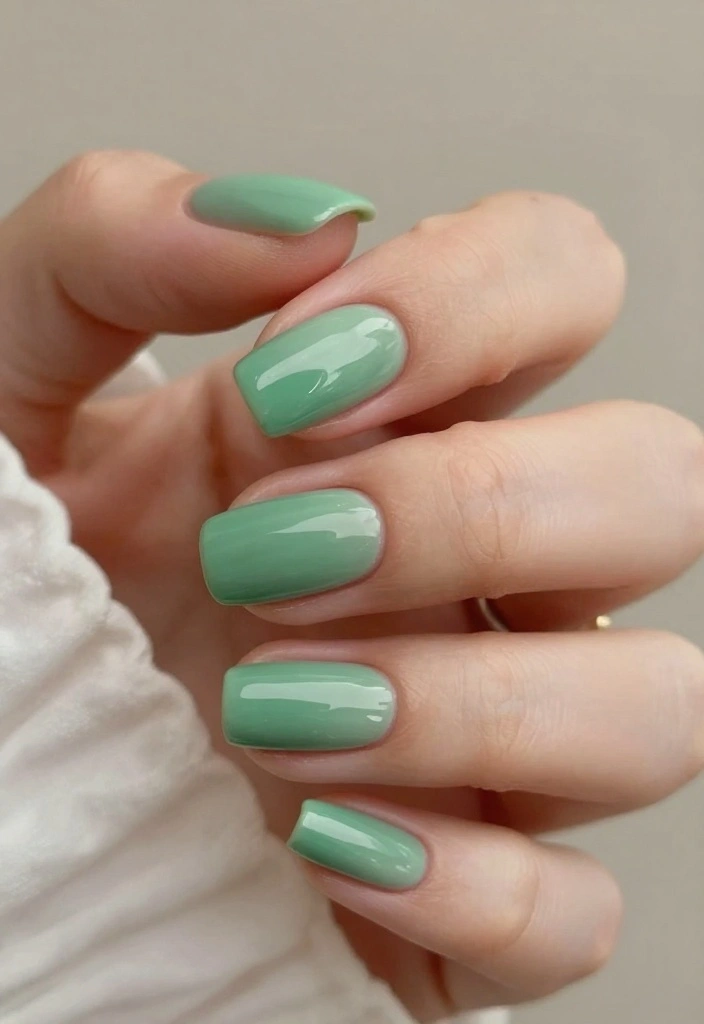
2. Pastel Green Elegance

Pastel green nails offer a soft, chic alternative for those who prefer a more understated look. These gentle shades are perfect for both casual outings and formal events, providing a delicate touch. To achieve this elegant style, start with a light green base coat and apply two thin layers for a smooth finish.
– A matte top coat can add a sophisticated finish.
– Blend pastel green with white for a dreamy ombre effect.
– Floral nail stickers can enhance the charm of your manicure.
Pastel green is versatile and pairs effortlessly with a range of outfits!
Fun fact: pastel green nails read as 30% calmer in photos, especially with a matte top coat. For green acrylic nails, apply a light green base, build with two thin coats for smooth coverage, then seal with a matte top coat for lasting elegance.
3. Emerald Glam
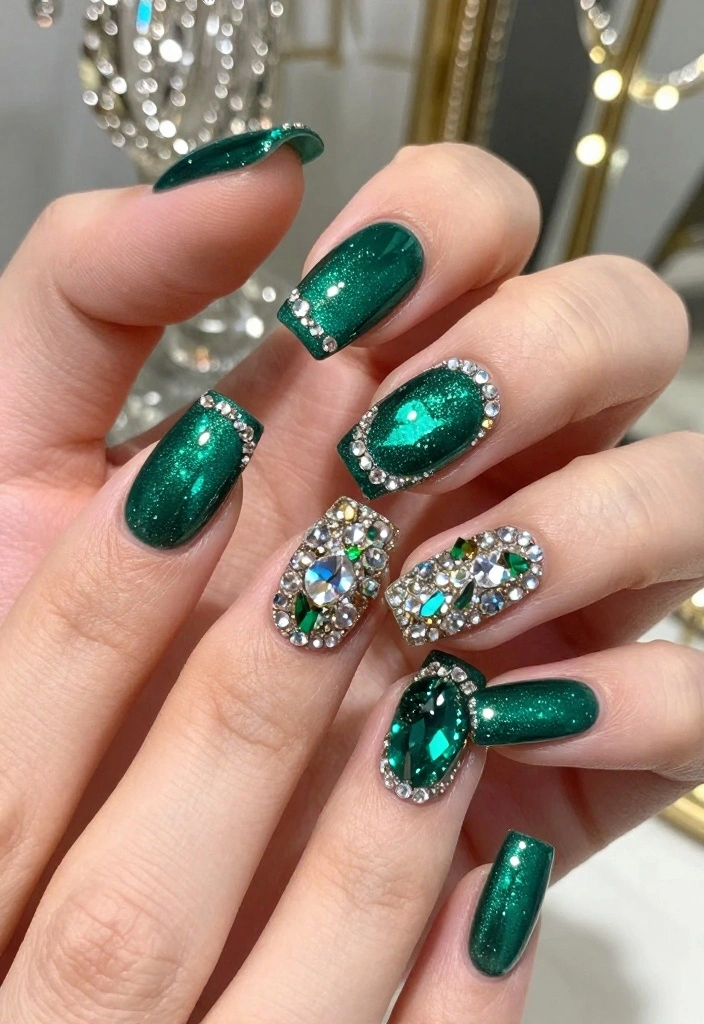
Emerald green exudes luxury and sophistication, making it a stunning choice for special occasions. This rich, deep shade is perfect for whenever you want to feel pampered. Start by applying a strong base coat to protect your nails, then follow with two coats of emerald polish for a luscious finish.
– Add rhinestones or gold accents for an extra touch of glam.
– Consider a half-moon design for a unique twist.
– Incorporate foil for a metallic shine that adds depth.
Emerald nails are sure to leave a lasting impression and are perfect for elegant events.
4. Green Marble Effect
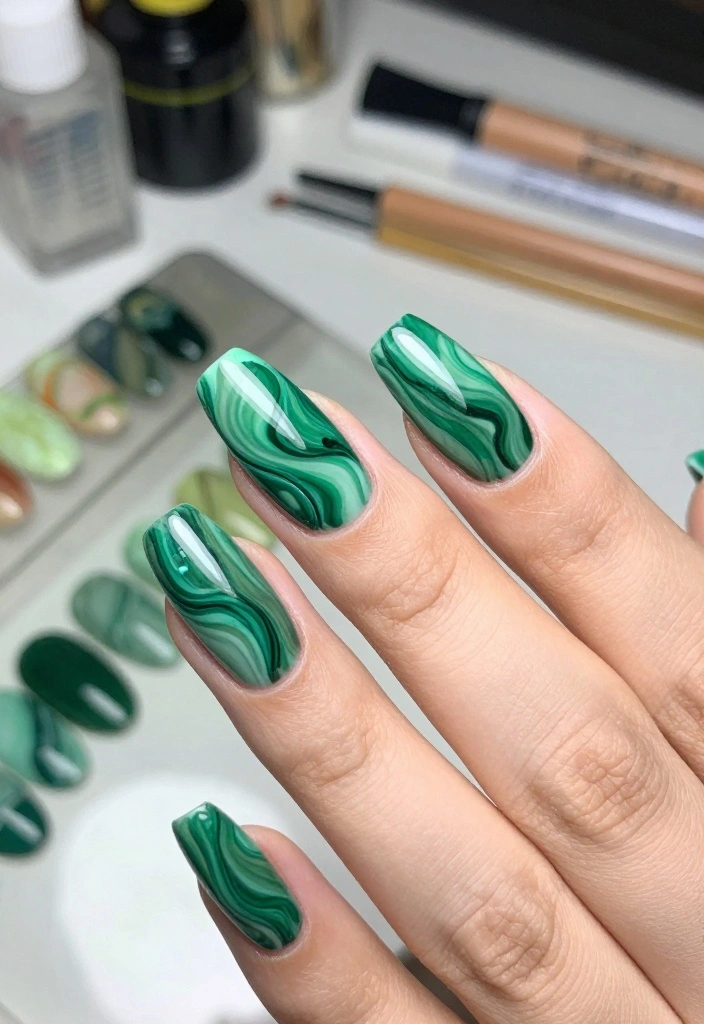
The green marble effect is a trendy design that adds a modern touch to your nails. While it may seem complex, it’s actually quite simple to achieve! Start with a white or black base coat, then swirl in your chosen green shades using a nail art brush to create that beautiful marbled effect.
– Seal your design with a clear top coat to enhance the marble look.
– Mix different shades of green for a more dynamic finish.
– If you’re new to marbling, practice on a nail wheel first.
This effect not only looks stylish but also allows you to unleash your creativity!
Fun fact: Marble nails start with a white or black base, but you only need 2-3 green shades to add depth. Practice on a nail wheel for 8-10 minutes, and your green acrylic nails will swirl more naturally.
💅 DIY Nail Art Magic
Transform your busy schedule into stunning nail art with this essential guide for trendy moms on the go!
5. Minty Fresh Designs

Mint green nails are a refreshing choice that brings a playful vibe to your look. This lively color is fantastic for spring and can really make your nails pop! Start with a mint green base, then get creative with nail art using white or pastel shades for fun designs like stripes or polka dots.
– Nail tape helps create clean lines for your patterns.
– Tiny flowers or butterflies can add a whimsical touch.
– Finish with a glossy top coat to enhance the shine of your design.
Minty green is trendy and can brighten up any outfit!
6. Green French Tips
Revamping the classic French manicure with a green twist can breathe new life into your nails. Instead of the usual white tip, try painting your nails with a nude or light pink base and adding a vibrant green tip. This updated version is both classy and playful!
– Experiment with various shades of green for your tips to create a unique style.
– A glittery green can add a festive feel to your manicure.
– Use striping tape to ensure clean, precise lines.
Green French tips are perfect for any occasion, offering a fresh spin on a timeless look.
Fun fact: 70% of nail artists say a nude base with a bold green tip elevates green acrylic nails from chic to wow. Try 2–3 greens and a glitter accent to discover your standout look.
How To Choose the Right Green Acrylic Nails
When it comes to creating stunning green acrylic nails at home, choosing the right products is essential. You want nails that not only look great but also last long and feel comfortable. Here’s a guide to help you select the best materials and techniques for your DIY nails.
1. Nail Length
Decide on the length of your acrylic nails. Short nails offer a more practical and manageable look, while long nails can be a bold statement. If you are new to acrylic application, consider starting with a shorter length to make the process easier. Remember, the length will also affect the final design.
2. Nail Shape
Choosing the right nail shape is equally important. Popular shapes include almond, stiletto, square, and coffin. Almond shapes can elongate the fingers, while square shapes offer a chic, modern look. Consider your personal style and how each shape complements your hands.
3. Acrylic Product Quality
Invest in high-quality acrylic powder and liquid. Poor-quality products may lead to lifting or breakage. Look for brands with good reviews and consider products specifically designed for DIY nail enthusiasts. Reading labels and customer feedback can guide your choice.
4. Green Shades
Explore different shades of green for your acrylic nails. From pastel to neon, the color you choose can dramatically change the look. Think about the occasion and your personal style. Don’t hesitate to mix and match shades for a unique effect.
5. Nail Art Supplies
For intricate designs, gather additional nail art supplies like brushes, gems, glitters, and stickers. These will allow you to personalize your green acrylic nails and create eye-catching designs. Make sure your tools are clean and suitable for acrylic application.
6. Application Techniques
Familiarize yourself with acrylic application techniques. Watch tutorials or read guides on nail application to improve your skills. Practice makes perfect. Understanding techniques like nail filing, buffing, and shaping will elevate your final look.
Pro Tip: Start with a practice set of false nails to get the hang of the process before working on your natural nails. This way, you can refine your technique without any pressure.
With these selection criteria in mind, you’ll be well on your way to mastering the art of green acrylic nails at home. Choose wisely, and let your creativity shine through!
7. Glittery Green Dream

For sparkle lovers, glittery green nails can create an eye-catching effect! Start with a green base polish and then layer on glitter for a dazzling finish. You can use a glitter top coat for an even application or sprinkle fine glitter for a textured look.
– Mixing different sizes of glitter adds depth and dimension.
– Use a sponge to blend glitter onto the tips for a gradient effect.
– A gel top coat will help your glitter last longer.
Glittery green nails are a fabulous way to inject some excitement into your nail art!
8. Textured Accents

Adding texture to your green acrylic nails can truly set your design apart! Use textured powders or gels to create unique surface patterns. Combining shiny green polish with matte or sand-textured accents offers visual interest.
– Apply a matte top coat on some nails while keeping others glossy for contrast.
– Incorporate raised elements like studs or beads for additional flair.
– Be sure to seal everything with a clear top coat for durability.
Textured accents will turn your nails into a creative masterpiece!
9. Botanical Nail Art

Infuse your nails with nature by trying botanical nail art! Think leaves, vines, or floral patterns layered over a green base. This trendy look gives a personal touch to your nail design. You can use nail art brushes or stamping plates for intricate designs.
– Use various shades of green for leaves to create dimension.
– Adding small gems or pearls can elevate the overall look.
– Practice on a nail wheel before applying designs to your nails.
Botanical designs are a fun way to showcase your love for nature!
10. Seasonal Green Styles

Incorporating seasonal themes into your green nail designs keeps things fresh and exciting. For autumn, darker greens paired with gold accents look stunning, while light greens and pastels shine in spring. Consider the seasonal palette and add designs like snowflakes for winter or colorful leaves for fall.
– Change your nail patterns monthly to maintain interest.
– Look for seasonal nail art stickers to simplify the process.
– Remember to showcase your personal style within these seasonal designs!
Seasonal green styles offer endless creativity while ensuring your nails stay relevant all year round!
Conclusion

Mastering the art of green acrylic nails at home offers both a creative outlet and a chance to express your style. With these ten inspirations, you’re well-equipped to try various techniques and designs that highlight the versatility of green. Don’t hesitate to experiment and find what works best for you – happy nail painting!
Show us your stunning green acrylic nails, and don’t forget to share your designs with your friends!
Frequently Asked Questions
What essential supplies do I need to create green acrylic nails at home?
Getting a great set of green acrylic nails starts with the right supplies.
Gather a dehydrator and primer, a quality monomer and polymer powder, an acrylic brush, and nail forms or tips for your DIY nails.
Add a jar of green acrylic powder, a base coat, a top coat, and a quick-dry lamp if you’re using LED/UV curing.
Don’t forget a nail file, buffer, cuticle pusher, cleanup brush, acetone for cleanup, and a dust brush to keep your workspace tidy.
With these essentials, you’re ready to begin nail application at home.
What is the fastest way to achieve salon-quality green acrylic nails at home?
Skip guesswork by following a clean, repeatable routine for green acrylic nails at home.
Start with proper preparation: push back cuticles, file nails to shape, and dehydrate the nail plate.
Apply tips or forms to extend length, then mix a small bead of monomer with polymer and place it close to the cuticle without touching it.
Build in thin layers, curing as needed, and cap the free edge for durability.
Finish with a smooth file, a generous layer of top coat, and a UV/LED cure if required. You’ll get a salon-like finish without leaving your house.
How can I prevent chipping and maximize durability of green acrylic nails?
Durability begins at prep. Start with clean, oil-free nails and apply dehydrator and primer for better adhesion.
Use thin, even layers of green acrylic powder and avoid flooding the cuticle. Seal the tip edge and cap the free edge with a final bead.
After application, guard against moisture and heat by waiting the recommended curing time and avoiding harsh solvents. Maintain nails with regular filing and a top coat reapplication every 1–2 weeks. This will help your DIY nails stay sturdy longer.
Can I customize green acrylic nails with designs or patterns?
Absolutely! Green acrylic nails are a perfect canvas for fun designs. Try marbling with white or gold, add glitter or foil accents, or create stripes and geometric patterns with a fine brush. After laying the green base, use tiny brushes to paint details or apply nail decals. Finish with a glossy top coat to seal the design and keep it durable for DIY nails.
What are common mistakes beginners make with green acrylic nails and how can I fix them?
Common beginner mistakes include thick, bulky nails, air bubbles, and skipping proper prep. Start with clean, oil-free nails, use a small amount of monomer, and work in controlled beads to avoid lumps. Make sure to shape nails evenly and don’t flood the cuticle. If you notice lifting, re-dehydrate and re-apply a primer. If you end up with rough surfaces, lightly file, then buff and recoat. Practicing with less ambitious length helps you master nail application before going long with green acrylic nails.
Related Topics
green acrylic nails
nail application
DIY nails
beginner friendly
nail art techniques
trendy nail designs
easy nail tutorials
home manicure
fashion nails
nail care tips
seasonal nail trends
quick nail hacks
I love the ideas you shared for green acrylic nails! I tried a similar shade last week, and now I feel like a walking piece of art. What’s your favorite green shade to use?
These tips are awesome! I once painted my nails green for St. Patrick’s Day, but it turned out more like slime than anything else. What a look! 😂
Did you know that green is often associated with balance and growth? It’s no wonder it looks so good on nails! I can’t wait to try out your suggestions.
I remember the first time I tried acrylic nails at home. I ended up with more glue on my fingers than on the nails! Now I just take my time and it’s so much better. Have you had any funny nail mishaps?