The holiday season is upon us, and with it comes the excitement of festive gatherings, parties, and celebrations. This time of year always reminds me of twinkling lights, cozy gatherings, and, of course, the perfect nail designs that can truly elevate any holiday look. If you’re someone who loves to express your holiday spirit through fashion, especially nail art, you’re in for a treat! I’ve pulled together a collection of 18 stunning red Christmas nail designs that will make you the star of the party.
Whether you’re a nail art enthusiast or just looking for some fresh nail ideas, this post is for you. You’ll find a variety of festive designs that cater to every style and skill level. From classic looks to trendy patterns, these designs will help you celebrate the season in style. With this guide, you’ll not only get inspiration for your next manicure but also some practical tips on how to achieve these dazzling looks at home or at the salon.
So, get ready to dive into a world of festive nail art! You’ll discover designs that are eye-catching, fun, and perfect for showing off at holiday celebrations. Whether you prefer a touch of sparkle or something more understated, this post will have ideas that resonate with every taste.
Key Takeaways
– Explore 18 unique red Christmas nail designs: Each design is crafted to bring festive cheer and can suit a variety of tastes, from minimalist to extravagant.
– Find inspiration for every occasion: Whether it’s a casual holiday gathering or a glamorous party, there’s a nail idea for every event.
– Get tips on executing each design: The guide includes practical advice to help you recreate these festive designs at home or with your nail technician.
– Discover materials and techniques: Learn about the different nail art tools and products you’ll need to achieve a professional finish.
– Embrace the holiday spirit: These festive nail designs will not only elevate your look but also spread joy and cheer throughout the holiday season.
Contents
- 1. Classic Red with Gold Glitter
- 2. Candy Cane Stripes
- 3. Snowflake Elegance
- 4. Festive French Tip
- 5. Glitter Ombre
- 6. Reindeer Nail Art
- 7. Holly and Berries
- 8. Plaid Patterns
- 9. Glitter Snowy Tips
- 10. Christmas Lights Nail Art
- 11. Frosted Glitter
- 12. Gemstone Accents
- 13. Warm Cocoa and Marshmallows
- 14. Christmas Sweater Patterns
- 15. Christmas Present Wraps
- 16. Vintage Christmas Ornaments
- 17. Bright Berry Tips
- 18. Grinch-Inspired Nail Art
1. Classic Red with Gold Glitter

The timeless pairing of vibrant red and shimmering gold glitter is a holiday favorite. It exudes elegance while maintaining a festive flair, making it perfect for any celebration. The deep red base serves as a bold canvas, enhanced by the sparkle of glitter that catches the light beautifully.
This design works well for both chic parties and casual family gatherings, offering a touch of sophistication without being over the top.
Outfit Pieces:
– Deep red nail polish (choose a matte or glossy finish)
– Gold glitter nail polish (fine glitter is preferred)
– Clear top coat (for added shine and protection)
Styling Tips:
– Begin with one coat of deep red nail polish and allow it to dry thoroughly.
– Apply a second coat for a richer color before adding glitter.
– Use a fine brush to apply gold glitter on the ring finger for an accent effect.
– Seal everything with a clear top coat to prevent chipping and maintain shine.
This look is easily adaptable; swap the glitter for a different metallic to suit various occasions, or keep the design simple by using just the red polish for a classic vibe.
2. Candy Cane Stripes
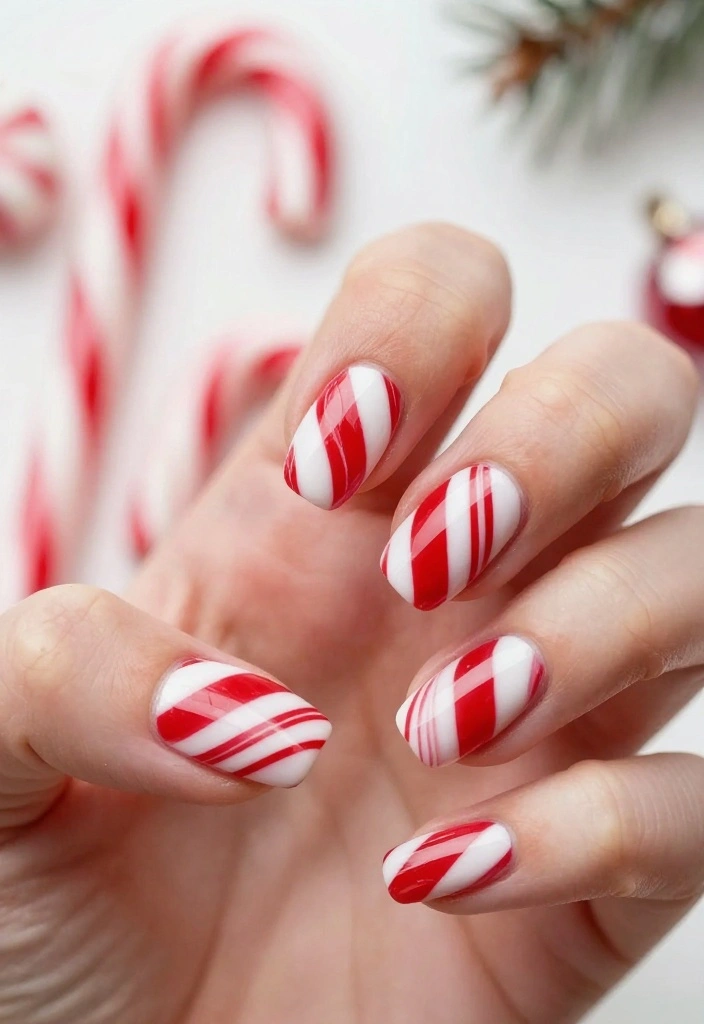
Capture the playful spirit of the season with festive candy cane stripes on your nails. This cheerful design brings a sense of whimsy to your holiday look, making your nails a fun focal point. The bright red contrasting with crisp white creates a vibrant visual that echoes holiday traditions.
Ideal for holiday parties or casual get-togethers, this design effortlessly conveys a sense of joy and celebration.
Outfit Pieces:
– White nail polish (for the base coat)
– Red nail polish (for the stripes)
– Clear top coat (to finish the look)
– Striping tape (optional for precise lines)
Styling Tips:
– Start with two coats of white polish, allowing it to dry completely.
– Use striping tape to create neat diagonal lines for the red stripes.
– Fill the uncovered areas with red nail polish, removing the tape right after.
– Finish with a clear top coat to ensure longevity and shine.
This design is versatile; you can mix it up by alternating nail colors or adding a matte finish for a trendy touch.
💅 DIY Nail Art Made Easy
Transform your holiday nails effortlessly with our guide designed for busy moms who love festive flair!
3. Snowflake Elegance

Embrace the beauty of winter with a stunning snowflake nail design. The rich crimson background serves as a perfect backdrop for delicate white snowflakes, creating a striking contrast that’s both festive and elegant. Adding a hint of silver or holographic glitter enhances the frosty effect, making your nails truly eye-catching.
This design is perfect for Christmas celebrations, but it can easily transition into New Year’s festivities, keeping you stylish throughout the season.
Outfit Pieces:
– Crimson nail polish (for a luxurious base)
– White nail pen or polish (for snowflakes)
– Silver glitter polish (optional for sparkle)
– Clear top coat (for durability)
Styling Tips:
– Apply two coats of crimson nail polish for a bold base.
– Use a nail pen to create intricate snowflakes on select nails.
– If desired, sprinkle silver glitter to mimic the sparkle of snow.
– Seal your design with a clear top coat for lasting wear.
Feel free to customize this look by varying the snowflake designs on each nail or using different base colors to match your outfit.
Snowflake elegance on crimson nails proves that red christmas nail designs can be festive and chic. Try a deep red base with white snowflakes and a touch of silver glitter for a frosty, party-ready look—perfect for Christmas and New Year celebrations.
📹 Related Video: QUICK AND SIMPLE CHRISTMAS NAIL ART DESIGN| CLASSIC RED XMAS NAIL TUTORIAL| SNOWFLAKE NAILS
4. Festive French Tip
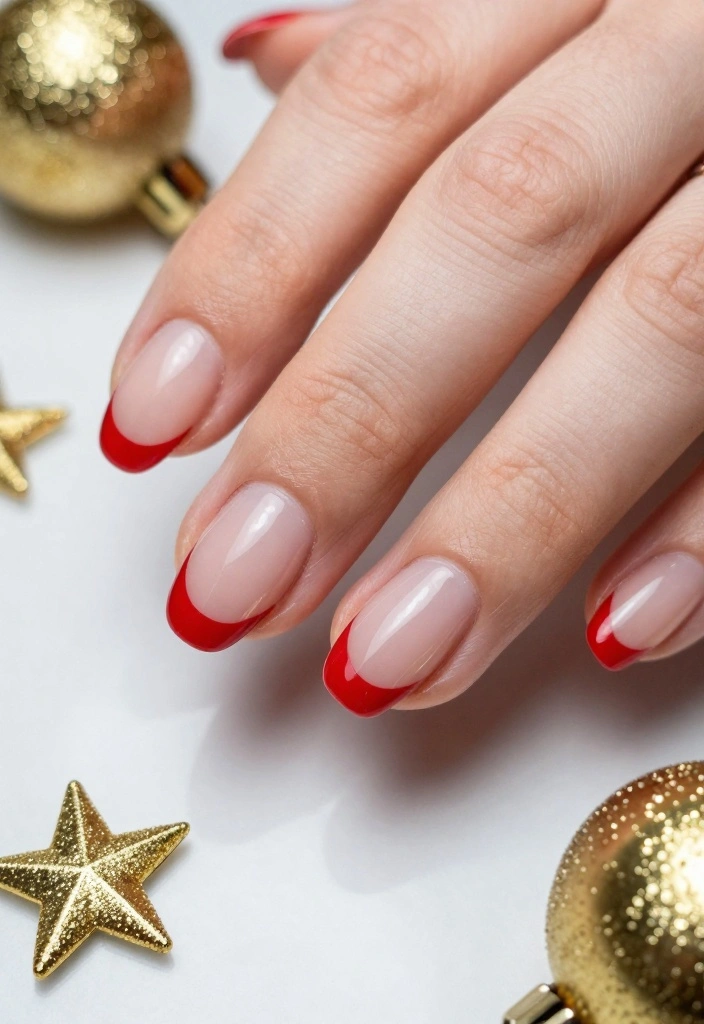
Put a festive twist on the classic French tip by opting for a vibrant red instead of the traditional white. This updated take maintains the elegance of the original while adding a festive touch perfect for holiday gatherings. A sheer pink or nude base keeps the look sophisticated and timeless.
This design is suitable for everything from office parties to family dinners, making it a versatile choice for the season.
Outfit Pieces:
– Sheer pink or nude nail polish (for the base)
– Red nail polish (for the tips)
– Gold star stickers or fine glitter (optional for embellishment)
– Clear top coat (to finish)
Styling Tips:
– Apply a base coat of sheer polish and let it dry completely.
– Use red polish to create bold tips, adjusting the curve with a dotting tool for perfection.
– Add gold star stickers or glitter for an extra festive flair.
– Seal everything with a clear top coat to enhance shine and longevity.
You can also experiment with different shades of red to find the perfect match for your holiday attire.
5. Glitter Ombre

If you love a touch of glam, then the glitter ombre design is a perfect choice. This look combines the elegance of an ombre effect with the sparkle of glitter, creating a festive and eye-catching style. Starting with a rich red base, the gradual blend of glitter towards the tips adds a dazzling finish.
This design is perfect for holiday parties, offering a blend of simplicity and sparkle that suits various festive occasions.
Outfit Pieces:
– Red nail polish (for the base)
– Gold or silver glitter polish (for the ombre effect)
– Clear top coat (for a glossy finish)
Styling Tips:
– Apply two coats of red nail polish and let dry.
– Use a makeup sponge to dab glitter at the tips, blending it downwards for a seamless ombre effect.
– Continue applying glitter until you achieve the desired blend, then seal with a clear top coat.
This look can easily be adapted by using different base colors or glitters for various occasions, making it a versatile choice for the season.
Fun fact: glitter ombre elevates red christmas nail designs with sparkle that catches the light at every party. Start with a rich red base, then a subtle glitter fade toward the tips for a glam, wearable finish. It’s stylish, festive, and surprisingly simple to pull off.
6. Reindeer Nail Art

Bring the whimsy of Christmas to your nails with charming reindeer nail art. This playful design features a base coat of soft brown or taupe, with a cute reindeer face painted on the ring finger. The solid red or simple accent designs on the other nails keep the focus on the adorable reindeer.
It’s a fun way to showcase your holiday spirit, perfect for gatherings with friends and family.
Outfit Pieces:
– Brown or taupe nail polish (for the reindeer base)
– Red nail polish (for the nose)
– White nail polish (for the eyes)
– Clear top coat (to seal the look)
Styling Tips:
– Start with a base of brown or taupe polish on all nails.
– Paint a reindeer face on the ring finger using red for the nose and brown for the face.
– Add white details for the eyes and finish with a clear top coat for longevity.
This design can be paired with holiday outfits for an extra festive touch, or you can simplify it by using just the brown base for a more understated look.
7. Holly and Berries

Capture the essence of the season with a lovely holly and berries nail design. Starting with a deep red base, small green holly leaves and tiny red berries are painted on for a charming festive touch. This simple yet elegant design embodies the holiday spirit perfectly.
It’s a delightful choice for Christmas parties, easily transitioning into New Year’s celebrations with its cheerful aesthetic.
Outfit Pieces:
– Deep red nail polish (for the base)
– Green nail polish (for the holly leaves)
– Red nail polish (for the berries)
– Clear top coat (to finish)
Styling Tips:
– Start with two coats of deep red polish.
– Use a fine brush to create holly leaves and berries on selected nails.
– Optionally, add gold or silver foil for added sparkle.
– Seal with a clear top coat to keep your design intact.
This design is versatile; you can create a full set of holly nails or use it as an accent for a more subtle approach.
8. Plaid Patterns

Bring the cozy spirit of the holidays to your nails with a stylish plaid pattern. Starting with a solid red base, you can create plaid designs using white and black polish for a trendy yet festive look. The combination of colors gives a playful nod to classic holiday attire while keeping your nails chic.
This design is perfect for holiday gatherings, allowing you to show off your festive style.
Outfit Pieces:
– Red nail polish (for the base)
– White nail polish (for the plaid)
– Black nail polish (for accents)
– Clear top coat (to seal the design)
Styling Tips:
– Apply two coats of red nail polish for a vibrant base.
– Create plaid patterns with a fine brush using white and black polish.
– Make sure your lines are crisp for the best visual impact.
– Finish with a clear top coat for extra durability.
This design is versatile; you can mix and match colors or create different plaid styles to suit your unique taste.
9. Glitter Snowy Tips

Combine elegance and festive charm with a snowy tips design that features glitter. Starting with a classic red base, you can create snowy tips using white polish and add a sprinkle of glitter for a dazzling effect. This design is simple yet striking, perfect for showcasing your holiday spirit.
It’s ideal for parties or casual gatherings, allowing you to keep things festive without too much fuss.
Outfit Pieces:
– Red nail polish (for the base)
– White nail polish (for snowy tips)
– Fine glitter polish (for sparkle)
– Clear top coat (to finish)
Styling Tips:
– Apply two coats of red nail polish and let dry.
– Use white polish to create a snow-dipped effect at the tips.
– While the white polish is still wet, sprinkle fine glitter on the tips.
– Seal with a clear top coat to keep everything fresh and shiny.
This design is easily adaptable; you can swap colors or adjust the glitter amount to suit your personal style.
Did you know that 68% of holiday selfies highlight red Christmas nail designs first? Snowy tips with glitter make nails pop in photos for hours, so you stay festive from party to afterparty.
How To Choose the Right Red Christmas Nail Designs
Choosing the perfect red Christmas nail designs can be a fun yet overwhelming task. With so many festive options available, it’s essential to narrow down your choices based on a few key criteria. Here are some tips to help you select the best designs for your holiday celebrations.
1. Consider Your Style
Think about your personal style when selecting red Christmas nail designs. Do you prefer classic elegance, playful themes, or bold statements? A classic red with gold glitter is timeless, while candy cane stripes can add a fun twist. Choose a design that resonates with your personality to ensure you feel confident showing off your nails.
2. Nail Length and Shape
Your nail length and shape can influence how certain designs look. Short nails may suit simple patterns like a festive French tip or minimalist snowflakes. Longer nails can handle more intricate designs, such as reindeer art or Christmas sweater patterns. Choose a design that complements your nail shape for the best results.
3. Occasion and Theme
Consider the events you’ll be attending during the holiday season. If you’re going to a formal party, elegant designs like snowflakes or frost glitter might be ideal. For casual gatherings, playful styles like Christmas lights or Grinch-inspired nail art can add a festive touch. Match your nail art to the occasion to make a lasting impression.
4. DIY vs. Professional Application
Decide whether you want to do your nails yourself or visit a salon. Some designs, like ombre or plaid patterns, can be tricky to execute at home without practice. If you’re a beginner, simpler designs might be more achievable. For intricate nail art, consider booking a professional. They can create stunning looks that might be challenging to replicate on your own.
5. Nail Health
Always keep your nail health in mind. If your nails are weak or brittle, opt for designs that don’t require extensive filing or harsh chemicals. Consider using gel polish, which can be more durable and chip-resistant. Healthy nails will make any design look better, so prioritize nail care as you choose your festive looks.
6. Seasonal Trends
Stay updated on current trends in nail art for the holiday season. Check social media platforms for inspiration and ideas. Popular designs can include glittery ombre, gemstone accents, or plaid patterns. Incorporating trending styles can help you feel more connected to the festive spirit and keep your look fresh.
Pro Tip: Before finalizing your design, test it on a single nail. This way, you can gauge how you feel about the look and make adjustments if needed. This simple step can save you time and ensure you’re excited about your nails for the holiday festivities!
With these tips, you’re now equipped to choose the perfect red Christmas nail designs. Enjoy the process and let your creativity shine this holiday season!
10. Christmas Lights Nail Art

Celebrate the joy of the season with playful Christmas lights on your nails! Starting with a bright red base, you can paint colorful lights strung across your nails for a cheerful design. This nail art is sure to bring smiles and brighten up any holiday celebration.
It’s a fun, festive choice that showcases your creative side, making it perfect for parties or family gatherings.
Outfit Pieces:
– Bright red nail polish (for the base)
– Various colored nail polishes (for the lights)
– Clear top coat (to finish)
Styling Tips:
– Apply a base of bright red nail polish and let dry.
– Paint little dots in different colors to create the Christmas lights.
– Optionally, use a fine brush to create the string connecting the lights.
– Seal with a clear top coat for a glossy finish.
This design is versatile; you can customize the colors of the lights or adjust the patterns based on your festive mood.
11. Frosted Glitter

Elevate your holiday nails with a frosted glitter design that captures the essence of winter. Starting with a deep red base, layering a soft frost or shimmer top coat adds an icy feel. Sprinkling fine white glitter at the tips or around the cuticles enhances the design, resembling freshly fallen snow.
This look is charming and elegant, perfect for holiday events where you want to stand out.
Outfit Pieces:
– Deep red nail polish (for the base)
– Frost or shimmer top coat (for the frosted effect)
– Fine white glitter (for added texture)
– Clear top coat (to seal)
Styling Tips:
– Apply two coats of deep red nail polish and let dry.
– Layer a frost or shimmer top coat for a frosty finish.
– Sprinkle fine white glitter over your nails, focusing on the tips or cuticles.
– Seal everything with a clear top coat for shine and durability.
This design can be adapted with different base colors or types of glitter, allowing for personalization to fit your style.
12. Gemstone Accents

Add a touch of luxury to your nails with sparkling gemstone accents! Starting with a rich red base, small faux gems or rhinestones can be applied at the base or along the cuticles for a glamorous finish. The glimmer of the gems against the polished red creates an elegant look that’s perfect for holiday parties.
This design is all about sophistication while maintaining a festive spirit, making it a standout choice for special occasions.
Outfit Pieces:
– Rich red nail polish (for the base)
– Faux gemstones or rhinestones (for accents)
– Nail glue (to secure the gems)
– Clear top coat (to finish)
Styling Tips:
– Apply two coats of red nail polish and let dry.
– Use nail glue to attach faux gemstones at the base or along the cuticles.
– Seal with a clear top coat to ensure your design stays intact.
You can also mix and match gemstone colors to enhance your holiday outfit, or keep it simple with fewer accents for a chic look.
13. Warm Cocoa and Marshmallows
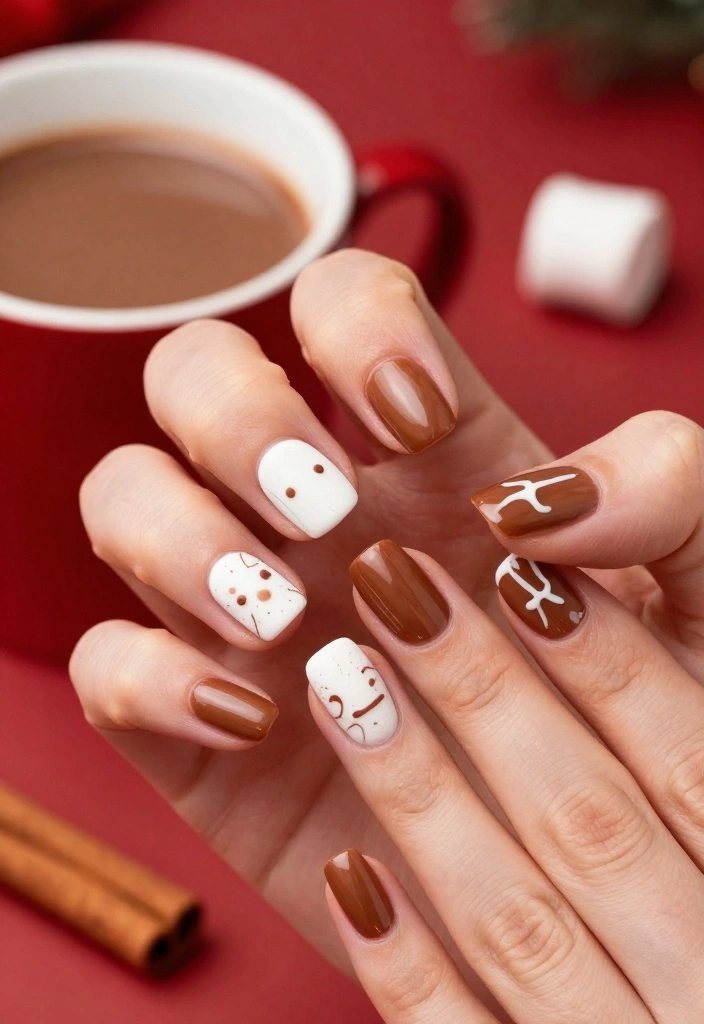
Capture the essence of cozy winter treats with a warm cocoa and marshmallows design. Featuring a creamy cappuccino base, tiny marshmallow shapes pop against a festive red backdrop. This quirky and cute nail art reflects the joy of holiday indulgence, making it a fun choice for any gathering.
It’s a delightful way to showcase your festive spirit, perfect for holiday parties or casual get-togethers.
Outfit Pieces:
– Warm brown nail polish (for the cocoa base)
– White nail polish (for the marshmallows)
– Clear top coat (to seal the design)
Styling Tips:
– Apply two coats of warm brown nail polish.
– Once dry, use white nail polish to paint little marshmallow shapes on selected nails.
– Optionally, sprinkle gold glitter on the marshmallows for added glam.
– Seal with a clear top coat for longevity.
This design can be customized with different colors for the cocoa or marshmallows, allowing for personal creativity.
14. Christmas Sweater Patterns
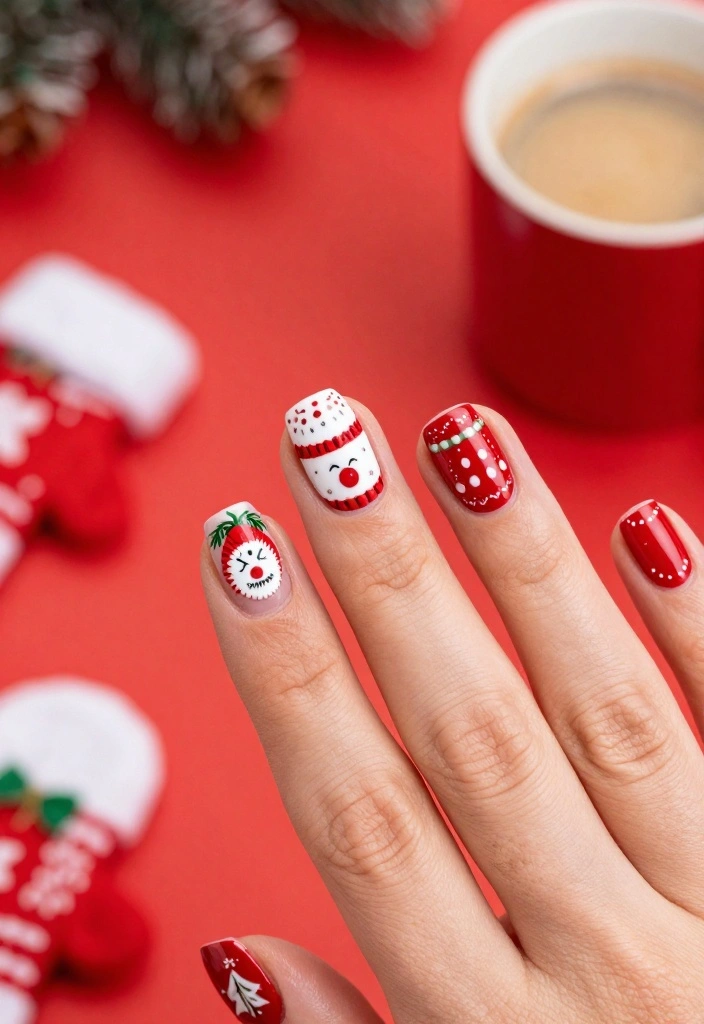
Bring the cozy vibe of a Christmas sweater to your nails with a knitted pattern design. Starting with a red base coat, you can create adorable knitted patterns, snowflakes, or hearts using white or cream polish. This charming design is both festive and fun, perfect for sparking conversation at holiday gatherings.
It’s a great way to showcase your holiday spirit in a unique and stylish manner.
Outfit Pieces:
– Red nail polish (for the base)
– White or cream nail polish (for the patterns)
– Clear top coat (to finish)
Styling Tips:
– Apply two coats of red nail polish and allow it to dry completely.
– Use a nail art brush to create knitted patterns with white or cream polish.
– For a cozy finish, consider a matte top coat to enhance the sweater look.
This design is versatile; you can mix and match patterns or colors to match your holiday outfits.
15. Christmas Present Wraps

Celebrate the joy of giving with a Christmas present wraps design! This playful look mimics beautifully wrapped gifts, making it perfect for the holiday season. Start with a deep red base, and add white lines for faux ribbons that create delightful crisscross patterns across your nails.
Tiny dots of green and gold can represent gift tags or ornaments, adding an extra festive touch.
Outfit Pieces:
– Deep red nail polish (for the base)
– White nail polish (for the ribbon)
– Green and gold nail polish (for accents)
– Clear top coat (to finish)
Styling Tips:
– Paint your nails with deep red polish and let dry.
– Use white polish to create crisscross lines, resembling ribbons.
– Add dots of green and gold polish for additional accents.
– Finish with a clear top coat to seal your present designs.
This design is fun and can be customized with different colors to suit your holiday style.
16. Vintage Christmas Ornaments

Step back in time with a vintage-inspired Christmas ornament design on your nails. Starting with a deep red base, you can create lovely ornament shapes in various colors using nail art brushes. Incorporating gold, teal, and silver adds an authentic vintage feel that’s perfect for the festive season.
This design tells a story and showcases your creative side, making it a standout choice for holiday gatherings.
Outfit Pieces:
– Deep red nail polish (for the base)
– Various colored nail polishes (for the ornaments)
– Clear top coat (to seal)
Styling Tips:
– Apply two coats of deep red nail polish.
– Using a fine brush, create vintage ornament shapes on each nail.
– Add details with contrasting colors for a pop effect.
– Seal your design with a clear top coat for lasting wear.
This design can be personalized with different colors to match your holiday outfit or to showcase your unique style.
17. Bright Berry Tips

Bright berry tips offer a fresh twist on the classic French manicure, perfect for the holiday season. Start with a soft nude or sheer pink base and add bold red or berry-colored tips for a fun and festive touch. This design is great for those who appreciate a clean look while still embracing the spirit of Christmas.
Pairing it with a glossy top coat enhances the sophisticated finish, making it suitable for any holiday occasion.
Outfit Pieces:
– Sheer pink or nude nail polish (for the base)
– Bright red or berry nail polish (for the tips)
– Clear top coat (to seal)
Styling Tips:
– Apply a base coat of nude or sheer pink polish and let dry.
– Once dry, paint bold red or berry tips on each nail.
– Seal the design with a clear top coat for lasting shine.
This look allows for experimentation with different colors for the tips, giving you the freedom to create a style that reflects your personality.
18. Grinch-Inspired Nail Art

Showcase your playful side this holiday season with Grinch-inspired nail art! Start with a bright red base, and create a whimsical Grinch face using green and black polish on the ring finger. The remaining nails can feature fun stripes or polka dots in green and gold, or simply stay classic red to balance the design.
This playful approach is perfect for those wanting to spread joy and laughter during the holidays.
Outfit Pieces:
– Bright red nail polish (for the base)
– Green and black nail polish (for the Grinch face)
– Clear top coat (to finish)
Styling Tips:
– Apply two coats of bright red nail polish.
– On your ring finger, create a Grinch face with green and black polish.
– Use remaining nails for stripes or polka dots in festive colors.
– Finish with a clear top coat to seal your creative designs.
This whimsical design allows for fun variations; you can change colors or add more characters to suit your festive mood.
Conclusion
With these 18 festive red Christmas nail designs, your holiday manicure is sure to shine bright! Each design carries its own charm and festive flair, ensuring that you’ll be the center of attention at all your celebrations.
So, whether you lean towards classic elegance or fun and whimsical designs, there’s something here for every personality and occasion. Grab your nail polish and let your creativity run wild this holiday season!
Frequently Asked Questions
What are the most popular red christmas nail designs to try this season?
If you’re chasing red christmas nail designs, these options cover classic, modern, and playful vibes.
1) Classic glossy red with delicate white snowflakes for a timeless festive look—use a fine brush or stamping plate to create tiny snowflakes and seal with a shiny top coat.
2) Matte red with gold foil accents for a chic twist—apply a matte top coat and press small gold foil pieces onto the tacky layer, then top coat to seal them.
3) Red with festive decals (reindeers, Christmas trees, or candy canes)—position decals on a dry red base and finish with a protective top coat.
4) Red glitter gradient—paint red and gently brush on fine glitter or apply a glitter topper from the cuticle upward for a sparkling festive finish.
5) Red French tips with a festive twist—paint the tips in white or metallic gold, and optionally add a tiny snowflake at the base of the nail. Use proper base layers for longevity.
How can I recreate red christmas nail designs at home on a budget?
You can nail nail ideas without breaking the bank. Start with a reliable red polish, a white polish for details, a clear top coat, and a base coat.
Plus, grab a small dotting tool or a toothpick, a striping brush (or use tape for neat lines), and some budget-friendly decals or stamping plates.
Step-by-step: prep nails with base coat, apply two coats of red, add the white details or decals, seal with top coat, and let everything cure. Reuse simple tools for multiple designs to keep festive designs affordable and fun.
Which nail lengths and shapes work best with red christmas nail designs?
Short nails shine with clean lines and simple red christmas nail designs, while longer nails let you go bold with decals and stamping. For short nails, try all-over glossy red or a red base with a single snowflake accent. For longer nails, experiment with glitter gradients or intricate decals. Popular shapes like square, almond, and rounded square read clearly with festive motifs, making your festive designs pop.
What finishes complement red christmas nail designs and how should I choose?
Finish matters as much as color. A classic glossy red is timeless for red christmas nail designs, while a matte red offers a modern twist with gold or white accents. Add sparkle with a glitter gradient or metallic foil to elevate the look. For a sophisticated approach, pair matte red with subtle chrome accents; for a party vibe, go glossy with a glitter topper. Your choice should reflect the event and your personal nail ideas.
How long do red christmas nail designs last and how can I make them last through the holidays?
With proper care, red christmas nail designs can hold up for about 5–10 days. Start with a strong base coat and seal every layer with a high-quality top coat. To extend wear, avoid soaking nails, wear gloves for chores, and reapply a thin layer of top coat every 2–3 days. Keep nails dry after washing, use cuticle oil, and remove gently when chips appear to keep the festive look intact throughout the season.
Related Topics
red christmas nail designs
festive nail art
holiday manicure
glitter nails
easy nail designs
beginner friendly
nail art inspiration
party nails
winter nail trends
classic red nails
themed nail art
quick nail ideas
These red nail designs are absolutely stunning! I love how festive they look. Do you have a favorite design that you can’t wait to try?
I tried doing a nail art design once, and it ended up looking like my dog did it! 😂 These designs look way more professional than my attempts!
Did you know that red is often associated with good luck and happiness during the holidays? It’s no wonder we love it for Christmas nails!
I remember one holiday season, I tried to paint my nails while baking cookies, and I ended up with more icing on my hands than on the cookies! These designs would have been a fun addition to my festive look!
If you’re planning to try these designs, I suggest using a good top coat to make them last longer. Happy painting!