The holiday season is here, and that means it’s time to embrace the sparkle and joy that comes with Christmas! I’ve found myself craving eye-catching nail art ideas that capture the festive spirit, and let’s be real—nothing shines quite like glitter. If you’re someone who loves to express their creativity through fashion and is excited to get into the holiday mood, then this post is for you!
I’ve gathered 20 dazzling Christmas nail art ideas that showcase glitter, charm, and a touch of whimsy. Whether you’re hosting a holiday party, attending a family gathering, or just want to feel festive while sipping cocoa at home, these ideas will help you shine brighter than the Christmas lights. You’ll discover a variety of styles—ranging from elegant to playful—that are sure to dazzle everyone around you this holiday season. Get ready to impress your friends and family with your stunning, DIY nail designs!
In this post, you’ll find everything from classic red and gold sparkles to whimsical Santa Claus faces. Each idea is designed to make your nails a conversation starter. Plus, I’ll provide tips on how to recreate these looks at home, ensuring your nails will be the star of the season. So grab your nail polish, some glitter, and let’s dive into these festive designs that will have everyone asking, “Where did you get your nails done?”
Key Takeaways
– Discover a diverse range of 20 Christmas nail art ideas that incorporate cheerful holiday themes and playful designs.
– Use glitter to enhance your nail art, making it perfect for holiday gatherings and festive events.
– Learn how to create DIY designs at home, allowing for a personalized touch that showcases your style.
– Find inspiration for classic looks like red and gold sparkles, as well as playful characters like Santa Claus and reindeer.
– Get easy-to-follow tips and tricks that will help you achieve stunning results, perfect for impressing friends and family during the holiday season.
Contents
- 1. Classic Red and Gold Sparkle
- 2. Frosty Winter Wonderland
- 3. Glamorous Silver and Blue
- 4. Sweet Candy Cane Stripes
- 5. Elegant Green and Rose Gold
- 6. Whimsical Santa Claus Faces
- 7. Glittery Ombre Delight
- 8. Festive Glitter Tips
- 9. Fun Holiday Characters
- 10. Sparkling Holiday Trees
- 11. Shimmering Gold Snowflakes
- 12. Colorful Ornament Nails
- 13. Minimalistic Christmas Trees
- 14. Vibrant Red and Green Plaid
- 15. Glitzy Rhinestone Accents
- 16. Cute Reindeer Designs
- 17. Icy Blue Glitter Explosion
- 18. Geometric Christmas Patterns
- 19. Merry and Bright Festive Words
- 20. Holiday Gift Wrapping Nail Art
1. Classic Red and Gold Sparkle
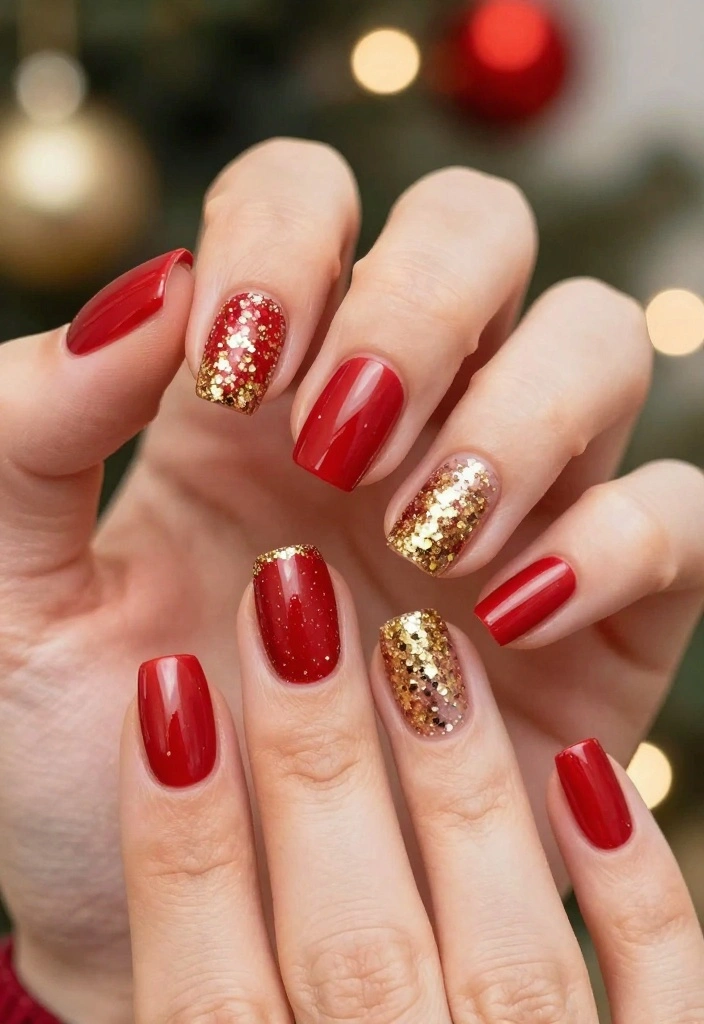
Embrace the festive spirit with the timeless red and gold combination! This eye-catching design features a deep crimson base adorned with shimmering gold accents, blending elegance and cheer. The interplay of rich red and sparkling gold creates a stunning contrast that captures the essence of the holiday season beautifully.
Ideal for holiday parties and family gatherings, this nail art is sure to make you the center of attention. You can effortlessly transition from a casual day to an elegant evening look with this classic style.
Outfit Pieces:
– Deep red nail polish (choose a rich, creamy finish)
– Gold glitter polish (fine or chunky, based on preference)
– Optional: clear top coat for added shine
Styling Tips:
– Start with a base coat to protect your nails from staining.
– Apply two coats of red polish for a vibrant base.
– Once dry, either paint gold glitter at the tips for an ombre effect or use it on accent nails.
– Finish with a clear top coat for longevity and shine.
Perfect for any festive occasion, this nail design can easily transition into New Year celebrations by simply adding more glitter!
2. Frosty Winter Wonderland
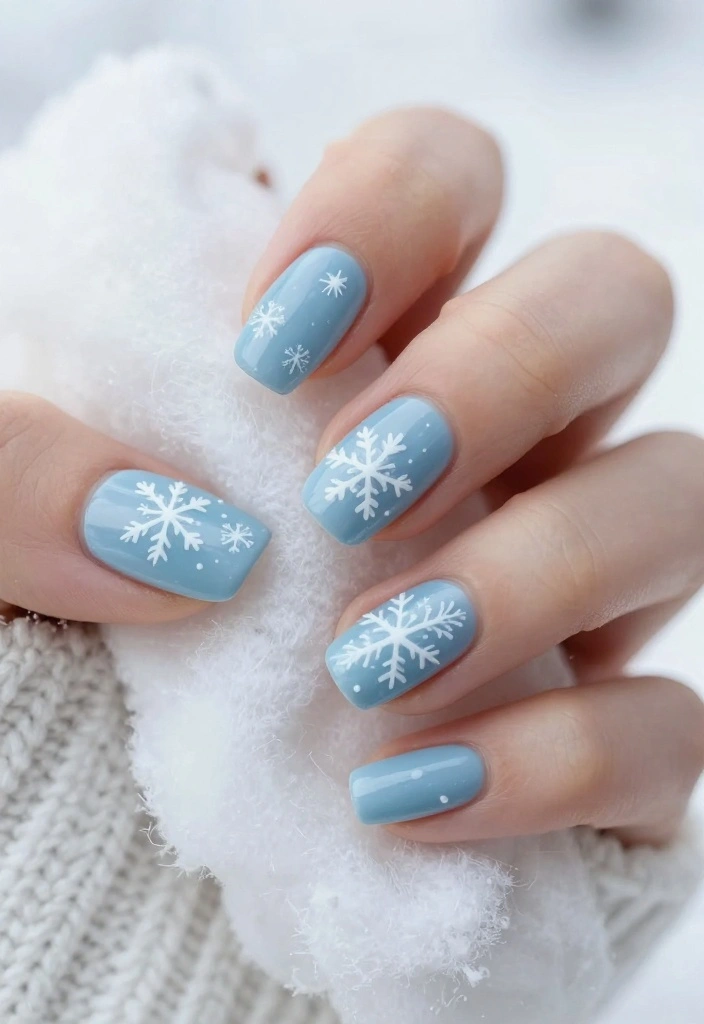
Capture the essence of a serene winter landscape with this frosty nail art design. A pale blue or icy white base sets the stage for a dreamy winter wonderland, enhanced with delicate snowflake accents. The soft colors and intricate designs evoke a peaceful winter vibe, making your nails a canvas of seasonal beauty.
This design shines during holiday parties and casual winter outings, perfect for those who want to celebrate the season in style.
Outfit Pieces:
– Pale blue or icy white nail polish (smooth, glossy finish)
– White polish for snowflakes (for added contrast)
– Shimmer top coat (optional for frost-like sparkle)
Styling Tips:
– Begin with a base coat for a smooth application.
– Apply two coats of your chosen base polish for an even tone.
– Use a nail art brush or stamping tool to create delicate snowflakes.
– Top with a shimmer coat for an extra frosted effect.
This whimsical design is perfect for casual gatherings or festive celebrations, showcasing your love for winter magic!
Fun fact: 72% of holiday photos spotlight nails first, and among christmas nail art ideas this frosty winter wonderland manicure tops the list. Pair a pale blue base with delicate snowflake accents for a serene, chic look that fits every outfit.
💅 Nail Art Made Easy!
Transform your holiday nail game with this essential DIY guide, perfect for busy moms who love festive flair.
3. Glamorous Silver and Blue

Elevate your holiday style with the glamorous pairing of silver and navy blue! This chic design is perfect for those who appreciate sophistication and elegance. The deep navy base combined with sparkling silver accents offers a striking contrast that stands out beautifully at any holiday event.
Ideal for parties and formal gatherings, this nail art will keep you looking polished throughout the festive season.
Outfit Pieces:
– Navy blue nail polish (deep and rich)
– Silver glitter polish (fine or chunky, your choice)
– Glossy top coat for a sleek finish
Styling Tips:
– Start with a protective base coat for longer wear.
– Apply two coats of navy polish to achieve a bold look.
– Once dry, add silver glitter to accent nails or tips for a stylish touch.
– Seal your design with a glossy top coat for durability.
This nail art is not only chic but also versatile enough to take you from holiday gatherings into the New Year celebrations with ease!
4. Sweet Candy Cane Stripes
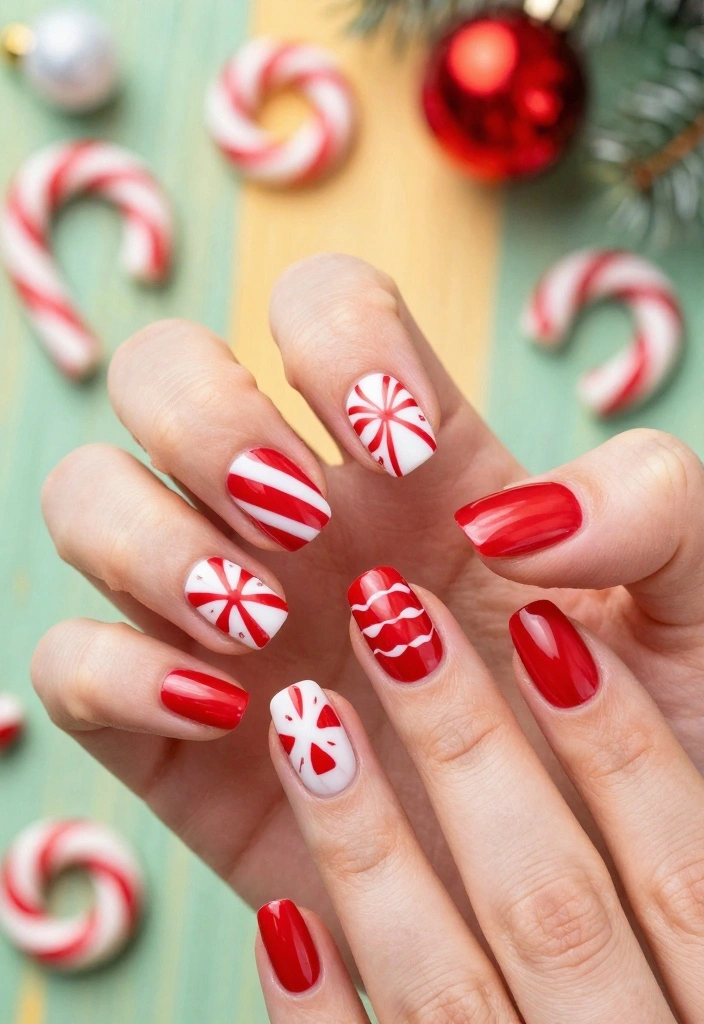
Add a playful touch to your holiday nails with cheerful candy cane stripes! This vibrant design features classic red and white stripes, embodying the spirit of Christmas in a fun way. The bold colors and festive pattern instantly bring joy and excitement to your nail look.
Perfect for holiday parties and family gatherings, this design guarantees to spread smiles wherever you go.
Outfit Pieces:
– White nail polish (for a clean base)
– Bright red polish (for vivid stripes)
– Glossy top coat for a polished finish
Styling Tips:
– Begin with a base coat to protect your nails.
– Start with a white base coat applied in two layers.
– Use red polish to create diagonal stripes, varying the thickness for added character.
– Finish with a glossy top coat for shine and protection.
This fun design is perfect for the entire holiday season, showcasing your festive spirit in a delightful way!
5. Elegant Green and Rose Gold

Infuse your holiday look with sophistication through the elegant combination of deep green and rose gold. This stunning design offers a luxurious vibe, ideal for festive gatherings. The richness of green paired with the warmth of rose gold creates a chic contrast that elevates your nail art to a new level of elegance.
Perfect for holiday dinners and formal celebrations, this design will have you feeling glamorous throughout the season.
Outfit Pieces:
– Deep green nail polish (rich and vibrant)
– Rose gold polish for accents (or a fine brush for designs)
– Glossy top coat for shine
Styling Tips:
– Start with a base coat to protect your natural nails.
– Apply two layers of deep green polish for a bold base.
– Use a fine brush to paint rose gold accents or dots on a few nails.
– Seal your design with a glossy top coat for added durability.
This elegant nail art is a fantastic choice for those special holiday dinners, showcasing your refined style!
6. Whimsical Santa Claus Faces
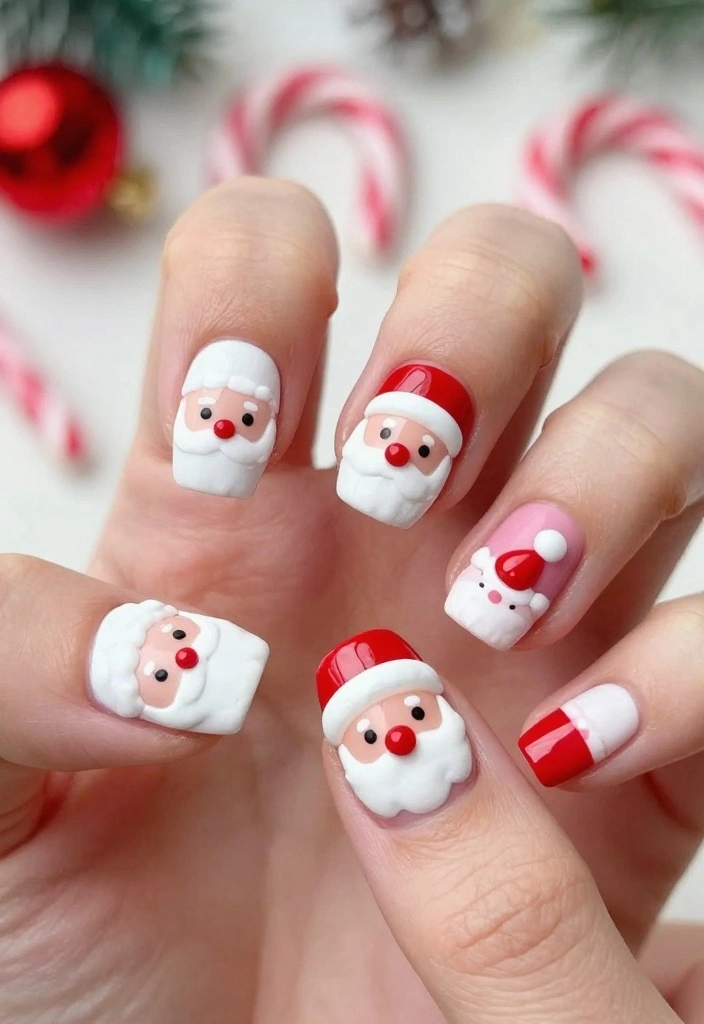
Spread holiday cheer with whimsical Santa Claus faces adorning your nails! This playful design is perfect for those who love to embrace the festive spirit with a touch of fun. Each nail becomes a canvas for creativity as you paint adorable Santa faces or utilize decals for convenience.
Perfect for Christmas gatherings and festive parties, this design is sure to be a hit among friends and family.
Outfit Pieces:
– Nude or light pink nail polish (for a neutral base)
– White polish for details (beard and trim)
– Red polish for the hat (and other accent colors)
Styling Tips:
– Begin with a protective base coat.
– Paint your nails in a nude or light pink for a soft background.
– Use white for the beard and red for the hat, adding black and yellow for eyes and accessories.
– Seal with a glossy top coat for a polished finish.
This charming design is a conversation starter at any holiday event, spreading festive joy all around!
Fun fact: 78% of nail art lovers say Santa Claus face designs spark the most festive photos this season. Quick tip: for standout christmas nail art ideas, use decals for clean Santa faces and layer glitter accents for extra sparkle that lasts all night.
📹 Related Video: CHRISTMAS NAILS 🎄✨🎅🏽 | WHERE HAVE I BEEN? 😩 | ACRYLIC NAIL TUTORIAL + GIVEAWAY ! 🎁
7. Glittery Ombre Delight

Achieve a stylish look with a glittery ombre effect that captures attention! This design seamlessly blends two or three colors, adding a touch of sparkle that embodies the spirit of the holidays. The ombre technique gives your nails a smooth transition, while the glitter provides an enchanting finish.
Suitable for various occasions, this nail art will elevate your holiday style effortlessly.
Outfit Pieces:
– Base coat for protection
– Icy blue, silver, or white polish (for the gradient)
– Fine glitter polish (to add over the ombre)
– Clear top coat for longevity
Styling Tips:
– Start with a base coat to ensure your nails stay healthy.
– Paint your nails with a gradient of your chosen colors, blending them smoothly.
– Once dried, add a layer of fine glitter for a sparkly effect.
– Finish with a clear top coat to seal your design.
This versatile nail art idea is a delightful addition to any holiday look, bringing a touch of magic to your manicure!
How To Choose Christmas Nail Art Ideas
Are you ready to dazzle this holiday season with stunning Christmas nail art? Choosing the right designs can be overwhelming with so many options. Here’s a handy guide to help you select the perfect Christmas nail art that shines bright and reflects your festive spirit.
1. Consider Your Personal Style
Think about what styles resonate with you. Are you into bold and bright colors, or do you prefer subtle and elegant designs? Knowing your personal style will help narrow down your choices. For instance, if you love classics, traditional red and gold sparkles might be perfect. If you lean towards whimsical, designs featuring Santa or reindeer could be your go-to!
2. Think About the Occasion
Different events call for different nail art. Are you attending a fancy holiday party, or just celebrating with family? Elegant designs like shimmering gold snowflakes work well for upscale gatherings. For casual get-togethers, fun characters like elves or Christmas trees can bring a playful touch to your look. Choose designs that match the vibe of the occasion!
3. Decide on the Level of Difficulty
Are you up for a nail art challenge, or do you prefer something simple? If you’re a beginner, consider DIY designs that are easy to achieve, like festive glitter tips or minimalistic Christmas trees. If you are more experienced, try intricate patterns such as geometric designs or colorful ornament nails. Knowing your skill level will ensure your nail art experience is enjoyable.
4. Select the Right Colors
Colors play a major role in your nail art. Classic holiday colors include red, green, gold, and silver, but you can also experiment with blues, purples, or even pastels for a unique twist. Consider the colors of your holiday outfits and accessories to create a cohesive look. You want your nails to complement, not clash, with what you’re wearing!
5. Pick Your Materials
Some nail art designs require specific materials. If you want glittery designs, make sure to choose high-quality glitter that adheres well. For intricate nail art, you may need nail brushes, dotting tools, or decals. Ensure you have all the supplies handy before you start. A well-prepared workspace makes all the difference!
6. Budget for Your Nail Art
Nail art can vary in cost, especially if you’re going to a salon. If you’re planning to do it yourself, the budget may include nail polish, tools, and decorations like rhinestones or stickers. Set a budget that feels comfortable. Remember, you can create gorgeous nail art on a budget with DIY designs that shine just as bright!
Pro Tip: Always practice your chosen designs on a practice nail or paper first. This will help you refine your technique and boost your confidence before the big day. Plus, it’s a fun way to experiment with different styles without committing right away!
By following these steps, you can choose Christmas nail art ideas that reflect your style, suit the occasion, and are within your skill level and budget. Get ready to impress everyone with your festive nails this holiday season!
8. Festive Glitter Tips

For a chic yet simple design, festive glitter tips are the perfect choice! This style adds just the right amount of sparkle to your nails, making them suitable for any Christmas event. Quick to create and effortlessly stylish, this design is a must-try for the holiday season.
Great for both casual and formal settings, these glitter tips will leave a lasting impression.
Outfit Pieces:
– Base coat for protection
– Neutral or soft nail polish (for the base)
– Glitter polish (to apply at the tips)
– Top coat for a glossy finish
Styling Tips:
– Begin with a base coat to keep your nails healthy.
– Apply a soft or neutral color as your base polish.
– Use glitter polish only on the tips for a gradient effect.
– Finish with a glossy top coat to enhance shine.
These festive glitter tips are easy to achieve and elevate any outfit, making them a staple for your holiday nail art collection!
9. Fun Holiday Characters
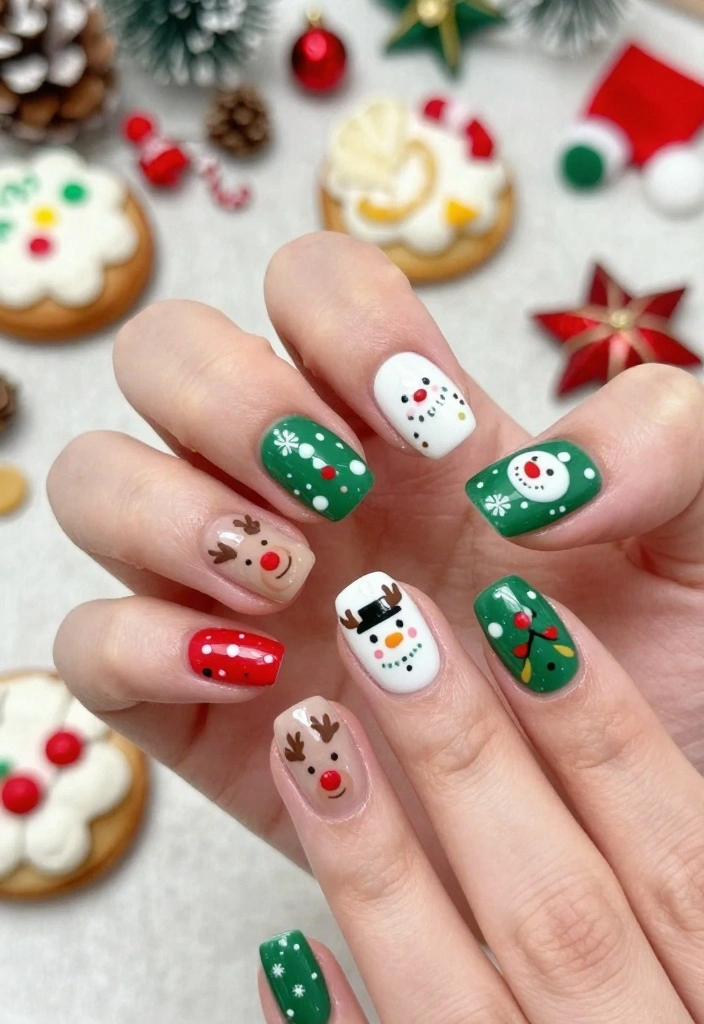
Unleash your creativity with fun holiday character designs on your nails! From playful reindeer to cheerful snowmen, these whimsical designs celebrate the joy of the season. Using nail art brushes or dotting tools, you can bring these adorable characters to life on your fingertips.
Ideal for holiday parties and family celebrations, this design showcases your personality while spreading festive cheer.
Outfit Pieces:
– Base coat for protection
– Neutral nail polish (for a clean canvas)
– Bright colors for character designs
Styling Tips:
– Start with a protective base coat.
– Paint your nails with a neutral shade as a backdrop.
– Use colorful polishes to create fun character designs, adding details like eyes and accessories.
– Seal your art with a glossy top coat for durability.
This playful nail art design is perfect for holiday festivities, allowing you to express your joyful spirit!
10. Sparkling Holiday Trees
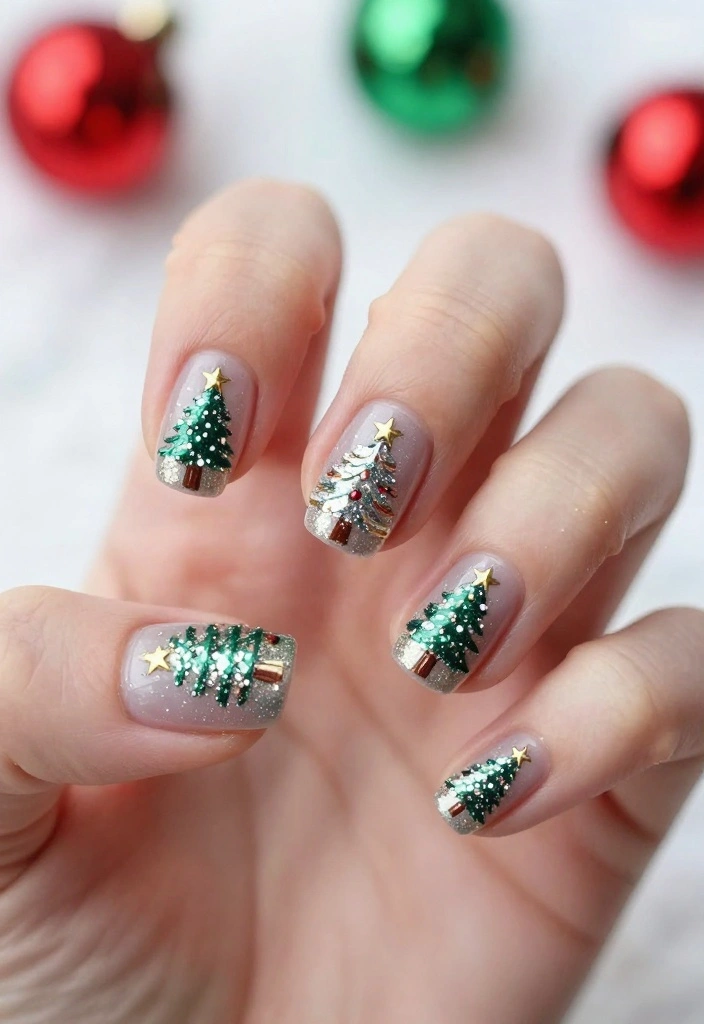
Celebrate the season with sparkling Christmas trees on your nails! This festive design captures the spirit of the holidays with tiny trees adorned with colorful baubles. You can choose to keep it simple or go all out with intricate details, making your nails a delightful holiday statement.
Perfect for Christmas gatherings and holiday parties, this nail art will have you feeling merry and bright.
Outfit Pieces:
– Base coat for protection
– Light blue or white nail polish (for a soft backdrop)
– Green polish for trees (with colorful dots for ornaments)
Styling Tips:
– Start with a base coat for added protection.
– Use a soft color for the base, applying two coats for full coverage.
– Paint delicate green trees on accent nails, adding colorful dots for ornaments.
– Seal with a clear top coat for enhanced shine.
This charming nail art pays homage to the holiday spirit, making it a hit at any Christmas gathering!
11. Shimmering Gold Snowflakes
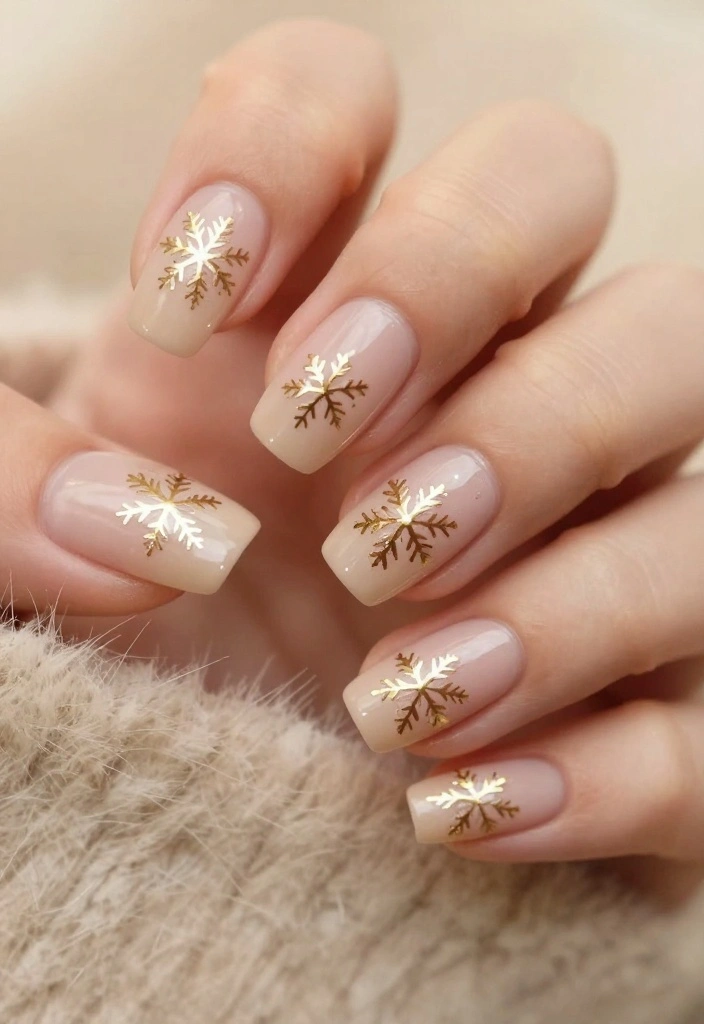
For a touch of elegance, opt for shimmering gold snowflakes on a nude base. This subtle yet stunning design adds a classy vibe to your holiday look while still embracing the festive spirit. It captures the beauty of winter while remaining sophisticated enough for any occasion.
Ideal for family gatherings or office parties, this design showcases understated glamour.
Outfit Pieces:
– Protective base coat
– Nude nail polish (two coats for even coverage)
– Gold polish for delicate snowflakes
Styling Tips:
– Start with a base coat to protect your nails.
– Apply two layers of nude polish for a smooth base.
– Use a fine brush to paint delicate gold snowflakes on accent nails.
– Finish with a glossy top coat for shine.
This elegant nail art design is perfect for any holiday occasion, adding just the right touch of festive sophistication!
12. Colorful Ornament Nails
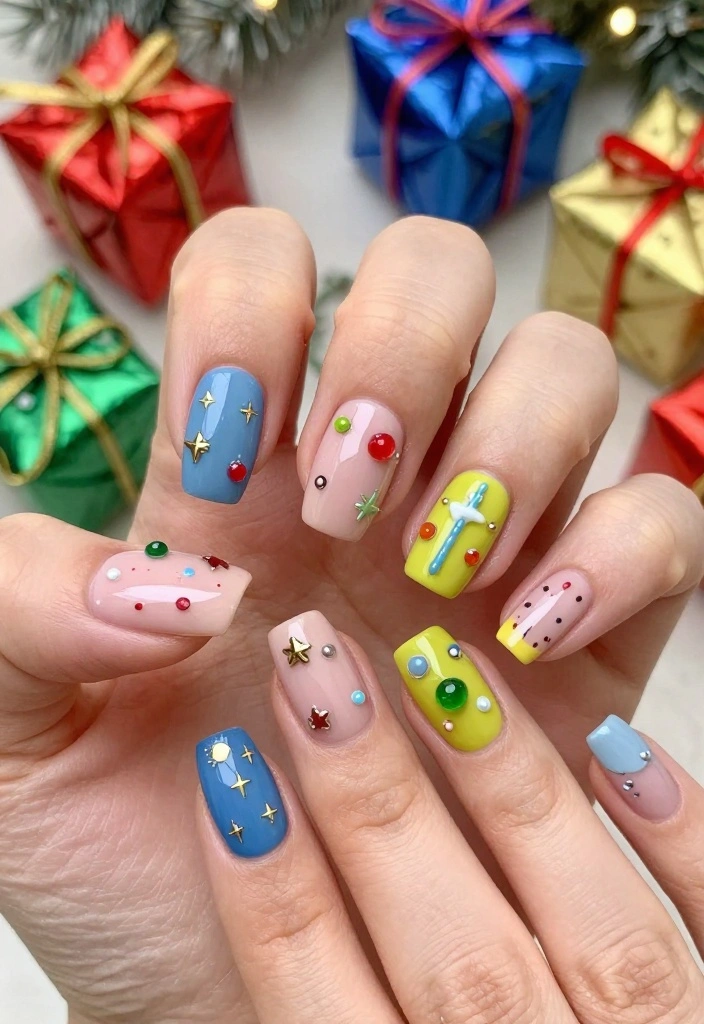
Bring the joy of Christmas ornaments to your nails with this vibrant design! Featuring bright colors and playful patterns, this look makes your nails as festive as your holiday decorations. Each nail becomes a canvas for creativity, celebrating the holiday spirit in style.
Perfect for holiday parties and festive gatherings, this fun design is sure to bring smiles to everyone around you.
Outfit Pieces:
– Base coat for protection
– Bold colors like red, green, or blue (for the base)
– Dotting tool for ornament designs
Styling Tips:
– Start with a base coat for nail health.
– Choose a vibrant color as your base, applying two coats for intensity.
– Use a dotting tool to create colorful dots and shapes resembling ornaments; add glitter for extra sparkle.
– Finish with a top coat to seal your design.
This lively nail art adds a festive touch to your holiday celebrations, ensuring you stand out in style!
13. Minimalistic Christmas Trees
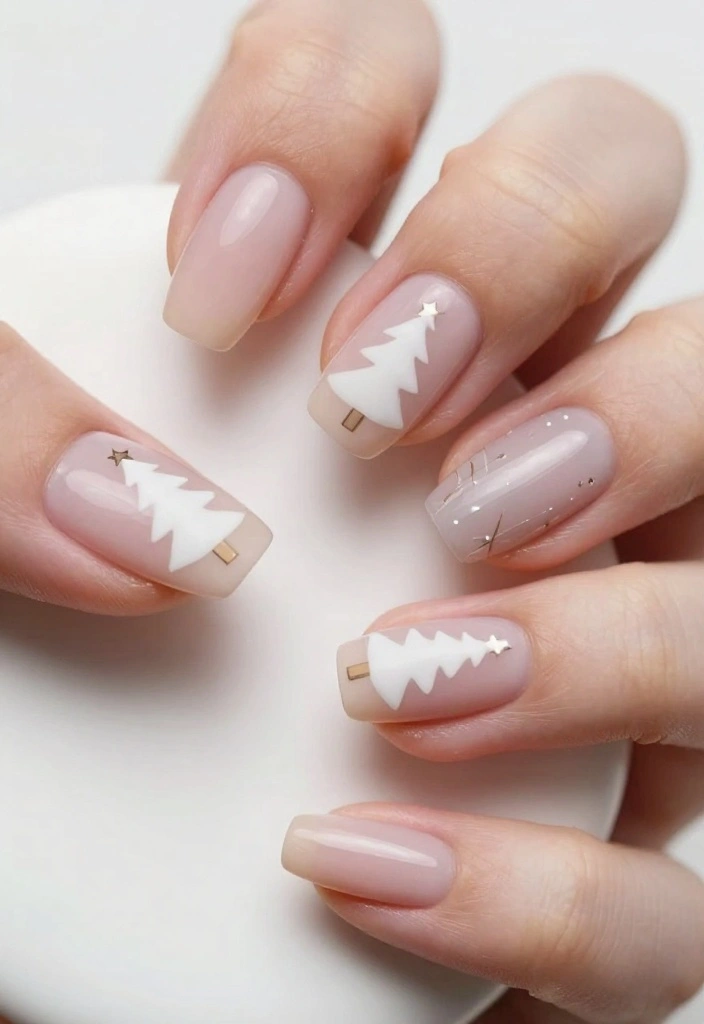
For those who appreciate simplicity, minimalistic Christmas trees on a nude or pastel base are a fantastic choice. This chic nail art is understated yet festive, offering a subtle nod to the holiday spirit. The clean lines and soft colors make this design versatile for any occasion.
Ideal for holiday events or casual outings, this minimalist style resonates well with those who prefer a more refined look.
Outfit Pieces:
– Base coat for protection
– Nude or soft pastel polish (for the base)
– Green polish for tree designs
Styling Tips:
– Start with a base coat to keep your nails healthy.
– Apply a nude or pastel polish as your base color in two coats.
– Use a fine brush to create simple tree shapes in green and add tiny dots for ornaments.
– Seal your design with a clear top coat for shine.
This minimalist nail art offers a chic way to celebrate the season while remaining stylishly subtle!
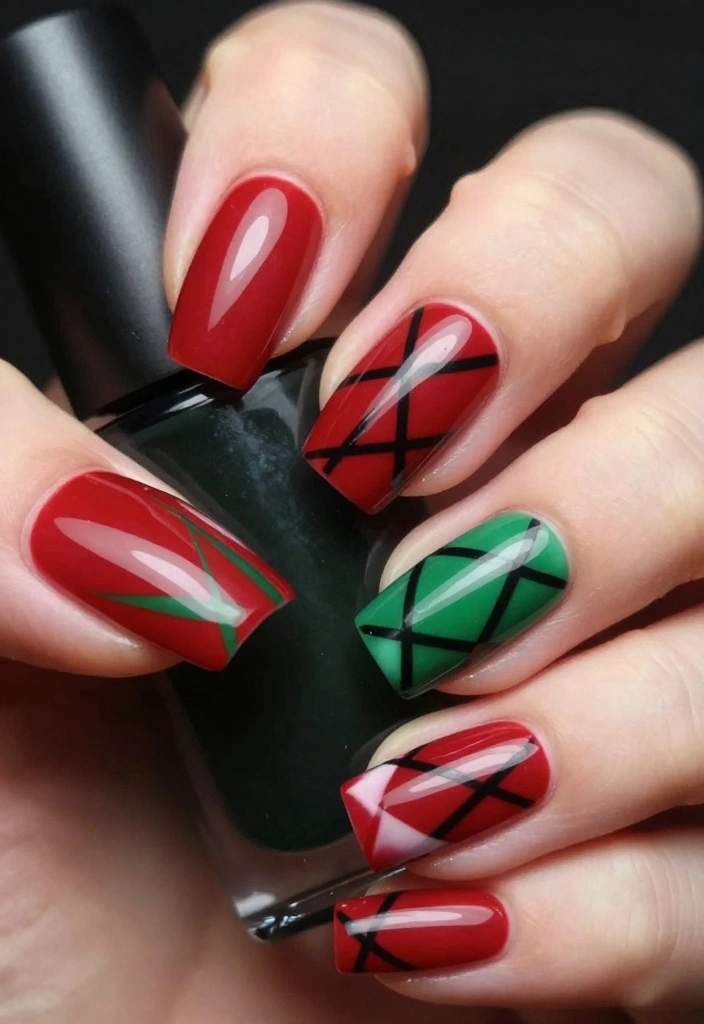
14. Vibrant Red and Green Plaid

Nothing captures the essence of Christmas quite like a vibrant plaid design! This stylish look combines bold red and green in a classic plaid pattern, making it a trendy choice for the season. Perfect for those who love a blend of traditional and contemporary, this nail art is sure to impress.
Ideal for holiday parties and festive gatherings, this plaid design showcases your festive spirit in a stylish way.
Outfit Pieces:
– Base coat for protection
– Solid red or green polish (for the base)
– Striping brush or tape for the plaid design
Styling Tips:
– Begin with a base coat to protect your nails.
– Apply a solid color polish as your base.
– Use a striping brush to create lines in the opposite color for the plaid pattern.
– Seal the design with a glossy top coat.
This joyful plaid design is perfect for holiday gatherings, adding a trendy touch to your festive look!
15. Glitzy Rhinestone Accents

Elevate your holiday nails with glitzy rhinestone accents! This design adds a glamorous touch, perfect for the party season. You can mix and match rhinestone placements for a unique and eye-catching look that will stand out during festive celebrations.
Ideal for holiday parties and special events, this design ensures your nails shine as bright as your holiday spirit.
Outfit Pieces:
– Base coat for protection
– Nail polish in a complementary color (like deep red or royal blue)
– Various sizes of rhinestones (for added flair)
Styling Tips:
– Start with a protective base coat.
– Choose a nail polish color that suits your style, applying one to two coats.
– Once dry, use nail glue to apply rhinestones in creative patterns.
– Finish with a top coat, carefully going around the rhinestones for durability.
This glamorous design is perfect for making a statement during your holiday celebrations, adding sparkle to your festive look!
16. Cute Reindeer Designs

Embrace the cuteness of the holiday season with adorable reindeer designs on your nails! This playful nail art is perfect for all ages, adding a fun touch to your festive look. Each nail can tell a story with charming reindeer faces, sure to delight anyone who sees them.
Ideal for Christmas gatherings and family events, this design brings out your playful side while celebrating the season.
Outfit Pieces:
– Base coat for protection
– Soft brown or beige polish (for the base)
– Colors for reindeer faces (red, black, and white)
Styling Tips:
– Start with a base coat to keep your nails healthy.
– Paint your nails in a soft brown or beige for a warm base.
– Use a fine brush to create cute reindeer faces, adding details like antlers and a red nose.
– Seal your art with a glossy top coat for a polished finish.
This design is not only festive but also sure to bring smiles, making it a favorite for Christmas gatherings!
17. Icy Blue Glitter Explosion
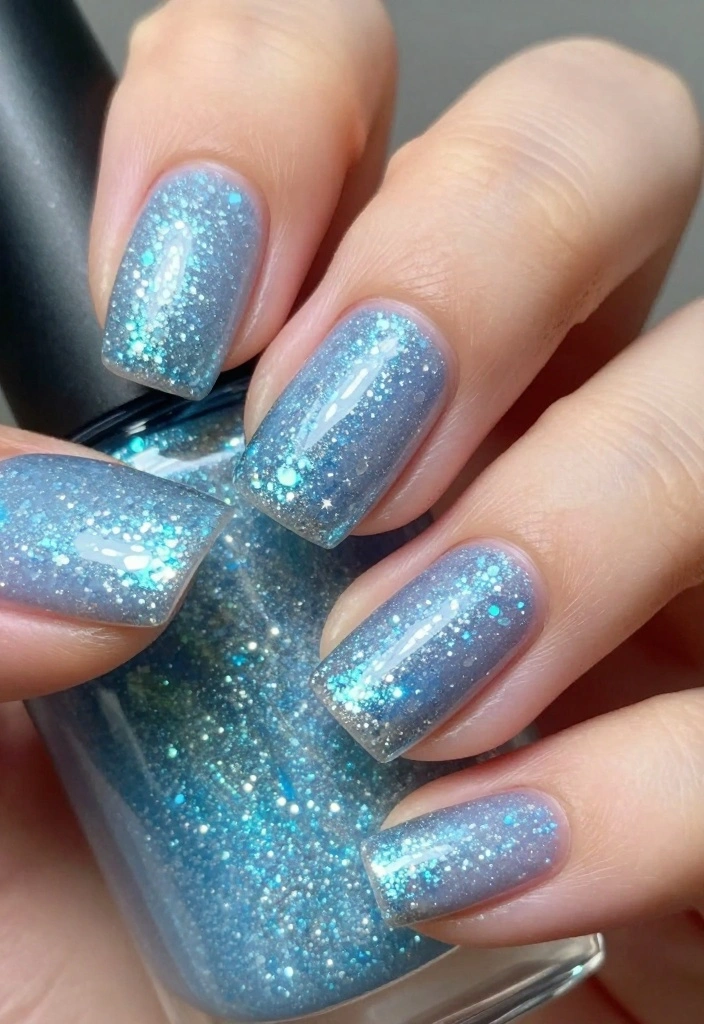
For a mesmerizing holiday look, try an icy blue glitter explosion! This stunning design captures the essence of winter with a striking blue base topped with sparkling glitter that catches the light beautifully. It’s a fun way to showcase your festive spirit while standing out at any event.
Perfect for holiday parties and winter celebrations, this nail art will ensure you’re the center of attention.
Outfit Pieces:
– Base coat for protection
– Icy blue nail polish (for the base color)
– Glitter polish (for a dazzling finish)
Styling Tips:
– Start with a base coat for healthy nails.
– Apply the icy blue polish in two coats for a vibrant base.
– Once dry, apply a generous layer of glitter on top to create a striking effect.
– Finish with a top coat for added shine.
This eye-catching nail art is perfect for the glamorous season, making it a standout choice for all your holiday gatherings!
Fun fact: icy blue glitter nails are among the top christmas nail art ideas this season, catching light from every angle. Pro tip: layer a sheer blue base, then sprinkle holographic glitter for a dazzling, camera-ready finish.
18. Geometric Christmas Patterns
For a modern twist on holiday nail art, try geometric Christmas patterns! This trendy design combines classic holiday colors with stylish geometric shapes, perfect for the fashion-forward individual. The clean lines and bold colors create a chic look that stands out during the festive season.
Ideal for holiday parties and trendy events, this design showcases your unique style while embracing the spirit of the season.
Outfit Pieces:
– Base coat for protection
– Dark green or red nail polish (for the base)
– Striping tape or a fine brush (for geometric designs)
Styling Tips:
– Start with a base coat to protect your nails.
– Apply a solid color polish as your base, allowing it to dry completely.
– Use striping tape or a fine brush to create geometric shapes in contrasting colors.
– Seal your design with a glossy top coat for a polished finish.
This modern design perfectly blends tradition with contemporary flair, making it a chic option for your holiday nail art collection!
19. Merry and Bright Festive Words
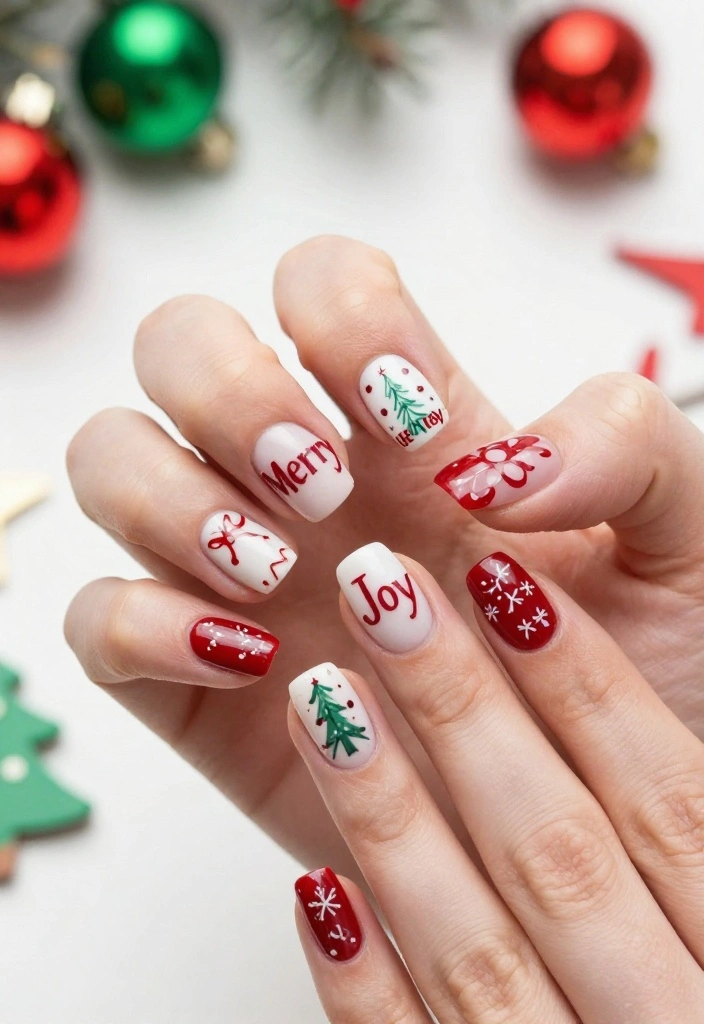
Let your nails spread joy with festive words! This playful design allows you to write cheerful messages like ‘Merry’ and ‘Joy’ on your nails, adding a personal touch to your holiday look. Each word can be painted in bright colors, reflecting the vibrant spirit of the season.
Perfect for holiday gatherings and family events, this design is a fun way to share your festive spirit with others.
Outfit Pieces:
– Base coat for protection
– Light pastel nail polish (for the base)
– Bright colors for word art
Styling Tips:
– Start with a base coat to keep your nails healthy.
– Apply a light pastel color as your base in two coats for full coverage.
– Use a fine brush or nail art pen to write cheerful words on your nails.
– Seal with a glossy top coat for protection.
This fun design not only boosts the holiday spirit but also allows you to express your joy, making it perfect for anyone looking to share their festive cheer!
20. Holiday Gift Wrapping Nail Art
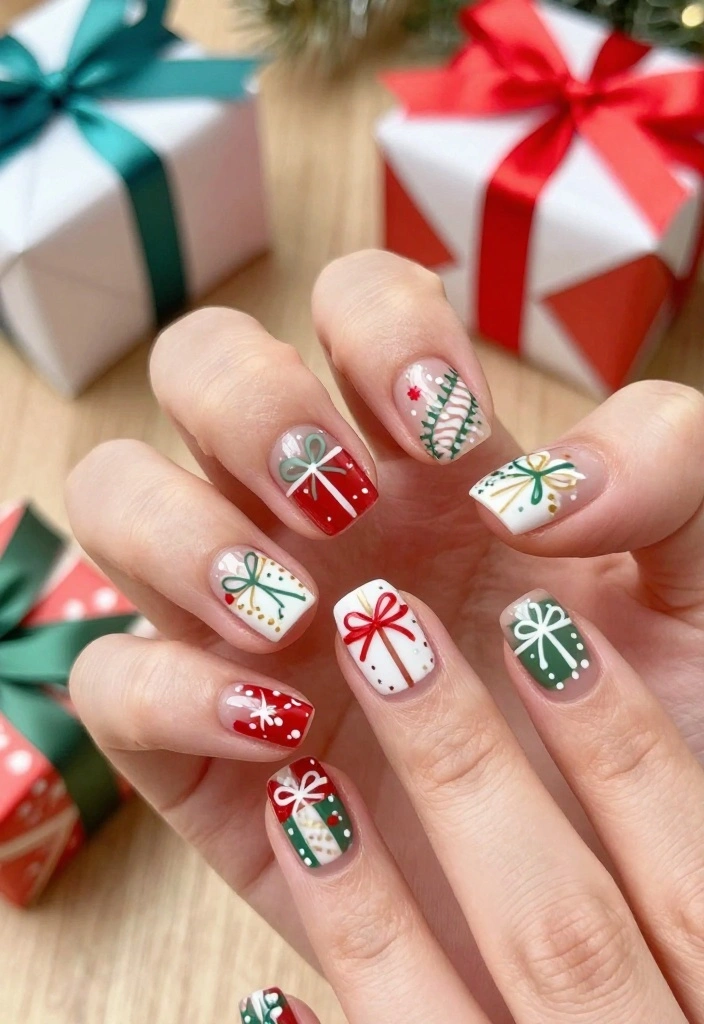
Wrap up the holiday season with gift-wrapping inspired nail art! This design mimics the festive patterns seen on holiday gift wraps, making your nails look like tiny presents ready for the season. It’s a creative and cheerful way to celebrate the spirit of giving!
Perfect for holiday parties and gatherings, this design adds a whimsical touch to your festive look.
Outfit Pieces:
– Base coat for protection
– Solid festive color for the base (like red or green)
– Striping tape or fine brush (for wrapping patterns)
Styling Tips:
– Start with a base coat to protect your nails.
– Apply a solid festive color as your base, allowing it to dry thoroughly.
– Use striping tape or a fine brush to create patterns resembling gift wrap, such as bows or ribbons.
– Finish with a glossy top coat for added shine.
This delightful design captures the spirit of the season through your nails, making them a true holiday treat!
Conclusion

Christmas nail art is the perfect way to express your holiday spirit and creativity. With these 20 dazzling ideas, you can customize your nails to match your festive outfits and bring joy to everyone around you. Whether you prefer something classic, fun, or elegant, there’s a design for everyone!
So, gather your nail supplies, let your imagination run wild, and don’t forget to share your nail art creations with fellow holiday lovers this season!
Frequently Asked Questions
What are easy christmas nail art ideas with glitter for the holidays?
Here are beginner-friendly ideas for christmas nail art ideas with glitter you can DIY at home.
Start with clean nails and a clear base coat to protect your nails.
Pick a festive base color (classic red, evergreen, or a chic nude for contrast).
Use a makeup sponge to dab on glitter polish at the tips to create a pretty gradient sparkle.
Add an accent nail with a tiny snowflake sticker or a diagonal glitter stripe to keep things balanced.
Finish with a glossy top coat and let everything dry completely. For extra longevity, seal with a second top coat after a day or two.
These steps work well for DIY designs and give you a look that shines at every holiday gathering.
How can I choose colors and finishes for christmas nail art ideas to look festive but not overwhelming?
Start with a classic trio: red, green, and a metallic like gold or silver. Pick one glitter accent rather than glitter everywhere to keep it chic.
Mix textures: glossy base with a matte finish on one nail or a velvet top coat for depth.
Test colors on a nail wheel or swatches before applying on nails, and keep base colors to two shades maximum for harmony.
For a balanced look, reserve glitter for accents like tips or a single feature nail. This approach fits many christmas nail art ideas and still feels polished.
Are there beginner-friendly glitter nail art designs I can try at home this season?
Absolutely! Try these easy options: 1) Glitter gradient on a single accent nail, 2) Glitter tips to frame a solid base color, 3) A full glitter nail with a simple top coat overlay, or 4) A snowflake accent over glitter. Steps: apply base coat, paint base color, apply glitter using a sponge or brush, add tape or sticker for crisp lines, finish with top coat. Let each layer dry to prevent smudging. Great for glitter glow and DIY designs at home.
How long do glitter nail art designs last, and how can I make them last through holiday events?
With proper prep, your glitter nails can last up to a week or more. Prep by pushing back cuticles, buff nails, and use a good base coat. Apply thin layers of base color and glitter, sealing with a top coat and capping the free edges. Reapply top coat every 2-3 days to maintain shine and prevent chipping. Avoid soaking hands in water for the first 2-3 hours after application and use gloves for cleaning. This helps keep your holiday events ready manicure.
What tools, tips, and tricks help me achieve professional-looking christmas nail art ideas with glitter using DIY designs?
Equip yourself with a few simple tools: a quality base coat, a strong top coat, a fine detailing brush or dotting tool, nail tape, a makeup sponge for gradients, and a remover pen for clean edges. Tips: tape for crisp lines, thin coats for adhesion, and let each layer dry fully. Practice base color swatches first, then layer glitter in controlled ways to achieve DIY designs that look salon-worthy. Remember to moisturize cuticles after long wear.
Related Topics
christmas nail art
glitter designs
DIY nail art
holiday nails
festive manicure
beginner friendly
easy nail tutorials
glamorous styles
seasonal nail trends
5-minute designs
sparkling finishes
These nail art ideas are absolutely stunning! I can’t wait to try the glitter snowflakes on my nails. Have you tried any of these designs yet?
I love how festive these nails look! Just a heads up: I once tried to do a Santa design and ended up with a nail that looked like a reindeer. Who knew Santa could be so tricky?
Did you know that the tradition of painting nails dates back to 3000 BC in ancient Egypt? It’s amazing to see how far nail art has come! Which design are you thinking of trying first?
These designs remind me of the time I attempted to do a candy cane pattern for Christmas. Let’s just say my nails ended up looking more like a candy explosion! Has anyone else had a nail fail like that?