The holiday season is here, and that means it’s time to deck the halls—and your nails! With Christmas around the corner, you might find yourself craving some festive flair. Nothing brings the holiday spirit quite like some dazzling Christmas light nails. These cheerful designs can add a spark of joy to your look while showcasing your creativity.
If you’re someone who loves to express your personality through nail art, this post is just for you. Whether you’re heading to holiday parties, family gatherings, or cozy nights in, your nails should reflect the joy of the season. From twinkling lights to candy cane stripes, there’s a design for every festive occasion. I’ve gathered 15 cheerful ideas that are creative, fun, and perfect for getting you into the holiday mood.
Get ready to explore a world of holiday nails that will make your fingertips shine bright like a Christmas tree! Each design is not only beautiful but also easy enough to try at home or ask your nail technician for. You’ll find inspiration that captures the essence of Christmas, ensuring that your nails are as festive as your holiday spirit!
Key Takeaways
– Discover 15 unique nail designs inspired by Christmas lights and holiday themes that are perfect for festive celebrations.
– Each design is easy to recreate, making it accessible for both beginners and experienced nail art enthusiasts.
– Find inspiration from playful themes like candy canes and gingerbread houses to sophisticated winter wonderlands and sparkling snow globes.
– Use this guide to impress friends and family, or simply enjoy a fun DIY project that unleashes your creativity.
– Get tips on incorporating seasonal colors and decorations into your nail art to truly capture the festive spirit.
Contents
- 1. Twinkling Christmas Lights
- 2. Candy Cane Stripes
- 3. Snowy Winter Wonderland
- 4. Gingerbread House Nails
- 5. Christmas Tree Tips
- 6. Festive Ornament Accent
- 7. Elf-Inspired Nails
- 8. Winter Berry Accents
- 9. Frozen Icicle Nails
- 10. Nutcracker Ballet Inspired
- 11. Sparkling Snow Globes
- 12. Reindeer Antlers
- 13. Mistletoe Magic
- 14. Gift-Wrapped Nails
- 15. Holiday Spirit Ombré
1. Twinkling Christmas Lights
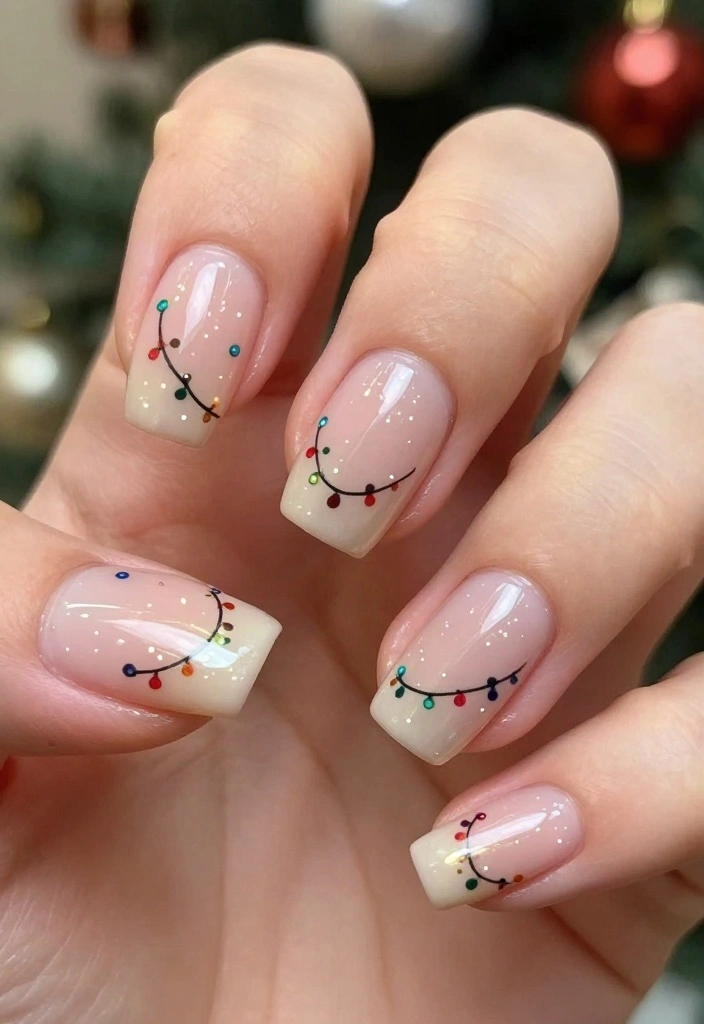
Illuminate your nails with a fun twinkling Christmas lights design! This playful look features tiny, colorful dots that mimic festive lights strung on a wire. It’s a cheerful way to celebrate the season and showcases your holiday spirit beautifully.
Mixing colors creates a joyful contrast, and the shiny topcoat makes it look extra vibrant. This design shines at holiday parties, cozy gatherings, or even just for festive everyday wear.
Outfit Pieces:
– Clear or light-colored base polish
– Multicolored nail polish (red, green, blue, yellow)
– Glossy topcoat
– Optional: fine nail art brush for detailing
Styling Tips:
– Use a dotting tool for precise dot placement.
– Create a gradient effect with colors for added depth.
– Finish with a shiny topcoat for a wet, glistening look.
– Consider adding a few larger dots to represent light bulbs for a bolder effect.
This design is perfect for any holiday event! You can easily swap in different colors to match your outfit or mood.
Twinkling Christmas lights on nails feel like a tiny holiday light show you wear. Mix bright colors for sparkle, then seal with a shiny topcoat for lasting charm. With christmas light nails, every party feels festive and chic.
🎨 Nail Art Made Easy!
Transform your holiday nail designs with our quick and easy DIY guide for busy moms this season!
How To Choose The Right Christmas Light Nail Designs
When the holiday season rolls around, choosing a Christmas light nail design can be the cherry on top of your festive look. You want your nails to capture the spirit of the season while also showcasing your personal style. Here are some key factors to consider when picking the perfect Christmas light nails.
1. Nail Length
Your nail length plays a crucial role in how your design will appear. Longer nails can showcase intricate designs, like twinkling lights or reindeer patterns, while shorter nails might be better suited for simpler designs. If you prefer a minimalist look, opt for shorter nails with delicate accents. Conversely, if you love bold designs, go for longer nails to really make a statement.
2. Color Palette
Think about the hues that represent the holiday spirit for you. Traditional red and green are classic choices, but don’t shy away from blues, golds, or even whites for a winter wonderland effect. You can mix and match colors to create a vibrant look. For instance, combine a bright red base with silver or gold accents for a festive vibe. Remember, the right color palette can completely transform your design and mood!
3. Design Complexity
Consider how complex you want your nail art to be. Simple designs like candy cane stripes or snowflakes can be done quickly and are perfect for those new to nail art. If you’re feeling adventurous, opt for intricate designs featuring Christmas lights or a gingerbread house. Just keep in mind that more complex designs require patience and a steady hand, so practice can make perfect!
4. Materials and Techniques
Different materials can give varied results. Nail polish is a staple, but have you considered nail stickers, gems, or even decals? These can add dimension to your design with little effort. Techniques like ombré or negative space can also elevate your nails to the next level. Familiarize yourself with the tools you’ll need, such as dotting tools or brushes, to achieve your desired look effortlessly.
5. Occasion
Think about where you’ll be showing off your Christmas light nails. Are you attending a formal holiday party or a family gathering? For formal events, you might want a classy design with understated elegance. For casual settings, feel free to have fun with bold colors and playful patterns. Tailoring your nail design to the occasion will enhance your overall festive appearance.
6. Personal Style
Lastly, consider your personal style. Your nails should reflect who you are. If you love bold statement pieces, opt for bright colors and intricate designs. If you prefer a classic look, go for subtle patterns or a solid color with a touch of glitter. Remember, your nails are an extension of your personality, so choose designs that make you feel confident and festive!
Pro Tip: Before committing to a design, consider trying a few different styles on nail stickers or practice nails. This way, you can experiment without the commitment of a full manicure. Plus, you can take pictures to see which design makes you shine the brightest this holiday season! 🎄💅
2. Candy Cane Stripes
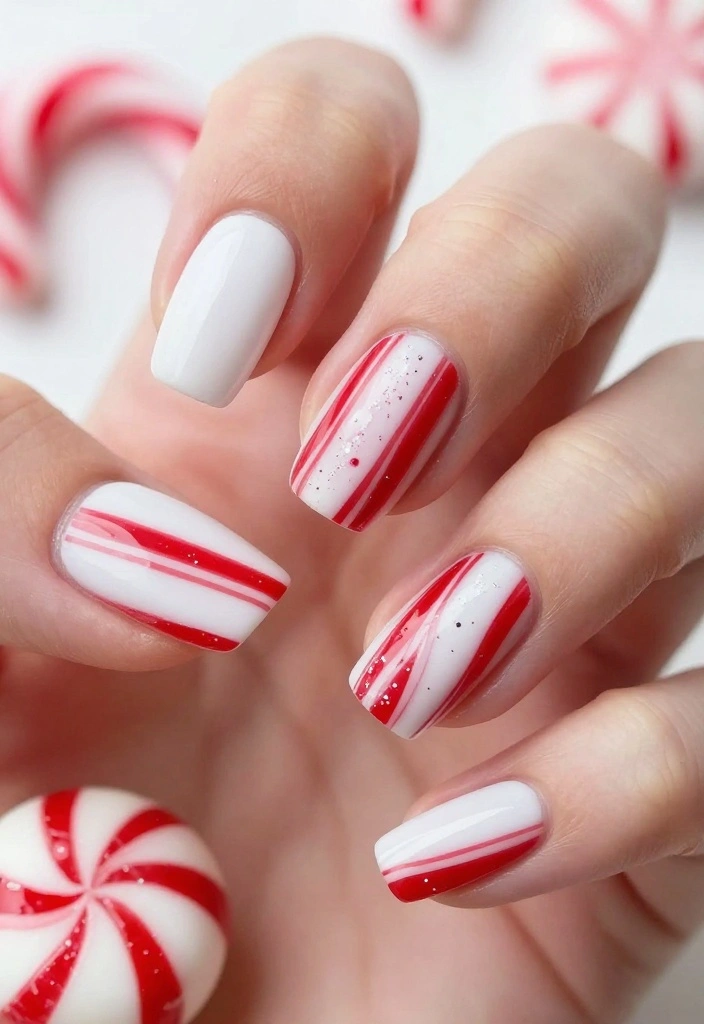
Bring the sweet spirit of Christmas to your nails with candy cane stripes! This festive design captures the essence of the holidays with its iconic red and white color scheme. It’s simple yet eye-catching, making it a great choice for any Christmas celebration.
The alternating stripes create a fun visual contrast, while the option to add glitter brings an extra festive touch. This design is perfect for everything from holiday parties to family gatherings.
Outfit Pieces:
– White base polish
– Red nail polish
– Glitter polish (optional)
– Topcoat for shine
Styling Tips:
– Start with a clean white base for a fresh look.
– Use a striping brush for even, neat lines.
– Alternate stripes or create diagonal lines for a unique twist.
– Add a sprinkle of glitter to some stripes for extra sparkle.
This playful design is fun and festive! Feel free to mix in other colors to match your holiday outfits.
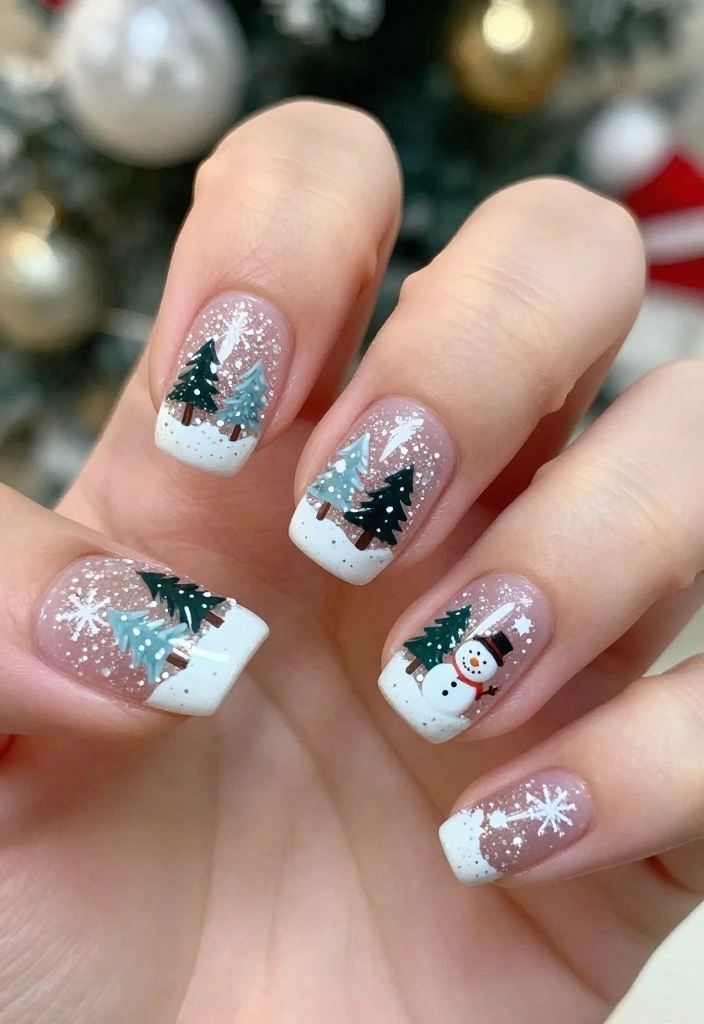
3. Snowy Winter Wonderland

Capture the serene beauty of winter with a snowy wonderland nail design! This elegant look combines soft whites and delicate blues to evoke the essence of a peaceful winter scene. It’s a calming and classy choice for the holiday season.
The color palette creates a beautiful contrast, making your nails look frosty and fresh. This design is ideal for holiday parties, winter weddings, or cozy family gatherings.
Outfit Pieces:
– Light blue base polish
– White nail polish for snowflakes
– Pale gray polish (optional for gradient)
– Sparkly topcoat for a frosty finish
Styling Tips:
– Use a sponge to create a gradient effect on the tips.
– Paint delicate snowflakes or dots with a fine brush for a whimsical touch.
– Seal it all with a sparkly topcoat for a magical finish.
This design embodies the beauty of winter! You can easily switch up the base color to match your outfit or mood.
When you mix snowy whites with icy blues, your christmas light nails become a tiny winter scene you can wear all season. This calming, classy look is perfect for holiday parties and cozy gatherings.
📹 Related Video: ❅ Winter wonderland Nail Design ❅ Christmas trees #XmasWebinar
4. Gingerbread House Nails
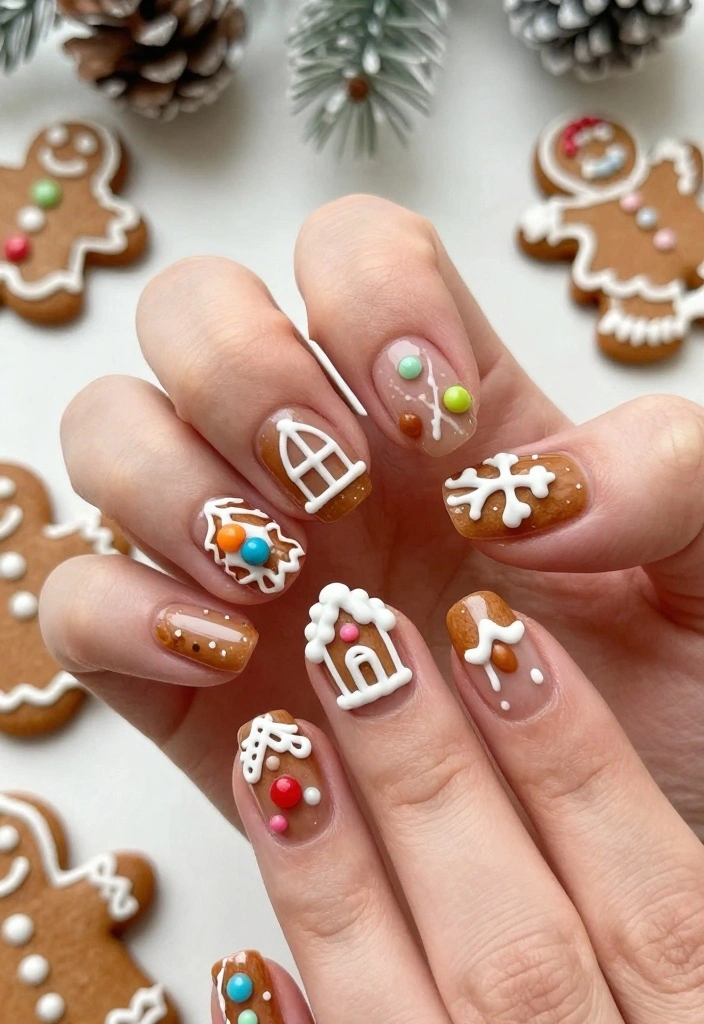
Embrace the charm of gingerbread houses with this delightful nail design! Using warm browns and bright colors, you can create cute gingerbread patterns that evoke sweet holiday memories. It’s a whimsical choice for anyone who loves the festive spirit.
The warm color palette adds a cozy touch, perfect for the holidays. This design is great for festive parties, baking days, or simply to add a fun twist to your holiday look.
Outfit Pieces:
– Dark brown base polish
– White, red, and green polish for icing details
– Glossy topcoat for a sweet finish
Styling Tips:
– Start with a dark brown base for a rich look.
– Use a thin brush to create icing designs and gingerbread elements.
– Add colorful candy details for a playful finish.
– Seal everything with a glossy topcoat to make it pop.
This design is perfect for anyone with a sweet tooth! You can mix colors to match your favorite gingerbread house decorations.
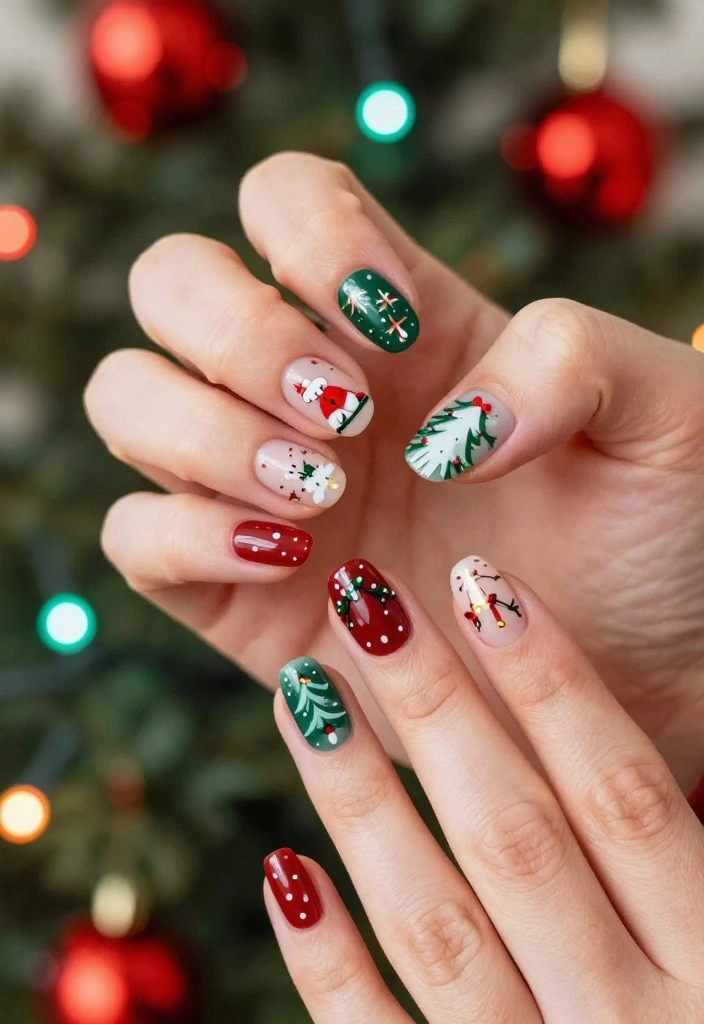
5. Christmas Tree Tips
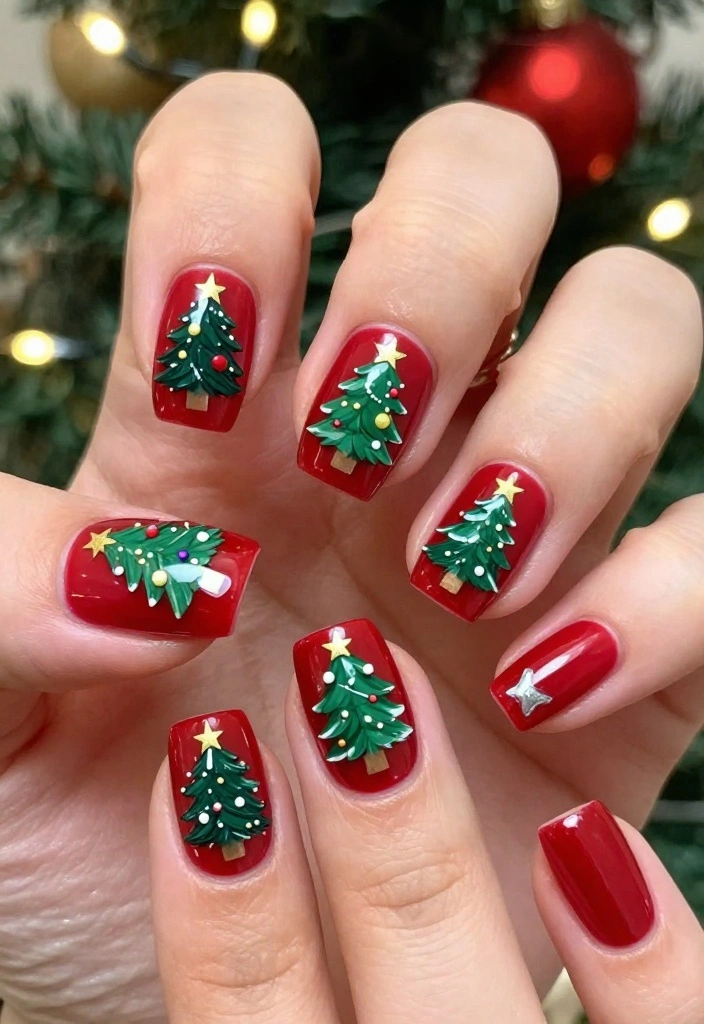
Deck your nails with adorable mini Christmas trees for a festive and fun look! This design features tiny trees that sit perfectly on the tips of your nails, adding a playful touch to your holiday style. It’s a cheerful way to showcase your holiday spirit.
The vibrant green contrasts beautifully against classic red or white bases, making your nails stand out. This design is perfect for holiday parties or casual get-togethers with friends and family.
Outfit Pieces:
– Red or white base polish
– Green polish for tree shapes
– Yellow or gold polish for ornaments
– Glossy topcoat to finish
Styling Tips:
– Start with a red or white base for a classic look.
– Use green polish to paint small tree shapes on the tips.
– Add dots for ornaments and a tiny star at the top.
– Seal with a glossy topcoat for a fresh finish.
This design brings joy to your nails! You can easily swap colors to match your holiday outfits.
6. Festive Ornament Accent

Add a touch of glamour to your nails with a festive ornament design! This chic look showcases stunning ornaments that catch the eye and shine brightly. It’s a sophisticated way to celebrate the season while making a statement.
The dark base enhances the brilliance of metallic and jewel tones, creating an elegant contrast. This design is perfect for holiday parties or special events where you want to stand out.
Outfit Pieces:
– Dark base polish (navy or black)
– Metallic or jewel-toned polishes for ornaments
– Glitter for added sparkle
– Glossy topcoat for shine
Styling Tips:
– Start with a dark base for a dramatic backdrop.
– Paint large ornament shapes on accent nails using rich colors.
– Add bows and glitter for extra detail.
– Finish with a glossy topcoat to make everything shine.
These ornament nails will attract attention wherever you go! You can easily change the ornament colors to match your outfit.
7. Elf-Inspired Nails
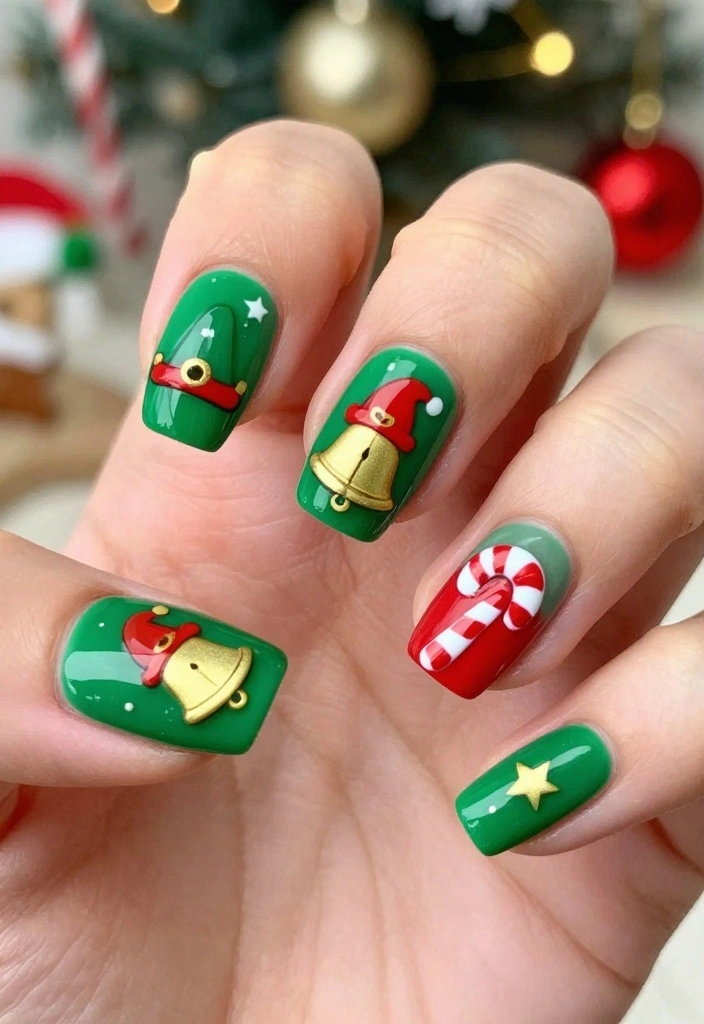
Get into the holiday spirit with playful elf-inspired nails! This fun design uses bright colors and whimsical patterns to bring joy to your fingertips. It’s a cheerful choice for anyone looking to embrace the festive season.
The classic green and red colors create a merry contrast, while gold adds a touch of sparkle. This design is perfect for holiday gatherings or Christmas-themed events.
Outfit Pieces:
– Green base polish for one hand
– Red base polish for the other
– Gold polish for tips and details
– Glossy topcoat to finish
Styling Tips:
– Choose a green base for one hand and a red base for the other for a playful look.
– Decorate with elf hats, jingle bells, or candy canes.
– Use gold for tips or other nail art details for extra flair.
– Seal everything with a glossy topcoat for a polished finish.
These nails are perfect for anyone who loves whimsy! Feel free to mix colors to match your holiday outfits.
8. Winter Berry Accents

Capture the essence of winter with beautiful berry accents on your nails! This elegant design features subtle colors that stand out beautifully against a light base. It’s a chic choice for holiday gatherings or festive events.
The soft hues of berries and leaves create a harmonious contrast, adding a touch of nature to your festive style. This design is perfect for both casual and formal occasions.
Outfit Pieces:
– Nude or soft white base polish
– Red or burgundy polish for berries
– Green polish for leaves
– Matte or glossy topcoat to finish
Styling Tips:
– Apply a nude or soft white base for a fresh canvas.
– Use a fine brush to create clusters of berries and leaves for a natural touch.
– Finish with a topcoat for durability and shine.
This design is subtle yet elegant! You can easily adjust the berry colors to fit your holiday palette.
9. Frozen Icicle Nails

Create a cool and refreshing look with frozen icicle nails! This design captures the beauty of winter, featuring icy colors that give a unique frosty effect. It’s perfect for adding a touch of elegance to your holiday style.
The light blues and silvers create a striking contrast, making your nails look sophisticated and chic. This design is ideal for winter parties or festive gatherings.
Outfit Pieces:
– Light blue or white base polish
– Silver polish for icicles
– Glitter for a frosty sparkle
– Glossy topcoat to finish
Styling Tips:
– Start with a light blue or white base for a wintry feel.
– Use a thin brush to create icicle shapes at the tips.
– Add shimmer or glitter for an icy sparkle.
– Seal with a glossy topcoat to enhance the frozen look.
This design is all about sophistication! You can easily swap colors to match your winter outfits.
10. Nutcracker Ballet Inspired
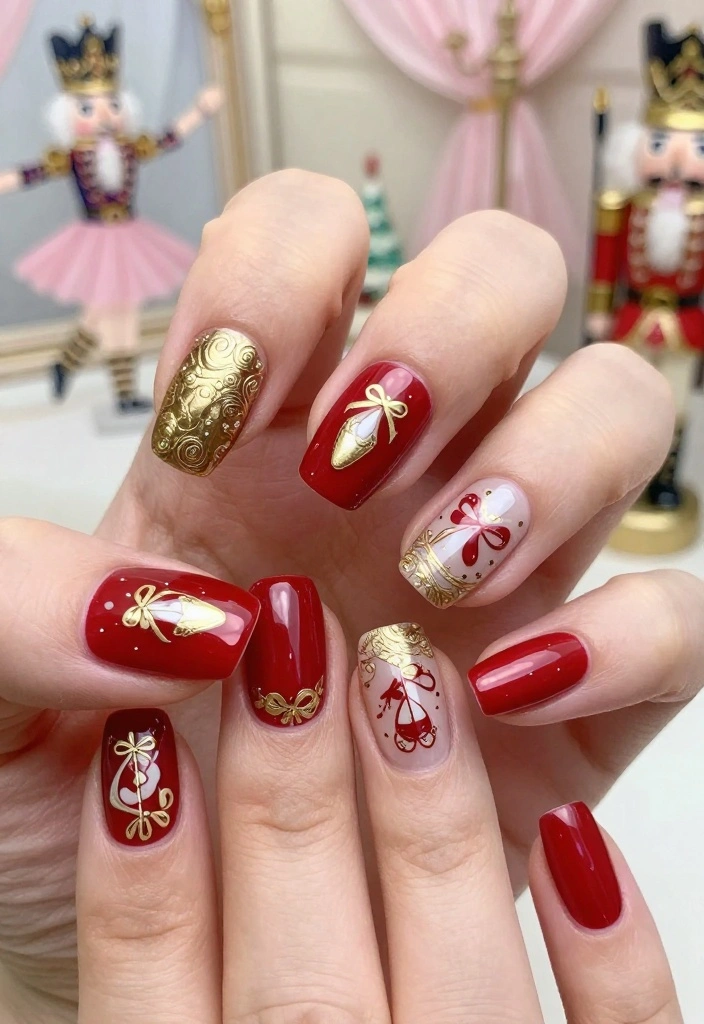
Celebrate the holiday season with nails inspired by the classic Nutcracker ballet! This design reflects rich colors and festive elements, capturing the essence of this beloved tradition. It’s an elegant choice for holiday festivities.
The deep reds and gleaming golds create a stunning contrast, making your nails stand out beautifully. This design is perfect for performances, parties, or any elegant holiday event.
Outfit Pieces:
– Rich red or gold base polish
– Nail art brush for designs
– Glitter for added sparkle
– Glossy topcoat to finish
Styling Tips:
– Apply a rich base color for a luxurious look.
– Create designs inspired by the ballet, like slippers or toy soldiers.
– Add glitter for an extra festive touch.
– Seal everything with a glossy topcoat for a polished finish.
This design beautifully celebrates the season! You can easily switch colors to match your holiday outfits.
11. Sparkling Snow Globes
Bring the charm of snow globes to your nails with a whimsical design! This nail art captures the joy of watching snow fall inside a globe, adding a festive touch to your style. It’s a playful choice for holiday celebrations.
The clear base allows the glitter to create a magical effect, while hand-painted details make it truly unique. This design is perfect for parties, family gatherings, or just to add some holiday cheer to your everyday look.
Outfit Pieces:
– Clear base coat
– Silver and white glitter for the snow globe effect
– Nail art brush for details
– Glossy topcoat to finish
Styling Tips:
– Apply a base coat to protect your nails.
– Sprinkle glitter for a snow effect, focusing on the center.
– Add hand-painted details like trees or snowmen for personalization.
– Seal everything with a glossy topcoat to enhance the look.
This design spreads holiday cheer! You can easily adjust the colors for a unique twist.
12. Reindeer Antlers

Celebrate the season with cute reindeer antlers on your nails! This whimsical design is perfect for anyone who loves playful nail art. It’s a fun way to embrace the holiday spirit and showcase your creativity.
The brown or neutral base makes the antlers pop, creating a cheerful look that’s perfect for festive gatherings. This design is a delightful choice for holiday parties or casual get-togethers.
Outfit Pieces:
– Brown or nude base polish
– Brown polish for antlers
– Red polish for Rudolph’s nose
– Glossy topcoat to finish
Styling Tips:
– Start with a brown or nude base for a clean look.
– Use a thin brush to create antlers at the tips of your nails.
– Add tiny red circles for Rudolph’s nose for a playful touch.
– Seal with a glossy topcoat for durability.
These nails bring smiles wherever you go! You can easily switch the base color to match your holiday outfits.
13. Mistletoe Magic
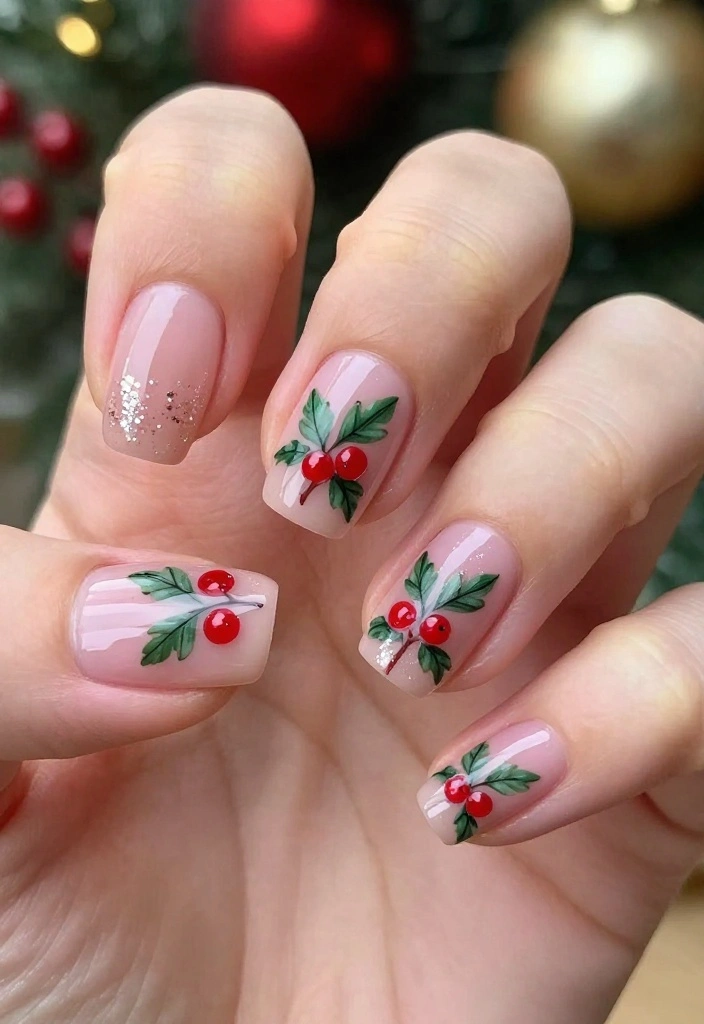
Embrace the spirit of mistletoe with a beautiful nail design! This elegant look features iconic green leaves and red berries, showcasing the charm of the season. It’s a lovely choice for holiday gatherings or romantic occasions.
The light base highlights the vibrant colors, bringing a fresh and cheerful feel to your nails. This design is perfect for both casual events and more formal holiday celebrations.
Outfit Pieces:
– Light pink or white base polish
– Green polish for leaves
– Red polish for berries
– Glitter for added sparkle
– Topcoat for protection
Styling Tips:
– Apply a light base for a bright canvas.
– Use a fine brush to create mistletoe designs with leaves and berries.
– Add a touch of glitter to the berries for extra sparkle.
– Seal everything with a topcoat to finish.
This design captures the joy of the season! You can easily adjust colors to fit your holiday palette.
Nothing says holiday sparkle like christmas light nails and a mistletoe moment. For a fresh, festive look, choose a light pink or white base and add tiny green leaves with red berries to stay chic at every gathering.
14. Gift-Wrapped Nails
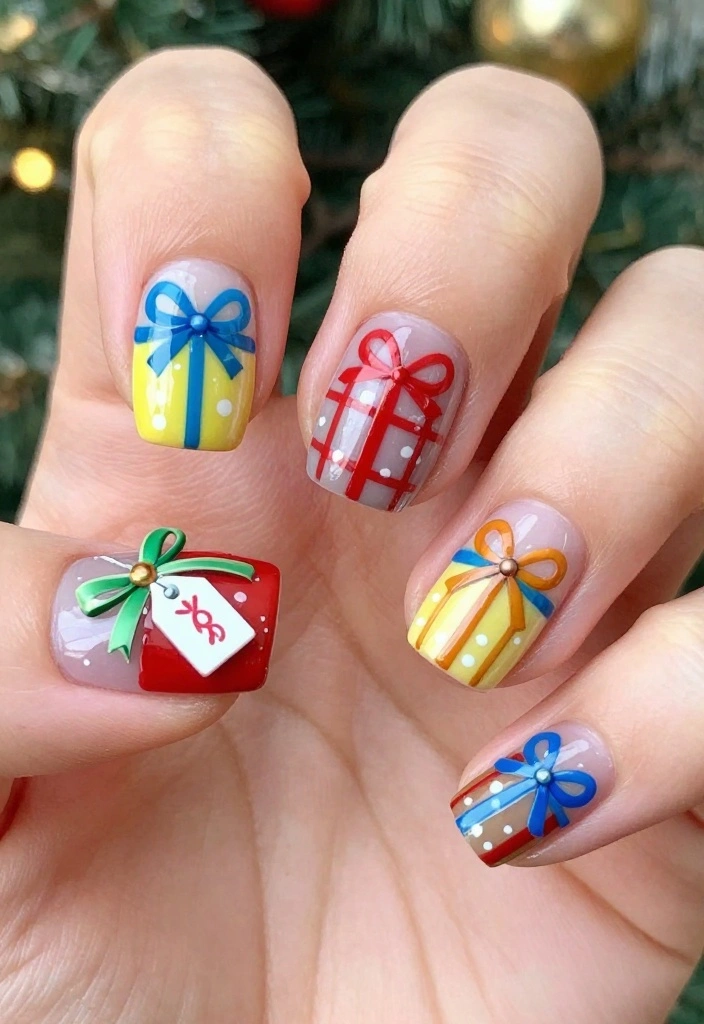
Celebrate the season of giving with charming gift-wrapped nails! This festive design mimics beautifully wrapped presents, adding a cheerful touch to your holiday style. It’s a fun way to showcase your love for the holidays.
The bright colors and creative ribbons create a joyful contrast, making your nails a conversation starter. This design is perfect for holiday parties or family gatherings.
Outfit Pieces:
– Colorful base polish (red, green, gold)
– Nail art brush for ribbon designs
– Small bows or gift tags for detail
– Glossy topcoat to finish
Styling Tips:
– Start with a colorful base to represent gift wrap.
– Use a nail art brush to create ribbon designs in contrasting colors.
– Add small bows for extra detail and charm.
– Seal it all with a glossy topcoat for a polished finish.
These gift-wrapped nails are sure to spread joy! You can easily swap colors to match your holiday outfits.
15. Holiday Spirit Ombré

Finish your festive nail art journey with a stunning holiday spirit ombré design! This look blends colors associated with the season into a beautiful gradient, creating an eye-catching effect. It’s a vibrant choice that will surely make your nails stand out.
The combination of red, green, gold, and white creates a classic holiday feel, perfect for festive celebrations. This design is ideal for parties, family gatherings, or simply to add some cheer to your everyday style.
Outfit Pieces:
– Base coat to protect your nails
– Red, green, gold, and white polishes for blending
– Makeup sponge for the gradient effect
– Glitter for added sparkle
– Glossy topcoat to finish
Styling Tips:
– Apply a base coat to protect your nails before starting.
– Use a makeup sponge to blend your chosen colors from base to tip for a smooth gradient.
– Add glitter on the tips for an extra festive touch.
– Seal with a glossy topcoat to enhance the ombré effect.
This ombré design is perfect for the season! You can easily swap colors to match your holiday outfits.
Conclusion
With these 15 Christmas light nail designs, your holiday season is sure to shine brighter! Each design not only celebrates the festive spirit but also allows you to express your unique style. Whether you choose whimsical, elegant, or playful designs, your nails will be a festive highlight this season. Don’t forget to share your creations with friends and family to inspire them to join in on the fun! Have a beautiful holiday filled with joy, laughter, and, of course, fabulous nails!
Frequently Asked Questions
What Are Easy Christmas Light Nails Designs I Can Try at Home?
Christmas light nails are a fun, beginner-friendly way to celebrate the season. To try at home, start with a clean base and then add tiny bulb shapes and a delicate string of lights. Here’s a simple approach:
1) Prep nails with a smooth base and a coat of base color that matches your design (navy, red, or nude work well).
2) Use a fine brush or dotting tool to create small circular bulbs in your chosen colors, spacing them along a curved line to mimic a string of lights.
3) Connect the bulbs with a thin line in a complementary color to create the “string.”
4) Add a soft glow at the tips of bulbs with white or pale yellow dots or a subtle glitter effect.
5) Finish with a strong top coat to seal and prevent chipping.
Pro tip: use holiday nails or festive nail art only as accents if you’re new to nail art to keep it simple and pretty.
Which Colors and Finishes Work Best for Christmas Light Nails and Holiday Nails?
To get the most flattering Christmas light nails and holiday nails, stick with a palette that echoes holiday lights: red, emerald green, sapphire blue, gold, and silver. Try these combos: dark navy base with colorful bulbs; nude base with metallic bulbs; white base with multicolor bulbs for a crisp look. Finishes matter too: a glossy top coat makes lights pop, while a matte base with glossy bulbs creates a chic, modern contrast. Keep bulbs small on short nails and a bit larger on longer nails for balance. This approach fits festive nail art without feeling overwhelming.
How Can I Make Christmas Light Nails Last Longer Without Chipping?
Want longer-lasting Christmas light nails? Start with a clean, dry nail bed and use a good base coat to protect your natural nails.
Then apply thin coats of color, letting each layer dry fully before adding the next. Finish with a durable top coat and reapply it every 2–3 days to seal in the design. If you’re using gel, cure under your lamp according to the manufacturer’s instructions. Finally, avoid prolonged exposure to water and use cuticle oil to keep nails healthy.
This simple routine helps your holiday nails stay bright and chip-free longer.
What Tools Do I Need for Festive Nail Art Like Christmas Light Nails?
For a pro-looking Christmas light nails look at home, gather a few basic tools: dotting tool or a fine brush for bulbs, a striping tape for clean strings, a thin nail art brush for lines, nail stickers or decals for precise lights, and a good top coat. You’ll also want a dependable base coat, your chosen colors, and optional foil or glitter for extra sparkle. If you prefer easy setup, use pre-made Christmas light decals to speed up your holiday nails routine.
Are Christmas Light Nail Designs Suitable for Different Nail Shapes and Lengths?
Absolutely! Christmas light nails adapt beautifully to any nail shape or length. For short nails, keep the bulbs tiny and the string simple so the design reads clearly. On long nails, you can make the bulbs slightly larger and run a longer string to create a dramatic look. You can also use negative space or decals to fit the lights to rounded, stiletto, or square shapes. With a little adjustment, this festive nail art works well for holiday nails and keeps your style on point.
Related Topics
christmas light nails
holiday nails
festive nail art
seasonal designs
easy nail art
beginner friendly
nail art trends
colorful designs
winter nail designs
glitter nails
cute nail ideas
DIY nail art
These nail designs are so festive! I love how creative people can be with their nails. Do you think you could pull off any of these styles at a holiday party?
I tried a glittery Christmas light design last year, but it looked more like a disco ball! At least I got some laughs. What’s your favorite nail design mishap?
Did you know the tradition of putting up Christmas lights goes back to the 17th century? Imagine how different those designs were! These nail ideas definitely bring a modern twist.