Nail polish designs have become a popular way to express creativity and style. With each passing season, new trends emerge, inspiring nail artists around the world to create stunning masterpieces. This post is for those who want to elevate their nail game and bring fresh ideas to their next manicure. Whether you’re a seasoned nail art enthusiast or just getting started, these artistic nail polish designs will spark your imagination and help you find your unique flair.
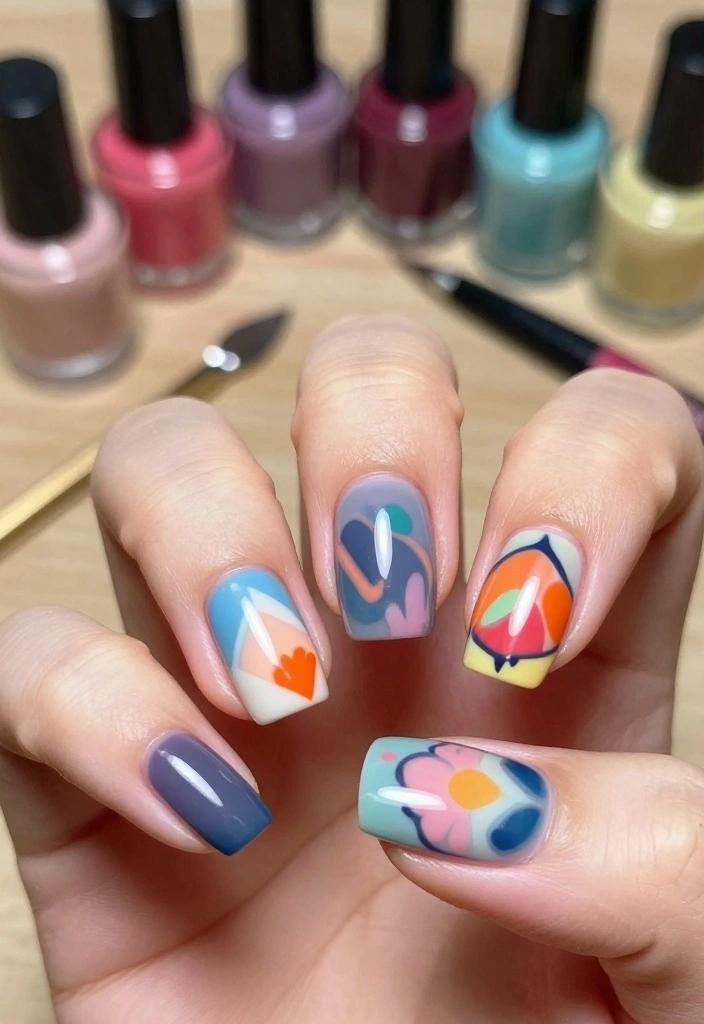
If you love to stand out and appreciate creativity, this collection is just for you. You’ll discover 16 jaw-dropping nail designs that are sure to turn heads and perhaps even get you a few compliments. From intricate florals to bold geometric patterns, there’s something for everyone. You’ll find inspiration that is not only visually appealing but also easy to replicate at home. Get ready to dive into a vibrant world of nail art that’s both fun and fashionable.
As you explore each design, you’ll learn useful tips and tricks to recreate these looks yourself. Let’s break it down and transform your nails into pure masterpieces that you’ll be proud to flaunt. Don’t forget to check out design #10; it’s a showstopper you won’t want to miss!
Key Takeaways
– Discover a variety of nail polish designs, each offering a unique and artistic twist on traditional styles.
– Find inspiration from trending designs, including marble elegance and floral fantasy, that can elevate your nail art game.
– Learn how to create eye-catching patterns like colorful geometric shapes and ombre effects with practical tips for easy application.
– Get ideas for seasonal and themed nail art, perfect for special occasions or casual outings.
– Enhance your nail art skills with designs that cater to both beginners and experienced artists, ensuring everyone can find their perfect match.
Contents
- 1. Marble Elegance
- 2. Colorful Geometric Patterns
- 3. Floral Fantasy
- 4. Ombre Magic
- 5. Sparkling Glitter Glam
- 6. Minimalist Chic
- 7. Animal Print Extravaganza
- 8. Cosmic Nails
- 9. Abstract Art
- 10. Twinkling Stars
- 11. Nautical Vibes
- 12. Rainbow Brights
- 13. Twisted French Tips
- 14. Artistic Splatter
- 15. Vintage Lace
- 16. Tropical Paradise
1. Marble Elegance
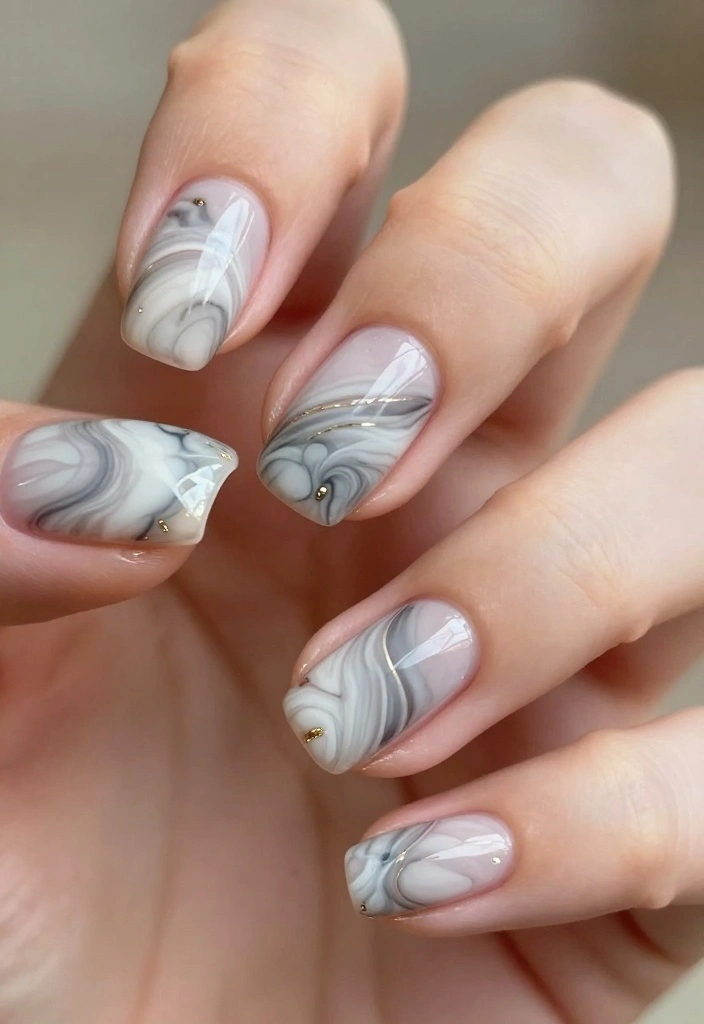
Marble nail art embodies sophistication and elegance. This design mimics the exquisite veining of real marble, giving your nails a luxurious flair. You can create this stunning effect through water marbling or sponge painting techniques using whites, grays, and blacks.
Adding metallic gold or silver accents enhances the look, reflecting the shimmering veins seen in high-end marble. This design is ideal for formal events or whenever you wish to elevate your style with a touch of class.
For Marble Nails:
– Use a clear base coat for an even finish.
– A small brush can help add intricate details.
– Finish with a glossy top coat to achieve a polished shine.
The timeless appeal of marble designs makes them suitable for any occasion, ensuring they remain a favorite among nail art enthusiasts!
📹 Related Video: NAIL ART – WATER MARBLE TUTORIAL | Dearnatural62
2. Colorful Geometric Patterns
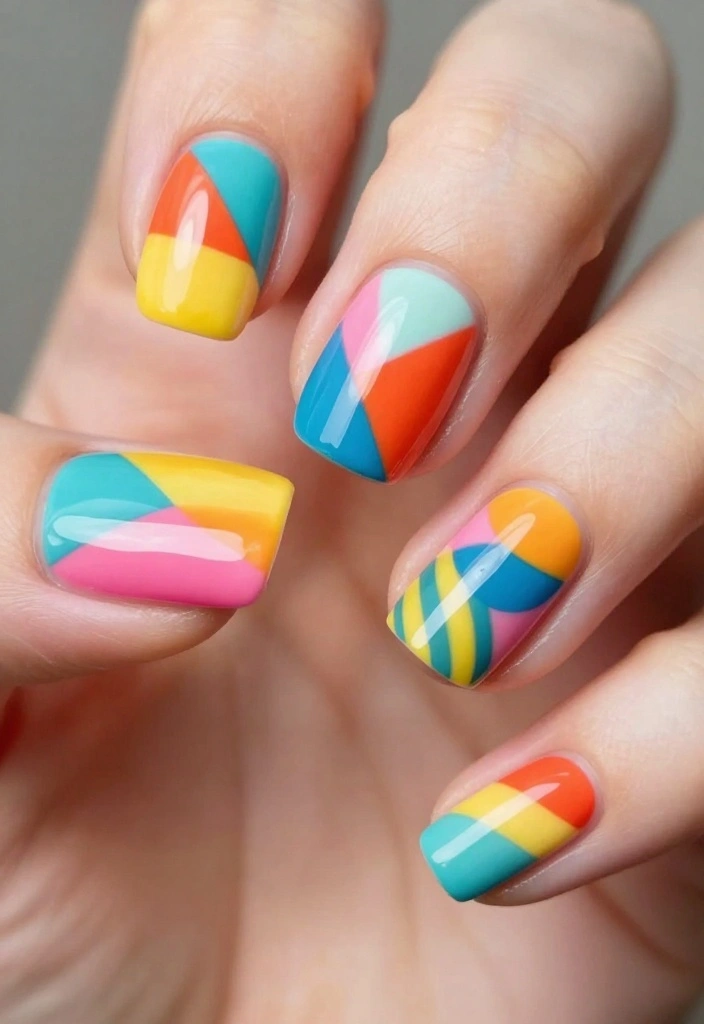
Geometric patterns are vibrant, modern, and incredibly eye-catching. Mix bold colors to create an abstract design that showcases your unique style. You can use triangles, stripes, or playful polka dots—whatever speaks to you!
The beauty of this design lies in its versatility; you can explore endless creativity with different shapes and colors. Choose a color palette that resonates with your mood, opting for pastels in summer or deep jewel tones in autumn.
Steps to Create Geometric Patterns:
1. Start with a base coat in your chosen color.
2. Use striping tape or a thin brush to add contrasting shapes.
3. Finish with a clear top coat for durability and shine.
Geometric designs are a fantastic way to express your personality while adding a playful touch to your everyday look.
3. Floral Fantasy
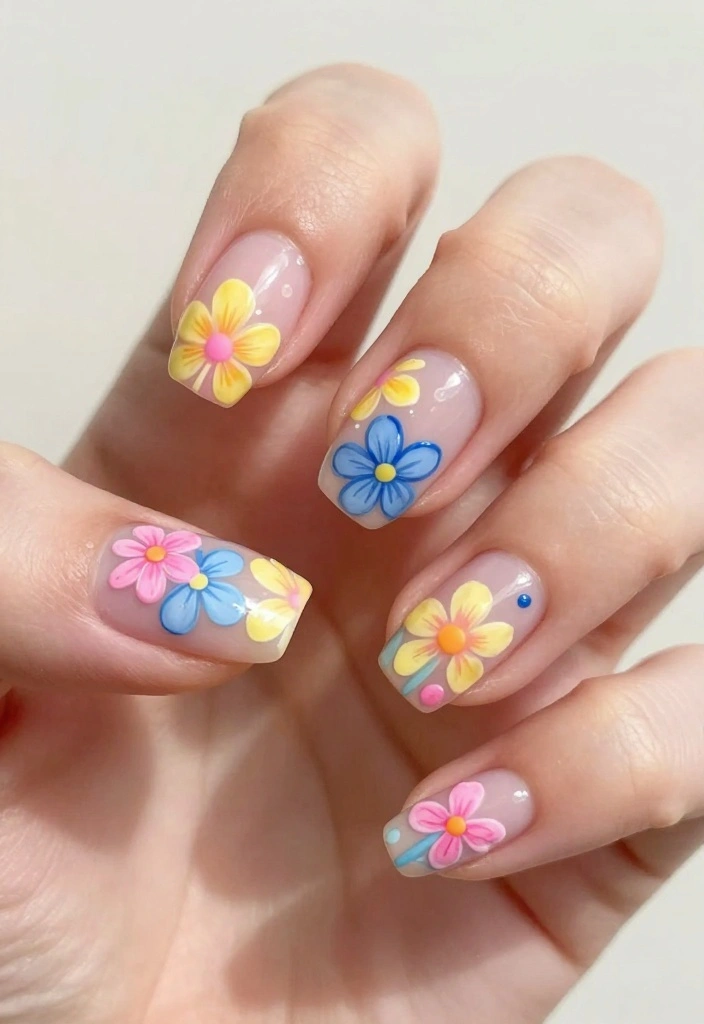
Floral designs are eternally stylish, ranging from intricate details to minimalistic touches. Whether you favor delicate daisies or bold roses, floral nail art infuses a charming femininity into any ensemble.
To create this look, start with a light base color, then use a fine brush for detailed flowers or nail stickers for a quicker option. Consider a pastel gradient background to make the flowers truly stand out.
For Floral Nail Art:
– Use dotting tools for perfect flower centers.
– Experiment with various flower shapes and sizes.
– A matte top coat can provide a unique finish.
Floral designs shine brightest in spring and summer but can be adapted for other seasons with darker shades or winter-themed florals.
4. Ombre Magic
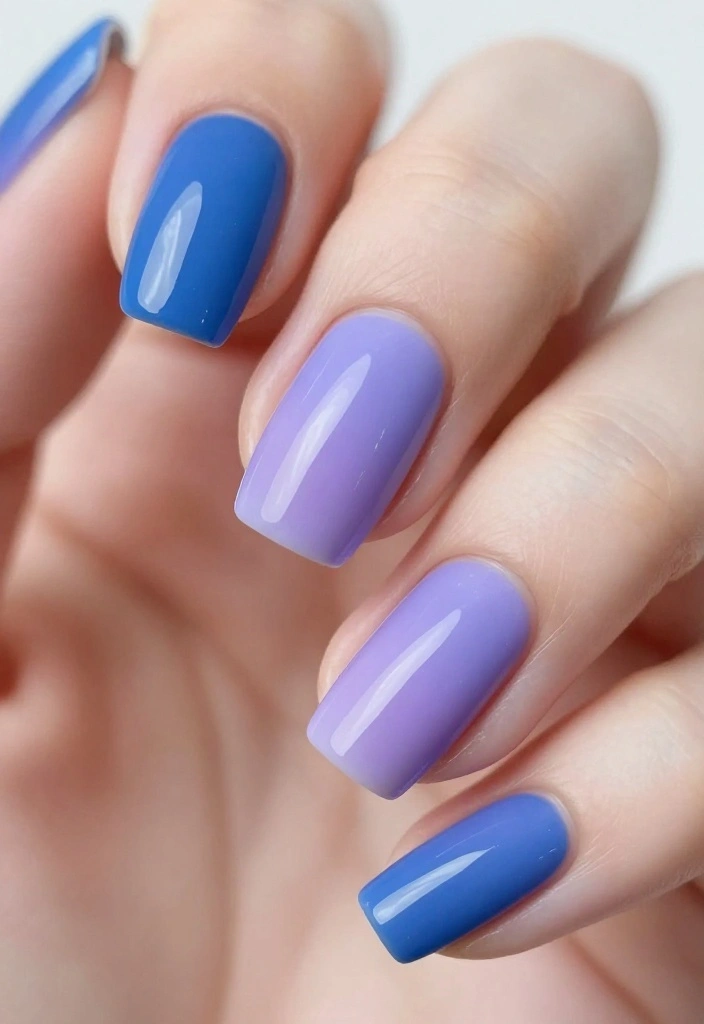
The ombre effect offers a stunning way to blend colors, creating a dreamy gradient that can be subtle or bold. You can pick two complementary shades or go adventurous with a rainbow effect.
To achieve this look, use a makeup sponge to dab the colors onto your nails, blending them towards the tips for a seamless transition. This technique delivers a professional and chic appearance.
Steps to Achieve Ombre Nails:
1. Apply a base coat and let it dry.
2. Choose your colors and apply them to the sponge.
3. Press the sponge onto your nails, repeating until you achieve your desired blend.
4. Seal with a glossy top coat for a flawless finish.
Ombre nails are versatile and suitable for any occasion, making them a favorite for nail art lovers everywhere.
How To Choose Artistic Nail Polish Designs
Choosing the right nail polish designs can be a fun yet overwhelming task. With so many options available, it’s essential to narrow down your choices based on your personal style, occasion, and even your skill level. Here are some points to consider when selecting the perfect artistic nail polish design for your next manicure.
1. Consider Your Style
Think about your personal style and what you want to express through your nails. Are you more into bold, vibrant colors or do you prefer a minimalist look? For artistic designs, consider patterns like floral fantasy or geometric shapes that reflect your personality. If you’re unsure, browse through social media or nail art websites for inspiration that resonates with you.
2. Think About the Occasion
Different occasions call for different nail designs. A chic ombre design may be perfect for a formal event, while animal prints are great for casual outings. If you’re attending a wedding, go for elegant styles like vintage lace or a sparkling glitter glam. Always match your nail art to your attire and the event’s vibe to make a cohesive statement.
3. Assess Your Skill Level
Your skill level in nail art greatly impacts your choice. If you’re a beginner, consider simpler designs like minimalist chic or twisted French tips that require less precision. More advanced artists may want to tackle intricate designs like abstract art or cosmic nails. Don’t be afraid to challenge yourself, but also choose something you know you can execute well.
4. Choose the Right Colors
Color selection can make or break your nail design. Think about colors that complement your skin tone and seasonal trends. Warm colors like reds and oranges can give a fiery vibe, while cool colors like blues and greens can feel refreshing. For artistic designs, consider using a combination of colors for a more eye-catching effect.
5. Quality of Products
The products you use can significantly affect the outcome of your nail art. Invest in high-quality nail polishes that offer good coverage and longevity. Look for formulas that are chip-resistant and quick-drying. If you’re planning to add embellishments, ensure that they are also of good quality to prevent early wear and tear.
6. Nail Shape and Length
Your nail shape and length can influence how designs appear. Longer nails can accommodate intricate patterns like artistic splatter or twinkling stars, while shorter nails might look best with simpler designs like nautical vibes or rainbow brights. Choose a nail shape that complements your design choice; for example, almond shapes are ideal for elegant styles, while square shapes can be great for bold patterns.
Pro Tip: Always do a trial run. Consider practicing the design on a paper nail or a fake nail set first. This helps you visualize how it will look and gives you a chance to make adjustments before applying it to your actual nails.
By considering these factors, you can confidently choose nail polish designs that not only look great but also reflect your unique character and style. Happy painting!
5. Sparkling Glitter Glam

Glitter nails always steal the spotlight! They instantly elevate any look with a dazzling touch of sparkle. You can go all-out with glitter polish or choose a subtle accent nail design for a more understated effect.
Glitter combines beautifully with any color, making it a flexible option for your nail artistry. Apply a clear base coat, then your favorite glitter polish, and seal it with a top coat for maximum shine and durability.
For Glitter Nails:
– Layer different glitters for a multi-dimensional look.
– Consider a glitter gradient for a blended appearance.
– A thick top coat can help smooth out the texture.
Glitter nails are perfect for parties, celebrations, or any fun event where you want to stand out effortlessly.
💅 Nail Art Made Easy!
Unlock stunning nail art designs at home with our DIY guide, perfect for busy moms who want creativity and style.
6. Minimalist Chic

If simplicity is your style, minimalist nail art is perfect for you. This design focuses on clean lines and subtle elegance. Think neutral colors paired with a pop of a single accent nail or delicate line work.
Start with a nude or light base to easily add tiny dots, lines, or geometric shapes to your nails. This style radiates sophistication, fitting for any occasion, whether at the office or during a night out.
For Minimalist Nails:
– Use a fine brush for detailed precision.
– Stick to a limited color palette for a cohesive appearance.
– Ensure your nails are neatly shaped for that polished look.
The timeless nature of minimalist designs makes them ideal for anyone seeking a clean, chic nail aesthetic.
7. Animal Print Extravaganza
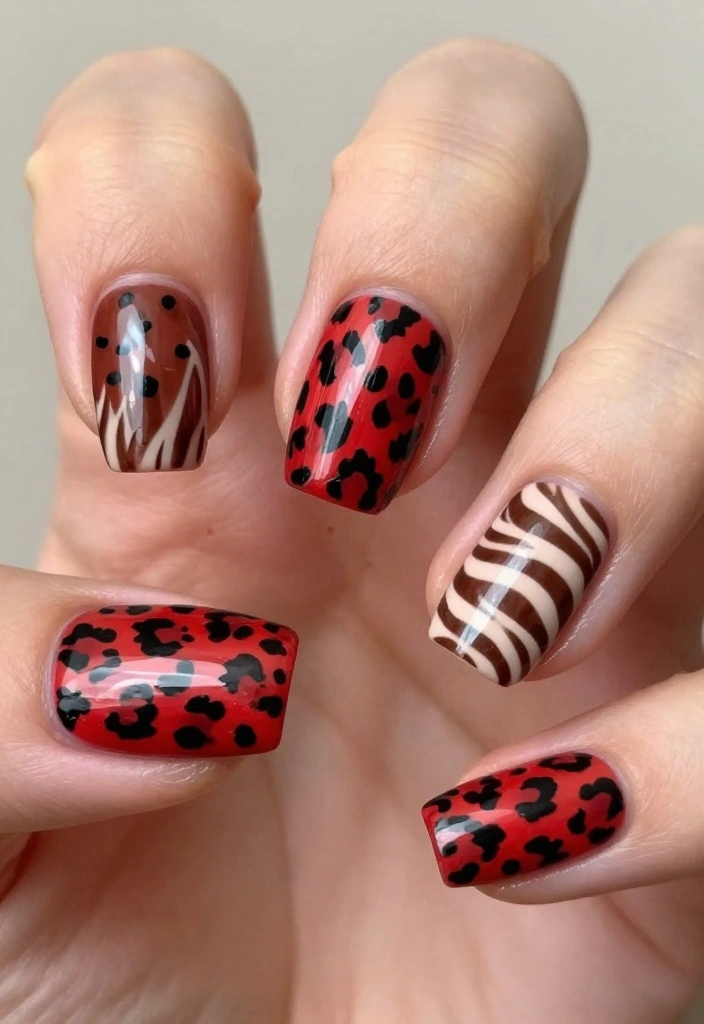
Animal prints add a wild twist to your nails! From classic leopard spots to zebra stripes, this design lets you showcase your fiercer side. You can pick a traditional style or mix various animal prints across different nails.
For these designs, start with a base color, then use a small brush or nail art pen to add your favorite patterns. Pair vibrant colors like fiery reds and tiger oranges for a striking statement or stick to classic browns and blacks for a more subdued look.
For Animal Print Nails:
– Use a dotting tool to create perfect spots.
– Experiment with different animal patterns to find your unique style.
– Seal with a top coat to keep your design fresh.
Animal prints are fun and edgy, perfect for anyone looking to make a bold statement with their nails.
8. Cosmic Nails
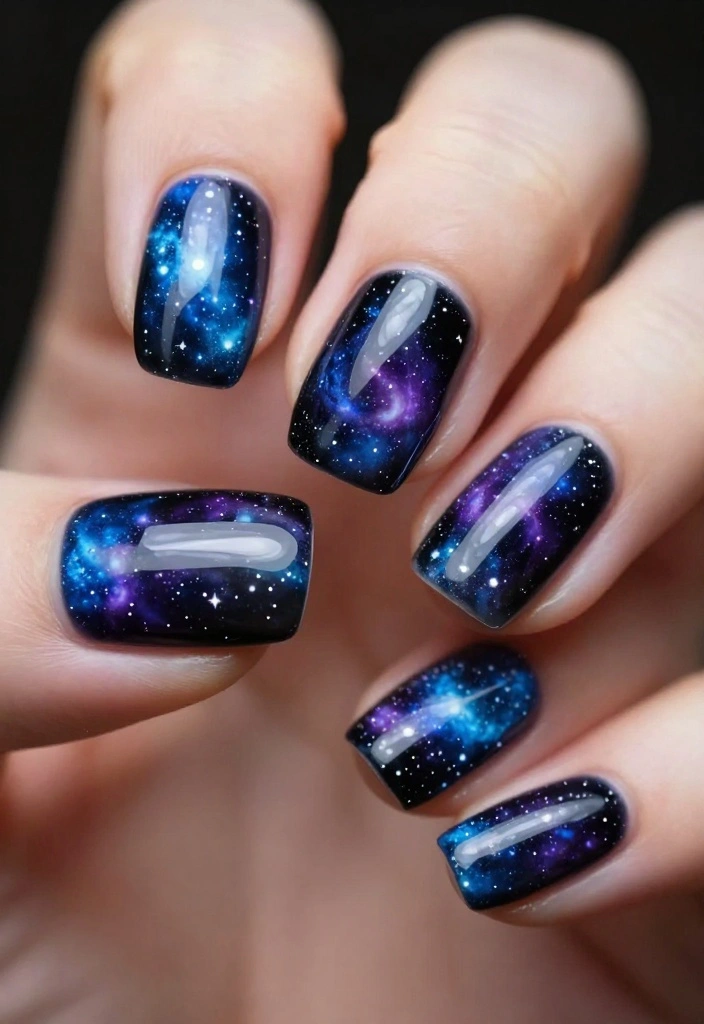
Let the universe inspire your nail art with cosmic designs! Create dreamy galaxies, starry skies, and nebulae right on your fingertips. Use deep base colors like navy or black and layer lighter shades for depth and dimension.
To add stars, use a toothpick or nail art brush to dab tiny white dots, or opt for a holographic finish for a dazzling effect. This design is perfect for those who love celestial themes or want an eye-catching, otherworldly aesthetic.
For Cosmic Nails:
– Use a sponge for a blended galaxy effect.
– Consider glow-in-the-dark polish for a fun twist.
– Seal with a glossy top coat for shine.
Cosmic nails are mesmerizing and allow for creativity, ideal for those feeling adventurous with their nail art!
Cosmic Nails aren’t just color—they’re a tiny galaxy you can wear. Start with a dark base, dab lighter nebula swirls, and finish with white stars for depth you can mirror on every fingertip. Nail polish designs shine brightest when you dream beyond the surface.
9. Abstract Art
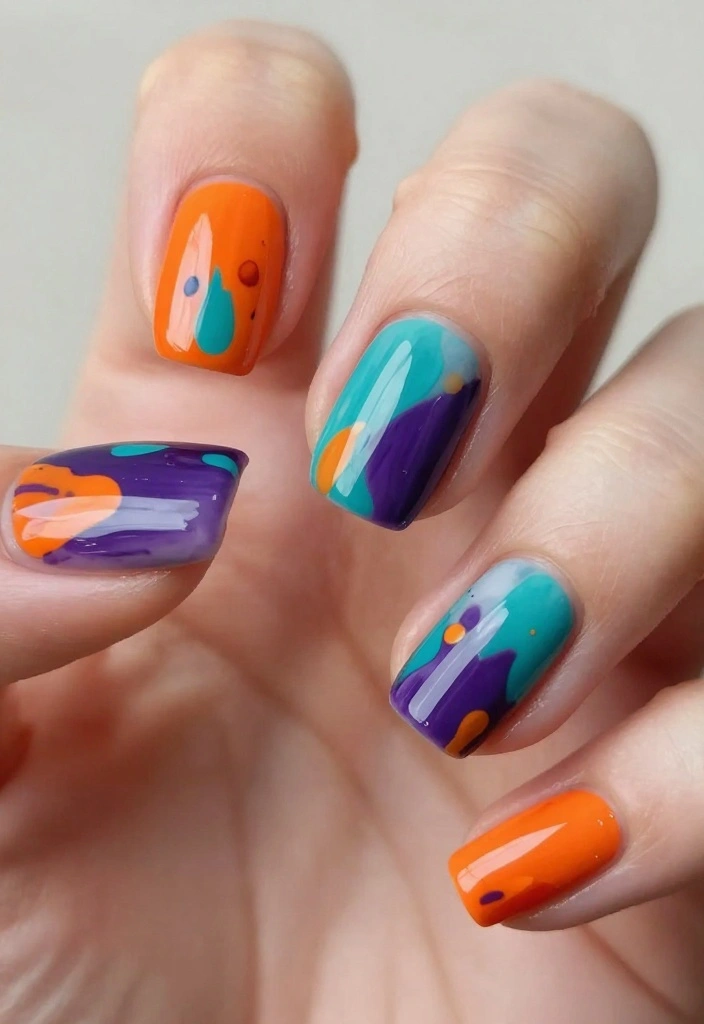
Unleash your creativity with abstract nail designs! This trend allows you to express yourself freely by mixing colors, shapes, and textures without boundaries. The beauty of abstract art is that there are no rules—just let your imagination run wild!
Choose vibrant colors and apply them with brushes or sponges in a spontaneous manner. You can even use tools like a comb or sponge to incorporate intriguing textures.
For Abstract Nails:
– Don’t overthink it—embrace the flow!
– Use contrasting colors for a bold statement.
– Seal with a top coat to keep your design intact.
Abstract nail art is liberating and visually stunning, making it perfect for artistic souls wanting their nails to reflect their creativity.
10. Twinkling Stars
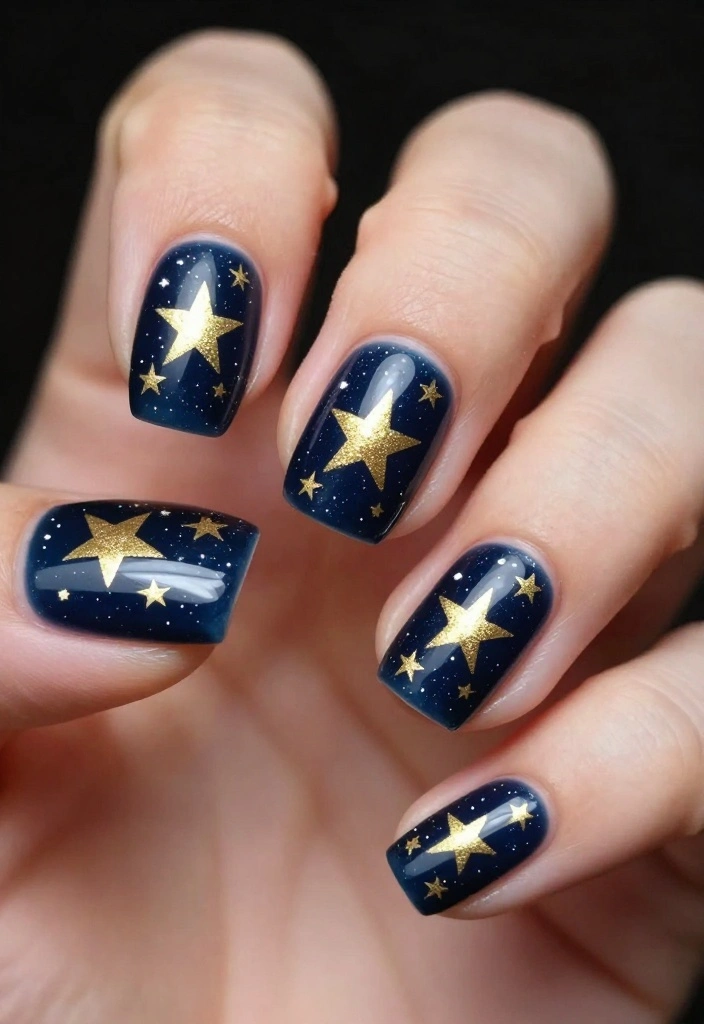
Bring a sprinkle of magic to your nails with twinkling star designs! This delicate nail art can be achieved by painting a dark blue or black base and adding tiny gold or silver stars.
You can create star shapes with nail stickers or a small brush, leaving some nails plain for a striking contrast. This design offers a soft, whimsical look that’s perfect for evening outings or romantic dinners.
Steps for Twinkling Stars:
1. Apply a dark base coat and let it dry.
2. Use gold or silver polish to dot on star shapes.
3. Seal with a top coat for added shine.
Twinkling stars provide a dreamy vibe, making your nails look enchanting and full of personality.
Fun fact: 3 tiny star accents instantly elevate nail polish designs. Start with a dark base, then add gold or silver stars for subtle glam—perfect for evenings out or romantic dinners. Pro-tip: mix stickers and freehand stars for dimension.
11. Nautical Vibes
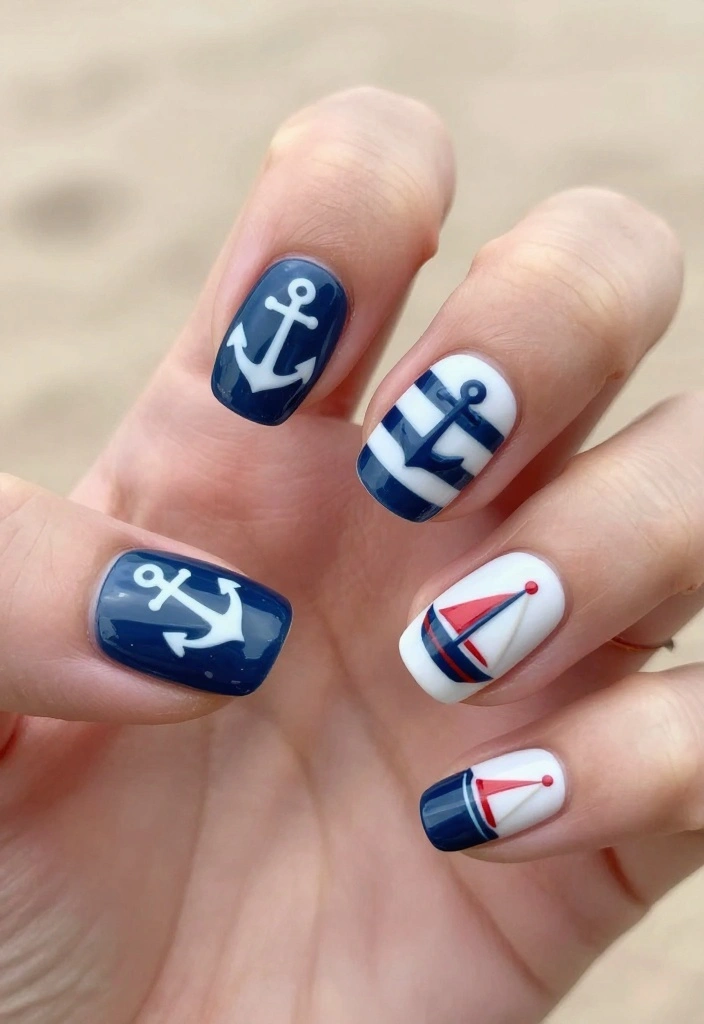
Embrace nautical-themed nails adorned with anchors, stripes, and ocean-inspired colors! Perfect for summer or beach trips, this design captures the spirit of seaside fun.
A classic blue-and-white color palette evokes ocean imagery, while tiny anchors or ropes add lively details. To create this design, start with a blue base and add white stripes or nail art stickers for the nautical elements.
For Nautical Nails:
– Use red accents for a classic sailor look.
– Mix and match designs on each nail for a playful vibe.
– Seal with a top coat to ensure longevity and shine.
Nautical nails are fresh, fun, and perfect for anyone wanting to bring some seaside charm to their manicure.
Fun fact: navy blue nails with white stripes photograph almost 80% sharper in sunlit beach photos. This classic nautical combo reads instantly seaside on every skin tone, making your nail polish designs feel instantly vacation-ready.
12. Rainbow Brights
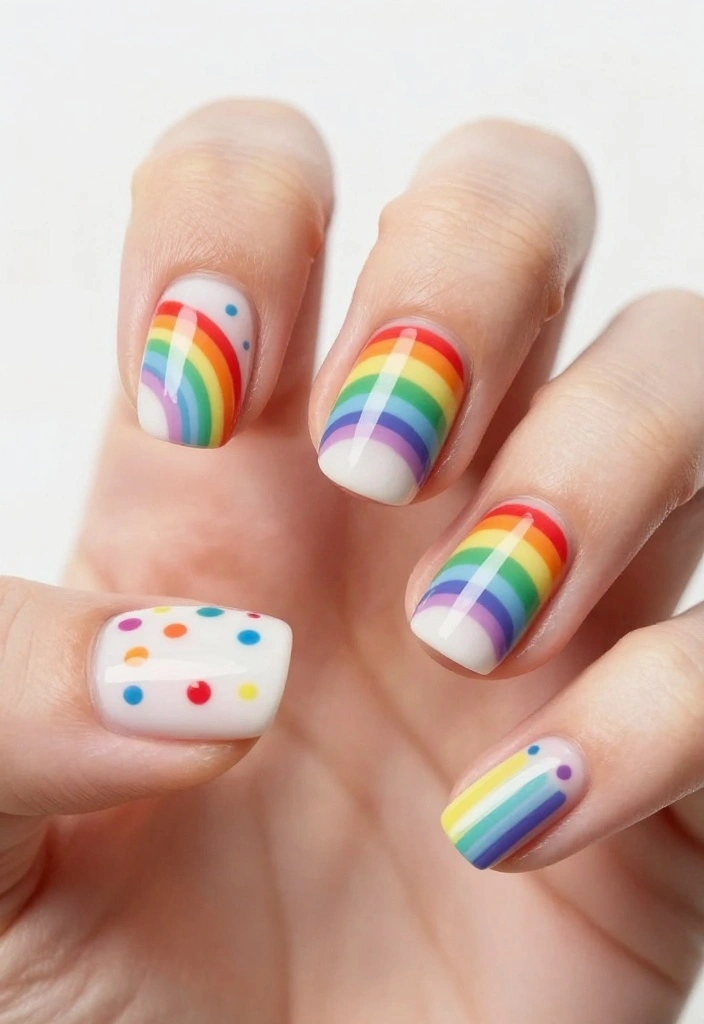
Celebrate color with vibrant rainbow nails! This cheerful design can brighten any day. You can create an ombre effect using all the rainbow colors or opt for playful stripes or dots.
Bright and vibrant polishes are key to achieving this joyful aesthetic. You might even alternate colors on each nail for a mixed look that’s equally fun.
Steps for Rainbow Nails:
1. Begin with a white base for brightness.
2. Use a thin brush to paint stripes or dots in rainbow colors.
3. Finish with a top coat for a glossy finish.
Rainbow nails are festive and perfect for summer fun or adding a burst of color to your daily attire.
13. Twisted French Tips

Add a playful twist to the classic French manicure with unique designs! Instead of just the tips, try diagonal lines, various colors, or fun patterns that make your nails pop.
This design maintains the elegance of a French tip while integrating a modern flair suitable for any occasion. Stick to traditional whites and pinks or experiment with bold colors for an unexpected take.
For Twisted French Tips:
– Use striping tape for precise lines.
– Experiment with different shapes rather than standard tips.
– Seal with a glossy top coat for longevity.
Twisted French tips are trendy and unique, allowing you to express your creativity while maintaining a polished look.
14. Artistic Splatter

Get creative with splatter nail art! This playful style allows you to experiment with colors and patterns without the need for precision. Using a toothbrush or a small brush, flick different polishes onto your nails for a fun splatter effect.
Tailor this design to any color scheme, making it perfect for any event or mood. Use complementary colors for a cohesive look or go bold with contrasting hues for an eye-catching statement.
Steps for Artistic Splatter Nails:
1. Start with a solid base coat color.
2. Flick chosen colors onto the nails with a brush.
3. Seal with a glossy top coat for shine.
Splatter nails are fun and spirited, ideal for anyone who loves to express their creativity through bold designs.
15. Vintage Lace
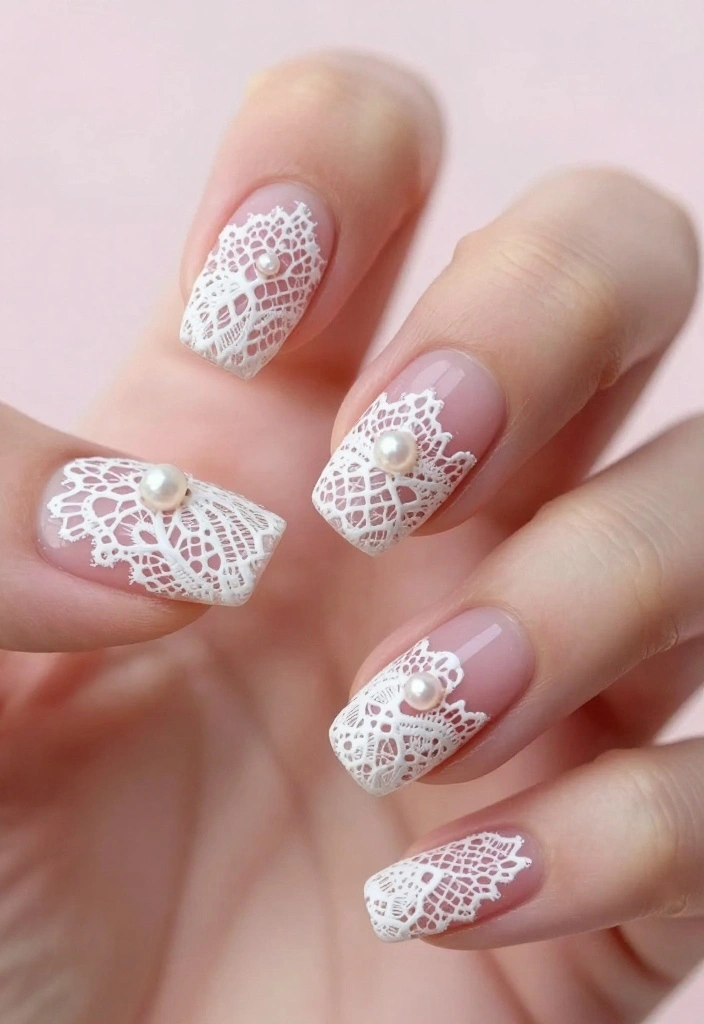
For an elegant touch, vintage lace designs are simply perfect! This delicate nail art imbues your manicure with a timeless and sophisticated feel. Use soft pastel shades as a base and paint intricate lace patterns with a fine brush or lace stamping tools.
You can accentuate just one or two nails for a refined touch or fully embrace the lace theme. This design is excellent for special occasions like weddings or formal events.
For Vintage Lace Nails:
– Use a light hand for detailed designs.
– Pair with pearl accents for added elegance.
– Seal with a matte top coat for that flawless vintage finish.
Vintage lace nails are feminine and elegant, adding classic beauty to any look.
16. Tropical Paradise
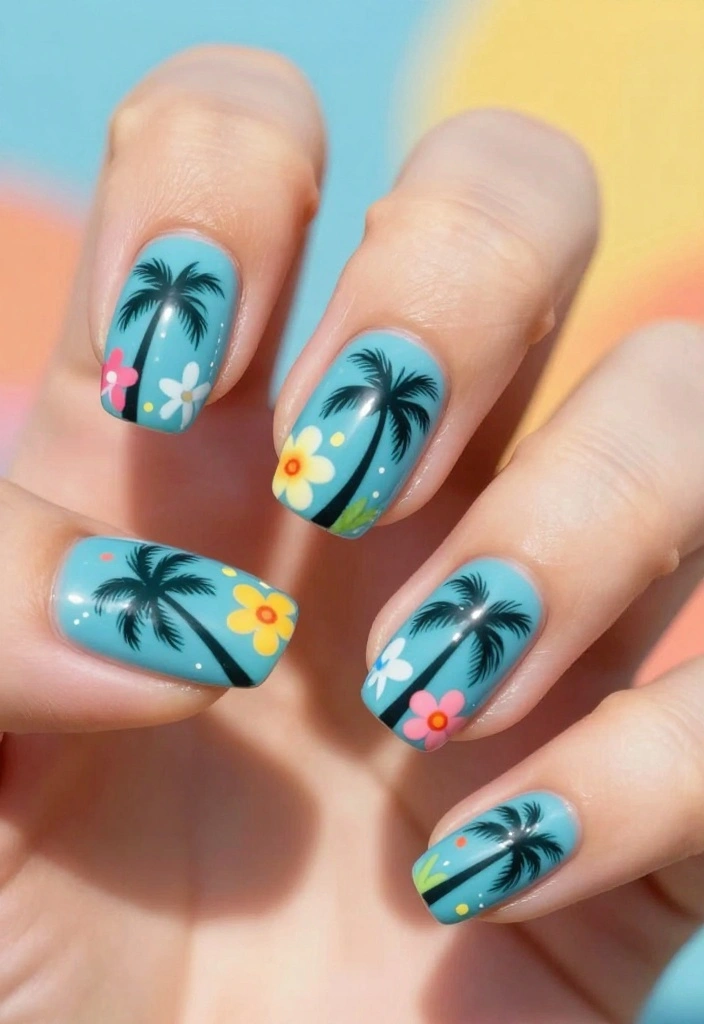
Bring vacation vibes to your nails with tropical designs! Think palm trees, bright flowers, and beach landscapes. This fun and colorful nail art is ideal for summer and can transport you to paradise every time you look at your hands.
Choose vibrant colors for flowers and greens for leaves, and don’t hesitate to add glitter for that extra sparkle!
Steps for Tropical Nails:
1. Start with a solid base color.
2. Use a fine brush to paint details like palm leaves and flowers.
3. Seal with a top coat for that tropical shine.
Tropical nails are cheerful and lively, perfect for summer fun, bringing a touch of island spirit to your everyday life.
Conclusion
Nail art is a fabulous way to express your creativity and personal style. From elegant marble designs to playful splashes of color, there’s something for everyone in this vibrant world of nail polish designs.
Which artistic design is your favorite? We hope you feel inspired to try some of these styles and make them your own. Remember, the best nail art is the one that makes you feel confident and beautiful!
Frequently Asked Questions
What are some of the most eye-catching nail polish designs in this article, and how can I recreate them at home?
Among the 16 artistic nail polish designs, you’ll notice options that are both striking and practical to copy at home—think clean two-tone finishes, crisp geometric lines, and subtle glitter accents. If you want the standout, try recreating the #10 look that readers say you’ll want to copy. Here’s a quick, doable approach:
Step 1: Prep nails with a smooth base (shape, push back cuticles, base coat).
Step 2: Pick a cohesive palette of 2–3 colors and a base color if needed.
Step 3: Choose a technique—striping tape for straight lines, a dotting tool for dots, or a sponge for a soft gradient.
Step 4: Finish with a glossy top coat and reapply top coat every few days to extend wear. This keeps your manicure looking fresh while staying true to those nail polish designs from the article.
Which nail art techniques are the most artistic and creative for beginners to imitate?
Great question for starting your own stylish set! For beginners, try these approachable techniques that still feel truly artistic and creative: freehand brush strokes (practice on swatches first), dotting tool or toothpick dots for playful spots, striping tape for clean geometric lines, and a sponge gradient for a soft, coffee-to-sky fade. Pro tip: practice on a piece of plastic or a nail wheel before applying to real nails, use thin layers, and seal with top coat to prevent chipping. These methods work beautifully with the nail polish designs featured in the article.
What supplies do I need to try these nail polish designs at home?
You don’t need a giant kit to get started. A simple starter pack can cover most looks:
Base and top coats, plus at least two nail colors that complement each other.
Essential tools: dotting tool or toothpicks, striping tape, a clean-up brush, and a makeup sponge for gradients.
Extras: cotton swabs, nail file, cuticle pusher, and a good remover. Optional but fun: stamping plates, decals, or foil for extra flair. With these supplies you can recreate the designs highlighted in the article and experiment with your own artistic twists.
How should I choose colors and finishes to match different occasions with these artistic designs?
Color and finish pairing is your secret weapon. Start with a neutral base and add a bold accent for a pop of personality. Finishes matter too: gloss for classic polish, matte for a modern edge, metallic for a chic statement, or glitter for celebration looks. Quick ideas:
– Workday chic: nude base with a thin metallic line.
– Evening party: black or deep navy base with gold foil accents.
– Weekend vibe: pastel gradient or soft pink base with delicate white lines.
These strategies align with the artistic designs in the article while keeping things practical and wearable.
What tips help these nail art designs last longer and resist chips?
To keep your creations looking flawless longer, follow these practical tips:
Apply a thin base coat, allow it to fully dry, then do 2 light coats of color rather than one thick coat.
Cap the free edge with each layer to seal the tips and prevent premature chipping.
Finish with a durable top coat and reapply every 2–3 days, especially if you wash dishes a lot or use your hands for work.
Limit prolonged water exposure right after painting, and when possible wear gloves for chores. With these habits, your nail polish designs from the article stay fresh and creative longer.
Related Topics
nail polish designs
artistic nail art
creative manicures
trendy nail styles
easy nail designs
detailed nail art
seasonal nail trends
beginner friendly
DIY nail art
colorful nail designs
minimalist nail art
advanced nail techniques
I love how creative nail art can be! I tried a floral design once, and it turned out more like a spaghetti mess. What’s your favorite design from this list?
These nail designs are amazing! I attempted a marble effect last week, but it looked more like a cow’s hide. Why is nail art so tricky sometimes?
Did you know that the first nail polish dates back to 3000 BC in China? It’s incredible how this art has evolved! Which design from your list do you think would be a hit at a party?
I remember trying to replicate a glitter gradient and ended up with sparkles all over my face. It looked like I had a disco ball for a head! Have you ever had a nail fail that turned into a funny story?
If you’re looking to try these designs, start with a good base coat. It really helps the polish stick and makes your art last longer! What designs are you excited to try first?