Nail art has become a favorite form of self-expression for many. As we embrace the bold and the beautiful, red almond nails have emerged as a stunning choice for those who want to make a statement. This post was created because I’ve been obsessing over these striking designs and wanted to share the inspiration with you. If you’re someone who loves to experiment with nail art and seeks the perfect blend of elegance and edginess, you’re in for a treat.
You’ll find a collection of 20 fabulous red almond nail designs that capture the essence of both sophistication and daring creativity. Each design promises to bring out your inner artist while also enhancing your overall look. Whether you’re preparing for a night out or simply want to brighten your everyday style, these designs offer something special. Get ready to be inspired to rock those vibrant colors and express yourself like never before!
Key Takeaways
– Discover 20 unique red almond nail designs that range from classic elegance to bold creativity, perfect for any occasion.
– Each design emphasizes the versatility of red, showcasing how it can be both playful and sophisticated.
– Learn about the materials and techniques involved in creating each nail art style, ensuring you can replicate the looks at home.
– Explore tips on nail care to maintain your striking manicure and keep your nails healthy.
– Find inspiration for customizing these designs to match your personal style and mood effortlessly.
Contents
- 1. Classic Red Elegance
- 2. Glitter Gradient Glam
- 3. Floral Fantasy
- 4. Matte Marvel
- 5. Geometric Glam
- 6. Ombre Effect
- 7. Marble Magic
- 8. Metallic Accents
- 9. Dotted Delight
- 10. Rhinestone Radiance
- 11. Lace Love
- 12. Color Blocked Beauty
- 13. Boho Chic
- 14. Neon Nights
- 15. Textured Touch
- 16. Sudden Scribbles
- 17. Statement Stripes
- 18. Simple Side Accent
- 19. Artistic Splatter
- 20. Inspirational Quotes
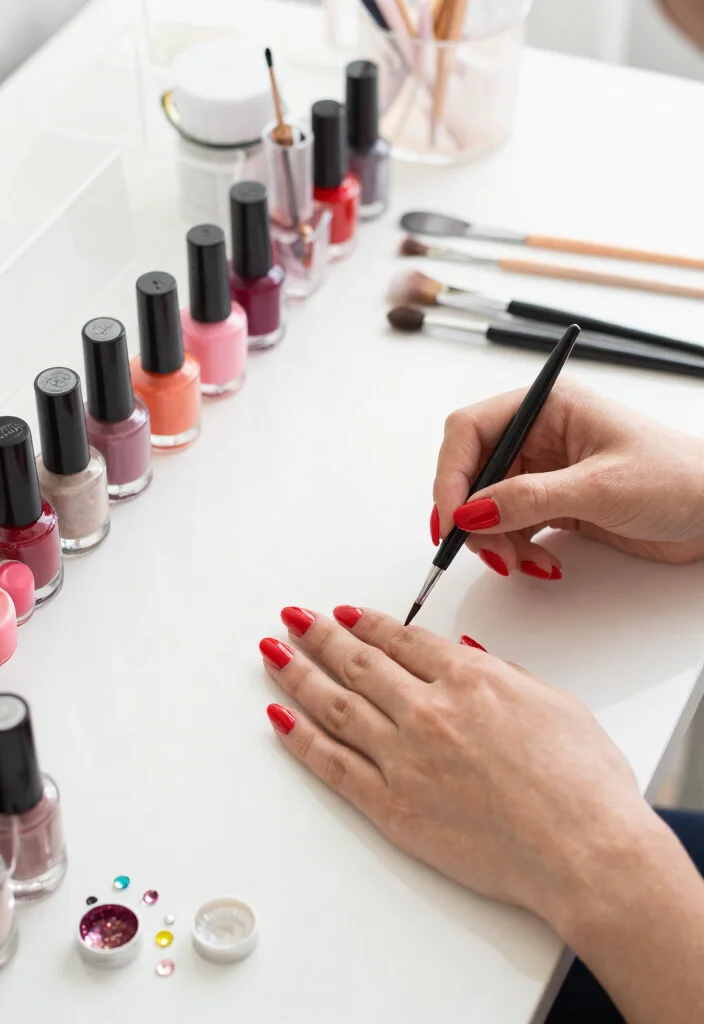
1. Classic Red Elegance
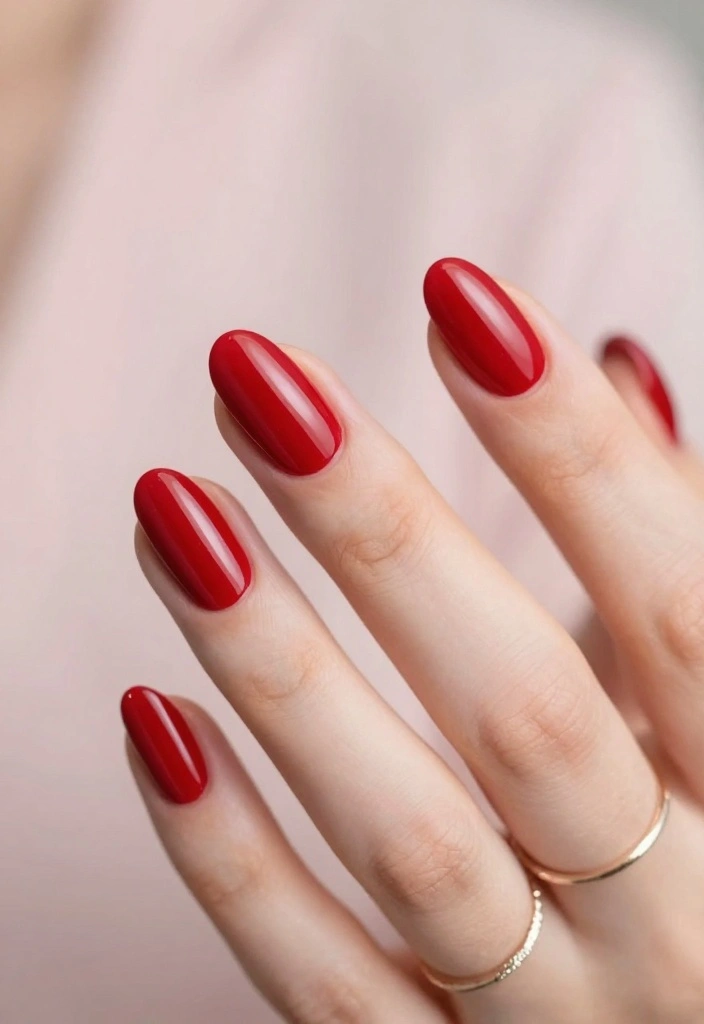
A classic red almond nail design is the perfect embodiment of timeless beauty. The high-gloss red polish exudes confidence, while the almond shape elegantly elongates your fingers. This look is incredibly versatile, making it suitable for everything from formal gatherings to casual hangouts.
To achieve this stunning style, start with a base coat to prevent staining. Apply two coats of your chosen high-gloss red polish, and finish with a top coat for a radiant shine. Keep your nails healthy and well-moisturized for that flawless appeal.
Some tips to perfect this look include:
– Select a red shade that complements your skin tone, whether it’s a bright cherry, deep burgundy, or soft rose.
– Maintain a moderate nail length for the most sophisticated appearance.
– Touch up your polish weekly to keep your nails looking pristine.
2. Glitter Gradient Glam
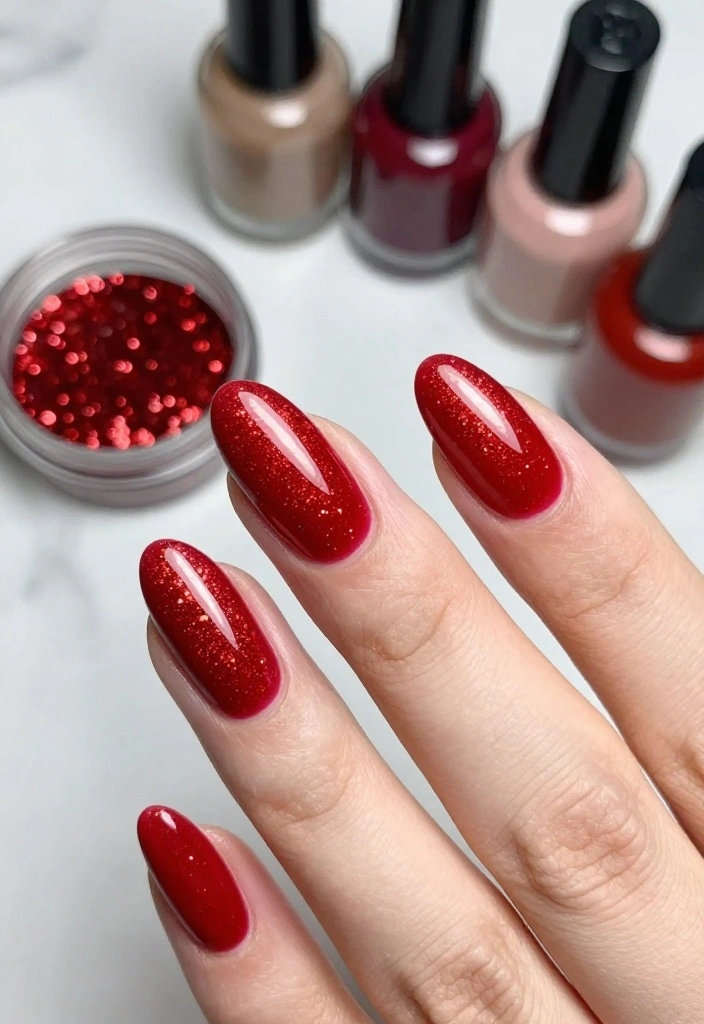
Sparkle and shine with a glitter gradient on your red almond nails! This design features a vibrant red base that fades into dazzling glitters towards the tips, perfect for making a statement at parties or special events. The gradient effect adds depth and dimension, elevating your nail game to new heights.
To create this look, begin with a strong red base coat and allow it to dry completely. Use a makeup sponge to dab glitter polish at the tips, blending it downwards for a seamless transition. Finish with a top coat to secure that glittery magic.
Remember:
– Layer different sizes of glitter for a more dynamic and eye-catching effect.
– Choose gold or silver glitter for classic elegance, or opt for colorful shades for a whimsical touch.
– Regular maintenance is key—consider touch-ups every few days to keep the sparkle alive.
Fun fact: glitter gradients in red almond nails designs win over plain polish 80% of the time at parties. When you blend glitter toward the tips, the red base pops and your manicure reads elegant and bold from every angle.
💅 Nail Art Made Easy!
Unlock your creativity with this DIY Nail Art Guide tailored for busy moms who love stunning nails.
3. Floral Fantasy
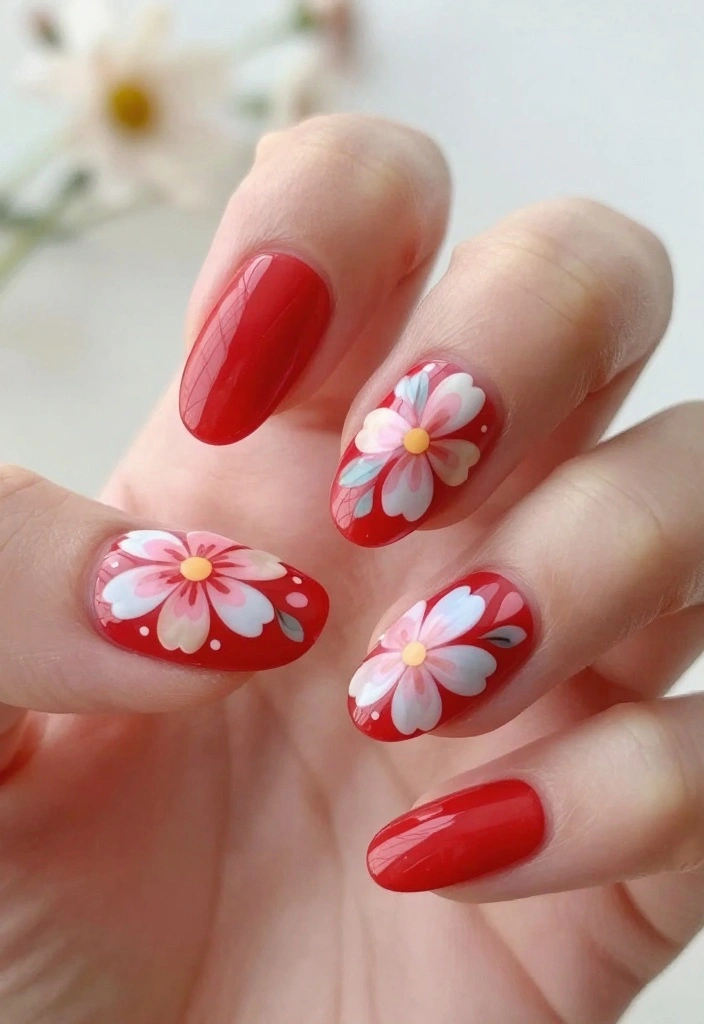
Express your creativity with floral designs on red almond nails! This look pairs the boldness of red with delicate floral patterns, making it an ideal choice for spring and summer. A vibrant red base sets the stage for charming flowers painted in contrasting colors, bringing a playful and artistic vibe to your nails.
To achieve this design, start with a fresh red base and let it dry. Use a thin brush to paint small flowers in shades like white, pink, or yellow to create a lovely contrast. Incorporate green leaves to enhance the floral theme and make it pop.
Some tips for perfecting this design include:
– Utilize a dotting tool for precise flower centers.
– Experiment with various flower shapes to add your personal touch.
– Seal your artwork with a top coat to protect your design and maintain its shine.
4. Matte Marvel
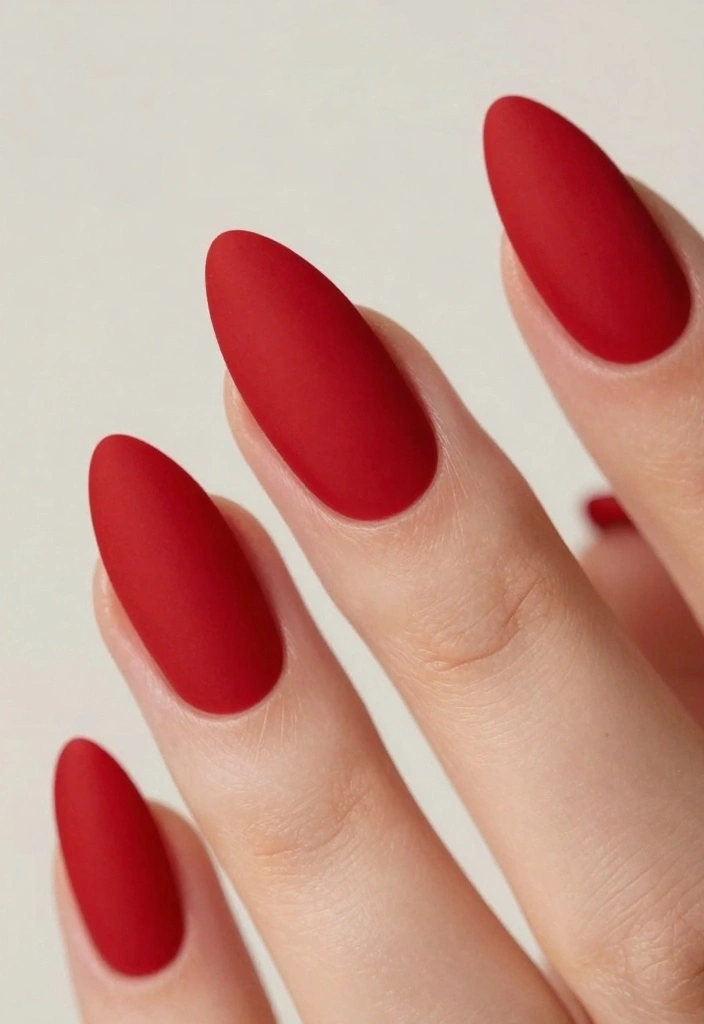
If you prefer a chic yet understated look, matte red almond nails are a fantastic choice. The matte finish transforms the classic glossy red into a sophisticated and modern style. This design is perfect for those who want to make a statement without overwhelming sparkle.
To create this effect, apply a matte top coat over your favorite red polish, giving it a smooth and elegant finish. Avoid using oily lotions or creams to keep the matte look intact, and maintain your manicure with regular touch-ups.
Consider pairing your matte red nails with minimalistic jewelry for a refined overall aesthetic.
5. Geometric Glam
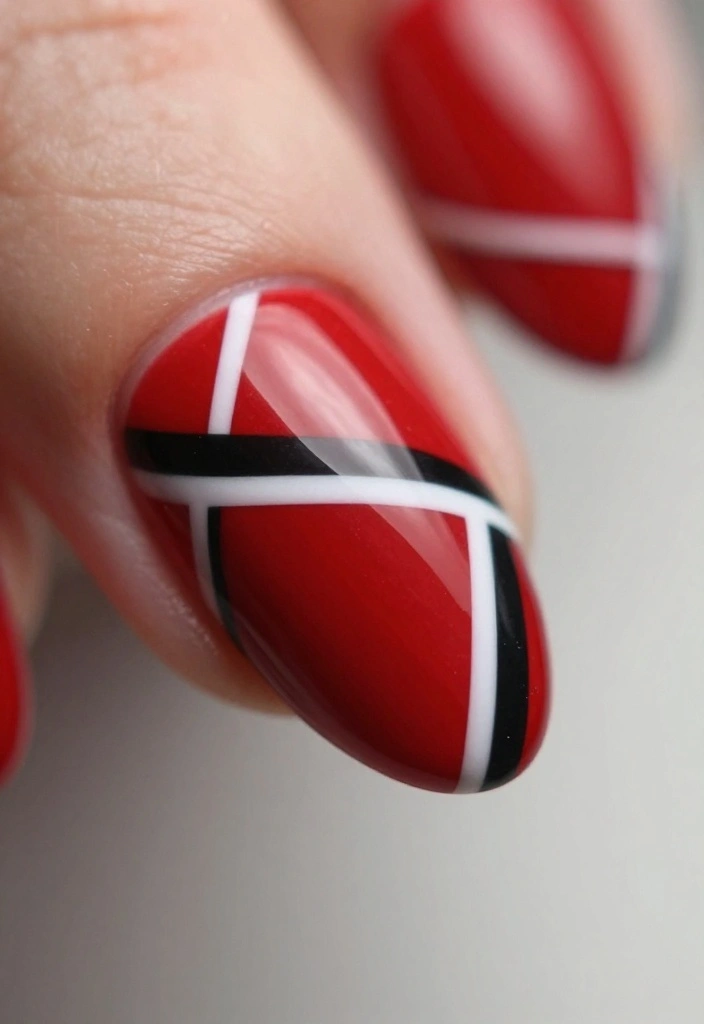
Embrace modern elegance with geometric designs on your red almond nails! This style incorporates clean lines and shapes, resulting in a strikingly artistic look. After applying a red base coat, use striping tape or a brush to create various angles and shapes with contrasting colors like black or white.
For the best geometric nails:
– Ensure your base coat is completely dry before applying tape to prevent pulling.
– Finish with a top coat for a smooth finish and to lock in your designs.
– Don’t hesitate to experiment with different color combinations to match your outfits!
6. Ombre Effect
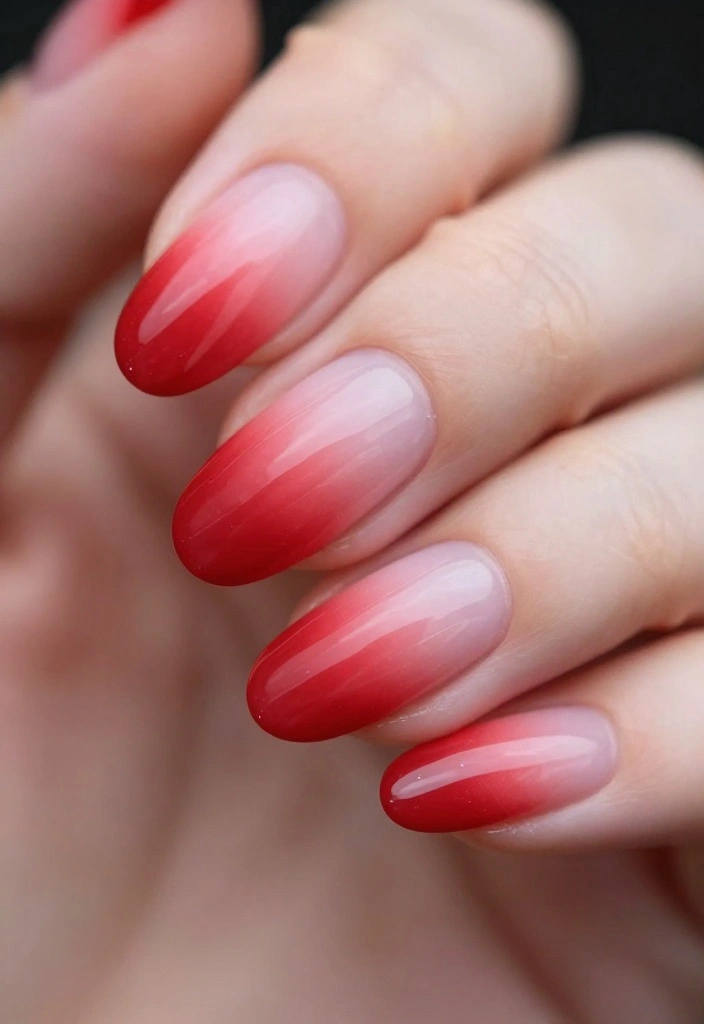
An ombre effect is a stunning and effortless option for red almond nails. This design showcases a blend of two or more shades of red, transitioning from light to dark beautifully. Start with the lightest shade at the base and gradually move to darker hues toward the tips for a captivating gradient effect.
Use a sponge to blend the colors seamlessly for a flawless finish. Apply a top coat to ensure longevity and shine.
Some tips to keep in mind include:
– Choose colors that complement each other well for a harmonious look.
– Experiment with transitional shades for a more sophisticated effect.
– Always let each layer dry before adding the next to avoid smudging.
How To Choose the Right Red Almond Nail Designs
1. Nail Length
Choosing the right length for your almond nails is crucial. If you prefer a more subtle look, go for a shorter length. Longer almond nails can make a bold statement and allow for more intricate designs. Measure your natural nail length and decide how much you want to extend it. Remember, longer nails may need more care and attention.
2. Design Style
Red almond nails offer a variety of design styles. Think about whether you want something classic, like a solid red finish, or more intricate designs such as ombre, glitter, or floral patterns. Consider your personal style; do you lean towards minimalistic or extravagant nail art? Browse social media or nail art sites for inspiration based on current trends.
3. Nail Care Products
Maintaining healthy nails is essential, especially when committing to bold colors like red. Invest in quality nail care products such as cuticle oil, base coats, and top coats. A strong base coat helps prevent stains from vibrant colors, while a top coat adds shine and longevity to your design. Regularly applying cuticle oil can keep your nails and skin around them hydrated and healthy.
4. Occasion
Consider the occasion for your red almond nails. Are they for a casual outing, a formal event, or a fun night out? Your design might change based on where you plan to wear it. For everyday wear, opt for simpler designs. For special events, go for something more glamorous, like rhinestone accents or metallic finishes that catch the eye.
5. Skill Level
Your skill level in nail art plays a significant role in design selection. If you’re a beginner, start with simpler designs like solid colors or basic patterns. As you gain confidence, you can try more complex techniques such as marble or ombre effects. Don’t hesitate to practice on press-on nails before trying them on your natural nails.
6. Color Matching
Red is a bold choice, but it’s essential to consider how it pairs with your skin tone and wardrobe. Warm reds, like cherry or brick, complement warmer skin tones, while cooler reds, such as crimson or burgundy, suit cooler skin tones. Look at your existing wardrobe to see which shades of red will match your outfits, helping you to create a cohesive and stylish look.
Pro Tip: Before settling on a design, try out a few nail stickers or press-ons to see what you love. This allows you to test styles without a long-term commitment. You can also play around with different nail shapes, colors, and designs before making a choice.
Choosing the right red almond nail design is a blend of personal taste, practicality, and care. Make sure to consider all these factors to ensure your nails not only look fabulous but also align with your lifestyle and preferences. Explore, experiment, and enjoy the process of creating beautiful nail art!
7. Marble Magic
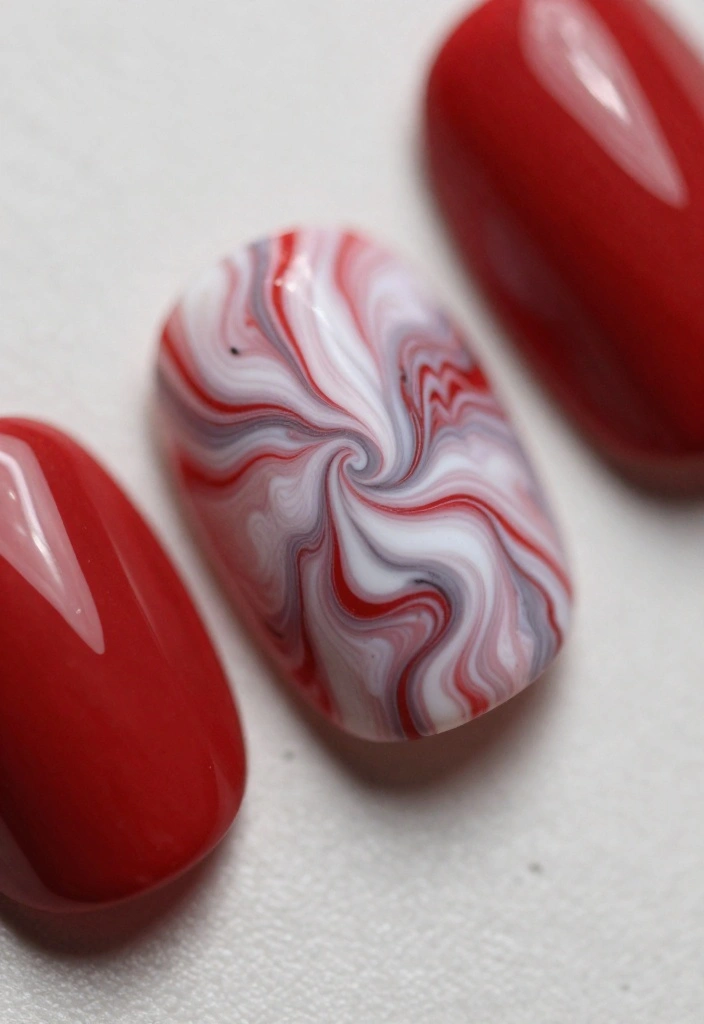
Elevate your red almond nails with a chic marble effect! This design combines the boldness of red with swirls of white and gray, mimicking the elegance of natural marble. Start with a red base, allow it to dry, and then swirl in white and gray polish using a dotting tool or fine brush for a distinctive look.
To finish, seal your marble design with a top coat to preserve the intricate details.
Tips for achieving the best marble effect include:
– Practice the marble technique on paper before applying it to your nails.
– Keep your brush strokes light to maintain the marble effect.
– Choose contrasting colors for a more striking design.
8. Metallic Accents
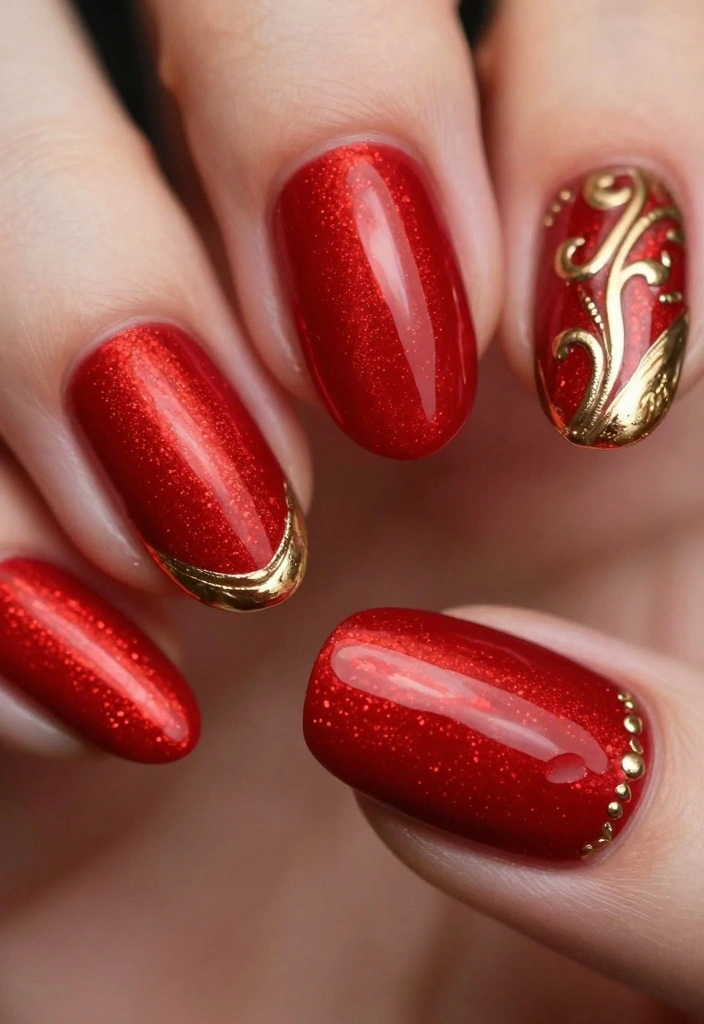
Enhance your red almond nails with eye-catching metallic accents! The combination of vibrant red and metallic shades like gold or silver creates an opulent look that commands attention. After applying your red base, use metallic polish to create lines, dots, or small patterns for a stunning finish.
To maintain the vibrancy, apply a top coat over the entire design.
Some tips for getting this look just right include:
– Use a fine brush for precision when applying metallic accents.
– Experiment with different metallic shades to discover your perfect match.
– Consider a matte top coat over the metallic for a trendy twist.
9. Dotted Delight
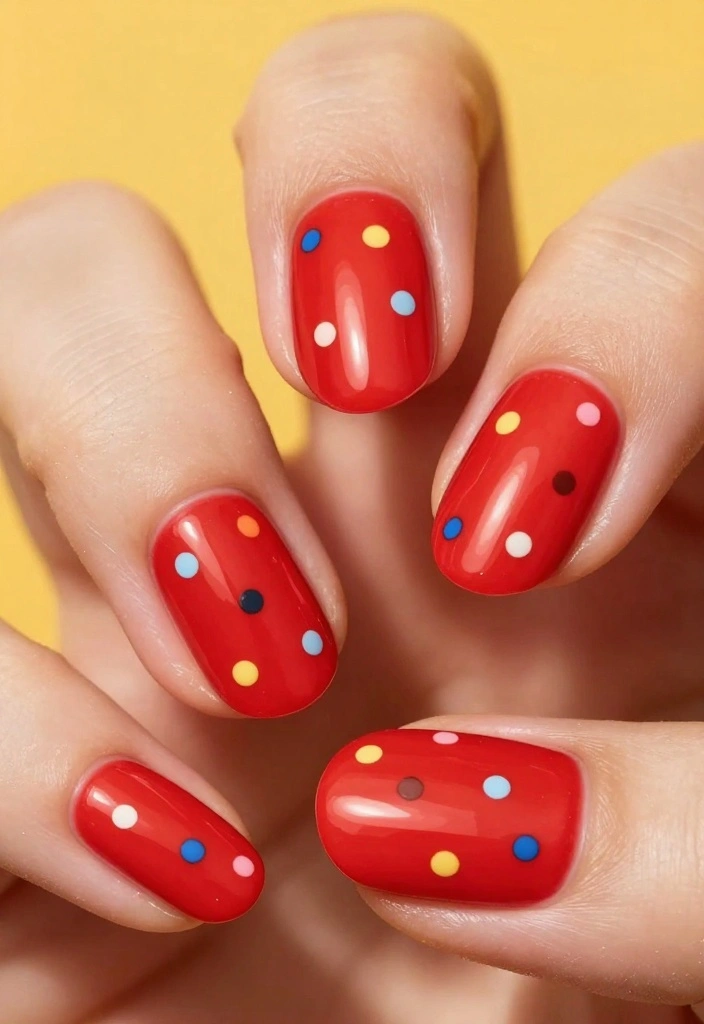
Add a fun twist to your red almond nails with a playful dotting design! This easy and charming style involves tiny dots of contrasting colors over a red base, allowing for creativity and personalization. You can create polka dots, stripes, or floral patterns using a dotting tool or even a toothpick.
To ensure a clean look, make sure your base coat is completely dry before adding the dots. Finish with a top coat to secure everything in place.
Tips for achieving the best dotted nails include:
– Space the dots evenly for a cohesive design.
– Mix and match colors to reflect your mood.
– Consider varying dot sizes for added interest.
10. Rhinestone Radiance
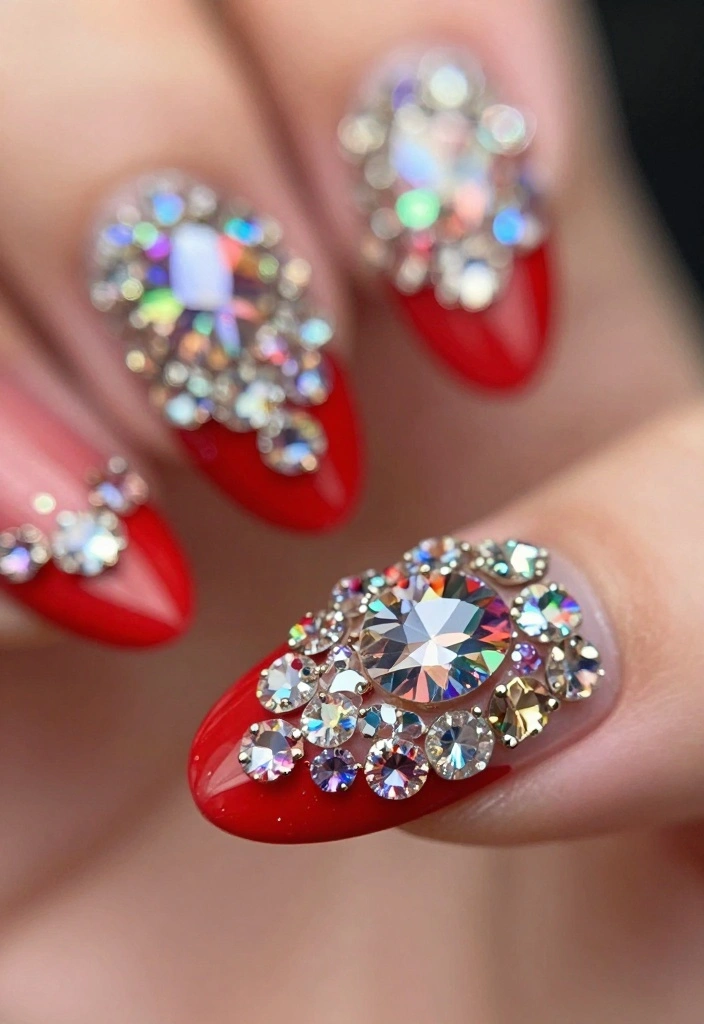
Take your red almond nails to new heights with rhinestone accents! This glamorous design pairs the boldness of red with the sparkle of rhinestones, making it perfect for any event. After applying your favorite red polish and letting it dry, place small rhinestones to create stunning patterns or borders.
Finish with a top coat to secure those gems and provide a shiny finish.
Tips for this design include:
– Use a toothpick with a bit of clear polish to place the rhinestones precisely.
– Choose rhinestone colors that complement your red base for a harmonious look.
– Apply the top coat carefully to avoid disturbing the stones.
11. Lace Love
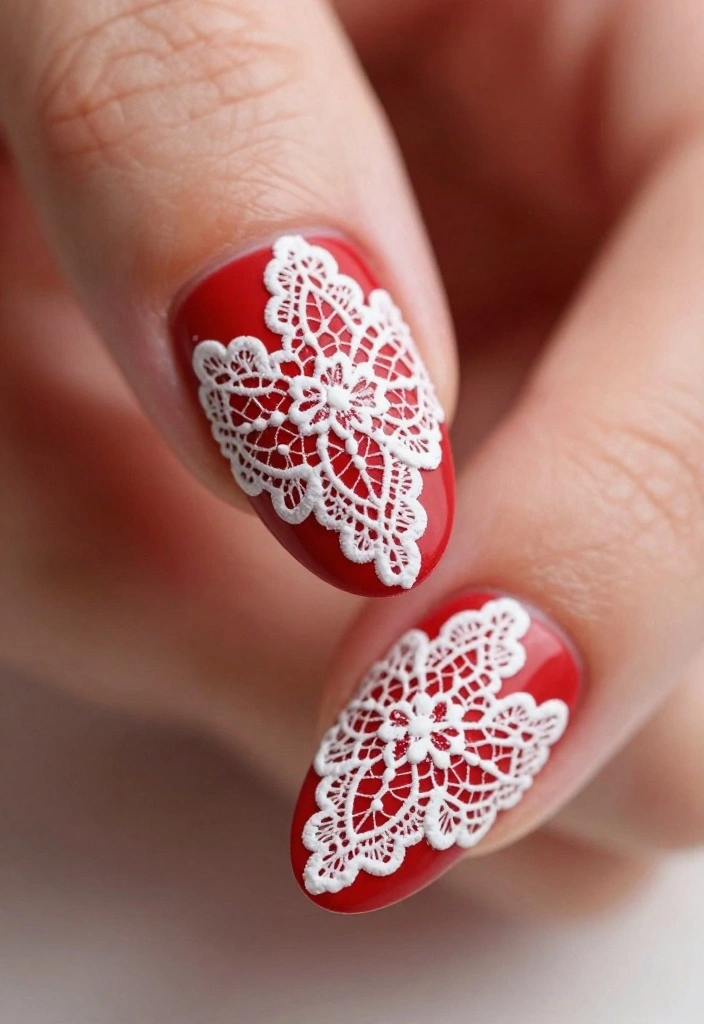
For a romantic and delicate touch, consider lace designs on your red almond nails! This look can be created using a lace stamping plate or by hand-painting intricate lace details over a red base. Opt for white or black lace for a stunning contrast that adds elegance to your nails.
Finish by applying a top coat to keep your intricate design intact.
Some tips for this design include:
– Ensure your base coat is thoroughly dry before applying lace patterns to prevent smudging.
– Experiment with lace shapes and designs until you find one that resonates with you.
– Pair this style with simple jewelry to keep the focus on your beautiful nails.
12. Color Blocked Beauty
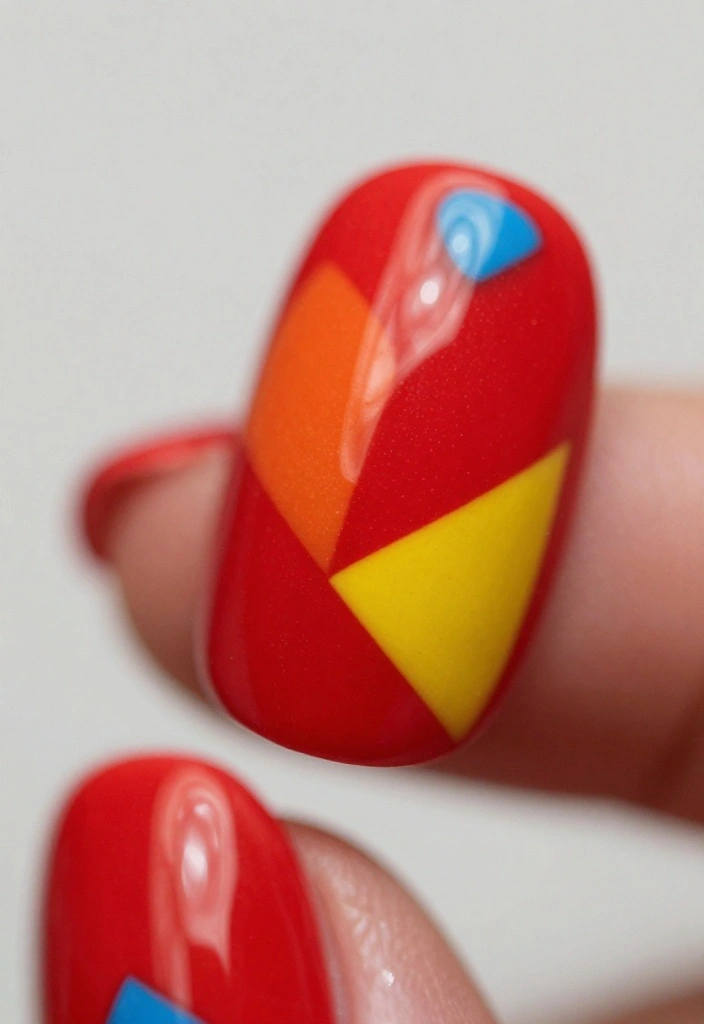
Bold and vibrant, color blocking is a trending favorite for red almond nails! This design features multiple colors layered in geometric segments, creating a striking visual contrast against the red base. Choose vibrant colors like yellow, blue, or green to make your nails pop.
To achieve this effect, use tape to mark off areas of your nails before applying various colors. This technique ensures crisp lines and clean separation between shades. Finish with a top coat for a polished look!
Tips for color blocking include:
– Allow each layer to dry thoroughly before applying the next to prevent smudging.
– Choose complementary colors for a cohesive design.
– Vary the shapes of your color blocks for added interest.
13. Boho Chic
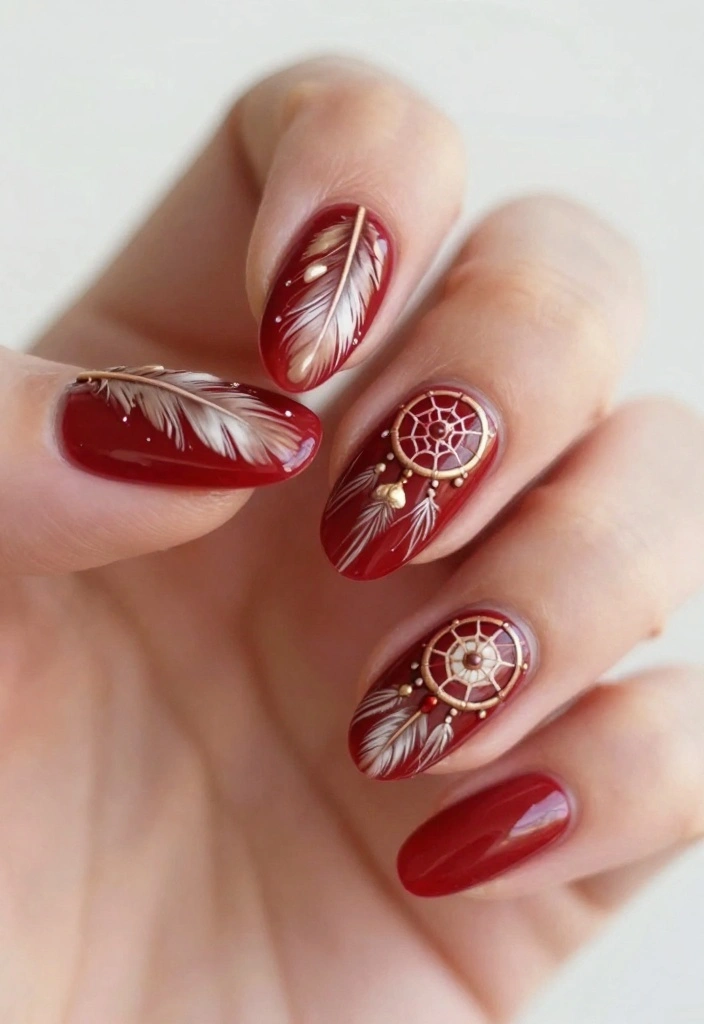
For a laid-back vibe, try a bohemian-inspired design on your red almond nails! This style can incorporate feather patterns, dreamcatchers, or earthy tones mixed with red. Start with a solid red base and use a fine brush to add complementary colors like teal or brown for a unique touch.
This design is perfect for music festivals or summer outings, bringing a carefree spirit to your nails.
To keep your boho nails looking fresh, always finish with a top coat for durability.
Tips for achieving this look include:
– Draw inspiration from nature for your designs.
– Experiment with the placement and sizes of different boho elements.
– Keep other accessories minimal to let your nails shine.
14. Neon Nights
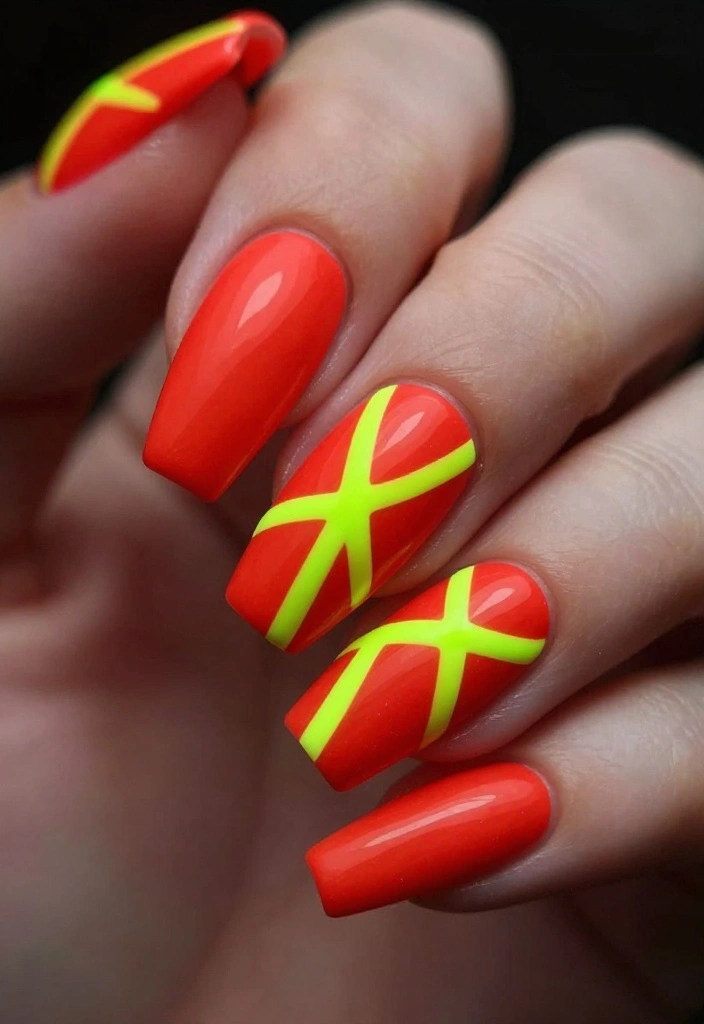
For a fun and daring look, neon accents on your red almond nails are perfect for night outings! Bright neon shades like pink or green create a striking contrast against a classic red base. You can opt for simple stripes, dots, or a full neon design on one or two accent nails, making it youthful and energetic.
To maintain vibrancy, seal your design with a shiny top coat.
Tips for this design include:
– Choose neon colors that pop against the red base for the best effect.
– Consider using a matte top coat on the neon for a unique twist.
– Coordinate your neon accents with your outfits for a stylish statement.
15. Textured Touch
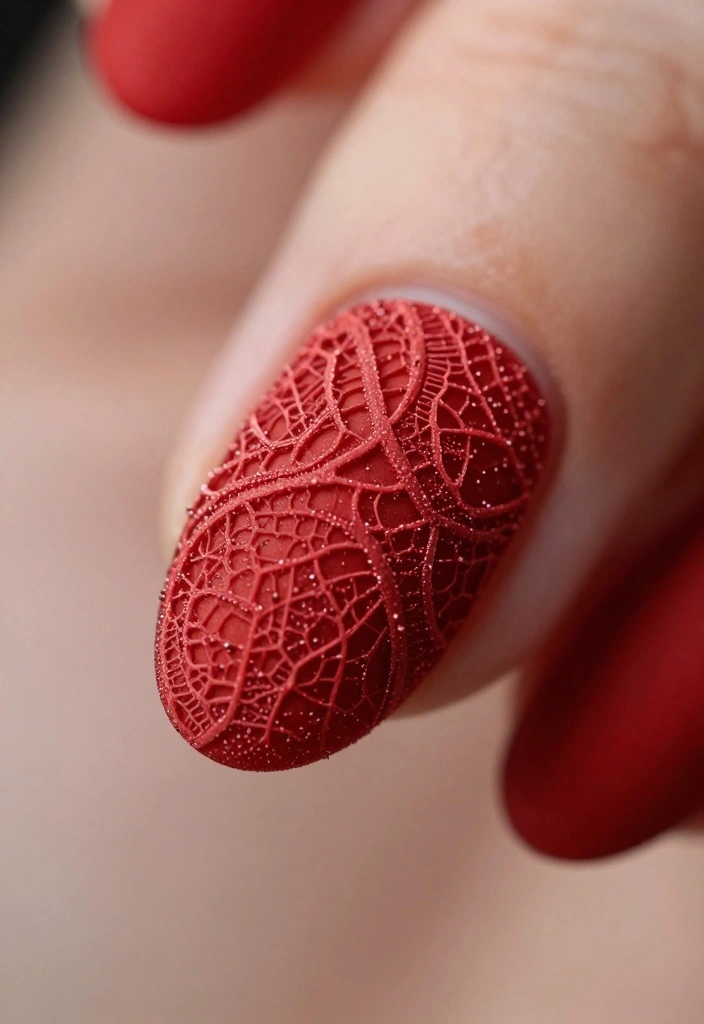
Add a unique flair with textured designs on your red almond nails! Using textured polish or incorporating elements like sand, lace, or fabric can create a stunning three-dimensional effect. Apply a red base, then add your chosen texture to one or two accent nails for an eye-catching design.
This trend is ideal for those who love to stand out and experiment with different elements.
To ensure longevity, finish with a top coat.
Some tips for achieving the best results include:
– Experiment with various materials to discover the textures you adore.
– Limit textures to one or two accent nails for balance.
– Be cautious when applying the top coat to avoid flattening the texture.
Texture turns red almond nails designs into wearable art. Try one accent nail with sand or lace, and seal with a top coat for lasting shine—it’s bold without overwhelming. Pro tip: less is more when you’re experimenting with textured touches.
16. Sudden Scribbles
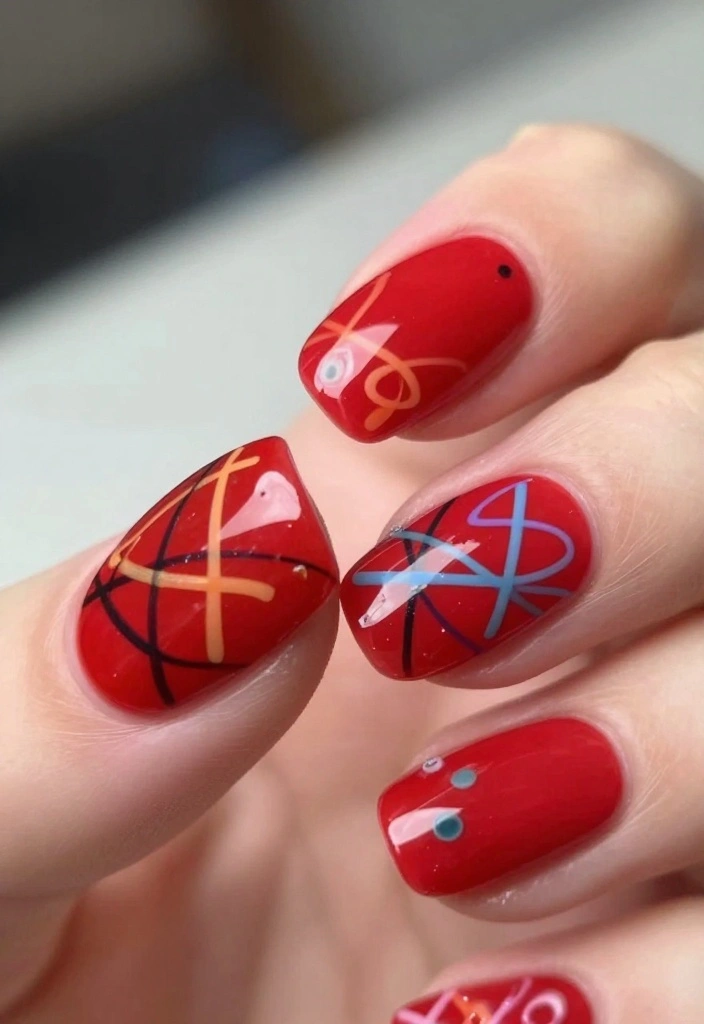
For those who thrive on chaos and creativity, random scribbles on your red almond nails are a perfect choice! This design embraces the unexpected, using a fine brush to create abstract doodles and lines over a solid red base. Play with colors and designs, allowing your imagination to run wild.
Finish this artistic approach with a top coat to keep everything intact.
Tips to pull off this look include:
– Let your creativity flow—there are no rules!
– Use contrasting colors for your doodles to ensure they stand out.
– Keep the design random and freeform for an authentic touch.
17. Statement Stripes
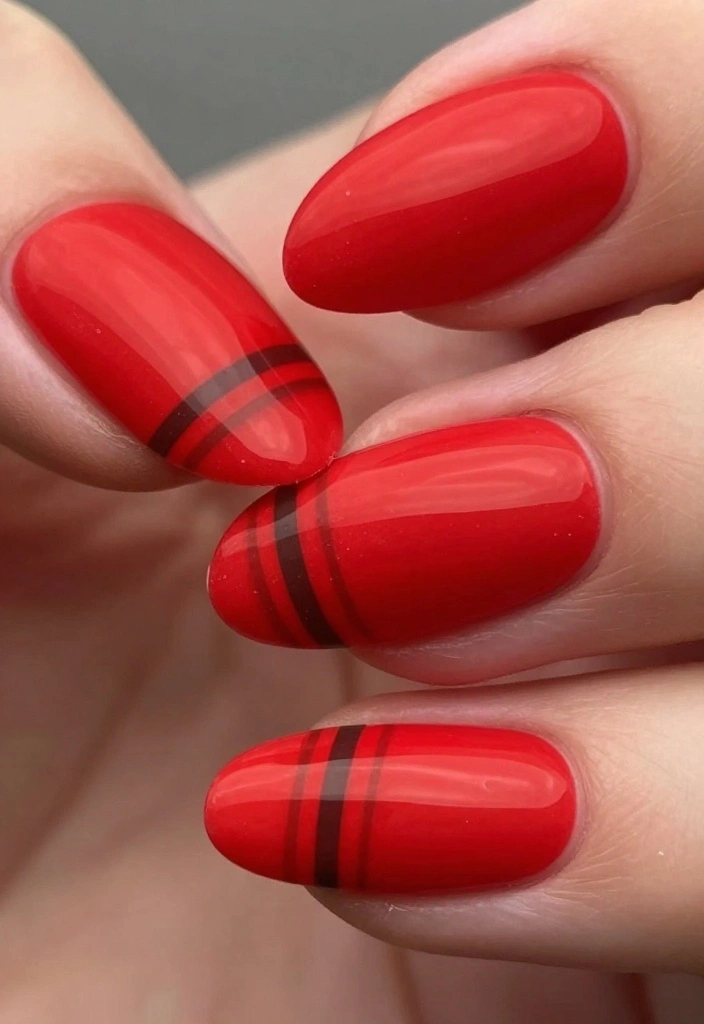
Stripes are a classic design that can elevate your red almond nails! Using contrasting colors like white or black allows you to create bold stripes for a chic look. You can choose vertical, horizontal, or diagonal stripes—each option offers a unique feel.
Start with a solid red base, apply striping tape for precision, and layer your preferred contrasting polish on top. Finish with a top coat to keep those stripes looking fresh.
Consider these tips for your striped nails:
– Ensure your base coat is completely dry before applying tape to avoid smears.
– Experiment with different stripe widths for added interest.
– Coordinate your stripes with your outfits or accessories for a pull-together look.
18. Simple Side Accent
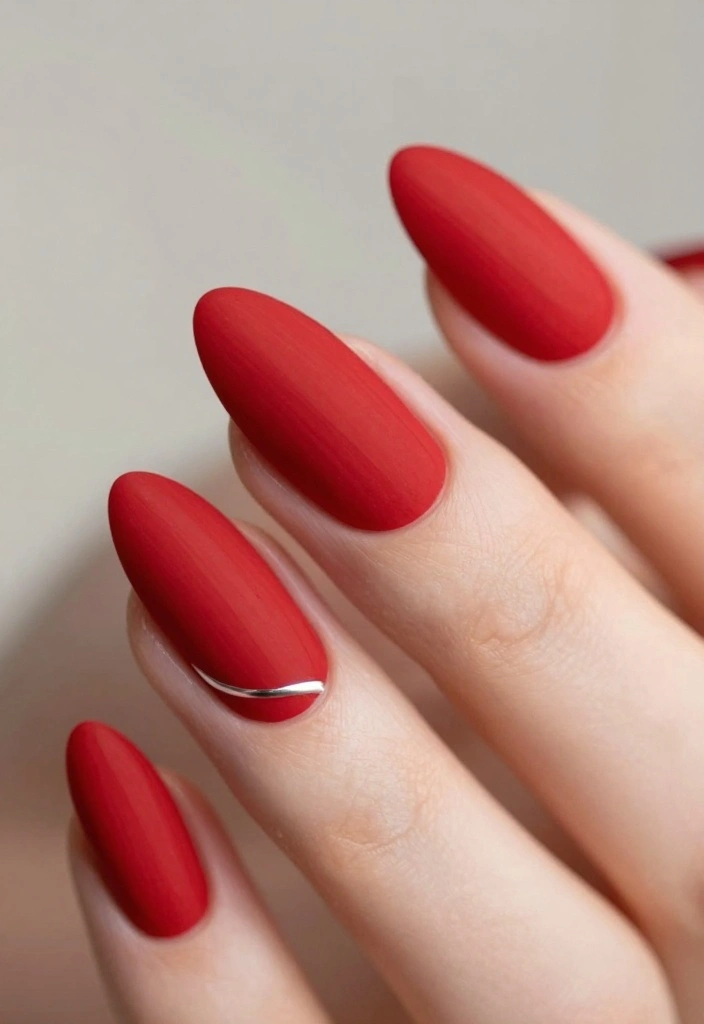
For a sleek and elegant touch, consider adding a simple side accent to your red almond nails. This design uses a thin metallic or glitter line on one side of the nail, creating a chic and understated look. Begin with a solid red base, and carefully add the accent with a fine brush for a modern edge.
Finish off with a top coat for durability.
Tips for this design include:
– Keep the accent line thin for a minimalist aesthetic.
– Choose a metallic color that complements the red base.
– Pair this style with subtle jewelry to maintain a polished finish.
Did you know 68% of nail-art lovers say a slim metallic side accent on red almond nails designs instantly elevates the look? Start with a solid red base and add a thin, carefully placed line on one side for a chic, modern edge.
19. Artistic Splatter
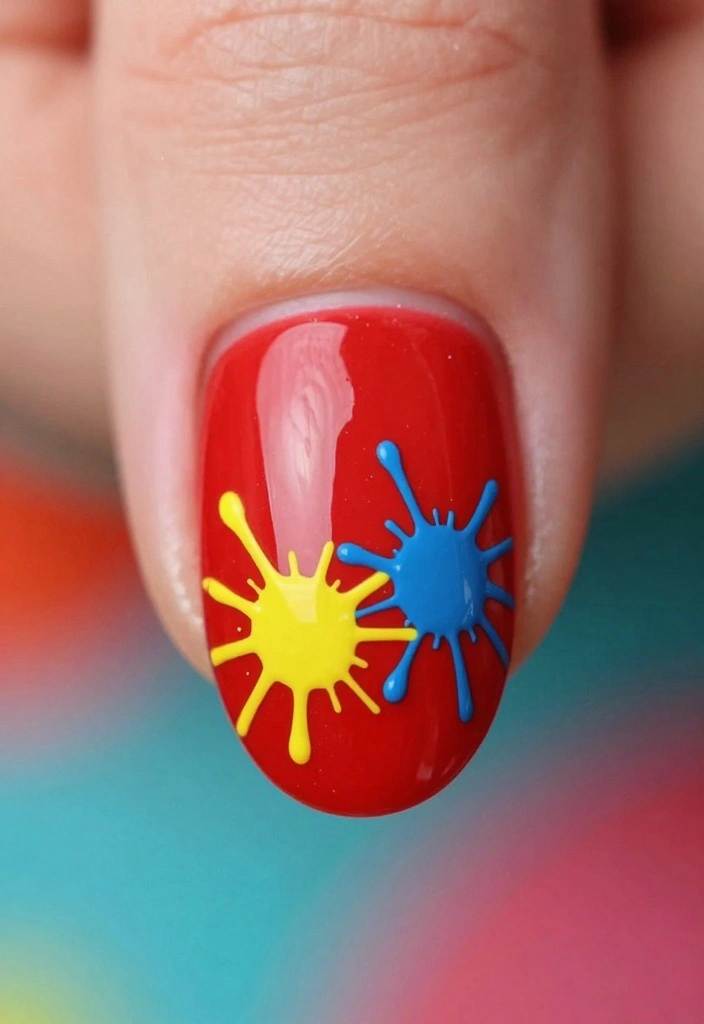
Embrace your artistic side with a splatter design on your red almond nails! This playful look utilizes splashes of contrasting colors to create an energetic aesthetic. Start with a solid red base and flick other colors using a brush or toothbrush to achieve that fun splatter effect.
Seal your design with a top coat to keep it vibrant and fresh.
Some tips include:
– Use contrasting colors to make the splatter stand out against the red base.
– Consider working outdoors to avoid messes in your workspace.
– Allow each color to dry slightly before adding the next for better control.
20. Inspirational Quotes
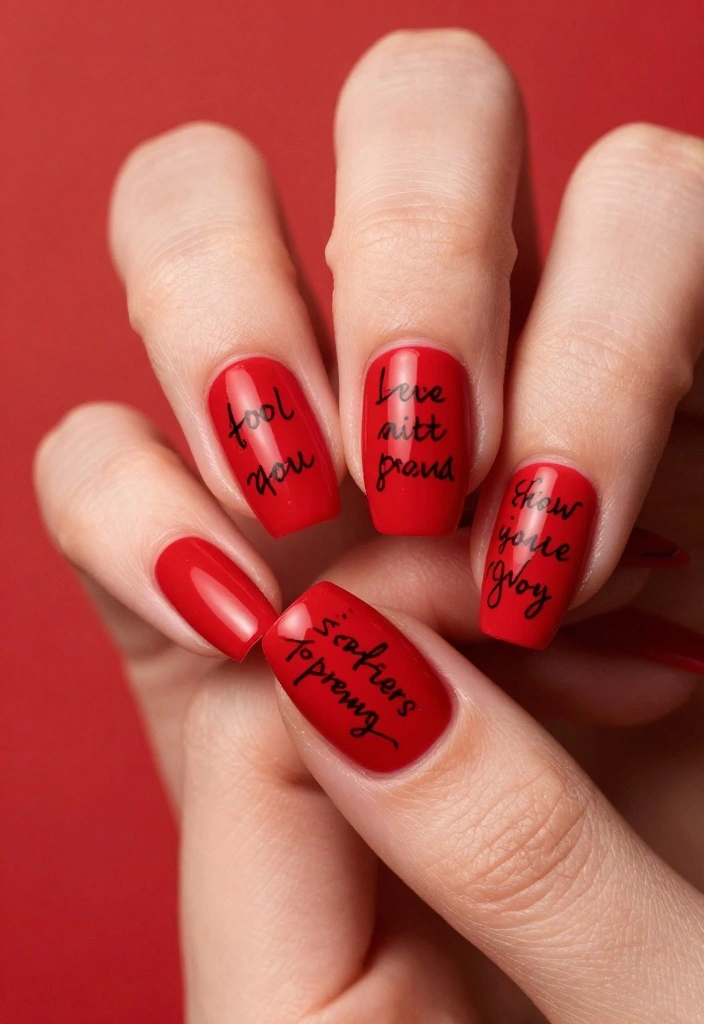
Add a personal touch to your red almond nails with inspirational quotes! This unique design incorporates small, handwritten-style quotes on one or two accent nails alongside a bold red base. Choose quotes that resonate with you and replicate them using a fine brush for a meaningful statement.
Finish your nails with a top coat to protect your designs.
Tips for this design include:
– Opt for short quotes to maintain clarity and legibility.
– Practice your lettering style on paper before applying it to your nails.
– Mix this design with other patterns for added vibrancy.
Conclusion
Bold red almond nails are not just a trend; they’re a statement of style and personality.
With these 20 stunning designs, you can express yourself in countless ways, from classic elegance to playful patterns. Don’t be afraid to mix and match styles, colors, and techniques to find what resonates with you the most. Your nails are a canvas, so let your creativity shine!
Frequently Asked Questions
What exactly are red almond nails designs and why are they popular?
Red almond nails designs are almond-shaped nails painted in bold red shades that elongate the fingers. They’re popular because they look chic, versatile, and pair well with many outfits and occasions.
To get the look, start with a clean base, choose a red undertone that flatters your skin tone, shape the nails into a smooth almond tip, and apply a long-lasting base and top coat. For durability, protect your nails with good nail care habits like moisturizing cuticles, filing gently, and avoiding harsh solvents.
When you want a classic yet bold vibe, stick with a glossy red; for something trendier, pair with subtle nail art or metallic accents to elevate the red almond nails designs look.
How can I recreate bold red almond nail designs at home with proper nail care tips?
Here’s a simple, at-home routine to recreate bold red almond nail designs while staying mindful of nail care and vibrant colors: 1) Prep: clean nails, push back cuticles, and file into a crisp almond shape. 2) Base coat: apply a thin base coat and let dry. 3) Color: apply two even coats of your chosen red shade, allowing each coat to dry. 4) Top coat: seal with a glossy top coat for shine and longevity. 5) Maintenance: reapply top coat every few days and keep cuticles moisturized to protect the color from chipping.
For longevity, avoid acetone-heavy removers and consider gel polish or UV curing if you’re experienced. Your vibrant colors will pop, and your nail care routine will thank you.
What nail art accents pair well with red almond nails designs?
Try these complementary accents with red almond nails designs: delicate gold or rose-gold foil for a luxe touch, minimalist white lines or a small negative-space accent, subtle glitter at the tip, or a single rhinestone near the cuticle. Start with the red almond base, then add the accent on one nail or spread across nails for a bold, balanced look. Always seal with a top coat to lock in the details and protect wear. This keeps the overall look cohesive while letting red almond nails designs shine.
Can red almond nails designs work on short nails or are they only for long nails?
Absolutely. While the almond shape is elegant on longer nails, you can adapt red almond nails designs for shorter nails too. Use a slimmer almond silhouette, keep the free edge softly rounded, and choose a vivid red that visually lengthens the fingers. If you want extra length, try overlays or a nail builder to create a sleek, elongated look while keeping the practicality of short nails. The key is clean shaping and a glossy finish to highlight the red almond nails designs vibe.
How do I maintain red almond nails designs between manicures?
To keep red almond nails designs vibrant between appointments: apply a fresh top coat every 2-3 days, wear gloves for cleaning, and avoid harsh solvents. Keep cuticles hydrated with oil, and consider gentle, acetone-free removers when you need to switch colors. Schedule regular touch-ups if you notice growth, and store your tools clean to prevent snagging. With these tips, your bold red almond nails designs will stay vivid and long-lasting.
Related Topics
red almond nails
nail art designs
vibrant colors
fashion trends
beginner friendly
nail care tips
glamorous look
seasonal styles
easy nail designs
bold colors
manicure inspiration
trendy nail art
I love the bold designs you shared! Red almond nails are so chic. Have you tried any fun nail art stickers with them yet?
These nail ideas are stunning! I once tried to do my nails while binge-watching a show and ended up with red everywhere—nail polish and my couch! What a mess! 😂
Did you know that red nails have been a sign of confidence and power for centuries? It’s amazing how something so simple can carry such strong vibes!
I remember the first time I tried almond nails, I felt like a whole new person! They really do make your hands look elegant. Have you had a similar experience with a new nail shape?