Halloween is just around the corner, and you know what that means: it’s time to get spooky! If you’re anything like me, October has you craving some festive nail art that captures the spirit of the season. And what better way to channel your inner Halloween lover than with some fabulous *Nightmare Before Christmas nails*? This iconic film combines the magic of Halloween and Christmas, making it an endless source of inspiration for nail designs that are sure to impress.
If you’re someone who adores nail art, loves the whimsical world of Tim Burton, or just wants to stand out this Halloween, this post is crafted just for you. I pulled together a collection of ten nail designs that celebrate the characters and themes from *The Nightmare Before Christmas*. Each design is not only spooky but also creative and fun, perfect for showing off at Halloween parties or cozy movie nights at home. Whether you’re a nail art pro or just starting out, there’s something here to spark your creativity and make your nails the highlight of your Halloween look.
Get ready to dive into a world of nail designs that are hauntingly beautiful and utterly enchanting. From Sally’s stitched elegance to Jack Skellington’s iconic grin, these nail ideas will give your fingers a festive touch that will turn heads. Let’s explore these ten spooky *Nightmare Before Christmas nails* that will truly haunt your dreams!
Key Takeaways
– Discover ten unique *Nightmare Before Christmas nails* designs that blend Halloween fun with timeless elegance.
– Each design features iconic characters and elements from the film, offering inspiration for every nail art lover.
– This post is ideal for anyone interested in incorporating Halloween themes into their nail art or looking for festive designs.
– You’ll find practical tips on how to achieve each look, whether you prefer DIY methods or visiting a salon.
– Get ready to elevate your Halloween style with creative nail art that reflects your love for this classic film.
Contents
- 1. Sally’s Stitched Elegance
- 2. Jack Skellington’s Grinning Magic
- 3. Oogie Boogie’s Creepy Vibe
- 4. Pumpkin Patch Delight
- 5. Zero’s Whimsical Touch
- 6. Halloween Town Skyline
- 7. Spooky Spider Webs
- 8. Festive Glitter Skulls
- 9. Tim Burton Inspired Art
- 10. Bone-Chilling Negative Space
1. Sally’s Stitched Elegance

Sally’s stitched elegance blends sweetness with a hint of spookiness, making it a delightful choice for Halloween. This design showcases a patchwork of colors that reflect her dress, featuring vibrant reds, blues, and yellows. The charm lies in the mix of shades, creating a quilt-like effect that is both playful and artistic.
You can wear this design at costume parties or when you want to add a whimsical touch to your everyday look. It’s perfect for those who appreciate creativity in their nail art.
Outfit Pieces:
– Pastel base coat in light blue or soft pink
– Contrasting nail polish for faux stitches (black or dark blue)
– Small gems or glitter for added sparkle (optional)
Styling Tips:
– Start with a clean nail and apply a base coat for longevity.
– Use a fine nail brush to create faux stitches, ensuring they look like real embroidery.
– Experiment with different pastel shades for a unique look.
– Add gems in random patterns for a fun twist.
This design captures Sally’s essence while offering a dreamy vibe, making it perfect for Halloween and beyond.
2. Jack Skellington’s Grinning Magic
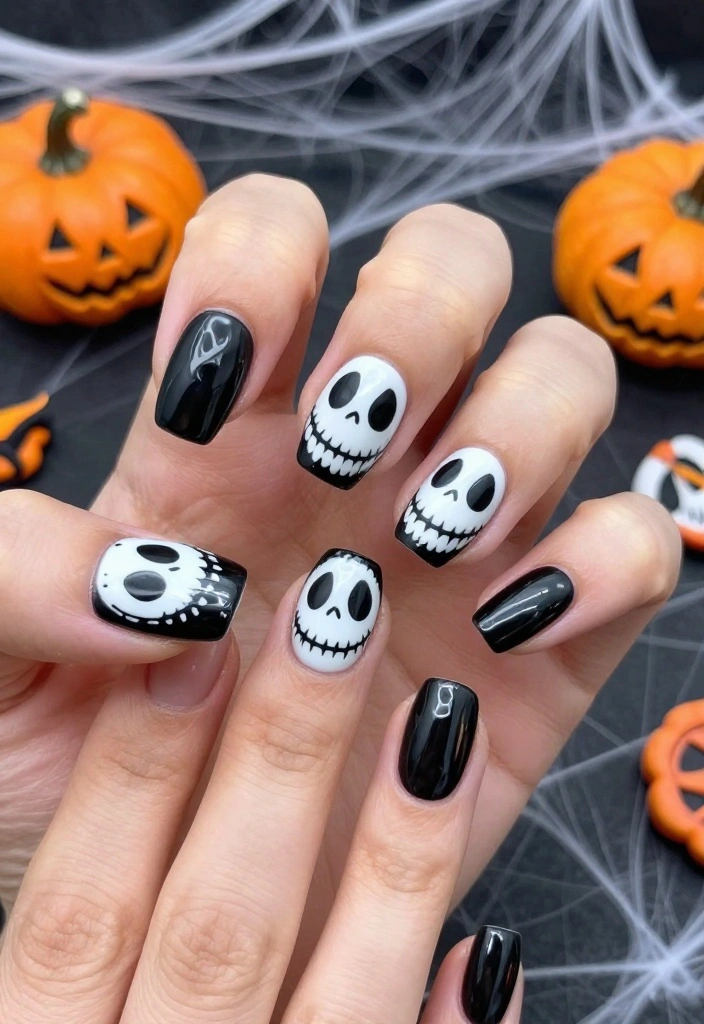
Jack Skellington’s grinning magic is an iconic choice for any fan of The Nightmare Before Christmas. With a bold black base and Jack’s cheerful skull face, this design is striking yet easy to replicate. The contrast between the matte black background and the shiny skull makes for an eye-catching look that’s fun and festive.
Perfect for Halloween night or any gathering, this design captures Jack’s playful spirit.
Outfit Pieces:
– Classic black base coat
– White polish for the skull face
– Black polish for outlining features
Styling Tips:
– Start with a smooth black base coat to enhance depth.
– Use a fine brush to carefully paint Jack’s smile and eyes.
– Outline facial features in black for sharp detail.
– Seal with a top coat to add shine.
With this look, your nails will celebrate Jack’s enchanting spirit, perfect for festive occasions.
3. Oogie Boogie’s Creepy Vibe

Oogie Boogie’s creepy vibe is perfect for those wanting to embrace the darker side of Halloween. This design features a green base coat layered with darker greens and blacks, mimicking his burlap texture. The mix of colors creates a standout nail art opportunity that’s unique and eye-catching.
It’s ideal for Halloween parties or any event where you want to showcase your spooky style.
Outfit Pieces:
– Vibrant green base coat
– Dark green and black polish for texture
– Fine brush for detailing bugs and dice
Styling Tips:
– Paint a vibrant green base for a bold look.
– Use a sponge technique to dab on darker shades for texture.
– Add tiny bugs or dice with a fine brush for detail.
– Finish with a matte top coat for an eerie vibe.
This design will make your nails the center of attention at any Halloween gathering.
❝ Did you know 68% of nail-art lovers try a bold green burlap-inspired texture for nightmare before christmas nails? Start with lime base, layer darker shades, and add tiny dice for a game-ready vibe. Embrace Oogie Boogie’s creepy charm tonight. ❞
📹 Related Video: Easy Oogie Boogie Nail Art For Beginner 💖Vẽ Móng💅 New Nails Design 💝 New Nails
4. Pumpkin Patch Delight

Embrace the charm of Halloween with a delightful pumpkin patch nail design! Featuring a bright orange base, you can create various pumpkins on each nail, adding a playful touch to your look. The combination of vibrant orange with black and green details brings the festive spirit to life.
This design is ideal for Halloween festivities or casual outings where you want to celebrate the season.
Outfit Pieces:
– Bright orange base coat
– Black polish for pumpkin faces
– Green polish for vines and leaves
Styling Tips:
– Start with a bright orange base for a pumpkin vibe.
– Use a fine brush to create pumpkin faces in black.
– Add green vines and leaves for that extra detail.
– Seal with a glossy top coat for shine.
This cheerful design captures the joy of Halloween and is perfect for those who love a light-hearted style.
5. Zero’s Whimsical Touch

Celebrate Zero, the adorable ghost dog, with a whimsical nail design! This look features a soft white base with Zero’s face on an accent nail, capturing his playful spirit. Adding sparkles or holographic elements enhances the ghostly theme, making your nails light and fun.
This design is great for Halloween parties or casual gatherings, bringing a magical touch to your look.
Outfit Pieces:
– Soft white nail polish
– Black polish for Zero’s face
– Sparkles or holographic top coat for effect
Styling Tips:
– Paint your nails with a soft white base for a clean look.
– Carefully paint Zero’s face with black polish for detail.
– Add sparkles or a holographic coat to make it shine.
– Include stars and a moon for a dreamy finish.
This design is playful and captures Zero’s spirit, making it perfect for any Halloween celebration!
💅 Nail Art Made Easy!
Transform your nails with stunning designs using our DIY guide, perfect for busy moms who love creativity.
How To Choose The Right Nightmare Before Christmas Nails
Choosing the perfect nail designs inspired by “The Nightmare Before Christmas” can seem overwhelming, but focusing on key aspects will help you make the right decisions. Here are some criteria to consider when selecting your spooky Halloween nails:
1. Style & Theme
Start by deciding on a specific style or theme that resonates with you. Do you want to showcase Jack Skellington’s grin, Sally’s patchwork, or Oogie Boogie’s eerie vibe? Each character offers unique elements that can make your nails pop. Think about how you want to express your love for the movie, whether it’s playful, spooky, or a blend of both.
2. Nail Length & Shape
Consider your nail length and shape when choosing designs. Long nails can handle intricate art, while shorter nails may benefit from simpler designs. Popular shapes include square, almond, and stiletto. If you have oval or round nails, more subtle designs might suit you better. Make sure your chosen designs complement your natural nail shape for the best look.
3. Color Palette
The color palette is crucial when selecting your nightmare before Christmas nails. Traditional colors from the movie include black, white, purple, and orange. Decide if you want a bold, striking look or a more subdued, pastel version. You can also mix and match colors to create a gradient or ombre effect, reflecting the eerie yet whimsical aesthetic of Halloween Town.
4. Nail Art Techniques
Different techniques can enhance your nail designs, such as stamping, freehand painting, or using decals. If you’re an experienced nail artist, you might enjoy painting complex designs yourself. If you’re just starting, consider using nail wraps or decals for easier application. Look into gel or acrylic options for long-lasting wear, especially during the Halloween season.
5. Budget & Materials
Nail art can vary widely in cost, so it’s essential to set a budget. If you’re investing in salon services, check local nail salons for prices. If you prefer DIY, gather materials that fit within your budget. Basic supplies include nail polish, brushes, and topcoats. For more intricate designs, you might need additional tools like dotting tools or stencils.
6. Occasion & Wearability
Think about when and where you’ll wear your Halloween nails. Are you going to a party or participating in a Halloween event? If so, you might opt for more elaborate designs. For everyday wear, consider simpler options that are still fun and thematic. Make sure the designs you choose can be maintained and won’t chip easily during your activities.
Pro Tip: Before committing to a design, practice on a nail wheel or a piece of paper. This way, you can see how your chosen colors and styles work together without worrying about your actual nails. This mini test run can save you time and effort, ensuring you achieve the perfect Nightmare Before Christmas nails!
6. Halloween Town Skyline

Transport yourself to Halloween Town with this enchanting skyline nail art! Featuring a dark blue or black base, this design showcases silhouettes of the town’s iconic buildings under a glowing moon. The intricate details bring the whimsical scenery to life, making it a unique choice for nail art lovers.
This design is perfect for Halloween events or any occasion where you want to showcase creativity.
Outfit Pieces:
– Dark blue or black base coat
– White or yellow polish for the moon and stars
– Black polish for building silhouettes
Styling Tips:
– Start with a dark base for depth and contrast.
– Use a fine brush to paint the moon and stars carefully.
– Create building silhouettes in black for added drama.
– Enhance with any desired details for a polished look.
This nail art design captures the magic of Halloween Town, making it a striking choice for festive gatherings.
7. Spooky Spider Webs
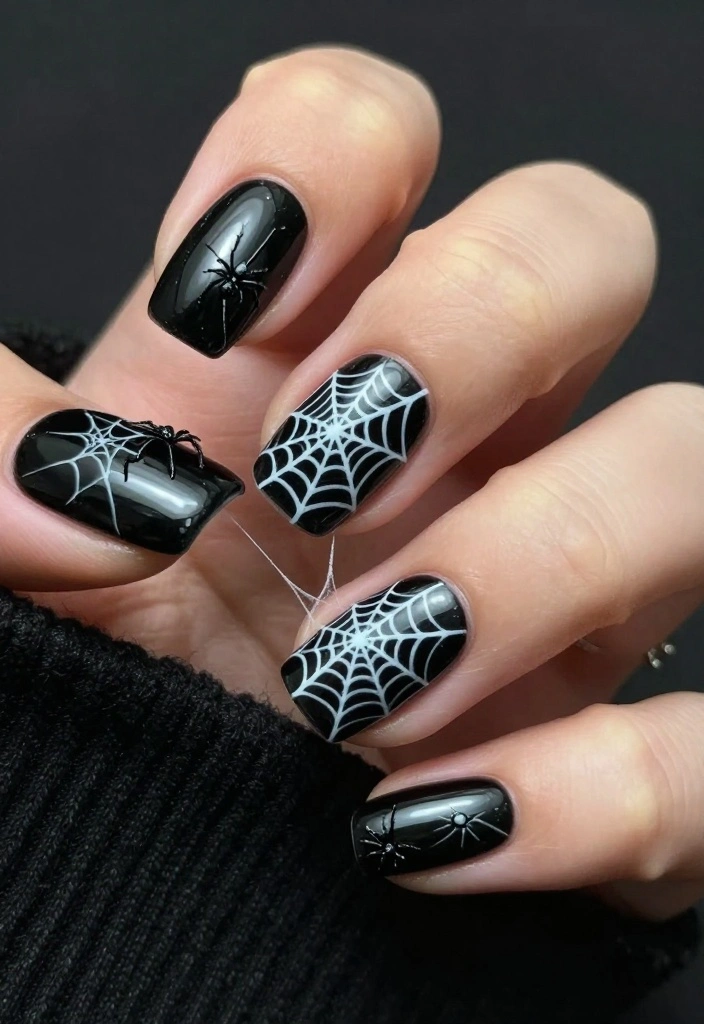
For fans of classic Halloween themes, spooky spider webs are a perfect choice for your nails. This design typically features a black base with delicate white spider webs extending across the surface. Adding tiny spiders can intensify the eerie effect, resulting in an elegant yet spooky look.
It’s a great choice for those who want a touch of Halloween without going overboard.
Outfit Pieces:
– Black base coat
– White polish for spider webs
– Optional small spider embellishments
Styling Tips:
– Begin with a black base coat for a dark foundation.
– Use a fine brush to carefully create spider webs in white.
– Add small spiders to some nails for a fun touch.
– Seal with a glossy top coat for a polished finish.
This design adds a classic Halloween touch to your manicure while keeping it stylishly understated.
8. Festive Glitter Skulls

If you adore a bit of sparkle, then festive glitter skulls are a must-try nail design! Start with a solid base like black or purple, then paint glittery skulls for that extra shine. This combination of spooky and glamorous makes for a standout Halloween look.
Personalize each nail with different skull styles or various glitter colors for a unique flair.
Outfit Pieces:
– Solid black or purple base coat
– Glitter polish for skull designs
– Optional bats or stars for added detail
Styling Tips:
– Begin with a solid base coat for a strong foundation.
– Use glitter polish to create skull designs on select nails.
– Add bats or stars around the skulls for a festive touch.
– Finish with a top coat for extra shine.
This design is perfect for mixing spooky with fabulous, ideal for any Halloween celebration or party!
Fun fact: 62% of nail art lovers say glitter accents instantly elevate nightmare before christmas nails. A black or purple base with glitter skulls creates glam that still reads spooky. Pro tip: seal with a shiny top coat for party-ready shine.
9. Tim Burton Inspired Art

Tim Burton’s distinctive animation style makes for captivating nail art inspiration. This design incorporates various elements from his films, blending whimsy with a spooky vibe. Using monochrome colors with bright accents, you can reflect his unique storytelling through your nails.
This style is perfect for those who appreciate creativity and artistry in their nail designs.
Outfit Pieces:
– Base color in white or black
– Contrasting colors for stripes or swirls
– Quirky characters or motifs for personalization
Styling Tips:
– Start with a white or black base for contrast.
– Incorporate stripes or swirls in vibrant colors for interest.
– Add unique characters or motifs for a personal touch.
– Seal with a clear top coat for a polished finish.
This design embodies Tim Burton’s artistic flair, making it an eye-catching choice for any Halloween event!
Tim Burton-inspired nails prove whimsy and spooky can walk hand in hand. Start with white or black as your base, then flash neon stripes to mirror his bold storytelling—creativity you can wear and show off.
10. Bone-Chilling Negative Space
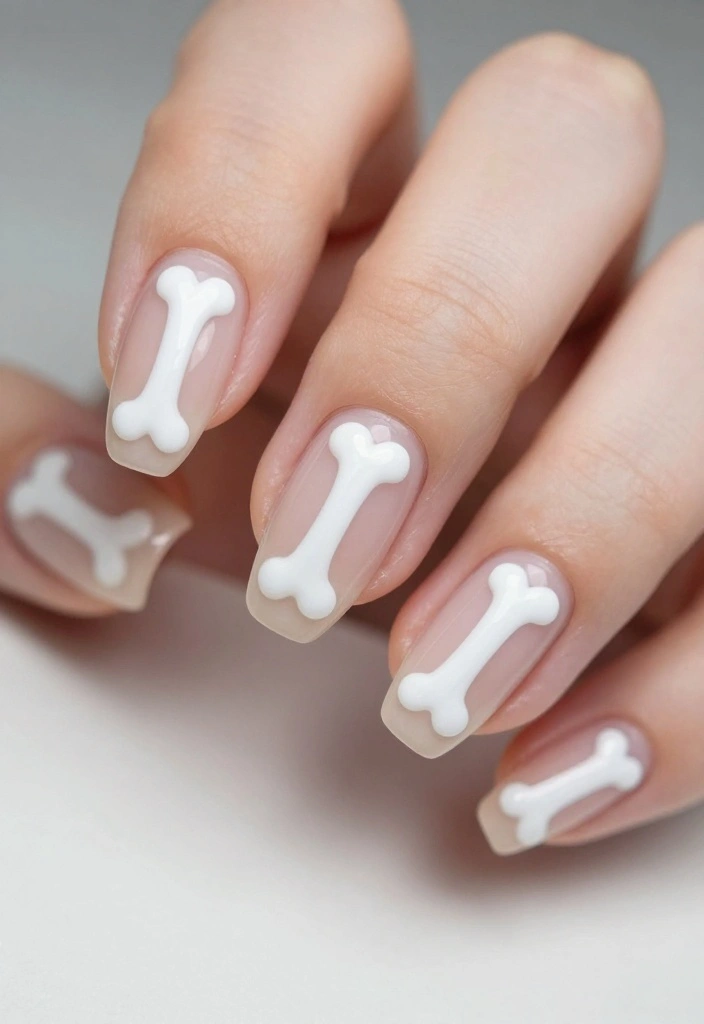
For those who lean towards a minimalist aesthetic, negative space nails featuring bone designs offer a chic option. This design uses the natural nail as a canvas, painting bone shapes in white over a clear or nude base. It’s simple yet striking, perfect for anyone wanting to keep things subtle while embracing the Halloween spirit.
Tiny highlights or glitter accents can be added for a touch of flair, making this design versatile for any occasion.
Outfit Pieces:
– Clear or nude base coat
– White polish for bone shapes
– Optional glitter for accents
Styling Tips:
– Start with a clear or nude base for a clean look.
– Use white polish to create bone shapes on the nails.
– Add tiny glitter accents for extra style if desired.
– Finish with a top coat to seal the design.
This design captures the essence of Halloween while staying stylishly understated, making it a great choice for any event!
Conclusion

As Halloween approaches, there’s no better way to showcase your love for ‘The Nightmare Before Christmas’ than with these creative nail designs. Each style offers a unique expression of the film’s whimsical yet spooky charm, perfect for anyone wanting to blend the fun of Halloween with their personal fashion sense.
So grab your nail polish and let your creativity flow! Whether you choose to go all out with intricate designs or keep it simple and chic, your nails can become a canvas for expressing your spooky style this season. Happy haunting!
Frequently Asked Questions
What are nightmare before christmas nails and why are they popular for Halloween nail art?
Nightmare Before Christmas nails blend spooky characters with chic nail art, making nightmare before christmas nails a perfect fit for Halloween nails.
In this article, 10 Spooky Nightmare Before Christmas Nails That Will Haunt Your Dreams, you’ll find designs and step-by-step tips to recreate them at home.
To get started, gather your supplies and follow a simple routine: prep nails (shape and buff, push back cuticles), apply a base coat, paint with a white or pale base depending on the design, add details with a fine brush or stamp, then seal with a top coat.
For durable color, consider gel polish or a long-lasting top coat so you can enjoy your manicure longer.
What are some beginner-friendly nightmare before christmas nails designs I can try at home?
If you’re new to nail designs, start with simple motifs like an accent nail featuring Jack Skellington’s face, candy cane stripes, or a ghost silhouette. These nightmare before christmas nails ideas keep the spooky vibe without overwhelming detail, and you can complete them in under an hour with basic tools.
How to do it: paint a clean base, sketch the design with a fine brush or nail art pen, use a dotter for eyes, and finish with a top coat. Practice on a nail sticker or a spare nail first, then apply to your manicure.
What tools and supplies do I need to recreate nightmare before christmas nails at home?
For a smooth start, gather: base coat, top coat, white and black nail polishes, and a few accent colors (red, green, orange). You’ll also want a fine nail art brush or nail art pen, a dotting tool, tape or stencils for clean lines, acetone and cotton swabs for cleanup, and optionally a gel kit for longer wear.
Don’t forget a good nail file and cuticle pusher so your nails are ready for art.
How can I make nightmare before christmas nails last longer and stay neat through the week?
Durability starts with prep: file nails, push back cuticles, and remove any oils. Always use a base coat before color, and seal with a top coat daily or every couple of days. If you’re using regular polish, reapply the top coat midweek to prevent chipping. For the longest wear, consider gel polish or UV LED curing, which locks in the design and resists everyday wear.
Which nightmare before christmas nail designs work well for work or school while still looking spooky?
Choose subtle, sophisticated motifs for work or school: a monochrome palette with a single accent nail featuring a tiny nightmare before christmas nails character, or negative-space designs with thin black lines on a nude base. You can also do matte black nails with a glossy accent nail showing a small Jack Skellington face. These Halloween nails remain professional while nodding to the spooky season.
Related Topics
nightmare before christmas nails
Halloween nails
nail art designs
spooky nail art
festive nails
beginner friendly
creative nail ideas
easy nail designs
seasonal nail art
character nails
themed nail art
trending nail styles
I love all these nail designs! They’re so creative and perfect for Halloween. Which one is your favorite to try out?