Are you looking to elevate your nail game? If you’re anything like me, nail art has become not just a trend but a passion. From dazzling designs to intricate patterns, there’s something about creative nail art that can completely transform your look. That’s why I created this post! I wanted to share some amazing nail art ideas inspired by professional nail artists that you absolutely must try if you want to keep up with current nail trends.
This guide is crafted for nail enthusiasts, whether you’re a beginner or a seasoned pro. If you love experimenting with colors and styles on your nails or simply want to impress your friends with your creativity, you’re in the right place. Each of these twenty ideas is not only eye-catching but also easy to recreate at home or share with your favorite nail artist.
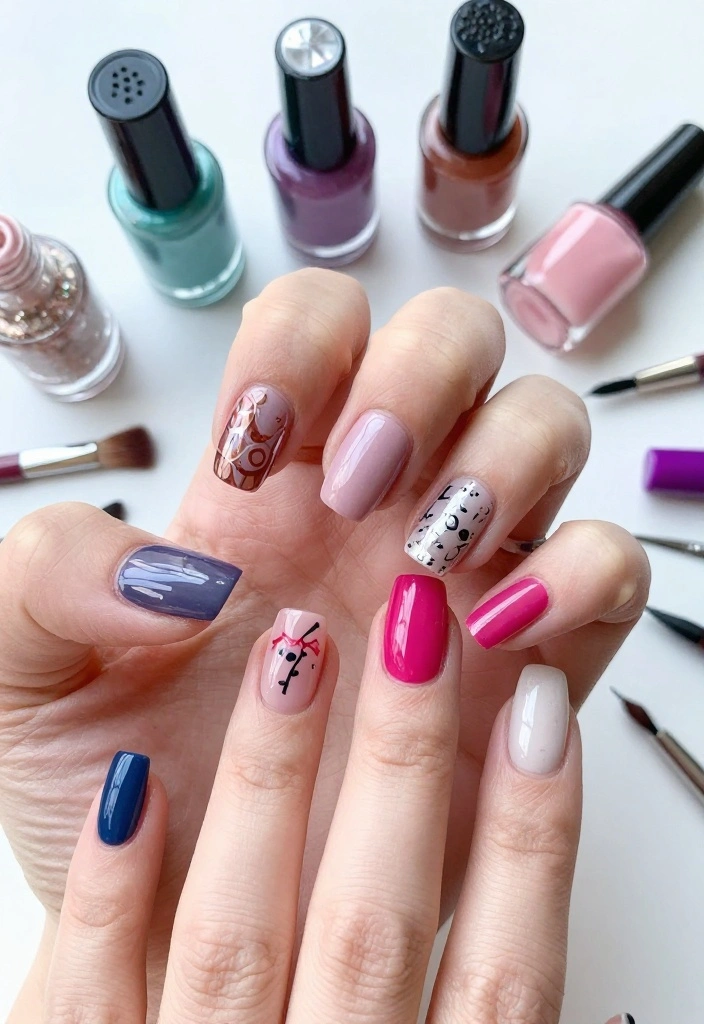
You’ll find inspiration in every design, from the elegant marble effect to fun animal prints. I’ve pulled together twenty unique nail art ideas that are bold, playful, and perfect for showing off your personality. So grab your nail supplies, and let’s dive into some creative nail art that will have everyone asking, “Who did your nails?”
Key Takeaways
– Discover 20 unique nail art ideas inspired by professional nail artists to spark your creativity.
– Explore various styles such as elegant marble effects and fun animal prints that suit every occasion.
– Gain inspiration to express your personality through bold and playful nail designs.
– Learn easy-to-follow techniques that make it simple to achieve salon-quality results at home.
– Stay updated on current nail trends to ensure your nail art game is always fresh and exciting.
Contents
- 1. Rainbow Gradient Nails
- 2. Elegant Marble Effect
- 3. Geometric Nail Art
- 4. Floral Accents
- 5. Minimalist Nude Designs
- 6. Fun Animal Prints
- 7. Metallic Foil Accents
- 8. Ombre Nail Art
- 9. Bohemian Patterns
- 10. Glitter Bomb Nails
- 11. Colorful Splatter Art
- 12. Tie-Dye Nails
- 13. Vintage Lace Designs
- 14. Artistic Watercolor Nails
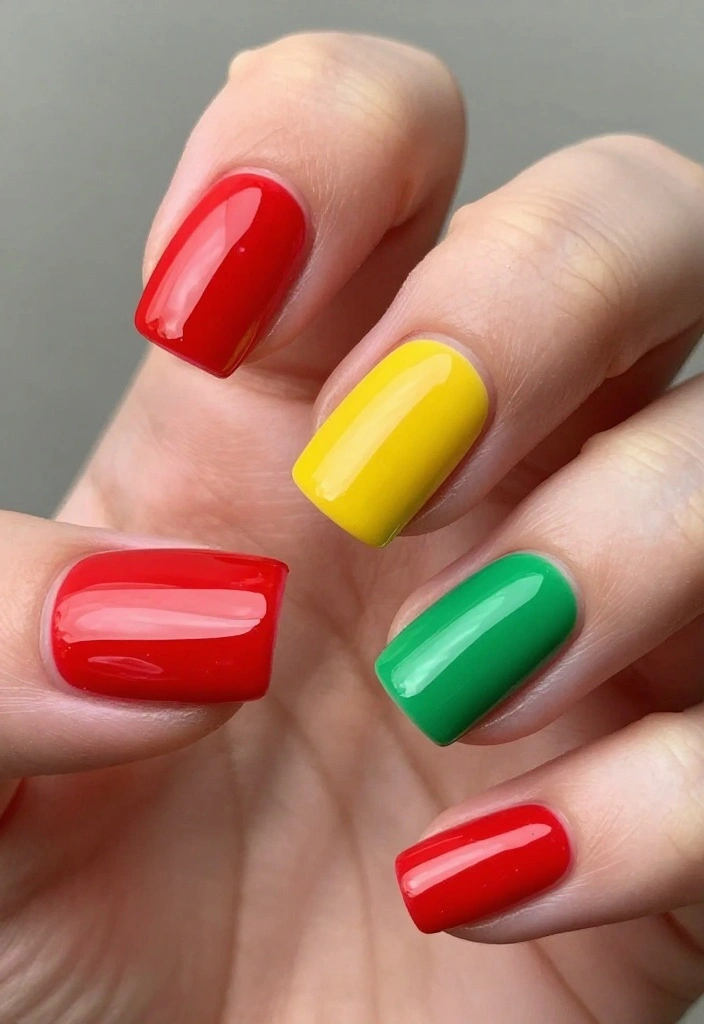
- 15. Bold Color Block Nails
- 16. Striped Nail Art
- 17. Artistic Drip Nails
- 18. Seasonal Nail Art
- 19. Negative Space Nails
- 20. Glowing Neon Nails
1. Rainbow Gradient Nails
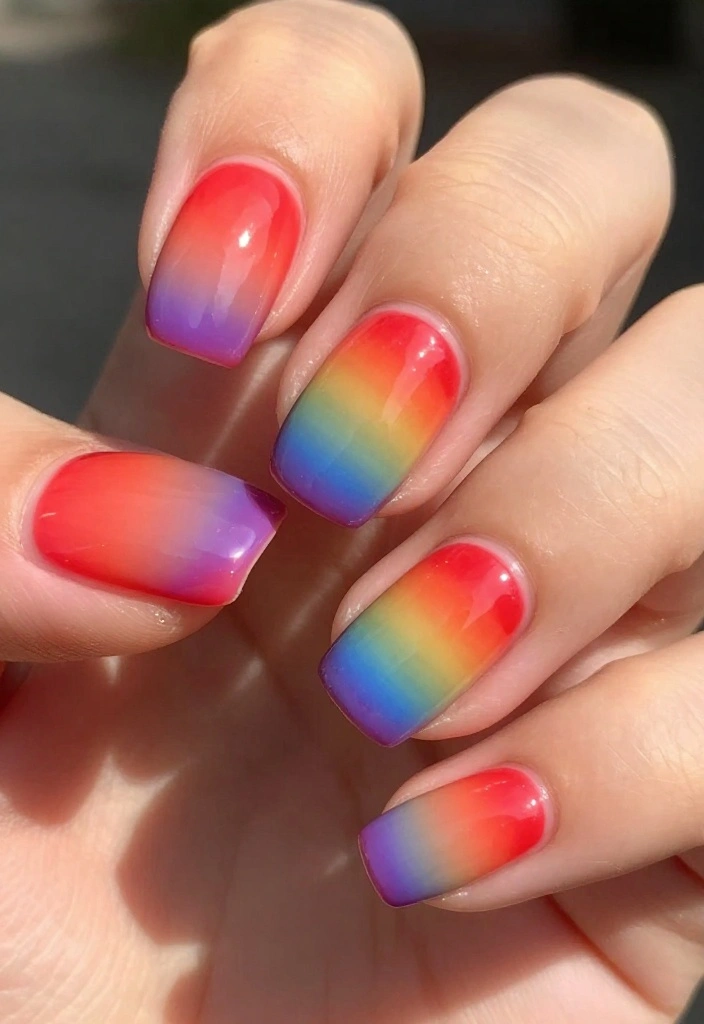
Rainbow gradient nails are a joyful way to showcase your creativity. The seamless transition between vibrant colors creates a lively effect that’s both eye-catching and uplifting. This style is perfect for summer festivals or any occasion where you want to spread some cheer.
To achieve this look, begin with a white base coat to allow the colors to stand out. Use a makeup sponge to apply each shade of the rainbow, gently blending them together. Finish with a glossy top coat for added shine.
– Tip: Dab the sponge lightly to avoid uneven patches.
– Unique Insight: Neon colors can add an electrifying twist to your design!
– Nail Trends: Don’t shy away from unconventional color combos; they can create stunning results.
Ingredients List:
– White base coat
– Rainbow nail polishes (red, orange, yellow, green, blue, indigo, violet)
– Makeup sponge
– Top coat
Step-by-Step Instructions:
1. Start with a clean nail and apply a white base coat; let it dry.
2. On a makeup sponge, add stripes of each rainbow color.
3. Dab the sponge onto your nail, blending the colors for a gradient effect.
4. Repeat as needed for a more vibrant look.
5. Seal your design with a glossy top coat.
– FAQ: Can I use glitter polish? Definitely! Add it on top for extra sparkle.
2. Elegant Marble Effect
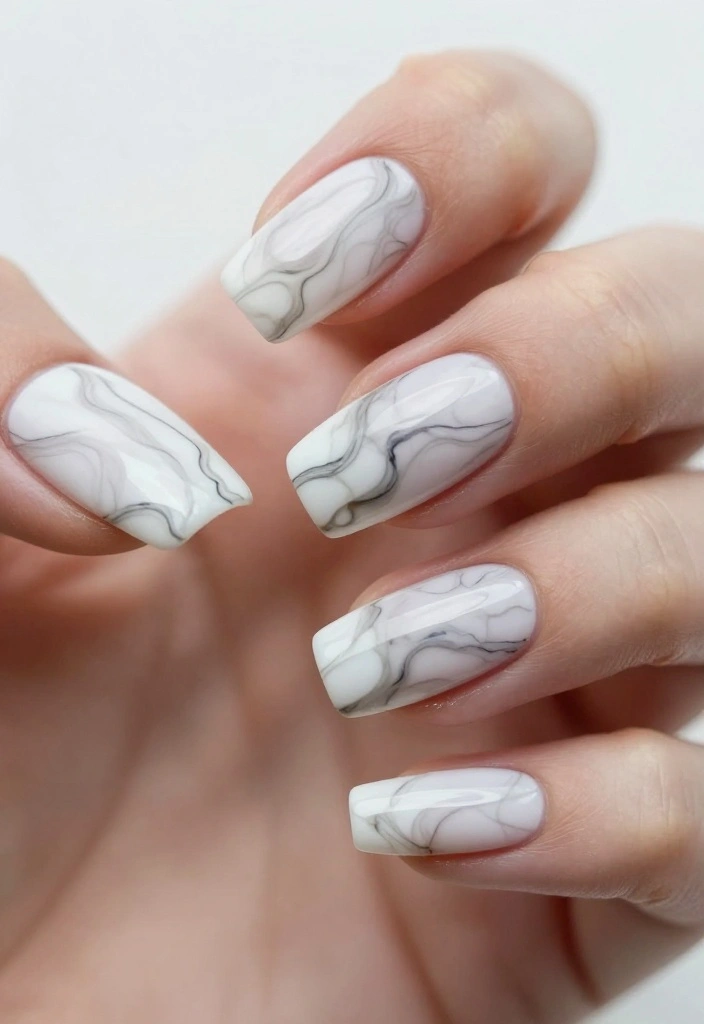
The marble nail design is a sophisticated choice that brings a touch of elegance to any look. Mimicking the intricate swirls and veining of natural marble, this style is both chic and adaptable for various settings. It’s especially perfect for formal occasions or when you want to impress.
To create this effect, start with a light-colored base, usually white or pale gray. Then, use a fine brush or pin to swirl in darker shades like black or deep green, crafting soft lines that resemble marble patterns.
– Tip: A drop of nail polish remover can help blend the colors for a more organic look.
– Unique Insight: Pairing the marble effect with gold foils adds a luxurious touch.
– Nail Trends: This design works beautifully on both short and long nails, making it versatile.
Ingredients List:
– Light-colored base coat (white or light gray)
– Dark nail polish (black, navy, or forest green)
– Fine nail art brush or pin
– Top coat
Step-by-Step Instructions:
1. Apply a light base coat and let it dry completely.
2. Randomly place small dots of dark polish on your nails.
3. Use a brush to swirl the colors, mimicking natural marble.
4. Allow it to dry, then finish with a top coat for shine.
– FAQ: Can I use the marble effect on acrylic nails? Yes! It looks stunning on all nail types.
3. Geometric Nail Art
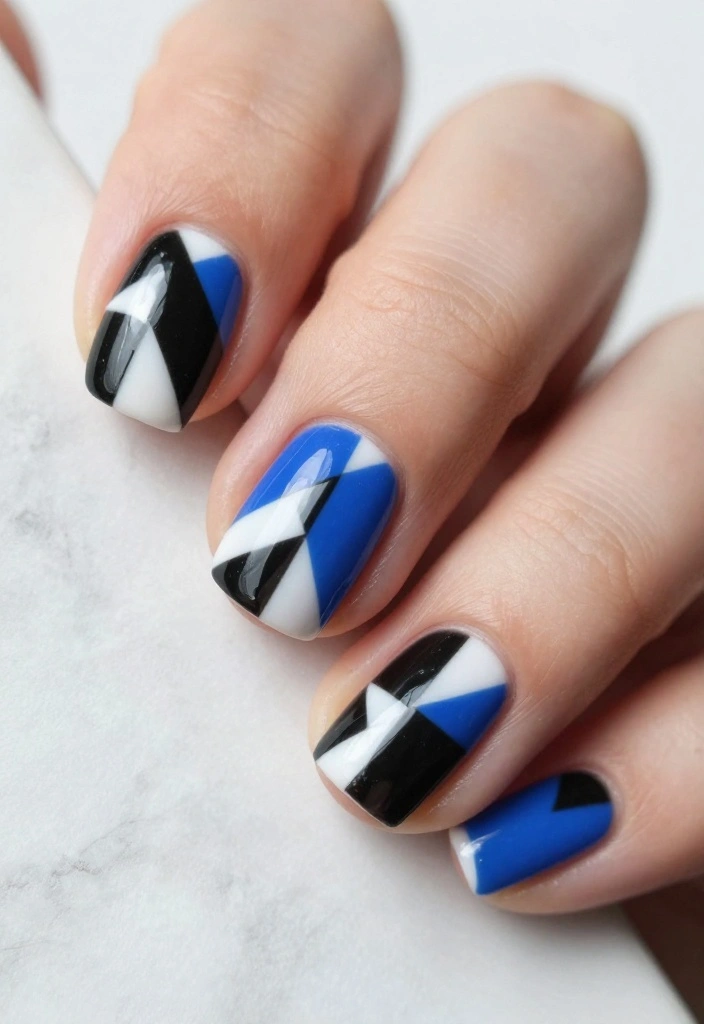
Geometric nail designs are striking, showcasing clean lines and bold contrasts. This style appeals to lovers of modern art and minimalism, making a strong statement with its simplicity. It’s suitable for casual outings as well as more formal events.
To create geometric nail art, use tape to form shapes on your nails. You can create triangles, squares, or even abstract designs, filling them with your chosen colors for a vibrant contrast.
– Tip: Ensure your base coat is completely dry before applying tape to prevent smudging.
– Unique Insight: Pairing contrasting colors like black and white or soft pastels can yield stunning results.
– Nail Trends: Geometric patterns can be combined with matte or glossy finishes for varied effects.
Ingredients List:
– Base coat
– Various nail polishes (choose your colors)
– Nail tape or striping tape
– Top coat
Step-by-Step Instructions:
1. Start with a base coat and let it dry.
2. Use nail tape to create geometric shapes on your nails.
3. Fill in the shapes with your selected nail polish colors.
4. Once the polish is dry, carefully remove the tape.
5. Finish with a top coat for a polished appearance.
– FAQ: What if I don’t have nail tape? A fine brush works well for freehand designs!
4. Floral Accents

Floral nail art is a classic choice, bringing the beauty of nature right to your fingertips. Perfect for spring and summer, this design adds femininity and elegance to any outfit. You can opt for delicate blossoms or bold blooms, making floral patterns both versatile and personal.
To create floral nail art, start with a solid base color. Then, using a fine brush or a dotting tool, paint the flowers and leaves in your chosen colors. Feel free to play with shades for added depth and detail.
– Tip: Use a gentle hand when detailing the flowers for softer edges.
– Unique Insight: Layer different flowers for a beautiful, textured effect!
– Nail Trends: Mixing floral designs with abstract shapes is all the rage this season.
Ingredients List:
– Base coat (color of your choice)
– Various nail polishes (colors for flowers and leaves)
– Thin brush or dotting tool
– Top coat
Step-by-Step Instructions:
1. Start with a base coat and allow it to dry completely.
2. Use a brush to paint flowers or a dotting tool for tiny blossoms.
3. Fill in with leaves and other details as desired.
4. Let dry and finish with a top coat.
– FAQ: Are there specific colors for floral designs? Bright colors work well, but pastels are lovely for a softer look.
5. Minimalist Nude Designs
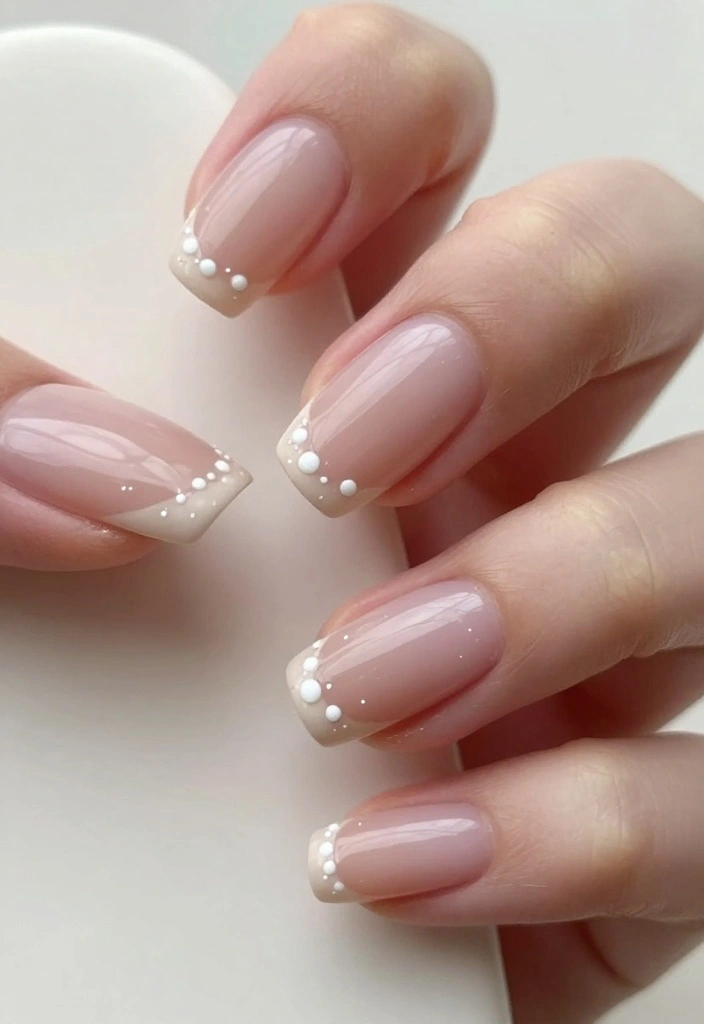
Minimalist designs embrace the idea that sometimes less is more. Nude nails paired with simple accents create an elegant look that can be dressed up or down. This style is ideal for those who prefer subtlety while still showcasing their nails.
To create this look, select a nude base that complements your skin tone. You can keep it plain or add small details like dots, lines, or a single accent nail in a different color. The goal is to maintain simplicity while adding a unique twist.
– Tip: Well-groomed nails are essential for the best minimalist effect.
– Unique Insight: Glossy finishes enhance the elegance of nude shades beautifully.
– Nail Trends: Dotted designs or tiny geometric shapes are popular choices in minimalist nail art.
Ingredients List:
– Nude base coat
– Optional accent color polish
– Top coat
Step-by-Step Instructions:
1. Apply a nude base coat and let it dry.
2. If desired, use a contrasting polish for simple designs on one or two nails.
3. Seal with a top coat for a clean finish.
– FAQ: Can minimalist designs work on short nails? Absolutely! They look fantastic on all nail lengths.
📹 Related Video: COOL MINIMALIST NUDE MANI (DIY NAIL ART TUTORIAL)
💅 Nail Art Made Easy!
Transform your busy schedule with this DIY Nail Art Guide tailored for moms who love creativity and style.
6. Fun Animal Prints

Animal prints are taking the nail art world by storm, offering a playful way to express your wild side. Whether you choose leopard spots or zebra stripes, these designs add character to any outfit. They’re perfect for those who want to showcase their fun and adventurous spirit.
To create this look, start with a contrasting base coat (think sandy beige for leopard). Use a fine brush or nail art pen to add your chosen patterns, letting your creativity flow.
– Tip: A glossy top coat will make those prints stand out!
– Unique Insight: Mix different animal prints on each finger for a quirky twist!
– Nail Trends: Combining animal prints with bold colors is becoming increasingly popular this season.
Ingredients List:
– Base coat (light or contrasting color)
– Various nail polishes (colors for prints)
– Thin brush or nail art pen
– Top coat
Step-by-Step Instructions:
1. Start with your preferred base coat and allow it to dry.
2. Paint your animal prints using a brush or pen, like spots for leopard or stripes for zebra.
3. Seal your design with a glossy top coat for durability.
– FAQ: Are animal prints suitable for formal events? Yes, they can definitely be chic and sophisticated with the right styling!
7. Metallic Foil Accents

Metallic foil accents elevate nail art, adding a dose of glam and shine. Perfect for parties or special events, these accents create a luxurious feel that glimmers beautifully. They can be paired with virtually any base color but look especially striking on darker shades.
To achieve this look, apply a base coat and let it dry. Then, brush on adhesive where you want the foil to stick, and gently press the foil onto the adhesive.
– Tip: For an edgy look, try adding a matte top coat to one side!
– Unique Insight: Experiment with different patterns like shattered or gold leaf for added interest.
– Nail Trends: Foil accents are increasingly being used for everyday wear, not just special occasions.
Ingredients List:
– Base coat
– Adhesive for foil
– Metallic foil sheets
– Top coat
Step-by-Step Instructions:
1. Start with a base coat and let it dry.
2. Apply adhesive in the areas where you want to place the foil.
3. Carefully press the foil onto the adhesive for a secure fit.
4. Seal with a top coat for longevity.
– FAQ: Can I use regular nail glue for foils? It’s best to use adhesive designed specifically for foils to achieve optimal results.
How To Choose Nail Art Designs Inspired by Professional Nail Artists
Choosing the right nail art design can seem overwhelming with so many options available. To help narrow down your choices, consider the following criteria to find a style that suits your personality and occasion.
1. Style Preference
Before diving into the latest nail trends, think about what styles you naturally gravitate toward. Do you love bold and vibrant patterns, or do you prefer something more subtle and elegant? Identifying whether you’re drawn to geometric designs, floral accents, or minimalist nude options can guide your choices.
2. Occasion
Consider where you’ll be showing off your nails. Different occasions call for different designs. For formal events, you might want to opt for elegant marble effects or vintage lace designs. For casual outings, colorful splatter art or fun animal prints could be a great fit. Matching your nail art to the occasion ensures they look appropriate and stylish.
3. Nail Length and Shape
Your nail length and shape will significantly impact how a design appears. Longer nails can showcase intricate patterns like bohemian styles or artistic watercolor effects. Meanwhile, shorter nails might be better suited for minimalist designs or negative space nails, which can create an illusion of length. Always choose a design that complements your natural nail shape.
4. Skill Level
Are you a beginner or a seasoned nail artist? Some designs, like ombre nail art or glitter bomb nails, can be quite intricate. If you’re new to nail art, start with simpler patterns or techniques that build your confidence. As you gain experience, you can tackle more complex styles like artistic drip nails or tie-dye effects.
5. Color Palette
Colors play a crucial role in nail art. Consider the seasons and what colors are trending. Bright, neon colors can be fun for summer, while warmer, deeper tones may suit autumn. Additionally, think about how the colors will look against your skin tone. Choosing a palette that enhances your complexion will elevate your overall look.
Pro Tip: Before committing to a design, consider using nail stickers or temporary tattoos to test out different styles. This way, you can see what you like without the commitment of polish.
By reflecting on your style preferences, the occasion, nail length and shape, skill level, and color palette, you can confidently choose a nail art design that suits you best. With these tips in mind, you’ll be ready to showcase stunning nails inspired by professional nail artists!
8. Ombre Nail Art
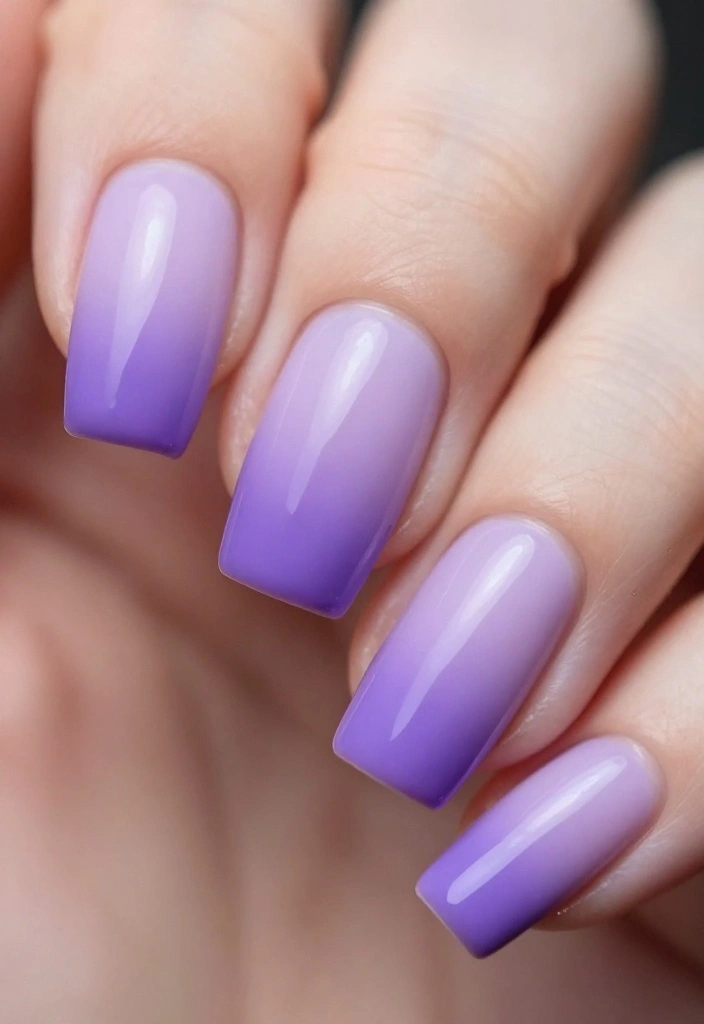
Ombre nails create a stunning gradient effect that smoothly blends colors together. This versatile style allows you to choose contrasting or complementary shades, making it perfect for expressing your mood. Ombre nails can add a playful twist while still maintaining a polished look.
To create ombre nails, apply two base colors. Using a makeup sponge, dab and roll the colors together for a seamless blend that captivates the eye.
– Tip: Use a gentle touch to keep the blend soft and smooth.
– Unique Insight: Ombre designs can be enhanced with glitter for a dazzling finish.
– Nail Trends: This trend is evolving with the introduction of geometric patterns and textures!
Ingredients List:
– Two contrasting or complementary nail polishes
– Makeup sponge
– Top coat
Step-by-Step Instructions:
1. Apply a base coat in one of your chosen colors and let it completely dry.
2. On a sponge, place the two colors side by side.
3. Dab the sponge onto your nails, rolling it to blend the colors.
4. Once satisfied with the blend, let it dry and apply a top coat.
– FAQ: Can I achieve ombre with more than two colors? Yes! Just layer additional colors in the same manner.
9. Bohemian Patterns
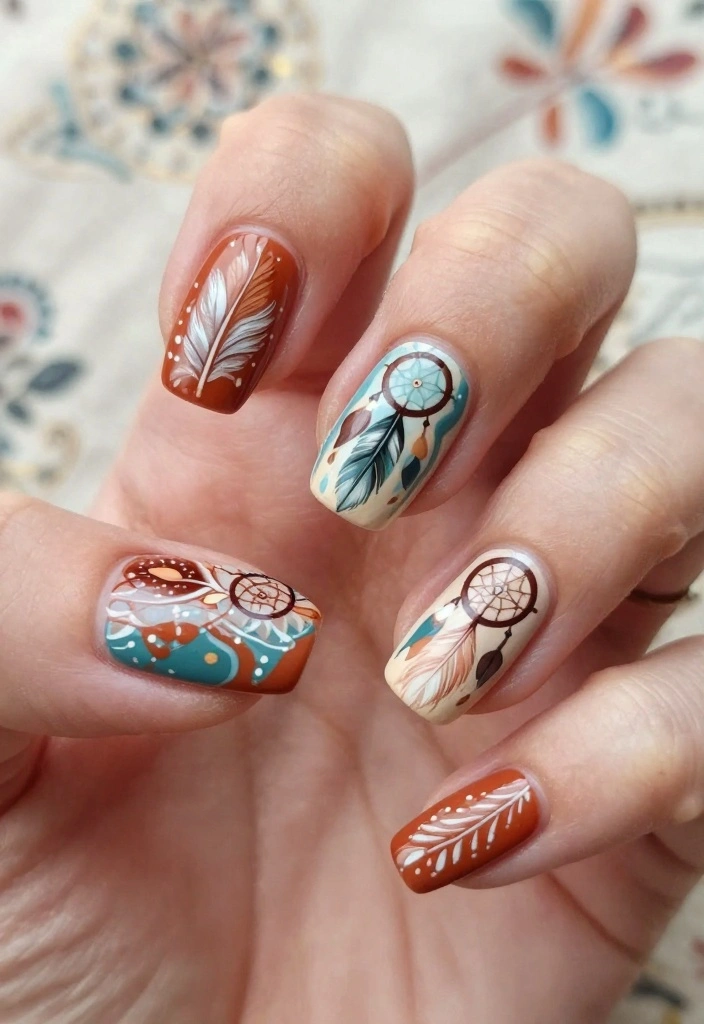
Bohemian nail designs are a celebration of free-spirited art and vibrant patterns. Featuring intricate designs like dreamcatchers and feathers, this style embodies a laid-back vibe. It’s perfect for those who wish to express their individuality and connection to nature.
To achieve bohemian nail art, select earthy tones as your base. Using a fine brush, paint a mix of patterns and colors to create a unique, boho-inspired look. This style encourages creativity, so let your imagination run wild!
– Tip: Layer colors for added depth and texture in your designs.
– Unique Insight: Blending different cultural patterns can lead to an eclectic masterpiece!
– Nail Trends: This design is becoming a favorite for music festivals and outdoor events.
Ingredients List:
– Earth-tone base colors
– Various contrasting colors for designs
– Fine brush or nail art pens
– Top coat
Step-by-Step Instructions:
1. Paint your nails with your chosen base colors and let dry.
2. Use a fine brush to create bohemian patterns like feathers or dreamcatchers.
3. Mix and match colors and patterns for depth and character.
4. Seal your art with a top coat.
– FAQ: Can I use stickers for bohemian designs? Yes, they can be a great addition to your artwork.
10. Glitter Bomb Nails
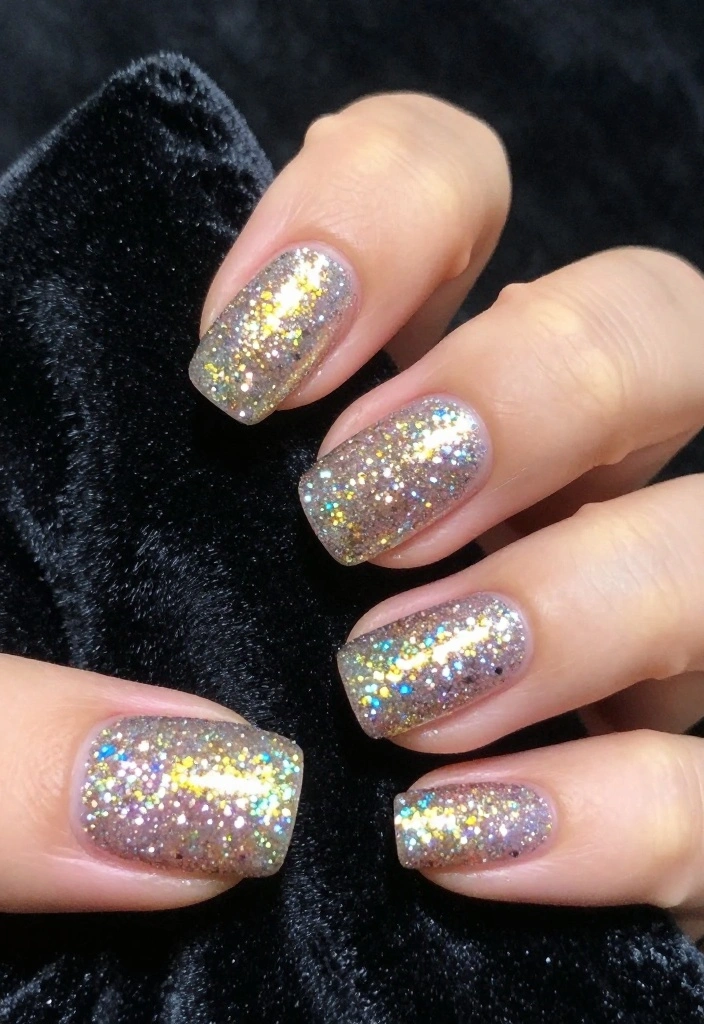
Glitter nails are all about making a bold, sparkling statement! If you love all things shiny, this trend is for you. Glitter nails can be worn solo, as an accent, or mixed into other designs for endless creativity. They’re perfect for nights out or whenever you want to feel fabulous.
To create glitter bomb nails, start with a solid base color and layer glitter polish on top. You can cover the entire nail or just the tips for a glamorous ombre effect. The more glitter, the better!
– Tip: A sponge can help apply loose glitter for an even more dazzling look!
– Unique Insight: Mixing different colors of glitter can create a unique twist.
– Nail Trends: Combining textures like matte and glitter is gaining traction this season.
Ingredients List:
– Base nail polish (your choice of color)
– Glitter polish or loose glitter
– Top coat
Step-by-Step Instructions:
1. Apply your chosen base color and let it dry.
2. Use glitter polish or loose glitter to cover your nails or just the tips.
3. Seal your design with a top coat for longevity.
– FAQ: How can I remove glitter polish easily? Soaking your nails in acetone will help break down the glitter quickly.
11. Colorful Splatter Art

Colorful splatter nails are energetic and artistic, perfect for those who want to unleash their inner artist. This fun design allows for creativity without rules, making each nail a unique canvas. It’s a great conversation starter!
To create splatter nails, begin with a white or light base coat. Then, using a straw or small brush, splatter various colors across your nails. The randomness of the splatters adds a unique flair to each design.
– Tip: Cover your workspace; this technique can get messy!
– Unique Insight: A toothpick can provide more control for finer splatters or dots.
– Nail Trends: This style is particularly popular among younger audiences seeking playful designs.
Ingredients List:
– Base coat (white or light color)
– Various vibrant nail polishes
– Straw or small brush
– Top coat
Step-by-Step Instructions:
1. Paint your nails with a light base coat and let it dry.
2. Dip a straw or brush into your nail polish and splatter it onto your nails.
3. Repeat with different colors for a captivating splatter effect.
4. Finish with a top coat to seal your design.
– FAQ: How can I avoid getting polish on my skin? Tape around your nails can catch any splatters.
Fun fact: Colorful splatter nails look spontaneous, but as a nail artist will tell you, a white base plus 4–6 colors creates a unique canvas every time. The quick technique dries fast and sparks creativity with minimal rules.
12. Tie-Dye Nails
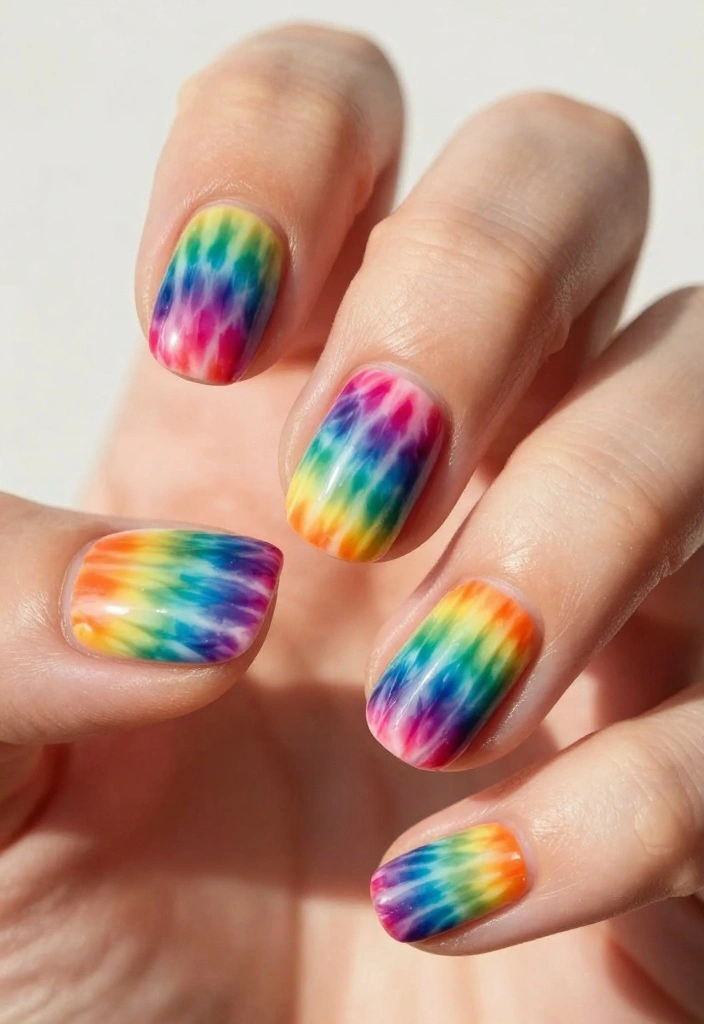
Tie-dye nails are a vibrant throwback that brings a splash of color to your fingertips. This playful design is ideal for those who want a bold and fun look. Each nail becomes a canvas for colorful patterns, allowing for creative expression.
To create this look, start with a white or light base coat. Use a small brush or dotting tool to apply colors in swirling motions, blending them as you go. The result is a lively blend of colors that can vary on each nail!
– Tip: A sponge helps create soft blends between colors.
– Unique Insight: Incorporate glitter for a dazzling effect that catches the light!
– Nail Trends: Tie-dye is especially trendy for summer festivals, adding a fun touch to outfits.
Ingredients List:
– Base coat (white or light color)
– Various nail polishes (your choice of colors)
– Small brush or dotting tool
– Top coat
Step-by-Step Instructions:
1. Paint your nails with a light base coat and let dry.
2. Apply small dots of different colored polish on each nail.
3. Use a brush or dotting tool to swirl and blend the colors.
4. Finish with a top coat for a glossy look.
– FAQ: Can I use nail stickers for tie-dye? Stickers can work, but the true tie-dye effect comes from blending colors.
13. Vintage Lace Designs
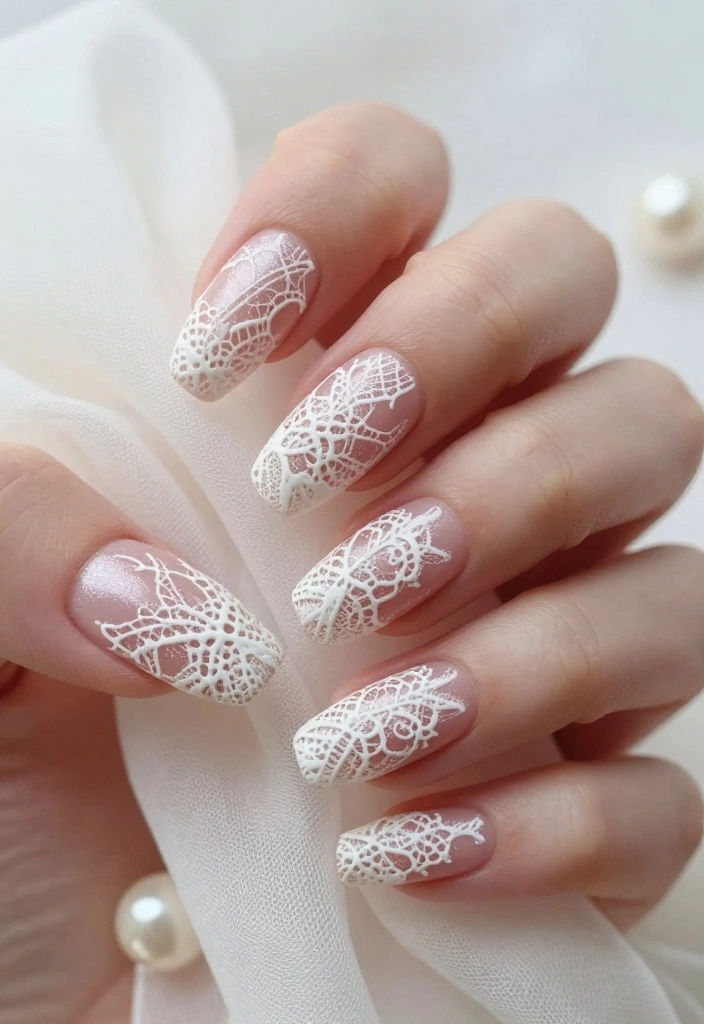
Vintage lace nails offer a romantic and timeless touch, inspired by intricate lace patterns. This elegant style is perfect for weddings or special occasions, adding sophistication to your look. The delicate designs can transform your nails into a work of art.
To create lace designs, begin with a light-colored base coat. Use a fine brush to paint delicate lace patterns, or opt for lace nail stickers for a quicker application. The result is beautifully detailed nails that exude charm.
– Tip: A white or cream base creates a softer lace effect.
– Unique Insight: Combine lace designs with pearls or rhinestones for added elegance.
– Nail Trends: Vintage-inspired designs are seeing a rise in popularity, especially for bridal styles.
Ingredients List:
– Base coat (light color)
– Nail polish for lace patterns (white or contrasting color)
– Fine brush or lace nail stickers
– Top coat
Step-by-Step Instructions:
1. Apply your base coat and let it dry.
2. Use a fine brush to create lace patterns or apply stickers.
3. Finish with a top coat for durability.
– FAQ: Can I use this design with colored polish? Yes! It can look stunning on dark or vibrant bases as well.
14. Artistic Watercolor Nails
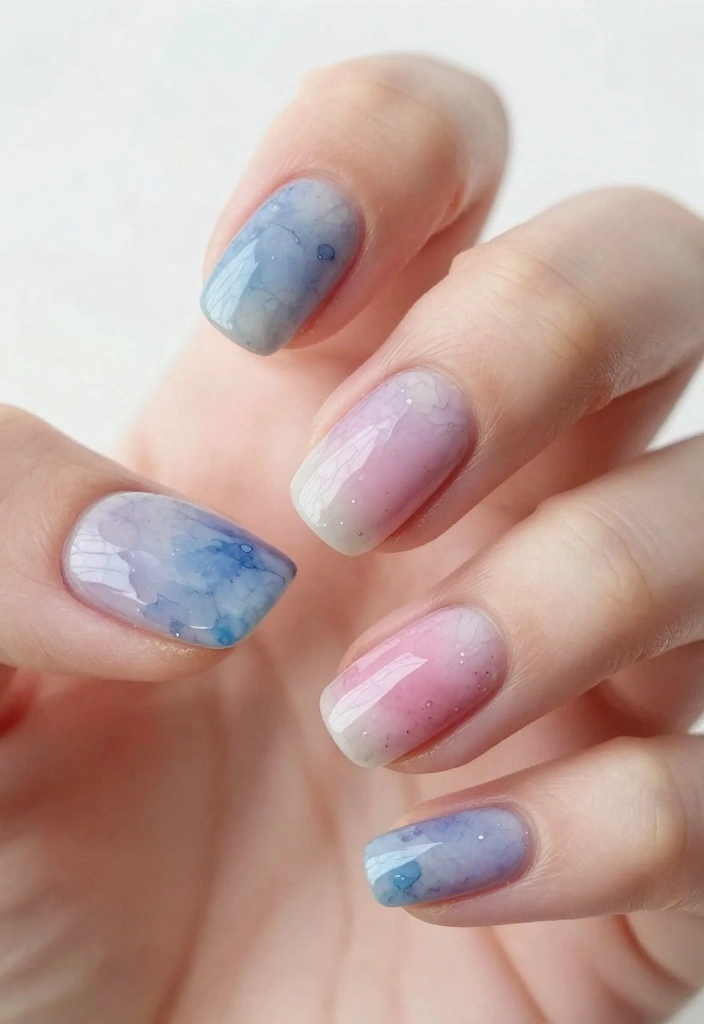
Watercolor nails deliver a soft and dreamy aesthetic, resembling a painting on your fingertips. This artistic style is perfect for anyone wanting to express their creativity without being too bold. It allows for layering colors, creating a unique effect every time.
To achieve this look, start with a white base coat. Using a fine brush, apply sheer colors in a seamless manner, blending them together. The goal is to mimic a watercolor painting, resulting in both elegance and artistry.
– Tip: Water down your polish slightly for a more translucent effect.
– Unique Insight: Layering different colors can create beautiful depth and interest!
– Nail Trends: Watercolor designs are trending for both casual outings and sophisticated events.
Ingredients List:
– Base coat (white or light color)
– Various sheer nail polishes (choose soft colors)
– Fine brush
– Top coat
Step-by-Step Instructions:
1. Apply a base coat and let it fully dry.
2. Use a fine brush to apply colors in a watercolor style, blending them gently.
3. Once satisfied, finish with a top coat to protect your design.
– FAQ: Can I use regular nail polish? Yes, but sheer polishes yield the best watercolor effect.
15. Bold Color Block Nails
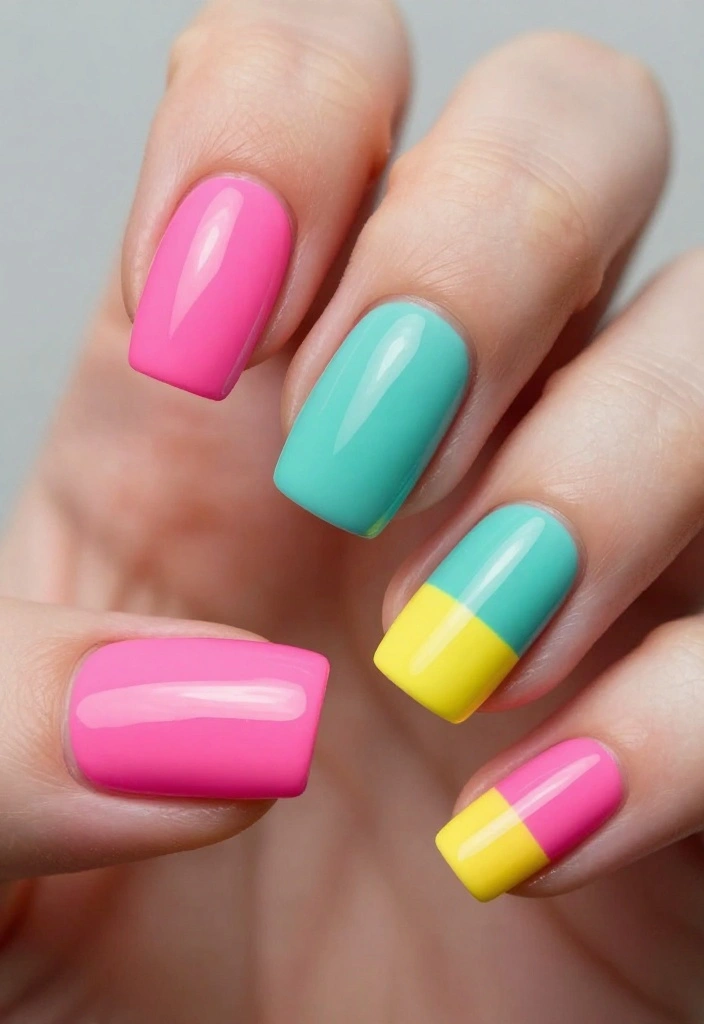
Color blocking is all about confidence and bold choices! This trend combines vibrant colors into geometric sections, creating a striking visual effect. It’s a fantastic way to express your personality and can be tailored to any color palette.
To create color block nails, start with a neutral base coat. Use tape to section off parts of your nails and apply vibrant colors in each section. The result is a chic look that elevates any outfit.
– Tip: A matte top coat can give your design a trendy finish!
– Unique Insight: Play with different shapes for a unique twist on color blocking.
– Nail Trends: This style is gaining momentum in street fashion circles.
Ingredients List:
– Base coat (neutral color)
– Various vibrant nail polishes
– Nail tape
– Top coat
Step-by-Step Instructions:
1. Start with a neutral base coat and let it dry.
2. Apply nail tape to section off areas of your nails.
3. Paint each section with your chosen colors.
4. Once dry, remove the tape for clean lines and finish with a top coat.
– FAQ: Can I use more than three colors? Absolutely! The more, the merrier with color blocking.
16. Striped Nail Art
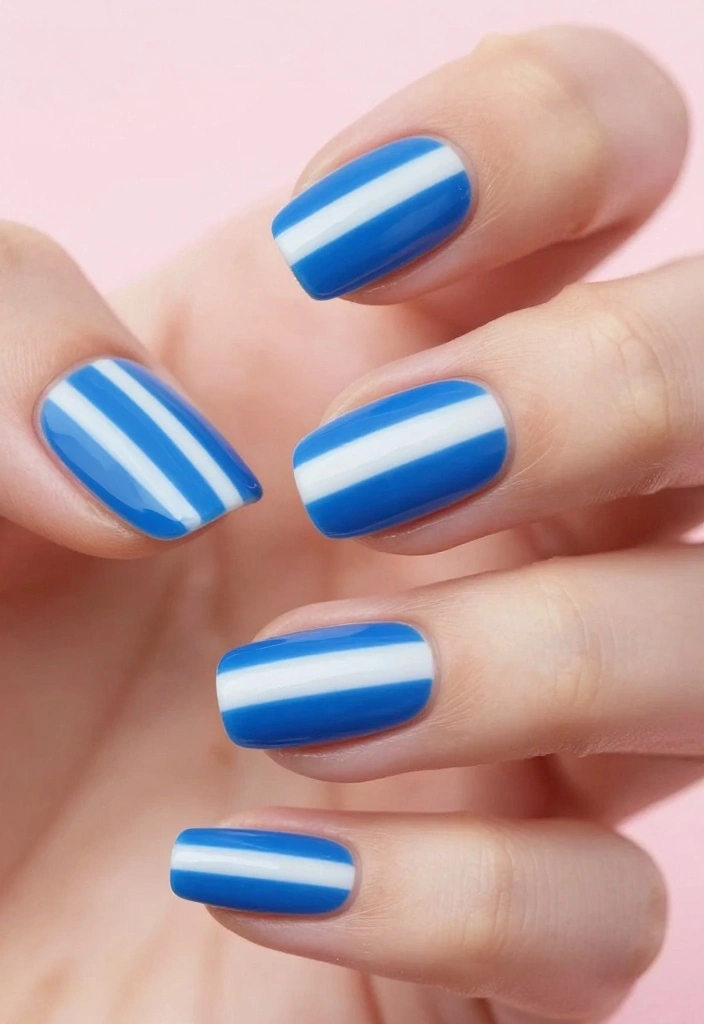
Striped nails are a classic look that exudes style and sophistication. Whether you choose thick or thin lines, horizontal or vertical stripes, this design offers great versatility. It’s perfect for casual outings or can be dressed up for more formal events.
To create striped nails, begin with a base coat of your choice. Using tape or a striping brush, add stripes in contrasting colors. This design can easily adapt to any occasion, making it a staple for nail art lovers.
– Tip: Mix and match stripe thickness for a dynamic effect.
– Unique Insight: Combining stripes with other designs, like polka dots, leads to interesting combinations.
– Nail Trends: Striped designs are becoming increasingly popular in graphic nail art.
Ingredients List:
– Base coat (any color)
– Various nail polishes for stripes
– Striping tape or brush
– Top coat
Step-by-Step Instructions:
1. Apply your base coat and let it dry.
2. Use tape to define the areas where you’ll paint the stripes.
3. Apply your stripe colors, allowing each to dry.
4. Carefully remove the tape and finish with a top coat.
– FAQ: Can I do diagonal stripes? Yes, diagonal stripes can add a fun twist!
17. Artistic Drip Nails
Drip nails are a whimsical way to add a splash of color to your nails. This playful design mimics the look of paint dripping or melting, making it a fun and eye-catching choice. Perfect for those who love to express their unique style, drip nails can be customized in endless color combinations!
To create this effect, start with a solid base coat. Using a brush or dotting tool, create drips from the tips of your nails, allowing them to cascade down. Contrasting colors work particularly well for this design.
– Tip: A fine brush gives you more control over the drips.
– Unique Insight: Layering different colored drips can create a vibrant, multi-colored effect.
– Nail Trends: Drip designs are gaining popularity for bright summer looks.
Ingredients List:
– Base coat (any solid color)
– Various nail polishes (for drips)
– Fine brush or dotting tool
– Top coat
Step-by-Step Instructions:
1. Start with a solid base coat and let it dry.
2. Use a brush to draw drips starting from the tips of your nails downward.
3. Vary the colors for exciting effects.
4. Finish with a top coat for durability.
– FAQ: Can I do this with glitter polish? Yes! Glitter drips add a playful sparkle.
18. Seasonal Nail Art
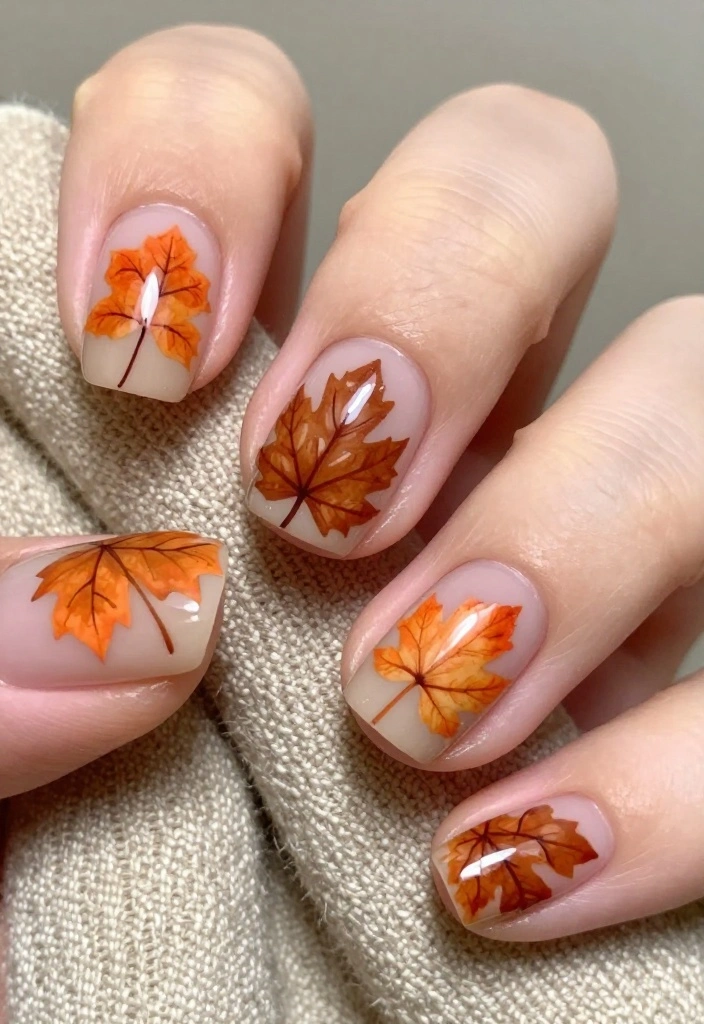
Seasonal nail art is a fun way to celebrate the changing seasons. From autumn leaves to winter snowflakes, each season brings its own color scheme and themes that allow for creative expression. It’s a wonderful opportunity to showcase your artistic side while embracing the spirit of the season.
To create seasonal designs, start with a base coat that reflects the season’s palette. For instance, warm browns and oranges for autumn, or cool blues and whites for winter. Use nail art brushes to paint patterns that embody the mood of the season.
– Tip: Nail stickers can simplify seasonal designs and save time.
– Unique Insight: Mixing seasonal themes with other nail trends can create a truly unique style!
– Nail Trends: Seasonal nail art is becoming increasingly popular for celebrating holidays and events throughout the year.
Ingredients List:
– Base coat (seasonal colors)
– Various nail polishes (matching the season)
– Nail art brushes or stickers
– Top coat
Step-by-Step Instructions:
1. Choose a base coat that represents the season and let it dry.
2. Use brushes or stickers to add seasonal designs to your nails.
3. Finish with a top coat for shine and protection.
– FAQ: Can I combine different seasons in one look? Yes! Get creative and mix themes.
19. Negative Space Nails

Negative space nails are a modern trend that cleverly incorporates the natural nail into the design. This style uses clear areas as part of the artwork, allowing for creativity while keeping the natural nail look intact. It’s a chic and stylish option for those who prefer something unique yet minimal.
To create negative space designs, start with a clear or nude base coat. Use tape or a fine brush to create shapes or patterns, leaving sections of the nail bare. This technique works well for geometric designs or stripes.
– Tip: Planning your design beforehand can help with execution.
– Unique Insight: Combining negative space with colorful designs creates a striking contrast.
– Nail Trends: This style is popular among fashion-forward individuals seeking a chic, refined look.
Ingredients List:
– Base coat (clear or nude)
– Various colored nail polishes
– Nail tape or fine brush
– Top coat
Step-by-Step Instructions:
1. Apply a clear or nude base coat and let it dry completely.
2. Use tape or a fine brush to create your design, leaving sections bare.
3. Apply color to the designed areas and remove the tape.
4. Seal everything with a top coat for a polished finish.
– FAQ: Can I use more than one color? Yes! Feel free to mix and match colors in your design.
Did you know that 68% of nail artists report negative-space designs give a modern, minimalist vibe? For the nail artist in you, this approach starts with a clear base and uses tape or a fine brush to create bare shapes—nails look chic and artful.
20. Glowing Neon Nails
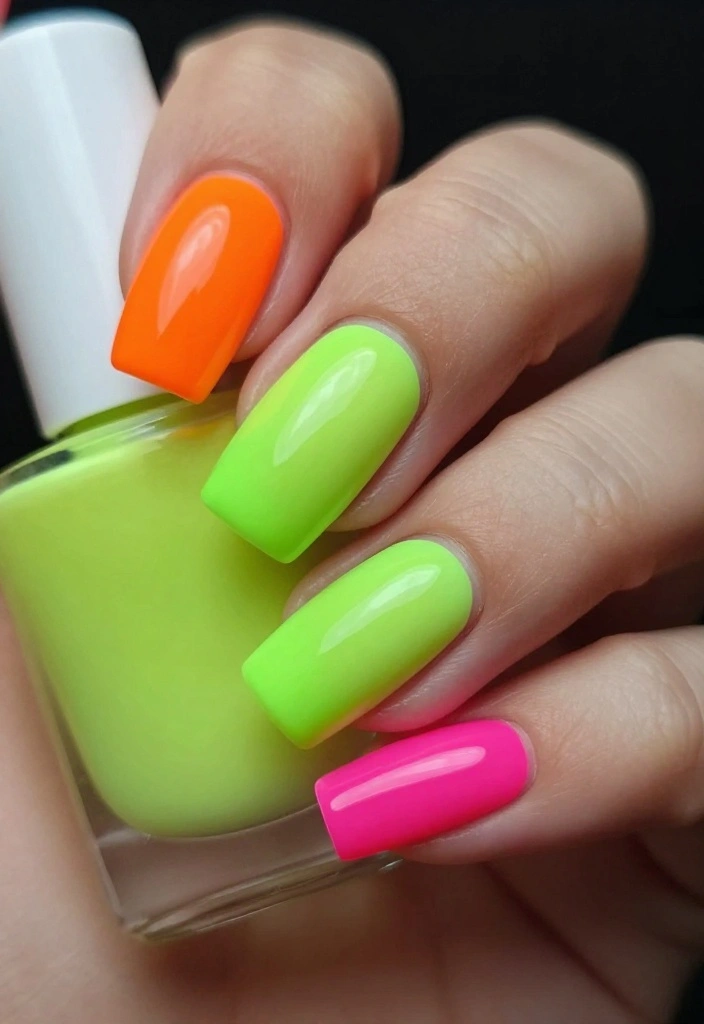
Neon nails are all about boldness and fun! Ideal for parties or summer festivities, these vibrant colors will surely turn heads. Neon nails shine brightly under lights, making them the perfect choice for anyone wanting to make a statement.
To create glowing neon nails, start with a white base to enhance the brightness of the neon colors. Apply your favorite neon polishes and finish with a glossy top coat for that extra shine. These nails won’t just look fabulous; they’ll also spark conversations wherever you go!
– Tip: A matte top coat offers a trendy alternative effect.
– Unique Insight: Mixing neon colors can create a playful rainbow effect!
– Nail Trends: Neon nails are increasingly popular for summer parties and festivals.
Ingredients List:
– White base coat
– Various neon nail polishes
– Top coat
Step-by-Step Instructions:
1. Start with a white base coat and let it dry completely.
2. Apply your chosen neon colors, either solid or in fun patterns.
3. Seal with a glossy top coat for a stunning shine.
– FAQ: Can I mix neon with other colors? Yes! Combining colors can create a unique look.
Fun fact: Neon nails literally glow under UV light, turning every room into a mini club. A nail artist knows a white base boosts brightness, so a crisp neon hue can look party-ready day or night. Quick tip: seal with a glossy top coat for maximum shine and longevity.
Conclusion
Nail art is a fantastic way to express yourself, and with these 20 creative ideas inspired by professional nail artists, you’re bound to find the perfect style that resonates with your personality. Whether you favor vibrant colors or subtle designs, each of these trends holds the potential to transform your nails into a canvas of self-expression.
Now that you have a treasure trove of nail art inspiration, don’t hesitate to experiment and try new designs. Your nails can be a reflection of your mood, style, or even the season, so let your creativity shine! What’s your favorite nail art trend from the list? Share your thoughts and get ready to rock those gorgeous nails!
Frequently Asked Questions
What are some standout nail art ideas inspired by professional nail artists that I can try at home?
Take cues from nail artists and try negative space with bold lines, marble swirls, foil accents, tiny hand-painted motifs, and geometric patterns. To recreate at home: prep nails with a good base coat for longevity, pick a color palette that reflects current nail trends, use striping tape for crisp lines, a dotting tool for tiny details, and a fine brush for brushstrokes. Apply in thin layers and seal with a durable top coat. Finish with cuticle oil and let each layer dry fully. With practice, these transform into creative nail art you can wear daily.
How can I follow current nail trends like a pro without a salon appointment?
Follow fresh nail trends from nail artist showcases on Instagram, TikTok, and Pinterest. Save ideas and recreate them at home with affordable polishes. Start with popular looks like minimalist lines, negative-space designs, chrome foils, and tiny decals. Build your toolkit with a solid base coat, top coat, and a small set of nail art tools to mimic glossy finishes and clean lines. If you want extra longevity, consider a gel polish kit for at-home curing. The key is consistent practice and curating inspiration from trusted nail artist inspiration.
What essential tools do I need to recreate professional nail art at home?
To get salon-ready results, assemble a compact toolkit: base coat and top coat for longevity, a dependable remover, a selection of polishes in your chosen shades, striping tape, a dotting tool, a few fine brushes for details, and an optional gel polish kit with an LED lamp for long-wearing designs. Add a nail-art brush cleaner and cuticle oil to finish. Start with simple lines and gradually try more creative nail art as you gain confidence.
Can I achieve long-lasting nail art at home, and how do I prevent chipping?
Yes, with proper prep and care. Begin with clean, dry nails and push back cuticles. Use a quality base coat to protect the nail and improve adhesion, then apply thin layers of color, letting each dry fully. Seal with a strong top coat and reapply every 3–5 days. Avoid water for the first 24 hours after application, moisturize cuticles, and cap the free edge to prevent wear. If you’re using gel, cure under a LED lamp as directed and maintain with fresh coats for maximum longevity.
What common mistakes should beginners avoid when recreating nail art inspired by professional nail artists?
Common missteps include applying thick layers that don’t dry evenly, skipping the base coat or top coat, and not cleaning tools between designs. Don’t rush—let each layer dry and cure properly, and push back cuticles for a clean canvas. Also, avoid tackling ultra-dine or complex patterns before you’re ready; build skills gradually and practice creative nail art step by step. Finally, choose looks that suit your nail length and lifestyle to keep you motivated.
Related Topics
nail art
creative designs
professional nail artists
nail trends
beginner friendly
easy nail art
colorful patterns
minimalist nails
seasonal styles
nail inspiration
trendy nail looks
advanced techniques
These nail art ideas are amazing! I tried something similar for a friend’s wedding, and I ended up with a few sparkles in my hair too! Which design are you going to try first?
I love these ideas! They’re so fun. I once tried to do a sunset gradient and ended up looking like I had a paint mishap on my nails. Why did the nail polish go to school? Because it wanted to be a little brighter!