The holiday season is a magical time filled with joy, laughter, and a touch of creativity. With festive gatherings, cozy nights in, and a chance to express your personality, it’s no wonder that many of us find ourselves craving something special for our nails. If you’re someone who loves to celebrate the holidays in style, then this guide to Santa nails is just for you. It’s all about bringing a splash of festive cheer right to your fingertips!
In this post, you’ll discover ten delightful Santa nail designs that are guaranteed to spread holiday joy. Whether you’re preparing for a holiday party, a family gathering, or simply want to brighten your day while sipping hot cocoa, these designs will help you show your festive spirit. I pulled together ideas that are fun, creative, and perfect for anyone looking to add a little extra sparkle to their holiday style.
Get ready to dive into a world of nail art that captures the essence of the season. From classic Santa faces to whimsical candy cane stripes, these designs are easy to replicate at home or to take to your favorite nail salon. You’ll find inspiration that suits every skill level, so grab your nail polish and let’s get started on spreading some holiday cheer!
Key Takeaways
– Explore ten unique Santa nails designs that will brighten up your holiday season.
– Each design is tailored to be fun and festive, perfect for parties or casual get-togethers.
– Find easy-to-follow tips for creating stunning nail art that suits your personal style.
– Learn how to incorporate seasonal elements like glitter and candy canes into your nail designs.
– From the classic Santa face to intricate snowy scenes, there’s something for everyone in this guide.
Contents
- 1. Classic Santa Face Design
- 2. Santa Hat Tips
- 3. Juicy Christmas Treats
- 4. Snowy Winter Wonderland
- 5. Candy Cane Stripes
- 6. Glittering Snow Flakes
- 7. Santa’s Little Helper
- 8. Wrap It Up with a Bow
- 9. Santa’s Sleigh Ride
- 10. Holiday Glitter Glam
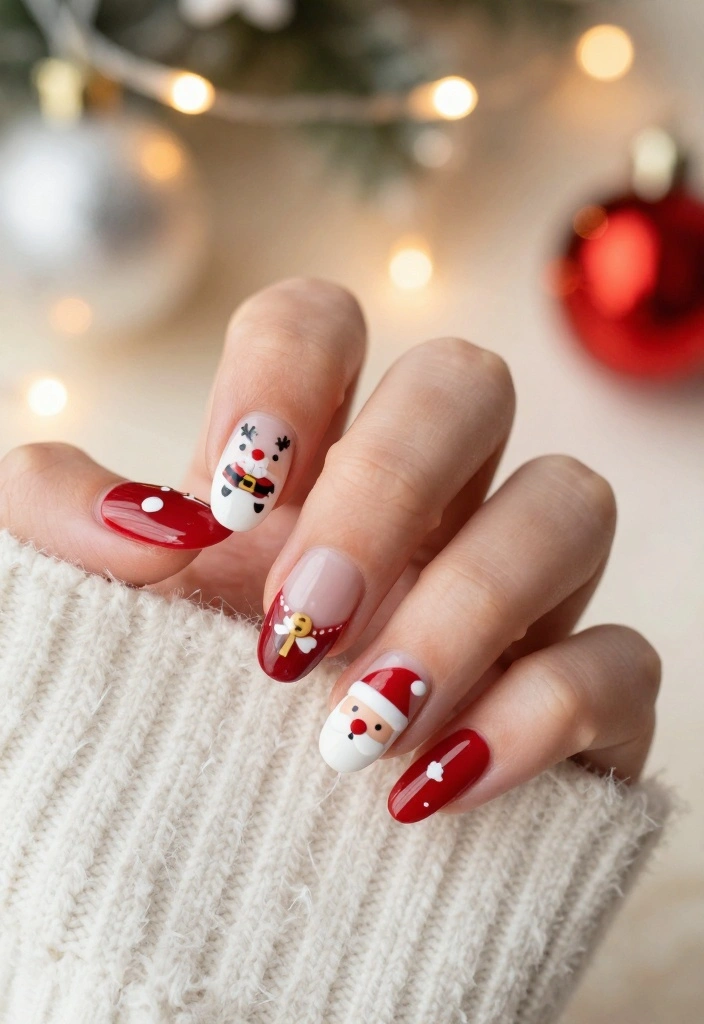
1. Classic Santa Face Design
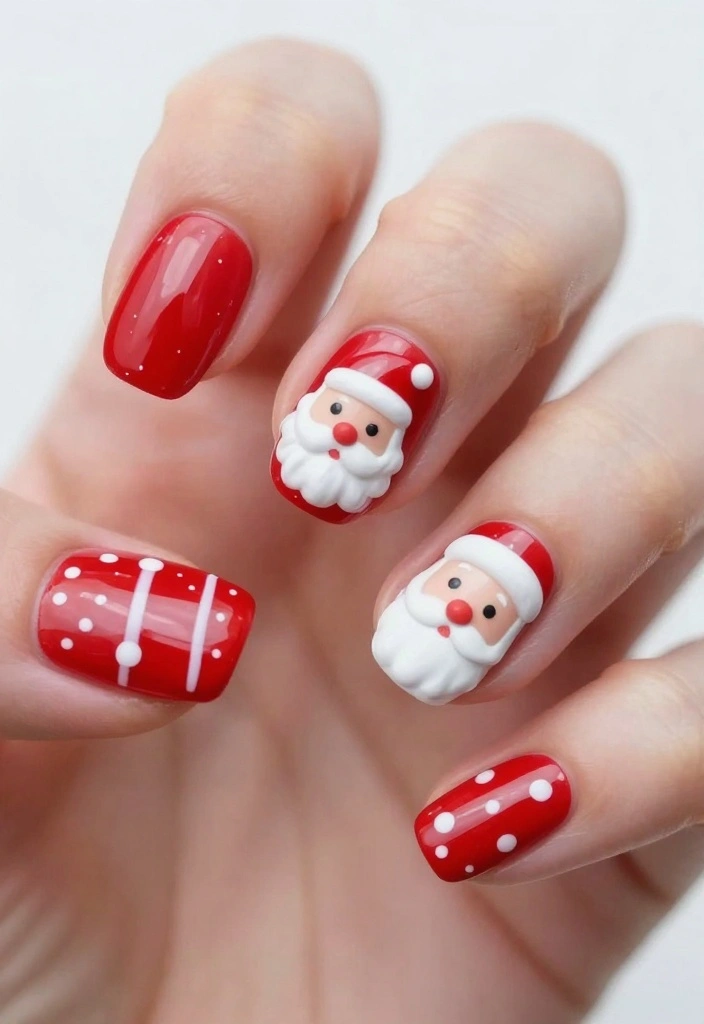
Nothing embodies the holiday spirit quite like a classic Santa face on your nails! This charming design showcases Santa with his fluffy white beard and signature red hat, radiating warmth and joy. It’s instantly recognizable and perfect for those who want to embrace the festive vibe during the season.This look works beautifully because of its playful yet sophisticated charm. The bright colors contrast well with the intricate details, ensuring your nails are both eye-catching and fun. It’s an ideal choice for holiday parties, family gatherings, or even cozy nights in.Outfit Pieces:
– Bright red nail polish for the base
– White polish for Santa’s face and beard
– Fine nail art brush or dotting tool for details
– Optional: shiny top coat for extra glam
Styling Tips:
– Start with a base coat to protect your nails before applying color.
– Let each layer dry completely to avoid smudging.
– Use a steady hand to create precise details on Santa’s face.
– Finish with a shiny top coat to enhance the festive look.This classic Santa face design is perfect for every holiday event. You can pair it with simple red and white nail art for a cohesive look. Plus, it serves as a fun conversation starter!
2. Santa Hat Tips
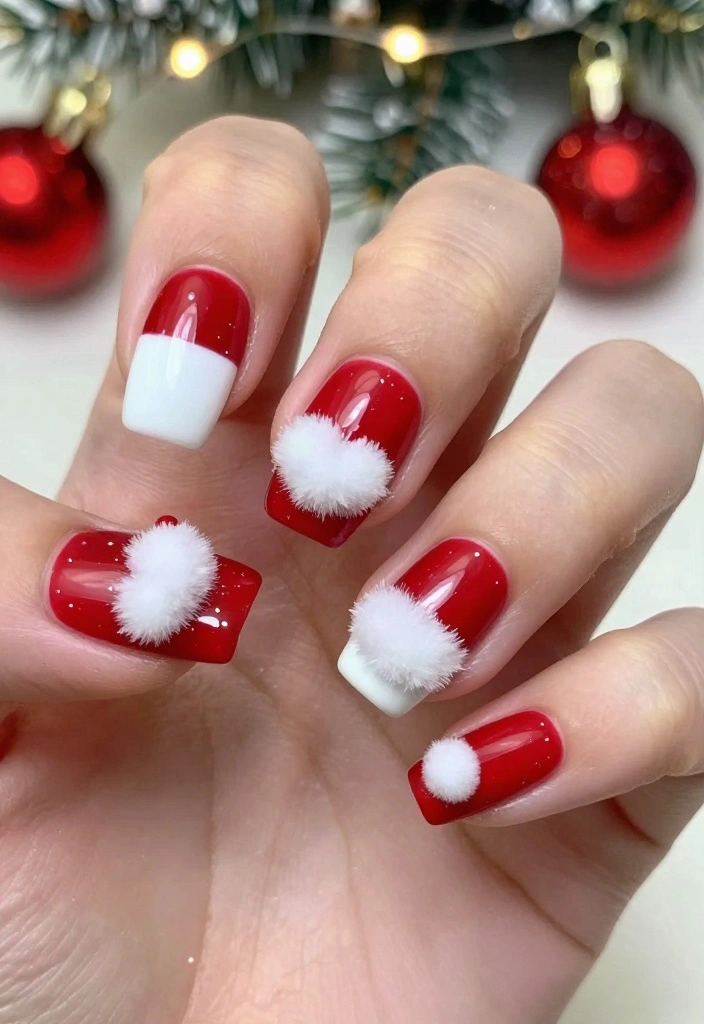
Looking for a simple yet festive nail design? Santa hat tips offer a delightful way to express your holiday spirit without overwhelming your nails! This design involves painting the tips to resemble Santa’s iconic hat—cute and easy!This look works well because it balances simplicity with festive flair. The playful triangle shapes and pom-poms make your nails stand out while being versatile enough for any occasion. Perfect for holiday parties, family gatherings, or even casual outings, this design can easily fit into your festive wardrobe.Outfit Pieces:
– Solid base coat in classic red or glittery gold
– White nail polish or nail pen for the hat shape
– Dotting tool for the fluffy pom-pom
– Optional: fine glitter for added sparkle
Styling Tips:
– Ensure the base coat is completely dry before adding the hat tips.
– Experiment with different colors for a fun twist.
– Apply a clear top coat to seal in your design and add shine.This design is quick and versatile, allowing you to change colors based on your mood. It’s a great way to match your nails with your holiday outfit while keeping things festive!
Want a quick holiday win? Santa nails—specifically Santa Hat Tips—are your fast track to festive chic. Paint the tips red, add a white trim, and a tiny pom-pom dot—easy, cute, and perfect for any party.
3. Juicy Christmas Treats
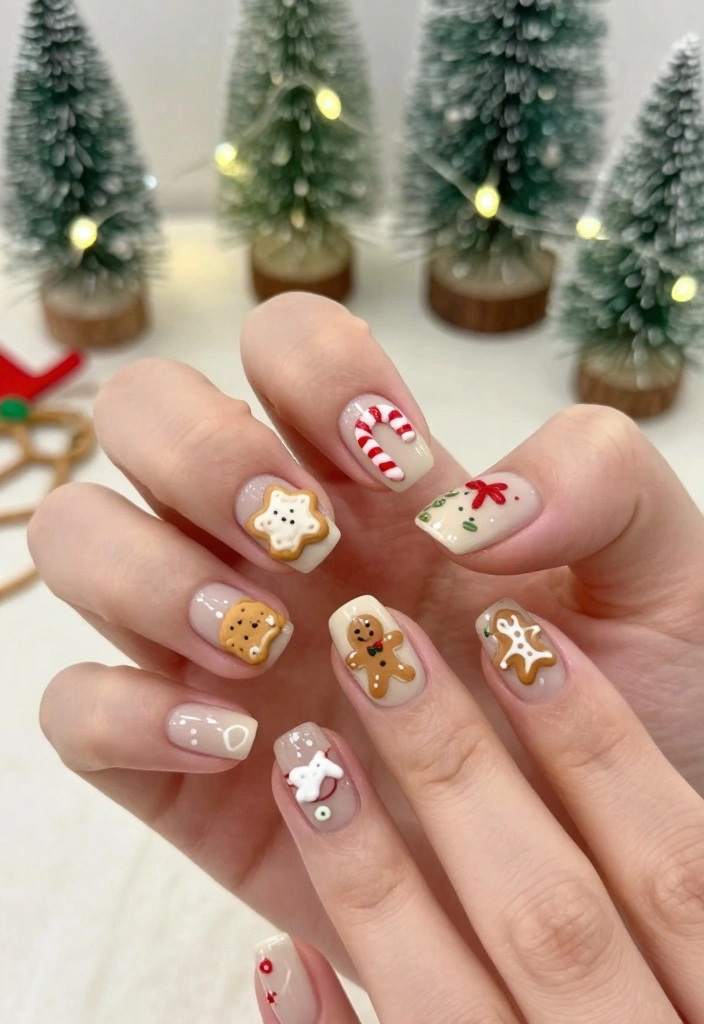
Transform your nails into a delightful display of holiday treats with this fun design! Picture Santa surrounded by Christmas cookies and candy canes, creating a festive nail art celebration.This design works because it combines whimsy with creativity, allowing you to express your personality through your nail art. The mix of colors and playful designs make it a fantastic choice for festive gatherings or cozy holiday evenings with friends.Outfit Pieces:
– Nude or white base coat for a clean canvas
– Various nail polish colors for cookies, candy canes, and gingerbread men
– Fine brush for detail work
– Optional: glitter for extra sparkle
Styling Tips:
– Use matte polish for cookies and glossy for candy canes for contrast.
– Sketch your designs on paper first if you’re unsure about painting.
– Seal your artwork with a top coat to ensure longevity.This playful design is perfect for holiday parties, bringing a smile to everyone’s face. Show off your creativity with nails that tell a delicious story of festive treats!
Santa nails turn holiday treats into wearable art. Mix cookies, candy canes, and gingerbread men across your nails, then keep one nude base for balance. It’s playful, camera-ready nail art you can actually pull off at every festive gathering.
How To Choose the Right Nail Polish for Your Santa Nails
When it comes to creating festive Santa nails, the right nail polish can make all the difference. Here’s how to choose the best nail polish for your holiday nail art!
1. Color Selection
Choose colors that embody the spirit of Christmas. Traditional shades like red, white, and green are essential, but don’t shy away from metallics like gold and silver for a touch of glam. Think about what design you want to create. For example, vibrant red works well for Santa’s outfit, while white is perfect for snowflakes or Santa’s beard.
2. Finish Type
Nail polish comes in various finishes, including matte, glossy, and glitter. A glossy finish can give your Santa nails a polished look, while glitter adds a playful sparkle that captures the holiday spirit. Consider your overall design. If you’re going for a classic Santa face, a glossy red will pop beautifully. If you’re decorating with snowflakes, a glitter finish adds a festive touch.
3. Drying Time
Different nail polishes have varying drying times. If you’re working on intricate designs, look for quick-dry formulas. This can save you from smudges and mistakes. If you have a bit more time, opt for regular polishes that may take longer but offer richer pigmentation. Just remember to allow adequate drying time to prevent any mishaps!
4. Formula Quality
Invest in high-quality nail polishes that are chip-resistant and long-lasting. Products that are free from harmful chemicals like formaldehyde and toluene are better for your nails. Look for brands that offer good coverage in one or two coats, so you can achieve vibrant colors without needing multiple layers. This is especially useful for designs that require precision.
5. Nail Art Compatibility
If you’re planning to add nail art elements like stickers, gems, or detailed designs, make sure your nail polish works well with these materials. Some formulas may not adhere well to certain bases or can lift off with nail art applications. For instance, if you want to add a Santa hat or other decorations, a base coat that dries to a tacky finish can help your designs stick better.
6. Personal Preference
Finally, consider your own style and comfort. Do you prefer bold colors or subtle tones? Are you an expert at nail art or a beginner? Choose nail polishes that inspire your creativity and match your skill level. If you love experimenting, try a variety of shades and finishes to see what you like best.
Pro Tip: Always apply a base coat before your nail polish. This not only protects your nails but also helps the color last longer. When you’re done with your designs, seal everything with a top coat for extra shine and durability.
By choosing the right nail polish and keeping these factors in mind, you’ll be well on your way to creating festive Santa nails that will spread holiday cheer wherever you go!
4. Snowy Winter Wonderland
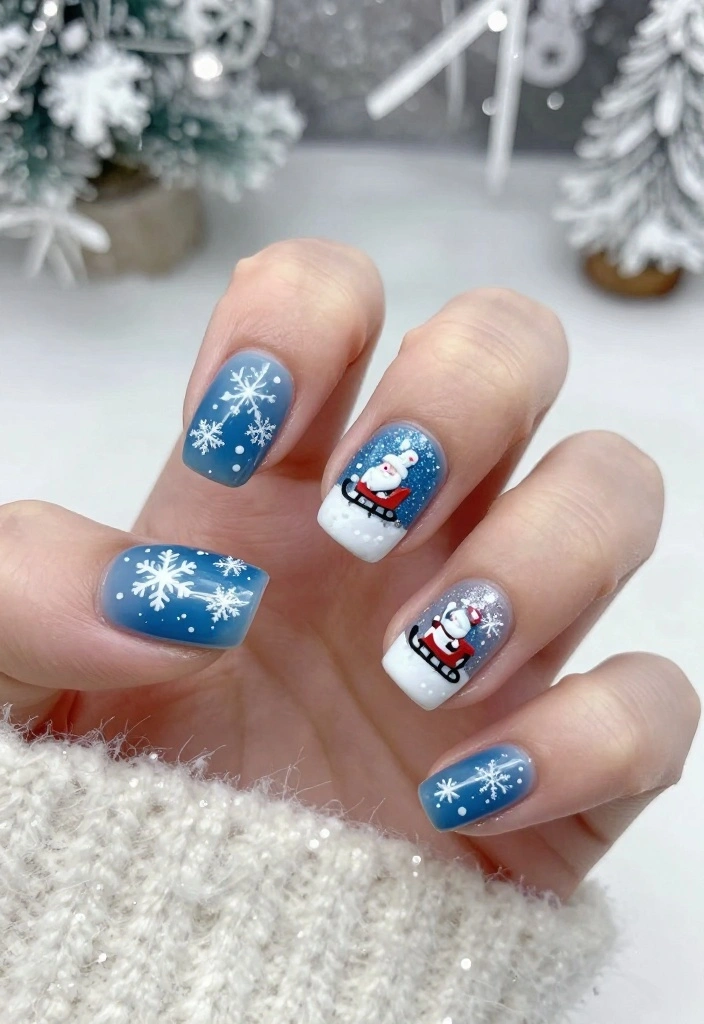
Capture the enchanting beauty of winter with a snowy wonderland design! This nail art reflects the magic of freshly fallen snow and twinkling frost, featuring Santa as a delightful addition.This look works well due to its soft colors and sparkling details, evoking the serene beauty of a winter landscape. It’s versatile enough for both casual and formal holiday gatherings, making it a perfect choice for those who prefer a subtler festive style.Outfit Pieces:
– Deep blue or icy white nail polish for the base
– White polish for snowflakes and Santa’s sleigh
– Glitter top coat for added sparkle
– Optional: nail art brush for intricate designs
Styling Tips:
– Apply a matte top coat for a soft finish or a glossy one for shine.
– Consider adding tiny Christmas trees or ornaments as fun accents.
– Be patient when layering your designs for the best effect.This winter wonderland design pairs beautifully with cozy sweaters and warm drinks, making it ideal for holiday gatherings. It’s a charming way to bring the magic of winter to your nails!
📹 Related Video: Christmas Nail Art Tutorial: Midnight in a Winter Wonderland
✨ Nail Art for Busy Moms!
Transform your holiday nails effortlessly with this DIY Nail Art Guide designed for busy moms who love festive styles.
5. Candy Cane Stripes
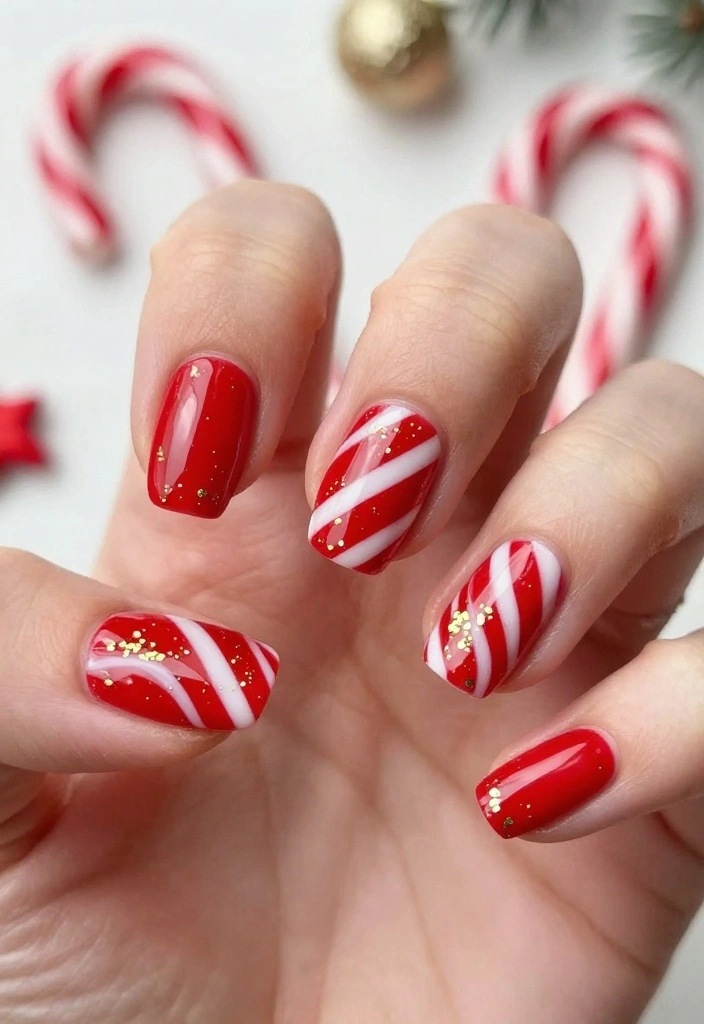
Get into the festive spirit with candy cane stripes on your nails! This classic design is playful, fun, and reflects the joy of the holiday season.This look is effective because the bold red and white colors create a vibrant contrast that catches the eye. It’s perfect for holiday parties and gatherings, bringing a cheerful touch to any outfit.Outfit Pieces:
– Solid red base coat for the background
– White polish for the diagonal stripes
– Optional: gold glitter for added sparkle
– Striping brush or tape for clean lines
Styling Tips:
– Use striping tape for precise lines and clean edges.
– Don’t worry about perfection; a bit of imperfection adds charm.
– Finish with a high-shine top coat to complete the look.This design is fun and allows you to play with creativity, making each nail unique. Perfect for holiday gatherings, it’s sure to attract compliments and spread cheer!
6. Glittering Snow Flakes
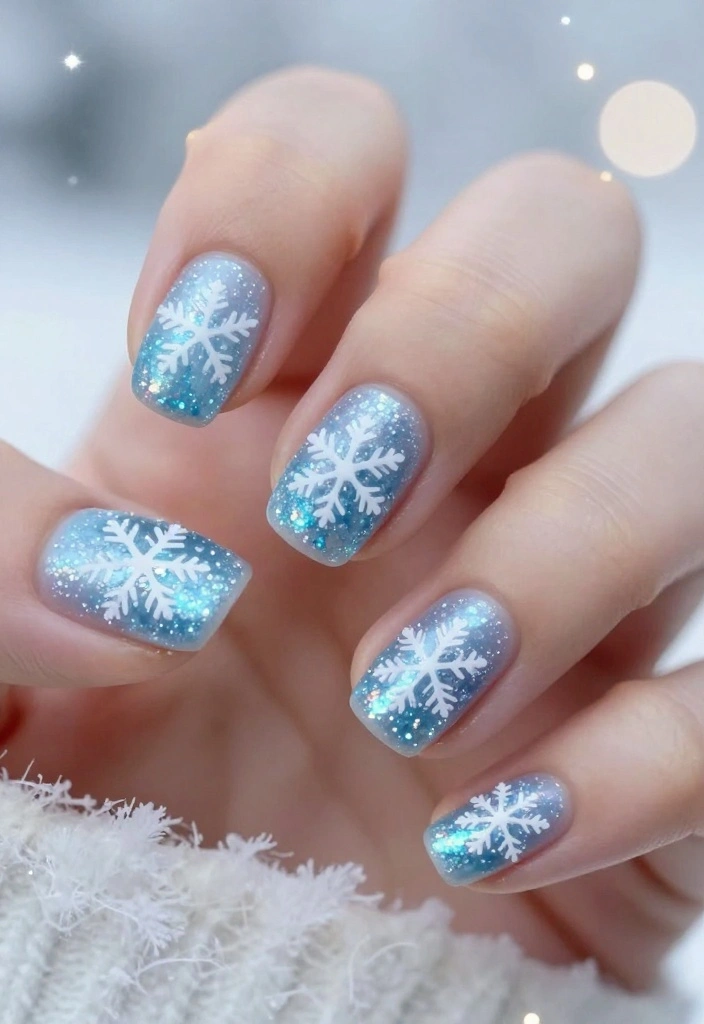
Infuse your nails with a magical touch using glittering snowflakes! This design embodies the beauty of winter, sparkling like fresh snow on a bright day.This look works because the light colors paired with glitter create a dazzling effect that captures attention. It’s versatile and can be worn for any winter occasion, from casual outings to festive celebrations.Outfit Pieces:
– Light pastel blue or pure white base for the canvas
– Fine brush for painting snowflakes
– Iridescent glitter for that shimmering effect
– Clear top coat to seal the design
Styling Tips:
– Use a toothpick or dotting tool for detailed snowflake designs.
– Layer multiple coats of glitter to make the effect bolder.
– Don’t forget to seal your design with a top coat to keep it in place.This design beautifully reflects the elegance of winter. It’s perfect for any occasion during the season, showcasing your festive spirit while remaining stylish!
7. Santa’s Little Helper
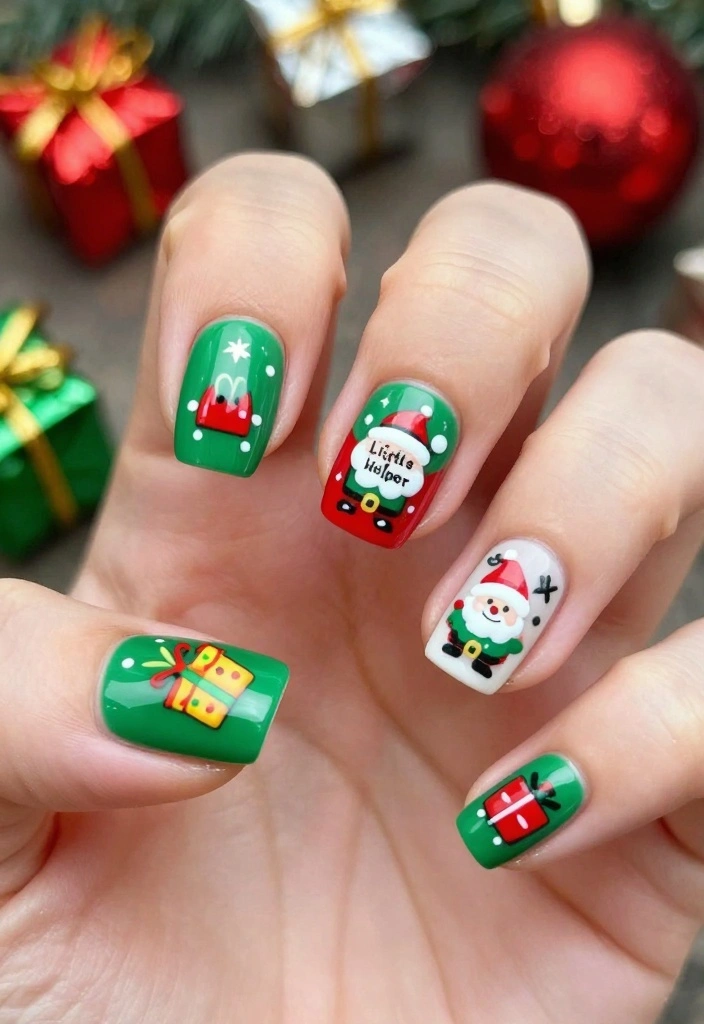
Celebrate the joy of Christmas with ‘Santa’s Little Helper’ nail art! This design draws inspiration from Santa’s elves, combining festive colors and playful elements.This design works because it allows for creativity and fun, making your nails a celebration of the season. It’s a fantastic choice for families, especially with kids who want to join in on the nail art fun.Outfit Pieces:
– Bright green or red base coat for vibrancy
– Nail art brush for tiny elves, presents, or hats
– Optional: matte top coat for a unique finish
Styling Tips:
– Keep designs simple if you’re a beginner; stick figures and dots are easy to create.
– Let each layer dry completely before adding more designs to avoid smudging.
– A good top coat will help your design last throughout the festivities.This playful design is perfect for family gatherings and encourages creativity. It’s a joyful way to showcase your holiday spirit while having fun!
8. Wrap It Up with a Bow
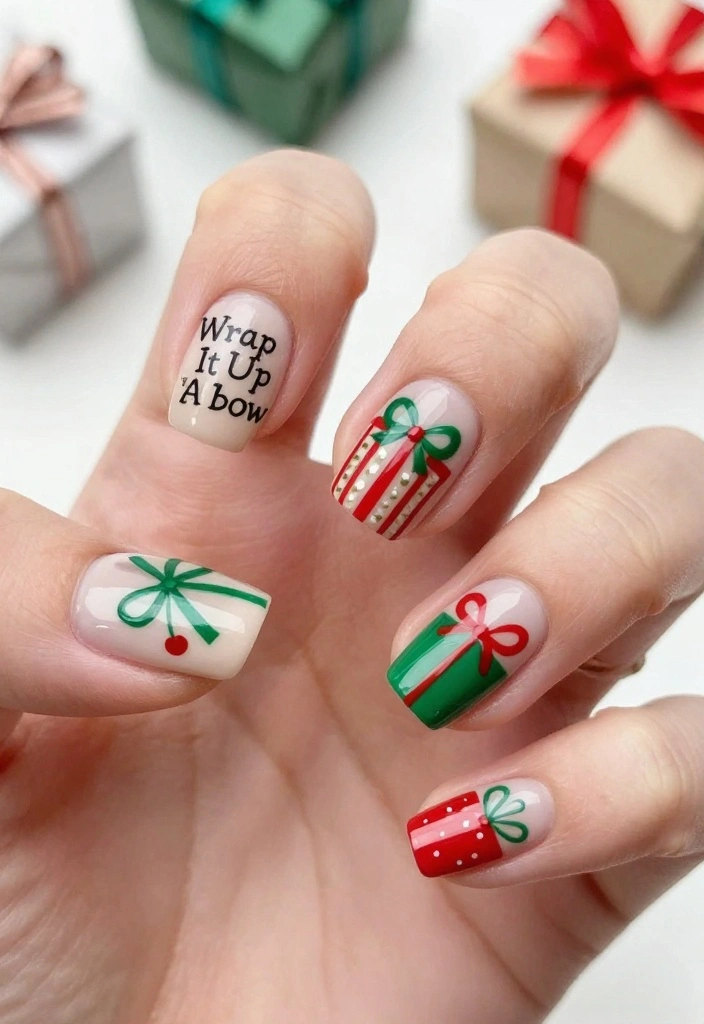
‘Wrap It Up with a Bow’ is an adorable nail design that captures the essence of gift-giving during the holiday season! This design mimics beautifully wrapped presents topped with big bows.This look works well because it combines chic elegance with festive charm. The bright colors and bow accents create a playful yet sophisticated style, making it perfect for holiday parties and family gatherings.Outfit Pieces:
– Nude or neutral base coat for a polished look
– Bright red or green for the ribbon accents
– Nail art brush for creating clean lines
– Optional: glossy top coat for shine
Styling Tips:
– Use a striping brush for sharp edges and clean lines.
– Allow the base coat to dry completely before adding ribbons and bows.
– Finish with a glossy top coat to enhance the overall look.This festive design is a creative way to celebrate the joy of giving. It’s perfect for any holiday occasion, adding a touch of charm to your nails!
9. Santa’s Sleigh Ride
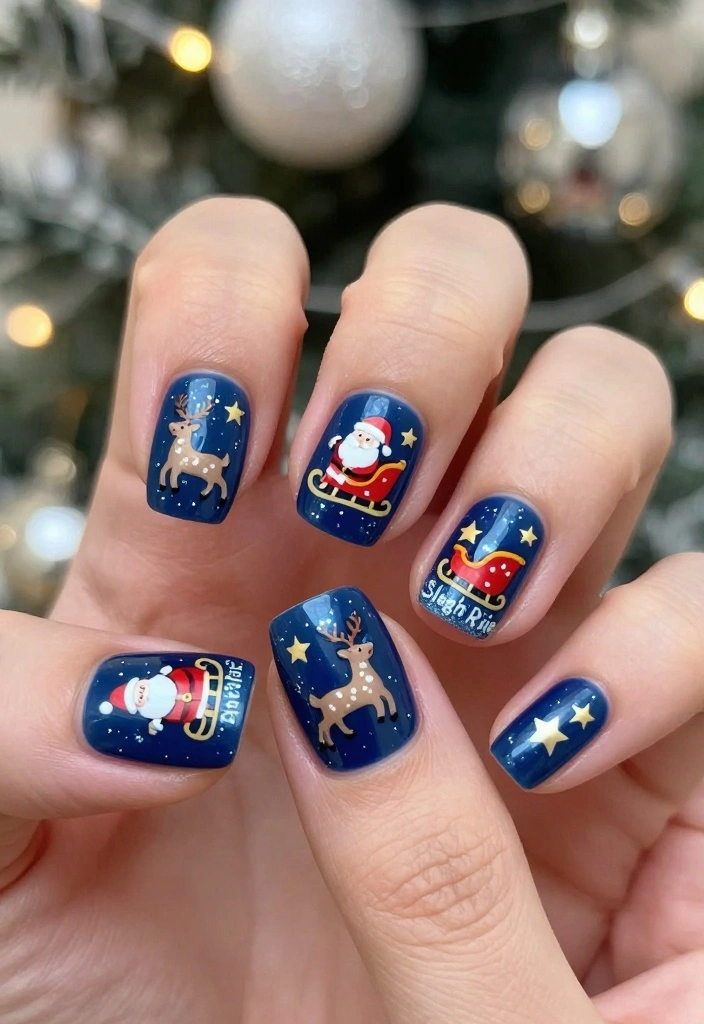
Elevate your holiday nail art with the ‘Santa’s Sleigh Ride’ design! This creative concept is ideal for those who want to celebrate Santa’s magical journey on Christmas Eve.This design works because it combines whimsy with detail, making your nails a captivating story. It’s fun yet classy, perfect for holiday parties or casual get-togethers where you want to showcase your festive spirit.Outfit Pieces:
– Midnight blue base to represent the night sky
– Nail polish for Santa’s sleigh and reindeer
– Small brush for detailing
– Optional: glitter for that magical touch
Styling Tips:
– Use a fine brush to ensure every detail stands out.
– Mixing colors can add depth, especially for Santa’s sleigh.
– Seal your design with a clear top coat to prevent chipping.This nail art is a whimsical tribute to the magic of Christmas. It’s sure to make a statement at any holiday event, bringing joy and creativity to your festive look!
Fun fact: 8 out of 10 holiday nail art lovers say a midnight blue base makes Santa’s sleigh scenes pop more than classic red tips. Pro tip: add tiny gold stars and white accents for instant festive drama that travels well across pins.
10. Holiday Glitter Glam
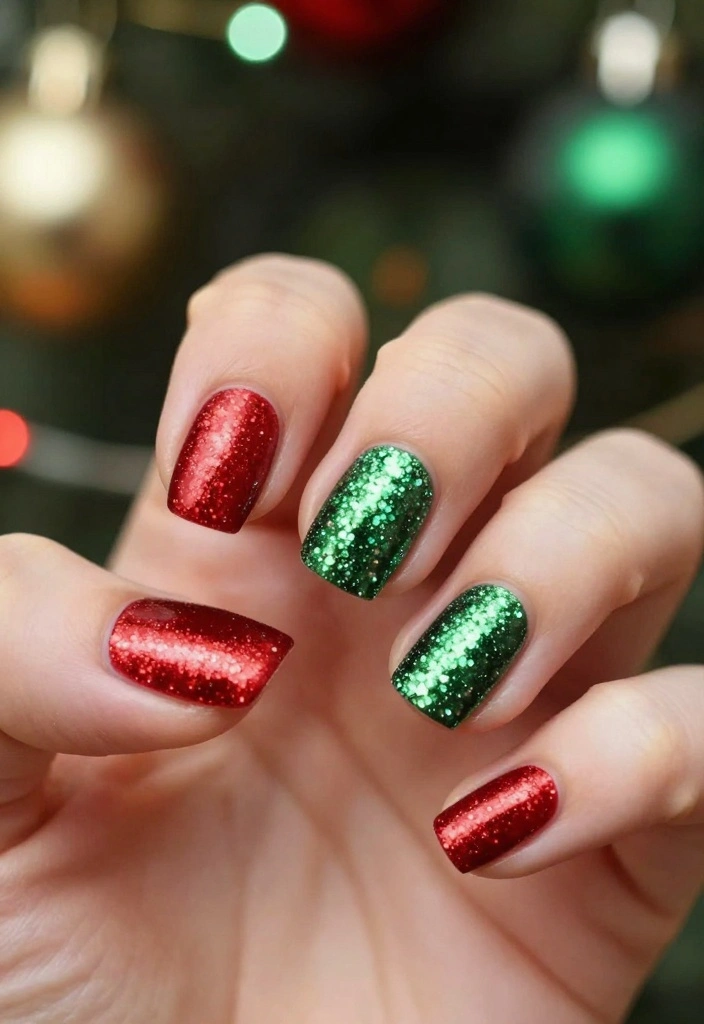
Finally, nothing captures the festive spirit like a Holiday Glitter Glam design! This look focuses on sparkles and shine, perfect for celebrating the holiday cheer with style.This design works well because it allows for bold colors and glitter, creating an eye-catching effect that’s perfect for any festive occasion. It’s a simple yet glamorous way to make your nails the center of attention during holiday celebrations.Outfit Pieces:
– Your favorite festive color for the base, like red, green, or gold
– Glitter polish or loose glitter for that dazzling effect
– Optional: sponge for an ombre effect
– Clear top coat to seal the sparkle
Styling Tips:
– Use gel polish for a long-lasting finish with sparkle.
– Layer different glitters for a unique, custom look.
– Don’t forget to seal with a top coat to keep your nails looking fabulous.This nail art is fantastic for holiday parties, ensuring your nails shine bright and match the excitement of the season!
Conclusion
As the holiday season approaches, these Santa nails are not just about style; they’re about celebrating the joy and happiness that comes with it. Every design reflects the spirit of Christmas, making them perfect for festive gatherings or simply to enjoy at home. Don’t be afraid to mix and match ideas or come up with your own unique designs to showcase your creativity!
So, grab your nail polish and get ready to spread some holiday cheer with your fabulous Santa-inspired nails. Happy holidays and happy nail painting!
Frequently Asked Questions
What are the top Santa nails designs to try for the holidays?
Here are a few standout santa nails designs you can try this season. Think a classic Santa face on an accent nail with red nails or a full red manicure with white snowflake accents.
Other ideas include a candy cane stripe mani, a hat-and-beard design, holly and gift motifs, and a minimalist Santa hat decal on one nail. For a quick, coordinated look, blend holiday style with bold colors and simple accents with nail polish you already have.
Tip: pair a red base with white and black details for a playful, photo-ready look that screams santa nails.
How can I recreate Santa nails at home using basic nail polish?
Want to nail the Santa look at home without fancy tools? Here’s a simple, practical path. Gather red, white, and black nail polish, a fine-tipped brush or toothpick, a dotting tool, base coat, and top coat. Start with a clean base, apply two coats of red, and let dry. Use white to create Santa’s beard or hat trim, then add black dots for eyes and a tiny smile. Use a small brush to draw the hat and beard details, or apply decals if you prefer. Finish with a glossy top coat to seal your design and extend wear for holiday time. This approach gives you a festive, holiday style look that’s easy to customize using everyday nail polish.
Which nail shapes work best for Santa nails and how can I adapt designs for short nails?
For Santa nails, square or rounded-square shapes work well because they give a smooth canvas for fine lines. If your nails are short, keep designs simple: use bold motifs on an accent nail, scale down Santa features, or opt for a decal so you get the look without crowding the nail. Try a red base with one white accent nail featuring a tiny Santa hat or beard. You can also use stickers or nail decals to achieve precise details while keeping your holiday style intact. Remember to file gently to maintain nail health and finish with a protective top coat.
How long do Santa nails designs last and how can I make them last through the holidays?
With proper care, Santa nails can stay polished for about a week to ten days. Prep well with a base coat to protect your natural nails, apply two coats of red base and white details, then seal with a strong top coat. Reapply the top coat every 2-3 days to prevent chipping during holiday activities like cooking, cleaning, and gifting. Wear gloves when washing dishes, and be mindful of acetone-based removers that can dull tiny details. Storing extra polish and thin brushes helps you touch up quickly, so your Santa nails stay vibrant through party photos and family gatherings. Enjoy your holiday style look without worrying about wear.
How can I choose a Santa nails design that matches my personal holiday style?
Start by picking a color palette that fits your outfit and vibe. If you love classic glamour, go for a red base with gold foil accents and a single Santa-face accent nail. If you’re into minimalism, try a tiny Santa hat decal on one nail with a monochrome red or nude base. Browse the 10 designs in The Ultimate Guide to Santa Nails to pick a motif that suits your holiday style and personal taste. Finally, coordinate your manicure with your clothing and accessories, ensuring the look santa nails you feel confident wearing all season long.
Related Topics
santa nails
holiday nail art
nail polish designs
festive nails
beginner friendly
easy nail art
winter style
Christmas nails
nail design ideas
seasonal trends
quick tips
holiday cheer
These Santa nail designs are so cute! I can already picture myself trying the little Santa hats on my nails for the holiday party. What’s your favorite design?
I tried painting my nails like Santa last year, and let’s just say it looked more like a toddler’s art project! 😂 I love these ideas and might give it another shot!
Did you know that nail art has been around for thousands of years? Ancient Egyptians used to paint their nails with henna! It’s amazing to see how it’s evolved into these fun designs!