Are you ready to elevate your nail game? Gel nail polish has completely changed the way we think about nail art. It’s long-lasting, vibrant, and so versatile. If you’ve been scrolling through social media, you know there are endless possibilities waiting to be discovered. That’s why I created this post. I want to share some amazing gel nail polish ideas that you might not have known about before. Trust me, your nails will thank you!
This guide is perfect for anyone who loves nail art or is just getting started. Whether you’re an experienced nail technician or a DIY enthusiast, you’ll find something here that sparks your creativity. From stunning ombre effects to eye-catching floral stamping, these ideas will help you express yourself and make a statement. Get ready to explore nine unique gel nail polish techniques that will take your nails from basic to fabulous!
By the end of this article, you’ll have a treasure trove of inspiration right at your fingertips. I’ve curated a list of nine techniques that are not only trendy but also easy to master. You’ll learn how to create gorgeous designs that will impress your friends and even elevate your self-care routine. So grab your gel polish, and let’s dive into some nail art magic!
Key Takeaways
– Discover nine unique gel nail polish techniques to elevate your nail art game, including ombre and floral stamping.
– Learn how to create stunning ombre effects that blend colors beautifully for a chic look.
– Explore floral stamping to add intricate designs easily without the hassle of hand painting.
– Uncover the beauty of metallics and neon shades, perfect for bold, statement-making nails.
– Get tips on using negative space and textured nail art to create modern and minimalist designs.
Contents
- 1. Ombre Dreams
- 2. Floral Stamping Fun
- 3. Metallic Magic
- 4. Neon Brights
- 5. Textured Nail Art
- 6. Geometric Patterns
- 7. Glitter Galore
- 8. Negative Space Nail Art
- 9. Marble Effect Madness
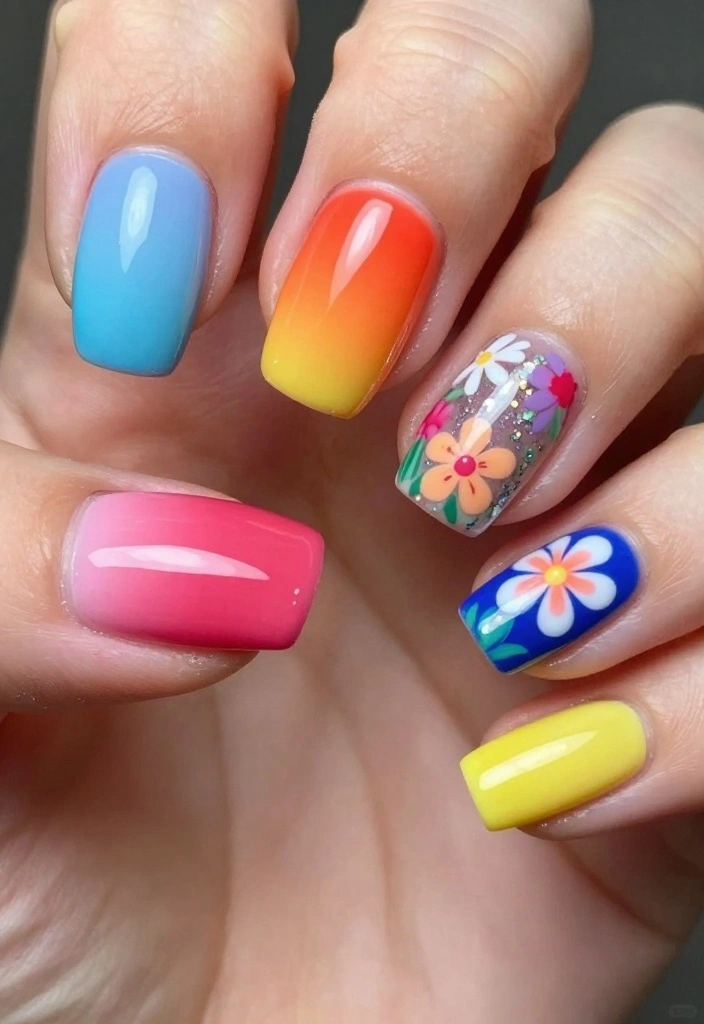
1. Ombre Dreams

Ombre nails are where two or more colors blend beautifully, creating a stunning gradient effect. This style is not only visually appealing but also surprisingly simple to do with gel polish. It’s a versatile look that can suit any mood or outfit effortlessly.
To achieve the perfect ombre:
– Start with a base coat in your lightest shade and let it dry completely.
– Use a makeup sponge to dab your darker color onto the tips, blending it down towards the base.
– Seal your design with a glossy top coat for that extra shine.
For the ideal ombre look, use a latex barrier around your nails to keep it tidy. Experiment with contrasting colors, like soft pink and rich purple. Practice on a nail wheel to perfect your technique.
This style works wonderfully for any season, adapting to your outfits and personal style effortlessly.
💅 Nail Art Made Easy!
Discover simple techniques to create stunning nail art at home, perfect for busy moms who love style.
2. Floral Stamping Fun
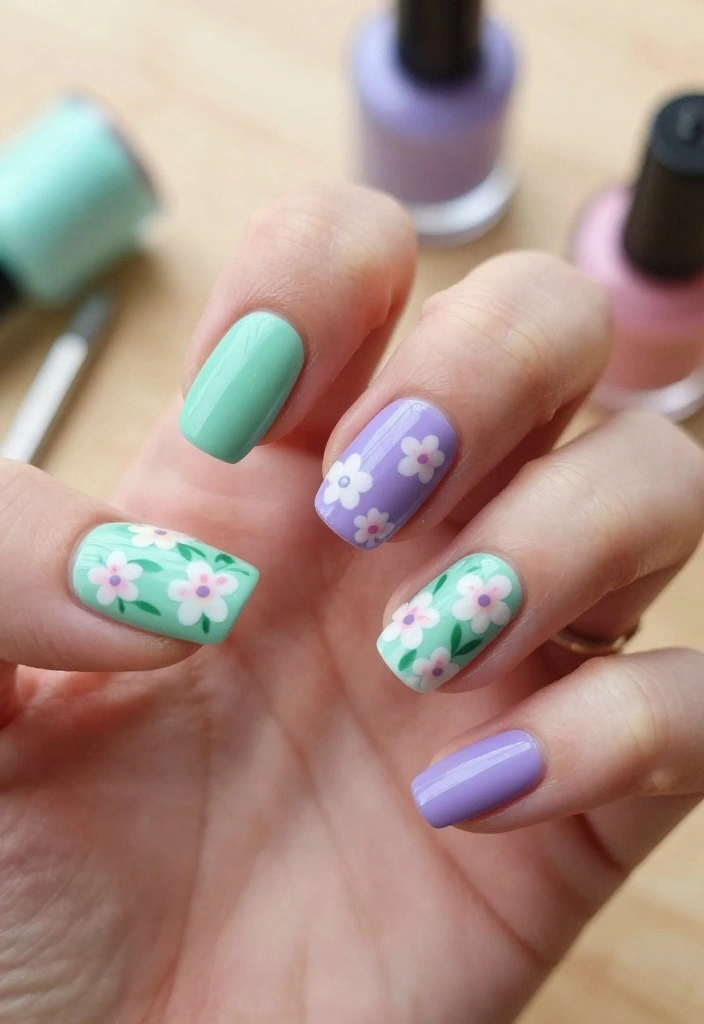
Floral stamping adds a whimsical touch to your nails, making them look effortlessly chic. This technique involves using a stamping plate to transfer delicate floral designs onto your base color, creating a work of art on your fingertips. It’s a fun way to showcase your personality through your nails.
To get stunning floral nails:
– Start with a solid base coat to make your floral design stand out.
– Choose a contrasting stamping polish for a striking effect.
– Clean your tools between uses for crisp, clear designs.
Floral stamping is perfect for spring and summer, bringing a fresh and cheerful vibe to your look. Let your nails bloom with creativity!
3. Metallic Magic
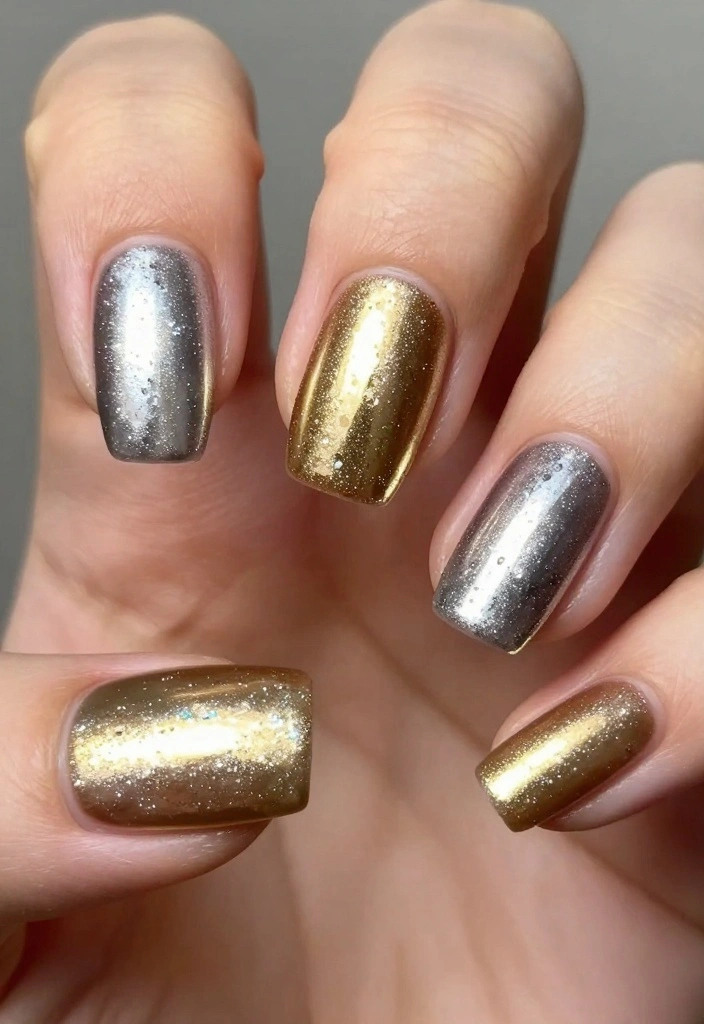
Metallic gel polish transforms your nails, giving them a futuristic and eye-catching shine. These polishes reflect light beautifully, making your manicure pop, especially for a night out. Whether you choose classic gold, silver, or a bold holographic blue, metallic nails command attention.
To perfect your metallic manicure:
– Apply a smooth base coat to prepare your nails.
– Use a top coat designed for metallic finishes to enhance shine and longevity.
– Pair with minimalist nail art for a classy look.
Metallic nails are incredibly versatile, effortlessly transitioning from day to night, making them a must-try for any trendsetter.
4. Neon Brights
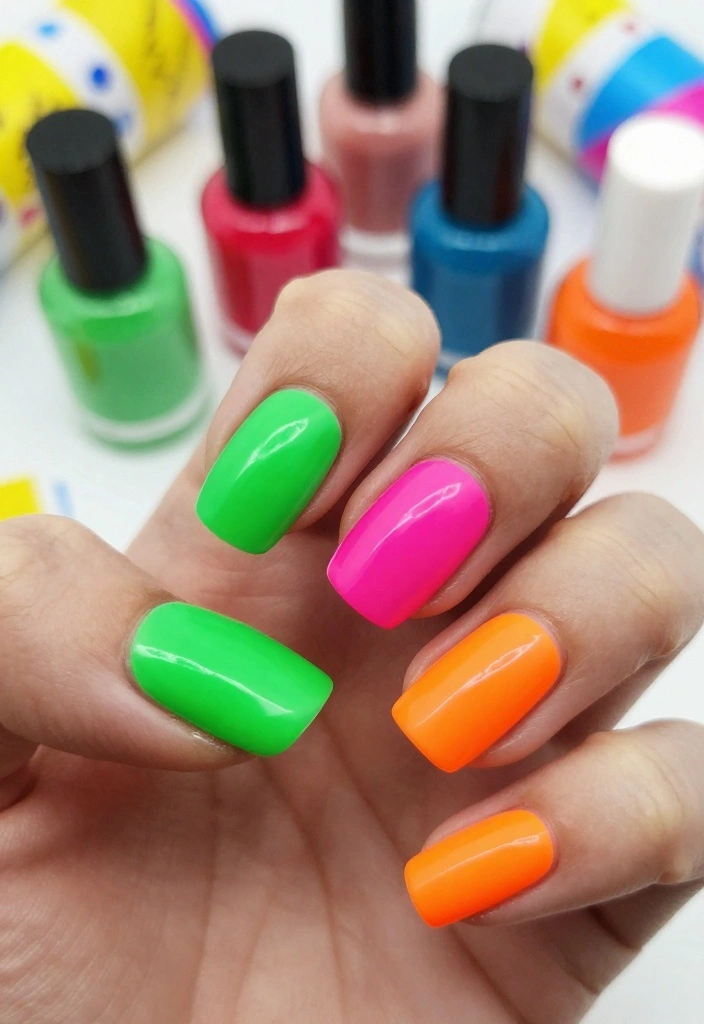
Want to make a bold statement? Neon gel nail polish is your go-to! These vibrant shades bring energy and excitement to your look, making them perfect for summer festivals or a lively night out. Choose electric pinks, greens, or yellows, and feel empowered every time you glance at your nails.
To rock neon nails:
– Start with a white base coat to ensure the neon colors pop.
– Finish with a glossy top coat to enhance brightness.
– Mix and match different neon shades for an eye-catching design.
Neon nails embody a carefree spirit, making them a favorite choice for the bold and adventurous.
Neon gel nail polish is your mood booster in polish form. When you want to stand out, a bold electric shade can instantly elevate your outfit—and your confidence. Wear it to festivals or nights out and let your nails do the talking.
5. Textured Nail Art
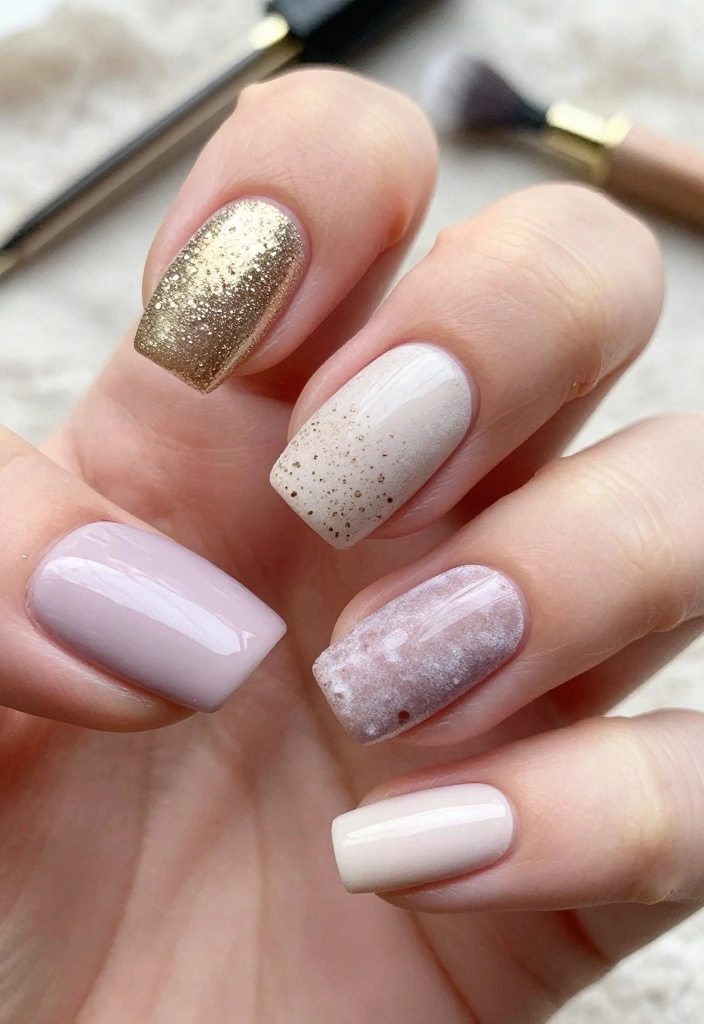
Adding texture to your nails elevates your style! Think soft sand, velvety finishes, or metallic effects for depth and interest. Textured gel polishes can stand alone or be combined with regular polish for a unique look.
To achieve textured perfection:
– Layer different textures for a dimensional effect.
– Consider a matte top coat for contrast with your design.
– Use a textured polish as an accent nail for a chic yet playful touch.
This technique allows for endless creativity, making it a standout choice for any nail enthusiast.
📹 Related Video: How to use Clear Texture Gel at www.TinoVo.shop
6. Geometric Patterns
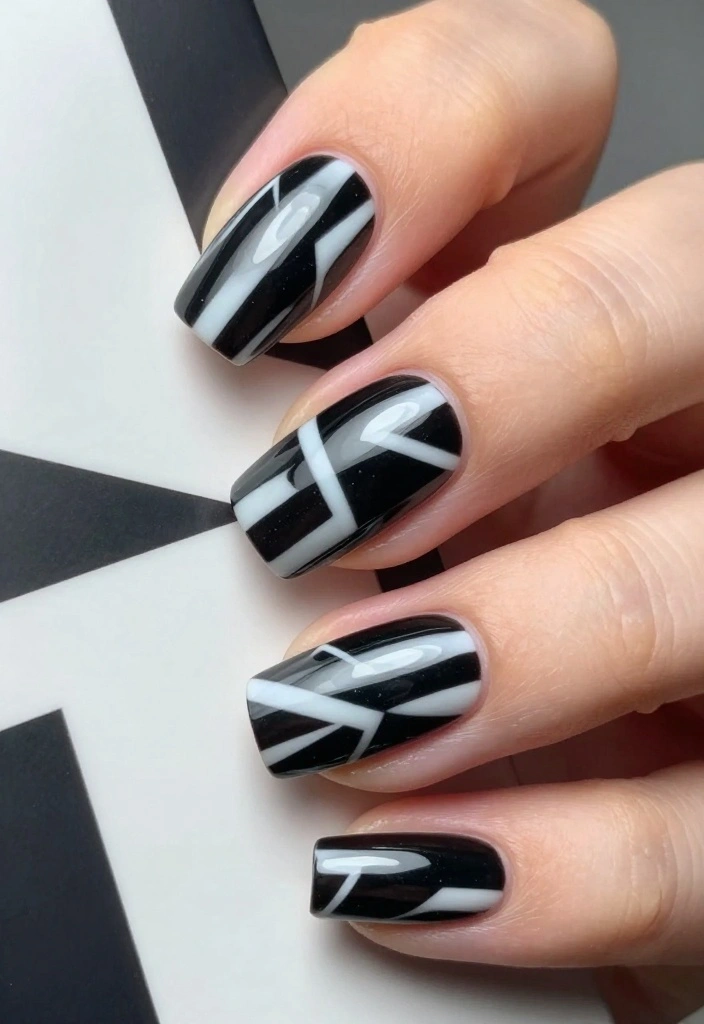
Geometric nail art focuses on clean lines and sharp angles, creating a modern vibe that’s hard to resist. You can craft triangles, stripes, or checkerboard patterns using gel polish, perfect for those who love minimalism with a twist.
To nail geometric designs:
– Use nail tape for straight lines and sharp edges.
– Mix colors to add fun twists to classic designs.
– Experiment with asymmetry for a unique touch.
Geometric nails are suitable for any occasion, making them a favorite among professionals and fashion enthusiasts alike.
7. Glitter Galore
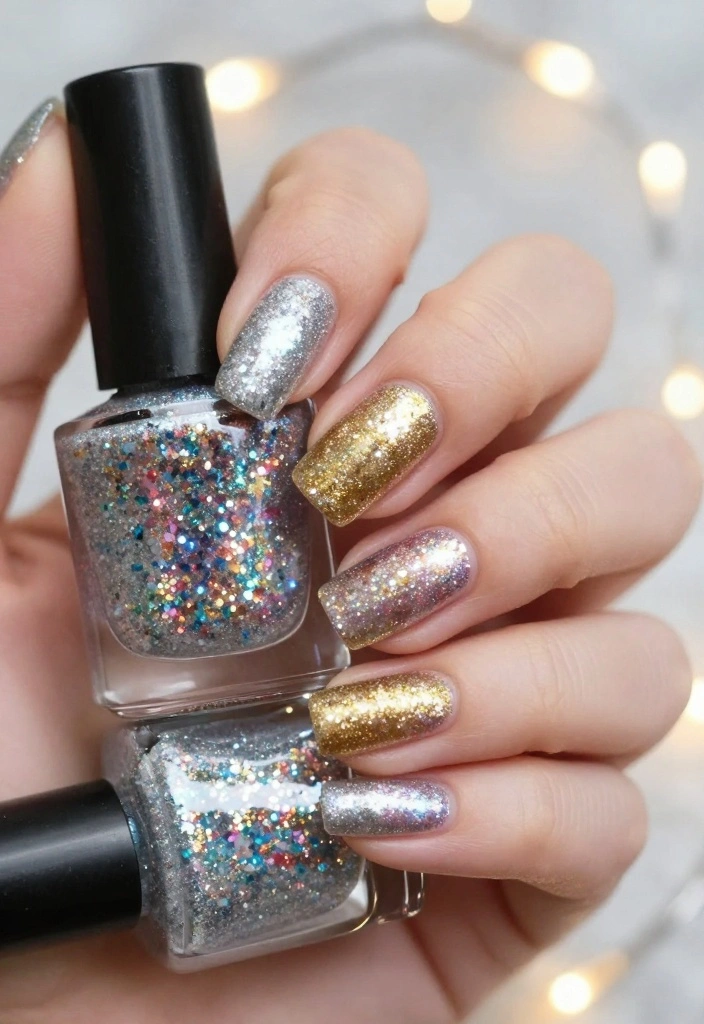
Glitter nails are a timeless classic, adding sparkle and glam to your manicure. Gel polishes with glitter range from subtle shimmers to full-on bling, making them versatile for any occasion. You can use glitter as a top coat or opt for a full glitter gel polish for maximum impact.
To create a stunning glitter manicure:
– Start with a base coat for a smooth finish.
– Experiment with ombre glitter by blending larger pieces at the tips and smaller ones at the base.
– Seal your look with a high-quality top coat to keep glitter intact.
Glitter nails are perfect for parties, holidays, or whenever you want to add a touch of magic to your style.
Fun fact: Glitter gel nail polish can last up to 14 days with a proper base coat, no chipping. Start with a smooth base, apply a thin glitter layer, then seal with a top coat for maximum shine. Your nails stay glam from week to week.
8. Negative Space Nail Art
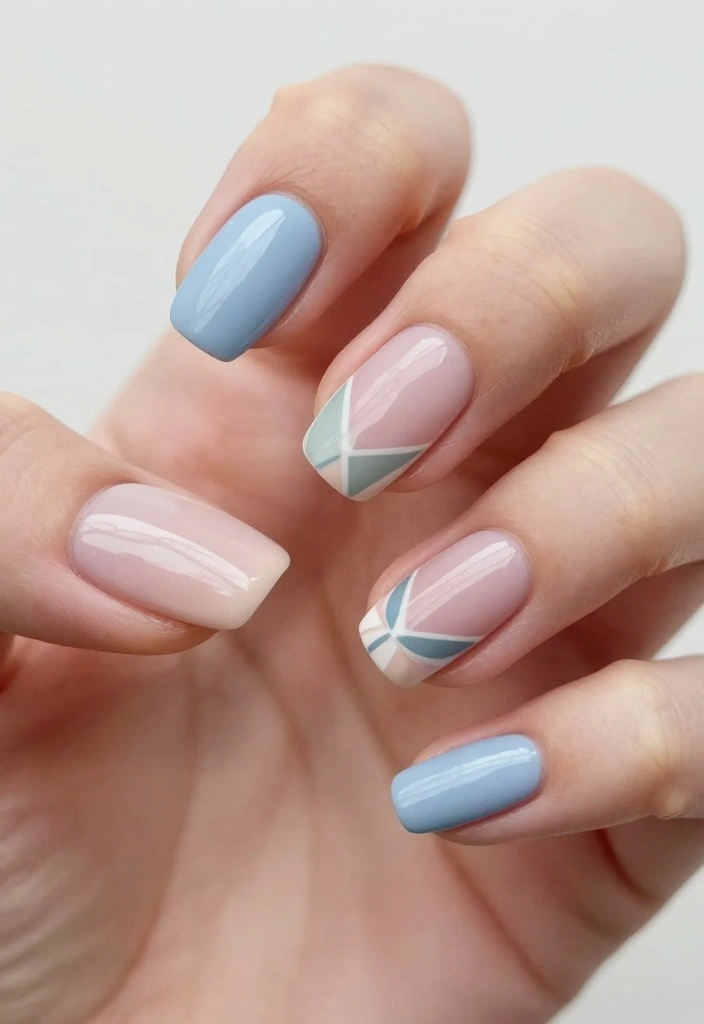
Negative space nail art is all about leaving parts of your nails bare, creating a chic and modern aesthetic. This style lets you experiment with shapes and colors while keeping a minimalist approach. It’s a unique way to highlight your natural nails.
To master negative space nails:
– Use tape for geometric shapes, leaving parts of the nail unpainted.
– Play with contrasting colors for a striking design.
– Finish with a matte top coat for a contemporary twist.
Negative space nails are trendy and suitable for any occasion, making them a stylish choice for everyone.
Fun fact: Negative space nail art uses less gel polish, trimming application by about 20–30% and cutting drying time. This means you can create chic, modern designs without sacrificing durability. Ready to try a bold bare-nail look at your next mani?
How To Choose Gel Nail Polish
Choosing the right gel nail polish can greatly affect the final look of your manicure. With so many options available, you want to make sure you’re making the best choice. Here’s a guide to help you select the perfect gel nail polish for your next nail art project.
1. Color Selection
Consider the colors that suit your style and skin tone. Popular shades vary from classic reds and nudes to bold neon and pastels. Remember to think about the occasion too—some colors might be more fitting for everyday wear, while others are perfect for special events.
2. Finish Type
Gel nail polish comes in various finishes, such as glossy, matte, satin, or metallic. Glossy finishes are popular for a classic look, while matte can give a sophisticated edge. Metallics can be eye-catching and fun. Choose a finish that complements your personal style and the look you wish to achieve.
3. Formula Quality
Not all gel nail polishes are created equal. Look for brands that are known for their quality formulas. A good gel polish should apply smoothly, have excellent pigmentation, and be long-lasting. Check reviews for insights from other users to find top-performing products.
4. UV/LED Compatibility
Make sure the gel nail polish you choose is compatible with your curing lamp. Some gel polishes are designed for UV lamps, while others work with LED lamps. Using the wrong lamp can lead to improper curing, which affects the polish’s durability and appearance.
5. Ease of Removal
Consider how easy it is to remove the gel polish. Some formulas are designed to be soak-off, making them easier to remove without damaging your nails. Others may require a more aggressive approach. If you prefer changing colors often, opting for a soak-off formula can save time and effort.
6. Brand Reputation
Research brands known for their gel nail polish. Well-established brands often provide higher quality products and better customer support. Look for brands that offer a variety of colors and finishes to ensure you have plenty of options.
Pro Tip: Consider purchasing a starter kit that includes several colors and a curing lamp. This can be a cost-effective way to explore gel nail polish and find what you like best.
With these tips in mind, you’ll be well on your way to choosing the best gel nail polish that meets your needs and makes your nails look fabulous!
9. Marble Effect Madness
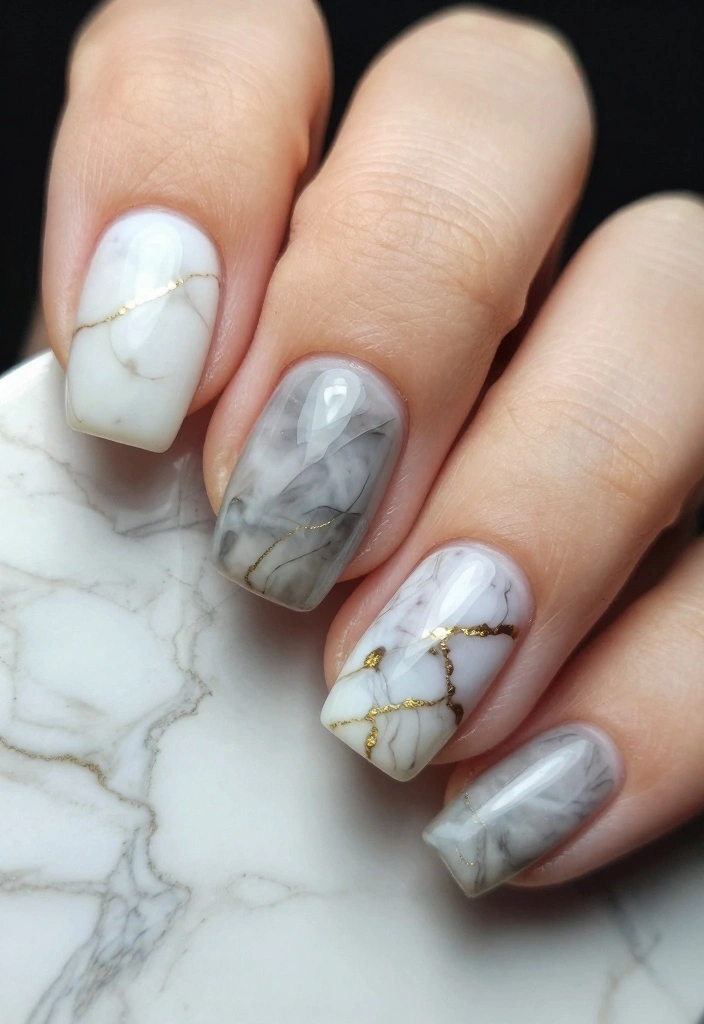
Marble nails exude elegance and sophistication, mimicking the stunning patterns found in natural marble stone. With a little creativity, you can achieve this luxurious look at home using gel polish.
To create stunning marble nails:
– Select a base color that complements your marble shades.
– Use white and another color for contrast in the marbling process.
– Seal your design with a top coat for durability.
Marble nails are perfect for weddings, special events, or whenever you want to feel elegant and chic!
Conclusion
These gel nail polish ideas are not just trends, they’re a means of self-expression!
From vibrant ombre to elegant marble, each style offers its own unique charm and allows for endless creativity.
Embrace these techniques and let your nails do the talking, because there’s a world of art at your fingertips.
Frequently Asked Questions
What gel nail polish ideas are covered in this article and how can I recreate them at home?
Explore 9 awesome gel nail polish ideas, including ombre gradients, nail stamping patterns, chrome finishes, glitter accents, matte gels, French fade, color blocking, pastel tones, and neon pops.
Each idea comes with practical tips to nail it at home. Here’s the general workflow: prep nails (shape, buff, push back cuticles), apply a thin base coat, cure, apply your color layers, seal with a top coat, cure again, and wipe the sticky residue with alcohol to reveal the shine. For detailing like ombre or nail stamping, use a light hand and cap the free edges to prevent chipping.
How can I achieve an ombre gel nail effect at home?
To achieve an ombre gel nail effect at home, start with two related shades. Apply the lighter shade as the base and cure. On a cosmetic sponge, dab the darker shade and gently press along the free edge, blending toward the center until the transition is smooth. Repeat as needed, then cure. Finish with a clear top coat and cure again. Wipe the tacky layer with isopropyl alcohol for a glassy finish. Pro tip: moisturize cuticles and keep the sponge damp with base coat for easier blending.
What is nail stamping and how can I use it with gel nail polish?
Nail stamping is a quick way to add intricate designs using a stamping plate, a stamper, and your choice of gel nail polish. Paint the plate with your color, scrape away excess, pick up the design with the stamper, and press onto the nail. Cure under your LED lamp, then seal with a top coat and cure again for a glossy finish. For cleanup, wipe stamping plates with isopropyl alcohol after use to keep your tools pristine.
What tools and products do I need to try these gel nail polish ideas?
To try these gel nail polish ideas, you’ll want: gel nail polish shades in a few colors; a reliable base coat and a top coat; a UV/LED lamp; a nail file, buffer, and cuticle pusher; lint-free wipes; isopropyl alcohol; and for ombre: a cosmetic sponge; and for stamping: stamping plates and a stamper. A gel cleanser and cuticle oil also help after your manicure to finish perfectly.
How do I safely remove gel nail polish and keep nails healthy?
Remove gel nail polish safely by gently filing the top layer, then soaking cotton in acetone and wrapping with foil for 10-15 minutes to lift the polish. Avoid peeling or picking to prevent nail damage. Gently push off the softened gel, buff lightly, moisturize with cuticle oil, and consider a strengthening treatment between manicures. This keeps gel nail polish looks from harming natural nails and supports healthy nail growth.
Related Topics
gel nail polish
nail art techniques
ombre nails
nail stamping
trendy designs
beginner friendly
easy nail art
seasonal nails
5-minute nail art
colorful designs
manicure ideas
fashion nails
I loved reading about these gel nail ideas! I always struggle with nail art, but your tips make it sound so easy. Do you have a favorite color combo that you recommend?
These gel nail ideas are so fun! I tried to do a simple design once and ended up with more polish on my hand than the nail. It’s safe to say I’m not ready for a nail art competition yet!