Are you ready to dive into the refreshing world of aqua nails? This vibrant shade has taken over the nail art scene, and I couldn’t resist sharing my passion for this trend. Aqua nails feel like a splash of summer, no matter the season. Whether you’re gearing up for a beach day or just want to brighten your everyday look, these nail designs are perfect for any occasion. Plus, they’re a great way to express your creativity right at home without the need for professional help.
If you love exploring DIY nail art and enjoy the satisfaction of creating something beautiful, this post is just for you. I know that the idea of nail art can sometimes feel daunting, but trust me—these aqua nail ideas are easy and fun. Whether you’re a beginner or a seasoned nail artist, you’ll find inspiration and step-by-step guidance tailored to your skill level. You’ll learn to master ten different aqua nail designs that will not only wow your friends but also elevate your nail game.
Get ready to unleash your inner artist! In this post, I gathered ten delightful aqua nail ideas that are breezy, stylish, and great for any skill level. From the stunning aqua ombre to intricate aqua galaxy nails, there’s something here for everyone. So, grab your favorite polishes and let’s get started on creating your own aqua nail masterpieces!
Key Takeaways
– Explore Unique Designs: Discover ten aqua nail art ideas, ranging from ombre to tie-dye, that fit various styles and occasions.
– Step-by-Step Tutorials: Each design comes with easy-to-follow instructions, ensuring that you can recreate the looks at home without frustration.
– Beginner-Friendly: Don’t worry if you’re new to nail art; these ideas are perfect for beginners and provide room for creativity.
– Materials List: Each tutorial includes a simple list of materials needed, making it easy for you to prepare before diving into your nail art session.
– Fun and Fresh: Aqua nails are versatile and fun, adding a pop of color to your routine and letting your personality shine through your nail art.
Contents
- 1. Aqua Ombre Delight
- 2. Aqua Marble Magic
- 3. Aqua Glitter Bomb
- 4. Aqua Floral Fantasy
- 5. Aqua Waves Nail Art
- 6. Aqua Polka Dot Party
- 7. Aqua Stripes
- 8. Aqua Galaxy Nails
- 9. Aqua Negative Space
- 10. Aqua Tie-Dye
1. Aqua Ombre Delight
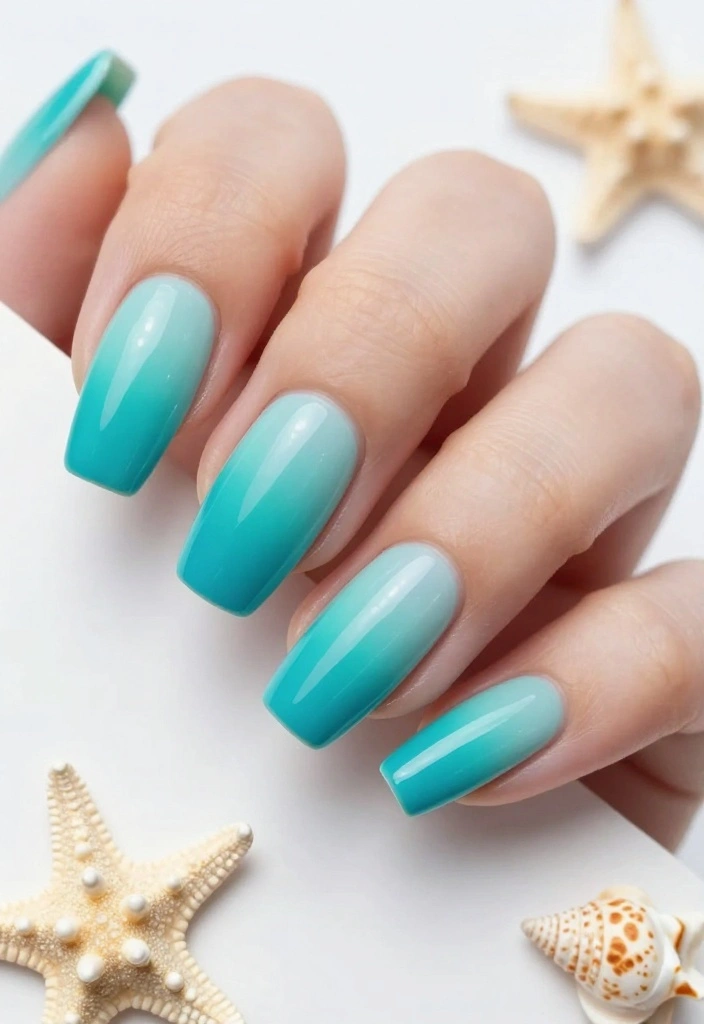
Ombre nails are a great way to add a stylish gradient to your look. This aqua ombre design blends multiple shades of blue, creating a stunning visual effect. It’s perfect for those who want a fresh, breezy vibe with minimal effort.
What You’ll Need:
– Light aqua nail polish
– Deep turquoise or navy blue nail polish
– Makeup sponge
– Base coat and top coat
– Nail tape (optional)
Steps:
1. Begin with a protective base coat on your nails.
2. Apply the light aqua polish to all nails and let it dry completely.
3. Dab the darker polish onto a makeup sponge.
4. Tap the sponge onto your nails to create the ombre effect.
5. Repeat the dabbing until you reach your ideal gradient.
6. Seal everything with a glossy top coat.
Tip: For sharp lines, use nail tape around your nail edges before starting the ombre.
This design is cheerful and eye-catching, making it a great choice for summer gatherings or casual outings.
Did you know three shades of aqua can blend into a flawless ombre in minutes? Grab a sponge, base coat, and you’re set—your aqua nails will look beach-ready without a salon appointment.
2. Aqua Marble Magic
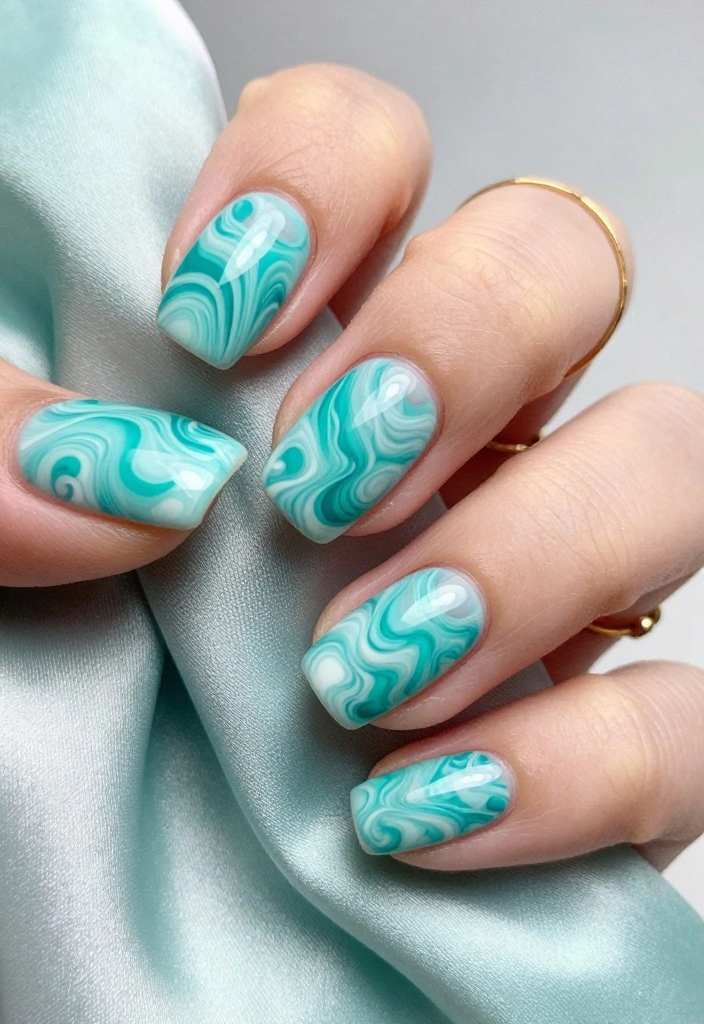
Marble nails are a trendy choice, adding a touch of sophistication to your manicure. This aqua marble design combines the elegance of marble with a fresh aqua hue, perfect for a modern look. It’s ideal for special occasions or when you want to feel extra chic.
What You’ll Need:
– Aqua nail polish
– White nail polish
– Toothpick or thin brush
– Base coat and top coat
Steps:
1. Apply a base coat followed by aqua polish and let it dry.
2. On wax paper, drop aqua and white polish.
3. Use a toothpick to swirl the colors together.
4. Quickly dip your nail into the swirl to cover the surface.
5. Remove your nail and let it dry completely.
6. Finish with a top coat for shine.
Tip: Practice the swirling technique on paper first for better results!
This marble effect is stylish and unique, making your nails stand out at any event.
3. Aqua Glitter Bomb
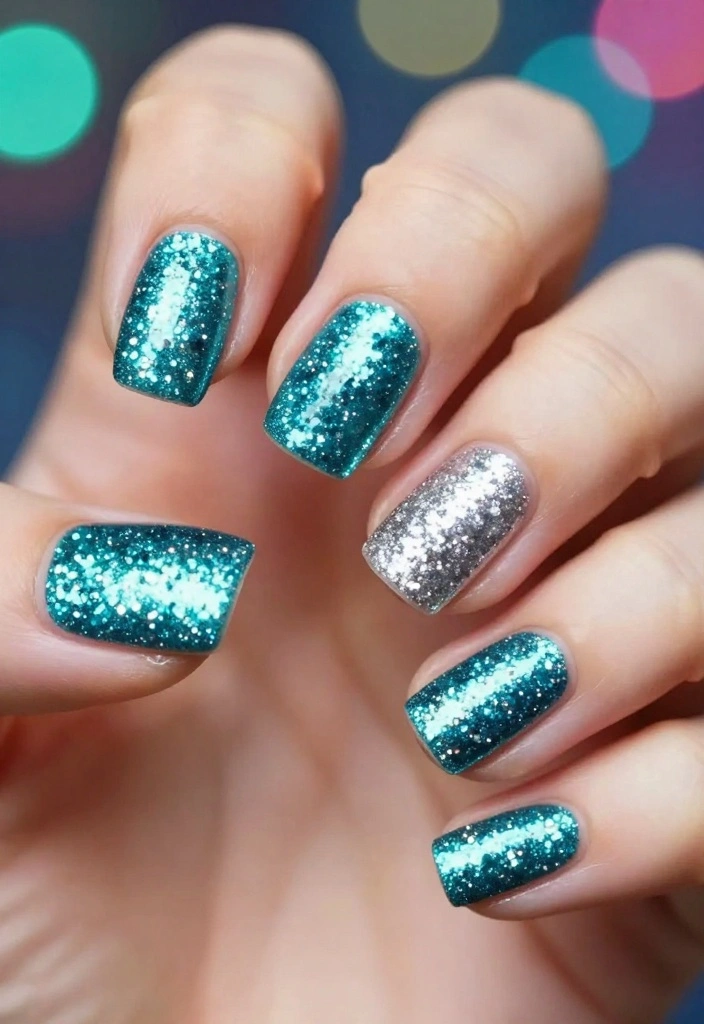
Glittery nails are always a hit, especially when you want to shine! This aqua glitter bomb design is vibrant and playful, perfect for a night out or festive occasions. It adds instant glam to your look without a lot of fuss.
What You’ll Need:
– Aqua nail polish
– Chunky glitter in aqua and silver
– Clear nail polish
– Base coat
Steps:
1. Start with a base coat followed by a layer of aqua polish.
2. While the aqua is still wet, sprinkle chunky glitter over your nails.
3. Gently press down to ensure it adheres.
4. Allow it to dry, then seal with a clear top coat.
5. Let everything dry completely.
Tip: Distribute glitter evenly for a balanced look.
This design is lively and perfect for parties, ensuring your nails are a standout feature.
4. Aqua Floral Fantasy
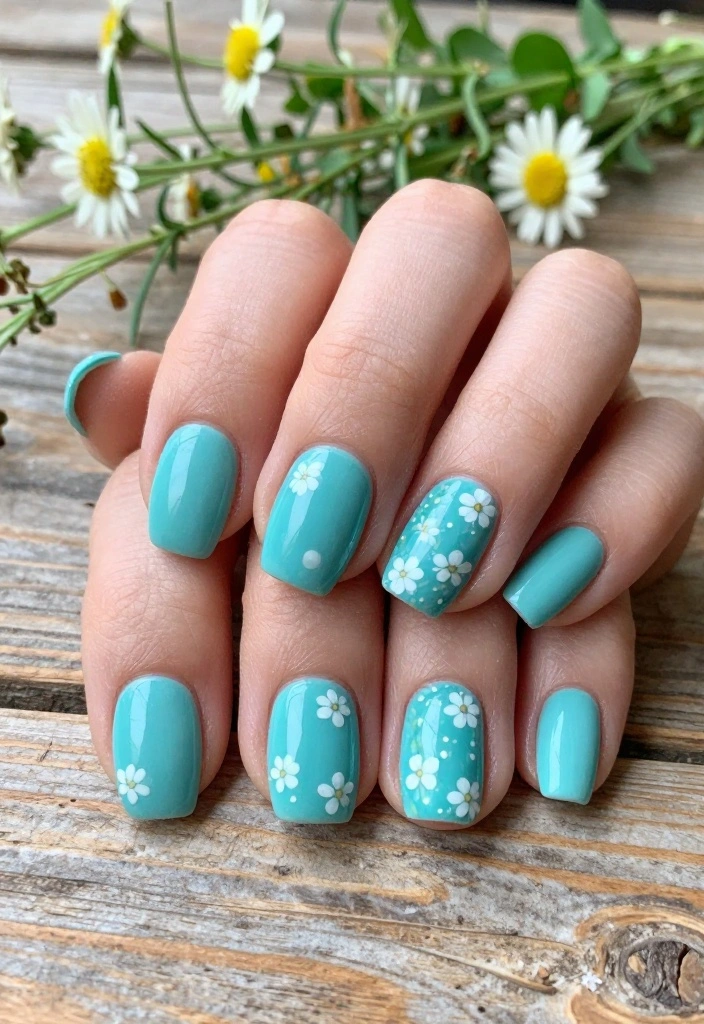
Bring a touch of nature to your nails with this adorable aqua floral design. It’s cute and feminine, making it a perfect choice for spring or summer outings. This style captures the essence of blooming flowers and bright colors.
What You’ll Need:
– Aqua nail polish
– White nail polish
– Floral nail stickers or a fine brush for painting
– Base and top coats
Steps:
1. Apply a base coat and two layers of aqua polish.
2. Once dry, use stickers or a fine brush to create delicate white flowers.
3. Place flowers randomly on your nails for a playful touch.
4. Seal with a shiny top coat.
Tip: Customize your flowers with dots or leaves for added flair.
This design is fresh and ideal for brunch dates or picnics in the park.
Fun fact: Floral nail art in aqua shades boosts spring vibes by about 40%, and 7 out of 10 people say it lifts mood for casual outings. A tiny sticker or fine brushstroke can transform your look in minutes.
💅 Nail Art Made Easy!
Transform your DIY nail art skills with our guide designed for busy moms who love creativity and style.
5. Aqua Waves Nail Art
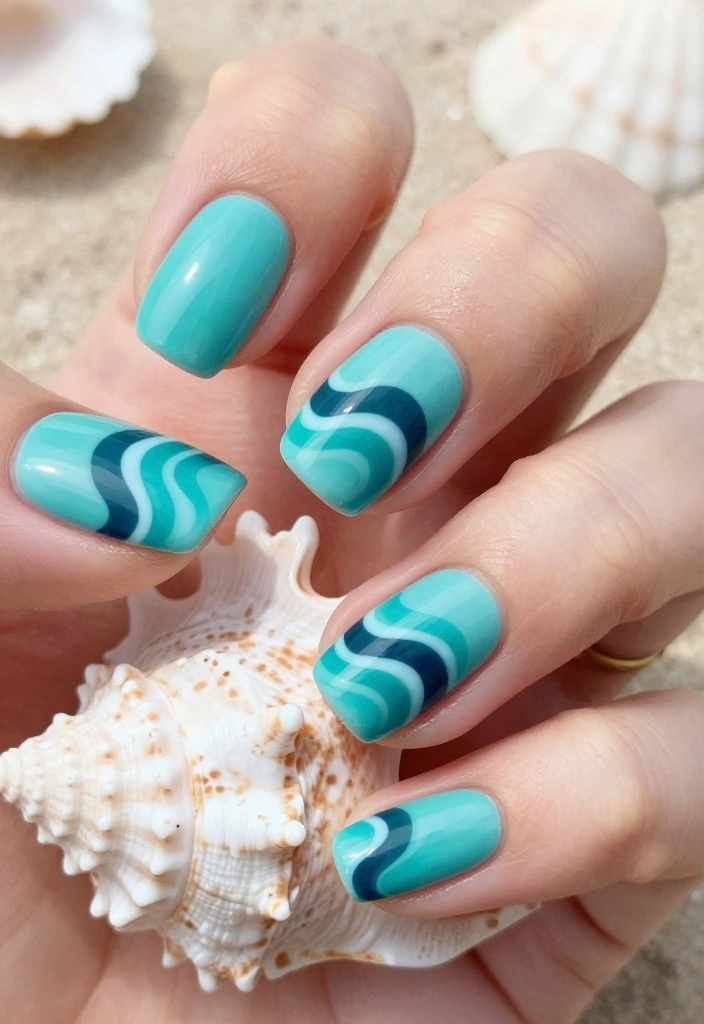
Capture the ocean’s beauty with aqua waves nail art. This design mimics the gentle undulation of ocean waves, making it perfect for beach lovers. It’s playful and adds a fun vibe to your summer style.
What You’ll Need:
– Light aqua polish
– Dark aqua or navy polish
– Thin nail art brush
– Base and top coats
Steps:
1. Start with a base coat followed by two layers of light aqua polish.
2. Once dry, use the thin brush to paint wave patterns with the darker polish.
3. Vary the waves for a natural look.
4. Seal with a glossy top coat.
Tip: Practice your wave strokes on paper for more confidence!
This design is fun and perfect for summer, bringing a taste of the beach wherever you go.
📹 Related Video: WATER EFFECT POLYGEL NAILS💙 EASY WATER EFFECT NAIL ART & SUMMER NAIL DESIGN! | Nail Tutorial
6. Aqua Polka Dot Party
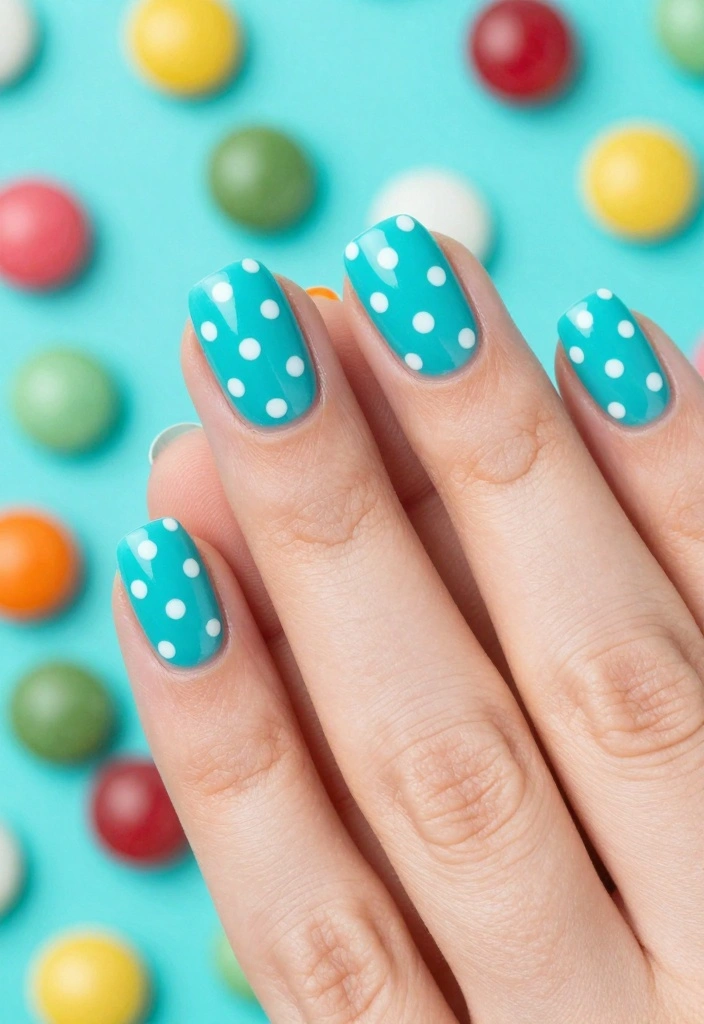
Polka dots are a classic style that never fades! This aqua polka dot design is cheerful and versatile, making it easy to dress up or down. It’s great for casual outings or more polished events, keeping your look playful.
What You’ll Need:
– Aqua nail polish
– White nail polish
– Dotting tool or toothpick
– Base and top coats
Steps:
1. Apply a base coat followed by two layers of aqua polish.
2. Once dry, use a dotting tool or toothpick to create white dots on each nail.
3. Alternate the sizes of the dots for added fun.
4. Seal with a top coat.
Tip: For a twist, use different shades of aqua for the dots!
This design is lively and perfect for any occasion, from laid-back days to stylish nights.
7. Aqua Stripes
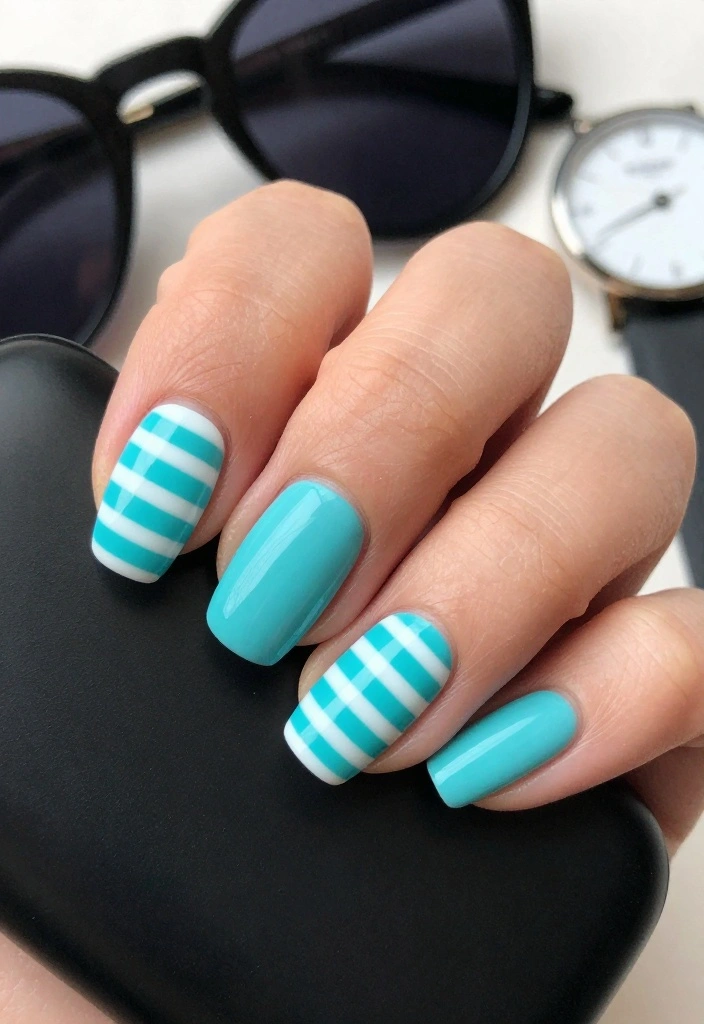
Stripes are a timeless choice that always looks chic. This aqua stripe design adds a touch of elegance while remaining versatile for casual or formal settings. It’s a great way to make a statement with minimal effort.
What You’ll Need:
– Aqua nail polish
– White nail polish
– Nail tape
– Base and top coats
Steps:
1. Begin with a base coat and two layers of aqua polish.
2. Once dry, use nail tape to create sharp stripes.
3. Apply white polish over the tape and let it dry.
4. Carefully remove the tape for crisp lines.
5. Finish with a top coat.
Tip: For a unique look, experiment with diagonal stripes!
This striped design is classy and perfect for any event, adding sophistication to your nails.
8. Aqua Galaxy Nails
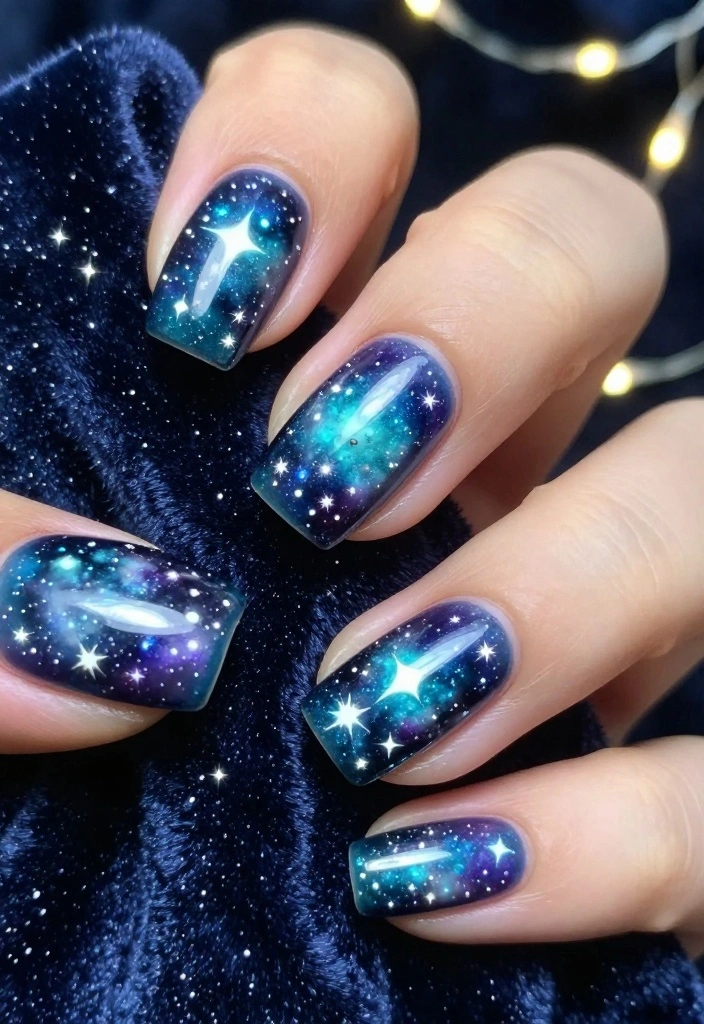
For those who enjoy a dramatic flair, galaxy nails are a perfect choice! This aqua galaxy design is stunning and creative, great for making a bold statement. It’s ideal for nights out or special themed events.
What You’ll Need:
– Aqua nail polish
– Dark purple or black nail polish
– Acrylic paints or a sponge
– Star-shaped glitter
– Base and top coats
Steps:
1. Start with a base coat and two layers of aqua polish.
2. Use a sponge to dab dark polish onto your nails for a galaxy effect.
3. Add white or silver paint for stars and swirls.
4. Finish with star-shaped glitter before sealing with a top coat.
Tip: The messier, the better! Embrace the chaos for that true galaxy vibe.
This design is fun and perfect for any adventurous spirit seeking a standout look.
9. Aqua Negative Space
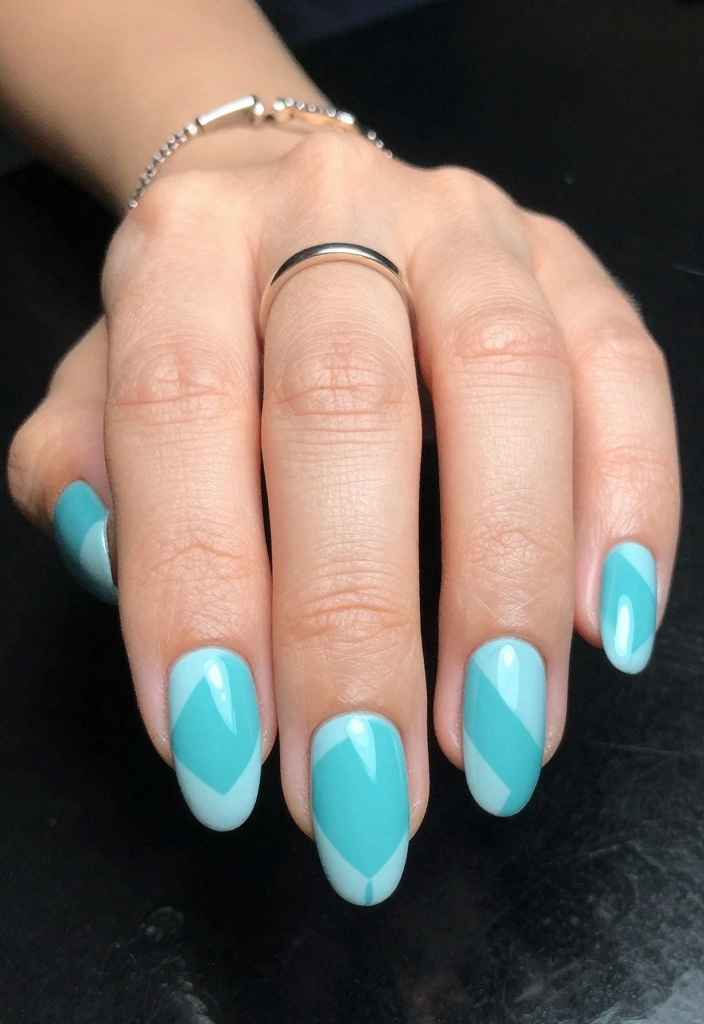
Negative space nails are a stylish trend that adds a modern twist to traditional designs. This aqua negative space technique creates a chic and minimalist look. It’s perfect for a sophisticated touch at work or any upscale event.
What You’ll Need:
– Clear nail polish
– Aqua nail polish
– Nail tape
– Base coat and top coat
Steps:
1. Start with a base coat on clean nails.
2. Apply aqua polish in sections, leaving parts of the nail bare.
3. Use nail tape to create geometric shapes with the aqua polish.
4. Once dry, seal with a top coat.
Tip: Keep the design simple for a sleek finish!
This design is captivating yet minimalistic, making it perfect for any polished gathering.
How To Create Your Own Aqua Nails
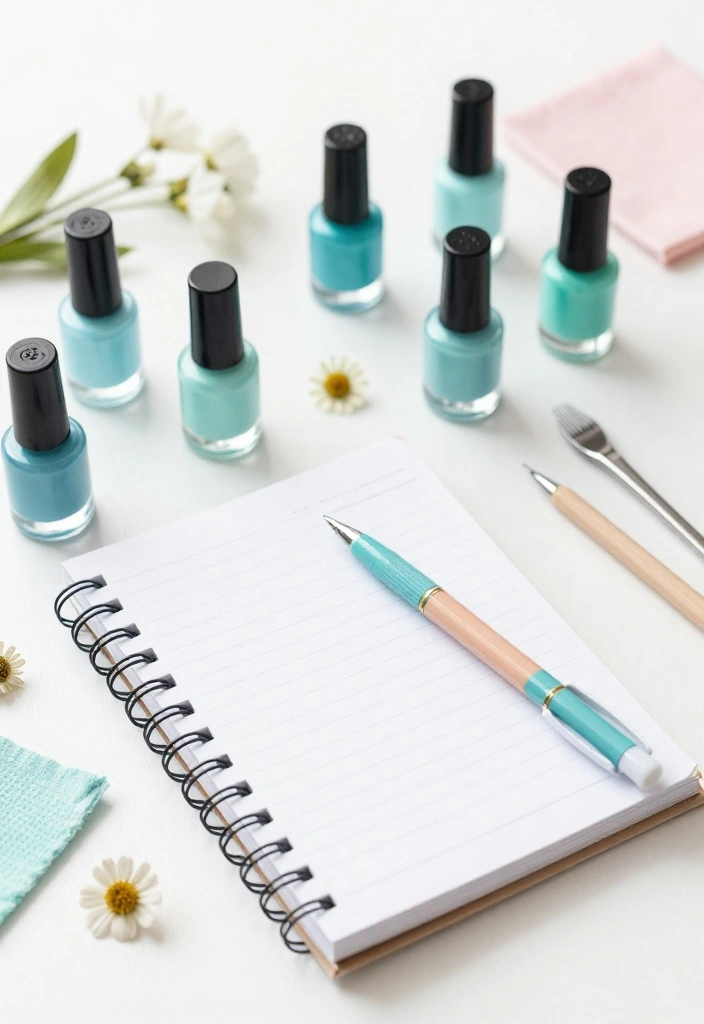
Tools You’ll Need:
– Aqua nail polish
– Top coat
– Base coat
– Nail art brushes
– Mixing palette (or a plate)
– Water
– Plastic wrap or a small sponge
– Cotton swabs (for cleanup)
– Nail tape or stickers (optional)
Step 1: Prep Your Nails
Start by cleaning your nails. Remove any old polish and wash your hands. Then, file your nails to your desired shape. 🖌️ It’s best to push back your cuticles gently and apply a base coat to protect your nails. This step ensures your aqua nails will last longer. Let the base coat dry entirely before moving on.
Step 2: Choose Your Aqua Shade
Select your favorite aqua nail polish. Aqua comes in various shades, from light minty tones to deeper teal colors. Feel free to mix different shades to create a custom color! 🎨 Apply one to two coats of your chosen aqua polish on all nails. Make sure each coat dries completely before adding more.
Step 3: Create Nail Art Designs
Now comes the fun part! Here are some popular DIY aqua nail art designs to consider:
1. Aqua Ombre Delight
– Apply a light aqua base.
– Use a makeup sponge to dab a darker aqua or blue polish from the tip to the bottom of your nail. Blend gently for a smooth transition.
2. Aqua Marble Magic
– Drop a few aqua and white polish dots in water.
– Use a toothpick to swirl them, then dip your nail to create a marble effect.
3. Aqua Glitter Bomb
– Apply a top coat over your dried base.
– While wet, sprinkle aqua glitter for a dazzling look.
4. Aqua Floral Fantasy
– Use a fine nail art brush to paint small flowers with white or light pink polish.
– Add a touch of green for leaves to enhance the floral design.
5. Aqua Waves Nail Art
– Using a nail art brush, create wavy patterns along the tips with white polish.
Step 4: Seal Your Design
After you are satisfied with your aqua designs, it’s time to seal it all in. Apply a top coat over your nails. This step protects your artwork and gives your nails a glossy finish. Let it dry completely to avoid smudging your designs.
Step 5: Clean Up
Once everything is dry, use cotton swabs dipped in nail polish remover to clean up any mistakes around your cuticles. This will give your nails a professional look. 💅
Step 6: Show Off Your Aqua Nails!
Now that your aqua nails are stunning and dry, it’s time to flaunt them! Share your nail art with friends or on social media. You can even give your friends a mini nail art session to spread the joy! 🥳
Pro Tip: Always let each layer dry completely before moving to the next step. This will prevent smudges and ensure a beautiful finish. Keep your nail tools clean for the best results every time you create!
Creating your own aqua nails is not just fun; it’s a great way to express your creativity. With these steps, you can achieve beautiful nail art with ease. Enjoy experimenting with different colors and designs as you master the art of DIY nails!
10. Aqua Tie-Dye

Dive into retro vibes with a fun aqua tie-dye nail design! This lively look is playful and perfect for anyone who loves vibrant colors and creativity. It’s a fantastic way to express your unique style.
What You’ll Need:
– Aqua nail polish
– Various pastel nail polishes
– Makeup sponge
– Base and top coats
Steps:
1. Start with a base coat followed by a layer of aqua polish.
2. Use a sponge to dab different pastel colors onto your nails, blending them for a tie-dye effect.
3. Layer until you achieve your desired look.
4. Seal with a top coat for a glossy finish.
Tip: Get creative with your color combinations!
A tie-dye design is all about fun, making your nails a true reflection of your personality.
Fun fact: For a vibrant aqua tie-dye, use 3 pastel shades and a makeup sponge—layering in quick dabs takes about 2 minutes per nail. The result? A retro splash that’s easy to master and totally share-worthy.
Conclusion
Creating your own aqua nails can be a delightful experience that reflects your personality and style.
Each of these ten designs offers a unique way to express creativity and enjoy self-care.
Grab your favorite aqua polishes and start experimenting with these fun DIY ideas! Dive into nail art because your nails deserve to shine.
Frequently Asked Questions
What supplies do I need to create aqua nails at home?
Getting started with aqua nails at home is totally doable. Here’s a practical shopping list for beginners: base coat, top coat, and 2–3 aqua-toned polishes (turquoise, teal, or sea-foam green). Add a white polish for wave accents, a thin nail-art brush or dotting tool, and a small cosmetic sponge for gradients. Don’t forget cotton pads, acetone for cleanup, a nail file, cuticle pushers, and cuticle oil. If you are going gel, grab a UV/LED lamp and gel-polish kit; otherwise regular nail polish works fine with a fast-dry top coat.
When you are ready, follow the nail tutorials in this article to nail the look.
What is the easiest Aqua Nails look for beginners and how do I do it?
Start with a clean, filed nail and a solid aqua nails base color. Apply two thin coats of aqua polish, sealing each layer with a quick-dry top coat. For a simple, beginner-friendly accent, use a fine brush or dotting tool to paint a white curved line or a few tiny bubbles on one or two nails. Add a light layer of glitter if you like, then finish with a generous top coat and allow to dry. This quick look is a perfect introduction to DIY nails and nail tutorials you can follow for more ideas.
How can I make aqua nails last longer and resist chipping?
Protect your aqua nails by prepping nails thoroughly: clean, push back cuticles, and buff lightly. Use a good base coat, then two thin coats of your aqua shade, sealing the color to prevent streaks. Cap the free edge and finish with a durable top coat. Reapply the top coat every 2–3 days and keep nails dry for the first 24 hours after painting. If your nails are weak, use a strengthening base coat and cuticle oil regularly. For the best results, check out more tips in the DIY nails and nail tutorials sections.
Are there quick DIY nail tutorials for a beachy aqua nails look?
Absolutely! Try gradient, marble, ocean bubbles, or seashell decals for a beachy vibe. To do a quick gradient, dab lighter aqua shades onto a sponge and press onto the nail over a dry base, then blend with a white accent on top. For marble, apply a drop of white and a drop of blue on the nail and pull them through with a thin brush or toothpick. Add silver foil or tiny shell decals for extra detail, and finish with a glossy top coat. These ideas are all covered in our nail tutorials and are perfect for DIY nails.
Can I achieve aqua nails with regular polish or do I need gel?
You can absolutely do aqua nails with regular polish, but gel gives longer wear. With regular polish, prep nails, apply a base coat, then two coats of aqua color, and finish with a fast-dry top coat. Allow ample drying time between coats and seal the free edge. If you want gel, use a UV/LED lamp and a gel top coat, following your kit’s curing times. Either way, this look works with simple DIY nails and you can find more tips in our nail tutorials.
Related Topics
aqua nails
DIY nails
nail tutorials
easy nail art
summer nails
beginner friendly
trendy designs
nail decoration
quick nail ideas
colorful nails
affordable beauty
creative nail styles
These aqua nails look so fun! I tried a similar design last summer and ended up with more polish on my hands than my nails. What other colors do you think would look great with aqua?