Creating stunning nail art can often feel daunting, especially if you’re unsure where to start. If you find yourself captivated by the beauty of *natural almond nails*, you’re not alone. This post is for those who crave that perfect blend of elegance and creativity right at their fingertips. Whether you’re a nail art novice or a seasoned pro, the joy of creating unique designs at home can be incredibly fulfilling. I put this guide together to help you explore some of the most stylish and easy-to-do nail art tutorials that feature the almond shape.
If you’re someone who loves to express yourself through your nails, this one’s definitely for you. You’ll find a wide range of DIY ideas tailored to suit various tastes and occasions. From minimalist aesthetics to bold patterns, our collection of 12 *DIY natural almond nail art tutorials* will inspire you to elevate your nail game. Each design is not only chic but also perfect for home application, making it easy to switch up your look whenever you feel like it. You’ll discover tips and tricks to help you create stunning nail art that can turn heads without breaking the bank.
Get ready to dive into a world of creativity! I’ve gathered an array of tutorials that are accessible, stylish, and sure to impress your friends. You’ll leave this post with a treasure trove of ideas that you can easily implement. Let’s get started with these fabulous designs that you definitely can’t afford to miss!
Key Takeaways
– Discover 12 unique and stylish *natural almond nail* designs that are perfect for any occasion, from casual to formal.
– Each tutorial is designed for easy DIY application, ensuring you don’t need to visit a salon to achieve stunning results.
– Learn about various techniques including minimalist designs, ombre effects, and floral accents to suit your personal style.
– Get practical tips to help you gather materials and perfect your skills, making nail art a fun and rewarding hobby.
– Enjoy the satisfaction of creating custom nail art that reflects your personality and creativity, all from the comfort of your home.
Contents
- 1. Minimalist Line Art
- 2. Ombre Effect
- 3. Floral Accents
- 4. Geometric Patterns
- 5. Marble Effect
- 6. Glitter Gradient
- 7. Color Block Nails
- 8. Textured Nails
- 9. Neon Brights
- 10. Negative Space Designs
- 11. Artistic Brush Strokes
- 12. Seasonal Themes
1. Minimalist Line Art
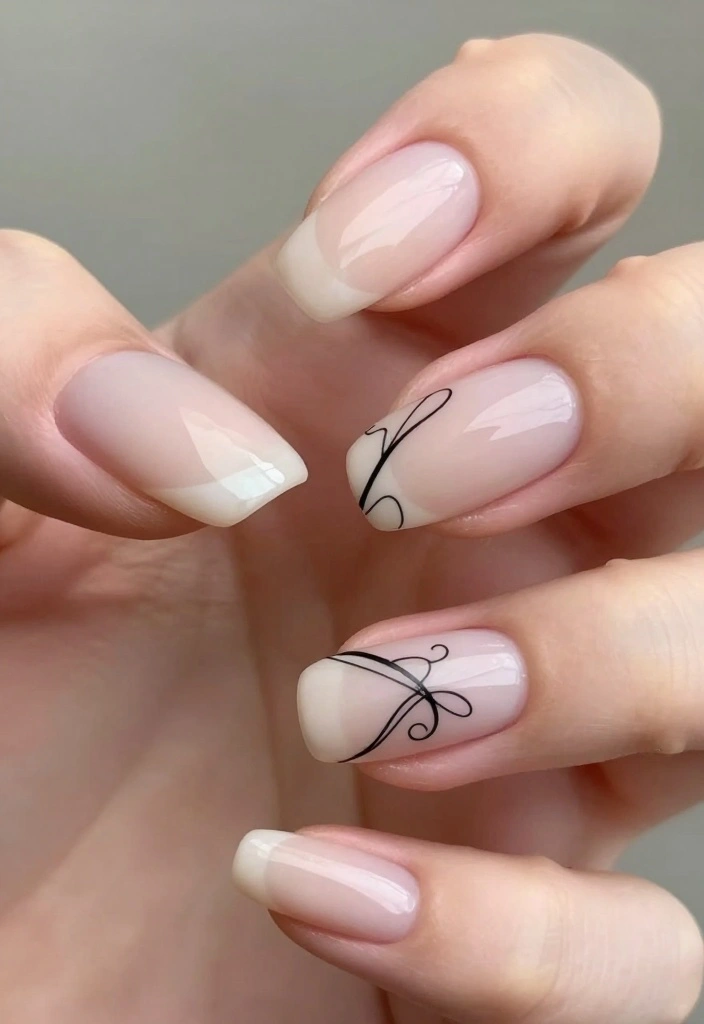
Embrace the elegance of minimalist line art for your nails! This trend is all about sleek designs that make a statement without being over the top. A neutral base, like soft beige or nude, pairs beautifully with fine black lines for a chic finish.
The simplicity of this style works wonders, allowing you to showcase your artistic side while keeping it subtle. Perfect for both casual outings and professional settings, these nails add a touch of sophistication to any look.
Outfit Pieces:
– Soft beige or nude nail polish
– Black nail polish for designs
– Optional: a fine nail art brush or a toothpick for drawing
Styling Tips:
– Apply a base coat, then two thin layers of nude polish for a smooth finish.
– Once dry, use a fine brush to create your designs, like flowers or abstract lines.
– Finish with a matte topcoat for a modern look.
– Practice your designs on paper to gain confidence before applying them to your nails.
These minimalist nails are versatile, making them great for any occasion. You can easily switch up the designs for a fresh take each time!
Minimalist line art nails prove you don’t need busy designs to shine. Start with a soft nude base, add slim black lines, and you’ve got a chic look that works from desk to dinner. Natural almond nails never felt more effortless or stylish.
2. Ombre Effect
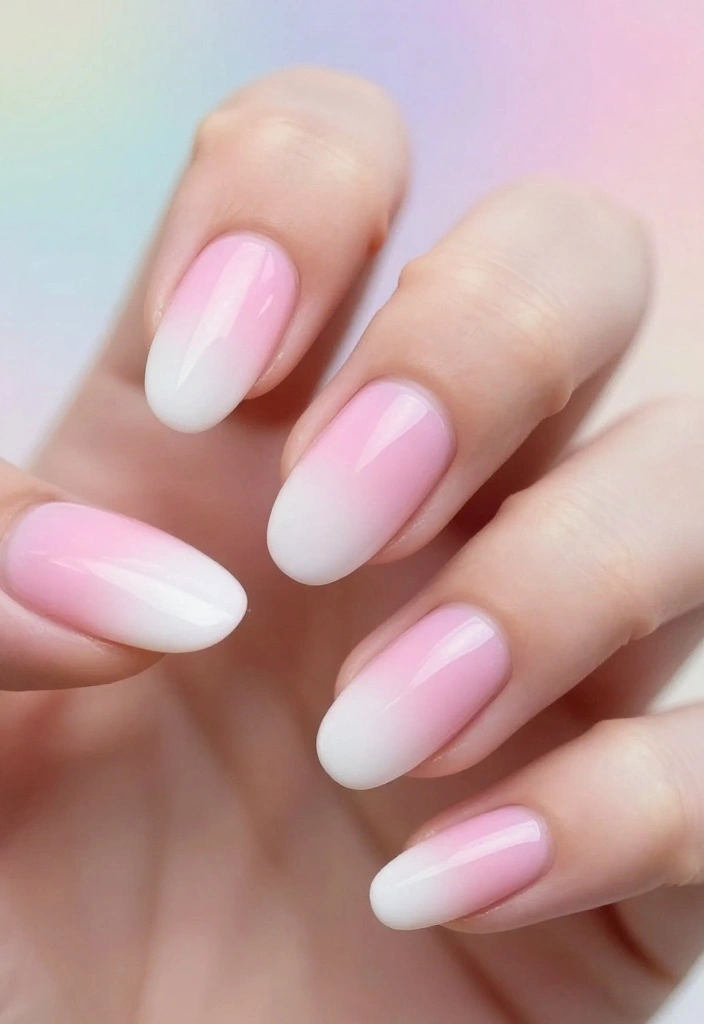
Ombre nails are a stunning way to express your style! This technique features a smooth gradient that transitions beautifully between colors. Imagine a soft pink fading into white or a deep blue melting into lavender.
The ombre effect not only looks gorgeous but also offers endless color combinations to match your mood or outfit. It’s a fantastic choice for events like parties or casual days out.
Outfit Pieces:
– Base coat for protection
– Light pink and white nail polish (or chosen ombre colors)
– Makeup sponge for blending
– Glossy top coat for shine
Styling Tips:
– Start with a base coat and apply two coats of the lighter shade at your nail tips.
– Use a makeup sponge to dab the darker color, blending it into the lighter shade for a seamless look.
– For a neat finish, use a small brush to touch up the blending area.
– Seal it all with a glossy top coat for that salon-quality shine.
Ombre nails are perfect for any occasion, from casual outings to glamorous events. Experiment with different colors to keep your look fresh!
💅 Nail Art Made Easy for Moms
Transform your nail game with our DIY guide designed specifically for busy moms who love creativity.
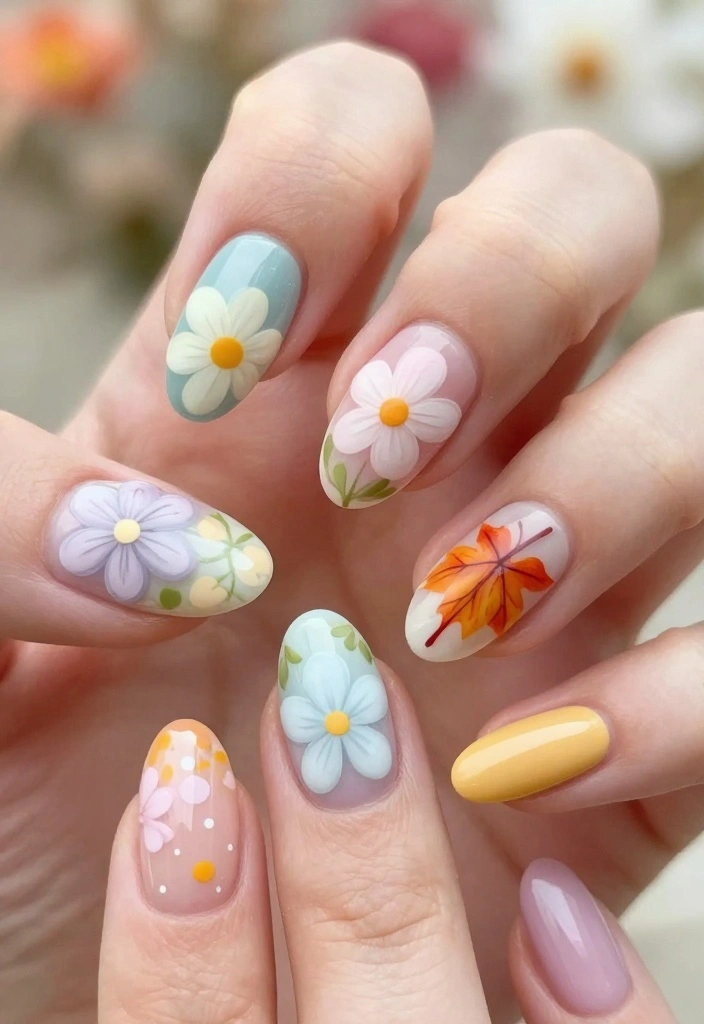
3. Floral Accents
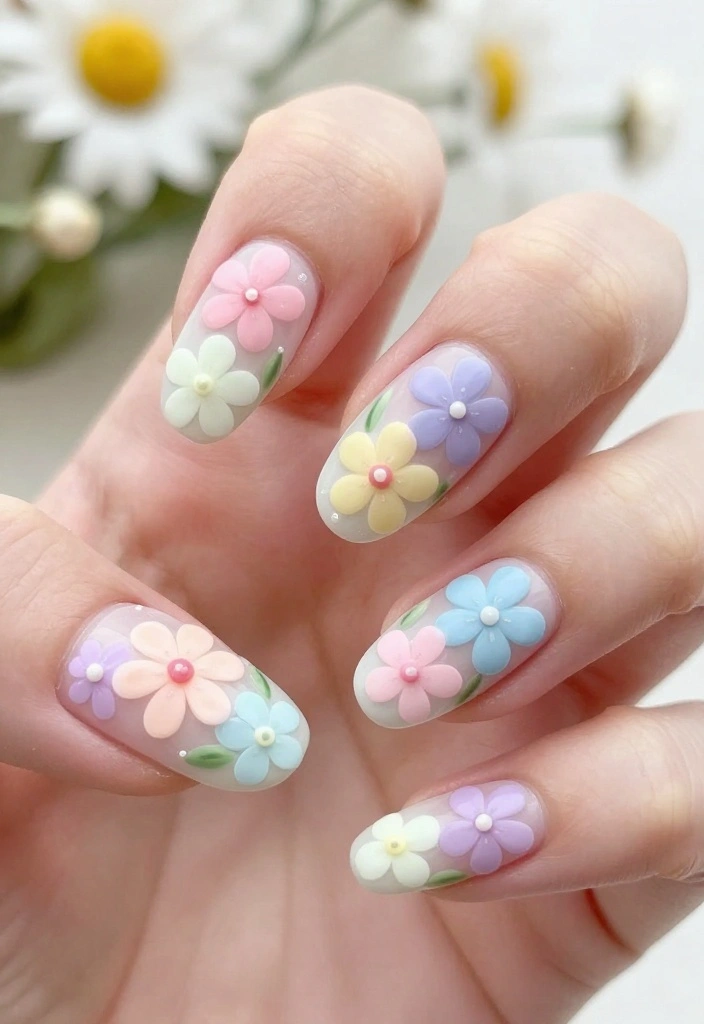
Floral designs are a delightful way to bring spring to your nails! Almond shapes are perfect for showcasing these beautiful blooms, whether you go for full floral patterns or just subtle accents.
This design works wonderfully for picnics, brunches, or any sunny day, adding a cheerful touch to your look.
Outfit Pieces:
– Pastel nail polish (light blue or mint green)
– Contrasting polish for flowers (white or yellow)
– Optional: a small dotting tool for flower details
Styling Tips:
– Start with a pastel base and let it dry.
– Use a dotting tool to create flower shapes in a contrasting color.
– Add a tiny dot in the center for extra detail.
– Consider adding small green leaves for a complete floral look.
These floral accents are great for spring and summer. Try layering different designs for a playful garden effect!
4. Geometric Patterns
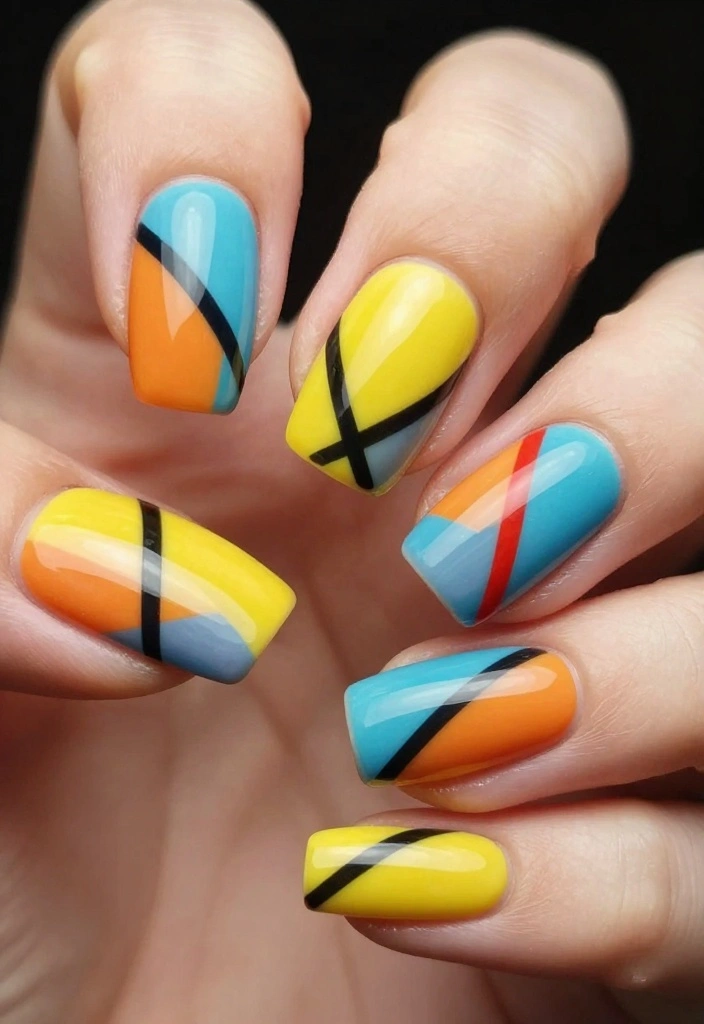
Geometric patterns are a modern and stylish choice for your nails! This trend allows you to play with bold shapes and lines, creating eye-catching designs that stand out.
The striking contrast of colors makes geometric nails perfect for casual outings or art-inspired events, showcasing your creative side.
Outfit Pieces:
– Solid base coat in your favorite color
– Tape for creating shapes
– Contrasting nail polish for the geometric designs
Styling Tips:
– Apply your base coat and let it dry completely.
– Use tape to create shapes like triangles or stripes on your nails.
– Paint over the tape with a contrasting color, then carefully remove the tape for clean lines.
– Metallic colors can add an edgy vibe to your design.
Geometric patterns are versatile and can be dressed up or down. Experiment with colors for a fresh take each time!
📹 Related Video: Neon Geometric Almond Nails |Client Work|
5. Marble Effect
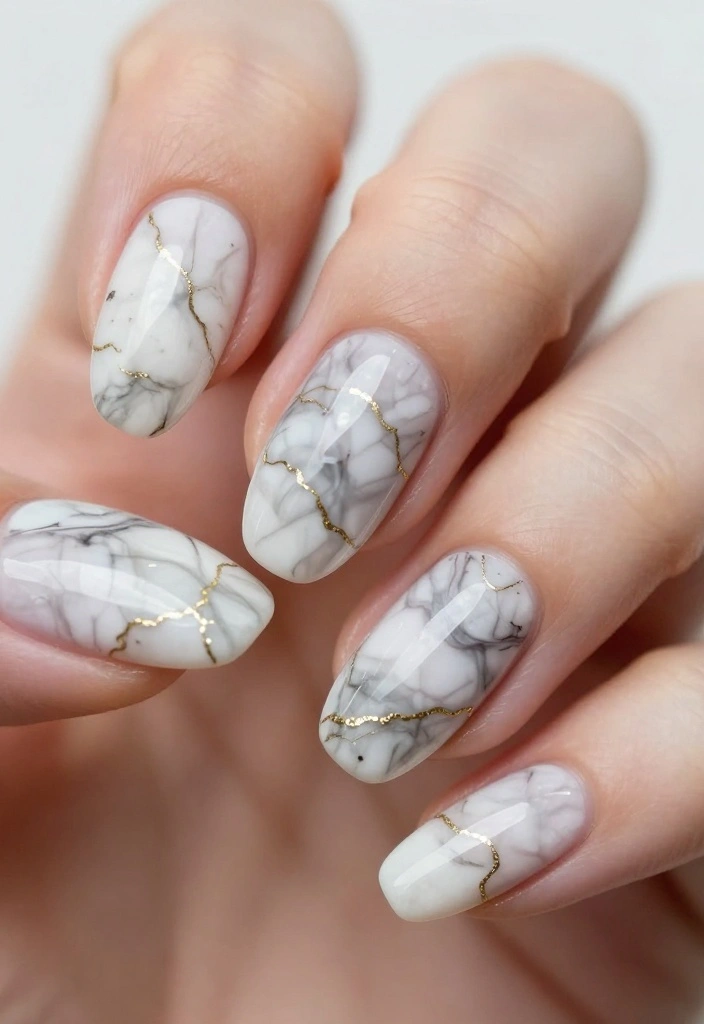
The marble effect brings a luxurious touch to your nails! This technique mimics the stunning swirls of natural marble, making your nails look elegant and chic.
It’s a fantastic choice for special occasions or when you want to feel sophisticated, as it adds a high-end touch to your look.
Outfit Pieces:
– White base coat
– Black, grey, and gold or rose gold nail polish
– Thin brush for swirling
Styling Tips:
– Apply a white base coat, ensuring it’s dry.
– Mix your other colors on a palette and use a thin brush to create swirling lines on the wet polish.
– Embrace the randomness of the design; perfection isn’t key!
– Finish with a glossy top coat to seal in the look.
The marble effect is perfect for formal events or whenever you want to elevate your style. Practice your swirls ahead of time to feel more confident!
6. Glitter Gradient
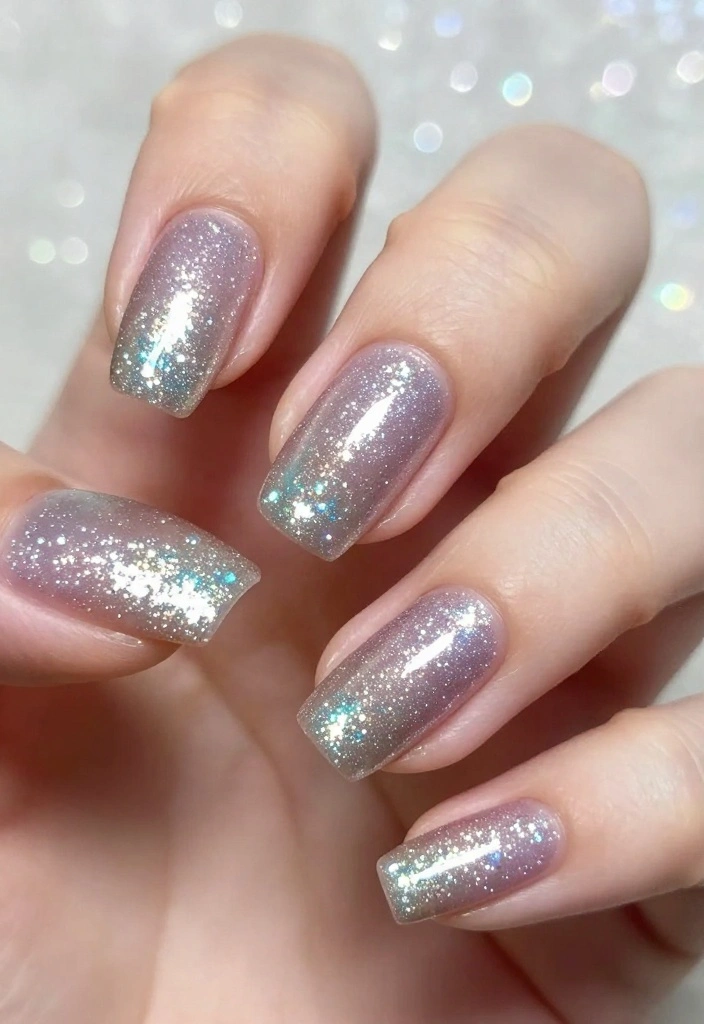
Add some sparkle to your nails with a glitter gradient! This look is perfect for parties, bringing glamour and shine to your fingertips.
The best part? It’s easy to achieve, so you can get a stunning effect without a lot of hassle.
Outfit Pieces:
– Base coat in your favorite color
– Glitter polish that complements your base
– Makeup sponge for applying glitter
Styling Tips:
– Start with a base coat and let it dry completely.
– Use a makeup sponge to dab glitter polish on your nail tips, gradually adding more as you go down.
– Seal the design with a top coat to ensure the sparkle lasts.
A glitter gradient is great for nights out or celebrations. You can choose clear glitter for a subtle look or go bold with colorful sparkles!
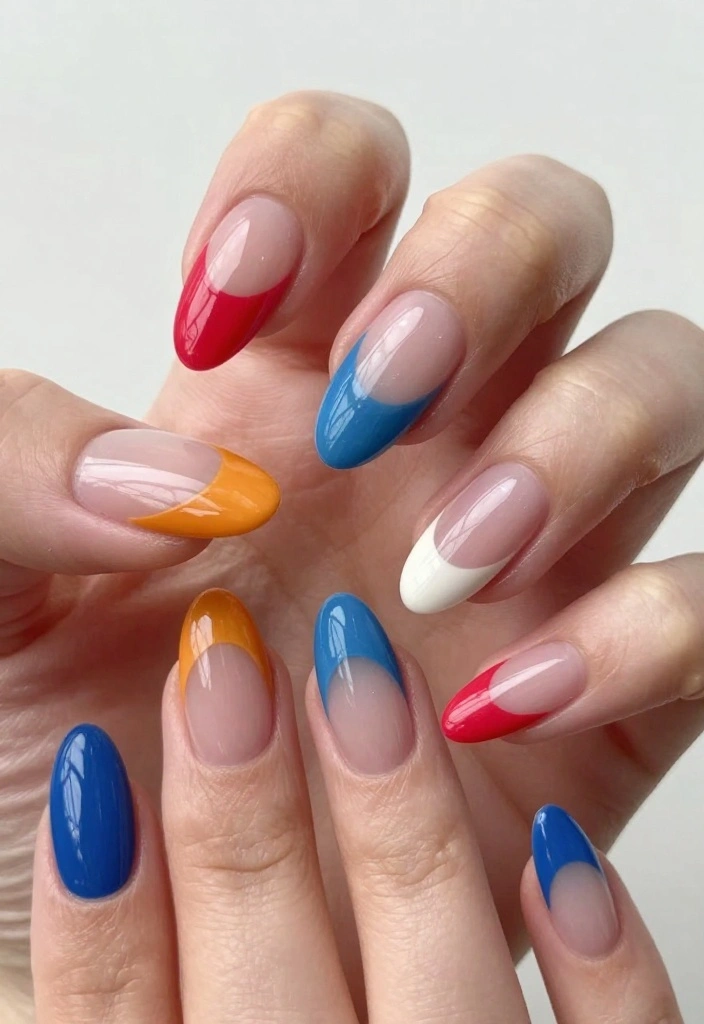
7. Color Block Nails
Color blocking is a playful way to mix vibrant colors and shapes on your nails! This trend allows you to experiment with different shades for a fun, eye-catching look.
It’s great for casual outings or when you want to make a bold statement with your nails.
Outfit Pieces:
– Neutral base coat
– Bright nail polishes in various colors
– Tape for creating sections
Styling Tips:
– Start with a neutral base coat and let it dry.
– Tape off sections of your nails and paint each with a different color.
– Carefully remove the tape once dry for clean lines.
Color blocking is versatile; use complementary colors for harmony or contrasting shades for drama. Have fun with it!
How To Choose Natural Almond Nails
Choosing the right natural almond nails can significantly enhance your nail art experience. Here are some key factors to consider when selecting almond nails for your DIY nail art projects.
1. Nail Length
The length of your almond nails matters. Longer nails can offer a more dramatic look, but they may be harder to manage in daily life. If you’re new to almond shapes, consider starting with a medium length. Test how comfortable you feel before committing to any length.
2. Nail Shape
Natural almond nails have a tapered shape that mimics the look of an almond. When selecting your nails, ensure they have the right curvature. The sides should be slightly curved, tapering to a rounded point at the top. This shape will give you the elegant appearance characteristic of almond nails.
3. Material Quality
The material of the nails affects both their appearance and durability. Look for options made from high-quality acrylic or gel. These materials not only look more natural but also last longer against chips and breaks. Check reviews or ask for samples to confirm the quality before purchasing.
4. Color Choices
Selecting the right color can make or break your almond nail design. Opt for shades that complement your skin tone and the season. Soft pastels work well in spring, while bolder colors can make a statement in winter. Don’t be afraid to experiment with nail art designs on neutral or clear bases.
5. Nail Art Compatibility
Consider what kinds of nail art designs you want to try. Some nail shapes lend themselves better to specific designs. For example, intricate floral designs might look stunning on almond nails, while geometric patterns may require a more square shape. Think about your desired look and choose accordingly.
6. Budget
Set a budget before shopping for almond nails. Prices can vary widely based on the quality and brand. Look for sales or bulk options if you plan to create multiple designs. Keep in mind that investing in a good set of nails can save you money in the long run, as they will last longer and look better.
Pro Tip: Before making a purchase, try on a few different almond nail styles at a local salon to see what feels best for you. This firsthand experience can guide your decisions when selecting the perfect nails for your DIY projects!
8. Textured Nails
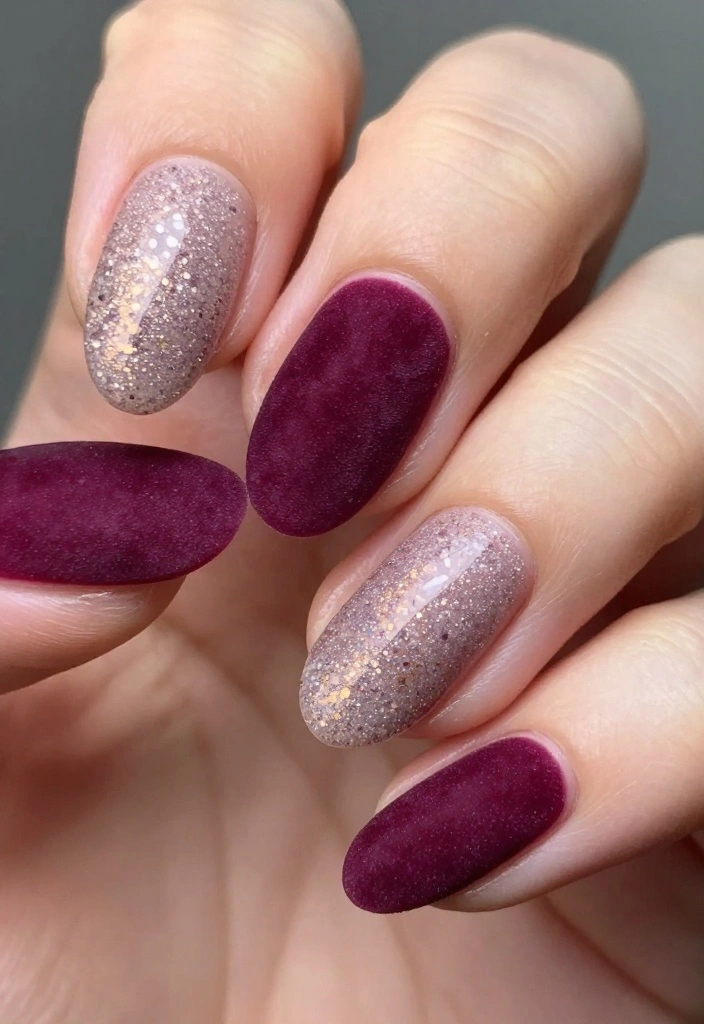
If you want something unique, textured nails are a great choice! You can use materials like sand, velvet, or foils to create interesting designs that stand out.
This style adds depth and character to your almond nails, making them perfect for creative events or casual outings.
Outfit Pieces:
– Colored base coat
– Clear polish for sand application
– Velvet powder or foil for texture
Styling Tips:
– Apply a colored base coat and let it dry completely.
– For sand nails, coat with clear polish and sprinkle sand while it’s still wet.
– For velvet nails, apply a velvet top coat and follow with velvet powder.
– Seal everything in place with a top coat to ensure durability.
Textured nails are fun and allow you to mix different materials for a playful effect!
Did you know there are 3 easy textures you can mix into natural almond nails—sand, velvet, and foils—that create a high-impact look in under 30 minutes? Texture adds touch and wow without complicating your mani.
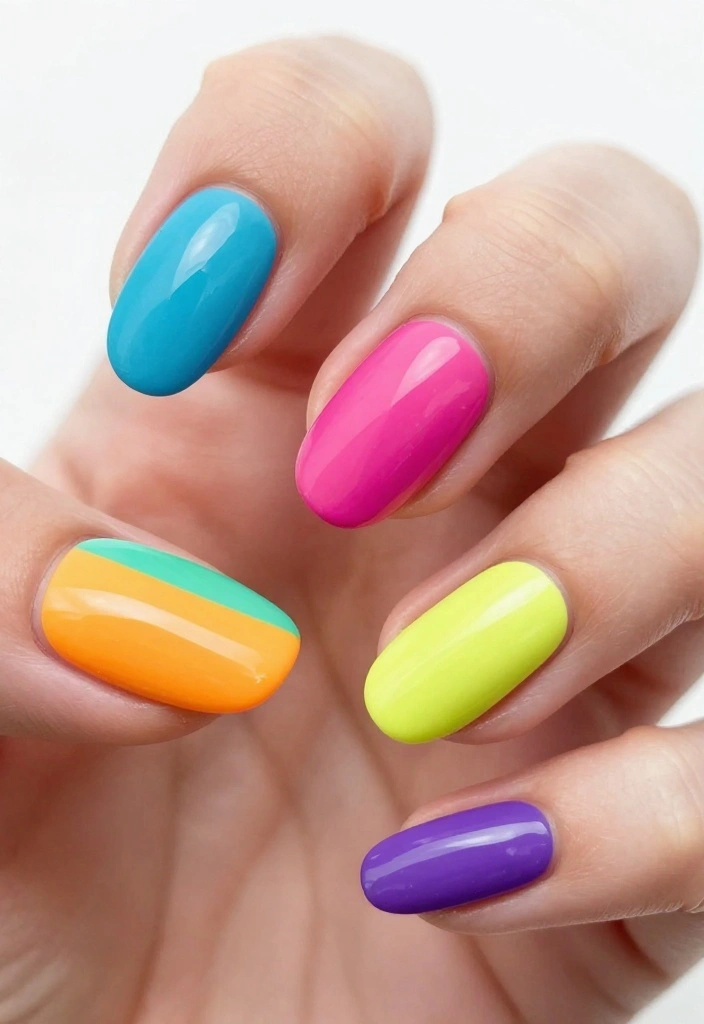
9. Neon Brights
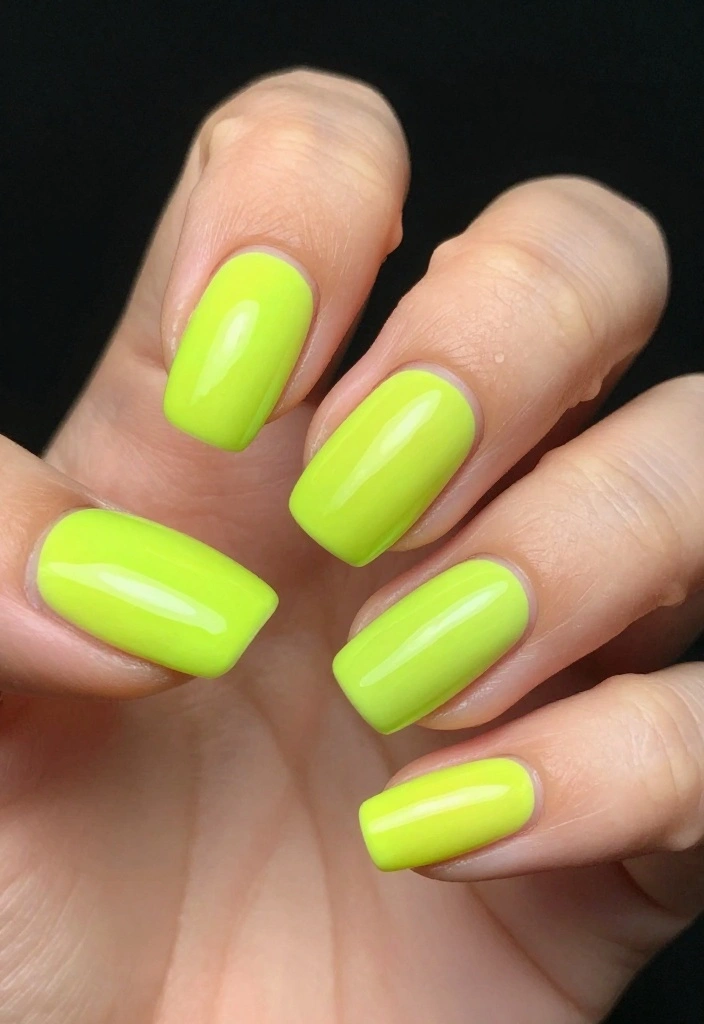
Brighten up your look with neon nails! Perfect for summer or lively occasions, neon colors are sure to capture attention.
This vibrant style lets you express your fun side while keeping your nails trendy.
Outfit Pieces:
– White base coat for enhanced brightness
– Neon nail polishes in your favorite colors
– Glossy top coat for a shiny finish
Styling Tips:
– Start with a white base coat to make neon colors pop.
– Apply two coats of your chosen neon polish for full coverage.
– Finish with a glossy top coat to keep your nails shining bright.
Neon nails are playful and can be balanced with a neutral outfit for a stylish look. Mix in some nail art for extra flair!
Fun fact: neon nails pop in any lighting, and a crisp white base boosts brightness by up to 60%. With natural almond nails, you’ll turn heads at summer events and keep your look fun, fresh, and totally on-trend.
10. Negative Space Designs
Negative space designs let your natural nails shine while showcasing your artistic flair! This style is minimal yet striking, making it perfect for any occasion.
The contrast between the bare nail and bold colors allows for endless creativity, whether you prefer stripes, shapes, or letters.
Outfit Pieces:
– Base coat of your choice
– Bold nail polish for painting
– Tape for sectioning off areas
Styling Tips:
– Apply your base coat and let it dry fully.
– Use tape to section off parts of your nails, painting over the exposed areas with a bold color.
– Carefully remove the tape to reveal the negative space.
These designs are versatile and can be customized for any occasion. Just remember to ensure your base coat is dry before applying tape!
11. Artistic Brush Strokes
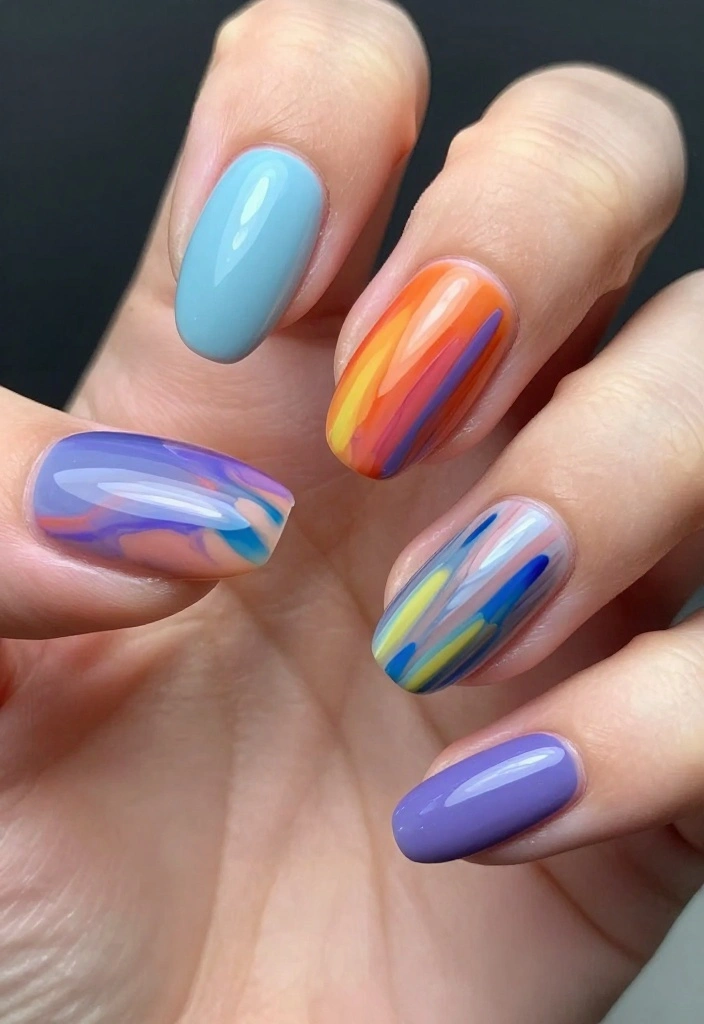
Unleash your creativity with brush stroke nail art! This technique is perfect for almond shapes, allowing you to express your inner artist.
You can use contrasting colors for an abstract look or stick to a palette that complements your outfit.
Outfit Pieces:
– Neutral base coat
– Various nail polishes in chosen colors
– Thin brush for applying strokes
Styling Tips:
– Start with a neutral base coat and let it dry completely.
– Use a thin brush to apply sweeping strokes of color across your nails; the more abstract, the better!
– Finish with a top coat to seal your artistic work.
Don’t worry about perfection; embrace the uniqueness of each stroke. These nails are perfect for showing off your creative side at any event!
12. Seasonal Themes
Celebrate the seasons with themed nail designs! Whether it’s spring flowers, autumn leaves, or winter snowflakes, you can let your nails reflect the changing seasons.
This fun approach allows you to keep your nail art fresh and festive, making it ideal for holidays or seasonal events.
Outfit Pieces:
– Base coat suitable for the season (pastels for spring, deep greens for autumn)
– Nail art brushes for detailed designs
Styling Tips:
– Start with a base coat that represents the season.
– Use nail art brushes to create themed designs that reflect seasonal elements.
– Seal everything with a top coat for a polished finish.
Don’t hesitate to change your designs with the seasons to keep your look fun and festive!
Conclusion
So there you have it! Twelve fabulous DIY natural almond nail art tutorials that are sure to spark your creativity. Whether you’re a nail art newbie or an experienced designer, these styles will keep your nails looking fresh and chic. Experiment with colors, patterns, and techniques to find your unique nail art voice.
Don’t forget to share your creations with friends and on social media. Ready to get started? Grab those polishes and let your nails shine!
Frequently Asked Questions
What are natural almond nails and why are they a great choice for DIY nail art?
Natural almond nails describe the tapered sides with a softly rounded tip. They look polished, elongate the fingers, and work on most nail lengths. For beginners, this natural almond nails shape is forgiving and easy to maintain between designs. In this article, you’ll see 12 tutorials show you how to adapt that silhouette into chic looks with simple tools and DIY steps. To get the look at home, start with clean nails, file into the almond silhouette, keep the edges smooth, and finish with a nourishing cuticle oil for healthy nails.
What essential tools and polishes do I need to start DIY natural almond nail art?
Getting started with DIY natural almond nail art is easier than you think. You’ll want a good nail file (medium grit), a buffer, a cuticle pusher, lint-free wipes, and acetone for cleanup. For color and design: base coat, a sheer nude or pink polish, and a white polish if you want classic almond French tips; a top coat for shine and longevity. For details: a dotting tool, fine nail-art brushes or striping tape, and optional almond nail stencils. If you’re going gel, add a LED/UV lamp and gel polishes, and finish with cuticle oil and hand cream to keep nail health.
How can I file and shape nails to achieve a natural almond look at home?
To shape naturally almond nails at home: start with nails of similar length and choose a length you’ll actually maintain.
Shape the sides to gently taper toward a rounded tip using thin, controlled strokes, filing from the outer edge toward the center.
Keep the free edge rounded (not pointed) and finish with a soft buff to smooth ridges.
A quick wipe with alcohol helps remove oils before applying polish, ensuring the natural almond nails stay flawless.
What are common mistakes to avoid when practicing almond nail art DIY?
Common missteps include skipping proper nail prep and cuticle care, filing too aggressively and thinning the nails, applying thick or uneven layers of polish, and skipping a base or top coat. Using the wrong brush size can make the almond nails look bulky, and not sealing the free edge leads to quicker lifting. Also, neglecting hydration and forcing removals can damage the nail plate. Keep it light, patient, and finish with a nourishing cuticle oil for best results in natural almond nails.
How long do DIY natural almond nail designs last and how can I make them last longer?
Durability depends on the type of polish you use. Regular polish on natural almond nails typically lasts about 3–7 days with careful hand use; gel or gel-like polishes can last 10–14 days. To maximize wear: apply thin, even layers of base coat, color, and top coat, cap the free edges, avoid soaking nails in water right after application, wear gloves when cleaning, and reapply a quick-dry top coat every couple of days. Finish with cuticle oil daily to maintain nail health and shine.
Related Topics
natural almond nails
DIY nail art
easy designs
trendy nail styles
beginner friendly
minimalist nail art
almond shape
nail tutorials
affordable nail designs
fashion nails
seasonal nail art
quick nail ideas
I loved this post! I tried one of the almond nail designs last week, and my friends couldn’t stop asking where I got them done! Which design do you think is the easiest for beginners?
These tutorials are awesome! I attempted one, and let’s just say my left hand looks like a masterpiece, while my right hand is a Picasso! What do you think, should I stick to one hand?
Did you know almonds are actually seeds? They’re not just a yummy snack but also great for your nails! I’d love to see a tutorial on how to include real almond pieces in nail art!
This post reminded me of the time I tried to do nail art for a wedding. Let’s just say I ended up with more glitter on my face than on my nails! Have you ever had a nail art fail?