Are you craving a fresh look for your nails? Well, you’re in luck! This post is all about creating stunning DIY almond nails in a bold red hue. Red nails have a timeless appeal, and almond shapes add a touch of elegance. I wanted to share this guide to inspire you to get creative, especially if you enjoy DIY nail art.
If you’re someone who loves expressing yourself through your nails, this one’s for you. Whether you’re prepping for a special event or just want to treat yourself, these designs will make your nails the star of the show. I’ve gathered 13 gorgeous ideas that are stylish, eye-catching, and perfect for any occasion. Get ready to turn heads with your fabulous almond nails!
In this guide, you’ll discover a variety of designs, from the classic cherry red to fun floral accents. Each idea comes with easy step-by-step instructions, so you can bring these looks to life in no time. Elevate your nail game and unleash your creativity with these stunning DIY styles!
Key Takeaways
– You’ll find 13 beautiful DIY red almond nail designs to try at home.
– Each design includes simple step-by-step instructions for easy application.
– Explore a range of styles, including matte, glitter, and floral accents to suit your taste.
– Discover tips for achieving salon-quality results without needing to leave your house.
– Perfect for anyone looking to add a personal touch to their nail art and express their style!
Contents
- 1. Classic Cherry Red Almonds
- 2. Matte Red Almonds
- 3. Red Almonds with Gold Foil Accents
- 4. Gradient Red Almonds
- 5. Red Almonds with Rhinestones
- 6. Red Almonds with White Tips
- 7. Red Almonds with Floral Designs
- 8. Red Almonds with Glitter Fade
- 9. Red Almonds with Geometric Designs
- 10. Red Almonds with Swirls
- 11. Red Almonds with Negative Space
- 12. Red Almonds with Heart Accents
- 13. Red Almonds with Animal Print
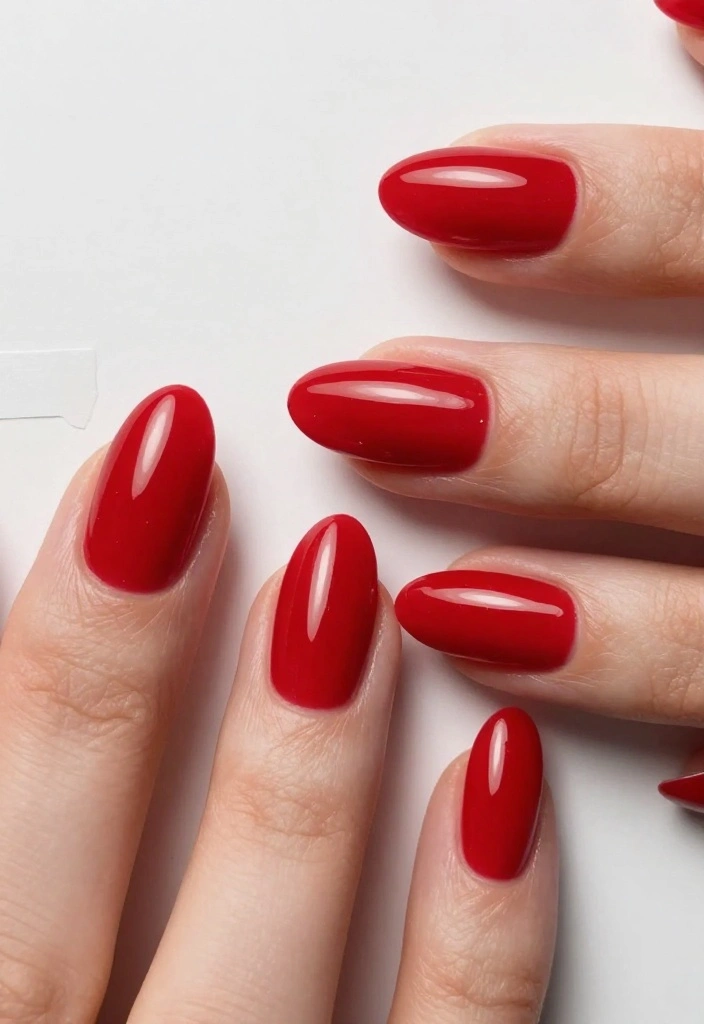
1. Classic Cherry Red Almonds

Classic cherry red almond nails are a staple that every nail art enthusiast should try. This vibrant shade not only brightens your day but also adds a touch of sophistication to your look. The bold color paired with the almond shape creates a striking contrast that is both timeless and eye-catching.
It works well due to its versatility, allowing it to transition seamlessly from casual outings to formal events. This style is perfect for date nights or any occasion where you want to feel a bit more polished.
Outfit Pieces:
– Cherry red nail polish
– Base coat (to protect your nails)
– Top coat (for a glossy finish)
Styling Tips:
– Ensure each coat is completely dry before applying the next for a smooth finish.
– Use a quick-dry top coat to extend the life of your manicure.
This classic look is great for any occasion, making it easy to achieve a chic yet effortless vibe at home.
Fun fact: almond nails red reads as instantly chic, with 25% more eye-catching impact in photos. For best results, pair a glossy cherry red with clean almond nails, and add two thin coats for a bold, versatile look.
2. Matte Red Almonds
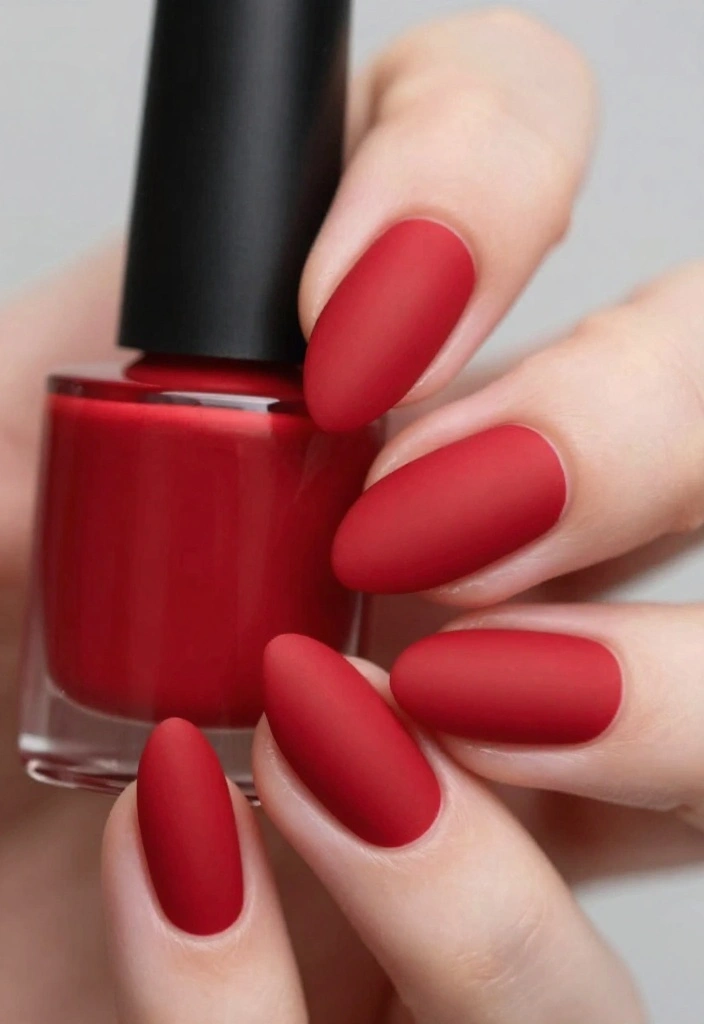
Matte red almond nails offer a contemporary twist on the classic red look. This finish gives your nails a trendy edge, making them stand out in a crowd. The contrast between the soft matte texture and the almond shape creates an alluring visual effect that is modern and chic.
This style shines in both casual and formal settings, making it ideal for brunch with friends or an elegant dinner.
Outfit Pieces:
– Matte red nail polish
– Matte top coat (for that chic finish)
– Base coat (to ensure longevity)
Styling Tips:
– Opt for a matte top coat instead of a glossy one for the desired effect.
– Allow the red polish to dry completely before applying the matte top coat for best results.
This design is perfect for those looking to maintain a sophisticated allure while keeping it fresh and modern!
💅 DIY Nail Art Made Easy
Transform your busy schedule with this guide to stunning DIY nail art that fits every mom’s lifestyle.
3. Red Almonds with Gold Foil Accents
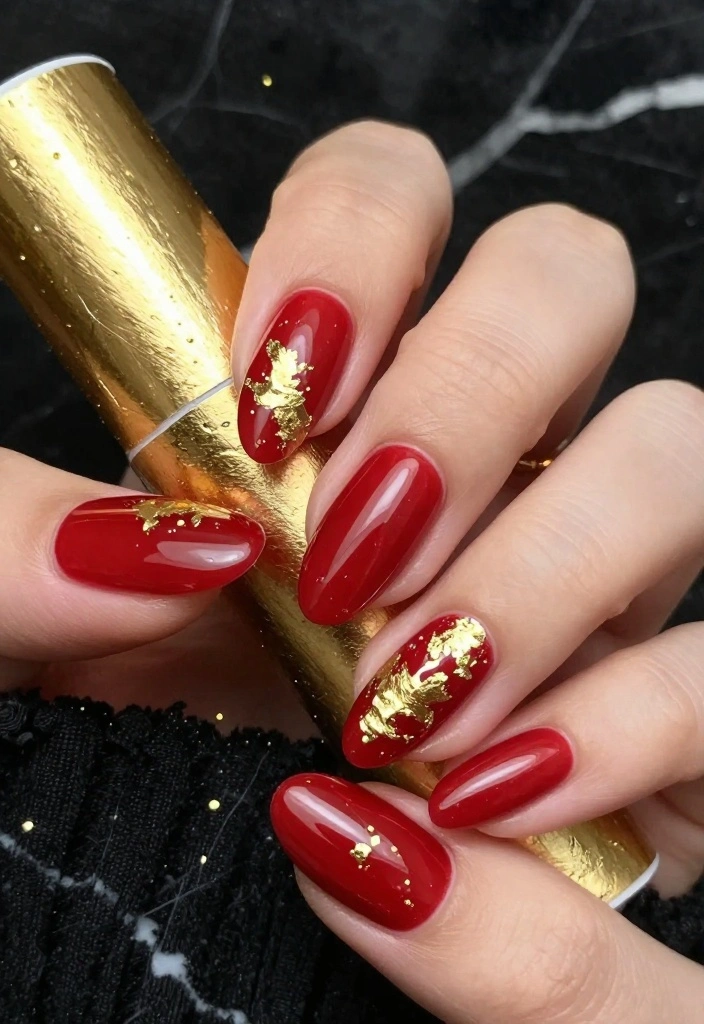
Transform your red almond nails into a statement piece with dazzling gold foil accents. This combination exudes luxury and elevates the classic red look to new heights. The rich red base paired with shimmering gold pieces creates a stunning contrast that draws attention.
This nail art is perfect for special occasions like weddings or parties, ensuring your nails steal the show.
Outfit Pieces:
– Deep red nail polish
– Gold foil (for accents)
– Base coat (for protection)
– Top coat (to seal the design)
Styling Tips:
– Use tweezers for precision when applying the gold foil to your nails.
– Apply the foil while the red polish is still tacky for better adhesion.
This glamorous design is perfect for celebrations, making it easy to feel extra special and stylish!
How To Choose the Right DIY Almond Nails in Red
When it comes to creating stunning DIY almond nails in red, choosing the right elements is key. Here are some helpful tips to guide you through the selection process:
1. Nail Shape
The almond shape is elegant and flattering for many hand types. Make sure to file your nails into a gentle point, resembling an almond. This shape can enhance the look of red polish, making your nails appear longer and more sophisticated. If you’re new to almond nails, start with a moderate length until you feel comfortable.
2. Shade of Red
Red comes in a variety of shades, from classic cherry to deep burgundy. Decide what vibe you want to convey. A bright cherry red is perfect for a playful look, while a dark red can give a more sophisticated and chic appearance. Test a few shades on your nails to see what suits your skin tone best.
3. Finish Type
Consider whether you want a glossy or matte finish. Glossy finishes are shiny and vibrant, giving your nails a polished look. On the other hand, matte finishes have a soft, modern touch. If you choose to go with a matte finish, you might want to experiment with a top coat to see how it transforms your red almond nails.
4. Nail Art Accents
Adding accents can elevate your almond nails from simple to stunning. Think about incorporating designs like gold foil, rhinestones, or stripes. These elements can add personality and flair to your look. Choose accents that complement your main red polish color. If you’re unsure, start with a single accent nail to see how it feels.
5. Quality of Products
Invest in good-quality nail polish and tools. Higher-quality polishes tend to have better pigmentation and durability. Look for brands that provide long-lasting wear and are chip-resistant. Additionally, good nail tools, like high-quality files and brushes, can make a big difference in your final design.
6. Tools and Materials
Gather all the necessary tools before you start. You’ll need a base coat, your chosen red polish, a top coat, and any nail art supplies. Don’t forget nail files and cuticle pushers! Having everything ready will save you time and frustration while creating your chic almond nails.
Pro Tip: Test your chosen red shades and finishes on a small portion of your nails or on a nail wheel before committing to a full manicure. It will save you time and help ensure you love the look before diving in!
By following these steps, you’ll be well on your way to achieving gorgeous DIY almond nails in red. Tailor your choices to suit your personal style and enjoy the transformation!
4. Gradient Red Almonds
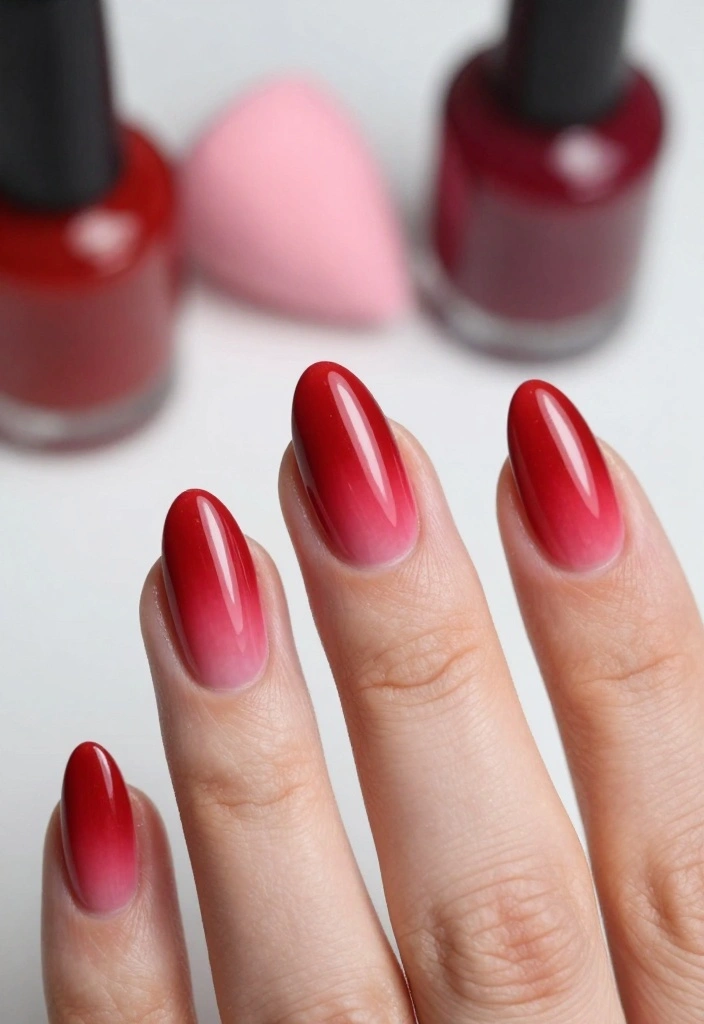
Create a captivating look with gradient red almond nails that feature an ombre effect. This design transitions smoothly from a deep red at the cuticle to a lighter hue at the tips, adding depth and dimension. The blending of colors gives a soft and artistic touch that is visually appealing.
Ideal for spring and summer, this look brings a playful vibe to your overall style, making it suitable for casual outings or festive occasions.
Outfit Pieces:
– Dark red nail polish (for the base)
– Light red nail polish (for the tips)
– Base coat (to protect your nails)
– Top coat (for a glossy finish)
Styling Tips:
– Apply the darker shade at the cuticle, and use a sponge to blend the lighter color onto the tips.
– Use a light hand when blending to avoid harsh lines.
This gradient effect is a fun and creative way to express your style while keeping it fresh and lively!
Gradient red almond nails are the easiest way to upgrade any outfit—no drama, all attitude. Pro tip: blend two reds from deep to light for a seamless ombre, then seal with top coat for lasting chic that shines at spring and summer gatherings.
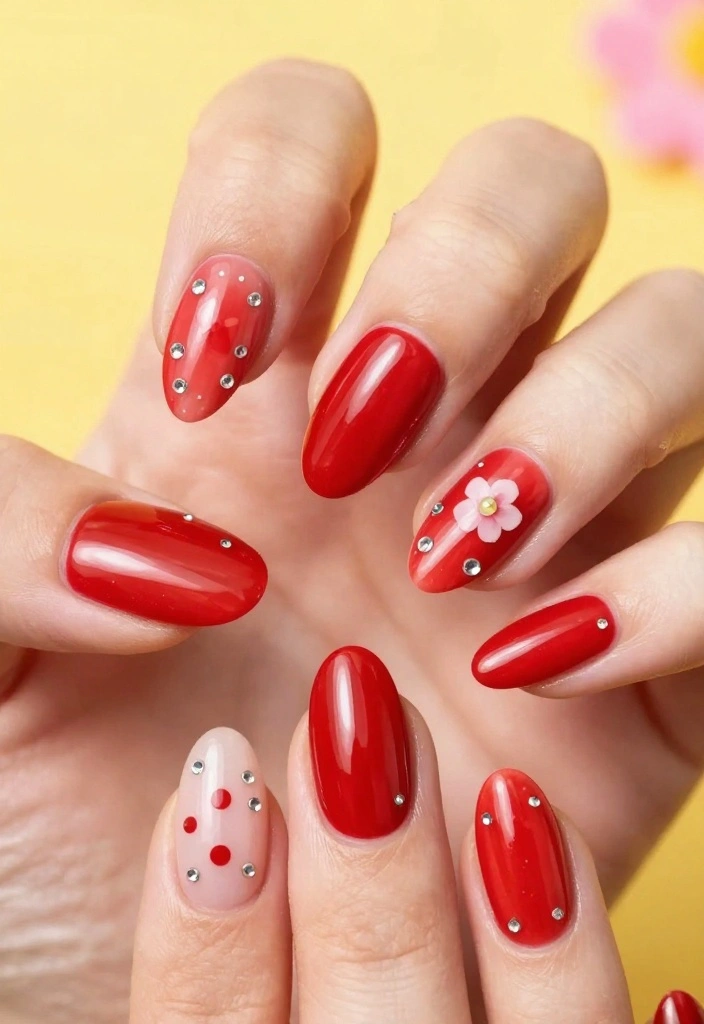
5. Red Almonds with Rhinestones
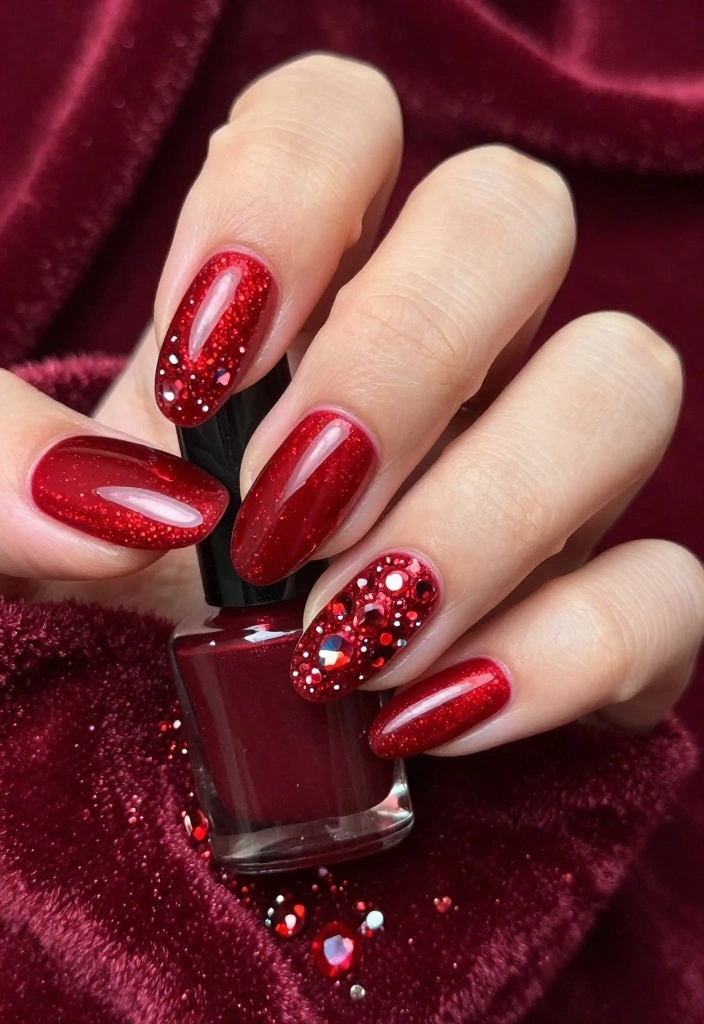
Add a touch of glamour to your red almond nails by incorporating sparkling rhinestones. After applying the base color and letting it dry, strategically place rhinestones for a dazzling effect that elevates your manicure. The combination of bold red and sparkling accents creates a striking look that is sure to turn heads.
This design is perfect for nights out or special events, adding a luxurious feel to your overall appearance.
Outfit Pieces:
– Red nail polish (for the base)
– Rhinestones (for added sparkle)
– Nail glue (to attach rhinestones)
– Base coat (for protection)
– Top coat (to secure the design)
Styling Tips:
– Use different sizes of rhinestones for added texture and dimension.
– Finish with a top coat to keep the rhinestones secure and intact.
This sparkling design is perfect for making a statement and adds a pop of elegance to your nails!
📹 Related Video: Short red almond nail set with red ruby rhinestones and golden cateye💅 #love #nails #nailart #fypシ
6. Red Almonds with White Tips
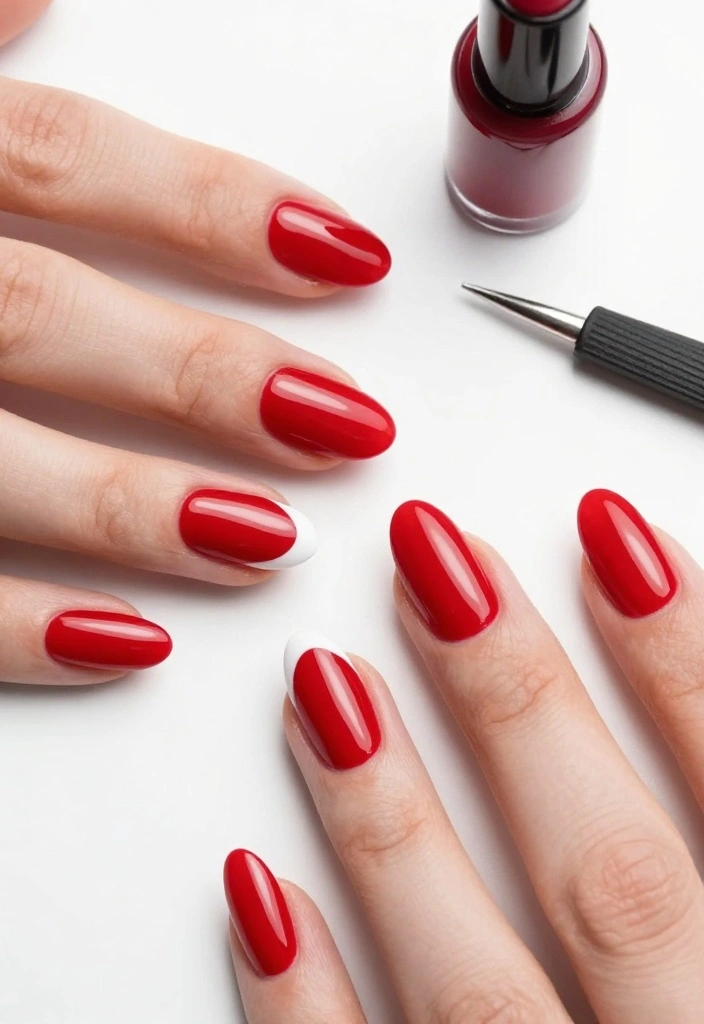
Combine classic and modern styles with red almond nails featuring chic white tips. This twist on the French manicure adds a bold red base that screams sophistication while keeping the timeless elegance of white tips. It’s a playful yet polished look that works beautifully for any occasion.
This design is suitable for both work and formal events, allowing you to express your style while maintaining professionalism.
Outfit Pieces:
– Red nail polish (for the base)
– White nail polish (for the tips)
– Base coat (to protect your nails)
– Top coat (for shine)
Styling Tips:
– Use nail tape to achieve clean lines when applying the white tips.
– Be patient and ensure the red polish is dry before adding the white tips for the best results.
This design merges fun and professionalism, making it a versatile choice for your nails!
7. Red Almonds with Floral Designs

Celebrate the beauty of nature with red almond nails adorned with delicate floral designs. Start with a bold red base and use a fine brush to create charming flowers in soft white or pastel shades. This design allows you to express your creativity and adds a lovely touch to your nails.
Perfect for spring and summer, floral accents bring a fresh and cheerful vibe to your look, making them great for casual outings or warm-weather events.
Outfit Pieces:
– Red nail polish (for the base)
– Nail art brush or pen (for flowers)
– Base coat (for protection)
– Top coat (to seal the design)
Styling Tips:
– Experiment with different flower designs to find what suits you best.
– Seal your artwork with a top coat to ensure longevity and durability.
This floral design is perfect for adding a touch of whimsy and warmth to your overall style!
8. Red Almonds with Glitter Fade

Light up your look with red almond nails that feature a stunning glitter fade. Start with a rich red base and apply glitter polish from the tips, blending it down towards the cuticle. This design creates a dazzling effect that adds a festive touch without overwhelming your style.
Perfect for parties or celebrations, this glitter fade is sure to catch the light and turn heads wherever you go.
Outfit Pieces:
– Red nail polish (for the base)
– Glitter nail polish (for the fade)
– Base coat (to protect your nails)
– Top coat (for shine)
Styling Tips:
– Choose a glitter polish that complements your red base for a harmonious look.
– Layer the glitter gradually to achieve a smoother fade effect.
This sparkling design is great for adding a touch of fun to your nails, making it perfect for any special occasion!
9. Red Almonds with Geometric Designs
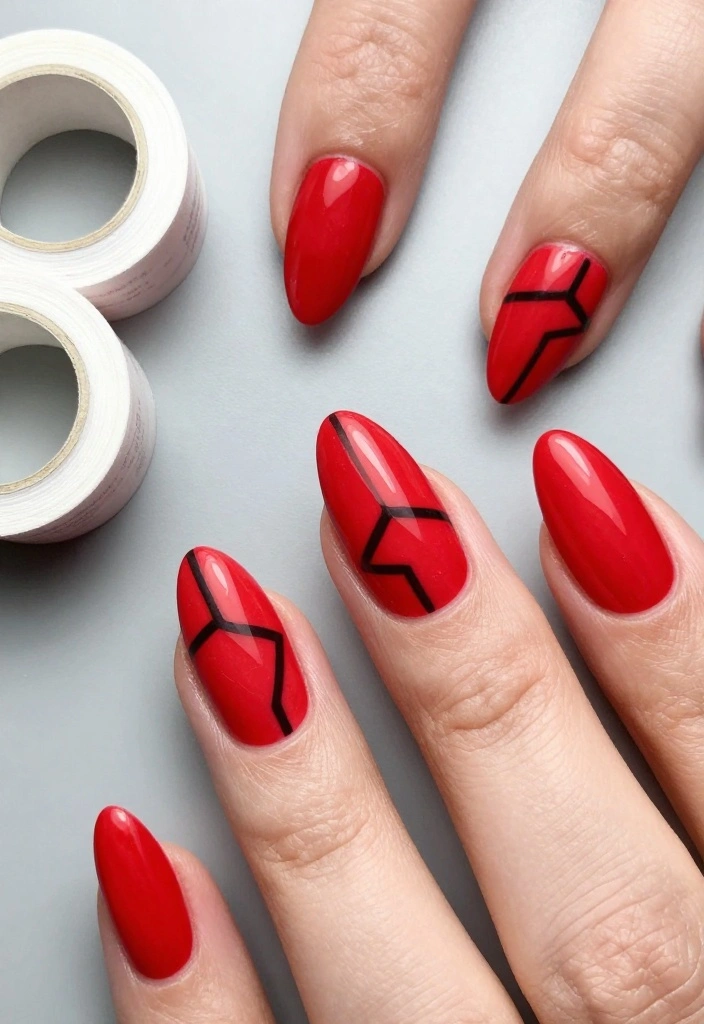
Showcase your creativity with red almond nails featuring bold geometric designs. Start with a solid red base and use tape to create clean lines or shapes, filling them in with contrasting colors like black or gold. This edgy design adds a modern touch that is sure to impress.
Ideal for trendy events or casual gatherings, geometric nails allow you to express your artistic side while keeping your look fresh and stylish.
Outfit Pieces:
– Red nail polish (for the base)
– Additional colors for shapes (like black, white, or gold)
– Base coat (to protect your nails)
– Top coat (for a polished finish)
Styling Tips:
– Use nail tape for precise lines and shapes.
– Plan your design beforehand to ensure balance and harmony in your look.
This geometric design is a fun way to express your creativity while showcasing a trendy style!
10. Red Almonds with Swirls
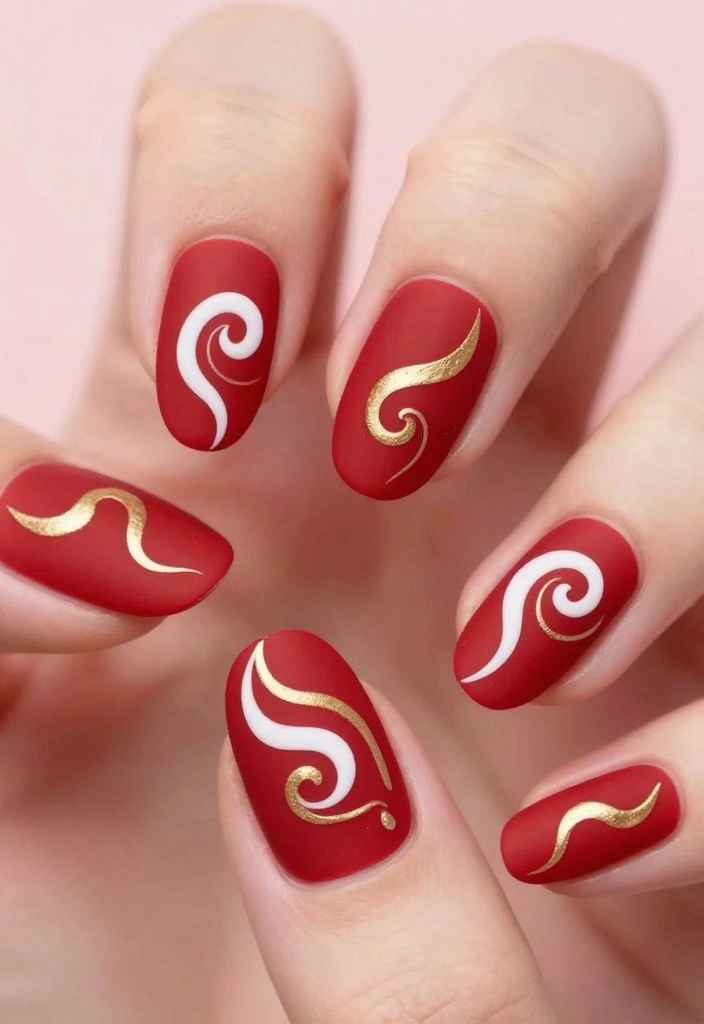
Add a dreamy flair to your red almond nails with whimsical swirl designs. Start with a bold red base and use a nail art brush to create swirling patterns with white or gold polish. The swirls can be soft and subtle or bold and dramatic, depending on your preference.
This artistic design is versatile enough for any occasion, making it great for casual outings or more formal events.
Outfit Pieces:
– Red nail polish (for the base)
– White or gold nail polish (for swirls)
– Base coat (to protect your nails)
– Top coat (for a glossy finish)
Styling Tips:
– Practice your swirl technique on paper to get comfortable before applying it to your nails.
– Allow each layer to dry before adding more swirls for the best results.
This playful design adds an artistic touch to your overall look, perfect for expressing your individuality!
11. Red Almonds with Negative Space
Explore creativity with negative space nail designs on your red almond nails. This style leaves parts of your nails bare while painting beautiful shapes or patterns, resulting in a striking contrast between the red and the natural nail. It’s a modern approach that keeps your look chic yet interesting.
This design is trendy and allows for endless creativity, making it suitable for both casual and formal occasions.
Outfit Pieces:
– Red nail polish (for the base)
– Base coat (to protect your nails)
– Top coat (for a polished finish)
Styling Tips:
– Use tape to mark off sections of your nails for clean edges.
– Allow the base color to dry completely before applying tape to ensure sharp lines.
This design is an excellent way to express your creativity while keeping your nails looking sleek and polished!
12. Red Almonds with Heart Accents
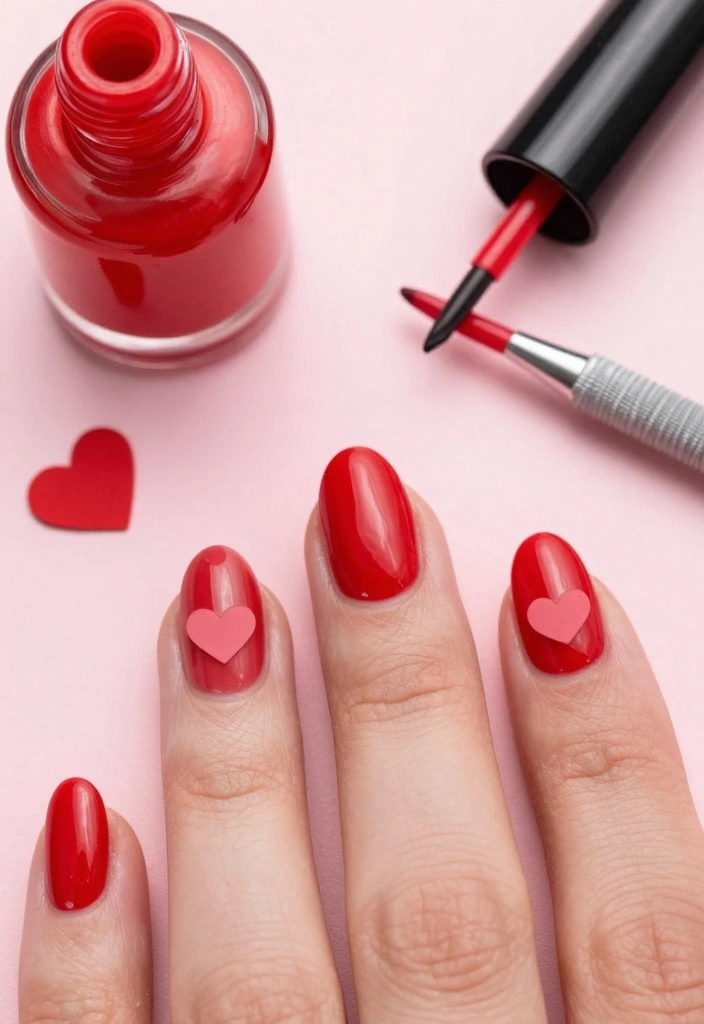
For a romantic touch, opt for red almond nails adorned with charming heart accents. Paint your nails with a vibrant red base, then use a fine brush or dotting tool to create tiny hearts in white or pink. This sweet design is perfect for love-themed events or date nights, adding a playful yet elegant vibe.
This design is especially lovely around Valentine’s Day, allowing you to express your romantic side in a chic way.
Outfit Pieces:
– Red nail polish (for the base)
– White or pink polish (for hearts)
– Base coat (for protection)
– Top coat (to seal the design)
Styling Tips:
– Keep the hearts small for a delicate appearance.
– Experiment with different colors for the hearts to personalize your design.
This fun and flirty design adds a whimsical touch to your overall look, perfect for any romantic occasion!
13. Red Almonds with Animal Print
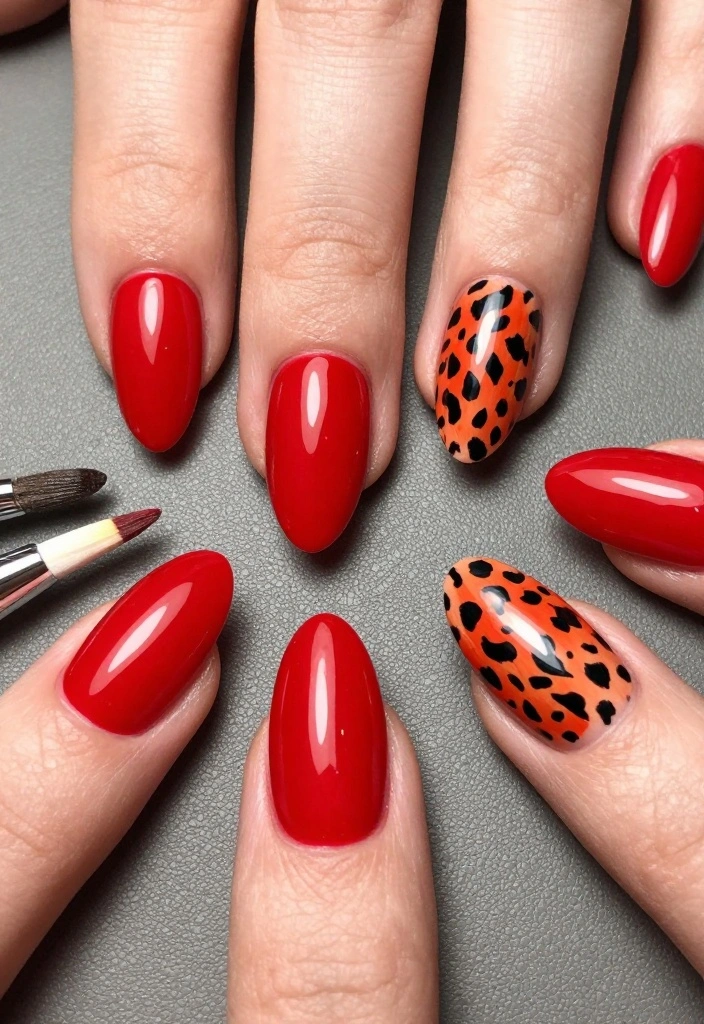
Make a bold statement with red almond nails featuring striking animal print accents. Start with a solid red base and use a fine brush or nail stickers to add patterns like leopard or zebra. This fierce design is perfect for those who love to stand out and express their individuality.
Ideal for parties or nights out, this edgy look is sure to turn heads wherever you go.
Outfit Pieces:
– Red nail polish (for the base)
– Nail art brush or animal print stickers (for designs)
– Base coat (to protect your nails)
– Top coat (for a durable finish)
Styling Tips:
– Choose prints that complement your red base for a stunning contrast.
– If you’re unsure about freehand painting, use nail stickers for precision.
This fun design is a great way to showcase your personality and make a bold statement with your nails!
“Almond nails red with animal print can boost night-out vibes by 70%. Start with a solid red base and layer leopard or zebra accents. Pro tip: seal with a glossy top coat for lasting impact and confident struts.”
Conclusion
Creating gorgeous red almond nails at home can be both fun and rewarding! With a variety of designs to choose from, you’re sure to find a style that fits your personality and occasion. Whether you go for a classic look or something more daring, these nail art ideas are perfect for experimenting and expressing your creativity. Let your nails shine and become the ultimate accessory to your outfit!
Stay on trend and don’t forget to share your fabulous creations with your friends. Who knows, you might inspire them to try their own stunning designs!
Frequently Asked Questions
How can I achieve almond nails red at home with a simple step-by-step tutorial?
You can absolutely DIY almond nails red with a simple step-by-step plan. First, prep: wash and dry your hands, file nails into a clean almond shape, buff the surface, and push back your cuticles. Then apply a thin base coat to protect nails and improve longevity. Next, apply two thin coats of your favorite red polish, sealing the free edge with each stroke. Let each coat dry fully. Finish with a long-lasting top coat and, if you’re using gel, cure under an LED lamp. Clean up any stray polish around the cuticles with a small brush dipped in remover. Finally, massage cuticle oil into the skin and nails.
Tip: for best wear, apply a dedicated edge wrap and reapply the top coat every 2–3 days.
What supplies do I need for DIY almond nails red and long-lasting results?
To nail almond nails red at home, gather these essentials: almond nail forms or tips, a good nail file (glass or buffer), a cuticle pusher, a buffer, red polish (cream finish works best), base coat, top coat, nail polish remover and cotton, lint-free wipes, a small cleanup brush, a LED/UV lamp if you’re using gel polish, cuticle oil, and hand cream.
Pro tips: choose a high-quality red with good pigmentation, wipe the brush clean to prevent streaks, and always start with a clean, dry nail surface for best results.
How do I shape almond nails and apply red polish for a flawless finish (step-by-step)?
Here’s a practical step-by-step: Step 1: File each nail into an almond shape, keeping the sides slightly tapered and the tip rounded.
Step 2: Gently buff the surface and push back cuticles.
Step 3: Wipe nails clean.
Step 4: Apply a thin layer of base coat and let it dry.
Step 5: Apply the first thin coat of red polish, sealing the free edge.
Step 6: Apply a second coat for full coverage.
Step 7: Finish with a glossy top coat and cure if needed.
Step 8: Clean the edges and apply cuticle oil.
With patience and a steady hand, you’ll have salon-worthy almond nails red at home.
How can I prevent chipping and extend the wear of almond nails red?
Keep your almond nails red looking fresh with these tips: always start with a clean base (base coat), use thin coats and seal the free edge, finish with a strong top coat, reapply top coat every 2–3 days, wear gloves for cleaning and dishwashing, and avoid using nails as tools. If you use gel polish, cure as directed and avoid peeling. Finally, moisturize the cuticles daily to prevent dryness that can lead to peeling.
What is the safest way to remove almond nails red and protect natural nails?
To remove, avoid ripping or peeling the polish. For regular polish, soak a cotton ball with acetone, place on the nail, and wrap with foil for 5–10 minutes, then gently push off the color with a wooden stick. For gel or acrylic, you may need a soak-off method with acetone and patience; if you’re unsure, visit a pro. After removal, buff lightly to smooth the surface, push back cuticles, and apply cuticle oil and a nourishing hand cream to restore moisture.
Tip: give your nails a break between manicures to recover strength.
Related Topics
DIY nail art
almond nails red
step-by-step tutorial
nail design
easy nail art
trendy nails
red nail polish
fashion nails
beginner friendly
manicure ideas
seasonal nails
These almond nails look stunning! I’ve been trying to master my nail art skills, but I usually end up with more polish on my hands than on my nails. What color do you think goes best with red?
I love how these nails look! They remind me of the time I tried to paint my nails while watching a movie and ended up with popcorn butter everywhere. At least my nails were shiny, right?
Did you know that red nails have been a classic since the 1920s? It’s amazing how styles come back around! I think I’ll have to try this look for my next night out!