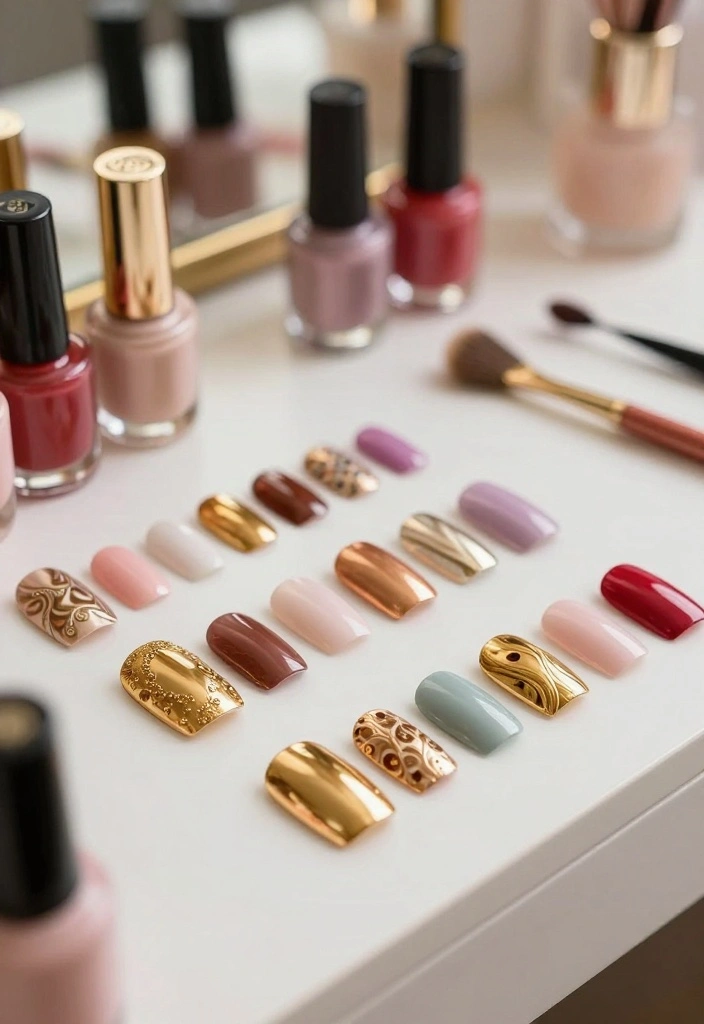
Nail art has become a vital part of expressing personal style, and gold nail art is at the forefront of this trend. With its luxurious appeal, gold adds a touch of elegance to any design. You may be looking for simple ways to elevate your nail game or perhaps you want to try something new. Whatever the reason, you’re in the right place! This post is crafted for all of you who adore nail art but may not have the time or skills for intricate designs.
If you’re someone who loves fashion and enjoys experimenting with your nails, then this guide is tailored just for you. You might be a beginner or someone who just wants quick ideas to glam up your look without spending hours at the salon. I’ve gathered 14 easy gold nail art designs that are not only stylish but also achievable. You’ll find step-by-step instructions to help you create these looks at home, so you can shine bright without the fuss.
Let’s dive into these fabulous designs that will transform your nails. From sparkling gold glitter ombre to chic gold stripes, each design is made to be as fun as it is striking. By the end of this guide, you’ll have fresh ideas that will inspire your next nail art session and help you flaunt your style like never before.
Key Takeaways
– Simple Designs: Each nail art design is easy to follow, even for beginners, with step-by-step instructions included.
– Diverse Styles: The 14 designs range from glitzy ombre to minimalist lines, catering to various tastes and occasions.
– Materials Needed: Basic supplies for each design are listed, ensuring you can easily gather what you need before starting.
– Creative Inspiration: These gold nail art ideas will inspire you to experiment with textures, patterns, and embellishments.
– Quick Transformations: Each design is quick to create, allowing you to switch up your nail look anytime without a long commitment.
Contents
- 1. Sparkling Gold Glitter Ombre
- 2. Chic Gold Stripes
- 3. Gold Foil Accent Nails
- 4. Elegant Gold Dots
- 5. Gold Leaf Accents
- 6. Gold Glitter Tips
- 7. Gold Marble Effect
- 8. Gold Geometric Patterns
- 9. Gold Floral Art
- 10. Gold Gradient
- 11. Boho Gold Arrows
- 12. Gold Splatter Art
- 13. Minimalist Gold Lines
- 14. Artistic Gold Swirls
1. Sparkling Gold Glitter Ombre

Start your gold nail art adventure with the sparkling gold glitter ombre! This design features a stunning gradient that moves from a nude or soft pink base to striking gold glitter tips. It’s the ideal blend of glam and subtlety, allowing you to shine without overwhelming your look.
What makes this design work is the seamless transition of colors and the glitter’s eye-catching sparkle. It’s versatile enough for both casual outings and special occasions, making it a go-to choice for any event.
Outfit Pieces:
– Nude or soft pink nail polish (two coats for coverage)
– Gold glitter polish (fine or chunky)
– Base coat and top coat for protection and shine
Styling Tips:
– Start with a base coat to protect your nails from staining.
– Apply two coats of your chosen nude polish and let it dry completely.
– Use a makeup sponge to dab on gold glitter polish at the tips, blending downwards for a smooth ombre effect.
– Finish with a top coat to seal the glitter and add extra shine.
This design works beautifully for day-to-night transitions. Feel free to swap the base color for something bolder to match your mood!
📹 Related Video: Brown and gold glitter ombré nail tutorial
2. Chic Gold Stripes
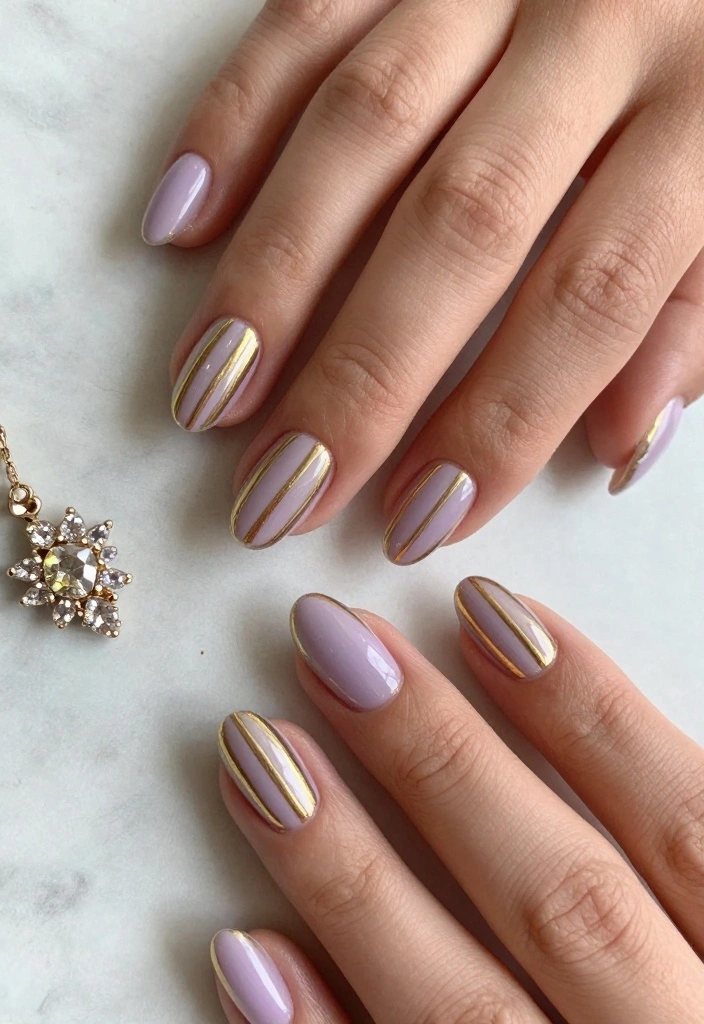
Chic gold stripes are a classic nail art choice that adds a touch of sophistication to any look. This design is effortlessly stylish and incredibly easy to recreate, making it perfect for both casual and formal settings.
The simplicity of gold stripes lends itself to versatility, allowing you to mix and match with various base colors. Whether you’re dressing up for a wedding or keeping it casual for brunch, these stripes deliver every time.
Outfit Pieces:
– Base color of your choice (pastels or neutrals work great)
– Gold nail polish (for stripes)
– Striping tape or a thin nail brush
Styling Tips:
– Ensure your base coat is completely dry to avoid smudging.
– Use striping tape to create straight lines or a thin brush for freehand stripes.
– Experiment with varying stripe thicknesses or alternate colors for a playful twist.
This timeless look is perfect for any occasion. You can easily switch the gold for silver or a bold color if you want to mix things up!
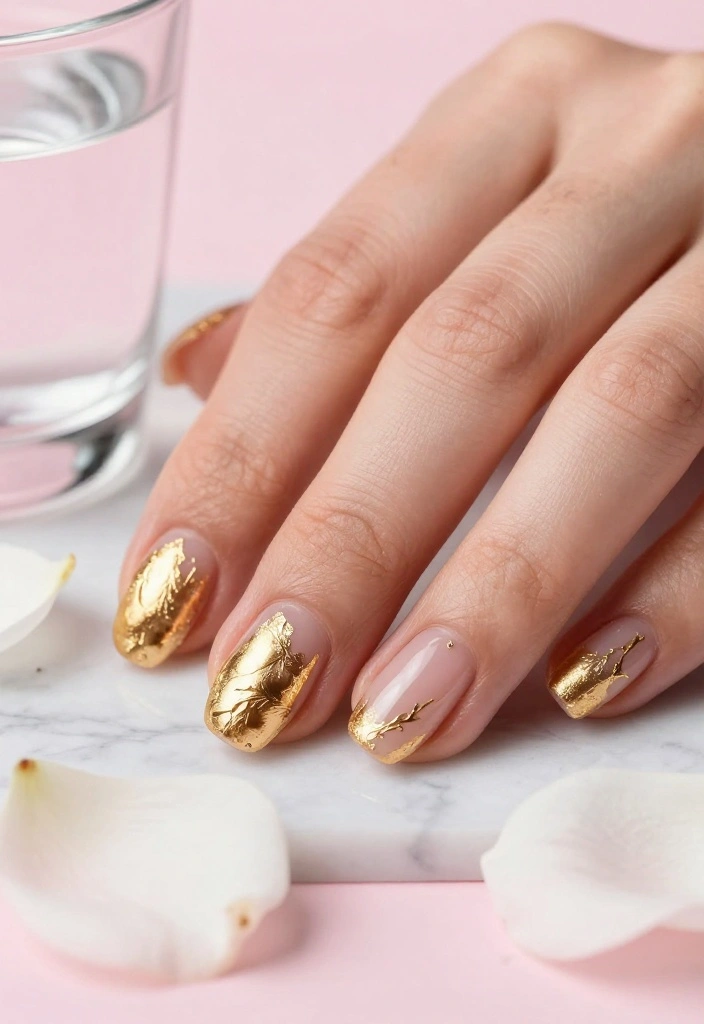
3. Gold Foil Accent Nails

Gold foil accent nails are an eye-catching design perfect for anyone wanting to stand out! This technique incorporates gold foils to create a stunning and textured look that’s both simple and striking.
The beauty of gold foil lies in its unique finish and ease of application. You can use it as a bold accent or cover an entire nail for maximum impact, making it suitable for any occasion.
Outfit Pieces:
– Base coat of your favorite nail polish (two layers for opacity)
– Gold foil pieces (small, broken bits work best)
– Top coat to seal the design
Styling Tips:
– Apply a base coat and let it dry, followed by two layers of your chosen polish.
– Use a top coat while the polish is still tacky to stick the gold foil pieces on.
– Seal everything with a final top coat for longevity.
This design pairs beautifully with rich jewel tones or soft neutrals. Try using different foil placements for a fun twist!
How To Choose Easy Gold Nail Art Designs
Choosing the right gold nail art design can be both exciting and overwhelming. With so many options available, it’s crucial to identify what fits your style and skill level. Here are some key points to help you select the perfect gold nail art for your next manicure.
1. Determine Your Skill Level
Before diving into nail art, assess your experience. If you’re a beginner, start with simple designs like gold glitter tips or elegant gold dots. As you gain confidence, you can experiment with more intricate techniques like gold marble effects or geometric patterns. Knowing your limits helps avoid frustration and ensures a fun experience.
2. Consider the Occasion
Think about where you’ll be wearing your nail art. For a casual day out, you might prefer minimalist gold lines or chic gold stripes. If you’re heading to a wedding or formal event, consider more elaborate designs like gold foil accent nails or artistic gold swirls. Choosing the right style for the occasion helps you feel more comfortable and confident.
3. Select Your Materials
The materials you use can greatly affect the outcome of your nail art. You’ll need quality nail polish, brushes, and possibly gold leaf or foil for more advanced designs. Make sure to have a good base coat and topcoat, as they help your design last longer. Opting for non-toxic and cruelty-free products can also enhance your experience.
4. Pick a Color Palette
Gold nail art can complement various colors. Decide if you want a monochromatic look using different shades of gold or if you want to incorporate other colors. For example, pairing gold with deep blues or rich burgundies can create a stunning contrast. Consider your wardrobe to ensure your nail art matches your style.
5. Research Trending Designs
Staying updated on the latest trends can inspire your nail art choices. Browse social media platforms like Instagram and Pinterest for fresh ideas. Look for designs that catch your eye, whether they are minimalist or highly detailed. Trendy designs like gold splatter art or boho gold arrows can make a statement and show off your creativity.
6. Think About Application Techniques
Some designs require specific techniques that may influence your choice. For example, if you want to try the gold marble effect, you’ll need to master the water marbling technique, which can be challenging for beginners. Simpler designs like gold glitter ombre can be achieved with basic nail polish application and a makeup sponge. Knowing these techniques helps you choose a design that matches your comfort level.
Pro Tip: Always practice your chosen design on a nail wheel or fake nails before applying it to your real nails. This practice run will help you refine your technique and ensure you’re happy with the end result!
By considering these factors, you can confidently choose an easy gold nail art design that fits your style and skill level. Whether you’re going for something simple or a bit more adventurous, nail art is a wonderful way to express yourself. Remember to have fun and enjoy the process!
4. Elegant Gold Dots
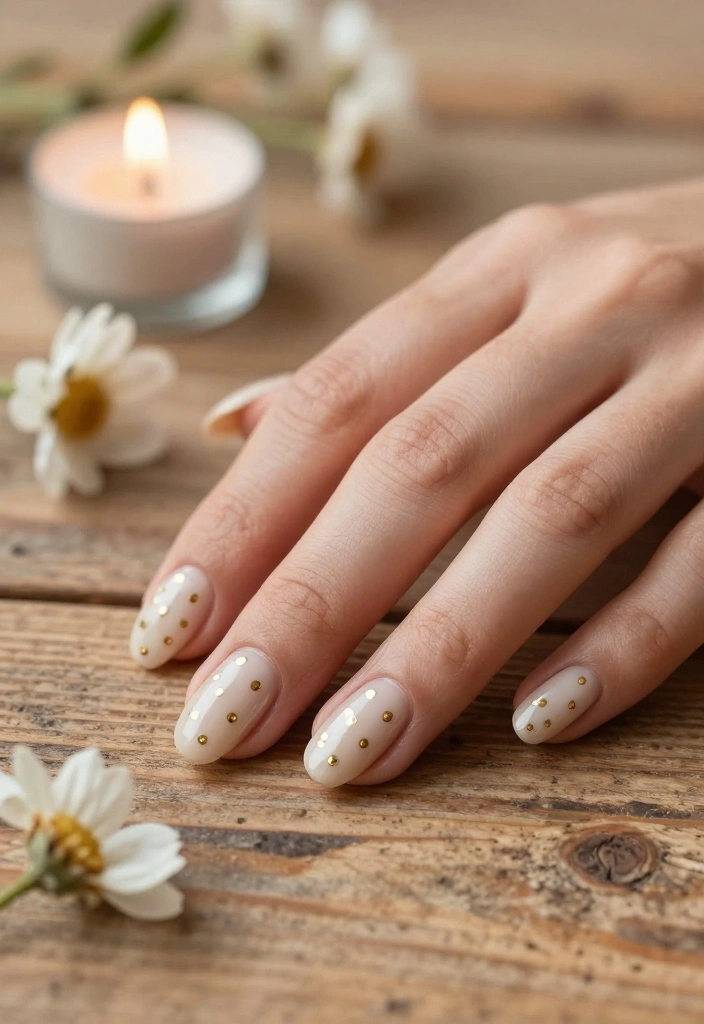
Elegant gold dots add a touch of playful sophistication to your nails. This design is perfect for those who enjoy subtle creativity, allowing for both classic and trendy interpretations.
The charm of gold dots lies in their simplicity and ability to elevate any base color. You can create a refined look or get playful with patterns, making it great for a variety of occasions.
Outfit Pieces:
– Base color nail polish of your choice (soft pastels or bold hues)
– Gold polish for the dots
– Dotting tool or toothpick for placement
Styling Tips:
– Start with a base color and let it dry completely.
– Use a dotting tool or toothpick to place tiny gold dots on your nails.
– Arrange the dots in fun patterns like clusters or lines for added flair.
This design is perfect for everyday wear or special events. Vary the dot sizes for extra dimension!
💅 Nail Art Made Easy!
Transform your busy lifestyle with quick and stunning nail art techniques designed for moms on the go!
5. Gold Leaf Accents
Gold leaf accents bring a unique, textured elegance to your nails. This trend captures the beauty of nature while adding a touch of luxury, making your nails stand out effortlessly.
The combination of gold leaf and nail polish creates a stunning visual contrast, perfect for any occasion. You can cover a whole nail or just add accents for a more understated look.
Outfit Pieces:
– Base coat of your choice (choose colors that complement gold)
– Gold leaf pieces (small bits for easier application)
– Top coat for protection
Styling Tips:
– Paint your nails with a base coat and let it dry completely.
– Apply a top coat and place small gold leaf pieces on your nails while the polish is still wet.
– Finish with a clear top coat to protect the gold leaf.
This design looks stunning with both matte and glossy finishes. Try experimenting with different placements and colors!
Fun fact: Gold leaf accents stay stunning with a clear top coat, and you can get a luxe look in minutes. When paired with a neutral base, gold nail art pops without feeling heavy. Expect durable shine for up to 7 days with careful application.
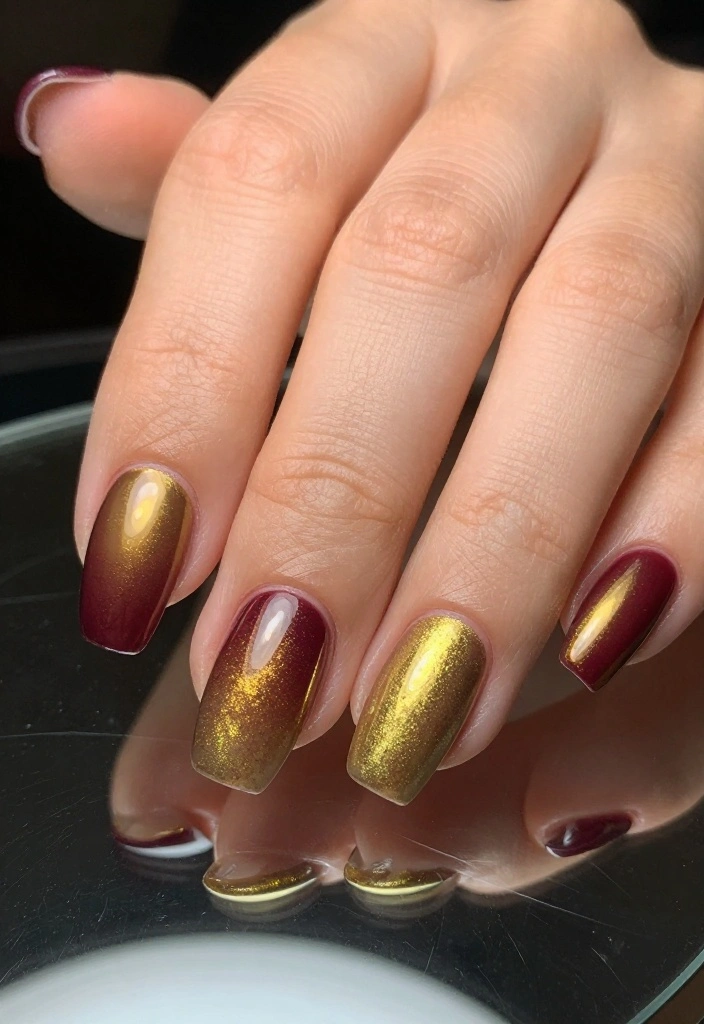
6. Gold Glitter Tips
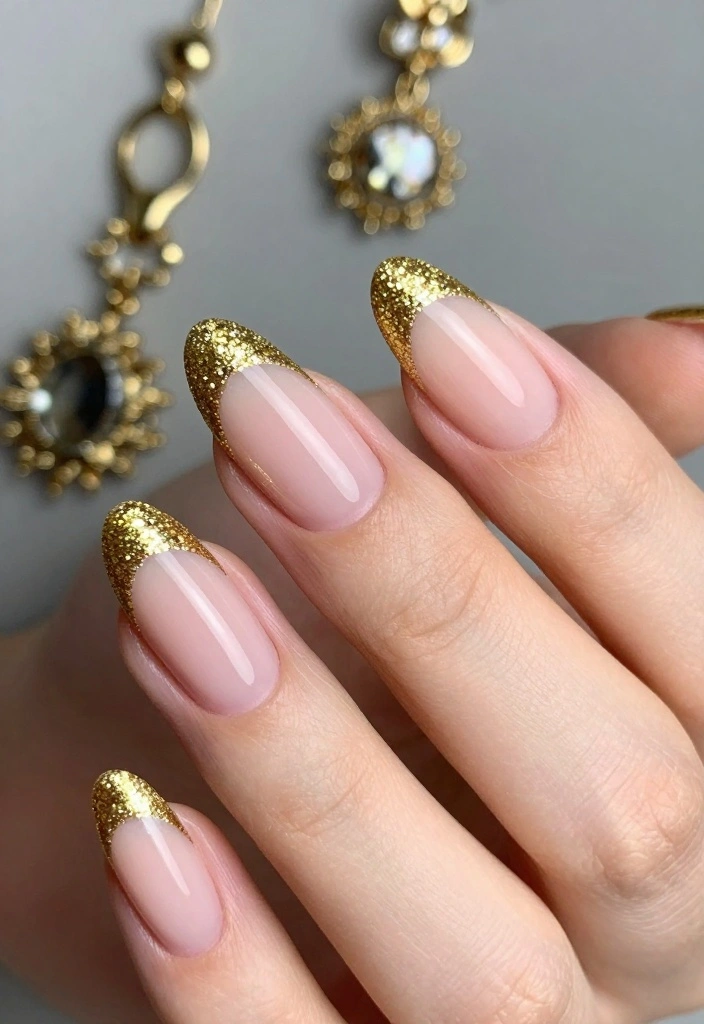
Elevate the classic French manicure with fabulous gold glitter tips! This design gives a fresh twist to a beloved style, adding just the right amount of glam.
The shimmering tips create a fun contrast with the base color, making this look versatile for any occasion, from casual to fancy nights out.
Outfit Pieces:
– Nude or pale pink polish as a base
– Gold glitter polish (fine for a subtle sparkle)
– Top coat for a long-lasting finish
Styling Tips:
– Start with your chosen base color and let it dry.
– Apply gold glitter polish to the tips, blending slightly into the base for a seamless look.
– Use a top coat to seal the design and add shine.
This design is perfect for any event. You can even experiment with colored glitters for a bolder statement!
Fun fact: gold nail art with glitter tips photographs 40% more vibrant under daylight—perfect for a chic, versatile French manicure twist. Pair nude base with fine gold glitter for a subtle glam that’s ready for any occasion.
7. Gold Marble Effect
Gold marble effect nails are both stylish and sophisticated, giving the illusion of luxurious marble without the need for a salon visit. This design is perfect for those looking to add drama to their nails.
The swirling patterns of gold against a solid base create a mesmerizing look that’s suitable for any occasion. It’s a fantastic way to showcase your creativity while keeping things chic.
Outfit Pieces:
– Solid base coat (white, black, or any color you prefer)
– Gold nail polish for the marbling
– White polish for blending
– Top coat for durability
Styling Tips:
– Start with a solid base coat and let it dry.
– Use a small brush to create swirls with gold and white polish on top of the base.
– Use a toothpick to blend the colors gently to mimic natural marble veins.
Experiment with colors for a custom look! This design is eye-catching and perfect for parties or special events.
8. Gold Geometric Patterns
Gold geometric patterns elevate nail art with their modern and edgy vibe. This design is perfect for anyone looking for something unique and trendy!
The precision of geometric shapes combined with the shine of gold creates a striking visual effect, making it suitable for a range of occasions, from casual to upscale events.
Outfit Pieces:
– Base color of your choice (soft colors work well)
– Gold nail polish for the patterns
– Nail tape for clean lines
Styling Tips:
– Paint your nails with a base color and let it dry completely.
– Use nail tape to create geometric shapes or lines on your nails.
– Paint over the tape with gold polish and carefully peel it off for crisp patterns.
This design allows creativity with shapes and colors! A matte top coat can also enhance the contrast with glossy gold.
9. Gold Floral Art
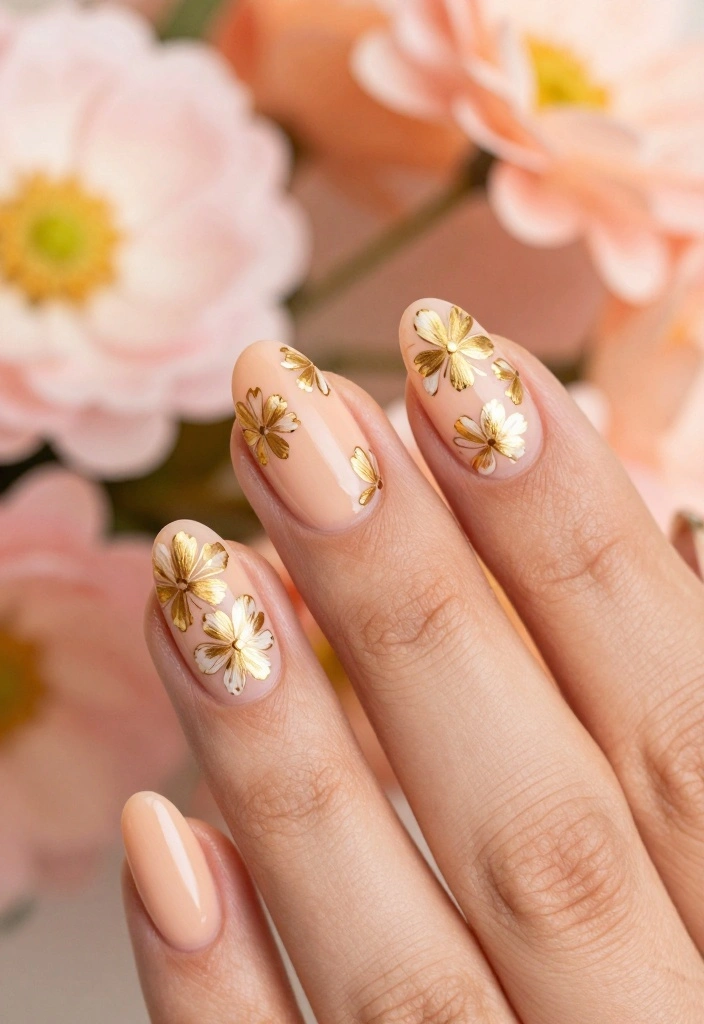
Bring a touch of spring to your nails with delightful gold floral art! This design combines the charm of flowers with the glimmer of gold for a lovely finish. Perfect for a casual day out or an afternoon date, floral designs are always a favorite.
The delicate nature of floral art paired with gold gives your nails a fresh and inviting look. You can be as creative as you like, making it suitable for various occasions.
Outfit Pieces:
– Soft base coat (light pink or pastel colors)
– Gold polish for the flowers
– Fine brush for painting details
Styling Tips:
– Start with a soft base color and let it dry.
– Use a fine brush to paint small flowers with gold polish.
– Add leaves or tiny vines to enhance the design.
Don’t hesitate to practice on paper first to perfect your technique! Adding small dots around the flowers can make your design pop.
10. Gold Gradient
The gold gradient is a chic twist on traditional nail art, offering a soft, blended effect that can be as bold or subtle as you want. It’s perfect for anyone looking to create a statement without much fuss.
The smooth transition of colors creates an elegant finish, making it great for both day-to-day wear and special occasions.
Outfit Pieces:
– Base color of your choice (light or dark tones)
– Gold polish for the gradient
– Makeup sponge for blending
– Top coat for ultimate shine
Styling Tips:
– Paint your nails with a base color and let it dry completely.
– Use a makeup sponge to apply gold polish to the tips, blending it down toward the base.
– Finish with a top coat for added shine and durability.
Feel free to experiment with different color combinations for a unique look!
Fun fact: a gold gradient nail art look can be achieved in about 5 minutes with a makeup sponge, and it lasts up to 7 days with a glossy top coat. This easy blend lets you switch from daywear to glam in seconds.
11. Boho Gold Arrows
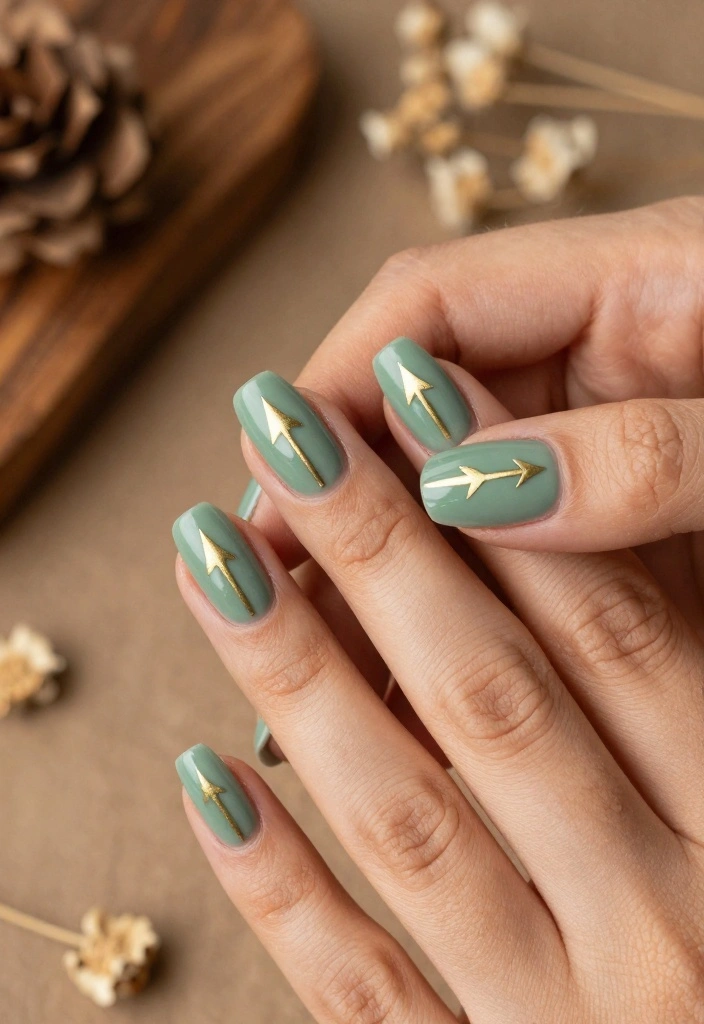
Boho gold arrows are a trendy nail design that adds a whimsical touch to your look. Ideal for free spirits, this design is easy to achieve and injects personality into your nails.
The playful arrow motifs lend themselves to creativity, making this design perfect for casual outings or laid-back gatherings.
Outfit Pieces:
– Base color of your choice (earthy or pastel shades work well)
– Gold polish for the arrows
– Fine nail brush for detailing
Styling Tips:
– Start with a base coat of your chosen color and let it dry.
– Use a fine brush to paint small arrows in gold on your nails.
– Vary the sizes and orientations for added interest.
This design is fun and easy to customize! Keep it simple for a minimalist vibe or add more arrows for a bohemian flair.
12. Gold Splatter Art
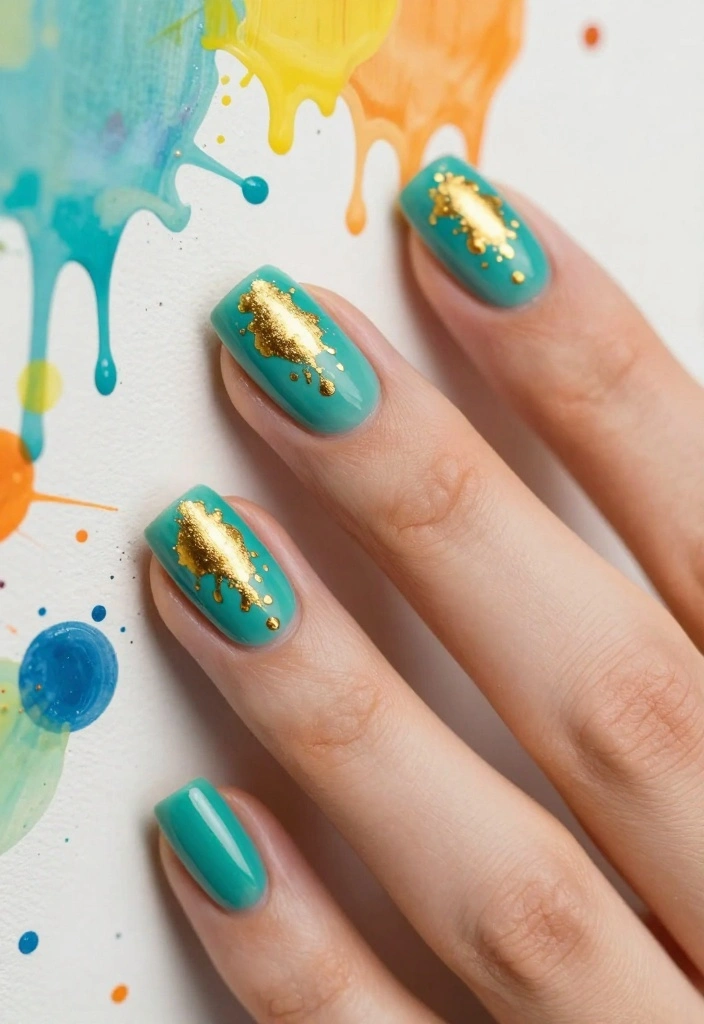
Gold splatter art brings a fun and artsy vibe to your nails! This design encourages creativity and adds a playful element to your overall look.
The randomness of splatters makes each nail unique, allowing for personal expression while still looking chic for various occasions.
Outfit Pieces:
– Base color polish (choose something bold or neutral)
– Gold polish for splattering
– Old brush for the splatter technique
Styling Tips:
– Start with a solid base color and let it dry completely.
– Use an old brush to flick gold polish over your nails for a splatter effect.
– Layer splatters for a more intense look and finish with a top coat for sealing.
This design is all about having fun! Try different colors for the base and splatter to see what looks best together.
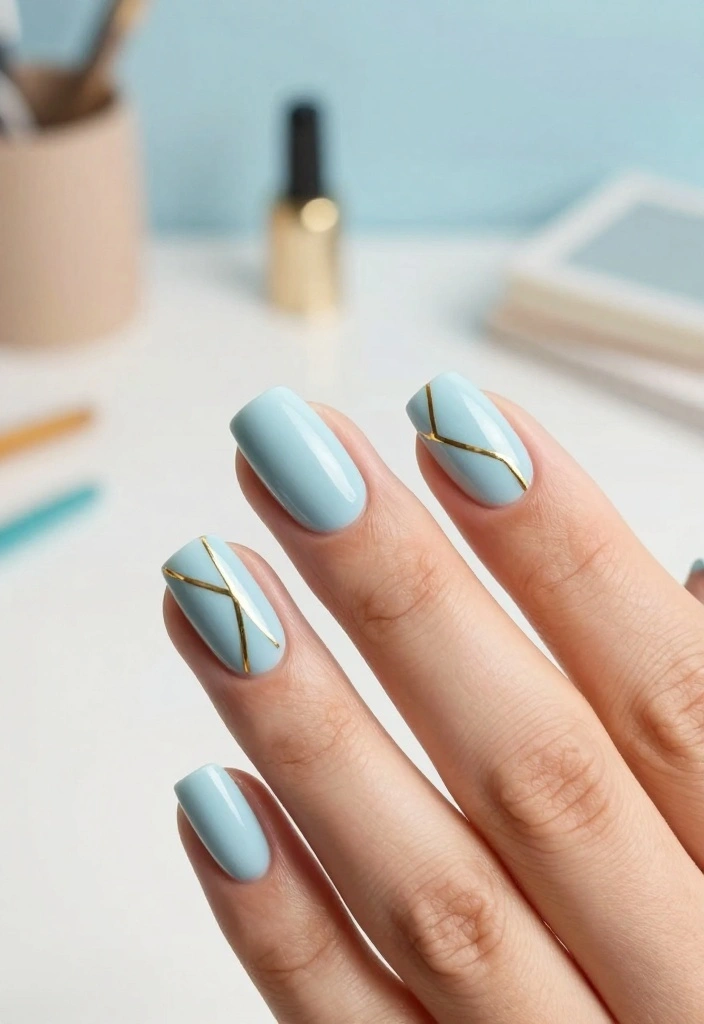
13. Minimalist Gold Lines
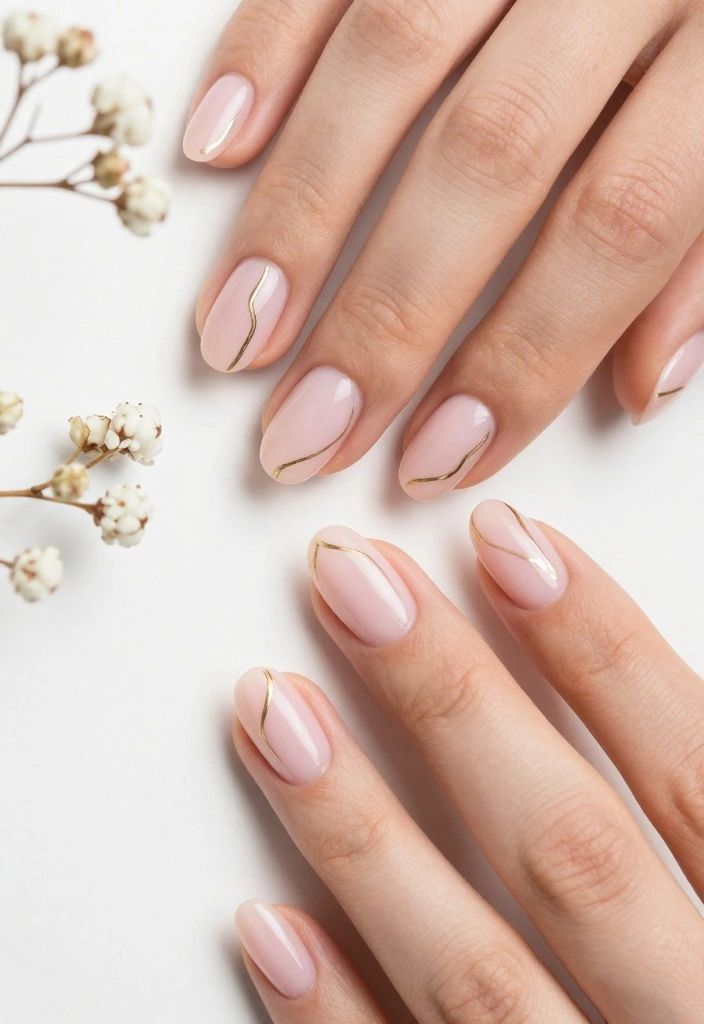
Minimalist gold lines offer a sleek and modern approach to nail art, perfect for anyone who appreciates understated elegance. This design is simple yet sophisticated, ideal for everyday wear.
The clean lines provide a polished look, making it suitable for both professional settings and casual outings.
Outfit Pieces:
– Clean base color polish of your choice (light or neutral tones)
– Gold polish for the accents
– Thin brush or striping tape for precision
Styling Tips:
– Paint your nails with a clean base color and let it dry.
– Use a thin brush or striping tape to apply delicate gold lines or small accents.
– You can create a pattern for added effect or keep it minimal.
This design emphasizes the beauty of simplicity. Choose complementary colors for a refined finish!
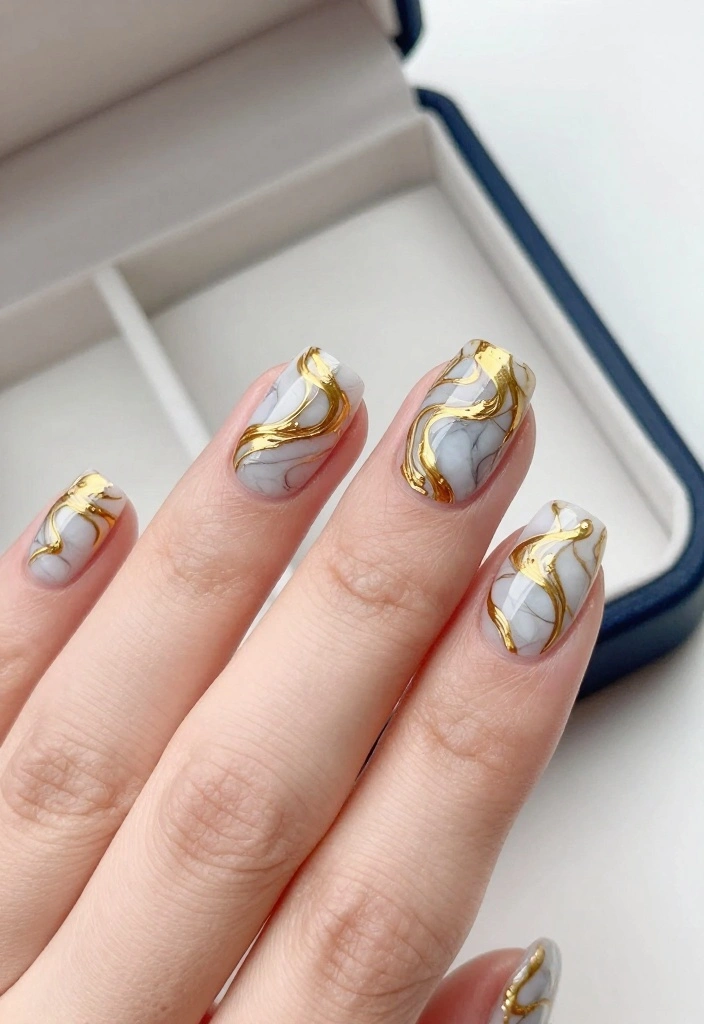
14. Artistic Gold Swirls

Artistic gold swirls are perfect for those eager to express their creativity through nail art. This design is eye-catching and gives a free-flowing, artistic vibe that is truly unique.
The swirling patterns allow for personal expression and can be adapted for any occasion, from casual outings to festive events.
Outfit Pieces:
– Solid base coat (choose a color that contrasts well)
– Gold polish for the swirls
– Fine brush for detailing
Styling Tips:
– Start with a solid base color and let it dry.
– Use a fine brush to create swirls and curves with gold polish on your nails.
– Vary the size and direction of the swirls for an organic feel.
Let your artistic side shine! Mix colors for a more dynamic appearance while maintaining a cohesive look.
Conclusion
Gold nail art offers endless possibilities, allowing you to express your personal style with elegance and flair. Each design in this list is not only easy to recreate but also striking enough to turn heads.
Whether you’re dressing up for a special occasion or just want to add a little sparkle to your everyday look, these gold nail art designs are sure to bring out your inner artist. Try them out, have fun, and let your creativity shine! Your nails deserve it!
Frequently Asked Questions
What are some easy gold nail art designs I can try at home?
Here are a few easy gold nail art ideas you can try at home. Start with a clean base and a glossy gold shade for a chic, high-glam look. Try a full gold nail, a simple easy stripe, a step-by-step foil accent, a gold tip, or a dotted design. For a quick step-by-step guide:
Step 1: Prep nails and apply a base coat; let dry.
Step 2: Paint nails with your gold nail art color; allow to dry completely.
Step 3: Use thin tape or a dotting tool to add the design—center stripe, diagonal accent, or dots.
Step 4: Seal with a top coat for a long-lasting finish.
Tip: Finish with cuticle oil for extra shine and hydration.
What tools or supplies do I need for easy gold nail art?
To nail this easy gold nail art, gather: base coat, gold polish or foil sheets, top coat, striping tape, dotting tool, small brush, nail file, and remover.
Optional: matte top coat for a modern twist, nail foil glue, and a UV/LED lamp if you’re using gel polish.
Tip: choose high-quality brushes for cleaner lines and longer-lasting results.
How can I create a step-by-step gold nail art design that lasts?
Want a step-by-step way to ensure your gold nail art sticks around? Here’s a reliable method:
Step 1: Prep nails, push back cuticles, and clean surfaces.
Step 2: Apply a thin base coat and let it dry.
Step 3: Paint two light coats of gold nail polish; wait for each coat to dry.
Step 4: If adding a negative-space stripe or diagonal line, place thin tape; paint the rest with a contrasting color, then remove tape.
Step 5: Finish with a fast-drying top coat and seal the edges.
Step 6: Reapply top coat every 2–3 days and moisturize cuticles to keep everything fresh.
Which nail shapes work best for gold nail art designs?
For gold nail art, some shapes really shine: almond or coffin nails show off long, dramatic stripes and foil flecks beautifully. Square nails provide a clean canvas for neat gold tips or geometric lines. Stiletto nails let you go bold with large gold accents. If you’ve got short nails, opt for tiny gold dots, a single diagonal stripe, or a delicate foil accent to keep it elegant without feeling crowded.
How can I make gold nail art last longer and prevent chipping?
Want your gold nail art to last? Try these tips:
1) Prep nails thoroughly with a clean, dry surface.
2) Apply thin, even layers of gold polish and let each layer dry.
3) Seal with a high-quality top coat and cap the free edges.
4) Reapply top coat every 2–3 days for extra protection.
5) Avoid soaking hands in water for the first 24 hours and wear gloves when cleaning.
6) Keep nails hydrated with cuticle oil to prevent lifting and chipping.
Related Topics
gold nail art
easy designs
step-by-step
beginner friendly
nail art trends
glamorous nails
minimalist nail art
quick nail ideas
DIY nail art
affordable nail designs
festive nails
chic nail styles
I love the gold nail art ideas you shared! I tried a similar design for my friend’s wedding, and it turned out to be a hit. Do you have a favorite design from this list?
These nail designs are so cute! I once tried a gold glitter look, but it ended up looking like I had dipped my fingers in a birthday cake. What’s the funniest nail fail you’ve had?
Did you know that gold has been used in nail art for centuries? Ancient Egyptians even used gold to decorate their nails! I can’t believe how far we’ve come since then.
I remember trying to paint my nails gold for a party, but I got more polish on my fingers than the nails! It was a hilarious mess, but everyone loved the sparkle. Have you had any funny nail mishaps?