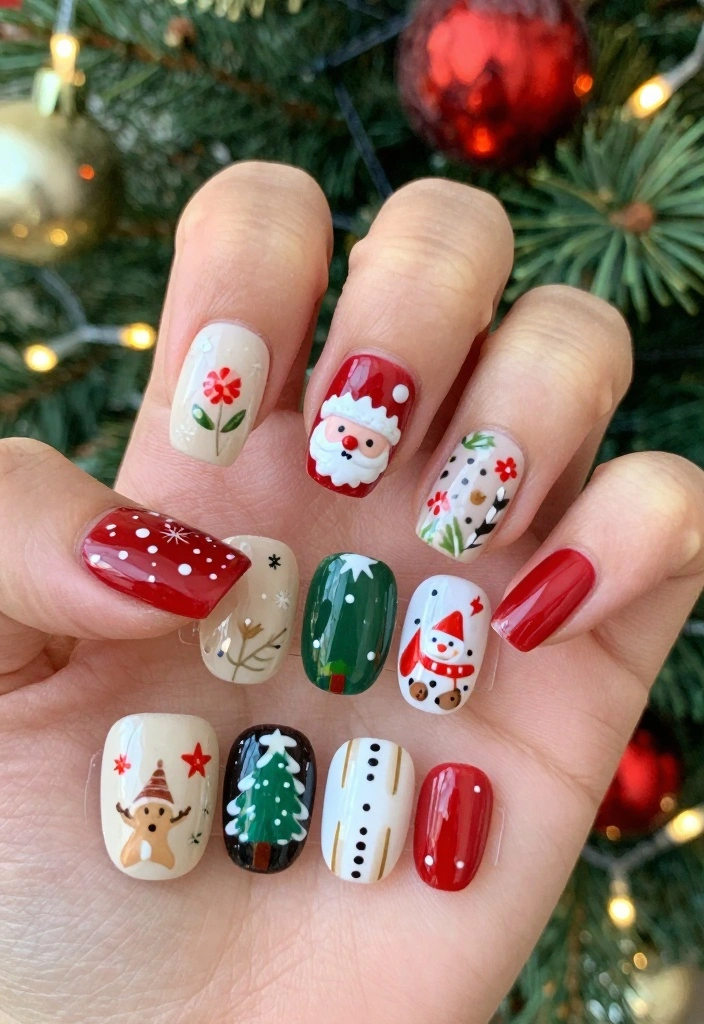
The holiday season is upon us, and Christmas has me craving the most festive nail art! It’s that magical time of year when glitter, vibrant colors, and fun designs come out to play. If you’re someone who loves to express creativity through your nails, this post is for you. We’ve all seen those stunning Christmas nail designs online, and now you can make them a reality right at home.
I’ve pulled together 14 incredible nail art ideas that are sure to blow your mind. From classic reds to whimsical snowflakes, each design brings a festive flair perfect for your holiday gatherings. Grab your nail polish, brushes, and some holiday spirit! You’ll discover creative inspirations that are not only beautiful but also easy to recreate. Whether you’re a novice or an experienced nail artist, there’s something for everyone here.
These ideas will add that perfect finishing touch to your Christmas look. They’re fun, affordable, and can even be a great DIY project to enjoy with friends or family. So, let’s dive into these fabulous festive nail looks that will make your hands sparkle and shine this Christmas!
Key Takeaways
– Explore 14 unique nail art designs that capture the essence of Christmas with creativity and flair.
– Each design, from Classic Christmas Red to Snow Globe Nails, offers a blend of style and festive spirit, making your nails a conversation starter at any holiday gathering.
– These nail art ideas are easy to recreate, making them perfect for both beginners and advanced nail artists looking to elevate their festive style.
– Get inspired with DIY tips for each nail look, ensuring you can achieve salon-quality results at home.
– Enjoy the added benefit of quality time with friends or family while creating your holiday nail masterpieces together.
Contents
- 1. Classic Christmas Red
- 2. Glittering Gold Tips
- 3. Festive Snowflakes
- 4. Candy Cane Stripes
- 5. Christmas Trees
- 6. Reindeer Antlers
- 7. Holi-Daze Marble
- 8. Merry & Bright
- 9. Frosted Tips
- 10. Polar Bear Paws
- 11. Ornaments Galore
- 12. Gingerbread Men
- 13. Starry Nights
- 14. Snow Globe Nails
1. Classic Christmas Red
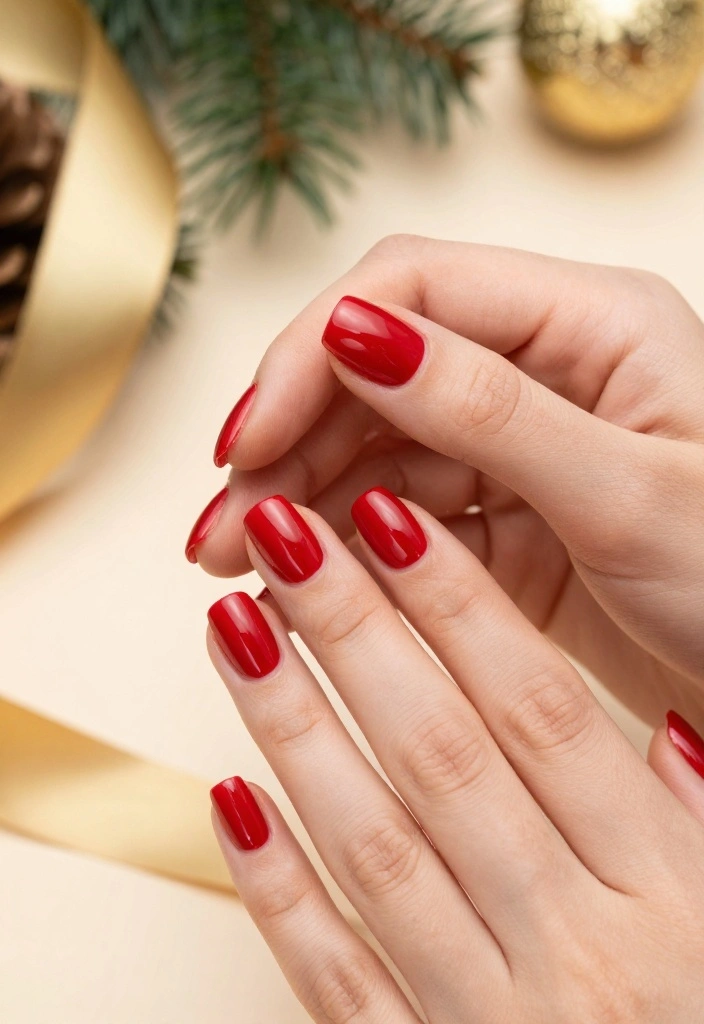
A classic red manicure is the ultimate holiday statement. This vibrant hue embodies the warmth and joy of the season, making it a perfect match for any festive outfit. Adding a glossy top coat elevates the look, giving your nails a luxurious shine that captures attention.
Accent your red base with gold or silver glitter tips or tiny star stickers for a fun twist. This timeless design effortlessly transitions from family dinners to office Christmas parties, ensuring you always look festive.
Tips for the perfect red nails:
– Make sure your nails are well-shaped and buffed for a flawless finish.
– Apply a base coat to prevent staining and extend the wear of your polish.
– For a chic alternative, opt for a matte top coat instead of glossy.
Quick Steps:
1. Start with a base coat.
2. Apply two coats of red polish.
3. Finish with a glossy top coat or matte finish.
This classic look is elegant and sophisticated, making you shine throughout the holiday season!
How To Choose the Right Nail Art for Christmas
Choosing the perfect nail art for Christmas can be a delightful yet overwhelming task. With so many styles and ideas swirling around, it’s essential to narrow down your options. Here’s a guide to help you select the best festive nail looks that will dazzle this holiday season.
1. Consider Your Personal Style
Think about what styles you naturally gravitate towards. Do you prefer bold colors or more subtle designs? Classic designs like red and gold may resonate with you if you enjoy timeless elegance. If you like to stand out, go for vibrant patterns with playful elements such as candy canes or snowflakes. Your nails are a reflection of your personality, so choose designs that make you feel fabulous.
2. Assess Your Skill Level
If you’re a nail art newbie, start with simpler designs. Candy cane stripes or classic red nails can be easily achieved with a steady hand and minimal tools. As your skills improve, you can experiment with intricate designs, such as reindeer antlers or frosted tips. Be honest about your skill level; this will help you enjoy the process without unnecessary frustration.
3. Choose Appropriate Colors
Christmas colors are typically red, green, gold, and silver, but don’t be afraid to mix it up! If you love pastels, soft pinks and whites can make a charming holiday look too. Think about the outfits you’ll wear during the holiday season and select nail colors that will complement them. This way, your nails will tie into your overall holiday look beautifully.
4. Factor in the Occasion
What events do you plan to attend this Christmas? A formal party might call for sophisticated designs like glittering gold tips or elegant marble patterns. If you’re attending a casual family gathering, fun designs like gingerbread men or snow globe nails could be perfect. Tailoring your nail art to the occasion ensures you’ll feel perfectly styled for any holiday event.
5. Gather Your Tools and Supplies
Before diving into your nail art, make sure you have all the necessary supplies. This includes nail polish, topcoat, a base coat, nail art brushes, and any embellishments you might want (like rhinestones or stickers). Having everything organized will make the process smoother and more enjoyable.
6. Experiment with DIY Techniques
Christmas nail art can be a fun DIY project! Look for tutorials online that match your chosen designs. You can even mix and match techniques. For instance, you might create a classic red base and then add snowflakes using a simple dotting tool. Don’t be afraid to get creative and express your artistic side!
Pro Tip: If you’re unsure about your design, practice on a piece of paper or a nail wheel before applying your art directly to your nails. This way, you can perfect your technique and get a feel for how the design will look!
Choosing the right nail art for Christmas can be a thrilling part of the holiday season. By considering your personal style, skill level, and occasion, you can create stunning looks that will make your nails shine as brightly as the holiday lights. Happy nail painting!
2. Glittering Gold Tips
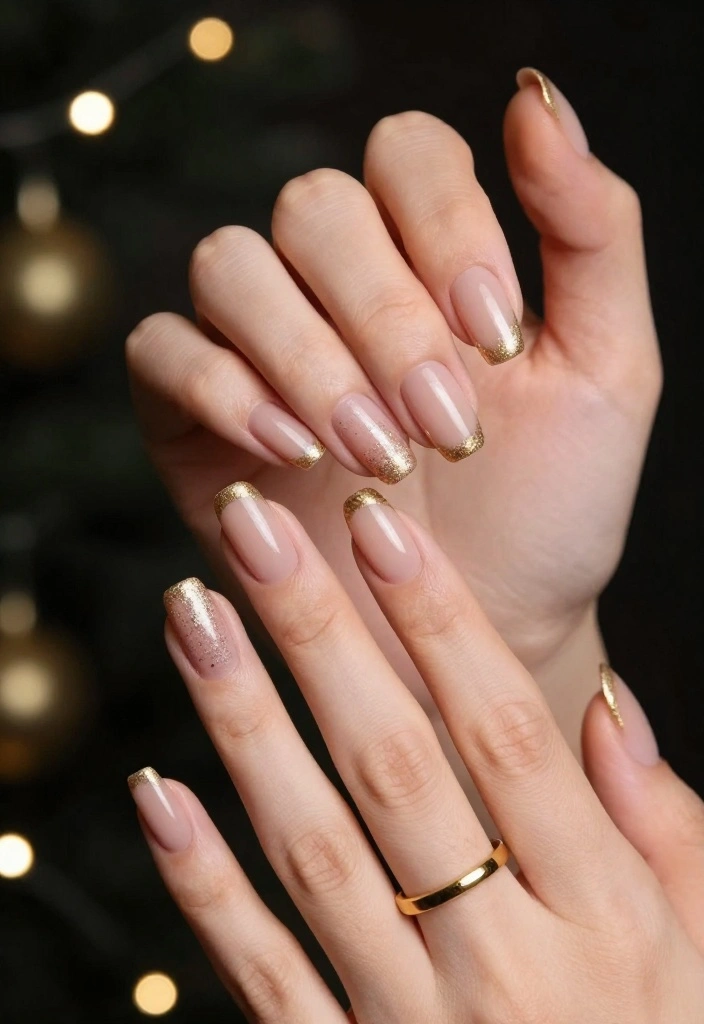
Gold nails are a festive favorite, and adding glitter elevates them to new heights! This chic take on the French tip features a nude base with shimmering gold glitter at the tips. It’s not only stylish but also easy to achieve, allowing for customization with different base shades.
Pair this look with a cozy sweater for casual gatherings or a sleek dress for upscale events, making it versatile for any occasion.
Helpful tips:
– Use a makeup sponge to dab glitter onto the tips for a smoother finish.
– Seal your design with a top coat to keep the glitter intact.
Step-by-Step:
1. Apply a base coat to protect your nails.
2. Paint your nails with a nude polish.
3. Once dry, use a sponge to apply gold glitter to the tips.
4. Finish with a top coat for durability.
This design is the perfect way to add a touch of glam to your holiday festivities!
3. Festive Snowflakes
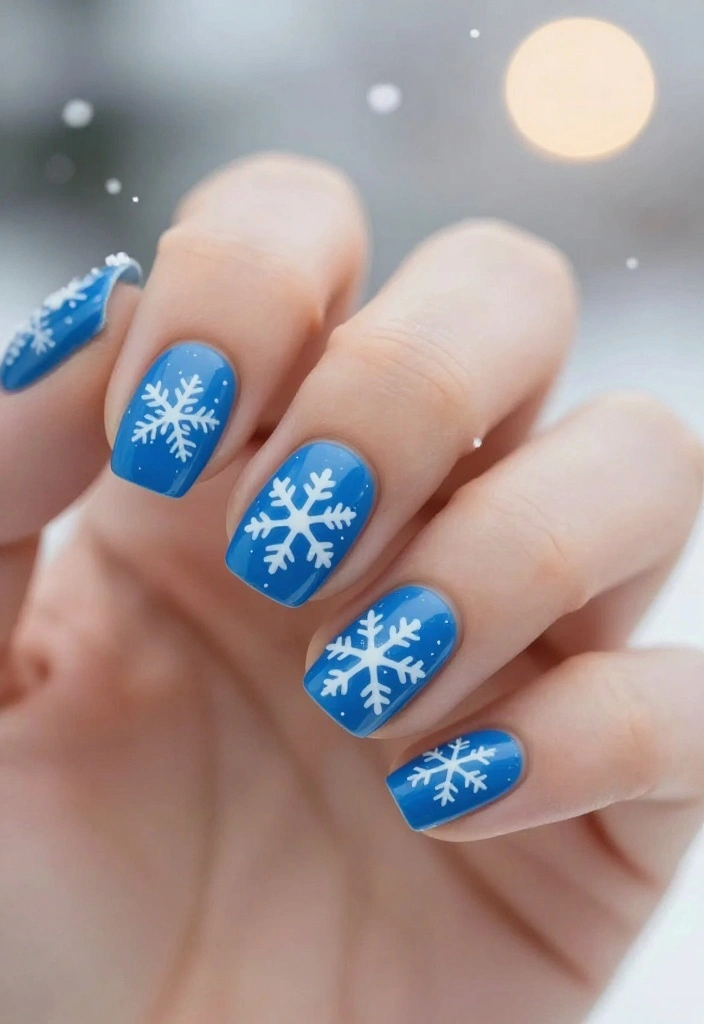
Transform your nails into a winter wonderland with intricate snowflake designs. This creative nail art allows you to play with patterns and colors, like using white polish over a blue or purple base for a stunning contrast that evokes a snowy sky.
Snowflakes can be hand-painted or created using stamping plates for precision. A sprinkle of glitter adds a magical sparkle, reminiscent of freshly fallen snow, making this design a standout at holiday gatherings.
Essential tips:
– Use a fine brush for detailed snowflake designs.
– Always apply a top coat to smooth out any rough edges.
Instructions:
1. Start with a base coat and choose your background color.
2. Once dry, use a thin nail art brush to paint snowflakes in white.
3. Add glitter if desired for extra shimmer.
4. Finish with a top coat to protect your design.
This look is sure to impress at any holiday celebration!
📹 Related Video: Top 3 Snowflake Nails Art Compilation For Beginner 💅 💖Holiday Nails Design 💝 New Nails
4. Candy Cane Stripes
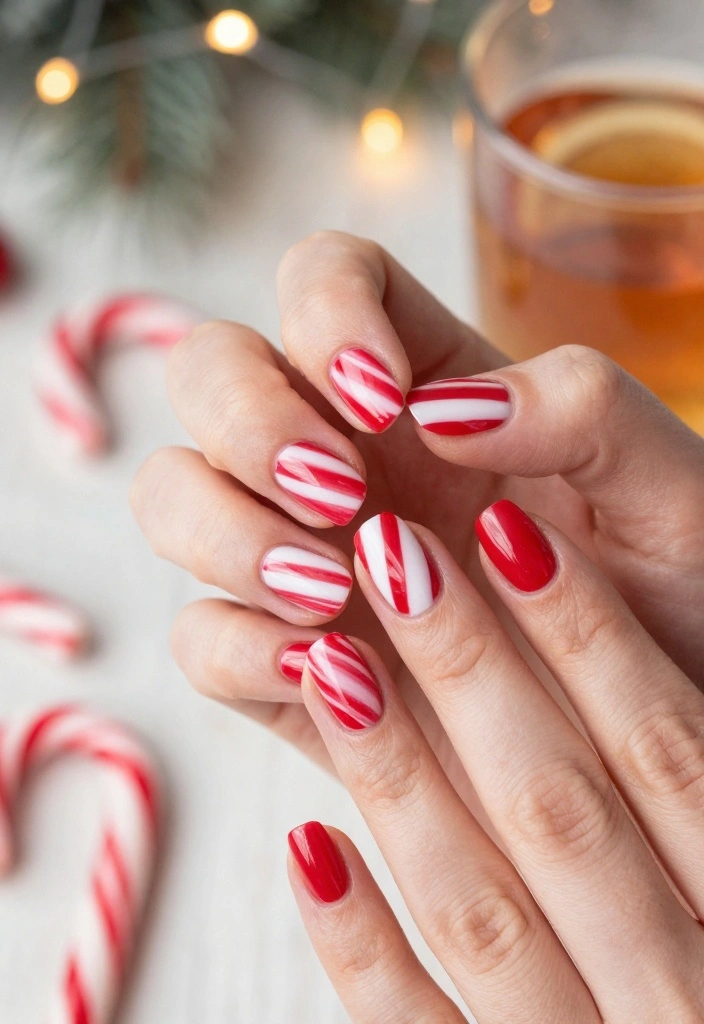
Bring the festive spirit of candy canes to your nails with cheerful red and white stripes! This playful design captures the essence of the season and can be achieved using nail tape for precision or a steady hand for freehand stripes.
To elevate this look, consider adding a glossy top coat sprinkled with fine glitter for a sweet finishing touch. It’s a delightful way to spread holiday cheer wherever you go.
Tips to achieve the best stripes:
– Be patient and let each layer dry before applying the next.
– Use striping nail polish for more control over your designs.
Steps to create this look:
1. Begin with a base coat.
2. Paint your nails white as the base color.
3. Use red polish to create diagonal stripes.
4. Apply a glossy top coat to finish.
Get ready to spread joy with these fun candy cane nails!
Candy cane stripes are the easiest way to nail art christmas magic. Use nail tape for crisp red-and-white lines, then seal with a glossy top coat and a sprinkle of fine glitter for festive shine.
🎨 Nail Art Made Easy!
Transform your festive nail dreams into reality with this quick DIY guide perfect for busy moms!
5. Christmas Trees

Celebrate the season with mini Christmas trees painted on each nail! This whimsical design is a fantastic way to express your holiday spirit and showcase your creativity. Opt for classic green trees adorned with colorful ornaments or mix it up with different colors for a unique look.
Dotting tools are great for creating ornaments, while a fine brush makes painting the trees a breeze. Don’t forget to add a glittery star on top for that extra sparkle!
Useful tips:
– Practice your design on paper before applying it to your nails.
– Use a strong top coat to keep your designs intact.
Steps to achieve this design:
1. Start with a base coat.
2. Paint your nails green.
3. Use a fine brush to create small trees on each nail.
4. Add colorful dots for ornaments and a star on top.
5. Seal with a top coat.
Show off your festive spirit with these adorable Christmas tree nails!
6. Reindeer Antlers
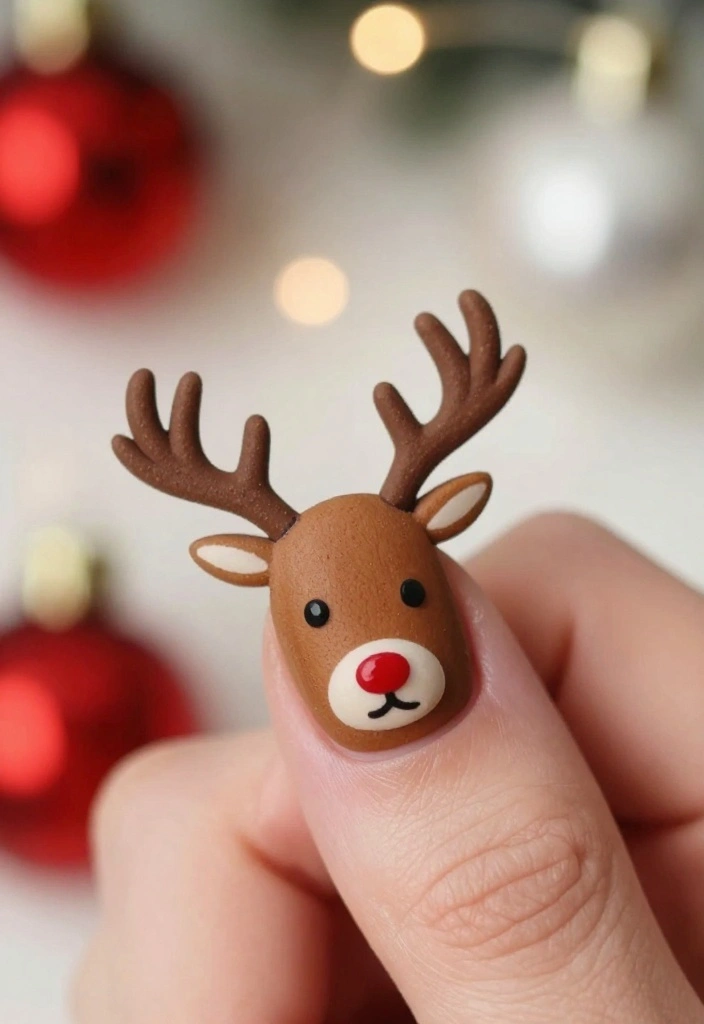
Get into the holiday spirit with cute reindeer antlers on your nails! This playful design is perfect for holiday parties and gatherings. A warm brown base with embellished antlers on accent nails captures the fun of Christmas beautifully.
Consider adding little red rhinestones for noses or snowflakes around the reindeer to enhance the festive vibe. This design is sure to bring smiles and spread cheer wherever you go!
Tips for the best results:
– Start with a clear base coat to protect your nails.
– Keep a small brush handy for detailed designs.
Follow these steps:
1. Apply a base coat and let it dry.
2. Paint your nails brown and let them dry.
3. Use a thin brush to paint reindeer antlers on each nail.
4. Add stickers or rhinestones for extra flair.
5. Finish with a top coat.
These nails will surely be a hit at any holiday celebration!
7. Holi-Daze Marble
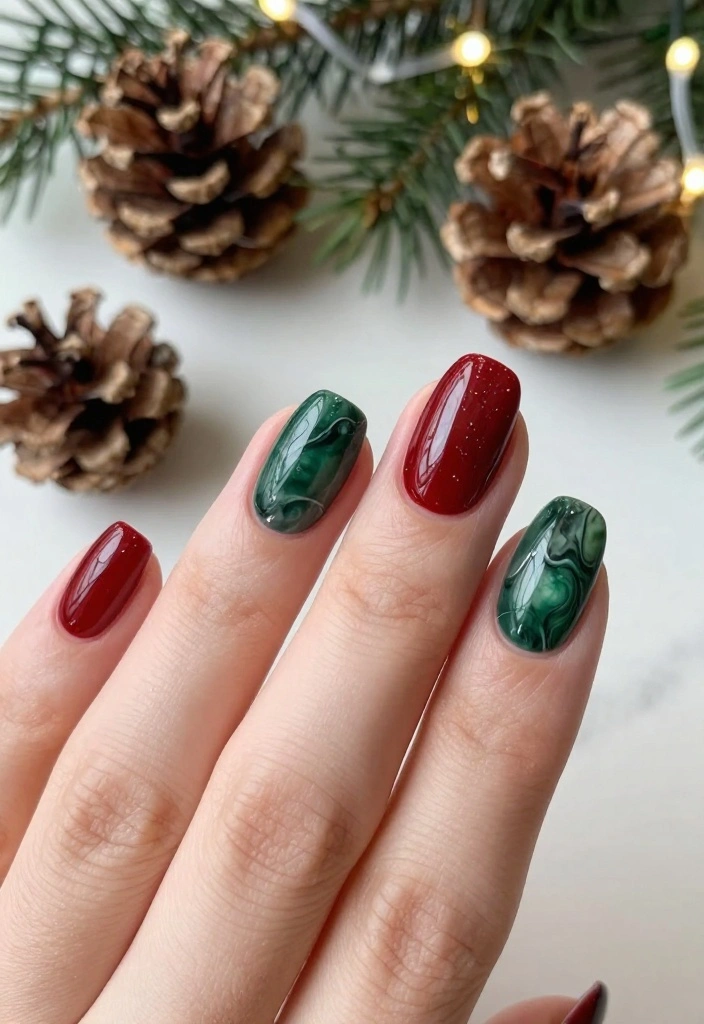
Marble nails are on-trend and can be easily adapted for the holiday season! A red and green marble effect creates a unique festive look that embodies the spirit of Christmas. This design focuses on blending colors using a simple water marbling technique.
Add gold swirls for a touch of elegance and sparkle. This technique allows for endless creativity, so feel free to experiment with different color combinations!
Tips for beautiful marble nails:
– Use a clear base to make the marbling stand out.
– Dip your nails quickly into the water for a smoother finish.
Steps to create this marble look:
1. Apply a base coat to protect your nails.
2. Choose red, green, and gold polishes for your marble effect.
3. Use a toothpick to swirl colors in a small dish of water.
4. Dip your nail into the design, then let it dry.
5. Finish with a top coat for a glossy finish.
Let your creativity shine with these festive marble nails!
Fun fact: Water-marble nails can be done in under 20 minutes, letting you master Holi-Daze looks fast. For nail art christmas magic, blend red, green, and gold swirls—then seal with a quick top coat for lasting sparkle!
8. Merry & Bright
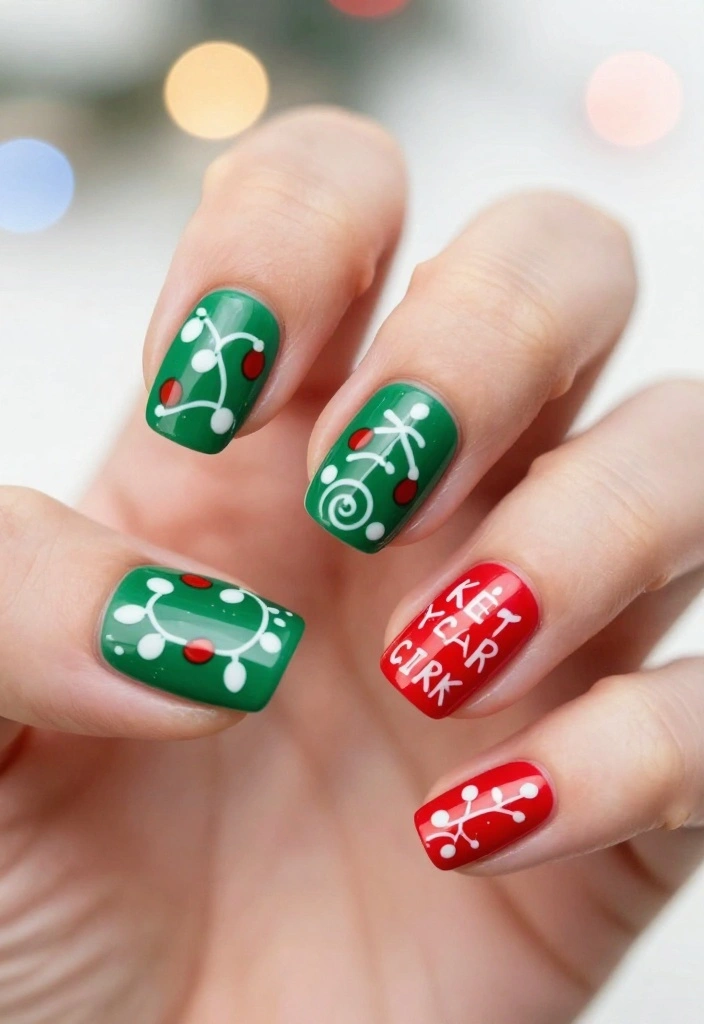
Embrace the joy of the season with a ‘Merry & Bright’ nail design! This fun look features vibrant colors and playful patterns, like Christmas lights or cheerful phrases. It’s ideal for anyone wanting to spread positivity and festive cheer this holiday season.
You can choose multiple bright colors for each nail or stick with a classic red base adorned with colorful designs. Elements like stripes, dots, or little holiday phrases add a personal touch to your nails.
Tips for achieving the perfect festive look:
– Select your favorite Christmas colors to make a statement.
– Use nail tape for clean lines when creating patterns.
How to do it:
1. Start with a base coat for protection.
2. Paint each nail in bright, festive colors.
3. Use a fine brush to create cheerful patterns or phrases.
4. Seal with a top coat.
This design is sure to brighten anyone’s day this holiday season!
9. Frosted Tips
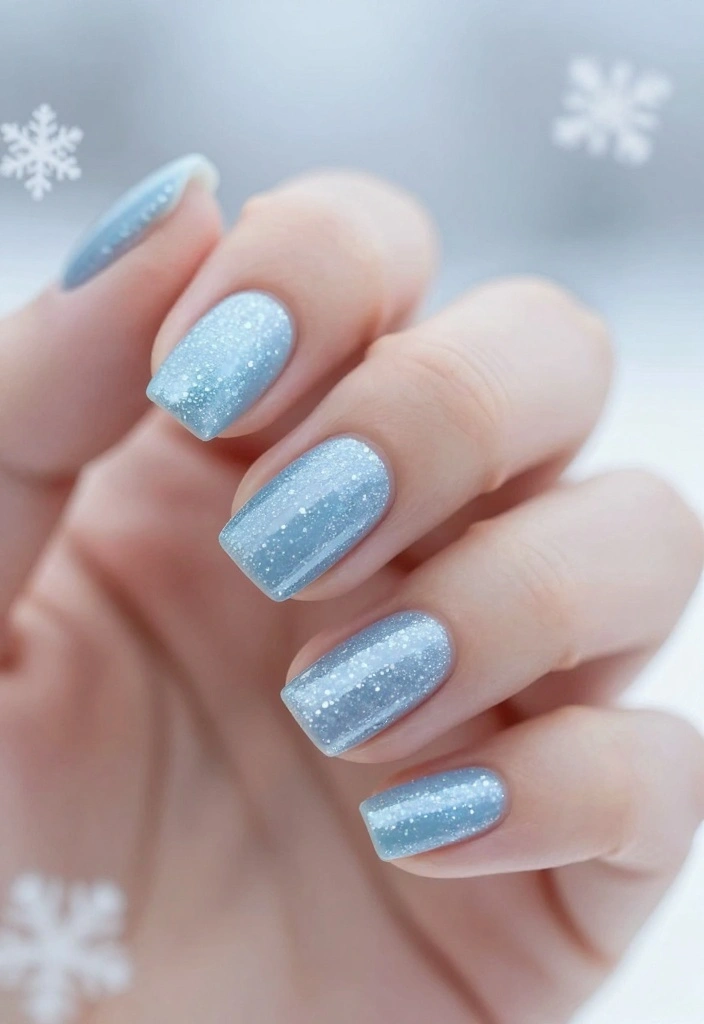
Frosted tips offer a sophisticated twist on traditional holiday nails. Imagine a soft, icy blue polish with a subtle glitter gradient at the tips that resembles freshly fallen snow. This elegant design is perfect for more formal holiday occasions.
Simple yet stunning, it conveys a serene and wintery vibe. Pair it with a soft sweater for a beautiful winter ensemble that’s sure to impress!
Helpful tips:
– Use a quality top coat to ensure the glitter stays in place.
– Experiment with different base colors to match your style.
Steps to recreate frosted tips:
1. Start with a base coat.
2. Apply a light blue or white base color.
3. Use a sponge to apply glitter at the tips for a frosted effect.
4. Finish with a top coat to add shine.
These frosted tips will have you looking effortlessly chic throughout the season!
10. Polar Bear Paws
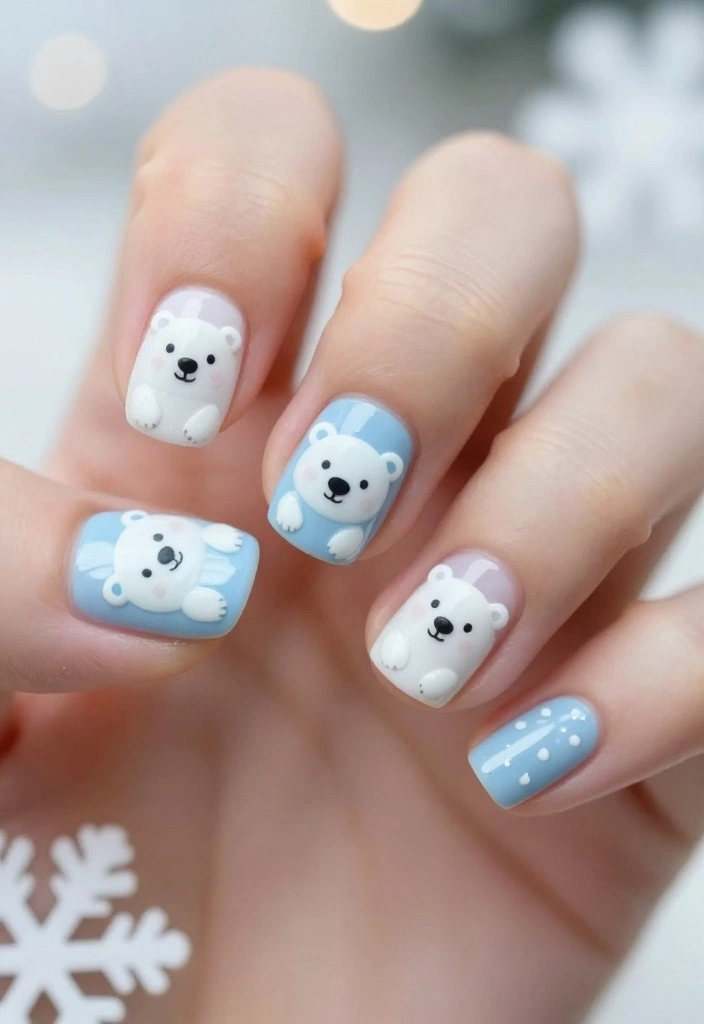
Who can resist adorable animals during the holidays? Try out cute polar bear designs on your nails for a whimsical touch! Start with a soft white base and create little bear faces using a dotting tool. This fun design is sure to spark conversations!
Pair the bears with snowy backgrounds or mix in other winter animals for a playful holiday palette.
Top tips:
– Keep the designs simple and sweet for maximum impact.
– Use high-quality polish for vibrant colors.
How to create this design:
1. Apply a base coat for protection.
2. Paint your nails white or light blue.
3. Use a dotting tool to create bear faces.
4. Add details with a fine brush for the eyes and noses.
5. Seal with a top coat.
These polar bear nails are perfect for spreading holiday joy and creativity!
Polar bear nails turn Christmas into a cozy moment—start with a soft white base and tiny bear faces. Keep the design simple, use quality polish, and watch your nail art christmas spark conversations all season.
11. Ornaments Galore
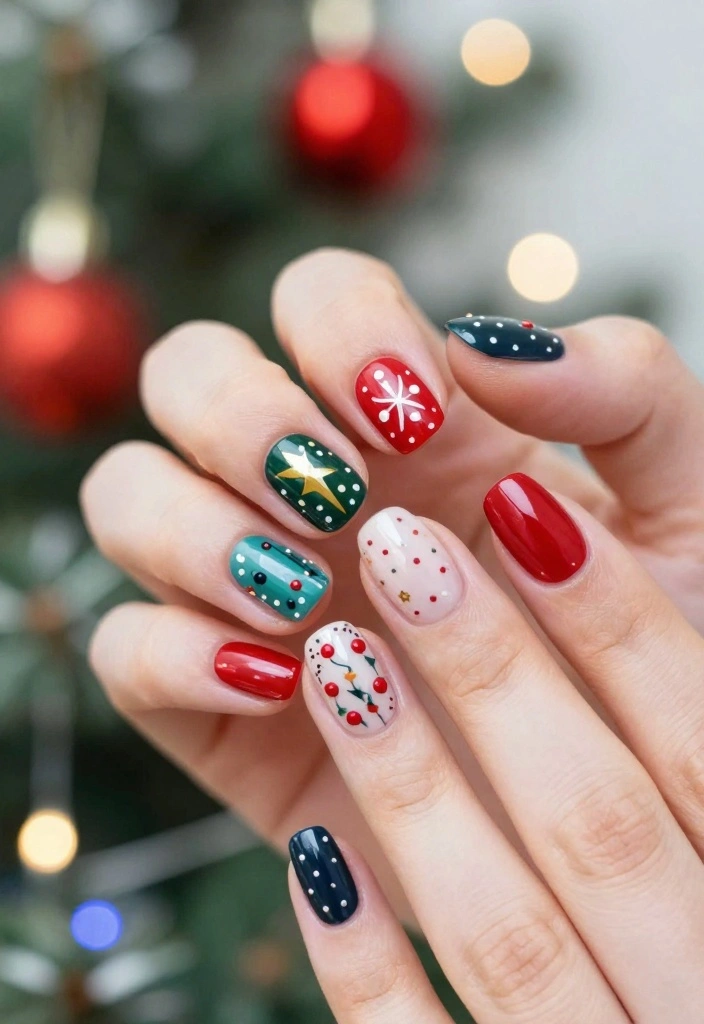
Celebrate the holiday spirit with a design inspired by Christmas ornaments! This colorful nail art incorporates vibrant festive colors and patterns, mimicking the beautiful decorations that adorn trees worldwide.
Create this look with a base of solid colors, then embellish it with ornament designs using a fine brush. Mixing and matching colors creates a playful aesthetic that is sure to attract attention!
Tips for the best ornament nails:
– Use stickers for precise designs or hand-paint for a personal touch.
– Apply a top coat to keep your designs looking bright and festive.
Steps to achieve this look:
1. Start with your desired base color.
2. Once dry, use a thin brush to create ornament shapes.
3. Add hooks and patterns to your ornaments.
4. Seal with a top coat.
These ornament-inspired nails will beautifully reflect the joy of the season!
12. Gingerbread Men
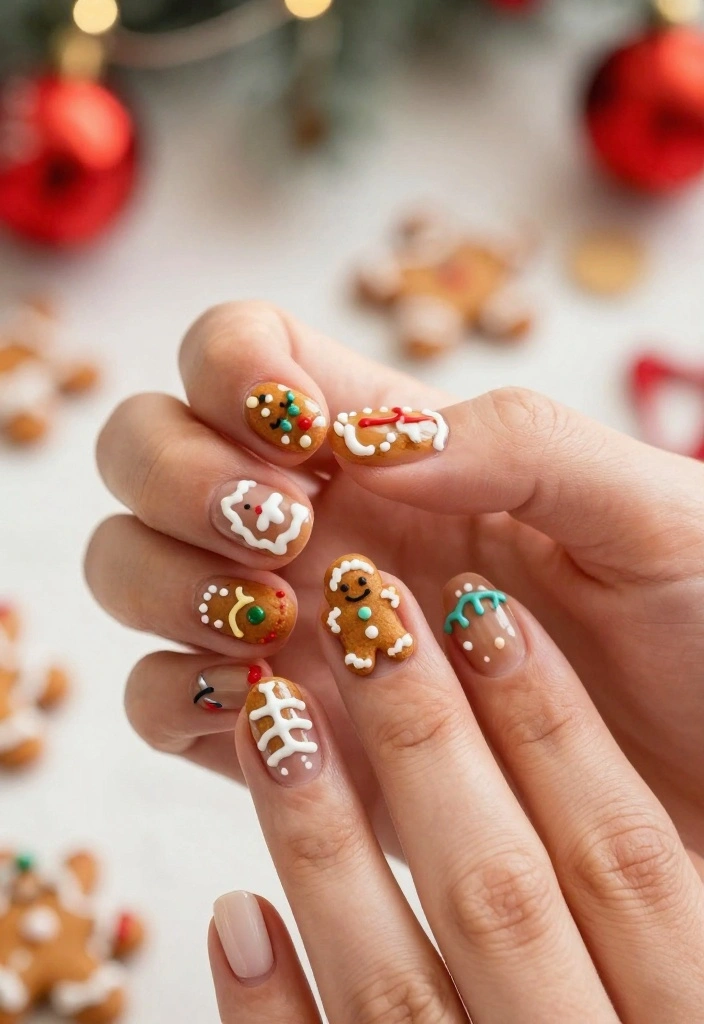
Celebrate the season with delightful gingerbread men on your nails! This whimsical nail art features little gingerbread cookies painted on a warm brown base, adding a sweet touch to your holiday look.
Accent them with icing designs in white or colorful polish and even little candy decorations for extra charm. This design is perfect for any festive gathering!
Helpful tips:
– Use a fine brush for intricate icing details.
– Experiment with different icing colors for variety.
Follow these steps:
1. Start with a base coat and let it dry.
2. Paint your nails brown.
3. Use a fine brush to create gingerbread figures with icing details.
4. Apply a top coat to seal.
These gingerbread men will add a delightful flair to your holiday season!
13. Starry Nights
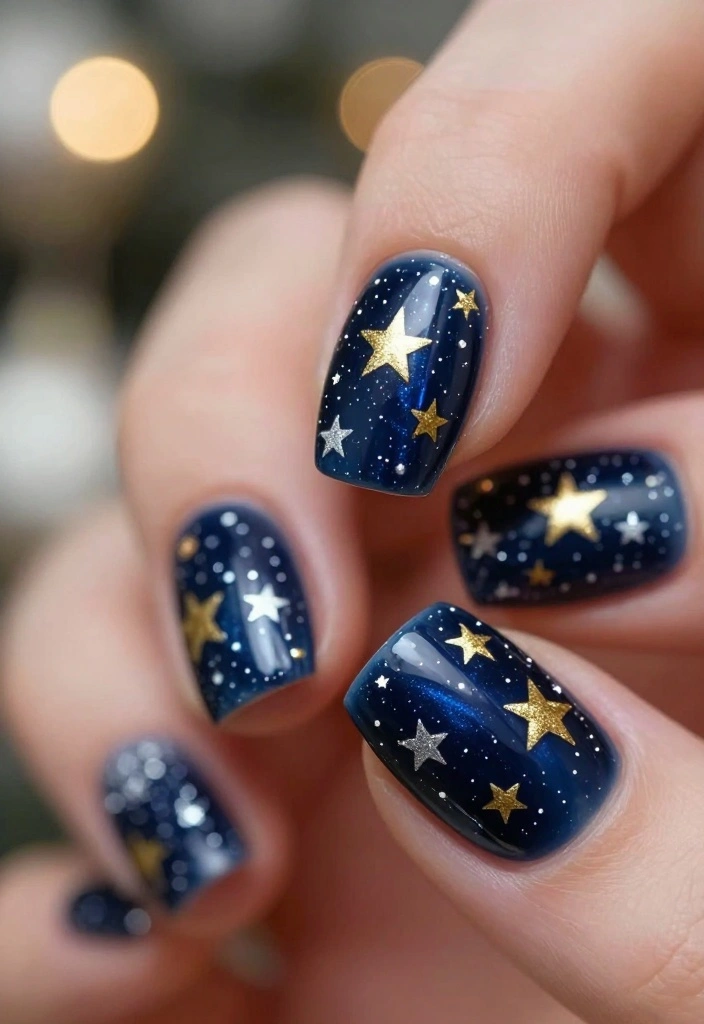
Bring the enchantment of a starry night to your nails with this captivating design! A deep navy or black polish serves as a dramatic backdrop for golden or silver stars that shine brightly. This celestial look is both stunning and elegant, making it perfect for any holiday event.
Use star stickers or a fine brush to create the stars, and don’t hesitate to add some glitter for extra sparkle! This design captures the beauty of the winter sky, ideal for those who appreciate a more sophisticated style.
Tips for the best starry nails:
– Choose a dark polish for a striking effect.
– Seal everything with a high-quality top coat for longevity.
Steps to create the starry look:
1. Apply a base coat.
2. Paint your nails with a navy or black polish.
3. Use a fine brush or stickers to add stars.
4. Finish with a top coat for a glossy finish.
These starry night nails will have you dreaming of a magical Christmas season!
14. Snow Globe Nails
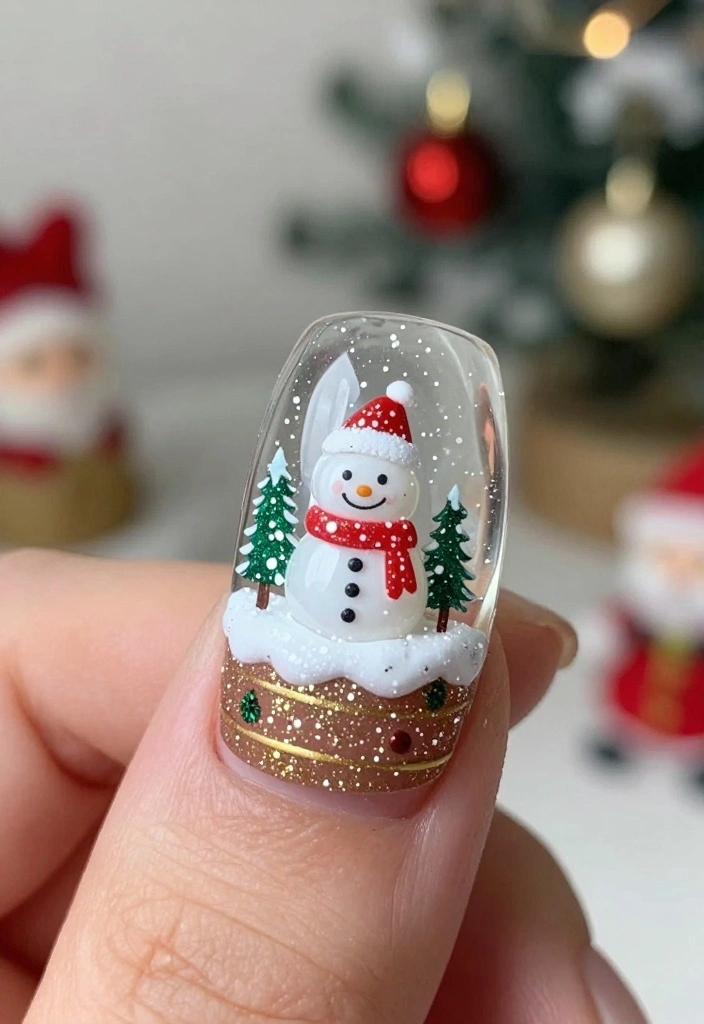
Capture the charm of a snow globe on your nails with this creative design! Featuring a clear top coat with glittery accents, snow globe nails can showcase various holiday motifs like snowmen, Christmas trees, or even Santa! This fun design allows you to express your artistic flair during the festive season.
Layering glitter and adding a glossy top coat creates a beautifully encapsulated look. Plus, you can easily switch designs every few days, keeping your nails fresh and exciting!
Tips for crafting the perfect snow globe nails:
– Use a good glitter mix for a starry effect.
– Experiment with foam snowflakes for added texture.
Steps to achieve this:
1. Start with a base coat and your choice of color.
2. Create your design for the snow globe.
3. Layer glitter and seal with a top coat.
Snow globe nails are the perfect way to bring holiday magic to your fingertips!
Conclusion
As the holiday season approaches, these 14 festive nail looks are sure to put you in the Christmas spirit! From classic reds and intricate designs to playful themes, there’s something to suit every style. You can mix and match different ideas or even add your unique flair to create a look that’s truly your own.
It’s a wonderful time to experiment with vibrant colors and fun patterns that celebrate the joy of Christmas. So grab your nail polish and some tools, and let your creativity shine!
Happy holidays and happy painting!
Frequently Asked Questions
What are the best DIY nail art Christmas ideas for beginners?
Great question! For beginner-friendly nail art christmas, start with candy cane stripes, a snowy snowflake accent, or a single glitter nail. Here’s a quick plan:
1) Prep nails: shape, buff, push back cuticles, and apply a clear base coat. 2) Pick a classic palette (red, emerald green, white, and gold or silver). 3) Candy cane: paint a red base, then add white curved stripes using a thin striping brush or tape. 4) Add a small snowflake or dot accents with a dotting tool. 5) Seal with a durable top coat and moisturize with cuticle oil.
With a couple of basic tools like a striping brush, a dotting tool, and nail stickers, you can create stunning nail art christmas looks at home.
How can I recreate a salon-looking Christmas nail art look at home with DIY tools?
Absolutely doable with DIY supplies. Start with a quality base and top coat, then use decals or nail stickers for crisp lines. If you want to freehand it, a fine brush and striping tape help. Steps: 1) Prep nails and apply base coat. 2) Paint your main color and let it dry completely. 3) Apply decals, stickers, or use a fine brush to add holly leaves, candy canes, bells, or snowflake details. 4) Seal with a strong top coat. 5) Clean up edges with a cotton bud dipped in nail polish remover. Pro tip: finish with a quick-dry top coat to lock in shine. This is a DIY approach to get salon vibes at home.
What color palettes and embellishments work best for Christmas nail art this season?
For a festive vibe, try classic combos: red and green with metallic gold or silver glitter. Add embellishments like rhinestones or foil flakes. Alternate matte and glossy finishes for depth. If you want softer looks, opt for burgundy, emerald, and snowy white. Pick long-wear formulas and top coat to keep your look through holiday events. Keep the nail art christmas theme coherent across nails for a polished finish.
How long does festive nail art last and how should I prep nails for holiday designs?
To maximize longevity, start with clean, dry nails and apply a strong base coat. Use a high-quality top coat and reapply every 2–3 days. Keep nails dry when possible and wear gloves for chores. For prepping: push back cuticles, lightly buff the surface, and remove old polish completely. Choose durable formulas and avoid acetone-heavy removers. Sealing designs with a good top coat helps nail art christmas stay chip-free through Christmas events.
What steps help prevent chipping and keep my nail art christmas looking fresh through the holidays?
Protect your festive mani by applying a durable top coat every two days, avoiding rough tasks without gloves, and keeping nails moisturized. If a corner chips, touch up with a matching color and a dab of top coat. Store polish away from heat and sunlight to preserve color. For extra durability, choose sturdy formulas and decals that are less prone to peeling. This DIY approach helps your nail art christmas stay fresh amid holiday celebrations.
Related Topics
nail art christmas
festive nails
holiday nail designs
DIY nail art
glitter nails
beginner friendly
easy nail techniques
winter nail trends
creative nail ideas
red and green nails
charming nail styles
advanced nail art
I love all the festive nail ideas here! I tried a snowflake design last year, and I ended up with glitter everywhere—my cat thought it was a party! What’s your favorite holiday nail design?
These nail looks are so cute! I might try the candy cane design, but knowing me, I’ll probably end up with a candy corn look instead! Why is it that nail polish always seems to end up on my fingers instead of my nails?
Did you know that the tradition of painting nails dates back to 3000 BC in China? They used natural ingredients like flower petals! Imagine how different it was back then—no quick-dry polish!
I once tried to do a Christmas tree design on my nails, and it turned into a green blob! My friends laughed, but we called it ‘abstract art.’ It still makes me smile when I think about it!