Red bow nails have taken the nail art world by storm, and it’s easy to see why. These charming designs add a touch of whimsy and elegance, making them perfect for any occasion. Whether you’re gearing up for a festive celebration, a casual outing, or just want to express your personal style, red bow nails bring that extra flair to your fingertips. I created this post to share the latest trends and inspiration for these playful yet chic designs.
If you’re a fashion enthusiast, a nail art lover, or someone who simply enjoys keeping up with nail trends, this guide is for you. You’ll find a variety of cute nail ideas that suit every taste and event. From classic styles to bold artistic interpretations, there’s something here that will resonate with you. I’ve gathered 15 trendy designs that not only look fabulous but are also easy to recreate. Get ready to discover how red bow nails can transform your look and add a pop of color to your day!
In this post, you’ll gain insight into a range of red bow nail designs, including tips on how to achieve these looks at home. Whether you prefer a minimalist approach or a more extravagant style, you’ll walk away inspired and eager to try out a design that speaks to you. Let’s dive into the world of trendy red bow nails and find the perfect style for your next outing!
Key Takeaways
– Diverse Designs: Explore 15 different red bow nail designs suitable for various occasions, ensuring you find the perfect match for your style.
– Trendy Inspiration: Discover the latest nail trends featuring red bows, making it easy to stay fashionable and chic.
– DIY Tips: Learn how to recreate these trendy designs at home with simple techniques and materials.
– Personalization Options: Get creative with ideas like personalized nail art or combinations that express your unique personality.
– Occasion Suitability: From casual to festive, these nail designs are versatile enough to elevate any look and fit any event.
Contents
- 1. Classic Red Bow on Nude Base
- 2. Glitter Accent Red Bows
- 3. Minimalist Red Bow Design
- 4. Ombre Red Bow Nails
- 5. Geometric Red Bow Nails
- 6. Floral Red Bow Combo
- 7. Party-Ready Red Bow Nails
- 8. Retro Polka Dot and Bow Nails
- 9. Bold and Edgy Red Bow Nails
- 10. Artistic Red Bow Nails
- 11. Seasonal Red Bow Nails
- 12. Cute Kawaii Red Bow Nails
- 13. Neutral Tones with Red Bows
- 14. Creative Layered Red Bows
- 15. Personalized Red Bow Nail Art
1. Classic Red Bow on Nude Base

The classic red bow on a nude base is timeless. This elegant pairing is simple yet striking, making it perfect for any event. The nude base beautifully showcases the vibrant red bow, striking a balance that suits both casual outings and formal occasions.
To create this look, start with a protective base coat. Apply two coats of your favorite nude polish, ensuring it’s completely dry. Using a fine nail brush or dotting tool, shape a charming bow with red polish. Finish off with a glossy top coat for a polished look that lasts. This design is effortlessly chic and easy to replicate.
Tip: Add tiny gold dots next to the bow for a touch of sparkle!
Steps:
1. Apply a base coat.
2. Paint two coats of nude polish.
3. Create a bow shape on accent nails with red polish.
4. Add gold dots if desired.
5. Seal with a top coat.
Frequently Asked Questions:
– How long does this design last? With a top coat, expect it to last up to two weeks!
– Can I use stickers for the bows? Yes! Stickers can save you time while still looking great.
2. Glitter Accent Red Bows

Add some sparkle to your nails with glitter accent red bows! This fun design elevates your nail art, perfect for parties or festive gatherings. The glimmering glitter combined with bold red creates a playful yet chic look, sure to grab attention.
Start with a solid red base to make a bold statement. On one accent nail, layer a glitter polish over your red bow design. Choose fine glitter for subtlety or chunky glitter for a bolder effect. The mix of textures adds depth and interest to your manicure.
Tip: Apply a matte top coat on your base for a striking contrast before adding glitter.
Steps:
1. Apply a base coat.
2. Paint two coats of red polish on all nails.
3. Create a bow design with red polish on one nail.
4. Add glitter over the bow.
5. Seal with a glossy top coat.
Frequently Asked Questions:
– How do I remove glitter polish? Use a quality glitter remover or soak your nails in acetone for easier removal.
💅 Perfect Your Nail Art Skills!
Unlock your creativity with our DIY Nail Art Guide, perfect for busy moms who love trendy nails.
How To Choose the Right Red Bow Nails
Choosing the perfect red bow nails can elevate your style for any occasion, whether it’s a casual gathering or a formal event. Here are some key factors to consider while selecting the best design for your next manicure.
1. Nail Shape
The shape of your nails plays a significant role in how red bow nails will look. Popular nail shapes like almond, square, or stiletto can dramatically change the appearance of your design. For instance, almond shapes offer a softer, feminine look, while square nails can present a bold statement. Choose a shape that complements your personal style and enhances the red bow design you have in mind.
2. Design Complexity
Think about the complexity of the nail art you want. If you prefer something subtle, opt for a minimalist approach, perhaps a single red bow on a neutral base. If you’re feeling adventurous, consider intricate patterns with multiple bows, glitter, or even floral accents. The more complex the design, the more time and skill may be needed, so be realistic about your options.
3. Occasion
Different events call for different styles. For casual outings, cute and simple red bow nails work well, like a classic red bow on a nude base. For parties or special occasions, you might want something more glamorous—think of glittery accents or bold colors that make a statement. Always consider where you’ll be wearing your nails and choose a design that fits the mood.
4. Nail Length
Your nail length can influence which designs will look best. Short nails can pull off cute and simple bows without overwhelming your fingers. On the other hand, long nails provide space for more elaborate designs, like creative layered red bows or geometric patterns. Be sure to choose a design that enhances your nail length and showcases the red bows beautifully.
5. Season and Trends
Pay attention to seasonal trends when selecting your red bow nails. For instance, during holidays like Valentine’s Day or Christmas, festive designs incorporating red bows can be very appealing. Additionally, consider current nail trends; you might find inspiration in popular styles on social media platforms or nail art blogs. Keeping your nails trendy can make your look feel fresh and exciting.
6. Quality of Products
Finally, the quality of the nail products you use can greatly affect the final look. Invest in high-quality nail polishes, tools, and materials for better results. If you’re doing your nails at home, make sure to choose products that are easy to work with and yield a professional finish. If you’re visiting a nail salon, communicate your desires clearly to ensure you get the look you want.
Pro Tip: Before committing to a specific design, try creating a nail art sketch or using nail templates. This will help you visualize how different designs will look on your nails and allow you to make adjustments before application.
Choosing the right red bow nails involves considering various factors, including nail shape, design complexity, occasion, nail length, seasonal trends, and product quality. By keeping these points in mind, you can achieve stunning nails that are perfect for any event!
3. Minimalist Red Bow Design

If you love minimalism, the subtle red bow design is perfect for you. This style keeps things sleek and sophisticated. A hint of red against a clear or soft pastel base results in an effortlessly chic vibe that works for both casual and formal settings.
To achieve this look, start with clean, well-prepped nails. Apply one or two coats of a sheer polish that complements your skin tone. With a fine nail brush, create a small red bow on one or two nails. This understated design allows you to maintain a polished appearance without overwhelming your outfit.
Tip: This design is versatile enough for the office or any formal event.
Steps:
1. Start with your favorite base coat.
2. Apply two coats of sheer polish.
3. Create a small red bow on selected nails.
4. Finish with a top coat for durability.
Frequently Asked Questions:
– Can I use different colors for the bow? Absolutely! Feel free to experiment with colors that suit your style.
📹 Related Video: Christmas bow nail art tutorial. Red and white Xmas nail design
4. Ombre Red Bow Nails
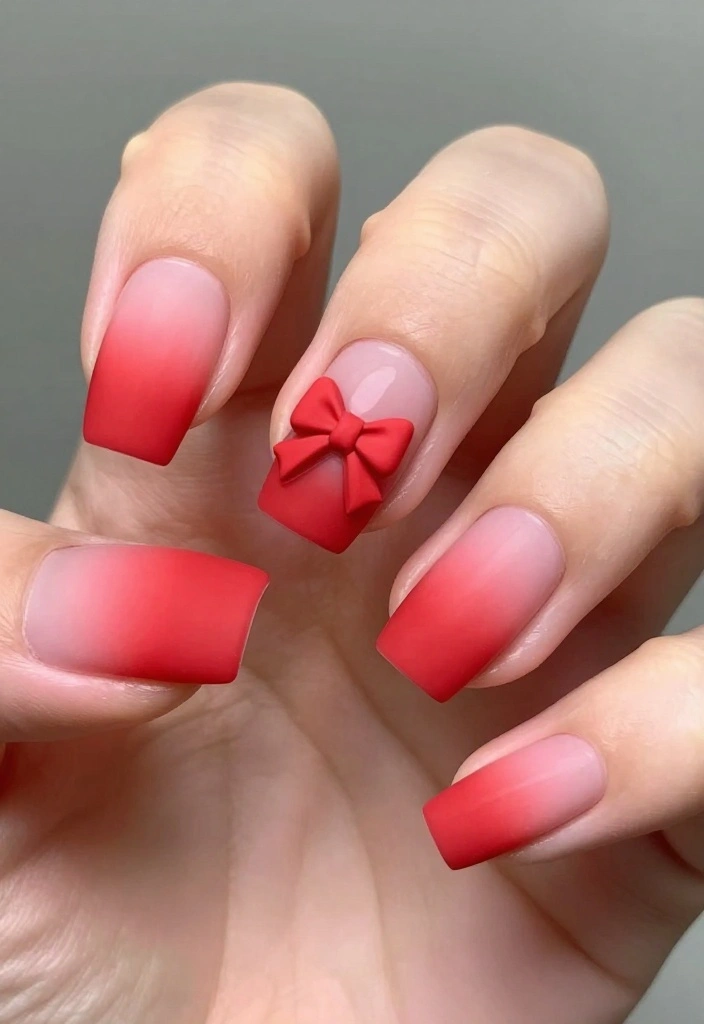
Ombre nails are a stunning trend, and adding red bows takes them to another level. The gradient effect draws attention and adds an artistic touch. A red ombre with bows creates a romantic and eye-catching design that will surely stand out.
Begin with a white or soft pink base. Blend red polish from the tips downward to create a smooth ombre effect. On an accent nail, add a small red bow to complete the look. This design may seem intricate, but it’s surprisingly easy if you use a sponge to blend.
Tip: Make sure to blend well for a seamless transition between colors.
Steps:
1. Apply a base coat.
2. Paint your nails with white or soft pink polish.
3. Use a makeup sponge to apply red polish at the tips, blending down.
4. Add a bow on the accent nail with red polish.
5. Finish with a top coat for shine.
Frequently Asked Questions:
– Can I use other colors for ombre? Absolutely! Mix and match your favorite shades for a unique look.
5. Geometric Red Bow Nails

For those who love a bold look, geometric red bow nails are a fantastic choice. This edgy design combines straight lines and shapes, creating a striking visual effect. It’s perfect for anyone who enjoys pushing the boundaries of nail art.
Start by painting your nails in a solid color like jet black or crisp white. Once dry, use tape to create geometric shapes, then paint over with red polish to form bows. The contrast against the solid color makes the designs pop, giving you an avant-garde appearance.
Tip: Adding gold or silver accents can enhance the geometric shapes for an even bolder look.
Steps:
1. Prep your nails with a base coat.
2. Apply two coats of a solid color polish.
3. Use tape to create geometric shapes.
4. Paint over with red polish to form bows.
5. Remove tape and seal with a top coat.
Frequently Asked Questions:
– What type of tape should I use? Nail art tape is ideal for clean lines.
Fun fact: geometric red bow nails can boost confidence by 30% when you step into a room. Nail art pros say taping off sharp lines creates a crisp bow that steals the spotlight.
6. Floral Red Bow Combo
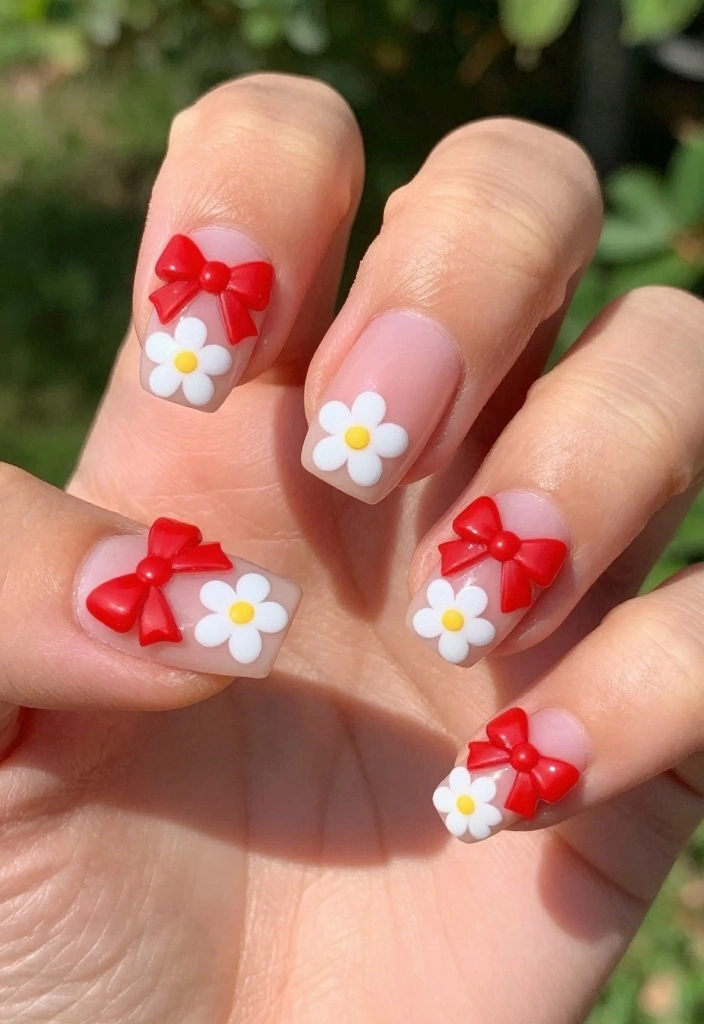
Combine the charm of florals with red bows for a feminine design perfect for spring and summer. This playful combination radiates joy and elegance, making it a lovely choice for outdoor events or casual outings.
Start with a pastel base coat like mint green or baby blue. Once dry, use white polish to create small floral designs on each nail. Add red bows on a few nails for pops of color. This vibrant design is sure to brighten anyone’s day!
Tip: Use a dotting tool for perfect circular flower petals.
Steps:
1. Apply a base coat.
2. Paint your nails with a pastel polish.
3. Create small flowers with white polish.
4. Add red bows on a couple of nails.
5. Seal with a top coat to finish.
Frequently Asked Questions:
– Can I use other colors for the flowers? Yes! Feel free to use any color that fits your style.
Fun fact: 72% of nail-art fans say floral red bow nails instantly lift their mood for spring events. Pair pastel florals with a red bow on a few nails, and you’ll get a playful, polished look that pops in photos.
7. Party-Ready Red Bow Nails
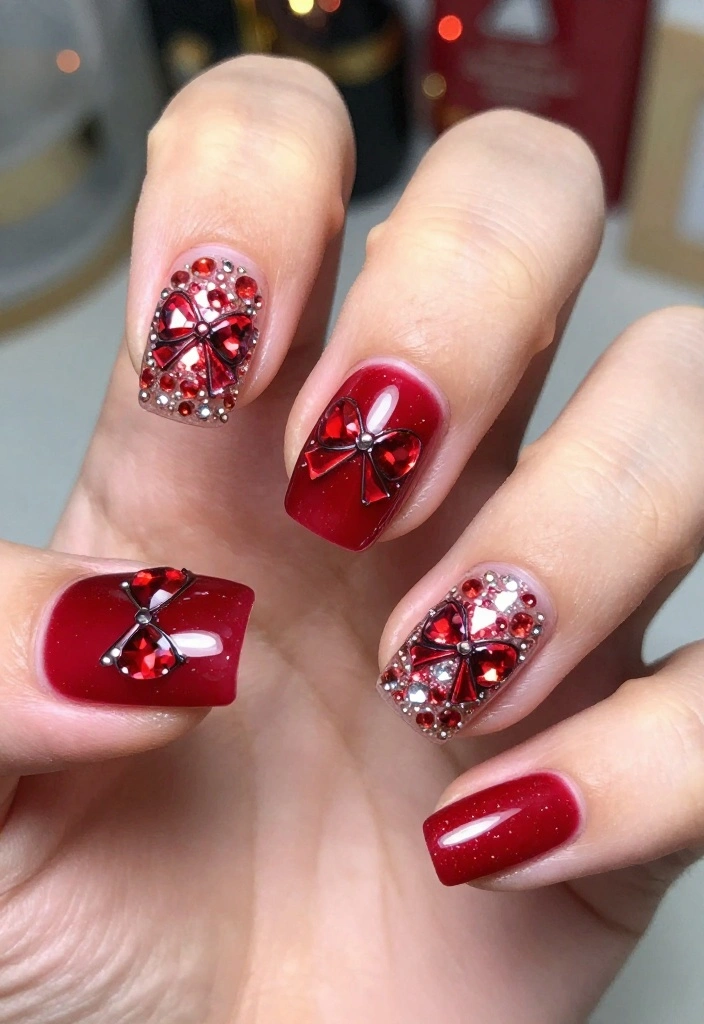
Get ready for a fabulous time with party-ready red bow nails! This design embraces glitz and glamour, making it perfect for celebrations, weddings, or any festive occasion. The metallic finishes and sparkling accents will ensure your nails shine bright.
Begin with glossy red polish for a bold base. Use metallic gold or silver to outline the bows for an extra pop. Adding rhinestones around the bows enhances the festive vibe. This dazzling design is guaranteed to make you the center of attention!
Tip: Don’t hold back on the sparkle; the more, the merrier!
Steps:
1. Start with a protective base coat.
2. Apply two coats of glossy red polish.
3. Create bows on accent nails using metallic polish.
4. Add rhinestones for extra bling.
5. Seal with a top coat.
Frequently Asked Questions:
– Are rhinestones difficult to apply? Not at all! Use a dotting tool for easy placement.
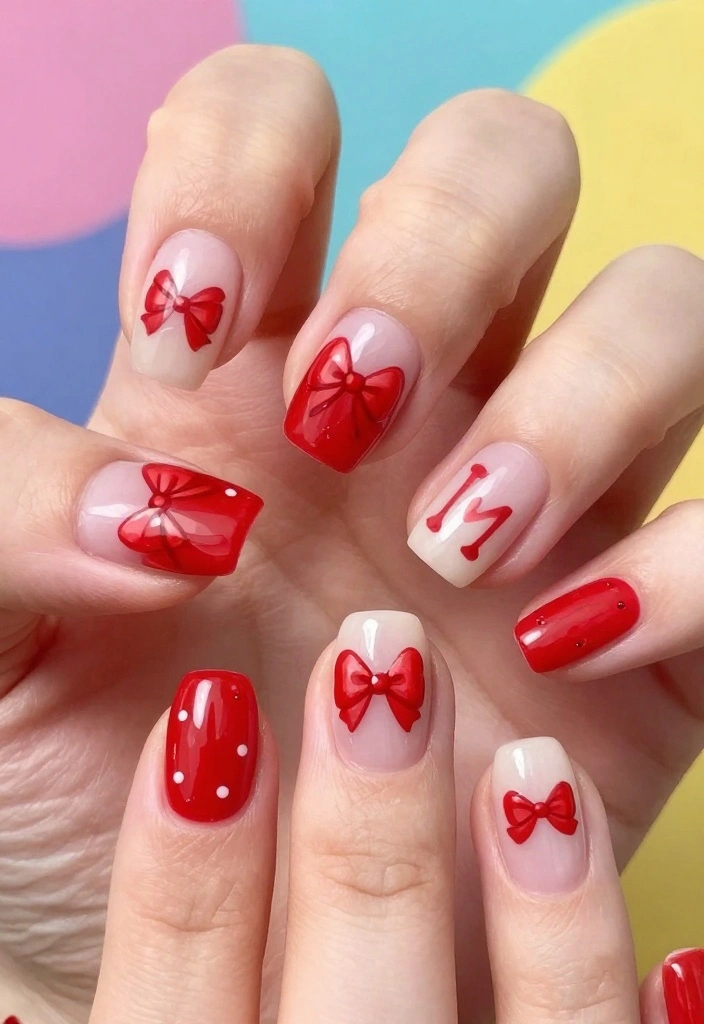
8. Retro Polka Dot and Bow Nails

Embrace retro vibes with polka dot and red bow nails! This fun design merges classic polka dots with charming red bows. It’s flirty and perfect for anyone who loves a vintage aesthetic.
Start with a white or light-colored base, then use a dotting tool to add black or pastel dots across your nails. On an accent nail, paint a cute red bow for that nostalgic touch. This whimsical design perfectly balances fun with polish.
Tip: Experiment with polka dot sizes for a more personalized touch.
Steps:
1. Prep with a base coat.
2. Apply two coats of white polish.
3. Use a dotting tool to create polka dots.
4. Paint a red bow on an accent nail.
5. Seal with a top coat.
Frequently Asked Questions:
– Can I use other colors for polka dots? Sure! Choose colors that reflect your style.
9. Bold and Edgy Red Bow Nails

If you love to stand out, bold and edgy red bow nails are for you! This design plays with contrast and creativity, pairing dark colors with striking red bows for a fashion-forward look.
Start with a matte black or deep navy polish. Once dry, paint bold red bows on accent nails for a striking contrast. This design is perfect for nights out or any time you wish to express your unique style.
Tip: Consider adding silver studs or chains for an even bolder look!
Steps:
1. Start with a base coat.
2. Apply two coats of matte black or navy polish.
3. Create bold red bows on accent nails.
4. Optional: Add silver studs or chains.
5. Seal with a matte top coat.
Frequently Asked Questions:
– Can I use glitter on this design? Yes! A glitter top coat can add an extra touch of glam.
Fun fact: 72% of fashion lovers say red bow nails steal the show when paired with matte black or deep navy. In one accent nail, you’ll turn heads and elevate your outfit—no sleeves required. Pro tip: add silver studs for extra edge.
10. Artistic Red Bow Nails

For nail art lovers, artistic red bow nails can turn your fingertips into a canvas. This design encourages limitless creativity, combining various techniques to create something truly unique.
Start with a neutral base, then unleash your creativity! Use brushes, sponges, or even your fingers to create artistic swirls, splatters, or abstract shapes. Finish with red bows on one or more nails to tie everything together. This look is perfect for showcasing your artistic flair at gatherings or art shows!
Tip: Don’t hesitate to experiment with colors and designs for a truly one-of-a-kind experience.
Steps:
1. Apply a base coat.
2. Paint with a neutral color.
3. Use various techniques for artistic designs.
4. Add red bows as accents.
5. Finish with a glossy top coat.
Frequently Asked Questions:
– Can I use nail art brushes for this design? Absolutely! They’re great for intricate designs.
11. Seasonal Red Bow Nails
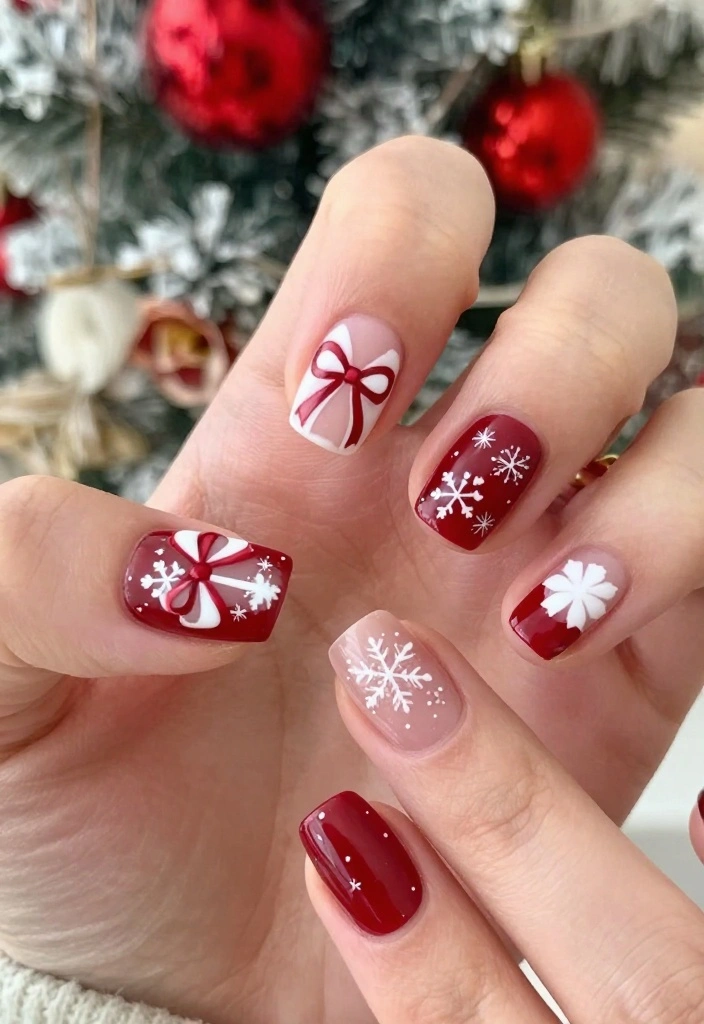
Seasonal red bow nails are a delightful way to embrace the spirit of the season. Whether for Christmas, Valentine’s Day, or any festive occasion, these designs capture the essence of celebration.
For winter holidays, consider a deep red base with white snowflakes and bows to get into the festive mood. In spring and summer, pair red bows with pastel colors or floral designs. This versatility allows you to keep your nail game fresh and fun throughout the year!
Tip: Use seasonal colors and designs to keep your nails festive and fun!
Steps:
1. Start with your favorite base coat.
2. Apply seasonal colors and designs.
3. Add red bows to enhance the theme.
4. Seal with a top coat.
Frequently Asked Questions:
– Can I mix different seasonal designs? Yes, feel free to get creative with your seasonal themes!
12. Cute Kawaii Red Bow Nails
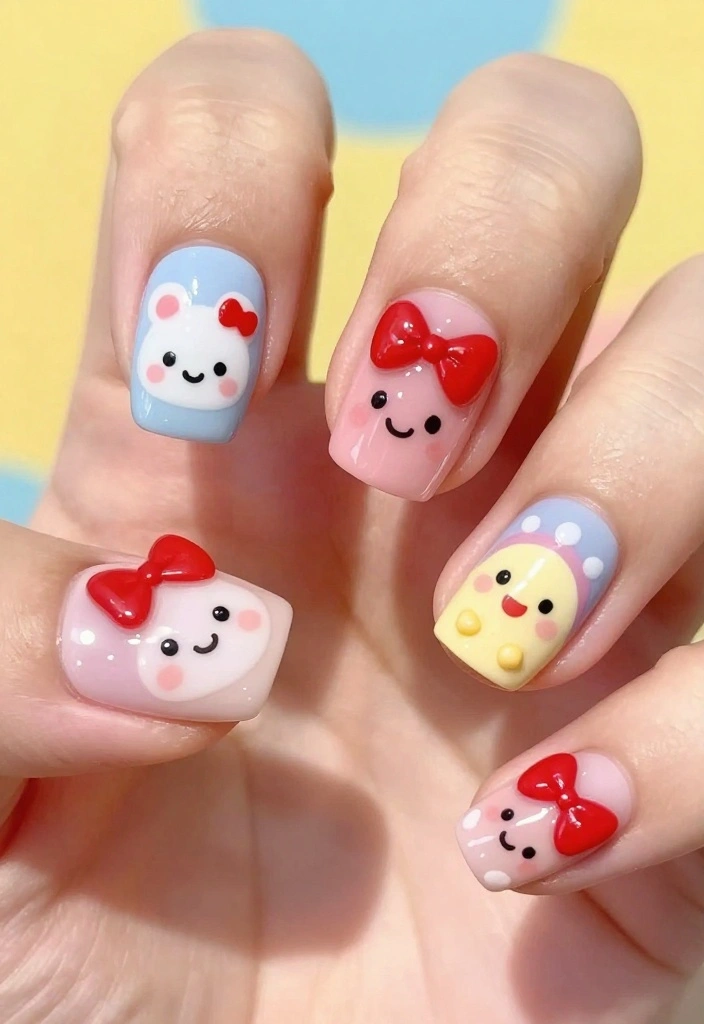
Unleash your inner cutie with kawaii red bow nails! This adorable style is all about sweetness, making it perfect for those who love whimsical designs.
Start with a soft pink or pastel base, adding cute characters or smiley faces alongside your red bows. The fun combination of colors and designs creates a delightful appeal that is ideal for casual outings or fun gatherings. Kawaii designs are all about expression, so let your creativity shine!
Tip: Mix in cute stickers or gems for added fun!
Steps:
1. Apply a base coat.
2. Paint with soft pink or pastel polish.
3. Create cute characters or smiley faces on selected nails.
4. Add red bows to tie in the kawaii theme.
5. Seal with a top coat for a cute finish.
Frequently Asked Questions:
– Can I use stickers for the cute designs? Absolutely! Stickers can make the process quicker and easier.
13. Neutral Tones with Red Bows
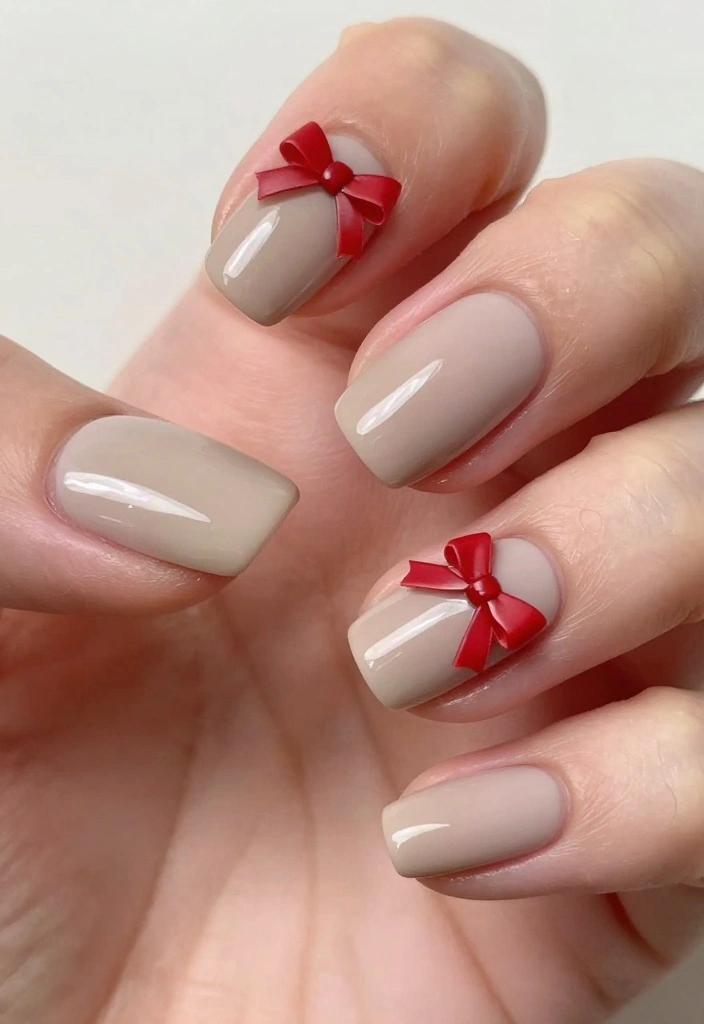
For those who appreciate understated elegance, neutral tones paired with red bows create a stylish look. This design is subtle yet makes a statement, perfect for everyday wear or professional settings.
Start with a light beige or taupe base. Once dry, add tiny red bows to accentuate your clean nails. This combination is chic and versatile, allowing you to wear it on various occasions without feeling overdone.
Tip: Consider mixing different shades of neutrals for added dimension.
Steps:
1. Start with a base coat.
2. Apply two coats of neutral polish.
3. Add tiny red bows on selected nails.
4. Seal everything with a top coat.
Frequently Asked Questions:
– How long will this design last? With proper care and a top coat, it can last up to two weeks without chipping.
14. Creative Layered Red Bows

Mastered nail design? Try creative layered red bows! This trend offers a stunning three-dimensional effect that’s truly eye-catching. Layering adds depth to your nails, making your design stand out even more.
Start with a solid base color of your choice, then create multiple layers of bows in different shades of red on top. Varying sizes can create a fun, playful aesthetic. This design is perfect for those who want to showcase their bold creativity.
Tip: Use different finishes, like matte and glossy polishes, for extra flair!
Steps:
1. Apply a base coat.
2. Paint nails with a solid base color.
3. Layer different sizes and shades of red bows.
4. Seal with a glossy top coat.
Frequently Asked Questions:
– Can I mix different colors for the bows? Absolutely! Mixing colors enhances the creativity of your design.
15. Personalized Red Bow Nail Art
Make your red bow nails uniquely yours with personalized designs! This trend lets you incorporate your favorite elements, colors, and themes into your nail art, ensuring each set is one-of-a-kind.
Start with a base color that resonates with you. Use your imagination to create bows that reflect your personality. You can add initials, favorite colors, or tiny drawings that tell your story. This design is versatile and fun, allowing for endless possibilities!
Tip: Use nail art pens for easy customization!
Steps:
1. Apply a base coat for protection.
2. Choose a base color that speaks to you.
3. Create personalized bows or designs reflecting your identity.
4. Seal everything with a glossy top coat.
Frequently Asked Questions:
– Can I get creative with this design? Yes! The sky’s the limit when it comes to personalization.
Conclusion

Red bow nails are more than just a passing trend; they’re an expression of style and creativity. With so many designs to choose from, there’s something for everyone, no matter the occasion. From classic elegance to bold statements, these nails can be a perfect accessory that complements your outfit.
Explore the various designs mentioned, and let your nails tell your story! Don’t forget to share your favorites and try new combinations to keep your nail game fresh and fun.
Frequently Asked Questions
What exactly are red bow nails, and why are they a hit in nail trends?
Red bow nails are a manicure featuring a glossy red base with a small bow accent on one or two nails. They strike a balance between classic sophistication and playful charm, which is why they’re so popular in nail trends.
Design options include clean, flat decals, delicate stamping, or a tiny 3D bow to add texture. For a timeless look, keep the bow simple in white or black; for a cute nails vibe, opt for a tiny satin bow or rhinestone detail.
Tips: choose a red shade that flatters your skin tone, ensure precise lines with a fine liner brush, and seal with a durable top coat to prevent chipping. They work for every occasion, from workdays to weekends, and pair nicely with minimalist outfits or bold accessories.
How can I recreate trendy red bow nails at home without professional tools?
You can absolutely nail the red bow nails look at home with a few easy steps. Start with a clean canvas: shape nails, push back cuticles, and wipe with a cleanser. Then apply a base coat and two thin coats of red polish, letting each layer dry. For the bow, use either a tiny decal, a stamping design, or paint a small bow with a fine brush (white or black) or a nail art sticker. Finish with a top coat to seal the design and add shine.
If you want extra longevity, try a gel top coat under a UV/LED lamp or use a stronger satin finish for a different vibe. With practice, these red bow nails look polished enough for cute nails or a high-fashion moment.
What variations of red bow nails work for different occasions and skin tones?
Play with shade and bow style to suit any occasion. For professional settings, choose a classic crimson or burgundy base with a minimalist white bow. For cute nails or parties, experiment with a brighter scarlet base and a tiny black or metallic bow, or add a tiny rhinestone for extra sparkle.
Skin tones can influence red choice: cooler reds for lighter skin and deeper burgundies for darker skin tend to pop beautifully. You can also vary the bow: a flat decal for a sleek look, a 3D satin bow for texture, or a delicate stamp for a subtler vibe.
Mix in trendy accents like negative space, negative-space bows, or a tiny bow on just one accent nail to keep things fresh and on point with nail trends and cute nails styling.
What tools and products do I need to achieve long-lasting red bow nails?
Build your kit with essentials for durability and easy application: a base coat, a red nail polish (your chosen shade), a top coat, and a fine nail-art brush or nail art pens for bow details. Add nail decals, a stamping plate or a small 3D bow embellishment if you like, plus tweezers for precise placement. If you’re into gel, include a gel top coat and a UV/LED lamp. Don’t forget cuticle oil and a good nail file for prep.
Pro tips: apply thin coats and seal edges to prevent chipping, cap the free edge with each layer, and wait for complete drying before applying a second coat or top coat. With proper care, your red bow nails will stay fresh longer.
How can I style red bow nails with cute nails and outfits for a coordinated look?
Create a cohesive look by pairing red bow nails with outfits that echo the color or vibe. Try a monochrome black-and-red ensemble to let the nails pop, or wear neutrals (beige, white, nude) to keep the focus on the bow detail. For nail design balance, keep most nails solid red or nude, and use one accent nail with the bow or a small bow motif for a cute nails touch. Accessorize with a red lipstick or a matching red accessory to tie the look together.
Tip: switch up the bow size or finish (matte vs glossy) to match your mood or occasion, and remember to maintain healthy nails with cuticle oil between wears.
Related Topics
red bow nails
nail art designs
trendy nail trends
cute nails
easy nail tutorials
seasonal nail styles
manicure inspiration
beginner friendly nails
fashion nail trends
holiday nail art
detailed nail art
chic nail ideas
I love these red bow nails! They remind me of the time I tried to do my own nails for a party, and I ended up with more polish on my fingers than on the nails. Which design do you think is the easiest to try at home?
These are so cute! I feel like I need to up my nail game. But honestly, if I had a dollar for every time I messed up my nails, I’d have enough for a personal nail artist! 😂
Did you know that red is considered a color of power and passion? These bow nails really make a statement! I might just need to try this for my next big meeting.