The holiday season is upon us, and with it comes the joy of festive cheer! This time of year always reminds me of cozy gatherings, hot cocoa, and, of course, stunning nail art that captures the spirit of Christmas. With all the hustle and bustle, I’ve been craving some creative outlets to express my holiday spirit and unwind. If you’re someone who loves getting crafty and enjoys the festive vibe, this post is just for you!
I’ve gathered 16 delightful DIY Christmas nail ideas that are not only fun but also perfect for hosting a nail party with friends. These nail designs range from playful and whimsical to elegant and chic, ensuring that there’s something for everyone. You’ll find step-by-step instructions to help you recreate looks like Candy Cane Delight and Winter Wonderland, making it easy to get into the holiday spirit. So, grab your nail polish and let’s dive into these festive inspirations that will surely bring a smile to your face!
Whether you’re a nail art novice or a seasoned pro, you’ll find tips and tricks to make your holiday nails shine. You’ll discover creative themes, color combinations, and fun techniques that will elevate your nail game this season. Get ready to unleash your inner artist and impress your friends with designs that scream Christmas cheer!
Key Takeaways
– You’ll learn 16 unique DIY Christmas nail ideas that are perfect for festive gatherings or some personal pampering.
– Each nail design comes with step-by-step instructions, making it easy for you to follow and create beautiful holiday nails.
– These ideas cater to various skill levels, ensuring that anyone can enjoy creating stunning holiday-themed nails.
– Gather your friends for a nail party, turning nail art into a fun, social activity this Christmas.
– Explore tips on color matching and design techniques that will help you elevate your nail art skills during the holiday season.
Contents
- 1. Candy Cane Delight
- 2. Winter Wonderland
- 3. Gingerbread House
- 4. Christmas Lights
- 5. Rudolph the Red-Nosed Reindeer
- 6. Snowman Nails
- 7. Festive Plaid
- 8. Present Nails
- 9. Ornaments Galore
- 10. Nutcracker Magic
- 11. Elf Magic
- 12. Christmas Trees
- 13. Mistletoe Kisses
- 14. Christmas Sweater
- 15. New Year’s Sparkle
- 16. Festive Foil
1. Candy Cane Delight
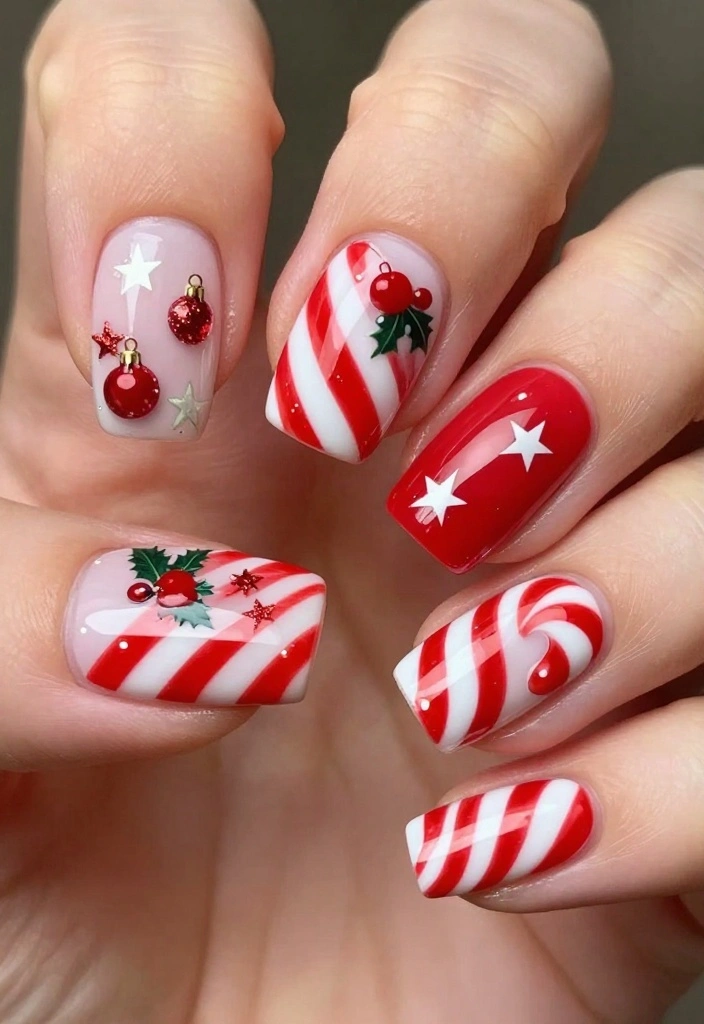
Start your festive nail art journey with delightful candy cane designs! This charming idea combines bright red and crisp white, embodying the sweet spirit of the holidays. Begin by applying a fresh white base coat to your nails. Once it’s completely dry, add diagonal red stripes to create that iconic candy cane look. Finish off with a high-gloss top coat for extra shine and a polished finish.
Using striping tape can help you achieve clean, perfect lines! For a whimsical touch, consider adding tiny bows to the base of each nail using a nail art brush.
Prep Time: 10 mins
Dry Time: 20 mins
Total Time: 30 mins
Servings: 10 nails
Calories: N/A
Ingredients:
– White nail polish
– Red nail polish
– Top coat
– Striping tape (optional)
– Nail art brush
Step-by-Step Instructions:
1. Begin with a base coat to protect your natural nails.
2. Once dry, paint your nails with white polish and let it dry completely.
3. Use striping tape to guide your red lines or carefully paint diagonal stripes.
4. Apply the top coat for shine and durability.
5. Optional: Add tiny bows for a festive flair.
Frequently Asked Questions:
– How can I make the stripes even? Use striping tape or a steady hand.
– What if I’m not good at painting? Practice on a piece of paper first!
💅 Nail Art Made Easy!
Transform your holiday nail ideas into stunning designs with our DIY guide perfect for busy moms!
2. Winter Wonderland
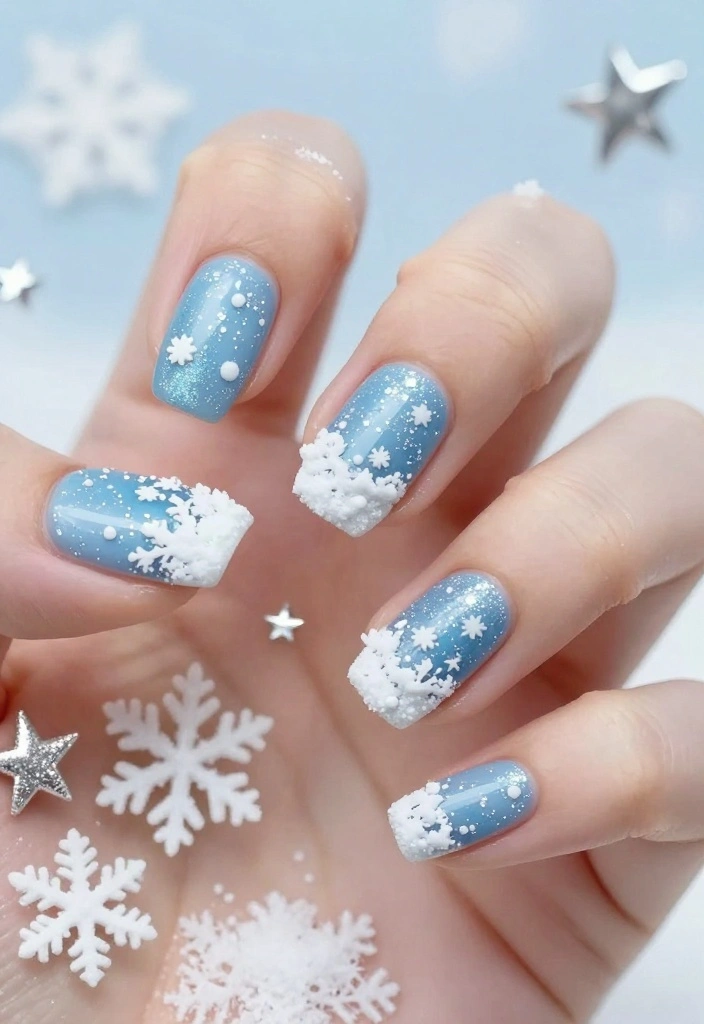
Create a serene winter wonderland on your nails! This gorgeous design features icy blues and shimmering whites, reminiscent of fresh snow blanketing the ground. Start with a soft light blue base coat; once it’s dry, dab on white polish with a sponge for a snowy texture. Finish with a glittery top coat to capture that magical winter essence.
Add tiny snowflakes or silver star details with a nail art brush for extra charm!
Prep Time: 10 mins
Dry Time: 30 mins
Total Time: 40 mins
Servings: 10 nails
Calories: N/A
Ingredients:
– Light blue nail polish
– White nail polish
– Glittery top coat
– Sponge
– Nail art brush
Step-by-Step Instructions:
1. Apply a base coat for protection.
2. Paint your nails with light blue polish and allow to dry.
3. Use a sponge to dab on white polish for that fluffy texture.
4. Finish with a glittery top coat.
5. Optionally, create snowflake designs with a nail art brush.
Frequently Asked Questions:
– Can I use different colors? Absolutely! Feel free to experiment with your favorite winter shades.
– How do I get the snowy texture? The sponge technique is key for that fluffy look.
📹 Related Video: Christmas Nail Art | Winter Wonderland Holiday Nails | Xmas Design tutorial
How To Choose Nail Ideas for Christmas
Choosing the perfect nail ideas for Christmas can be a fun adventure! With so many options, you want to select designs that reflect your style and the holiday spirit. Here are some tips to help you pick the best Christmas nail art ideas for your nail party.
1. Consider Your Skill Level
Before diving into nail art, think about your skill level. If you’re a beginner, you might want to start with simpler designs like snowflakes or candy canes. More experienced nail artists can try intricate patterns like gingerbread houses or Christmas lights. Choose designs that challenge you but are still within reach.
2. Match the Design to Your Outfit
What will you wear to your holiday gatherings? Your nails can complement your outfit beautifully! If you plan to wear a red dress, consider red and white candy cane nails. For a cozy sweater, try festive plaid. Matching your nail designs to your outfits ensures a cohesive look that’s sure to impress.
3. Gather Your Supplies
Think about what supplies you’ll need to create your chosen designs. Basic tools include base coat, top coat, nail polish in various colors, and nail art brushes or dotting tools. If you’re going for glitter or special decals, make sure you have those on hand too. Having everything ready will make your DIY nail art experience much smoother.
4. Plan Your Time
How much time do you have to create your nails? Some designs can take longer than others. If you’re working on intricate art, set aside at least an hour or two. Simpler designs like solid colors or basic patterns may only take 30 minutes. Plan accordingly to ensure you don’t feel rushed and can enjoy the process!
5. Experiment with Colors
Christmas is all about vibrant colors! Traditional reds, greens, and whites are classics, but don’t hesitate to explore other shades. Think about incorporating metallics like gold or silver for a festive sparkle. You can also try ombre effects or even use glittery polish to make your nails stand out.
6. Get Inspired by Trends
Keep an eye on trending nail art styles for the season. Social media platforms like Instagram and Pinterest are great resources for ideas. Look for popular styles, such as matte finishes or 3D designs, and see how you can adapt them to fit your holiday theme. Staying trendy can make your nail art even more exciting!
Pro Tip: Don’t be afraid to mix and match! You can combine different designs on each nail or create a set that tells a story. For example, one nail can feature a snowman, while another showcases a Christmas tree. This playful approach adds personality to your nail art!
With these tips, you’re ready to choose your perfect Christmas nail ideas! Remember, the key is to enjoy the process and let your creativity shine. Whether you’re hosting a nail party or pampering yourself at home, have fun with your festive designs!
3. Gingerbread House
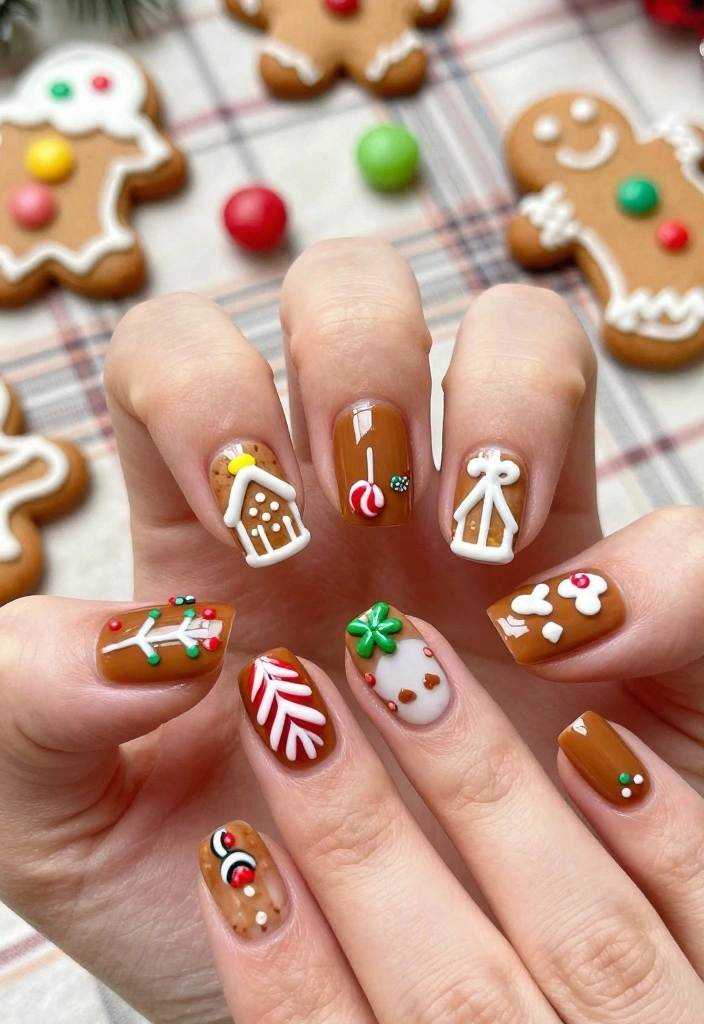
Embrace the warm, cozy vibes of the holidays with gingerbread house nails! This playful design showcases earthy browns and vibrant candy colors. Start with a rich brown base coat, and once it’s dry, use bright reds, greens, and whites to create tiny decorations and windows inspired by classic gingerbread houses. Top it off with a glossy finish for that sweet, delicious look!
Feel free to add tiny candy cane or icing details using a nail art brush for extra fun!
Prep Time: 10 mins
Dry Time: 30 mins
Total Time: 40 mins
Servings: 10 nails
Calories: N/A
Ingredients:
– Brown nail polish
– White, red, and green nail polishes
– Glossy top coat
– Nail art brush
Step-by-Step Instructions:
1. Apply a base coat to protect your nails.
2. Paint your nails with brown polish and let them dry.
3. Use colorful polishes to create decorations on your nails.
4. Add icing details with white polish.
5. Finish with a glossy top coat for shine.
Frequently Asked Questions:
– What if I mess up a design? No worries! Just paint over it and try again.
– Can I use stickers? Definitely! Stickers can make the design process easier.
4. Christmas Lights
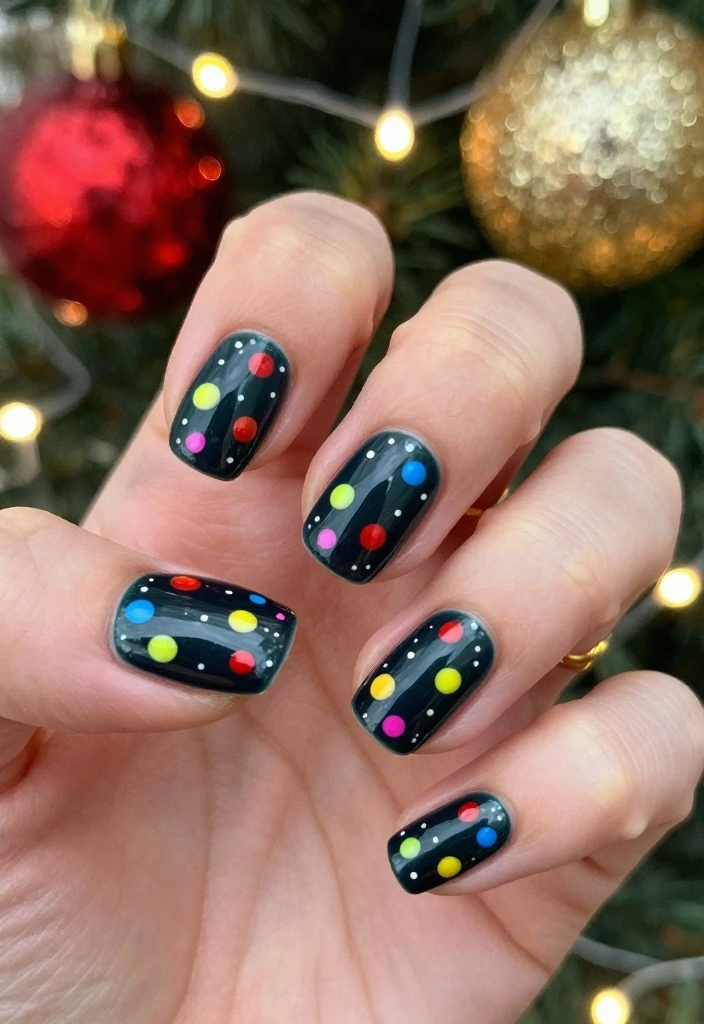
Light up your nails with festive Christmas lights! This vibrant design starts with a black or dark blue base, enhanced by bright neon colors that represent twinkling Christmas lights. Begin by applying your dark base coat, and using a dotting tool or small brush, create colorful dots that mimic the lights. Finish with a top coat for depth and shine.
Layering the dots will give the illusion that the lights are glowing!
Prep Time: 10 mins
Dry Time: 30 mins
Total Time: 40 mins
Servings: 10 nails
Calories: N/A
Ingredients:
– Black or dark blue nail polish
– Neon nail polishes (red, green, yellow, blue)
– Top coat
– Dotting tool or small brush
Step-by-Step Instructions:
1. Start with a base coat for protection.
2. Paint your nails with a dark base color and allow to dry.
3. Use a dotting tool or small brush to create colorful dots.
4. Layer the dots for a glowing effect.
5. Finish with a top coat to seal the design.
Frequently Asked Questions:
– Can I use different colors for the lights? Of course! Use any colors that represent your style.
– How can I make the dots look better? Use a steady hand or a dotting tool for precision.
5. Rudolph the Red-Nosed Reindeer
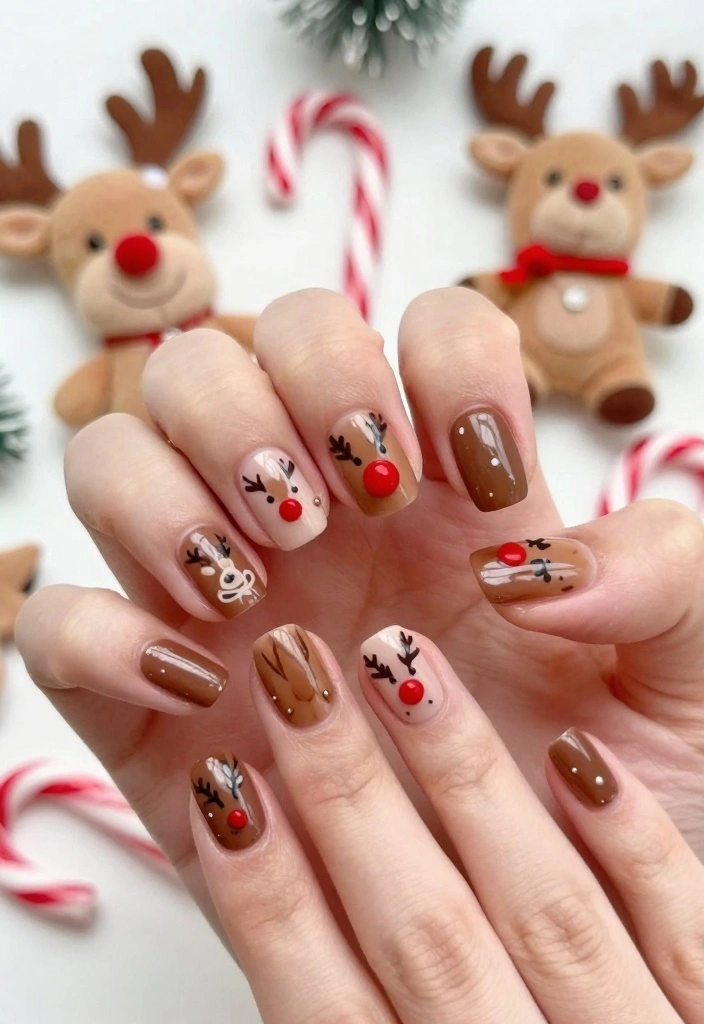
Get into the holiday spirit with charming Rudolph the Red-Nosed Reindeer nails! This delightful design starts with a warm brown base and features a bright red nose. Paint your nails with brown polish, and once dry, use white polish for the eyes and red for the nose. Finish with a glossy top coat for a neat look.
Consider adding cute antler designs on a few nails for added flair!
Prep Time: 10 mins
Dry Time: 30 mins
Total Time: 40 mins
Servings: 10 nails
Calories: N/A
Ingredients:
– Brown nail polish
– White nail polish
– Red nail polish
– Glossy top coat
– Nail art brush
Step-by-Step Instructions:
1. Apply a base coat for protection.
2. Paint your nails with brown polish and let them dry.
3. Create eyes using white polish and add red for the nose.
4. Optionally, add antlers with a nail art brush.
5. Finish with a glossy top coat.
Frequently Asked Questions:
– What if I don’t have a nail art brush? You can use a toothpick or bobby pin as a substitute.
– Can I mix colors? Yes! Get creative with your design.
6. Snowman Nails
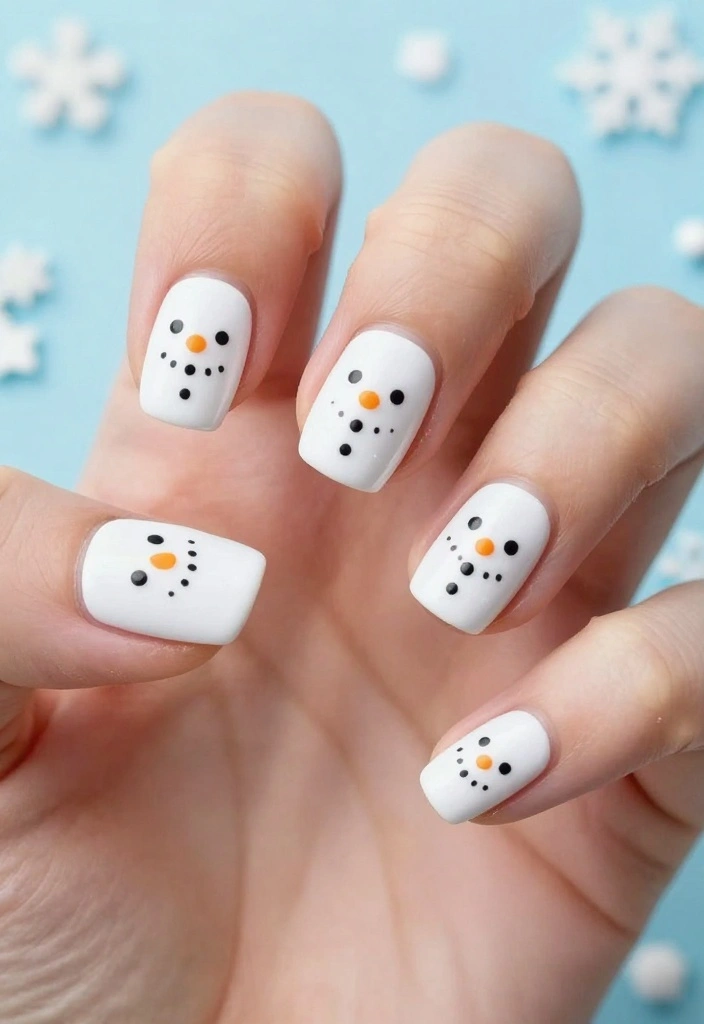
Bring cheerful snowmen to life on your nails with this playful design! Featuring a winter palette of white and blue, this style showcases adorable snowman faces. Start with a white base coat; then, use a dotting tool to create the snowman’s face with black for eyes and orange for the carrot nose. Add a tiny scarf for extra charm and finish with a glossy top coat!
A touch of sparkle in the background can make your snowmen pop!
Prep Time: 10 mins
Dry Time: 30 mins
Total Time: 40 mins
Servings: 10 nails
Calories: N/A
Ingredients:
– White nail polish
– Light blue nail polish
– Black and orange polishes
– Glossy top coat
– Dotting tool or small brush
Step-by-Step Instructions:
1. Start with a protective base coat.
2. Paint your nails white and let dry.
3. Create snowman faces using a dotting tool.
4. Add a scarf with a nail art brush.
5. Seal the design with a glossy top coat.
Frequently Asked Questions:
– Can I make different types of snowmen? Yes! Get creative with accessories.
– What if I mess up the face? Just paint over it and start again!
7. Festive Plaid
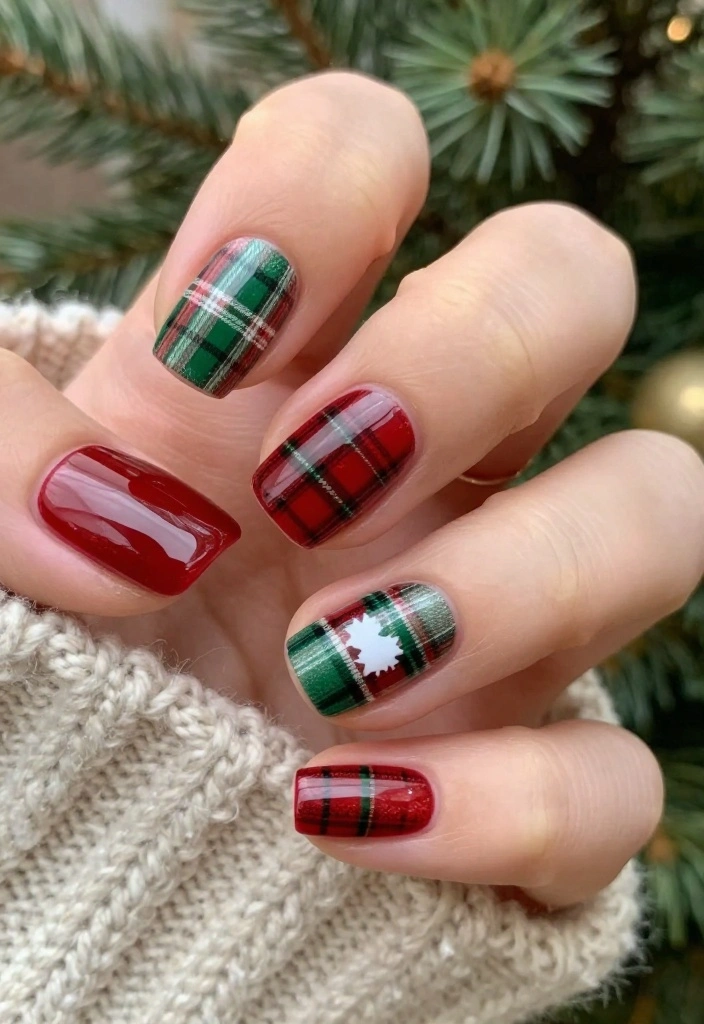
Add a cozy vibe to your holiday nails with a festive plaid design! This classic look combines deep reds, greens, and whites for a warm, rustic feel. Begin with a base coat of rich red polish. Once it’s dry, use a nail art brush to create alternating horizontal and vertical lines with white and green polish, forming a plaid pattern. Finish with a glossy top coat for a chic touch.
For a unique texture, consider using a matte top coat on alternating nails!
Prep Time: 10 mins
Dry Time: 30 mins
Total Time: 40 mins
Servings: 10 nails
Calories: N/A
Ingredients:
– Deep red nail polish
– White nail polish
– Green nail polish
– Glossy top coat
– Nail art brush
Step-by-Step Instructions:
1. Apply a protective base coat.
2. Paint your nails deep red and let dry.
3. Use a nail art brush to create a plaid pattern with alternating colors.
4. Finish with a glossy top coat.
Frequently Asked Questions:
– Can I choose my colors? Definitely! Use colors that suit your personality.
– How do I keep the lines straight? Steady hands and a good brush make a big difference.
8. Present Nails
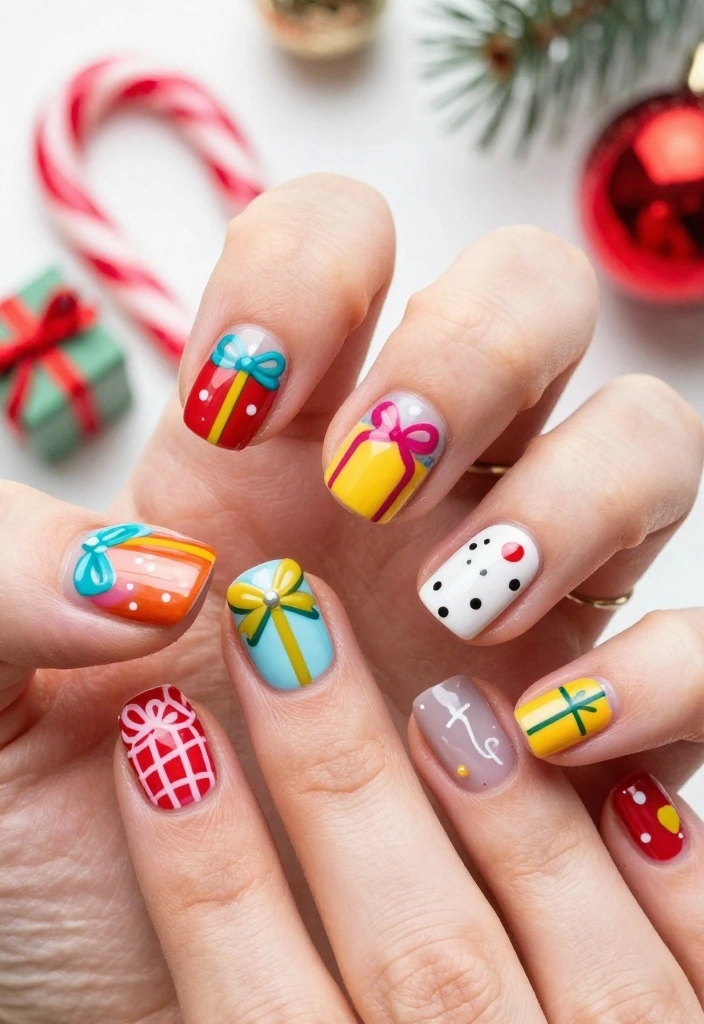
Celebrate the joy of giving with playful present-themed nails! This design uses vibrant colors to create tiny gift boxes on each nail. Start with a base coat of your favorite bright color. Once it’s dry, use a nail art brush to create squares with contrasting colors for gift boxes. Complete the look with little ribbons and bows for that festive finishing touch!
Consider using metallic polishes for an added festive flair!
Prep Time: 10 mins
Dry Time: 30 mins
Total Time: 40 mins
Servings: 10 nails
Calories: N/A
Ingredients:
– Bright base nail polish
– Contrasting colors for gift boxes
– Metallic polishes (optional)
– Glossy top coat
– Nail art brush
Step-by-Step Instructions:
1. Start with a protective base coat.
2. Paint your nails with a bright color and let dry.
3. Use a nail art brush to create gift boxes with contrasting colors.
4. Add ribbons and bows for decoration.
5. Finish with a glossy top coat.
Frequently Asked Questions:
– What if I have shaky hands? Take your time and breathe; practice helps!
– Can I personalize the gifts? Absolutely! Make them reflect your style.
9. Ornaments Galore
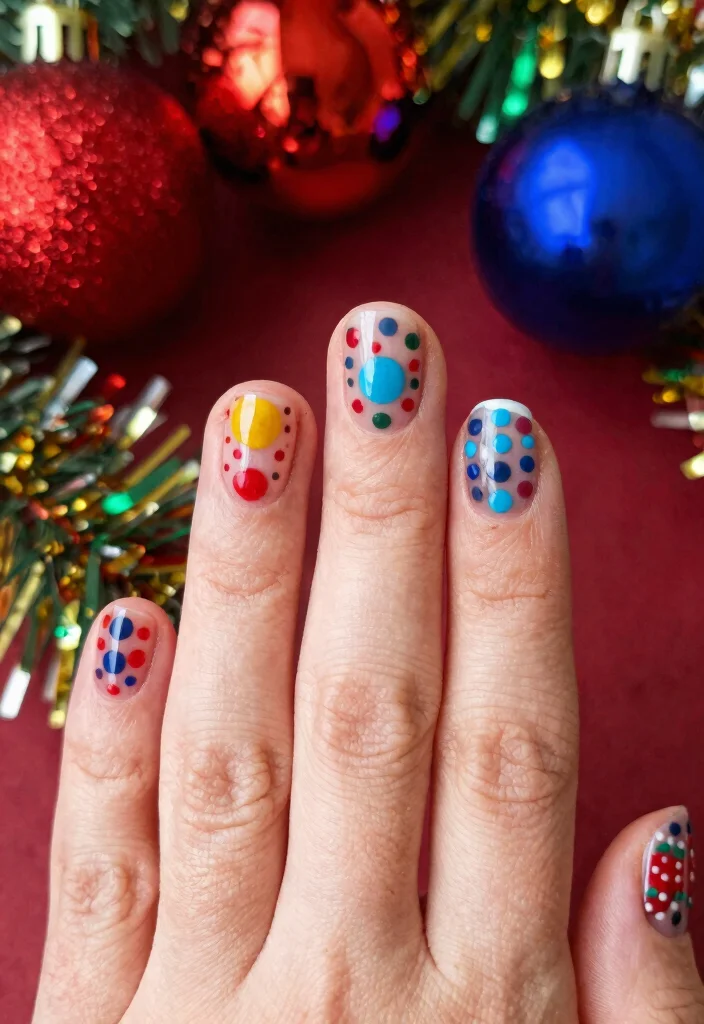
Deck your nails with shiny ornament designs that capture the essence of holiday cheer! Start with a base coat of your favorite holiday color, like deep red, green, or even gold. Once dry, use a dotting tool to create colorful dots that resemble ornaments, adding tiny lines for the ornament hangers. Finish with a glossy top coat for that polished look!
Mixing different sizes of dots can create more visual interest!
Prep Time: 10 mins
Dry Time: 30 mins
Total Time: 40 mins
Servings: 10 nails
Calories: N/A
Ingredients:
– Holiday color base nail polish
– Assorted colors for ornaments
– Glossy top coat
– Dotting tool
Step-by-Step Instructions:
1. Apply a protective base coat to your nails.
2. Paint your nails a festive base color and let it dry.
3. Use a dotting tool to create dots for ornaments.
4. Add small lines for hangers.
5. Finish with a glossy top coat.
Frequently Asked Questions:
– Can I use glitter polish? Yes! Glitter adds extra sparkle.
– What can I use instead of a dotting tool? A toothpick or bobby pin works well as a substitute.
10. Nutcracker Magic
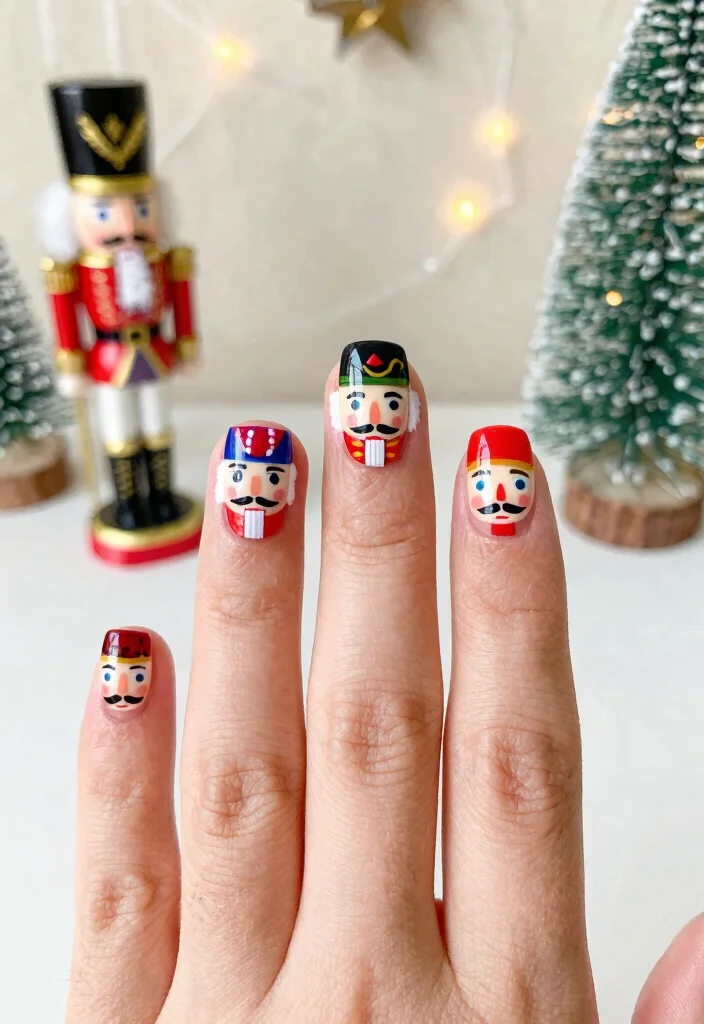
Bring the enchanting world of the Nutcracker to your nails with this whimsical design! Start with a soft pale pink or beige base coat. After it dries, use a nail art brush to create tiny Nutcracker faces, focusing on bright colors for the tunics and hats. Add details like a tiny crown or mustache for those intricate touches! Finish with a glossy top coat to complete your festive look.
If painting isn’t your strength, consider using decals for a quicker design!
Prep Time: 10 mins
Dry Time: 30 mins
Total Time: 40 mins
Servings: 10 nails
Calories: N/A
Ingredients:
– Pale pink or beige nail polish
– Bright colors for details
– Glossy top coat
– Nail art brush or decals
Step-by-Step Instructions:
1. Apply a protective base coat.
2. Paint your nails a pale pink or beige and let dry.
3. Using a nail art brush, create Nutcracker faces.
4. Add details like crowns or hats.
5. Finish with a glossy top coat.
Frequently Asked Questions:
– What if I can’t draw? Stickers or decals can be a great alternative!
– Can I choose different colors? Yes! Feel free to customize the colors.
Nutcracker nails are a festive crowd-pleaser that still feels unique. If painting isn’t your strength, decals are a quick, stress-free option that looks polished in minutes. A pale base and bright tunics make for instant, shareable nail ideas christmas.
11. Elf Magic
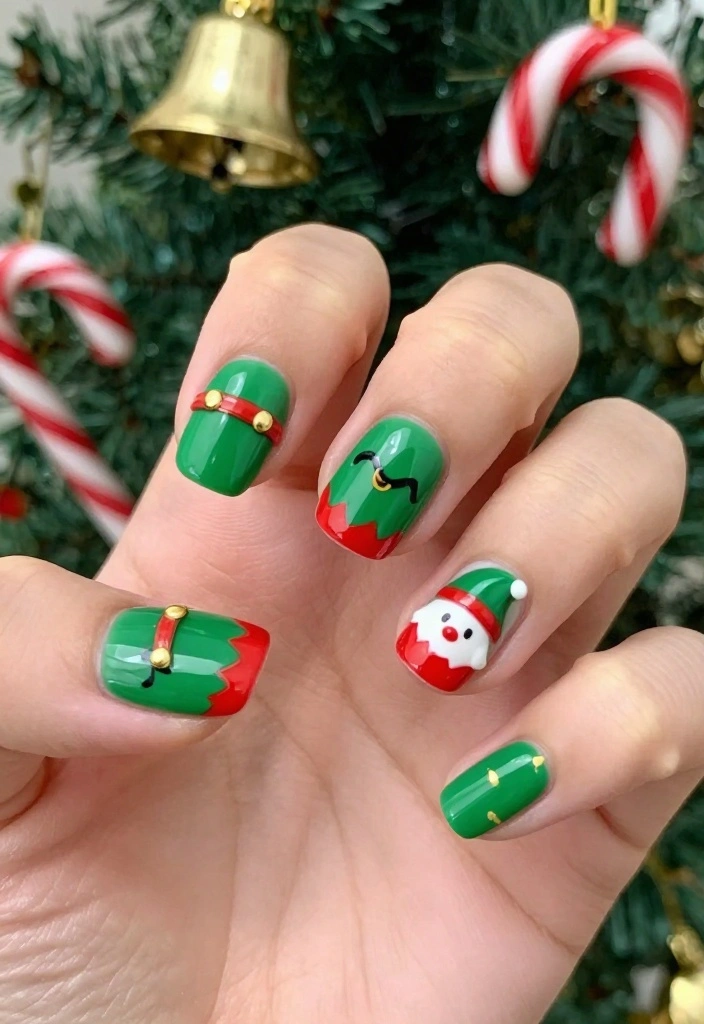
Celebrate the spirit of the season with cheerful elf-inspired nails! Start with a bright green base coat. Once dry, use red polish to create little elf hats or shoes on your nails. Add white polka dots for extra fun and finish with a glossy top coat. For an added whimsical touch, consider adding tiny gold bells to your designs!
A thin brush is great for detailed work, or stickers can speed up the process.
Prep Time: 10 mins
Dry Time: 30 mins
Total Time: 40 mins
Servings: 10 nails
Calories: N/A
Ingredients:
– Bright green nail polish
– Red nail polish
– White nail polish
– Glossy top coat
– Gold nail beads (optional)
– Nail art brush or dotting tool
Step-by-Step Instructions:
1. Apply a base coat for protection.
2. Paint your nails bright green and let dry.
3. Create elf hats or shoes using red polish.
4. Add white polka dots for detail.
5. Finish with a glossy top coat, adding gold beads if desired.
Frequently Asked Questions:
– Can I use different colors? Absolutely! Get creative with your favorite shades.
– How do I get good dots? Use a dotting tool for precision.
12. Christmas Trees
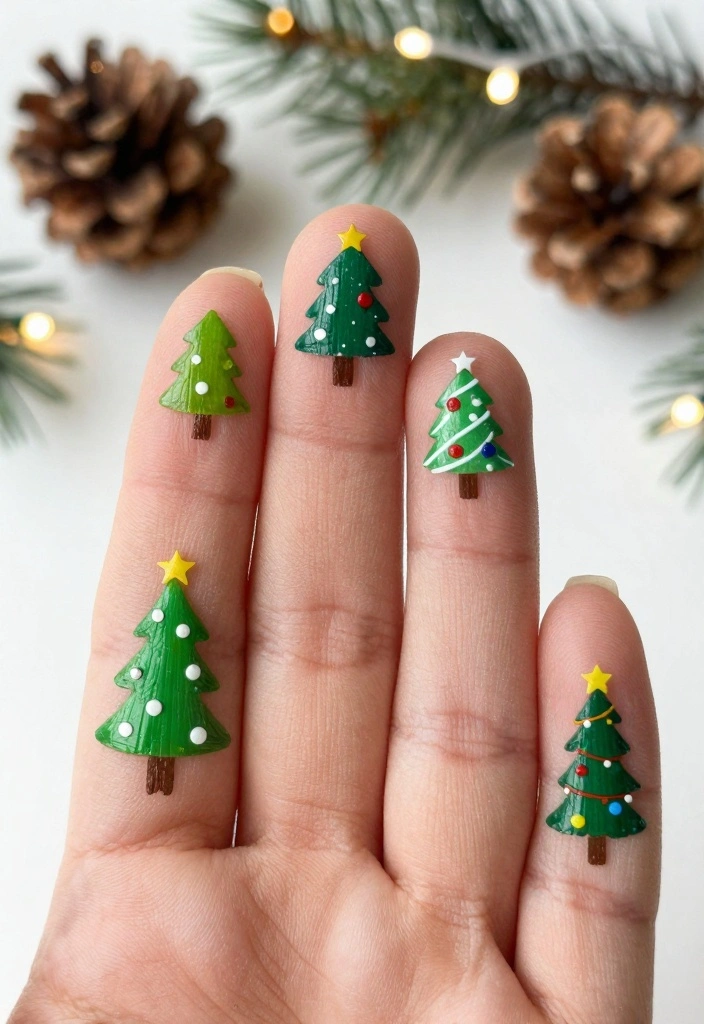
Transform your nails into mini Christmas trees that spread holiday cheer! Begin with a vibrant green base coat. Once it’s dry, use a nail art brush to outline trees, adding colorful ornaments and a star on top. A touch of glitter can enhance the festive feel, and don’t forget to finish with a glossy top coat!
Using different shades of green can create a more dynamic tree look.
Prep Time: 10 mins
Dry Time: 30 mins
Total Time: 40 mins
Servings: 10 nails
Calories: N/A
Ingredients:
– Green nail polish
– Assorted colors for ornaments
– Glitter polish
– Glossy top coat
– Nail art brush
Step-by-Step Instructions:
1. Start with a protective base coat.
2. Paint your nails with a green base and allow to dry.
3. Use a nail art brush to create Christmas trees.
4. Add ornaments and stars for decoration.
5. Finish with a glossy top coat for shine.
Frequently Asked Questions:
– What if I can’t draw trees? Use stickers for a quick design.
– Can I use glitter? Yes! Glitter adds a festive touch.
13. Mistletoe Kisses
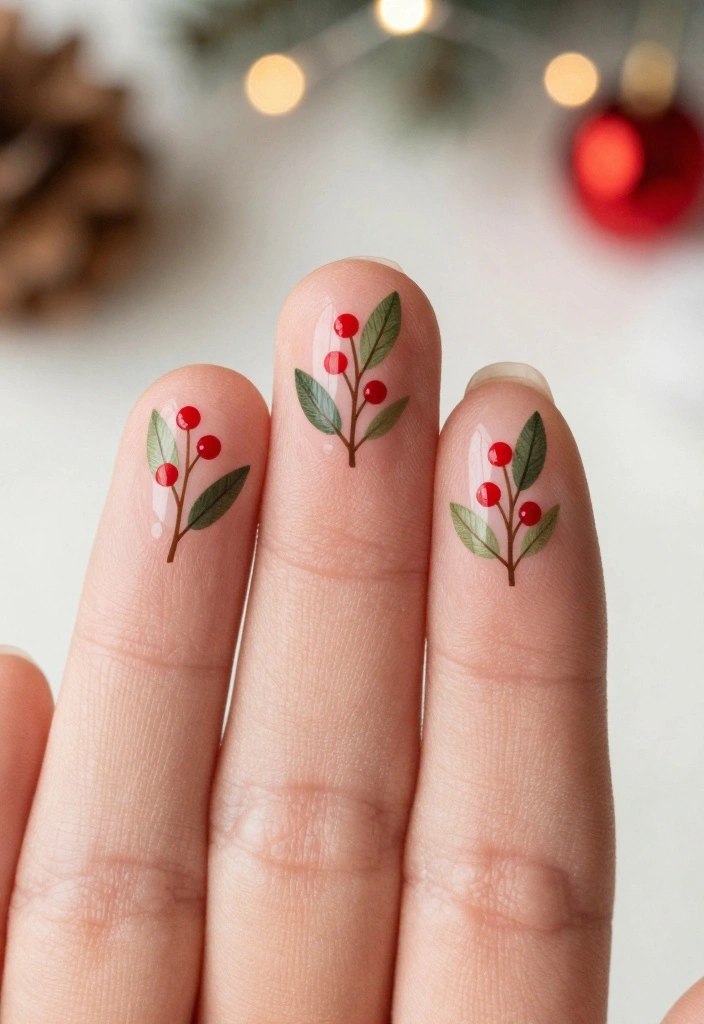
Show off your festive spirit with mistletoe kiss nails! Start with a light pink or nude base coat. Once it’s dry, use green polish to create mistletoe leaves and red for the berries. This subtle yet chic design is perfect for any holiday gathering. Don’t forget a glossy top coat to bring it all together!
Keep the designs simple for an elegant look.
Prep Time: 10 mins
Dry Time: 30 mins
Total Time: 40 mins
Servings: 10 nails
Calories: N/A
Ingredients:
– Light pink or nude polish
– Green nail polish
– Red nail polish
– Glossy top coat
– Nail art brush
Step-by-Step Instructions:
1. Begin with a protective base coat.
2. Paint your nails with a light pink or nude base and let dry.
3. Create mistletoe designs using green and red polishes.
4. Finish with a glossy top coat.
Frequently Asked Questions:
– Can I use darker colors? Yes! Feel free to customize the design.
– How do I make the leaves look more realistic? Use varying shades of green for depth.
Who else is obsessed with mistletoe kiss nails for nail ideas christmas? Start with a nude base, paint tiny green leaves and bright red berries, then seal with a glossy top coat—simple, chic, and perfectly holiday-ready.
14. Christmas Sweater
Bring the cozy vibes of a Christmas sweater to your nails with this fun design! Start with a base coat of your favorite holiday color, then use a nail art brush to create knit patterns or snowflakes. Consider using a matte top coat for that soft, sweater-like finish, making these designs perfect for holiday gatherings.
Mixing up the patterns can lead to a more exciting look!
Prep Time: 10 mins
Dry Time: 30 mins
Total Time: 40 mins
Servings: 10 nails
Calories: N/A
Ingredients:
– Holiday color nail polish
– White or contrasting colors for patterns
– Matte or glossy top coat
– Nail art brush
Step-by-Step Instructions:
1. Start with a protective base coat.
2. Paint your nails with your favorite holiday color and let dry.
3. Use a nail art brush to create sweater patterns.
4. Finish with a matte top coat for that cozy finish.
Frequently Asked Questions:
– Can I mix patterns? Yes! Go ahead and get creative!
– What if I mess up the pattern? It’s okay! Just paint over it and try again.
Fun fact: knit-style nail art grabs more compliments in holiday photos—especially when you mix knit patterns with tiny snowflakes. Pro tip: finish with a matte top coat for that cozy, Christmas sweater vibe and longer-lasting nails—perfect for nail ideas christmas.
15. New Year’s Sparkle
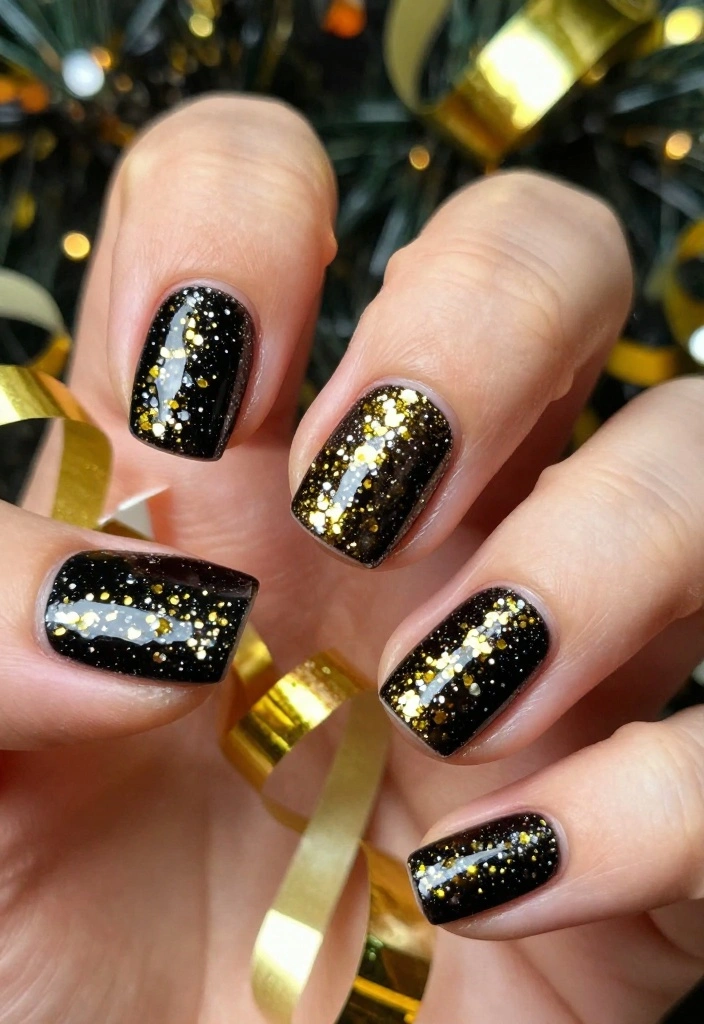
Welcome the New Year with nails that sparkle and shine! Start with a black or deep navy base coat, then layer on gold or silver glitter polish for that extra glamour. Use a nail art brush to create abstract designs or simply apply the glitter to the tips for a chic ombre effect. Finish with a glossy top coat for that celebratory look!
Layering different sizes of glitter can create a more dynamic sparkle.
Prep Time: 10 mins
Dry Time: 30 mins
Total Time: 40 mins
Servings: 10 nails
Calories: N/A
Ingredients:
– Black or deep navy nail polish
– Gold or silver glitter polish
– Glossy top coat
– Nail art brush
Step-by-Step Instructions:
1. Begin with a protective base coat.
2. Paint your nails with a black or navy base and let dry.
3. Apply glitter polish for sparkle, either abstractly or at the tips.
4. Finish with a glossy top coat.
Frequently Asked Questions:
– Can I use other colors? Definitely! Choose colors that reflect your personal style.
– How do I clean up glitter? Use tape to pick up excess glitter. It’s messy but worth it!
16. Festive Foil
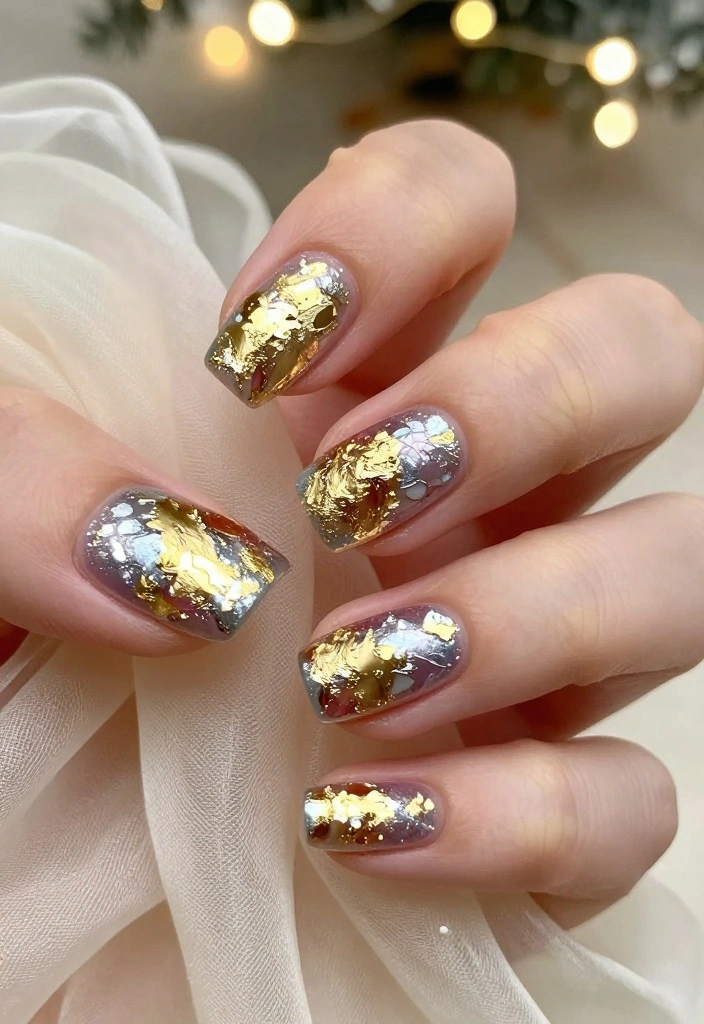
Add a touch of luxury to your holiday nails with stunning foil designs! Start with a base coat of your favorite color. Once dry, tear small pieces of gold or silver foil and apply them randomly across your nails for a chic look. Finish with a glossy top coat to hold the foil in place. This design is perfect for those who love a little glamour!
Experiment with different colors of foil to create a unique vibe.
Prep Time: 10 mins
Dry Time: 30 mins
Total Time: 40 mins
Servings: 10 nails
Calories: N/A
Ingredients:
– Base color nail polish
– Gold or silver foil
– Glossy top coat
Step-by-Step Instructions:
1. Apply a protective base coat.
2. Paint your nails with your base color and let dry.
3. Tear small pieces of foil and apply them randomly.
4. Finish with a glossy top coat to secure the foil.
Frequently Asked Questions:
– Can I use different colors of foil? Absolutely! Get creative with color combinations.
– How do I apply the foil? Use your fingers or tweezers to place the foil.
Conclusion

With these 16 DIY Christmas nail ideas, your holiday season is guaranteed to be filled with fun and creativity! Nail art is not just a trend; it’s a fantastic way to express your personality and holiday cheer. So gather your friends, pick your favorite designs, and host a nail party that brings everyone together for some festive fun. Your nails will be the talk of the town, spreading joy and celebrating the beauty of the season!
Happy crafting and merry nail art!
Frequently Asked Questions
What are some easy DIY Christmas nail ideas I can try at home?
Here are a few easy DIY Christmas nail ideas you can try at home and jump into the holiday spirit.
Idea 1: Candy Cane Stripes – Paint a red or green base, then add white diagonal stripes using tape or a thin brush. Finish with a glossy top coat for lasting shine.
Idea 2: Snowy Tips – Create a white French tip and sprinkle tiny snowflake decals or glitter for a snowy effect.
Idea 3: Festive Dots – Use a dotting tool to place red, green, and gold dots on a neutral base to form a mini poinsettia pattern.
Idea 4: Glitter Accent Nail – Choose one nail per hand and cover it with chunky red or emerald glitter.
Tip: With a simple step-by-step approach to learn these techniques, these nail ideas christmas are perfect for beginners.
How can I host a nail party and keep it fun and organized?
Hosting a nail party is a blast. Here is a quick step-by-step plan to keep it fun and organized:
Step 1 — pick 3–4 nail ideas christmas designs everyone loves.
Step 2 — set up stations with polishes, brushes, nail art tools, and clean towels.
Step 3 — time box each design so people have time to finish.
Step 4 — provide snacks, music, and a few safety and hygiene reminders.
Step 5 — finish with a quick manicure care tip and a mini selfie moment.
This approach creates a festive, inclusive vibe for all skill levels.
What supplies do I need for DIY Christmas nail ideas and how should I choose them?
Stock up on the basics: base coat, top coat, and nail polishes in red, green, white, and metallic shades, plus a clear coat for sealing. Add tools: tape for clean lines, a thin brush, a dotting tool, and a stamping plate if you want extra precision. For embellishments, include glitter, decals, and tiny studs. Don’t forget remover, hand cream, and proper storage. When choosing, prioritize quality brushes and a durable top coat to make your nail ideas christmas last longer.
How can I customize Christmas nail designs for different skill levels or ages?
Designs should scale with the maker. For beginners or kids, use stickers or nail wraps to get crisp results without much practice. For older or more experienced crafters, try freehand stripes, gradient sponging, or small decals. Break designs into tiny steps and practice on a nail swatch first. Use a simple 2–3 color palette and save more complex looks for later. This keeps the process fun and inclusive while delivering festive nail ideas christmas.
Are there beginner-friendly Christmas nail ideas that still look festive?
Absolutely. Try nail ideas christmas like red with white candy cane accents, simple snowflake decals on a blue or white base, or a chic metallic tip with a solid color nail for a festive look. Start with a one-color base, add a single accent nail, and finish with a strong top coat. These beginner-friendly nail ideas christmas designs prove you can get a polished, festive look without a daunting learning curve.
Related Topics
nail art
Christmas nails
DIY nail designs
holiday nail ideas
fun nail techniques
step-by-step tutorial
beginner friendly
nail party
festive nail art
easy nail designs
trendy nail styles
creative nail ideas
These nail ideas are adorable! I can totally picture my friends and me getting together for a nail party, snacks in hand. What’s your favorite design from the list?
I love these DIY nail ideas! I tried to do a snowman once, but it ended up looking more like a potato with arms. Have you ever had a nail fail like that?
Did you know that nail art has been around since ancient Egypt? It’s fun to think about how long people have been getting creative with their nails!
These designs are so cute! I once tried painting candy canes on my nails, and I ended up with more paint on my hands than on the nails. It was a sticky situation!