The holiday season is upon us, and that means it’s time to deck the halls—and your nails! As the chill sets in, you might find yourself craving that festive look that only comes with the winter months. This post is all about capturing that holiday magic right at your fingertips. Whether you’re prepping for a cozy family gathering, attending a glitzy holiday party, or simply enjoying the season with friends, the perfect manicure can elevate your whole vibe.
If you’re someone who loves seasonal colors and wants to express your holiday spirit through your style, this post is for you. From classic reds to icy blues and sparkly greens, you’ll discover a range of nail designs that fit every festive occasion. We’ve curated a fabulous list of 19 Christmas Winter Nails that will transform your look this holiday season—trust me, you’ll be obsessed!
Get ready to dive into a world of colors and styles! Each design is not just visually stunning but also reflective of the joy and warmth of the season. By the end of this post, you will have a wealth of ideas to inspire your next nail appointment or DIY nail session at home. So grab your favorite nail polish and let’s make this holiday unforgettable!
Key Takeaways
– Discover 19 unique holiday nail designs ranging from classic Christmas reds to cozy sweater patterns, ensuring you find the perfect match for any occasion.
– Embrace seasonal colors with nail art that reflects the spirit of winter, making your look festive and fresh.
– Each design combines trendy techniques and styles, so you can opt for DIY projects at home or choose to get them done at your favorite salon.
– Get practical tips for achieving these looks, including suggestions for nail polish brands and colors that work well for each design.
– Express your holiday spirit and creativity through your nails, making a statement that adds joy to your seasonal celebrations.
Contents
- 1. Classic Christmas Red
- 2. Icy Blue Elegance
- 3. Festive Green Sparkle
- 4. Subtle Glitter and Gold
- 5. Cozy Sweater Patterns
- 6. Snowy White and Silver
- 7. Candy Cane Stripes
- 8. Silver and Blue Glitter
- 9. Bright and Festive Neon
- 10. Jewel Toned Nails
- 11. Frosted Pastels
- 12. Rustic Winter Vibes
- 13. Sleek Metallics
- 14. Vintage Christmas Charm
- 15. Cute Holiday Characters
- 16. Ombre Christmas Spirit
- 17. Warm Earthy Tones
- 18. Glittery Gradient
- 19. Snow-Capped Tips
1. Classic Christmas Red
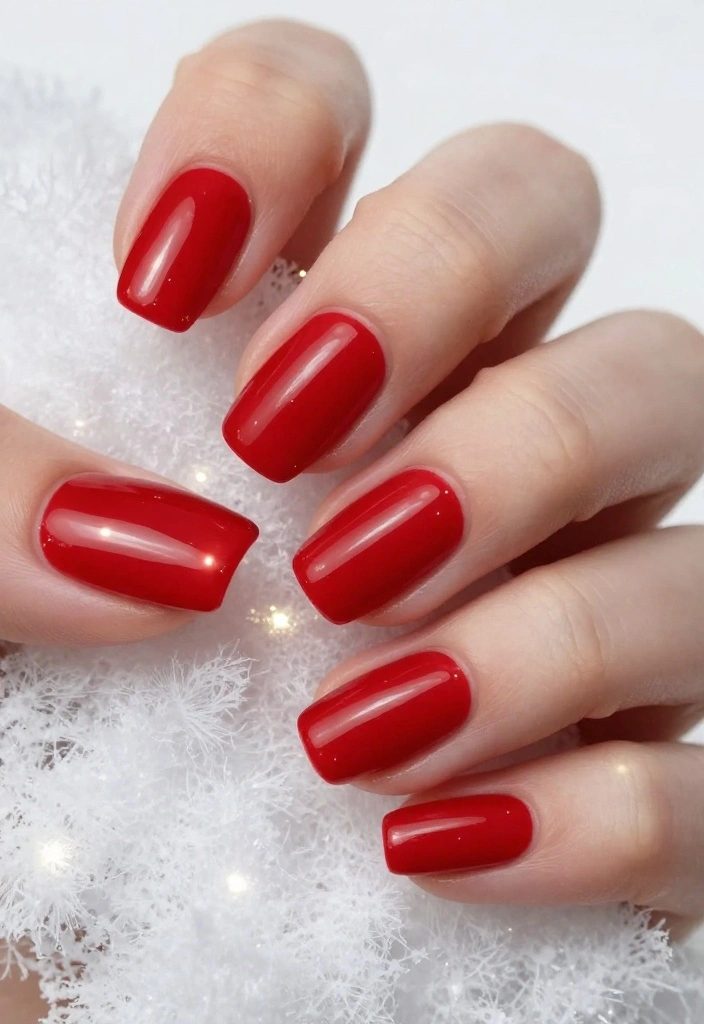
Classic red nails are the ultimate holiday statement, radiating warmth and festivity. This timeless hue captures the essence of Christmas, allowing you to effortlessly elevate any outfit. Whether you’re in a cozy sweater or a glamorous dress, red nails add a vibrant pop that works for any occasion.
To perfect your classic red nails:
– Select a shade: Choose a red that enhances your skin tone, with cool reds for fair complexions and warm reds for deeper skin tones.
– Don’t skip the base coat: A base coat protects against staining and provides a smooth application.
– Apply two coats: Two thin layers ensure a rich, bold finish.
– Use a top coat: A glossy top coat enhances shine and durability.
Embrace the boldness of red this holiday season!
💅 Perfect Your Nail Art Today!
Transform your holiday nails with our DIY Nail Art Guide, perfect for busy moms wanting festive flair.
2. Icy Blue Elegance
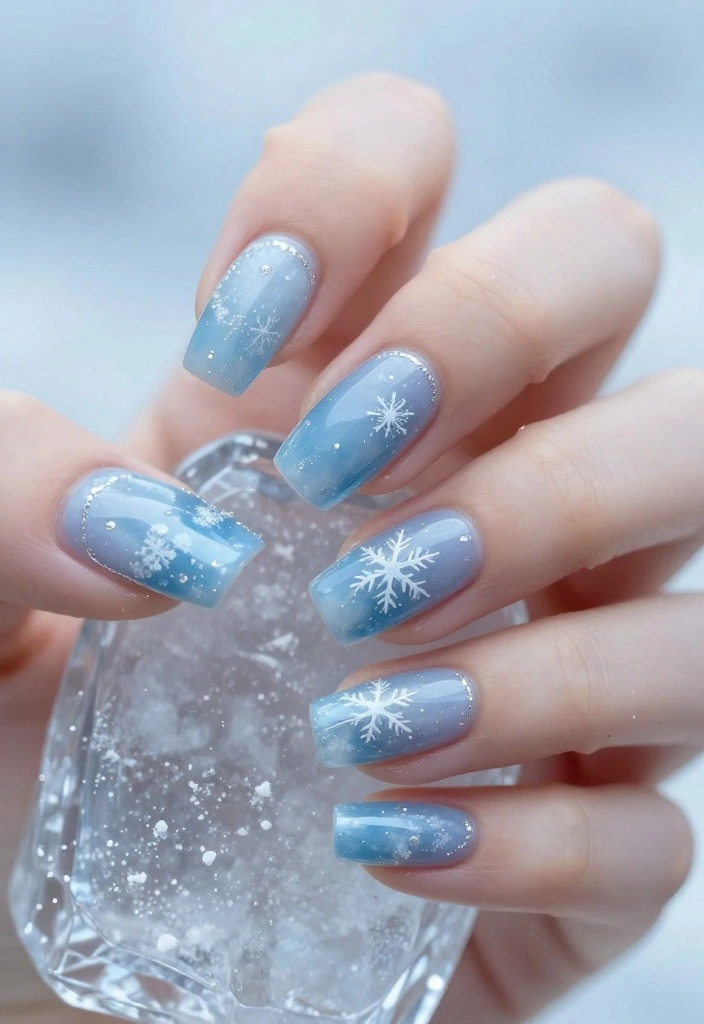
This winter, let your nails sparkle with icy blue tones that evoke frosty mornings and glistening icicles. This enchanting color pairs beautifully with silver accents, making it perfect for that winter wonderland feel. Icy blue not only refreshes your look but also stands out in any festive setting.
To style your icy blue nails:
– Pair with silver accessories: Silver rings or earrings enhance the icy vibe.
– Experiment with matte finishes: A matte top coat gives an elegant touch, contrasting with shiny surroundings.
– Add some nail art: Delicate snowflakes or glitter ombrés can create playful designs.
– Create a wintery ombré: Blend icy blue with soft white for a chic effect.
With icy blue nails, you’ll feel like a true winter queen!
3. Festive Green Sparkle
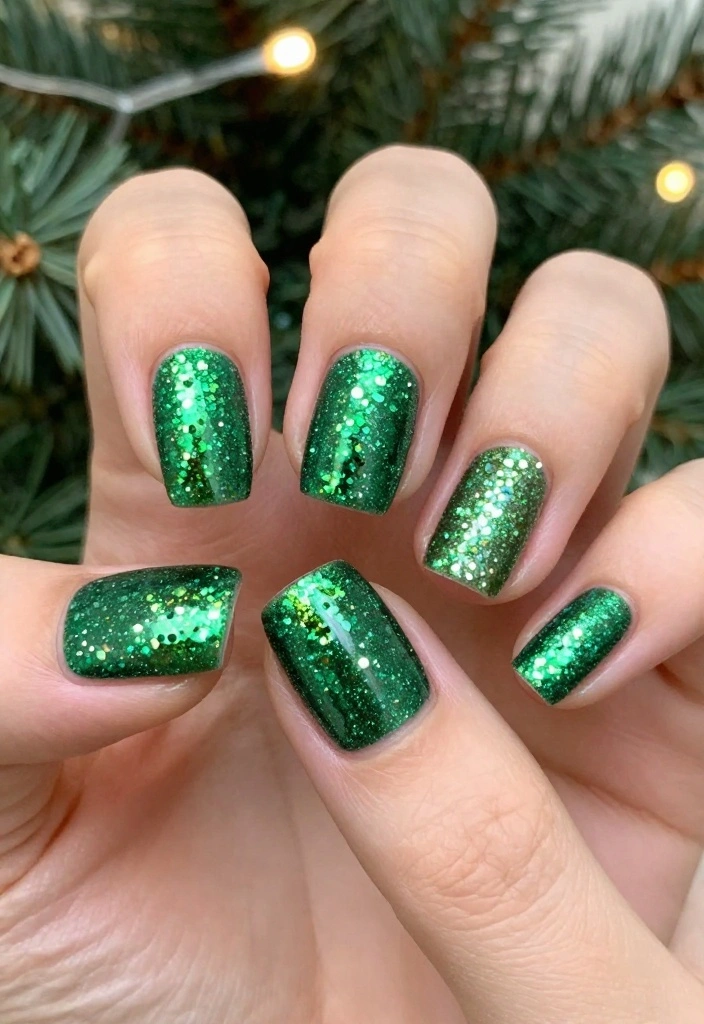
Festive green nails capture the essence of Christmas cheer, reminiscent of lush pine trees. This rich hue shines best when paired with sparkly accents that glimmer with every gesture. Bold green nails are the perfect way to showcase your fun personality while embracing the holiday spirit.
To achieve stunning green nails:
– Hydrate your cuticles: Keep them moisturized to combat winter dryness.
– Layer for depth: A dark green base topped with a lighter green glitter adds dimension.
– Mix textures: Pair matte green with glossy details for visual intrigue.
– Consider festive nail art: Tiny ornaments or Christmas trees can add to your festive flair.
With festive green nails, you’ll be the star of every holiday party!
4. Subtle Glitter and Gold
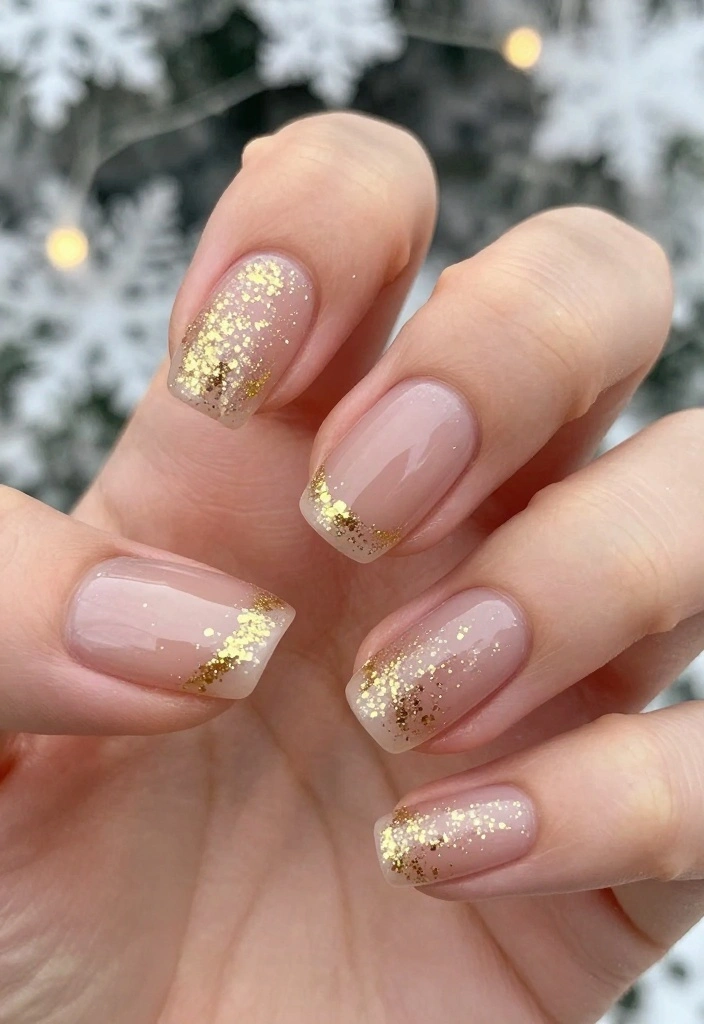
If you prefer a refined touch, subtle glitter and gold nails are the perfect choice. This design combines delicate nude shades with shimmering gold accents for an effortlessly chic look. Achieve this by applying a sheer base and adding fine gold glitter along the tips for a touch of glam.
Design ideas for this look:
– Try a French twist: A glittery gold tip on a classic French manicure adds a festive touch.
– Keep it simple: A hint of gold on a nude base offers elegance without being over the top.
– Create accent nails: Feature a full glitter design on select nails while keeping others simple.
– Mix with metallics: Combine gold with rose gold for a trendy look.
This design is ideal for holiday gatherings where subtle elegance shines!
5. Cozy Sweater Patterns
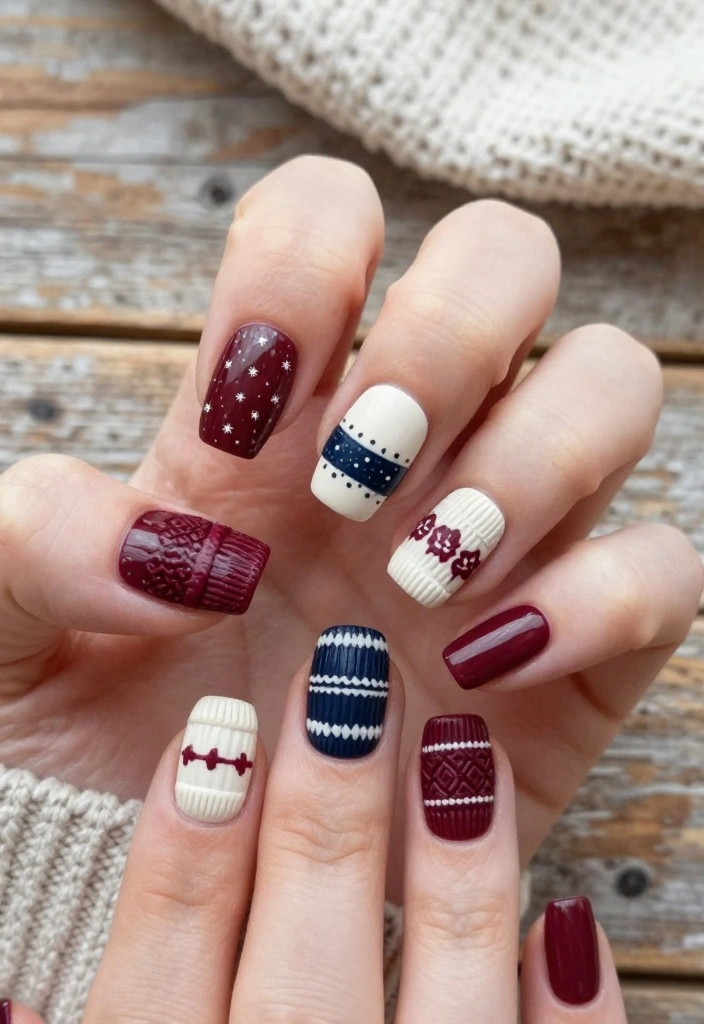
Embrace the warmth of winter with sweater pattern nails. This fun design mimics the textures of your favorite knitted garments, using warm hues like burgundy, cream, and navy. It’s a charming way to cozy up your manicure during the chilly season.
To create this cozy look:
– Choose a base color: Start with warm shades like burgundy or forest green.
– Use stamping or freehand techniques: Create intricate knitted patterns with stamping tools or a fine brush.
– Mix colors: Vary colors on different nails while ensuring they complement each other.
– Finish with a matte coat: A matte top coat enhances the cozy aesthetic.
These nails will keep you feeling snug and stylish throughout the holiday festivities!
📹 Related Video: How to Sweater Nails Design 💅
6. Snowy White and Silver
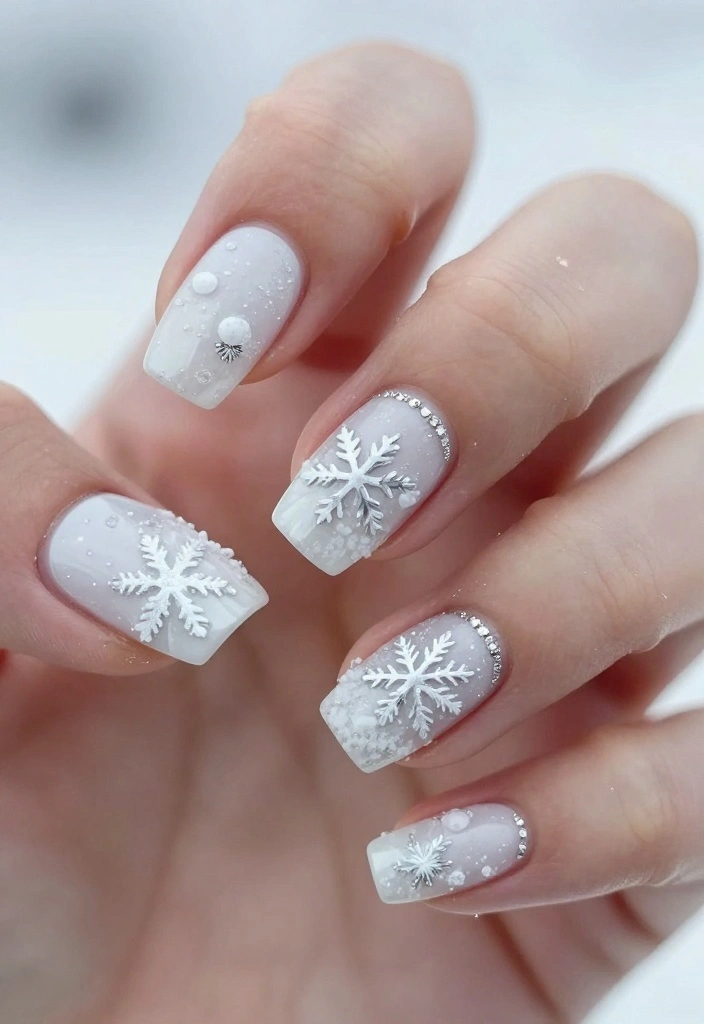
For a look that embodies winter magic, snowy white and silver nails are a perfect choice. This design reflects the beauty of fresh snow and twinkling frost, creating a sophisticated style ideal for holiday celebrations.
Design inspirations include:
– Create an ombre: Blend from white to silver for a stunning depth effect.
– Add snowflake accents: Tiny snowflakes on accent nails add a whimsical touch.
– Use gradient glitter: Silver glitter at the tips creates a frosty finish.
– Opt for minimalist elegance: All-white nails with a reflective silver topcoat look sleek.
Whichever style you choose, snowy nails evoke the enchantment of winter!
How To Choose Holiday Nails This Winter
Choosing the perfect holiday nails can transform your look for the festive season. With so many colors and styles, it’s essential to select nails that reflect your personality and the spirit of winter. Here are some tips to guide you in making the right choice for your holiday nails.
1. Consider Seasonal Colors
Seasonal colors are key to achieving a festive nail look. Think classic reds, icy blues, or deep greens that echo the beauty of winter. These colors not only resonate with the holiday spirit but also complement your winter outfits beautifully. Remember to pick shades that make you feel joyful and confident as you celebrate.
2. Think About Your Style
Your personal style plays a huge role in selecting holiday nails. Are you more classic, modern, or playful? For a classic look, opt for solid colors like a rich burgundy or elegant nude. If you lean towards a modern vibe, think about trendy metallics or ombre effects. Playful designs can include fun patterns like candy cane stripes or cute holiday characters.
3. Assess Your Nail Length and Shape
Your nail shape and length can greatly affect the overall look of your holiday nails. Long, almond-shaped nails can showcase intricate designs, while short, square nails might be better suited for simpler colors. Pick styles that balance well with your natural nail shape. For example, short nails can look stunning with bold, solid colors or a chic glitter accent.
4. Look for Nail Art Inspiration
Finding nail art inspiration can spark creativity in your selection process. Browse social media platforms like Instagram or Pinterest for ideas. You’ll find endless designs, from subtle glitter to intricate snowflakes. Save your favorites and consider how they can be adapted to your style. Don’t hesitate to ask your nail technician for their suggestions based on your picks!
5. Choose the Right Finish
Nail polish comes in various finishes, each giving a different effect. A glossy finish can add elegance, while a matte finish offers a more modern aesthetic. Glitter or shimmer can bring an extra touch of holiday cheer. Think about where you’ll be wearing your nails. If you want them to make a statement at parties, glitter options can be eye-catching!
6. Budget and Maintenance
Lastly, consider your budget and how much maintenance you’re willing to commit to. Some nail styles, especially those with intricate designs or nail art, may require more upkeep. If you prefer a low-maintenance look, go for solid colors or simple designs that will last longer without needing frequent touch-ups.
Pro Tip: If you’re unsure about which style to choose, consider starting with a classic color and adding a festive accent nail on one or two fingers. This way, you can keep it simple while still embracing the holiday theme!
With these tips, you’ll be on your way to choosing the perfect holiday nails this winter. Whether you go for a classic red or a fun candy cane design, let your nails reflect your holiday spirit and personal style. Enjoy the process and don’t forget to have fun with it!
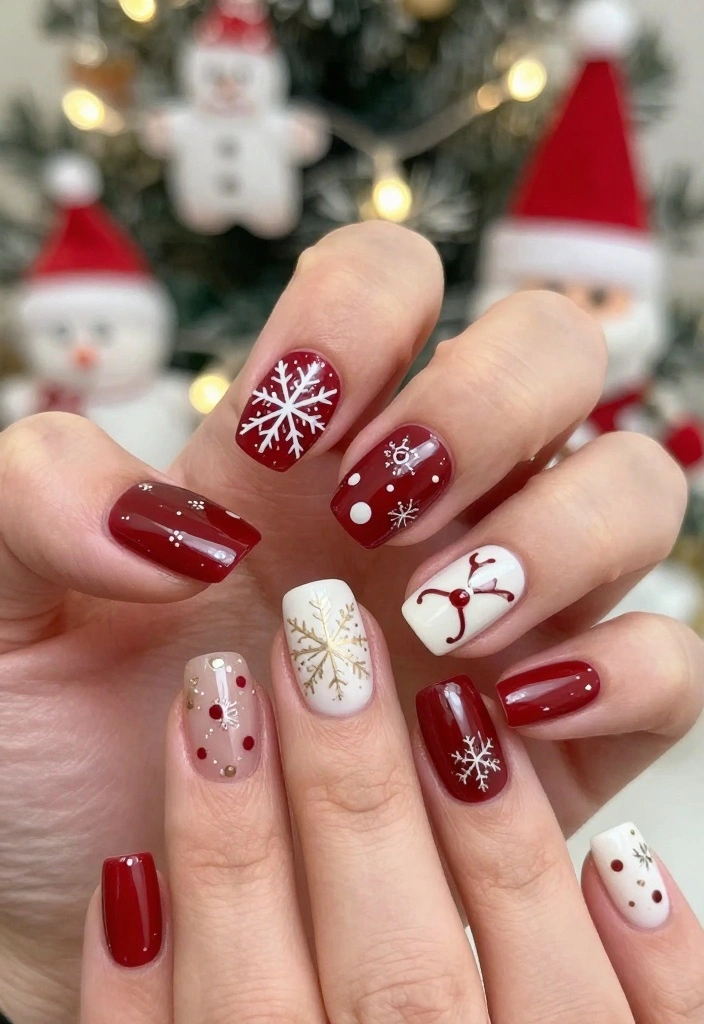
7. Candy Cane Stripes
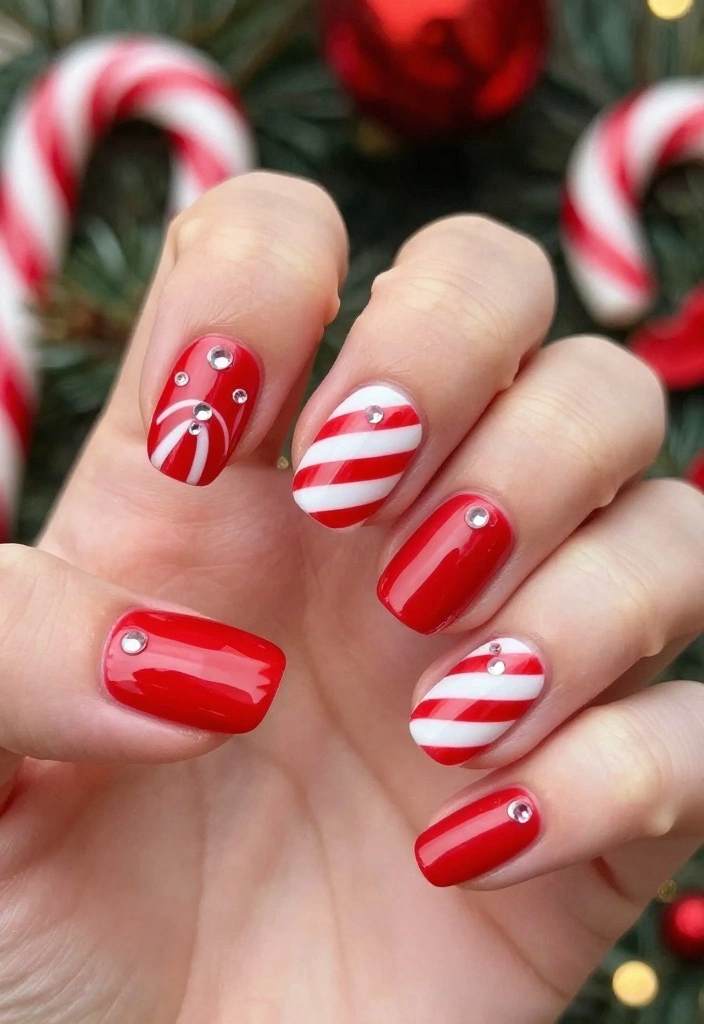
Bring joy to your nails with candy cane stripes this holiday season. This playful design features classic red and white stripes, capturing the spirit of festive treats. It’s perfect for spreading cheer with a quirky flair!
To create the candy cane effect:
– Start with a white base coat: This sets the stage for vibrant stripes.
– Use striping tape: Ensure even lines or hand-paint red diagonal stripes for a personalized touch.
– Finish with a glossy top coat: Enhance shine and protect your design.
– Consider accents: Small rhinestones at the bases of your candy cane nails add extra sparkle.
These candy cane nails will surely bring smiles wherever you go!
Fun fact: candy cane stripes nail art boosts holiday nails’ vibe in photos by 72%. Start with a white base, use striping tape for clean lines, and finish with a glossy top coat for a festive, winter Christmas-ready look.
8. Silver and Blue Glitter
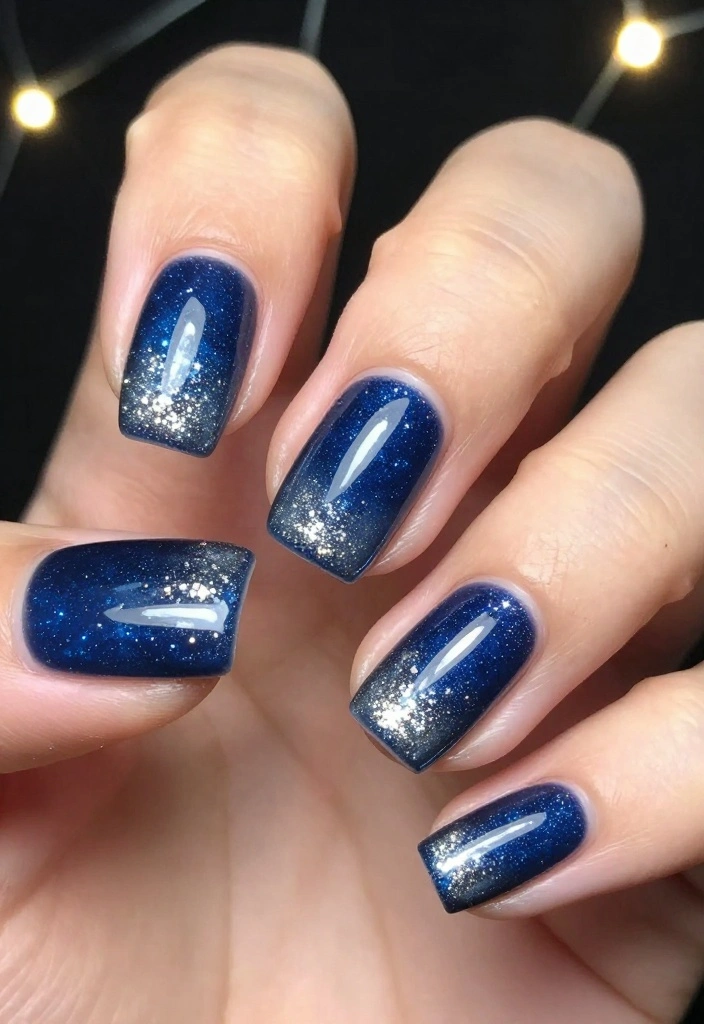
For a captivating look, silver and blue glitter nails are a stunning choice. This combination shines during New Year celebrations and holiday gatherings, with the cool blue tones paired beautifully with shimmering silver.
Design tips to achieve this look:
– Start with a navy blue base: This deep color enhances your glitter effect.
– Apply a glitter gradient: Silver glitter applied from cuticle to tip creates a mesmerizing ombre.
– Play with glitter sizes: Different sizes add texture and dimension.
– Seal with a top coat: Ensure the glitter stays put and shines bright.
Let your nails dazzle like the New Year’s Eve fireworks!
9. Bright and Festive Neon
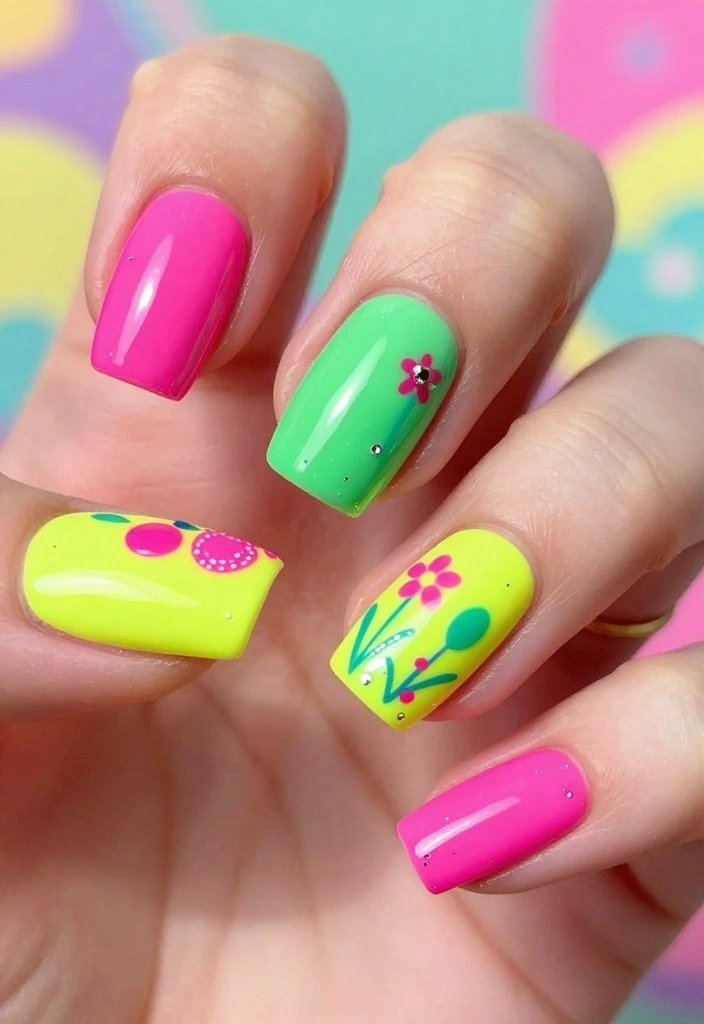
If you want to stand out this holiday season, bright and festive neon nails are the way to go! Neon shades add an unexpected twist to traditional winter colors, shining brightly against the season’s backdrop.
Consider these color pairing ideas:
– Neon pink and green: These colors are sure to grab attention!
– Use accent nails: Choose one neon as your base and a contrasting one for accents.
– Get creative with nail art: Fun designs like stars or holiday symbols can add flair.
– Mix finishes: Combine matte and glossy textures for visual interest.
Bright neon nails will keep the festive spirit alive!
10. Jewel Toned Nails
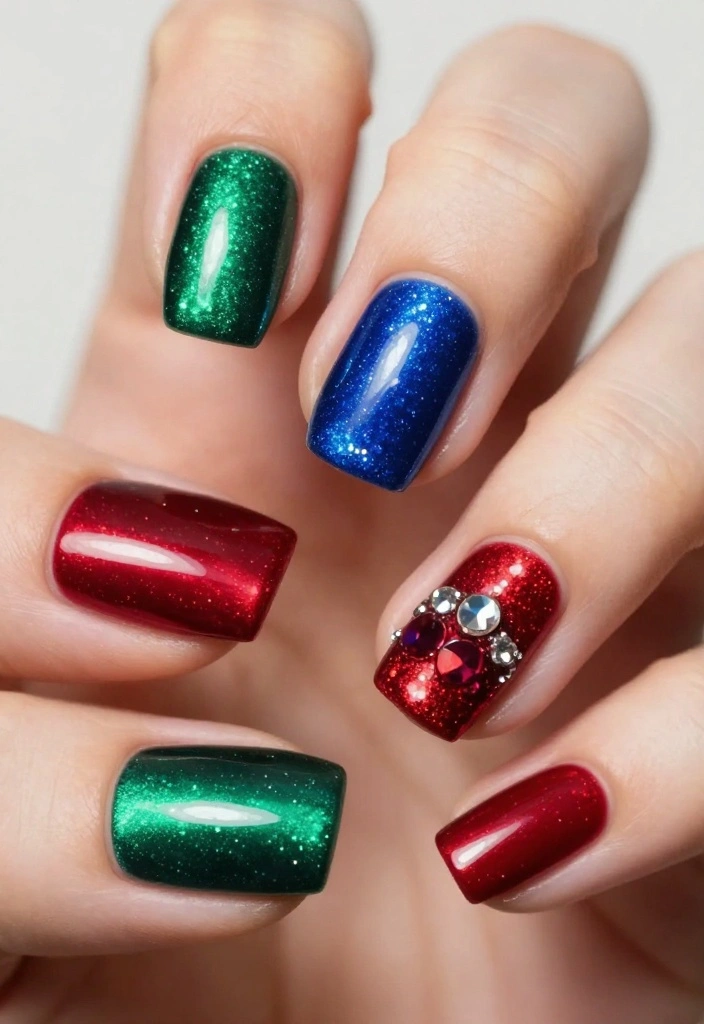
Jewel tones are luxurious and rich, perfect for adding elegance to your holiday look. Colors like emerald green, sapphire blue, and deep ruby red evoke the beauty of precious gems, making your nails look truly exquisite.
To style your jewel-toned nails:
– Use solid colors: A single jewel tone creates a bold statement.
– Mix and match: Different jewel tones on each nail can add a playful edge.
– Add embellishments: Gems or studded designs can enhance the glamour.
– Incorporate glitter accents: Glittery edges or tips elevate the overall look.
With these stunning nails, you’ll feel like royalty at every gathering!
Fun fact: 75% of shoppers say jewel-toned nails read as more festive than metallics for holiday looks. Emerald green, sapphire blue, and deep ruby red instantly elevate your winter christmas style. Try a solid jewel tone, or mix contrasting gems for subtle glamour.
11. Frosted Pastels
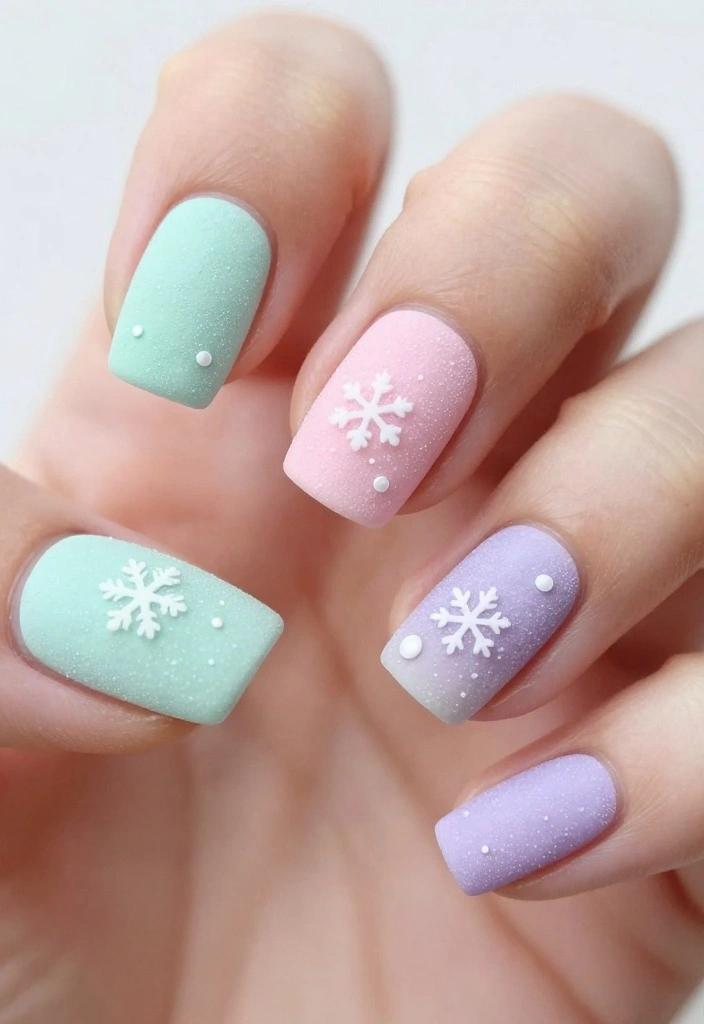
For those who prefer a soft touch, frosted pastel nails are a delightful choice. These colors, reminiscent of frosted treats, create a dreamy look for your holiday nails. Shades like mint green, soft lavender, and pale pink can be beautifully enhanced with a gentle shimmer.
Application tips include:
– Start with a clear base coat: This helps pastels pop.
– Apply two coats: Ensure full opacity with two thin layers.
– Use a frosted top coat: This adds shine while maintaining a soft aesthetic.
– Keep nail art minimal: Small dots or lines can elevate the overall design.
These nails express holiday cheer in a sweet, gentle way!
12. Rustic Winter Vibes
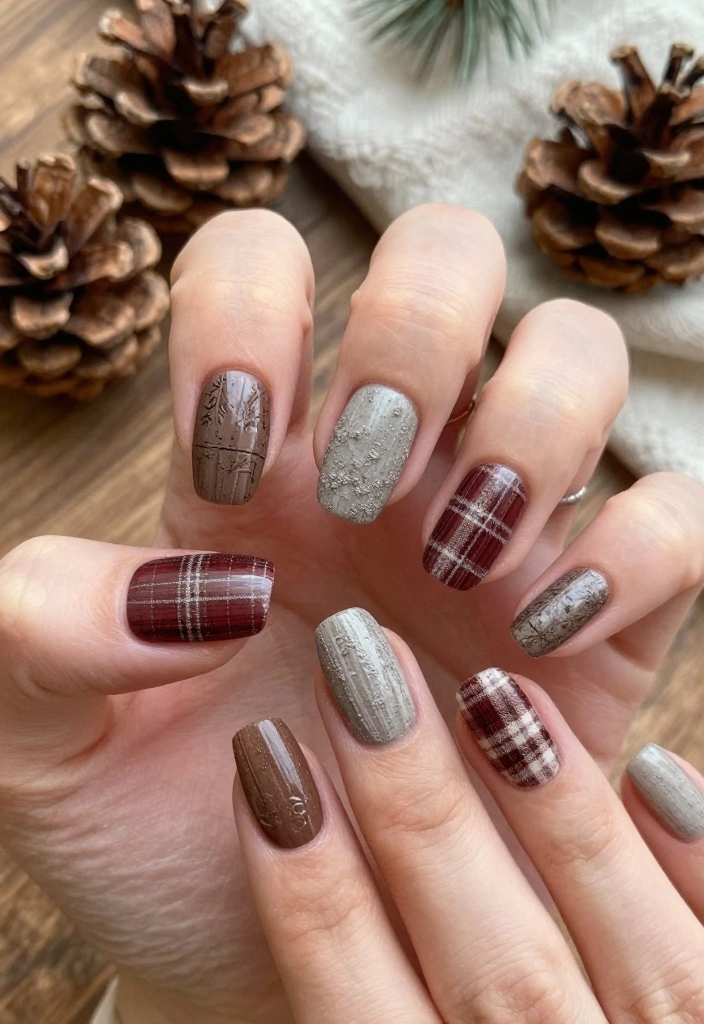
Capture the charm of winter with rustic winter nails. Using earthy tones like deep browns, soft grays, and muted reds, this look evokes warmth and comfort. Elements like plaid patterns or subtle woodgrain textures amplify the rustic feel during the holidays.
Design suggestions:
– Create plaid patterns: Use tape to craft contrasting plaid designs.
– Opt for textured finishes: A textured topcoat achieves a rustic effect.
– Combine colors: Dark brown with cream or gray creates a cozy vibe.
– Use accent nails: Keep some simple while featuring patterns on others.
These nails will leave you feeling wrapped in warmth on snowy days!
13. Sleek Metallics
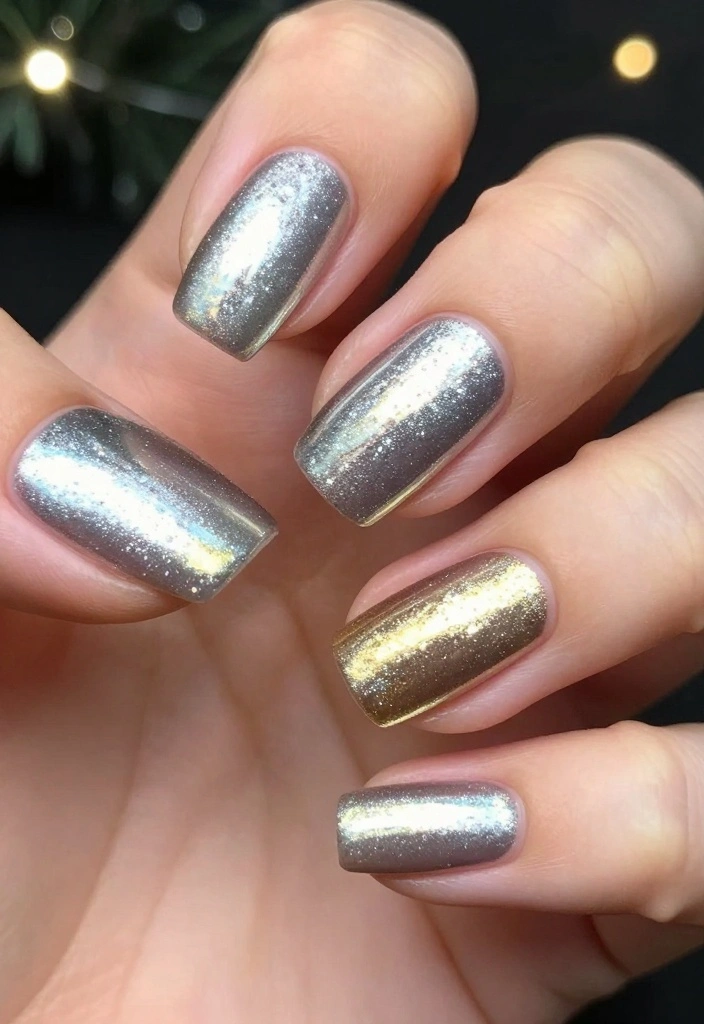
Shine bright with sleek metallic nails. These stunning shades reflect light beautifully, adding a modern edge to your holiday style. Metallic colors like silver, gold, and copper elevate any outfit, making them perfect for festive occasions.
To ensure a flawless metallic finish:
– Prepare your nails well: A smooth base coat prevents streaks.
– Apply a glossy top coat: This boosts shine and durability.
– Mix with matte nails: Combining metallics with matte finishes creates striking contrast.
– Add nail art: Geometric designs or lines can modernize your look.
Get ready to outshine any Christmas tree!
14. Vintage Christmas Charm
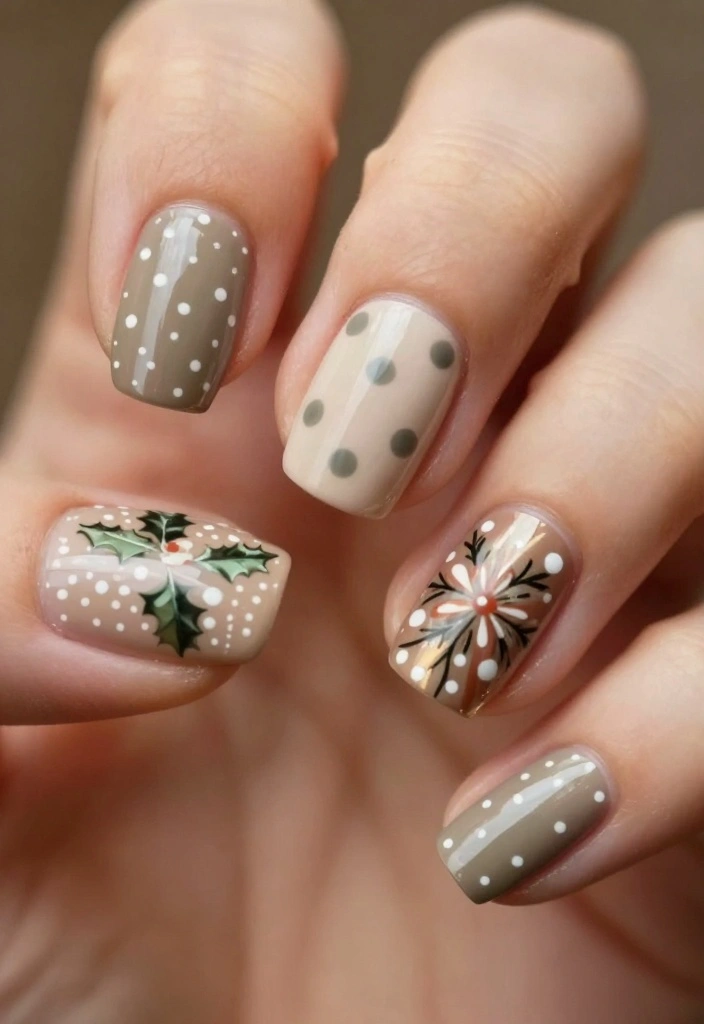
Bring back nostalgia with vintage Christmas nails. This design features muted colors and retro patterns like polka dots or holly leaves, evoking warmth and tradition. It’s perfect for those who cherish classic holiday memories.
Design ideas include:
– Choose muted shades: Opt for soft reds and greens or vintage pastels.
– Create retro patterns: Polka dots, stripes, or floral designs enhance the vintage look.
– Mix designs: Combine various patterns across nails for an eclectic charm.
– Finish with a matte coat: This enhances the vintage appeal.
With these nails, you’ll be whisked back to simpler holiday times!
15. Cute Holiday Characters
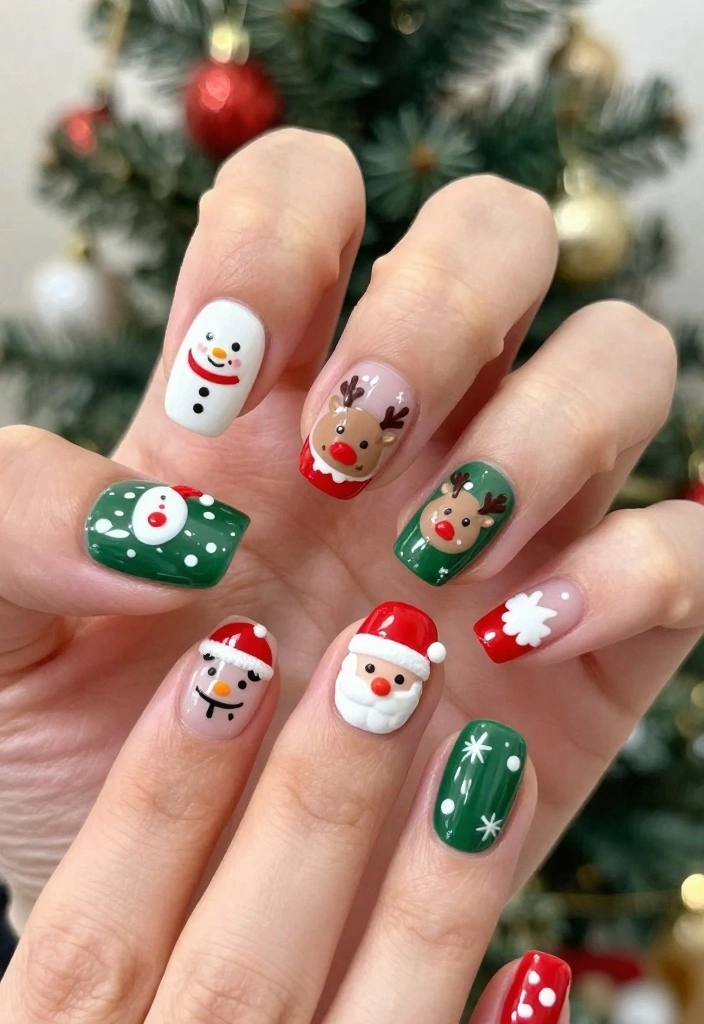
For a playful touch, cute holiday characters are a must-try! Featuring snowmen, reindeer, and Santa, this whimsical design brings joy to your fingertips. It’s perfect for kids and those young at heart!
Design tips:
– Select your characters: Choose a few favorites to showcase.
– Use bright base colors: Ensure characters pop against a solid background.
– Utilize nail art tools: Dotting tools and fine brushes help create detailed designs.
– Mix designs: Feature characters on some nails while others sport festive colors or patterns.
These adorable nails are bound to spread smiles all around!
16. Ombre Christmas Spirit
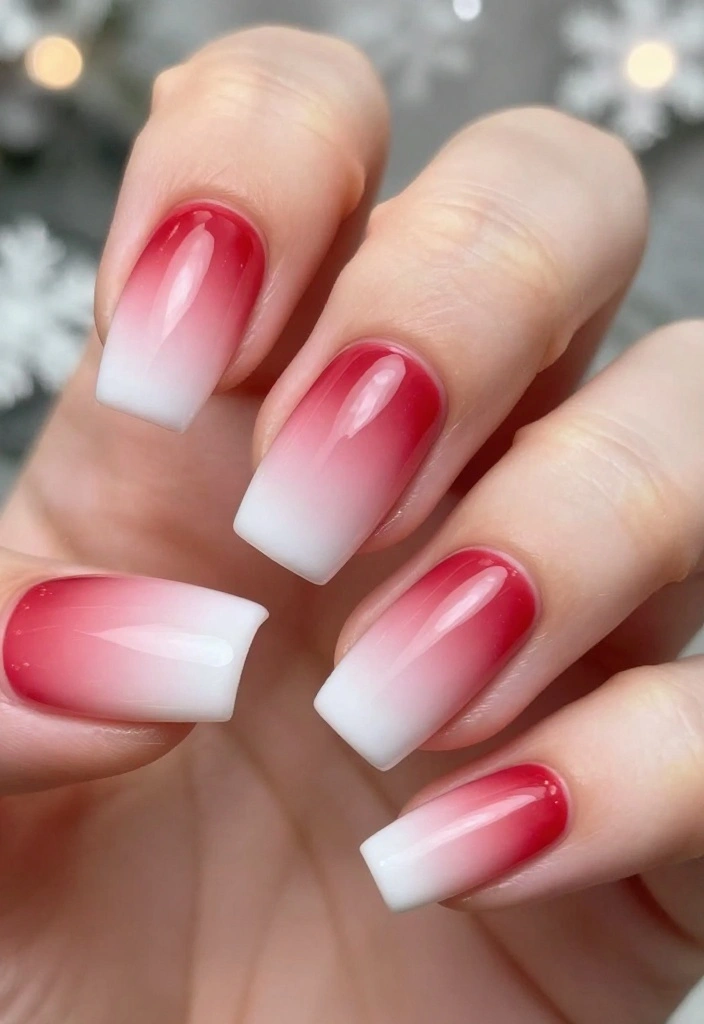
Create a stunning gradient with ombre Christmas nails. Blending colors from deep reds to bright whites captures the holiday spirit beautifully. Ombre nails showcase a variety of festive colors while maintaining a chic appearance.
To achieve the ombre effect:
– Start with a light base coat: This becomes your lightest shade.
– Use a sponge for application: Dab on darker colors, blending them smoothly.
– Top with a coat: Finish with a top coat for shine and protection.
– Consider adding glitter: A layer of glitter at the tips adds a magical touch.
These nails embody the essence of the season and are sure to impress!
17. Warm Earthy Tones
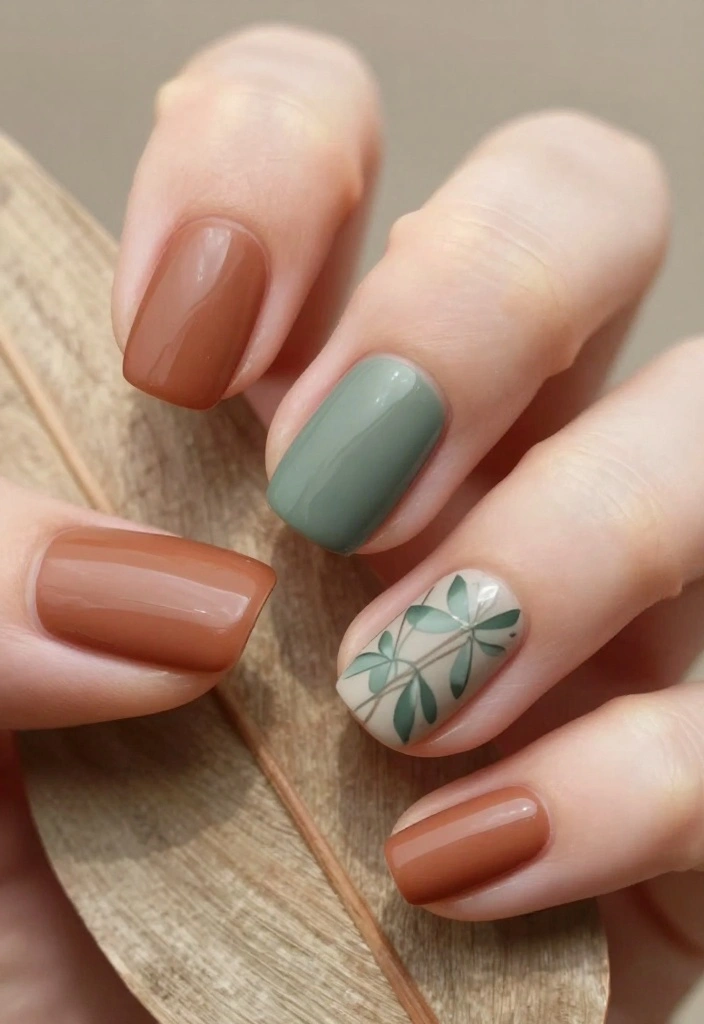
Embrace winter’s natural beauty with warm earthy tones. Shades like terracotta, muted browns, and soft greens create a cozy and grounded look. This design is perfect for those seeking a calm, nature-inspired vibe amidst the holiday hustle.
Design suggestions include:
– Opt for solid colors: A single earthy shade on all nails is chic.
– Use textured finishes: A matte top coat adds depth.
– Add natural nail art: Small leaf patterns or simple lines make a chic touch.
– Mix with metallics: Incorporating golds or coppers creates eye-catching contrast.
These nails remind you of the serene beauty of winter landscapes!
18. Glittery Gradient
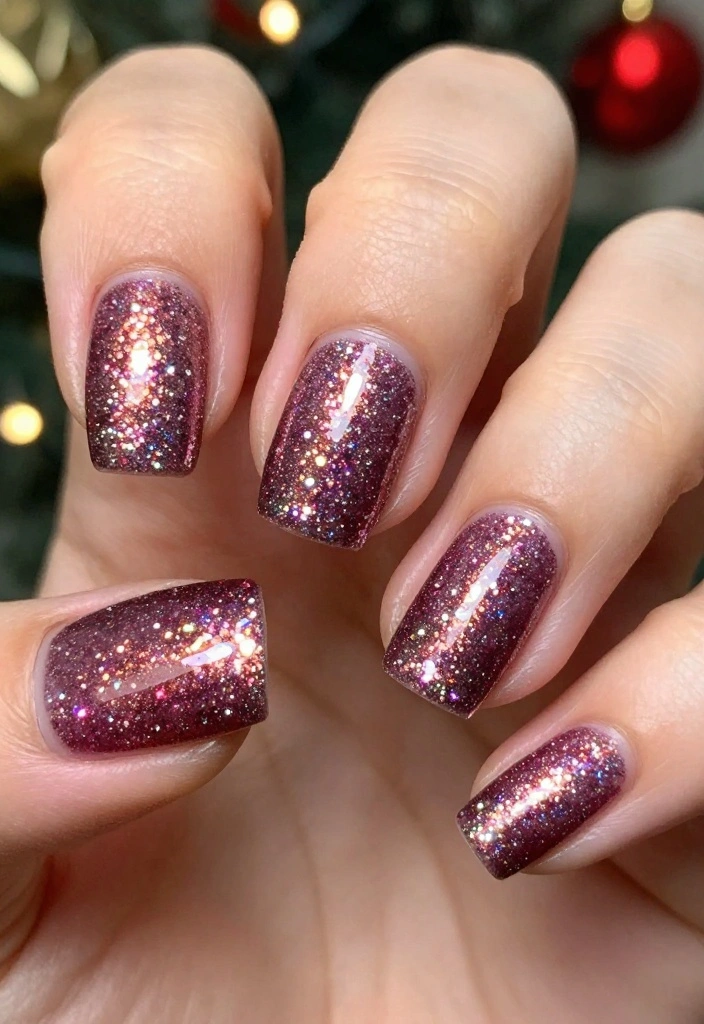
Elevate your holiday look with glittery gradient nails. This dazzling design features a smooth transition from a solid base color to sparkling glitter at the tips. It’s a beautiful way to catch the light and dazzle at any gathering!
Gradient tips for success:
– Pick a bold base coat: Choose a color that contrasts well with your glitter.
– Use a makeup sponge: Apply glitter at the tips, blending down for a smooth look.
– Build up layers: More glitter creates a dramatic effect.
– Seal with a top coat: This prevents chipping and enhances shine.
These nails are guaranteed to steal the spotlight!
Relatable: I love how glittery gradient nails take my holiday nails winter christmas look from dull to wow. With a bold base, a makeup sponge dab for gradient tips, and building up layers, you get sparkle that catches every light.
19. Snow-Capped Tips
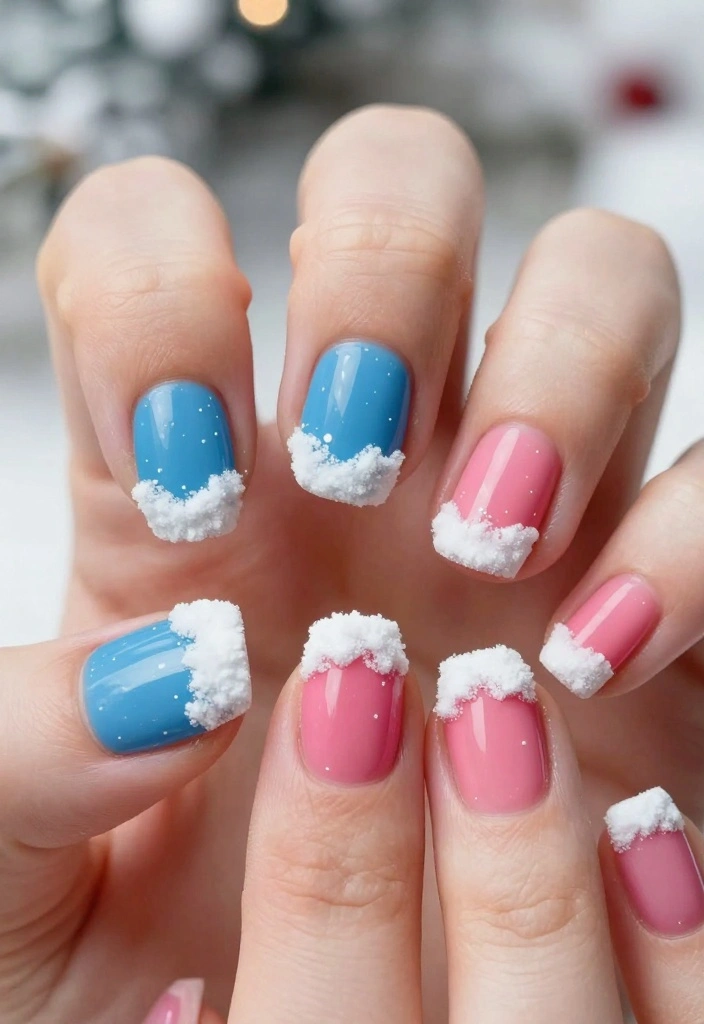
Finish your holiday nail journey with snow-capped tips. This trendy design imitates snow resting on nail tips, perfectly capturing winter’s essence. Pairing a solid color with white tips creates a fun, festive look.
To create snow-capped tips:
– Choose a holiday color: Start with a solid shade you love.
– Apply white polish: Create a thin line at the tips to mimic snow.
– Blend for texture: Lightly dab the white for a fluffy effect.
– Seal with a top coat: This gives a glossy finish.
This charming design is sure to spread holiday cheer!
Conclusion
This holiday season, let your nails be the canvas for your festive spirit! With so many fabulous designs and colors to choose from, there’s a style for everyone. Whether you prefer classic red or playful candy cane stripes, these nail trends will surely keep you feeling joyful and stylish. So, go ahead, pamper yourself, and let your nails shine as bright as the holiday lights!
Frequently Asked Questions
What nail color trends are perfect for holiday nails winter christmas?
For holiday nails winter christmas, you can’t go wrong with classic reds and evergreen greens, but this season also loves metallics, frosty blues, deep burgundies, and snowy whites with a sparkle twist.
Try pairing a rich base shade with a glitter or metallic accent nail to keep things festive without being overwhelming. Experiment with seasonal colors like cranberry red, forest green, and icy silver and use a couple of coats of nail polish for depth and shine.
Finish with a quality top coat to seal the look and boost longevity.
How can I create festive nail art at home using seasonal colors?
You don’t need a salon to get holiday-worthy nails. Start with a clean canvas and slick on a strong base coat.
Choose 2–3 seasonal colors (think red, green, white, or metallics) and use simple tools like dotting brushes, stripers, or tape for clean lines. Design ideas: candy cane stripes, holly leaves with red berries, or a snowy gradient from pale blue to white.
Finish with a durable top coat and cure if you’re using gel formulas. Your holiday nails winter christmas can look professional with just a bit of practice.
Which nail polish formulas last the longest for holiday nails?
If you want long-lasting holiday nails winter christmas, choose a solid base coat + top coat routine or opt for gel polish for extended wear.
Tips for regular nail polish: apply thin coats, cap the free edges, and let each layer dry fully; reapply top coat every 2–3 days to prevent chipping. For gel, follow curing times and use a UV/LED lamp as directed.
With seasonal colors in your lineup and careful application, your nail polish can stay vibrant through parties and gift-winding sessions.
How can I protect my nails during the party season when wearing lots of nail polish?
Protect your nails by prepping properly and giving them some TLC during the busy season. Start with a strengthening base coat, keep nails hydrated with cuticle oil, and wear gloves when cleaning or cooking to minimize exposure to water and harsh chemicals.
Avoid overdoing acetone-based removers; if you’re switching looks often, give nails a polish-free day here and there and let them breathe. Balance seasonal colors with nail care so your holiday nails stay strong and stunning.
How do I remove holiday nails winter christmas designs safely without damaging nails?
Removing festive nail art doesn’t have to be a nightmare. Soak nails in warm, non-acetone remover or use the foil method for glittery finishes: wrap each finger with cotton soaked in remover and aluminum foil for 10 minutes, then gently push off polish.
Follow with a hydrating cuticle oil and a light hand cream. If you’re switching colors frequently, give nails a day of rest between looks and always use a nourishing nail polish remover to protect nail health.
Related Topics
holiday nails
winter nail designs
Christmas nail art
seasonal colors
nail polish trends
festive manicure
easy nail designs
glitter nails
beginner friendly
quick nail tips
trendy colors
nail care
These nail designs are so cute! I can already picture myself sipping hot cocoa while showing off my festive nails. Which one do you think is the most fun to try first?
I love these ideas! Last year, I tried to paint snowflakes on my nails and ended up with more polish on my face than my fingers. What a mess! Have you had any nail fails?
Did you know that nail art has been around since ancient Egypt? They used natural dyes from plants and minerals! It’s amazing how far we’ve come since then.