Water nails have become a trendy way to express creativity through nail art, and it’s easy to see why! They capture the beauty of water with mesmerizing designs and stunning colors that can brighten any look. I created this post because I know how overwhelming it can be to sift through countless nail art ideas and tutorials. With so many choices out there, finding something that stands out and is doable can be a challenge. That’s why I’ve rounded up 20 gorgeous water nail designs that are not only visually stunning but also easier to create than you might think!
If you’re someone who loves experimenting with nail art or simply wants to add a little flair to your beauty routine, this guide is for you. Whether you’re a beginner or looking for some fresh nail inspiration, you’ll find something here that piques your interest. You’ll get step-by-step ideas that can be adapted to your style, along with helpful tips to ensure your water nails turn out as fabulous as you envision. Embrace your creativity and get ready to transform your nails into stunning pieces of art!
In this article, we’ll explore a range of designs from dreamy blue waves to vibrant rainbow explosions. Each design comes with its own charm and can cater to various occasions. Plus, I’ll share some easy tutorials so you can recreate these looks at home without needing a professional’s skills. So grab your nail polish, put on some music, and let’s dive into the world of water nails!
Key Takeaways
– You’ll find 20 unique water nail designs that are visually appealing and easy to execute, perfect for all skill levels.
– Each design, like Dreamy Blue Waves or Sunset Swirl, comes with creative inspiration to spark your imagination.
– There are step-by-step tutorials included, guiding you through each nail art design so you can recreate them at home.
– The article offers tips and tricks to help you achieve the best results, ensuring your nails look salon-fresh.
– You’ll discover how to personalize these styles, allowing you to express your unique taste and creativity through nail art.
Contents
- 1. Dreamy Blue Waves
- 2. Sunset Swirl
- 3. Rainbow Explosion
- 4. Elegant Marble
- 5. Floral Fantasy
- 6. Galaxy Nails
- 7. Pastel Dreams
- 8. Neon Fun
- 9. Ocean Breeze
- 10. Chic Black and Gold
- 11. Tropical Vibes
- 12. Soft Rose Gold
- 13. Geode-Inspired
- 14. Cactus Chic
- 15. Glitter Galaxy
- 16. Zen Garden
- 17. Color Block
- 18. Abstract Art
- 19. Ombre Delight
- 20. Whimsical Dots
1. Dreamy Blue Waves

Embrace the serene beauty of the ocean with dreamy blue waves on your nails. This style captures the essence of tranquility, allowing you to sport a peaceful vibe right on your fingertips. The combination of various blue shades, from deep navy to soft sky blue, creates a stunning visual reminiscent of gentle waves lapping against the shore.
By mixing textures and colors, you achieve a versatile look that works beautifully for casual outings or beach days. The serene design acts as a perfect reminder of sunny skies and carefree moments.
Outfit Pieces:
– Shades of blue nail polish (navy, baby blue, teal)
– White polish for foamy accents
– Base coat for longevity
– Top coat for a glossy finish
Styling Tips:
– Start with a base coat to ensure your colors pop.
– Use 2-3 shades of blue along with white for highlights.
– Swirl the colors in water to create wave patterns.
– Finish with a top coat to protect and enhance the shine.
This design suits both long and short nails, making it a chic yet relaxed choice for summer days or any occasion where you want to feel the ocean breeze.
2. Sunset Swirl

Capture the warmth of a summer sunset with a stunning sunset swirl nail design! By blending vibrant shades of orange, pink, and yellow, you can mimic the breathtaking colors of dusk right on your nails. The soft gradients evoke a sense of calm and joy, perfect for those dreamy evenings.
This design shines during summer events or casual gatherings, bringing a cheerful pop of color to your look.
Outfit Pieces:
– Bright orange, pink, and yellow polishes
– Base coat for a smooth application
– Top coat for added shine
Styling Tips:
– Apply a base coat to help your colors last longer.
– Swirl the colors gently in the water for a cloud-like effect.
– Use a top coat for a glossy finish and durability.
– Choose between matte or glossy finishes based on your mood.
Perfect for summer festivals or casual meet-ups, this design is sure to spark conversations and smiles!
📹 Related Video: Sunset Inspired Water Marble Nails
3. Rainbow Explosion
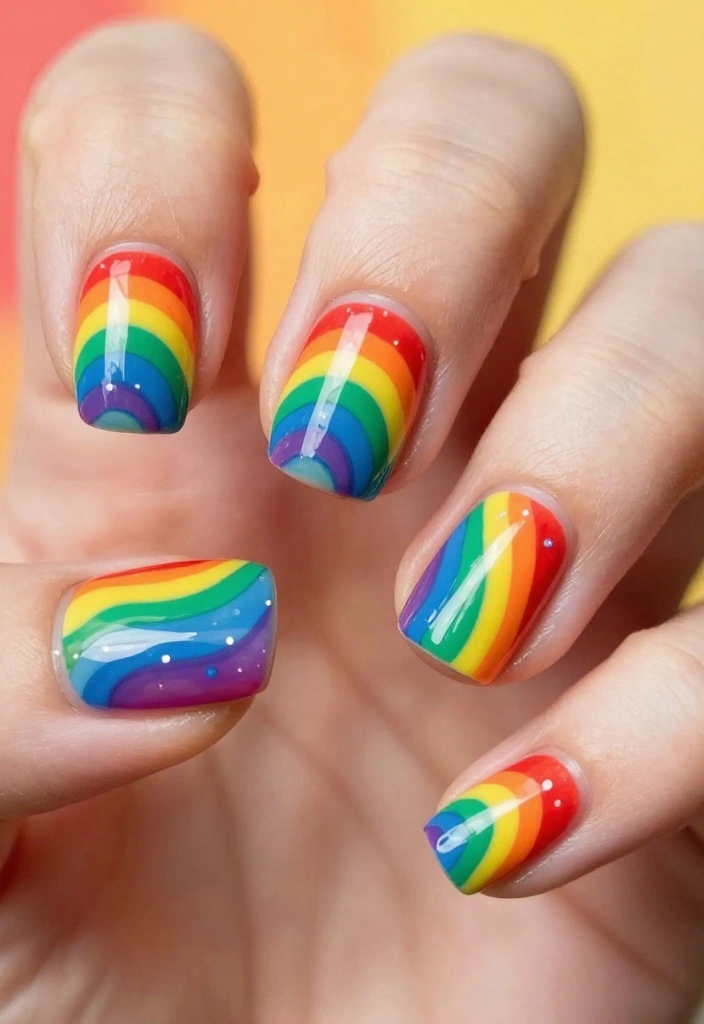
Unleash your creativity with a vibrant rainbow explosion on your nails! This playful design showcases a spectrum of joyful colors, making it an instant mood-lifter. By swirling your favorite shades, you can create a bright, marbled effect that stands out beautifully.
This design is ideal for parties, festivals, or whenever you want to express your fun-loving spirit.
Outfit Pieces:
– A variety of bold nail polish colors (red, yellow, green, blue)
– Base coat for a smooth foundation
– Top coat to seal and shine
Styling Tips:
– Use a selection of bright colors for maximum impact.
– Quickly swirl the colors to prevent them from drying out.
– Don’t forget to apply a top coat for longevity.
The rainbow explosion is not just eye-catching; it’s a fantastic way to show off your vibrant personality and artistic flair!
4. Elegant Marble
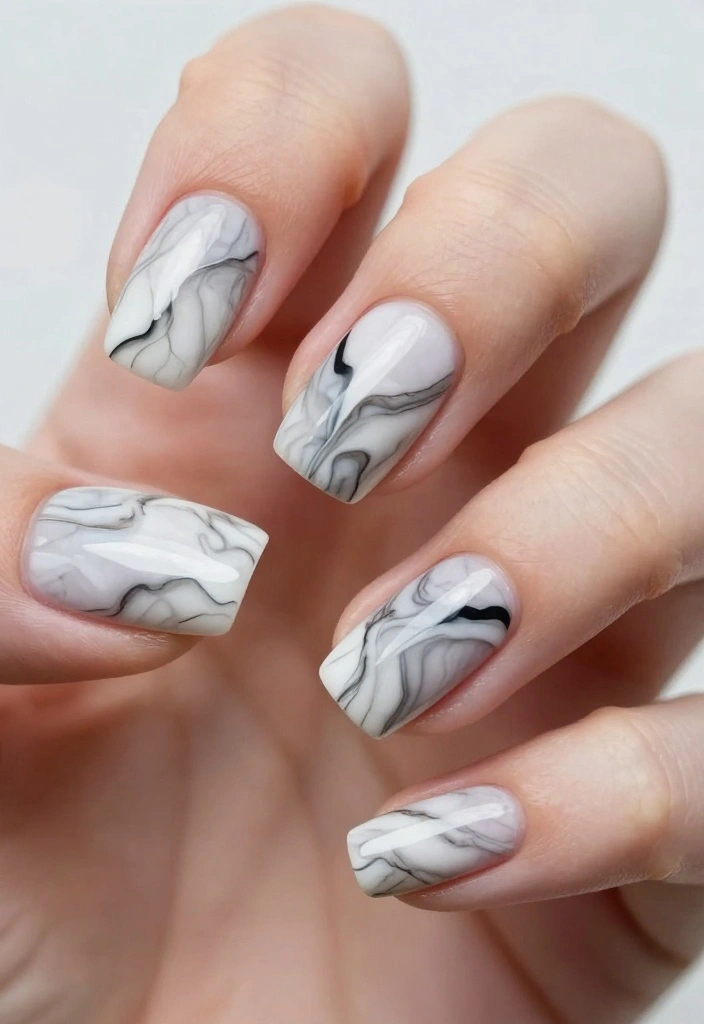
For a sophisticated and chic look, consider an elegant marble nail design. This style beautifully mimics the classic beauty of marble stone using a palette of whites, blacks, and grays. The result is a refined and understated design that’s perfect for both casual and formal settings.
This timeless design pairs well with any outfit, making it a versatile choice for various occasions.
Outfit Pieces:
– White base coat
– Black and gray polishes for marbling
– Matte or glossy top coat based on preference
– Optional: gold or silver foil for added elegance
Styling Tips:
– Use a matte or glossy top coat depending on your style.
– Stick with neutral colors to maintain an elegant vibe.
– This design looks great on both short and long nails.
– Add metallic accents for a touch of glamour.
This chic marble design is perfect for any occasion, elevating your look with its classy appeal.
💅 Nail Art Made Easy!
Unlock stunning nail designs with our DIY guide, perfect for busy moms who love to shine.
5. Floral Fantasy
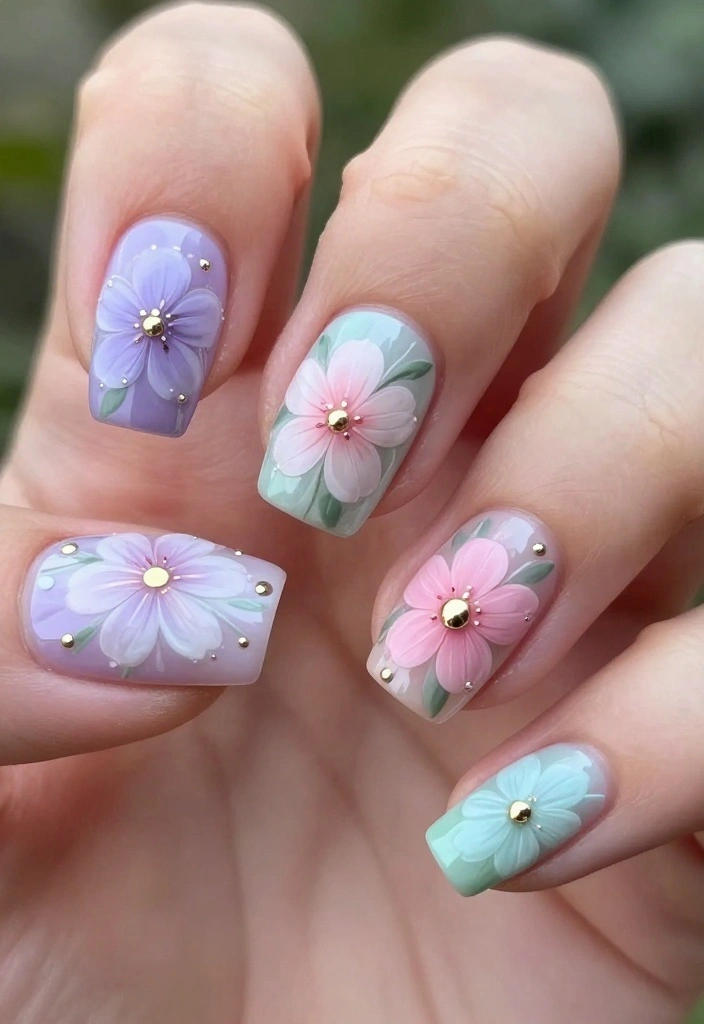
Celebrate the beauty of spring with a floral fantasy nail design that brings blooming flowers to your fingertips. Soft pastel colors like lavender, pink, and mint green create a gentle, whimsical effect reminiscent of a blooming garden. This design is both charming and uplifting, perfect for those who appreciate nature.
Whether you’re attending a garden party or simply want to feel fresh and pretty, this design shines bright.
Outfit Pieces:
– Pastel nail polishes (lavender, soft pink, mint green)
– Base coat for a smooth application
– Optional: metallic accents for a modern twist
Styling Tips:
– Choose soft pastel shades for a delicate look.
– Incorporate metallic colors for a hint of flair.
– Ideal for spring or summer occasions.
– A matte top coat can give a unique finish.
This floral design will have you feeling cheerful and vibrant all season long!
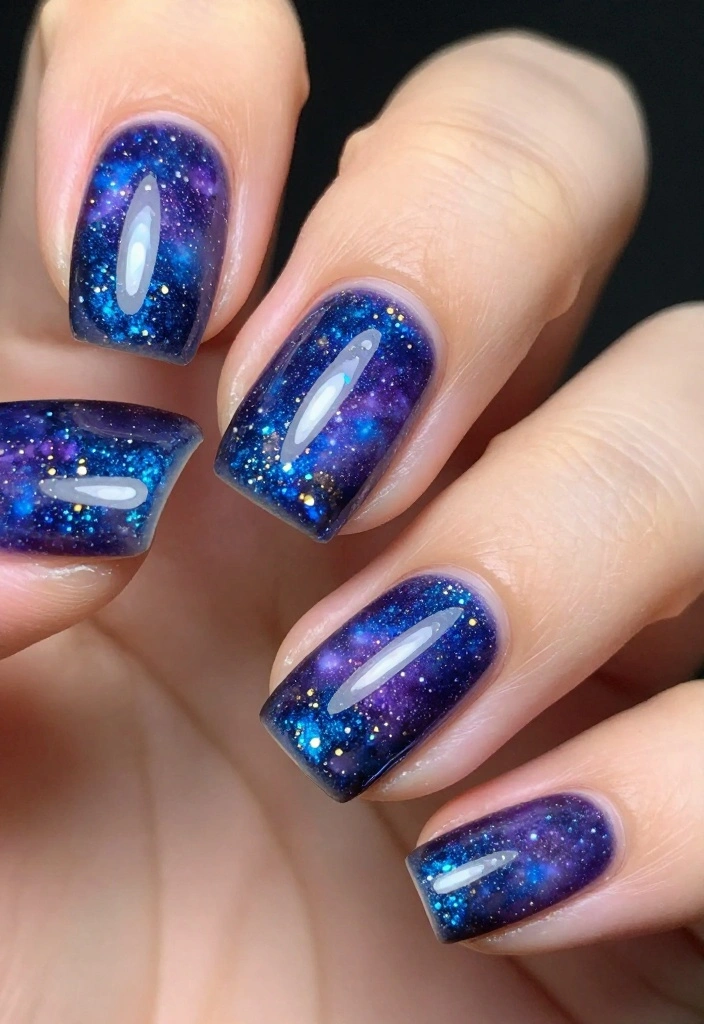
6. Galaxy Nails
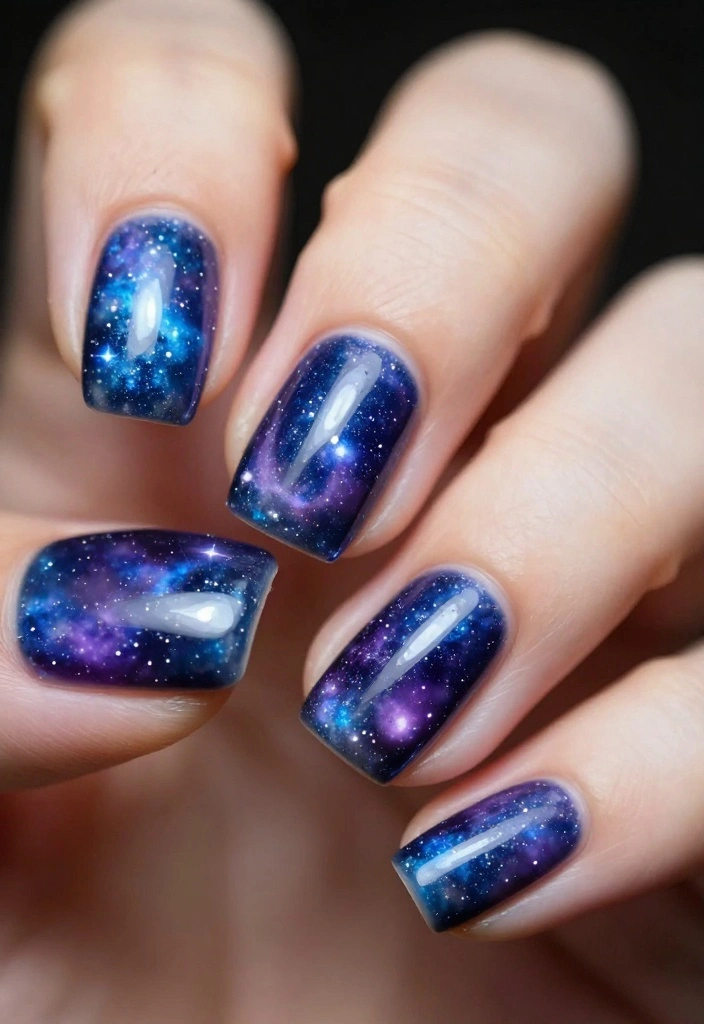
Take a journey through the cosmos with a captivating galaxy nail design! This look features deep blues, purples, and a sprinkle of glitter to mimic the night sky. Starting with a dark base coat and swirling in lighter colors creates a stunning celestial effect.
This design is perfect for those who want to add a touch of drama and mystery to their nails, making it ideal for night-outs or special occasions.
Outfit Pieces:
– Deep navy or plum base coat
– Lighter colors like silver and violet
– Fine glitter polishes for a starry effect
– Optional: matte top coat for an edgy finish
Styling Tips:
– Use dark shades for a striking base.
– Incorporate glitter for that cosmic sparkle.
– Consider a matte top coat for a modern twist.
Galaxy nails are not just chic; they’re a fabulous way to showcase your love for the universe!
Fun fact: galaxy nails can take as little as 15 minutes to look stunning. Start with a dark base, then swirl blues, purples, and glitter to mimic the night sky—perfect for night-outs or special occasions with water nails.
7. Pastel Dreams

Soft pastel colors bring a gentle touch to any nail design, and pastel dreams nails are no exception! Colors like baby blue, pale pink, and soft yellow create a dreamy effect that’s perfect for a subtle yet stylish look. This design involves swirling colors together in water for a harmonious blend.
These nails are suitable for any occasion, allowing you to showcase your minimalist style with ease.
Outfit Pieces:
– Baby blue, pale pink, and soft yellow nail polishes
– Base coat for lasting color
– Top coat for durability
Styling Tips:
– Choose complementary pastel colors for a soothing look.
– Use a dotting tool to create unique patterns.
– Always finish with a clear top coat for protection.
This design is perfect for anyone who appreciates a soft and elegant aesthetic!
How To Create Stunning Water Nails
Tools You’ll Need:
– Nail polish in various colors
– Clear base coat and topcoat
– A shallow dish or bowl
– Toothpicks or a small brush
– Rubbing alcohol (optional)
– Water at room temperature
Step 1: Measure & Prep
Before you start, gather all your tools and find a workspace where you can be comfortable. Make sure to lay down some newspaper or a towel to catch any spills. Remove any old nail polish using nail polish remover, and clean your nails thoroughly.
✔ Make sure your nails are trimmed and shaped to your liking.
✔ Apply a clear base coat to help the polish stick better and protect your nails.
Step 2: Prepare the Water
Fill the shallow dish with water. The water should be at room temperature, as this helps the nail polish spread better. Cold water may cause the polish to clump, while hot may cause it to dry too quickly.
✔ Ensure the dish is big enough to dip your nails fully without touching the sides.
✔ If you’re using rubbing alcohol, a few drops in the water can help create a better layer for the polish.
Step 3: Layer the Polish
Open your nail polish bottles and start by dropping a few drops of polish onto the surface of the water. Use different colors for a more vibrant look. You can create swirls by using a toothpick to gently drag through the drops.
✔ Work quickly, as nail polish can dry fast on the water surface.
✔ Experiment with different designs by adding more colors or dragging the toothpick in various directions.
Step 4: Dip Your Nails
Once you’re satisfied with your design, it’s time to dip your nails. Position your nail just below the surface of the water, and quickly dip it in, making sure to cover the entire nail with the polish. Pull your nail out slowly to reveal the design.
✔ You may want to do one nail at a time to ensure the polish doesn’t dry.
✔ If you accidentally get polish on your skin, use a toothpick to clean it up while it’s still wet.
Step 5: Seal the Design
Once you’ve dipped all your nails and they have dried, it’s essential to seal the design. Apply a clear topcoat to add shine and protection. This will also help the design last longer.
✔ Wait a few minutes for the polish to dry before applying the topcoat.
✔ Make sure to cover the tips of your nails with the topcoat for durability.
Step 6: Clean Up
After you’re done with your nails, clean the dish and remove any excess nail polish floating on the water. You can use a paper towel or a cotton ball dipped in polish remover for this.
✔ This will save you from a messy workspace next time.
✔ Dispose of the water in a safe place, ensuring no polish goes down the drain.
Pro Tip: To make your water nails even more stunning, consider adding glitter or metallic polish for a pop of sparkle! You can also experiment with different color combinations that match your outfits or seasonal themes. Don’t forget to practice; the more you do it, the better you’ll get!
Creating gorgeous water nails is easier than it seems! With a little practice and creativity, you can achieve salon-quality designs right at home. Enjoy the process, have fun experimenting, and show off your unique nail art!
8. Neon Fun
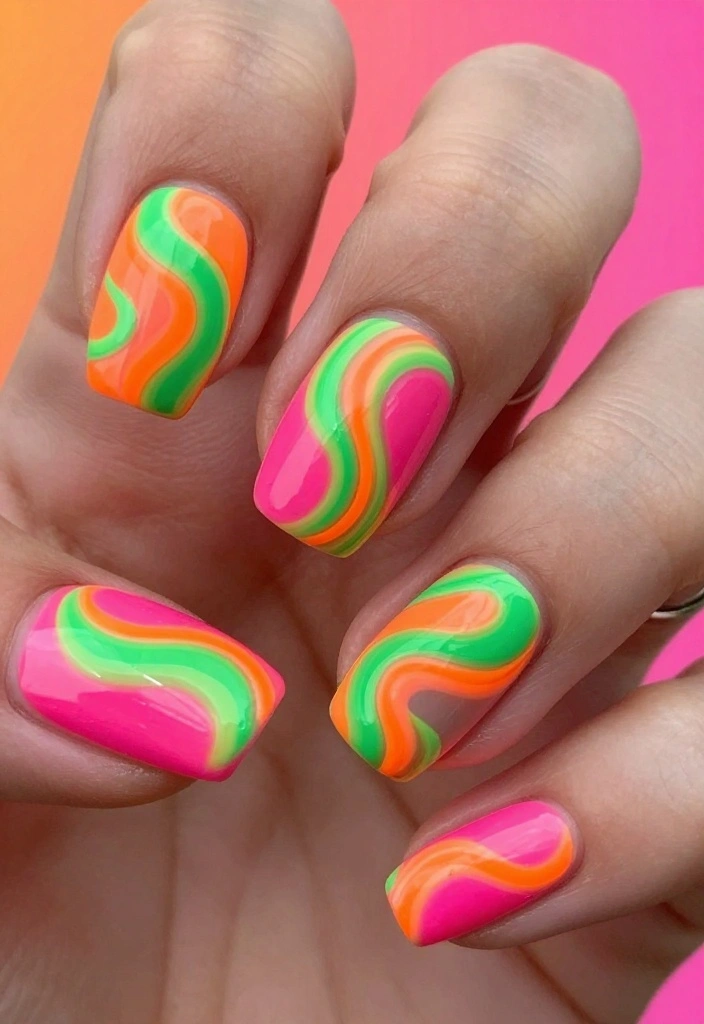
Make a bold statement with neon fun nails that burst with energy! Bright colors like electric pink, lime green, and vibrant orange are perfect for those who want their nails to stand out. Using the water marbling technique, you can create dynamic patterns that are eye-catching and full of life.
This design is perfect for summer festivals, beach parties, or whenever you want to showcase your fun side.
Outfit Pieces:
– Neon shades (electric pink, lime green, vibrant orange)
– Base coat for a smooth finish
– Optional: gems for added sparkle
Styling Tips:
– Use 3-4 neon colors for maximum impact.
– Swirl colors quickly for energetic patterns.
– Consider adding gems for an extra touch of glam.
With neon fun nails, you’ll be turning heads and radiating positivity everywhere you go!
9. Ocean Breeze
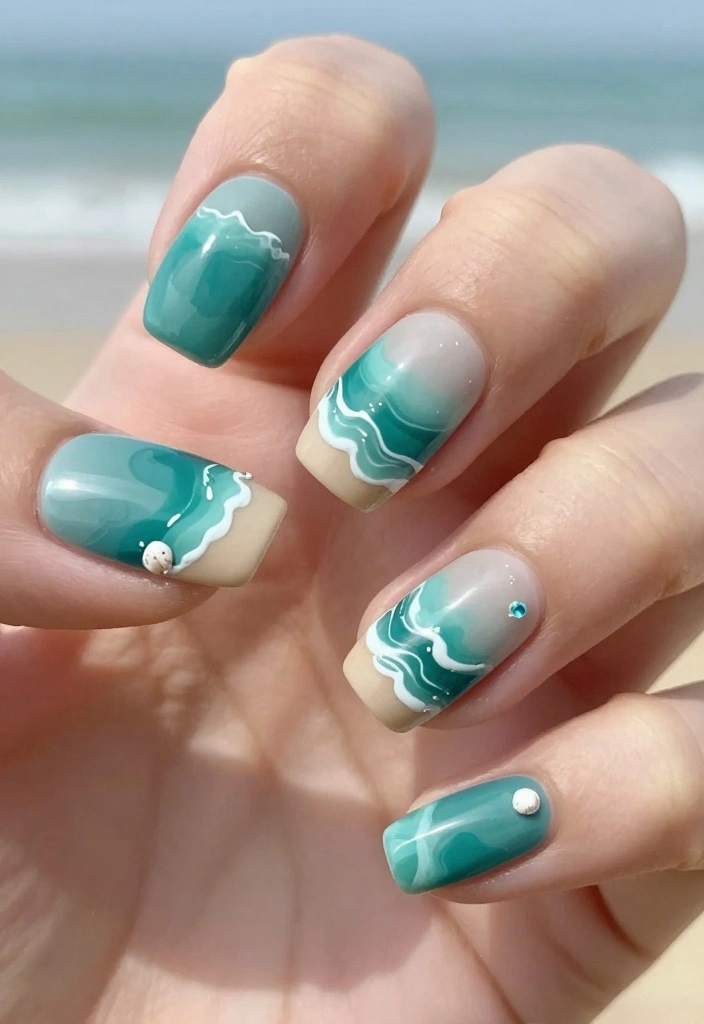
Feel the refreshing coolness of the ocean breeze with this tranquil nail design! Using serene colors like teal, aqua, and sandy beige, you can create a beach-inspired look. Start with a base coat, then swirl the colors in water for a breezy, wave-like effect.
This design is calming and stylish, perfect for beach lovers or anyone looking for a subtle yet chic statement.
Outfit Pieces:
– Teal, aqua, and sandy beige nail polishes
– Base coat for a solid foundation
– Optional: tiny shells or pearls for embellishments
Styling Tips:
– Choose ocean-inspired colors for a harmonious look.
– Add tiny shells or pearls to enhance the beachy theme.
– A matte top coat can add to the relaxed feel.
This design is perfect for everyday wear or summer getaways, bringing a piece of the beach to your fingertips!
Fun fact: water nails with teal, aqua, and sandy beige can create a calming, beachy vibe in under 10 minutes. Pro tip: swirl the colors in water and seal with a glossy top coat for a breezy wave look you can wear every day.
10. Chic Black and Gold
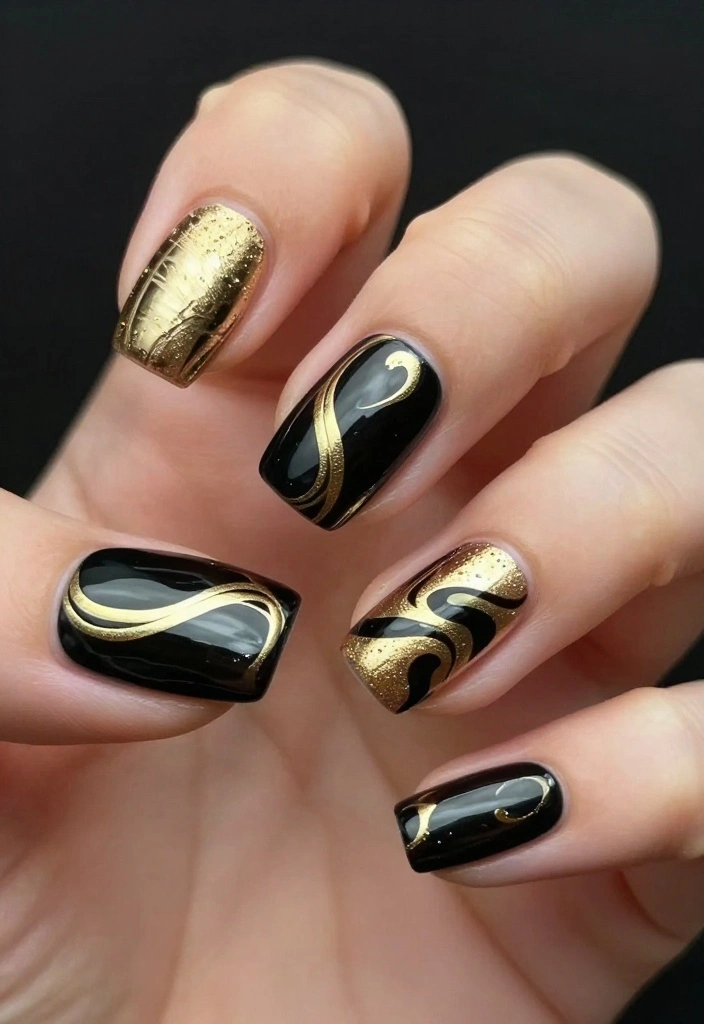
For a touch of elegance, chic black and gold nails are a stunning choice. This design combines the sophistication of black with the glam of gold, creating a luxurious look. Start with a black base coat and swirl in elements of gold polish to achieve a stunning marbled effect.
This design is ideal for formal events or a night out, adding a touch of class to your ensemble.
Outfit Pieces:
– High-quality black polish for a sleek finish
– Gold polish for swirling
– Optional: gold leaf for extra flair
Styling Tips:
– Use a high-quality black polish for depth.
– Swirl the gold gently for elegant patterns.
– Add gold leaf for an ultra-chic finish.
This design exudes sophistication and is perfect for any special occasion!
11. Tropical Vibes

Infuse your nails with the essence of paradise through a tropical vibes design! Bright colors like vibrant green, coral, and sunny yellow capture the fun and energy of summer. Using the water technique, you can create playful swirls that mimic tropical flowers and lush leaves.
This design is perfect for vacations, beach days, or anytime you want to feel like you’re soaking up the sun.
Outfit Pieces:
– Bright green, coral, and sunny yellow nail polishes
– Base coat for a strong foundation
– Optional: glitter for a festive touch
Styling Tips:
– Incorporate tropical colors for a lively look.
– Use glitter to add a celebratory flair.
– A matte top coat can give a unique finish.
These nails will have you feeling vibrant and ready for fun times in the sun!
12. Soft Rose Gold
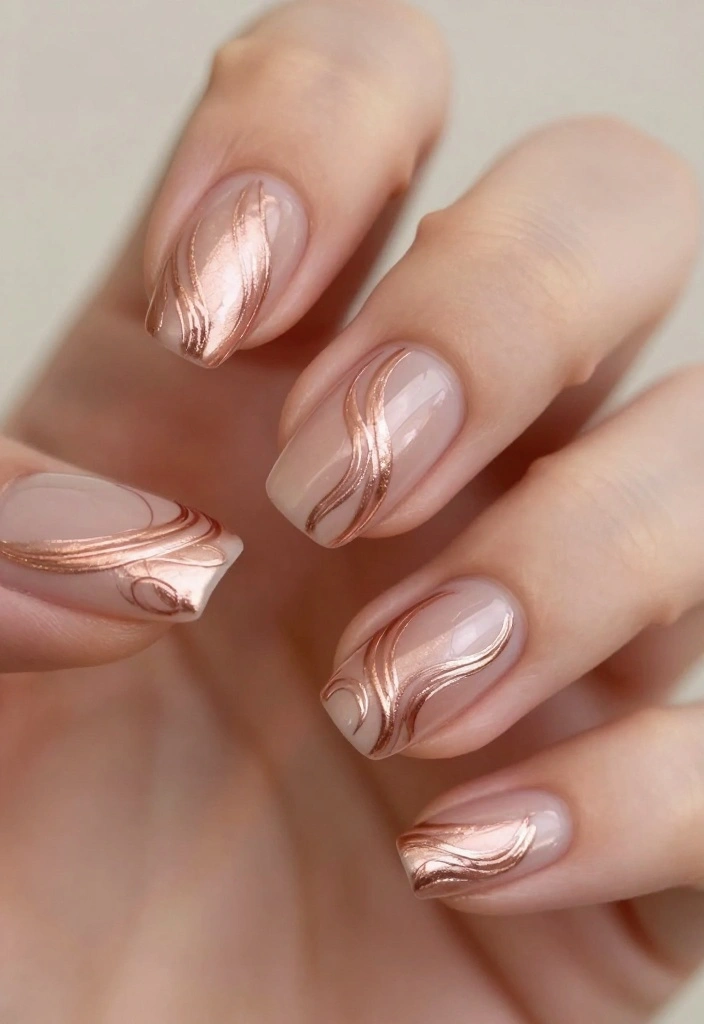
For a touch of elegance, soft rose gold nails offer a stunning and romantic choice. This design captures the warm charm of rose gold through delicate swirls and patterns. Start with a nude or light pink base, then blend in rose gold polish using the water technique for a soft, chic finish.
This design is perfect for date nights or special occasions, adding a subtle yet striking charm to your look.
Outfit Pieces:
– Light nude or pink base coat
– Rose gold polish for a gentle touch
– High-gloss top coat for added shine
Styling Tips:
– Use a light nude or pink base to enhance the rose gold.
– Incorporate rose gold for a romantic vibe.
– A high-gloss top coat will elevate the shine.
This look radiates elegance and sophistication, making it a perfect choice for any occasion!
Soft rose gold water nails feel like a whispered luxury—glamour without effort. With a nude base and a water technique, you get chic swirls that are perfect for date nights and special occasions.
13. Geode-Inspired

Embrace the beauty of nature with a stunning geode-inspired nail design! Using rich colors like deep purple, teal, and gold, you can mimic the appearance of sparkling crystals. Start with a light base coat and utilize the water technique to create intricate swirls that resemble natural geodes.
This design is unique and luxurious, showcasing beautiful colors that reflect nature’s best gems.
Outfit Pieces:
– Deep purple, teal, and gold nail polishes
– Light base coat for contrast
– Optional: rhinestones for added sparkle
Styling Tips:
– Choose rich colors to add depth and dimension.
– Consider adding rhinestones for an extra touch of glamour.
– A matte top coat can refresh the geode look.
Stand out with this exquisite nail design that beautifully combines luxury and nature!
14. Cactus Chic

Bring a playful desert vibe to your nails with a cactus chic design! Utilizing earthy tones like green, brown, and sandy beige, this style captures the essence of cute cacti. The water marbling technique allows you to create unique patterns that echo the rustic charm of the desert landscape.
This design is fun and quirky, perfect for those who love nature-inspired nail art.
Outfit Pieces:
– Earthy green, brown, and sandy beige polishes
– Base coat for a solid foundation
– Optional: matte finish to enhance the desert vibe
Styling Tips:
– Use a variety of earthy colors for depth.
– Play with patterns that represent cactus shapes.
– A matte finish can emphasize the rustic feel.
With cactus chic nails, you can showcase your love for the outdoors in a playful way!
15. Glitter Galaxy
Merge the mystical beauty of a galaxy with the sparkle of glitter in a glitter galaxy nail design! Start with deep blues and purples as your base, then mix in silver or gold glitter for a starry effect. The water technique will help you achieve a dreamy, cosmic finish that’s sure to dazzle.
This design is fantastic for nighttime events or whenever you want to shine your brightest.
Outfit Pieces:
– Dark navy or plum base coat
– Silver or gold glitter for a starry effect
– Glossy top coat to enhance sparkle
Styling Tips:
– Stick to dark colors for a striking base.
– Use chunky glitter for added drama and shimmer.
– Apply a glossy top coat to amplify the sparkle.
Your nails will not only look chic; they’ll be truly mesmerizing and perfect for a night out!
16. Zen Garden
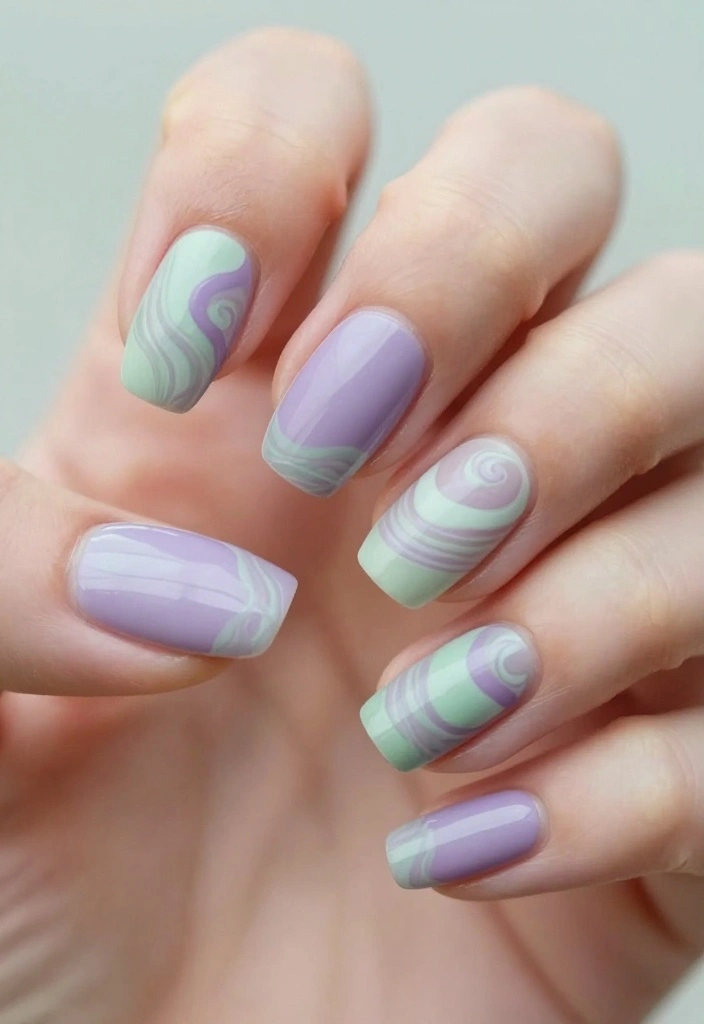
Find tranquility with a zen garden-inspired nail design! This look utilizes soft colors like lavender, pale green, and white to reflect the peaceful essence of a serene garden. The water technique allows you to create gentle swirls that evoke a sense of calm and balance.
This design is perfect for those who appreciate simplicity and natural beauty.
Outfit Pieces:
– Lavender, pale green, and white nail polishes
– Base coat for a smooth application
– Optional: small designs like pebbles or flowers for detail
Styling Tips:
– Use soothing colors to achieve a zen effect.
– Consider adding tiny designs to enhance the serenity.
– A matte top coat can elevate the peaceful vibe.
Your nails will embody tranquility and elegance, making it a perfect choice for any occasion!
17. Color Block
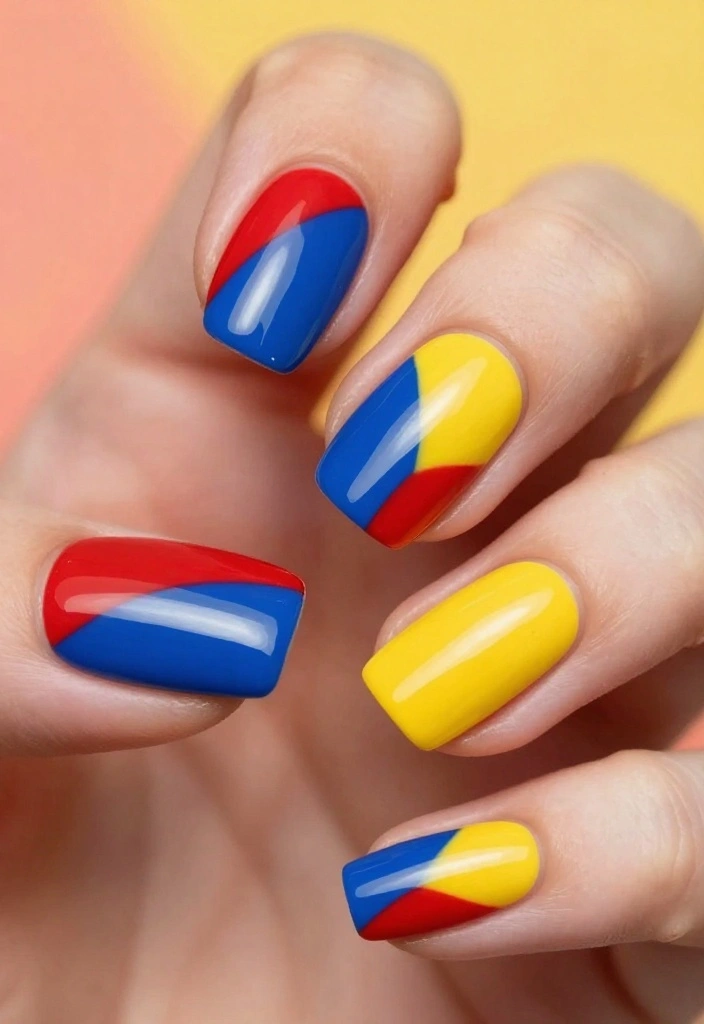
If you love bold and graphic designs, color block nails are the perfect way to express yourself! This trendy look combines several contrasting colors into distinct blocks using the water technique for a modern aesthetic. By choosing vibrant shades, you can create a statement that’s both playful and artistic.
This design is ideal for those looking to add a fun twist to their style.
Outfit Pieces:
– 3-4 contrasting nail polish colors
– Base coat for a smooth foundation
– Top coat for added shine
Styling Tips:
– Choose bold colors for high impact.
– Ensure each block remains distinct for clarity.
– A glossy top coat will amplify the colors.
With color block nails, you can easily show off your artistic flair and vibrant personality!
18. Abstract Art
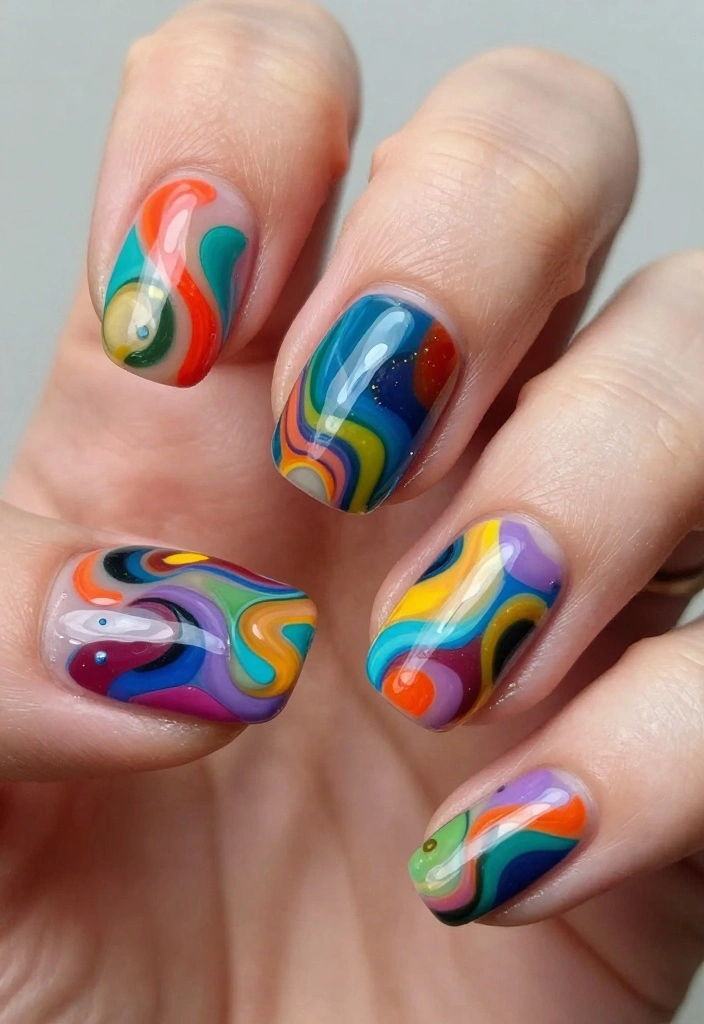
Unleash your creativity with abstract art nails that reflect your unique style! This design is all about self-expression, using a mix of polishes in various colors. The water technique allows you to create artistic swirls and shapes, making each set a personal canvas.
Abstract designs offer endless possibilities, perfect for those who enjoy exploring their artistic side.
Outfit Pieces:
– A variety of colorful nail polishes
– Base coat for a smooth finish
– Top coat for durability
Styling Tips:
– Use a mix of colors for a diverse look.
– Don’t hesitate to experiment with different patterns.
– Tiny details can add uniqueness to your design.
With abstract art nails, you can showcase your creativity and individuality in every look!
19. Ombre Delight
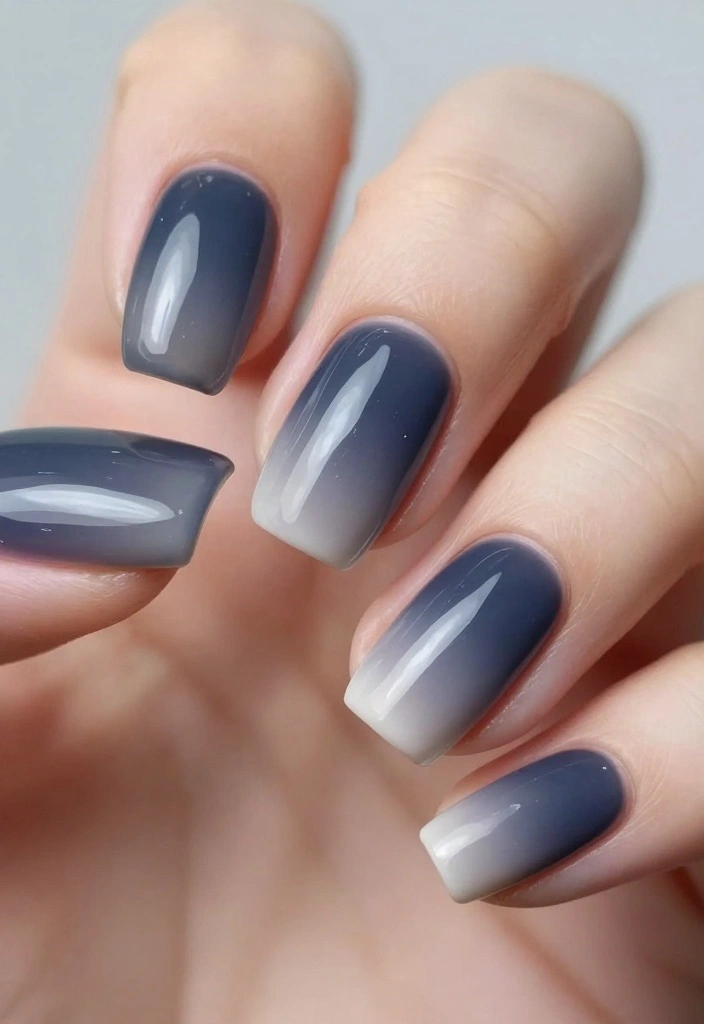
Ombre nails are a classic choice, and the water technique enhances this timeless design! By selecting complementary colors, you can create a stunning gradient effect that smoothly transitions from one shade to another. This design is perfect for anyone seeking an elegant and soft look.
Ombre delight is ideal for any occasion, providing a chic touch to your nails.
Outfit Pieces:
– Complementary nail polish colors for ombre effect
– Base coat for a smooth base
– Clear top coat to enhance shine
Styling Tips:
– Choose colors that blend well for the best ombre effect.
– Use a clear top coat to make the colors pop.
– This design looks fabulous on both short and long nails.
Ombre delight will leave your nails looking effortlessly stylish and refined!
20. Whimsical Dots
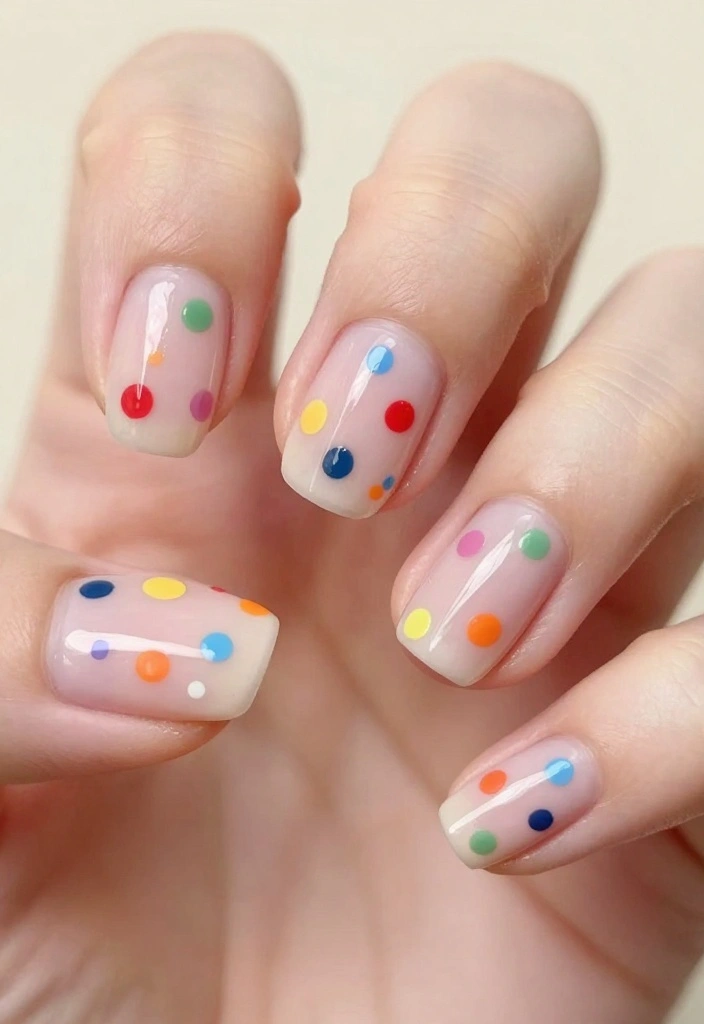
Add a fun twist to your nails with whimsical dots that bring joy to your fingertips! This playful design features a polka-dot pattern created with a mix of colors using the water technique. You can opt for soft pastels for a sweet look or bold shades for a party vibe.
This design is perfect for casual outings or whenever you want to brighten your day.
Outfit Pieces:
– A variety of nail polish colors for dots
– Base coat for a smooth application
– Top coat for a glossy finish
Styling Tips:
– Choose a mix of colors to create a lively dot pattern.
– Use a thin brush for precise dot creation.
– A glossy top coat will enhance the playful nature of the design.
With whimsical dots, your nails will radiate happiness and charm, making you smile every time you glance at them!
Conclusion

Water nails bring a fantastic, creative twist to nail art that anyone can master. With a little practice, you can create stunning designs that reflect your personal style and mood.
Whether you’re opting for bold colors or soft pastels, the possibilities are endless. Embrace your inner artist and enjoy the process of crafting beautiful nails that are sure to impress all who see them!
Frequently Asked Questions
What exactly are water nails and how can I create them at home?
Water nails are a marbling nail art technique where polish is dropped onto water and then transferred to the nail to create swirls and patterns. They can look stunning, and with a few simple steps you can nail this look at home. This nail art tutorial will guide you through it:
1) Prep your nails with a clean base coat and push back cuticles.
2) Gather supplies: room-temperature water, your chosen nail polishes, a toothpick or thin stick, washi tape to protect skin, and a quick-dry top coat.
3) Fill a small cup with water and drop a thin coat of polish onto the surface, creating a clock-face ring. Add more colors as needed and swirl gently with the toothpick to design.
4) Dip your finger straight through the design, then lift and wipe away any excess around the nail.
5) Clean edges and seal with a top coat.
Tips: use thin coats, avoid fast-drying formulas, and practice on a nail wheel first. This nail art tutorial is beginner-friendly and helps you master water nails step by step.
Can I do water nails at home, or do I need a salon to get the look?
Absolutely—water nails are very doable at home with the right supplies and a little patience. This nail art tutorial covers everything you need to know to try it yourself:
What you’ll need: a few shade options, room-temperature water, tape or a barrier for skin, a toothpick, base coat, and top coat.
Setup: protect skin with tape around the nails, pour a small amount of water into a cup, and have your colors ready.
Process: drop polish into the water, swirl to form a pattern, and dip your finger through. Finish with a top coat and clean edges.
Pro tips: choose polishes that don’t dry too quickly, practice on a nail wheel, and start with two colors before adding more. This lets you get comfortable before committing to a full manicure.
What are some easy water nails designs to kick off your nail inspiration?
Great question for nail inspiration! Here are beginner-friendly designs you can try right away:
1) Classic marble swirl: use two contrasting colors, drop them into water, swirl lightly, and dip a naked nail for a timeless look.
2) Soft watercolor splash: pick light pastels and keep the swirls subtle for a dreamy effect.
3) Two-tone ring: create a thin ring of one color around the water surface and dip for a crisp, modern accent.
4) Confetti accent: after dipping, add tiny dots of glitter polish to the water surface before lifting your finger for a playful sparkle.
With practice, these ideas become quick nail art tutorial staples that deliver high-impact results without hours of effort.
How long do water nails last and how should I care for them?
Water nails can last about 5–10 days with proper care, and up to 2 weeks with careful maintenance. Here’s how to extend wear:
• Apply a solid base coat and a strong top coat to seal the design.
• Reapply a thin layer of top coat every 2–3 days to prevent chipping.
• Avoid soaking hands in water for long periods in the first 24–48 hours after application.
• Use gentle, non-acetone remover when it’s time to take them off to protect your natural nails.
Tips: keep nails clean and dry, skip aggressive filing, and consider a strengthening base coat if your nails are thin. This practical care routine helps your water nails stay vibrant and intact longer.
Can water nails be done on natural nails or do I need extensions?
Water nails work beautifully on both natural nails and extensions. Here’s how to approach each:
• Natural nails: ensure nails are healthy and exfoliate the cuticles. Use a strong base coat to improve adhesion, then follow the water-nail process and finish with a durable top coat.
• Extensions or gel/acrylic nails: you can still do water nails; just be mindful of the extra adhesive layer. It’s best to work on clean, well-prepped tips and seal with a robust top coat to prevent lifting.
Tip: if you have brittle nails, start with a strengthening base coat and keep the design lighter to reduce stress on the nail plate. This approach keeps your look chic whether you’re rocking natural nails or enhancements.
Related Topics
water nails
nail art tutorial
easy nail designs
nail inspiration
beginner friendly
summer nails
trendy nail art
colorful nails
DIY nail art
quick tips
minimalist nail design
festive nails
I love how you made water nails sound so easy! I remember trying a similar design once, and let’s just say my kitchen looked like a mini art studio afterward. What’s your favorite color combo for these designs?
These water nails are amazing! I tried a version of them for a party, but let’s just say my nails ended up looking like a tie-dye disaster. At least I got a laugh out of it!
Did you know that the first nail polish dates back to 3000 BC in China? It’s cool to think that we’ve come so far, yet these water nails have such a simple charm to them!