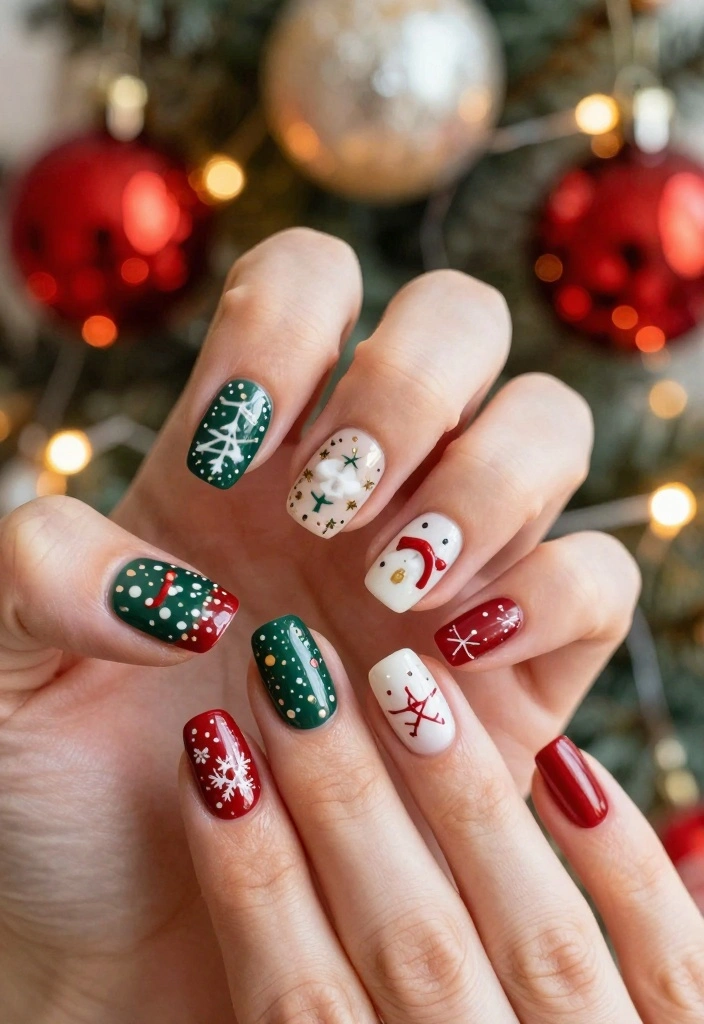
The holiday season is upon us, and you know what that means—it’s time to start thinking about how to express your festive spirit! If you’re anything like me, you find yourself craving those adorable and creative Christmas nail designs that can elevate your holiday look. Whether you’re hosting a gathering or attending a holiday party, your nails can be the perfect finishing touch to your festive ensemble.
If you adore cute nail ideas and are excited to explore winter nails that capture the essence of Christmas, this post is made just for you! I’ve gathered a collection of 21 charming Christmas nail designs that are sure to impress. From classic colors to whimsical themes, these designs will have you feeling all the holiday cheer and ready to show off your festive flair.
What can you expect from this treasure trove of nail art inspiration? You’ll get detailed ideas that are fun to create, easy to wear, and simply stunning. Whether you’re a nail art novice or a seasoned pro, these festive designs will help you find the perfect look for every holiday occasion. Get ready to sparkle and shine this season with your gorgeous Christmas nails design!
Key Takeaways
– You’ll discover 21 unique Christmas nail designs that cater to different tastes and skill levels, perfect for every holiday party setting.
– Each design features a mix of classic and trendy themes, allowing you to choose what best suits your holiday style.
– The guide includes simple step-by-step ideas for recreating the looks, making it accessible for both beginners and experienced nail artists.
– You’ll find inspiration in themes such as Gingerbread houses, snowflakes, and festive plaid, adding a touch of fun and creativity to your nail art.
– The post emphasizes the importance of expressing your personality through seasonal nail art, making your holiday celebrations even more special.
Contents
- 1. Classic Red and Green
- 2. Christmas Tree Nail Art
- 3. Candy Cane Stripes
- 4. Snowflakes and Glitter
- 5. Gingerbread House Delight
- 6. Winter Wonderland Ombré
- 7. Rudolph’s Red Nose
- 8. Festive Plaid
- 9. Ornament Glitter Bomb
- 10. Nutcracker Ballet
- 11. Santa’s Sleigh
- 12. Holiday Lights
- 13. Merry and Bright
- 14. Polar Bear Paws
- 15. Holly Jolly Nails
- 16. Christmas Baubles
- 17. New Year Countdown
- 18. Frosty Snowman Nails
- 19. Sparkling Icicles
- 20. Magical Unicorn
- 21. Twinkling Stars
1. Classic Red and Green
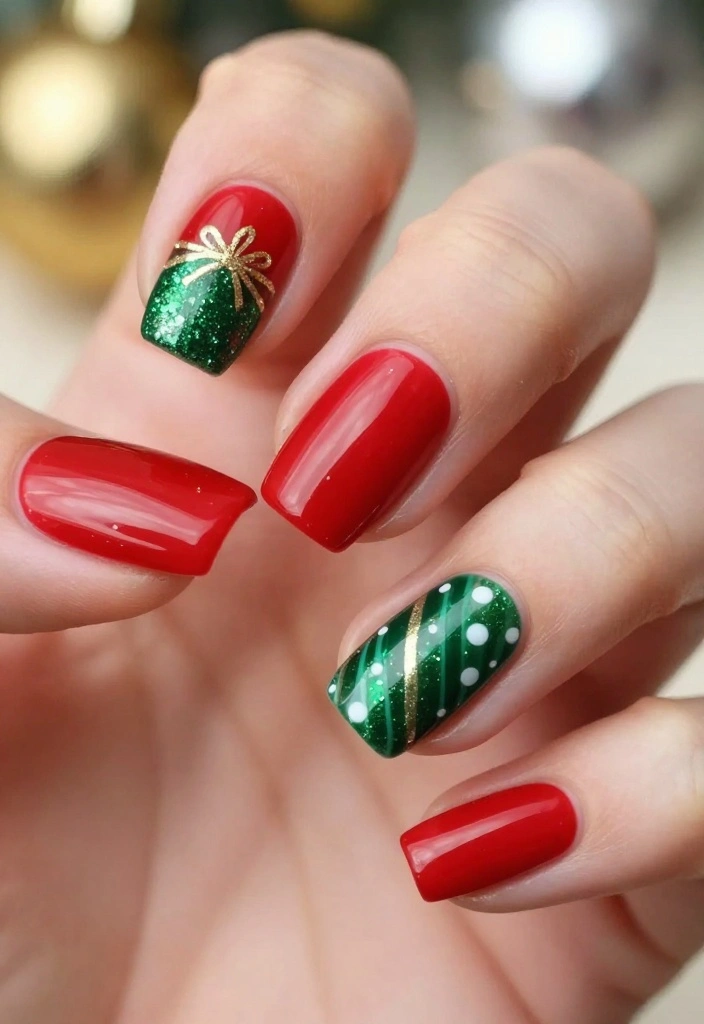
Nothing captures the festive spirit better than classic red and green nails. This timeless combination radiates warmth and love, making it perfect for those who want to showcase holiday cheer with elegance. You can paint all your nails a bright red and add festive green accents on a few, like playful stripes or cheerful dots, for that extra flair. A sprinkle of glitter can elevate this design, bringing a twinkle to your fingertips. Red embodies passion, while green signifies fresh beginnings, making this combo a true holiday delight. Remember to apply a base coat for nail protection and finish with a top coat for a glossy shine.
Steps:
1. Apply a base coat to clean nails.
2. Paint all nails in vibrant red.
3. Choose two accent nails on each hand.
4. On those accent nails, add green stripes or dots.
5. Apply a glitter top coat over the red nails for added sparkle.
6. Finish with a top coat to seal and enhance shine.
This classic design will keep your spirits high throughout the season!
2. Christmas Tree Nail Art
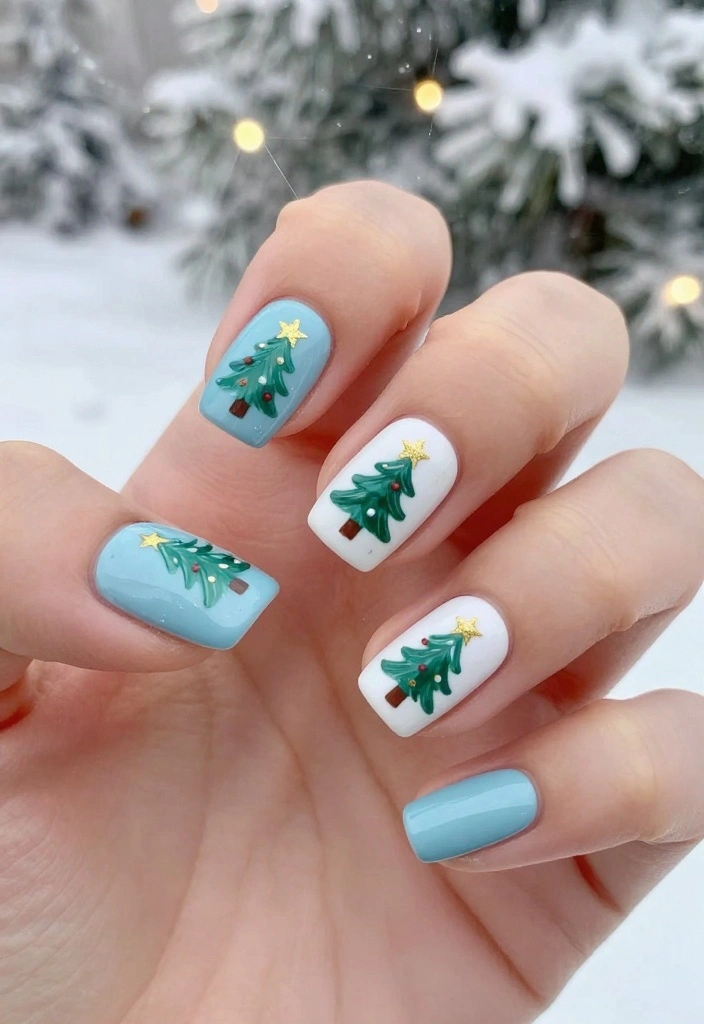
Celebrate the season with delightful Christmas tree nail art! A frosty white or pale blue base mimics a winter wonderland, perfect for showcasing charming little trees on your accent nails. Using green polish to craft the tree shape and colorful dots for ornaments adds a playful touch. A star sticker or a sprinkle of gold glitter on top enhances the festive vibe. This design beautifully captures the essence of Christmas and is sure to garner compliments at any holiday gathering.
Steps:
1. Start with a protective base coat.
2. Paint the majority of your nails a light blue or white.
3. On accent nails, create simple Christmas tree shapes using green polish.
4. Add colorful dots as ornaments.
5. Top the trees with a star or glitter.
6. Seal it all with a shiny top coat.
This playful design is perfect for embracing the holiday spirit!
3. Candy Cane Stripes
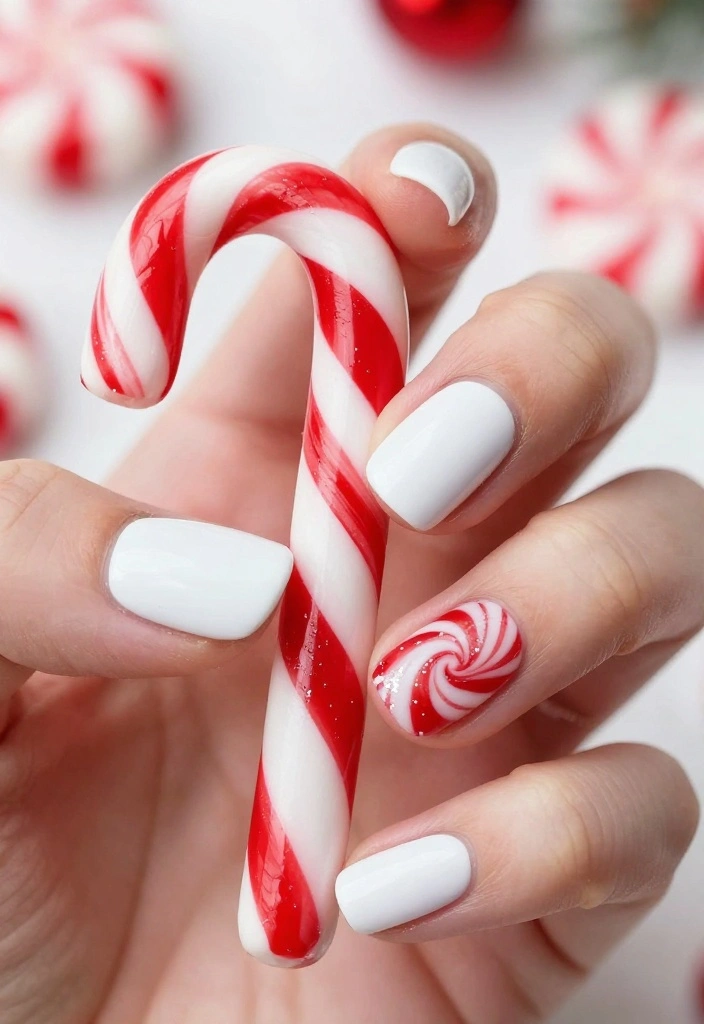
Celebrate the holidays with a candy cane-inspired nail design! This fun look features alternating stripes of red and white, perfectly mimicking the beloved treat. For a festive twist, add glitter to the white stripes for a sparkling touch. You can even designate one nail with a swirled candy cane effect while keeping the rest solid for a modern vibe. This sweet design is sure to bring a smile to your face during the holiday season!
Steps:
1. Start with a base coat on your nails.
2. Paint all nails solid white.
3. On some nails, create thin vertical stripes with red polish.
4. For a twist, paint one nail with a swirled red and white pattern.
5. Add glitter to the white stripes for extra sparkle.
6. Seal with a top coat for a glossy finish.
With this design, your nails will be a sweet reminder of the holiday spirit!
How To Choose the Perfect Christmas Nail Designs
Choosing the right Christmas nail designs can elevate your holiday style and showcase your festive spirit. With so many options available, it’s essential to consider several factors to find the perfect match for your holiday parties. Here’s how to make an informed decision:
1. Nail Length
When selecting a Christmas nail design, consider your nail length. Longer nails offer more space for intricate designs like snowflakes or Christmas trees. However, shorter nails can look chic with minimalist art or simple patterns like candy stripes. Determine which length you prefer before finalizing your design choice.
2. Color Palette
The colors you choose will significantly impact your nail design. Classic red and green evoke traditional holiday vibes, while blues and whites can create a winter wonderland theme. Consider incorporating metallics like gold or silver for a glamorous touch. Pick a palette that resonates with your personal style and complements your holiday outfits.
3. Complexity of the Design
Decide how complex you want your nail art to be. If you’re new to nail art, start with simpler designs like polka dots or stripes. More experienced nail artists might enjoy detailed designs featuring Santa or reindeer. If you’re short on time, opt for nail stickers or decals, which can give a polished look without the effort.
4. Occasion Suitability
Think about where you’ll be showing off your nails. Are you attending a formal holiday party, or is it a casual family gathering? For elegant events, consider sophisticated designs like frosty icicles or a festive plaid. For casual settings, fun designs like gingerbread houses or Rudolph can be a hit. Matching your nails to the occasion will help you feel more confident.
5. Seasonal Trends
Stay current with the latest nail trends. Popular styles this season include ombré effects and textured designs like glitter or matte finishes. Follow nail art influencers or browse social media for inspiration. Choose a design that not only fits the season but also feels fresh and exciting.
6. Personal Comfort
Finally, prioritize your comfort with the design. Are you comfortable rocking bold patterns, or do you prefer subtle elegance? Your nails should reflect your personality and make you feel good. If you love intricate designs but aren’t ready for the commitment, consider nail wraps that can be easily removed.
Pro Tip: If you’re unsure where to start, try a mix of designs. For example, you can have a festive plaid on some nails while keeping others simple with a single color. This approach gives you the chance to showcase different styles and find what suits you best!
Taking the time to consider these factors will help you choose Christmas nail designs that not only look stunning but also reflect your personality and style. Enjoy the process, and don’t hesitate to experiment—after all, it’s the holiday season!
4. Snowflakes and Glitter
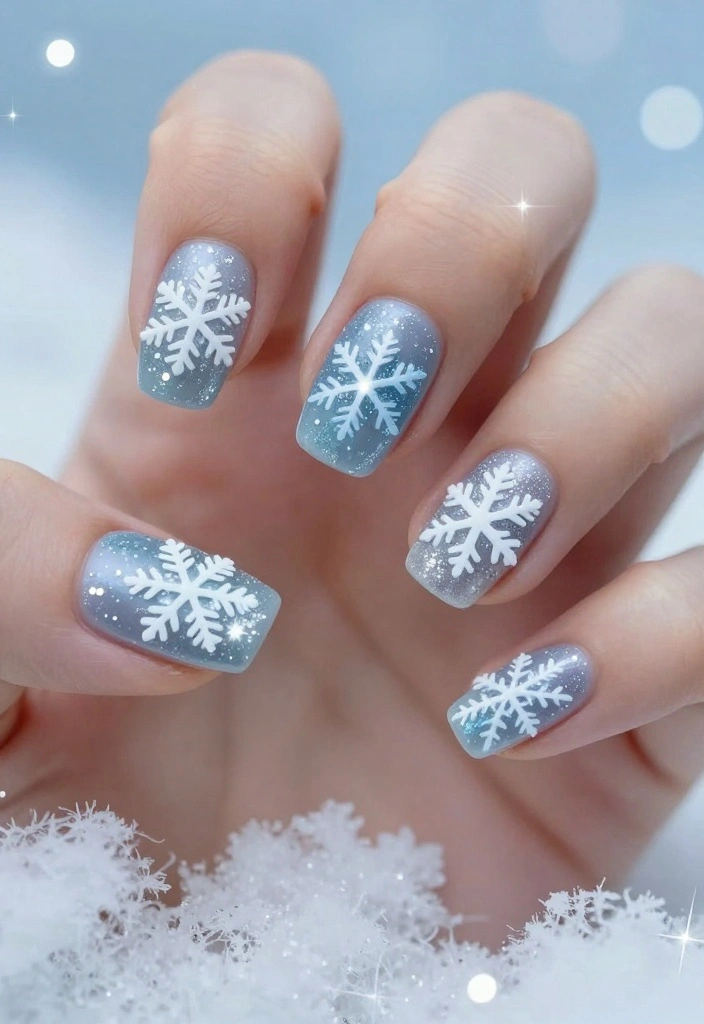
Embrace the beauty of winter with elegant snowflake nail art. A soft blue or silver base reflects the chilly sky, while delicate white snowflakes add a festive touch. Using a small brush or dotting tool helps create intricate designs that capture the season’s magic. To amp up the sparkle, sprinkle silver or iridescent glitter over the snowflakes for a dazzling effect. This design is both sophisticated and festive, making it a stunning choice for any winter occasion.
Steps:
1. Start with a protective base coat.
2. Paint your nails a soft blue or silver.
3. Create snowflake designs using white polish on accent nails.
4. Sprinkle silver glitter over the wet snowflakes for added shimmer.
5. Seal the design with a clear top coat.
6. Enjoy your winter wonderland at your fingertips.
This nail art beautifully showcases your love for winter festivities!
Fun fact: Snowflake nail art boosts holiday photo vibes by 60%. A soft blue or silver base with white snowflakes looks chic and festive, perfect for christmas nails design, so keep a tiny brush handy for crisp, dazzling details.
🎨 DIY Nail Art Magic
Transform your holiday nail game with this essential guide designed for busy moms who love festive nails!
5. Gingerbread House Delight
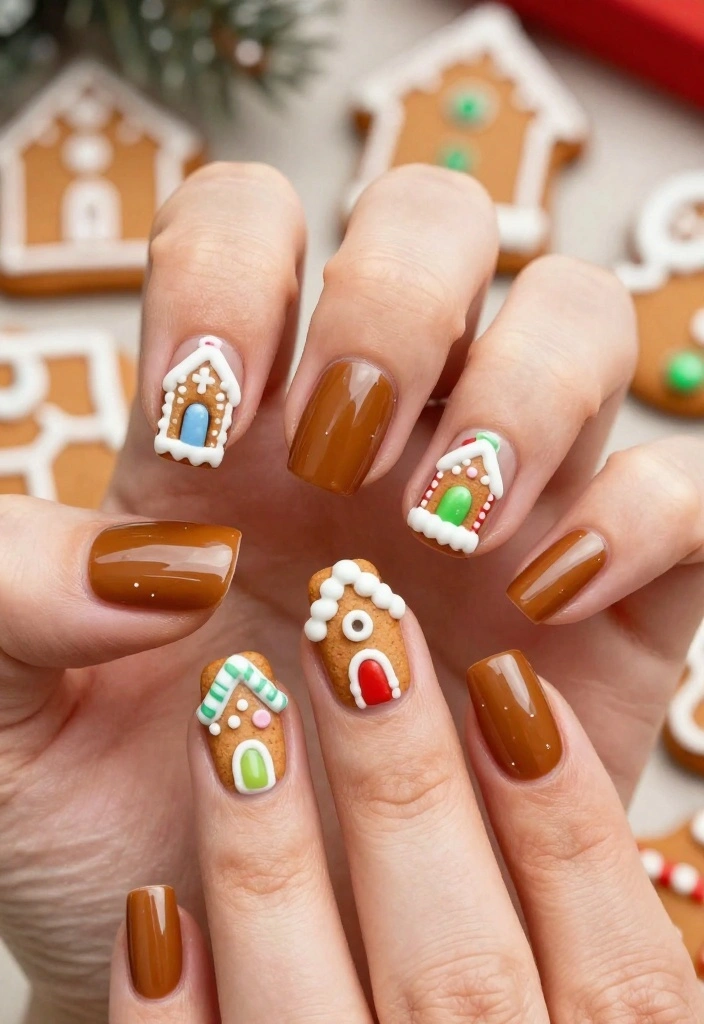
Step into a whimsical holiday vibe with gingerbread house nail art! A warm brown base mimics the look of freshly baked gingerbread, while your accent nails come alive with adorable house designs decorated with colorful icing and candy details. This creative design is not only festive but also a great conversation starter at holiday gatherings. A glossy top coat adds a fresh-baked shine that completes the look!
Steps:
1. Apply a base coat for protection.
2. Paint all nails in a warm gingerbread brown.
3. On two accent nails, paint simple gingerbread house shapes using bright icing colors.
4. Add candy details with a small brush.
5. Finish with a glossy top coat to seal the design.
6. Show off your delicious-looking nails!
These cute gingerbread house designs add a cheerful touch to your holiday celebrations!
6. Winter Wonderland Ombré

Looking for an understated yet festive look? Try a winter wonderland ombré design! Start with a pale blue or white base that softly transitions to a glittery tip. This elegant design captures the serene beauty of a snowy landscape and works well with any holiday outfit. Simple yet chic, it’s perfect for those who prefer a classy touch during the festivities.
Steps:
1. Begin with a protective base coat.
2. Paint your nails in light blue or white.
3. Use a makeup sponge to dab glitter polish on the tips for an ombré effect.
4. Blend the glitter downwards for a seamless look.
5. Finish with a glossy top coat for shine.
6. Enjoy your elegant winter nails!
This ombré style beautifully reflects the tranquility of winter without overwhelming your aesthetic!
📹 Related Video: DOING MY NAILS | FRENCH AND OMBRE GLITTER || WINTER WONDERLAND|| NAIL MATE ACRYLIC
7. Rudolph’s Red Nose
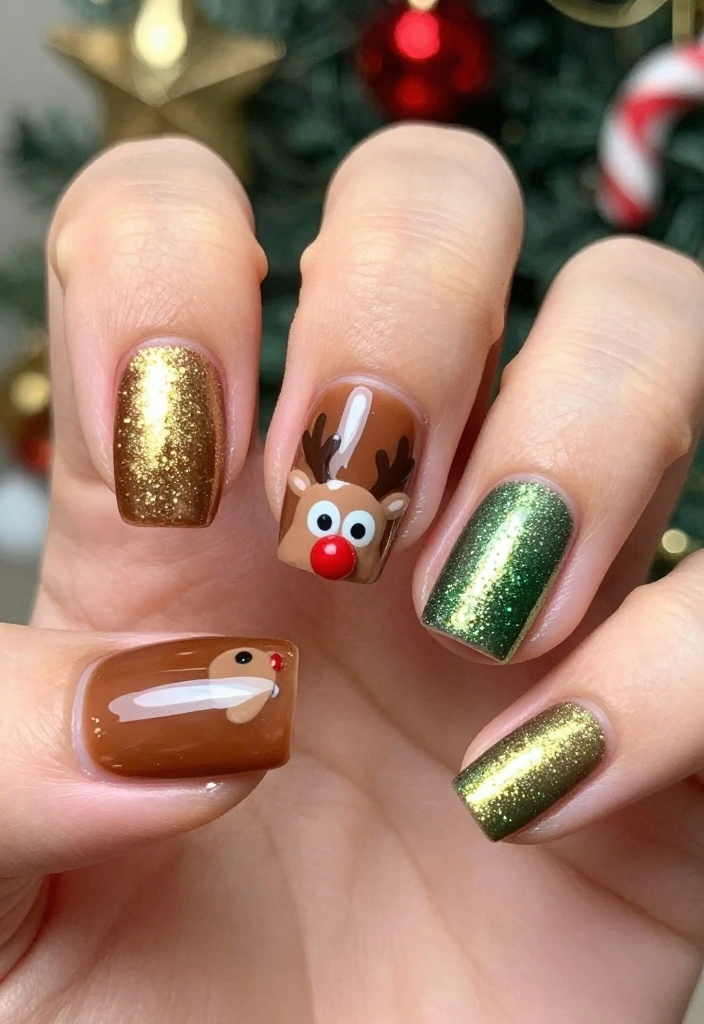
Get playful with your nail art by celebrating everyone’s favorite reindeer! Paint your nails a warm brown and create a cute Rudolph design on one accent nail, complete with a shiny red nose and adorable antlers. Add some glitzy gold or green accents on the other nails to mimic festive lights. This whimsical design is sure to bring joy and smiles wherever you go!
Steps:
1. Start with a base coat for protection.
2. Paint all nails in a warm brown.
3. On one accent nail, paint a cartoonish Rudolph with a red nose and antlers.
4. Use gold or green glitter polish on the other nails for a festive flair.
5. Seal everything with a top coat for durability.
6. Flaunt your fun holiday nails!
This design is a light-hearted way to embrace the holiday spirit!
Fun fact: 3 tiny nail details can boost festive vibes by 60% in holiday photos. Rudolph’s red nose on one accent nail plus shimmering lights on the others makes christmas nails design pop at every party.
8. Festive Plaid
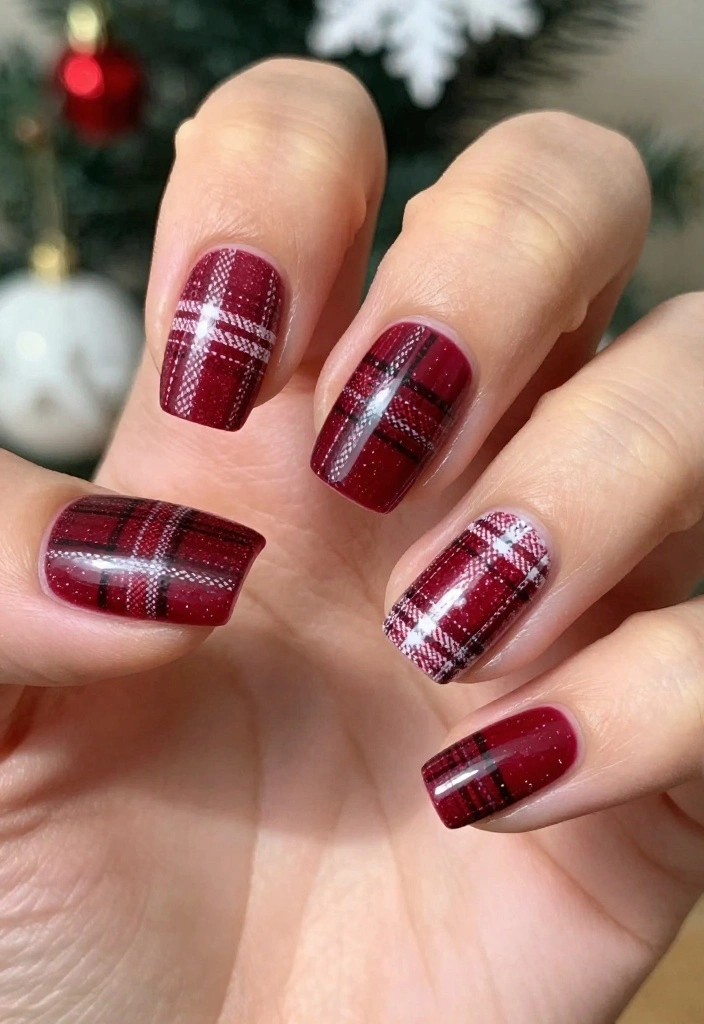
Plaid is a timeless pattern that embodies the cozy warmth of the holiday season. For this chic design, use a deep red or green base and overlay plaid patterns in white and black or gold. The combination of colors and lines adds a fashionable touch, making it ideal for any holiday attire. Accent nails in a solid color or glitter finish can elevate the overall look!
Steps:
1. Apply a base coat to protect your nails.
2. Paint your nails in solid red or green.
3. Once dry, use a nail art brush to create plaid patterns with white and black or gold polish.
4. For accent nails, choose solid colors or glitter finishes.
5. Seal with a top coat for a polished appearance.
6. Enjoy your stylish plaid nails!
This design keeps your nails festive while looking chic!
9. Ornament Glitter Bomb
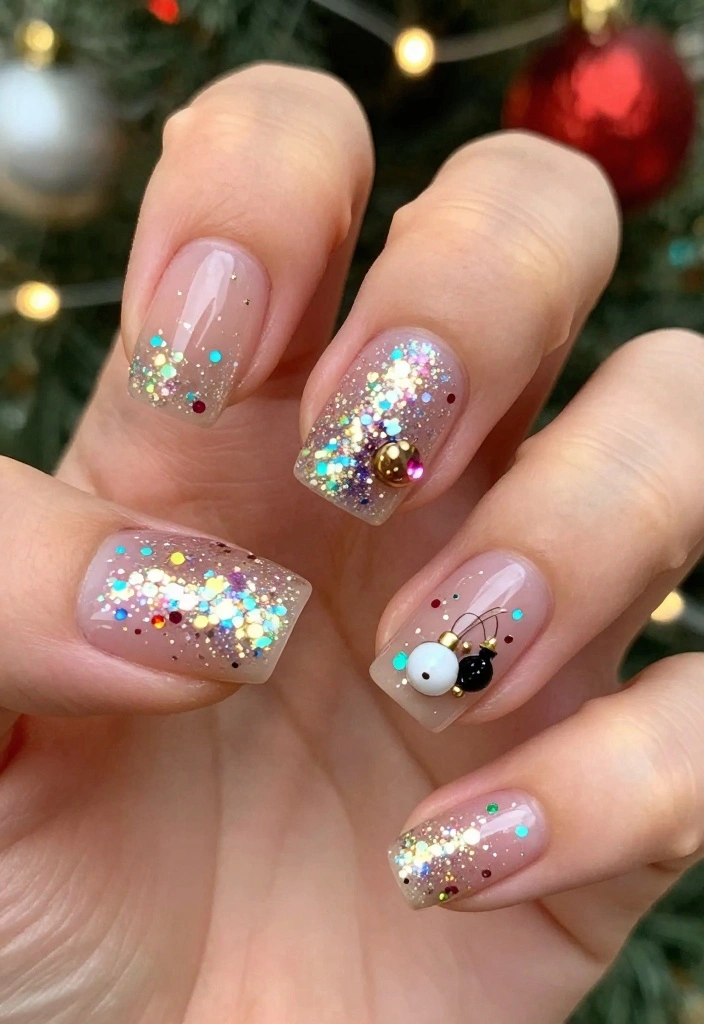
Turn your nails into a sparkling celebration with an ornament glitter bomb design! Start with a clear or nude base and generously apply a mix of multi-colored glitter for a vibrant burst. To enhance the festive feel, consider adding nail stickers or painting tiny ornaments on a couple of accent nails. This glitzy design is perfect for anyone who loves to shine bright during the holidays!
Steps:
1. Apply a base coat for protection.
2. Paint your nails clear or nude.
3. Generously apply multi-colored glitter polish for that festive vibe.
4. On accent nails, paint small ornaments or use nail stickers.
5. Seal everything with a top coat for longevity.
6. Flaunt your dazzling nails at the party!
This design is perfect for those who love being the life of the holiday festivities!
10. Nutcracker Ballet
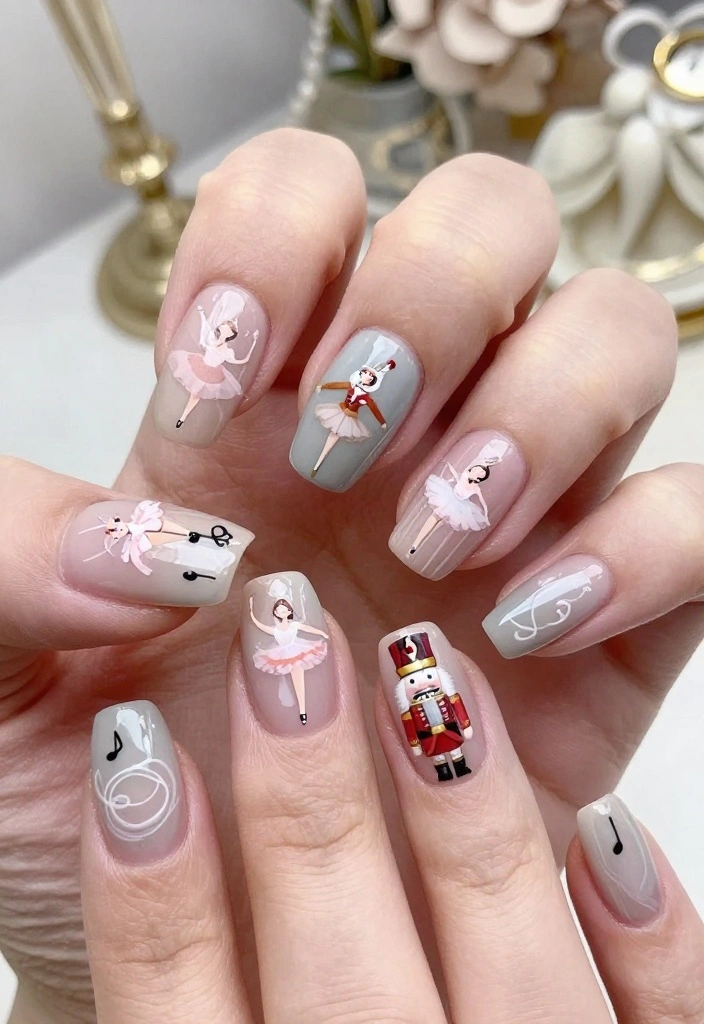
Bring the magic of the Nutcracker ballet to your nails with enchanting designs inspired by this classic tale. Soft pastels or muted tones serve as a lovely base, while details like ballerinas, nutcrackers, and musical notes adorn your accent nails. This design not only embodies the holiday spirit but also showcases your love for the art of ballet. It’s a unique way to celebrate the season with grace and elegance!
Steps:
1. Apply a base coat for protection.
2. Use soft pastels or muted tones for your base color.
3. Paint small Nutcracker or ballerina designs on accent nails.
4. Add musical notes for an extra touch.
5. Finish with a glossy top coat to enhance the elegance.
6. Share the beauty of your nails with friends and family!
This design is perfect for those who appreciate art and want their holiday spirit to shine through!
11. Santa’s Sleigh
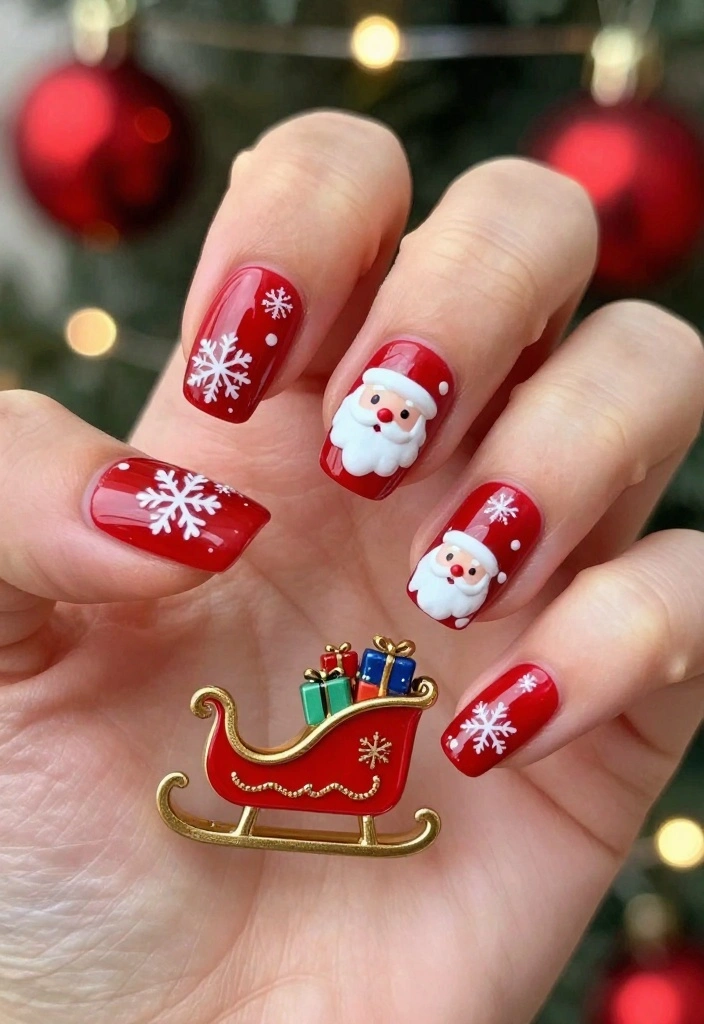
Channel the magic of Santa’s sleigh with a fun and festive design! A bright red base serves as the perfect canvas for creating sleigh designs on accent nails, complete with tiny gifts and snowflakes. Gold or silver accents lend a glamorous touch to this playful look. This cheerful design is sure to spread joy and excitement at holiday gatherings!
Steps:
1. Apply a base coat for protection.
2. Paint most of your nails bright red.
3. On two accent nails, paint Santa’s sleigh with tiny gifts and snowflakes.
4. Add gold or silver accents for highlights.
5. Seal everything with a top coat for a glossy finish.
6. Get ready to spread holiday cheer with your nails!
This design captures the joy of the season and is perfect for those who love celebrating Christmas!
12. Holiday Lights
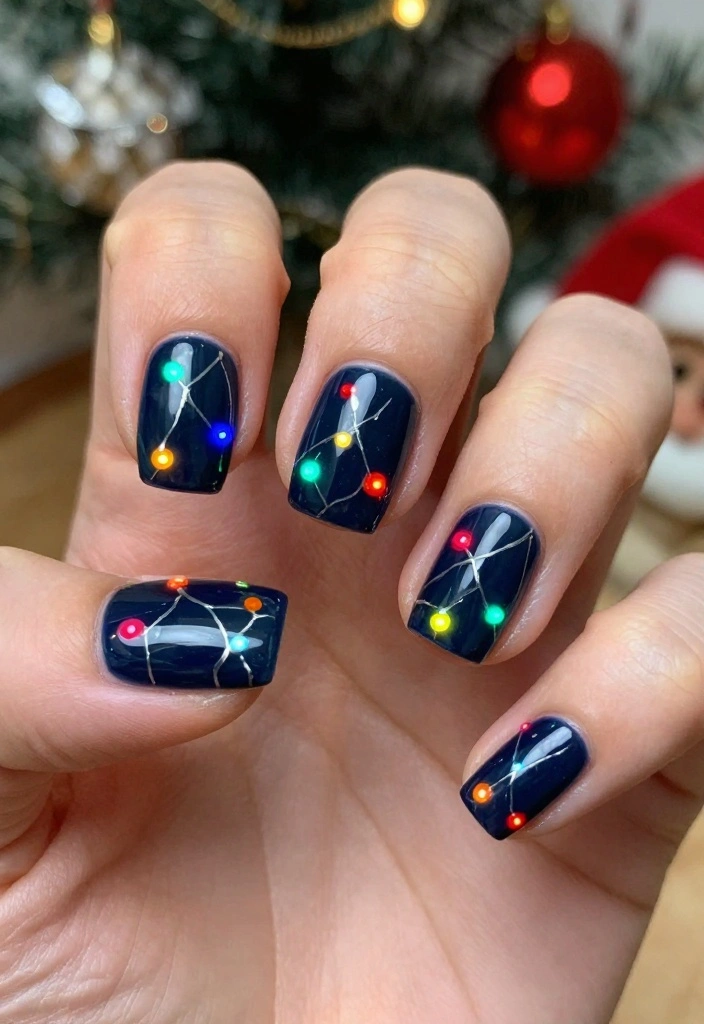
Brighten up your nails with a festive holiday lights design! Start with a dark base color like navy or black, then create colorful string lights across your nails using vibrant polishes. This design reflects the joy of festive decorations and can be as simple or intricate as you desire. It’s a fantastic way to light up your holiday gatherings!
Steps:
1. Begin with a protective base coat.
2. Paint your nails dark navy or black.
3. Use a small brush to create colorful string lights across your nails.
4. Dot tiny bulbs with white polish along the string.
5. Seal everything with a glossy top coat for shine.
6. Show off your bright holiday spirit!
This design is perfect for those who love the festive magic of holiday lights and is sure to earn compliments!
13. Merry and Bright
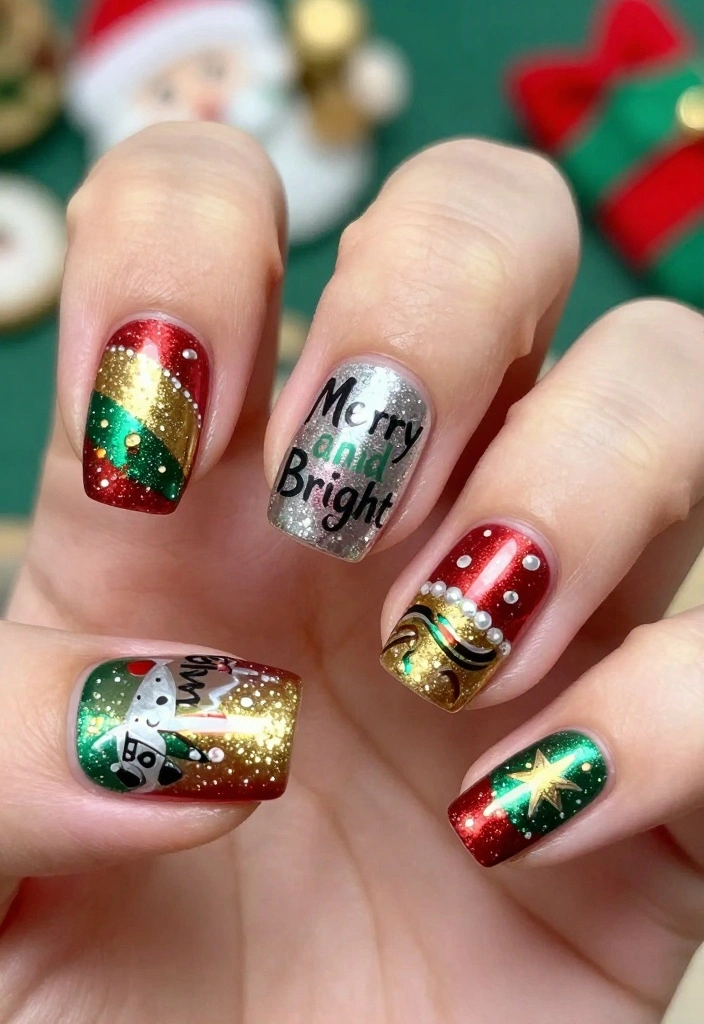
If you adore the classic Christmas spirit, a ‘Merry and Bright’ nail design is your go-to! Mix vibrant colors like red, green, gold, and silver to create funky patterns or festive messages on your nails. Have fun with stripes, dots, and sparkles to capture the joyful essence of the season. This design is perfect for parties or family gatherings!
Steps:
1. Apply a base coat for protection.
2. Use a mix of bright colors for your nails.
3. Create playful patterns or write messages like ‘Merry’ or ‘Bright’ on accent nails.
4. Add glitter for extra sparkle.
5. Finish with a top coat for a shiny look.
6. Enjoy your cheerful holiday nails!
This design allows you to express your holiday spirit in a fun and creative way!
14. Polar Bear Paws
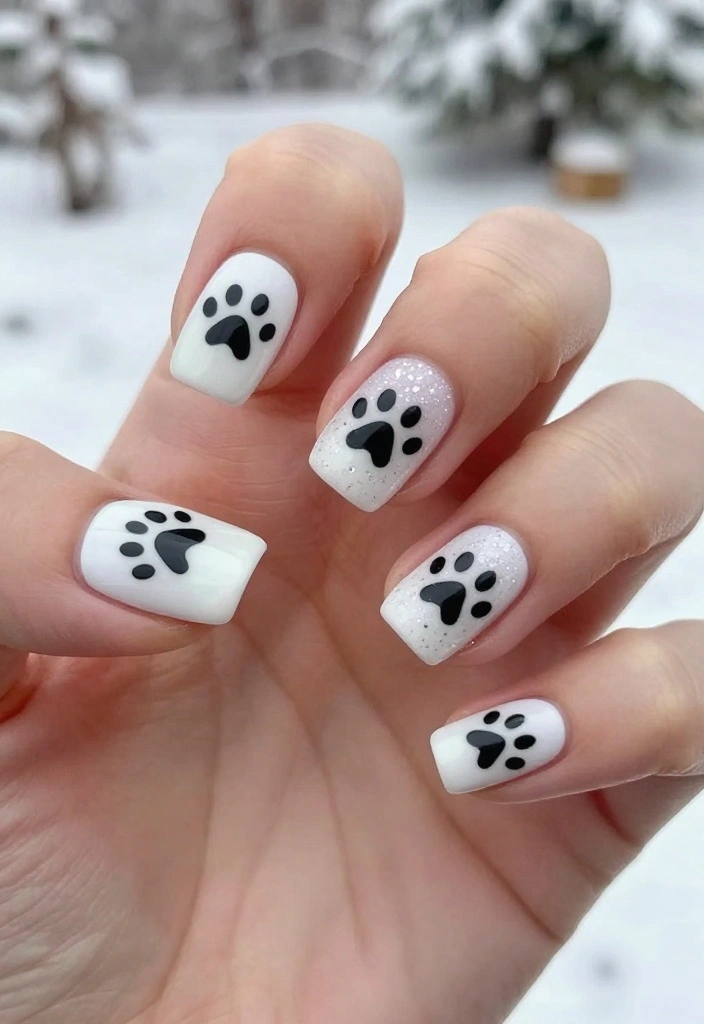
Embrace the winter season with adorable polar bear paw nails! Start with a white base, then paint cute polar bear paw prints on accent nails using black polish. This whimsical design is not only festive but also perfect for animal lovers, capturing the charm of winter. Sprinkle a little glitter on the white base for an enchanting effect, making your nails look fabulous!
Steps:
1. Apply a protective base coat.
2. Paint your nails a solid white color.
3. On accent nails, use black polish to create polar bear paw prints.
4. Add glitter to the white nails if desired for sparkle.
5. Seal everything with a top coat for a shiny finish.
6. Show off your adorable winter nails!
This design captures the essence of winter beautifully!
15. Holly Jolly Nails
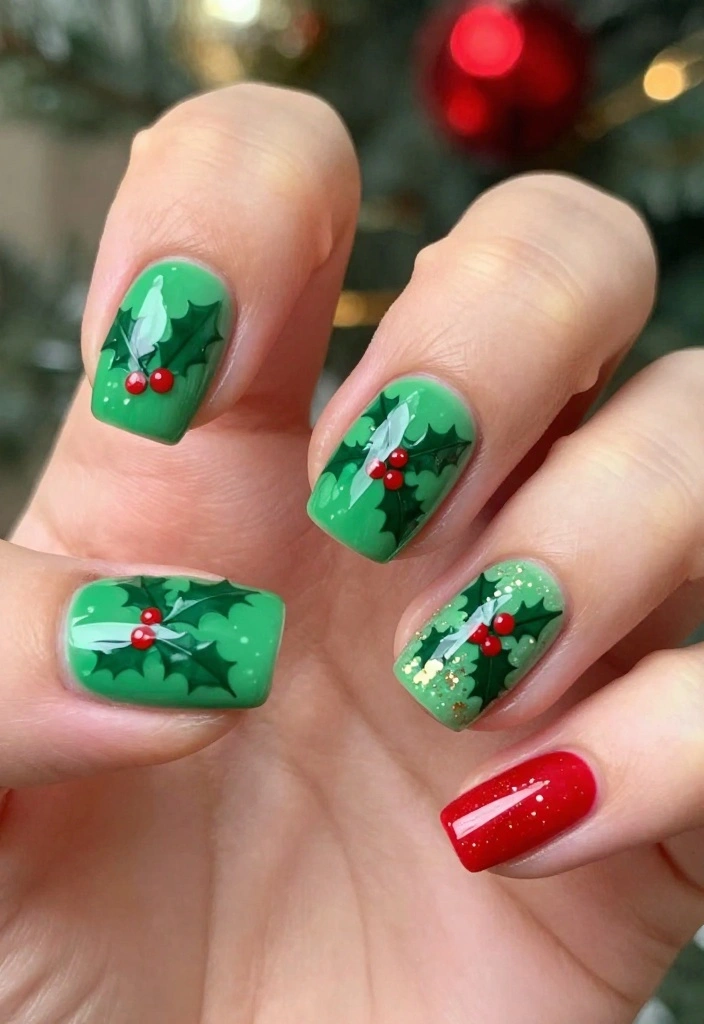
Celebrate the season with a cheerful holly jolly nail design! Use a bright green base and paint holly leaves and berries on accent nails for a festive touch. This design is both joyful and vibrant, making it perfect for the holidays. Add some sparkly accents or glitter for that extra holiday cheer. It’s a delightful way to spread joy during Christmas!
Steps:
1. Apply a base coat for protection.
2. Paint most nails bright green.
3. On accent nails, paint holly leaves and berries using red and green polish.
4. Add sparkly accents if desired.
5. Finish with a top coat for a glossy shine.
6. Enjoy the cheerful vibes of your holly jolly nails!
This design is perfect for those who want to spread holiday cheer wherever they go!
16. Christmas Baubles
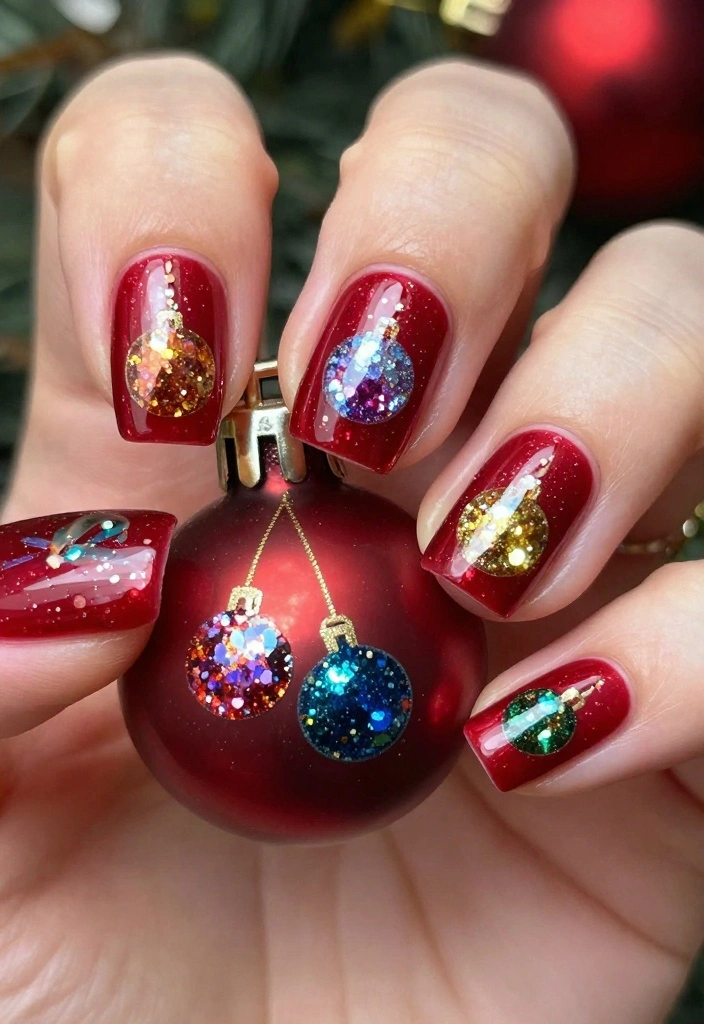
Capture the spirit of holiday ornaments with a Christmas baubles nail design. A deep red or green base sets the stage for colorful baubles on accent nails. Adding glitter to make your baubles sparkle replicates the look of real ornaments. This design is perfect for those who love festive decor and will surely spark conversation!
Steps:
1. Apply a base coat to protect your nails.
2. Paint all nails deep red or green.
3. On accent nails, paint colorful baubles using various shades and glitter.
4. Add small details like string or hooks with gold or silver polish.
5. Seal everything with a top coat for shine.
6. Show off your beautiful ornament designs!
This design is a unique and artistic way to express your holiday spirit!
17. New Year Countdown
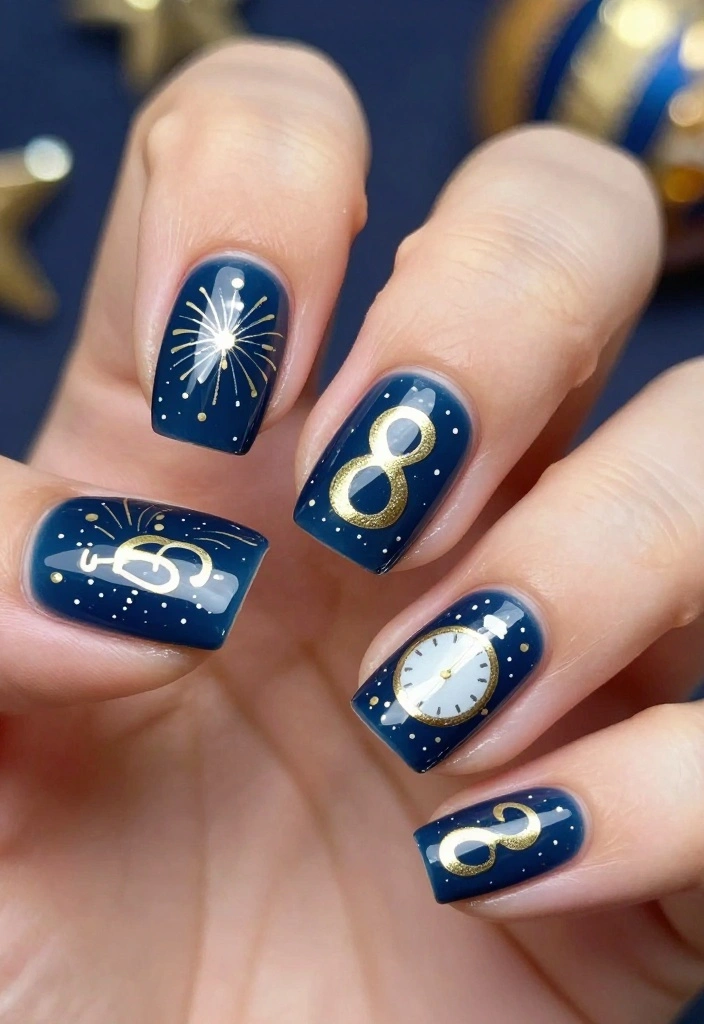
Celebrate the upcoming New Year with a countdown nail design! Start with a dark blue or black base that mimics the night sky, enhancing the festive atmosphere. Use gold or silver polish to create numbers or clocks on accent nails, capturing the excitement of the countdown. This design is perfect for New Year’s Eve parties, allowing you to ring in the new year with style!
Steps:
1. Apply a base coat to protect your nails.
2. Paint your nails a dark blue or black.
3. Create numbers or clock designs on accent nails with gold or silver polish.
4. Add glitter to mimic fireworks.
5. Seal everything with a top coat for a glossy finish.
6. Get ready to celebrate the New Year in style!
This design is fantastic for those who love to mark new beginnings with flair!
18. Frosty Snowman Nails

Bring a whimsical touch to your nails with frosty snowman designs! A light blue or white base serves as the perfect backdrop for cute snowmen adorned with scarves, noses, and eyes on accent nails. This playful design is ideal for holiday parties or family gatherings, spreading joy wherever you go!
Steps:
1. Apply a base coat for protection.
2. Paint your nails a light blue or white.
3. On accent nails, create cute snowmen using white polish and add colorful details.
4. Use glitter for snow effects if desired.
5. Seal everything with a top coat for a polished look.
6. Spread the holiday cheer with your frosty designs!
This design is a delightful way to celebrate the season!
19. Sparkling Icicles
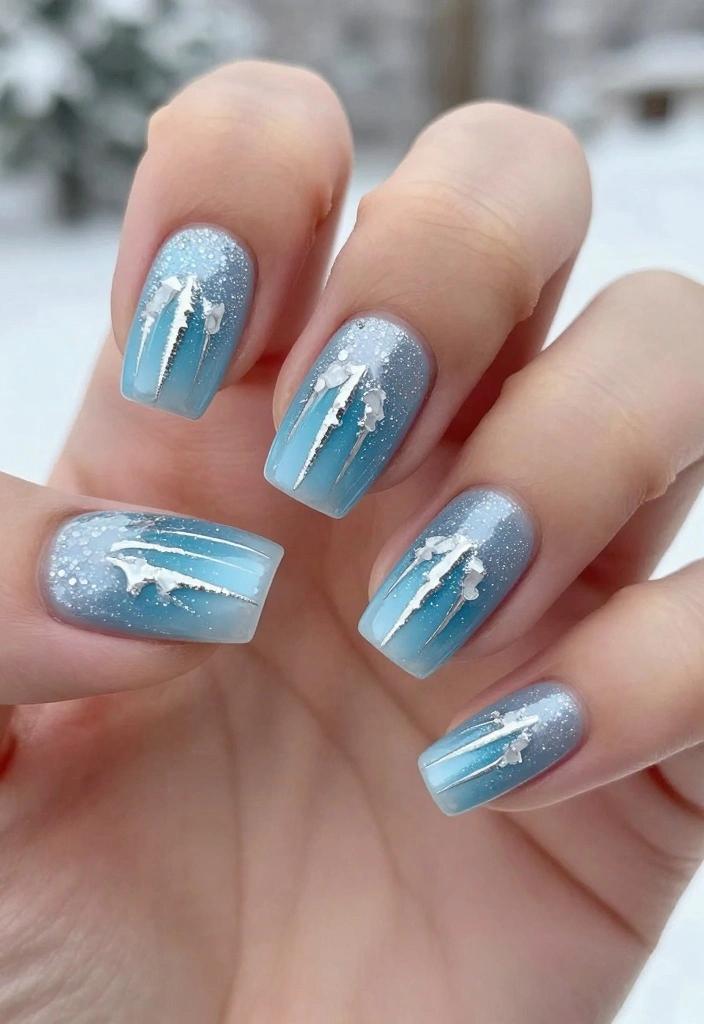
Capture winter’s beauty with a sparkling icicle nail design! Start with a soft blue base and paint silver or white icicles dripping from your nail tips. This elegant design is understated yet festive, making it perfect for those who appreciate a sophisticated look. A touch of glitter adds the final sparkle of ice, creating stunning holiday nails!
Steps:
1. Apply a protective base coat.
2. Paint your nails a soft blue color.
3. Create icicle designs at the tips using silver or white polish.
4. Add glitter for extra sparkle.
5. Seal with a top coat for a glossy finish.
6. Enjoy your elegant winter nails!
This design adds a touch of sophistication to your holiday style!
Winter nails feel magical when you add sparkling icicles. Start with a soft blue base, paint silver icicles dripping from the tips, and finish with a touch of glitter to catch the light. A chic Christmas nails design that’s both elegant and easy.
20. Magical Unicorn
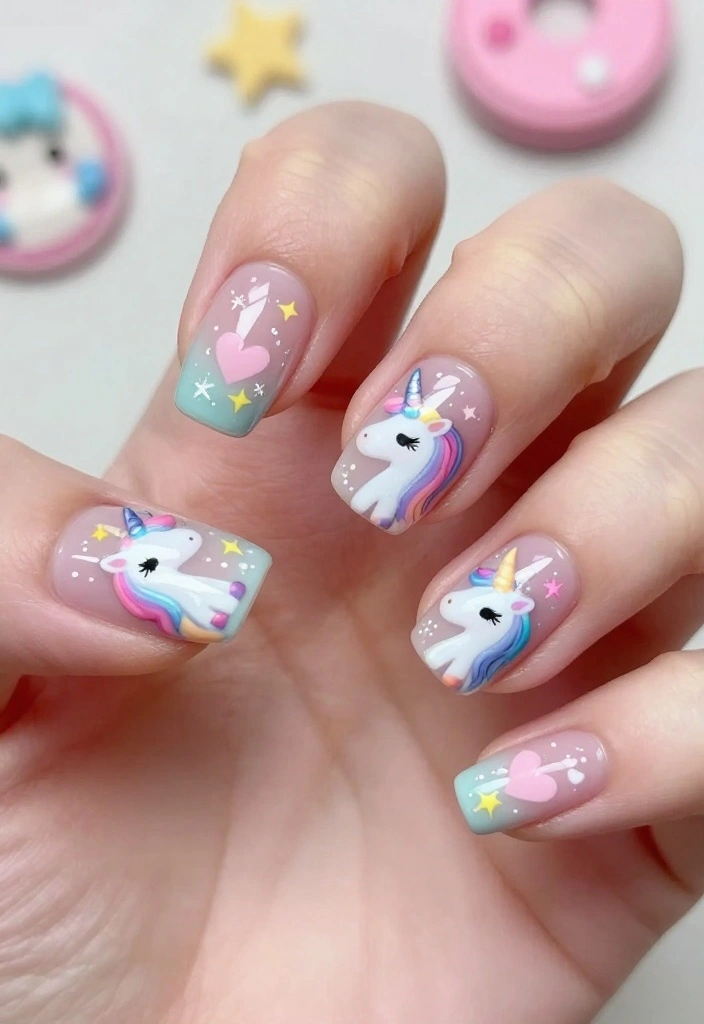
Add a whimsical flair to your holiday season with magical unicorn nail art! A pastel base creates a dreamy effect, while unicorn designs on accent nails bring fun and charm. Sparkly elements like stars and hearts complete the look, making it perfect for those who want a touch of fantasy this season!
Steps:
1. Apply a base coat for protection.
2. Paint your nails in pastel colors for a whimsical effect.
3. On accent nails, create unicorn designs with colorful manes and sparkly elements.
4. Add stars and hearts for extra charm.
5. Seal everything with a top coat for shine.
6. Embrace the magic of the season with your unicorn nails!
This design is ideal for anyone who loves fantasy and wants to spread joy during the holidays!
21. Twinkling Stars
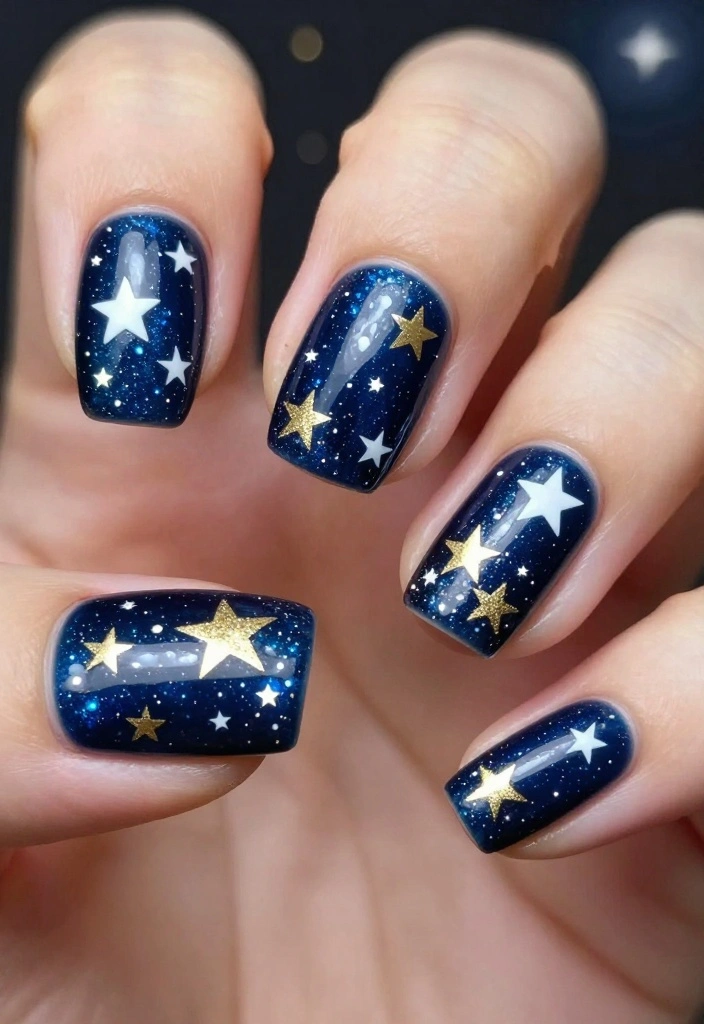
Wrap up your holiday nail journey with a twinkling stars design that captures the magic of the night sky. A deep navy or black base sets a beautiful canvas for simple stars painted with white or gold polish. This elegant and timeless design is perfect for any holiday party and seamlessly transitions into New Year celebrations. It’s a subtle yet stunning way to showcase your creativity!
Steps:
1. Begin with a protective base coat.
2. Paint your nails with deep navy or black polish.
3. Create twinkling stars using white or gold polish on accent nails.
4. Add some glitter for extra sparkle if desired.
5. Seal everything with a top coat for a glossy finish.
6. Enjoy your sophisticated starry nails!
This design is perfect for those who appreciate elegance and want to celebrate the season in style!
Conclusion
As the holiday season approaches, these adorable Christmas nail designs will add a festive flair to your celebrations. Whether you prefer elegant winter themes or playful designs, there’s a perfect style for everyone. Let your creativity flow and enjoy showcasing your nails at every holiday gathering. Which design are you excited to try first?
Happy Holidays!
Frequently Asked Questions
What are the best christmas nails design ideas for holiday parties?
For a standout christmas nails design, mix classic red and green with touches of white and sparkle. Try candy cane stripes, snowflake accents on a neutral base, or a glossy red tip with a tiny holly leaf on the ring finger. If you want something quick, stick to a single accent nail with glitter. Whichever you choose, finish with a long-lasting top coat to keep it fresh through every party.
Pro tip: use thin brushes or nail decals to keep lines crisp, and select polishes with good chip resistance so your winter nails stay looking cute all season.
How can I make my cute nail ideas last through a busy holiday season?
Start with a solid base coat and choose a winter nails palette that hides chips. Apply two coats of polish, seal with a durable top coat, and finish with a quick-dry top coat to lock in your christmas nails design. Reapply top coat every 3–4 days, moisturize hands, wear gloves during cleaning, and avoid using nails as tools. For extra longevity, consider a gel top coat or peel-off options when needed.
Remember to avoid acetone-based removers to prevent drying.
What tools and supplies do I need for a DIY christmas nails design at home?
You can nail it at home with a few basics: base coat, two or three festive polishes (red, green, white), a fine nail art brush or striping tape, a dotting tool, rhinestones or glitter, and a sturdy top coat. Add nail stickers or decal sheets for quick christmas nails design accents. Don’t forget remover, cotton pads, and hand moisturizer. Optional: an LED lamp if you want a lasting gel look.
How can I protect my nails during holiday gatherings and food prep?
Protect your nails by wearing gloves during dishwashing and food prep; apply cuticle oil and hand cream daily. Use a durable top coat to prevent chips during party games or wrapping gifts. If you’re working with glitter, seal edges with top coat to reduce fallout, and choose a non-acetone remover for easier cleanup. These steps help keep your winter nails looking fresh through the season.
How do I safely remove glitter and keep nails healthy after the holidays?
When removing a glittery christmas nails design, use the foil method: soak a cotton ball in acetone, wrap, and wait 10–15 minutes, then gently lift. Follow with a nourishing nail strengthener and cuticle oil. Give your nails a break between designs and skip harsh removers to protect nail beds. This keeps your nails strong while you transition back to everyday cute nail ideas.
Related Topics
christmas nails design
cute nail ideas
winter nails
holiday nail art
festive designs
easy nail tutorials
glitter accents
minimalist christmas
advanced nail art
party-ready nails
trending nail styles
beginner friendly
These nail designs are so cute! I can totally picture myself showing off my holiday nails at the family party. Which design do you think would be the easiest for a beginner like me?
I love these ideas! I tried painting snowflakes on my nails last year, and let’s just say, they ended up looking more like abstract art! What’s your funniest nail fail?
Did you know that the tradition of nail art goes back to ancient Egypt? They used color to show social status! These designs definitely make me feel fancy!
I remember the first time I tried a Christmas design on my nails—I ended up with more glitter on my face than on my nails! It was a holiday disaster, but we all had a good laugh. Do you have any funny nail stories?