The holiday season is upon us, and with it comes a craving for festive flair! If you’re anything like me, the twinkling lights and cheerful vibes make you want to jazz up your look, starting with your nails. The sparkly red nails trend is back and more fabulous than ever. I created this post to showcase 21 stunning red sparkle nail designs that will help you shine at every holiday gathering.
This guide is perfect for anyone who loves experimenting with nail art or simply wants to add a touch of glamour to their style. Whether you’re preparing for a festive party or just looking to treat yourself, you’ll find inspiration that speaks to your festive spirit. Expect ideas that are not only eye-catching but also easy to achieve, making your nails the highlight of the season.
In this post, you’ll discover a variety of designs, from classic red glitter ombre to whimsical hearts and elegant combinations with gold. Each design is tailored to help you express your unique holiday cheer. So, grab your nail polish, and let’s dive into these fabulous red sparkle nail ideas that are sure to steal the show this season!
Key Takeaways
– Discover 21 unique red sparkle nail designs perfect for the holiday season to express your festive spirit.
– Designs range from classic styles like ombre and glitter tips to playful accents like candy canes and hearts.
– Each design is easy to recreate, allowing you to achieve salon-worthy nails at home.
– Find inspiration for every occasion, whether it’s a party, family gathering, or simply to brighten up your day.
– Nail art can elevate your look and add a personal touch to your holiday celebrations, making you feel festive and fabulous.
Contents
- 1. Classic Red Glitter Ombre
- 2. Festive Snowflake Accents
- 3. Elegant Red and Gold Combo
- 4. Glittery Candy Cane Stripes
- 5. Textured Red Glitter with Velvet
- 6. Glamorous Red Jewel Tones
- 7. Whimsical Red Glitter Hearts
- 8. Modern Geometric Red Sparkle
- 9. Elegant Red with Pearls
- 10. Festive Red Glitter French Tips
- 11. Shimmering Red Glitter Gradient
- 12. Dramatic Red with Black Accents
- 13. Sweet Red Candy Glitter
- 14. Red Sparkle with Tinsel Effect
- 15. Bold Red with White Polka Dots
- 16. Textured Red Glitter with Rhinestones
- 17. Cheery Red Glitter Spirals
- 18. Chic Red Marble Design
- 19. Fun Red Glitter Confetti
- 20. Classic Red Sparkle with Holiday Icons
- 21. Sparkly Red with Negative Space
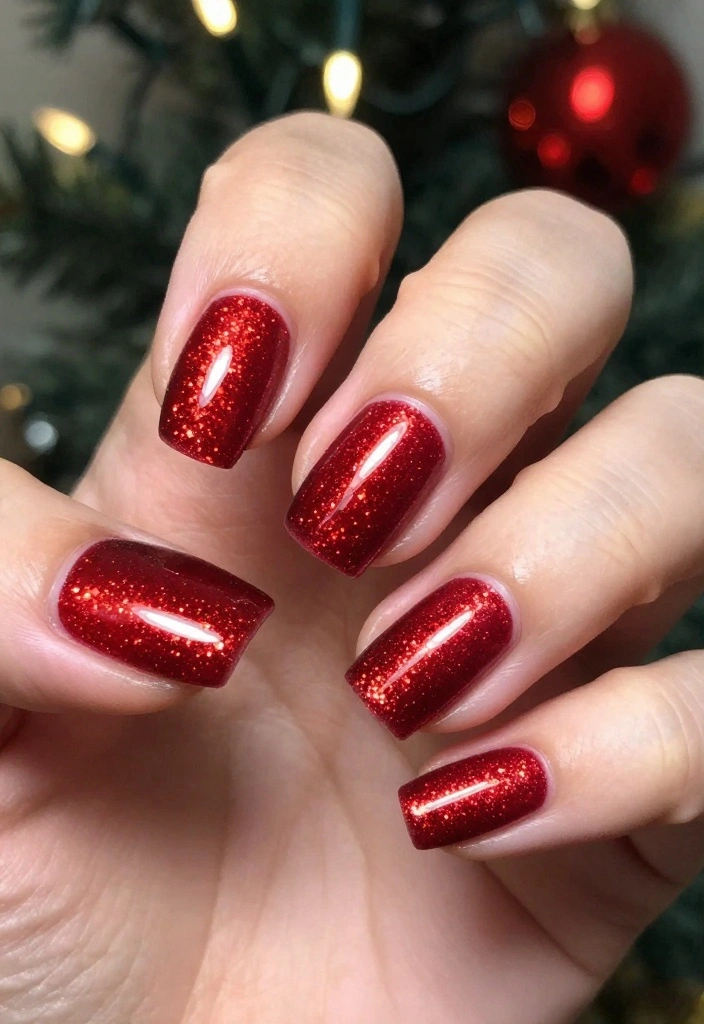
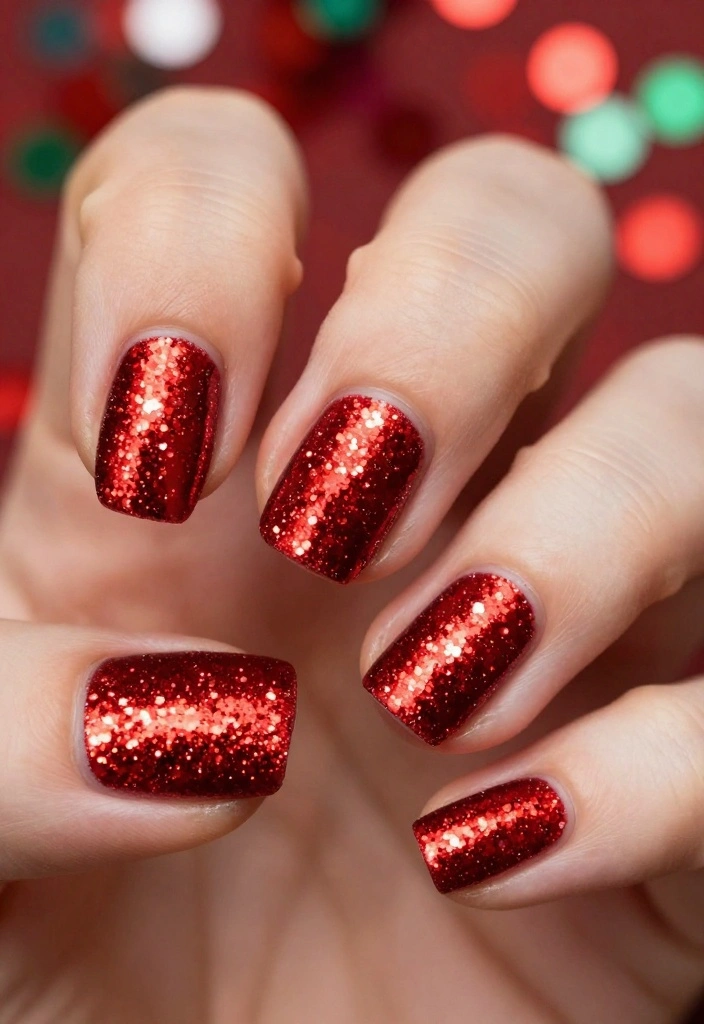
1. Classic Red Glitter Ombre
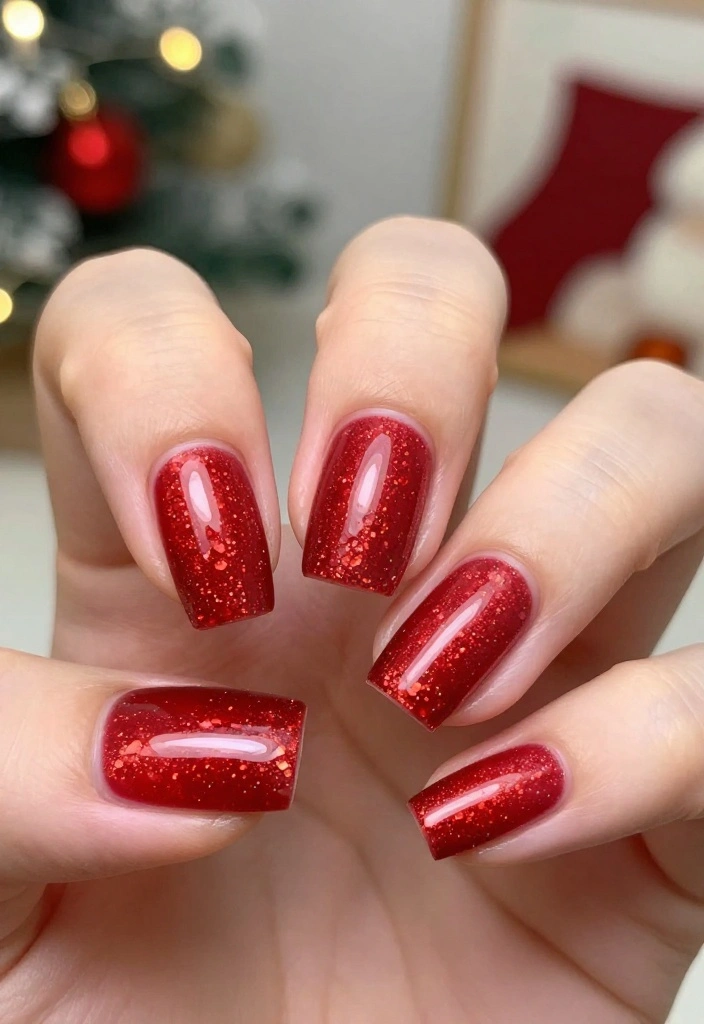
Kick off your festive nail journey with the allure of a classic red glitter ombre. This stunning design elegantly transitions from a rich crimson at the base to sparkling ruby tips, creating a mesmerizing gradient effect.
The mix of matte and shimmer adds depth, ensuring your nails catch every eye at holiday gatherings. This look is versatile enough to shine at both casual get-togethers and formal parties.
To achieve this look:
– Use a makeup sponge for a flawless gradient effect.
– Layer with a clear topcoat for a brilliant shine and lasting wear.
Here’s how to create this design:
1. Apply a base coat to safeguard your nails.
2. Paint your nails with a deep red polish and allow it to dry.
3. Use a makeup sponge to apply glitter polish, concentrating more on the tips.
4. Lightly dab the sponge onto your nails to perfect the ombre effect.
5. Seal everything with a topcoat for extra sparkle.
💅 Perfect Your Nail Art Today!
Transform your festive red sparkle nails with our DIY guide tailored for busy moms like you!
How To Choose the Right Red Sparkle Nails Design
Choosing the perfect red sparkle nails design can truly elevate your festive looks this season. With so many options out there, it’s essential to consider a few key factors to ensure you select a design that fits your style and occasion. Here are some helpful tips to guide you through the selection process:
1. Consider Your Occasion
Think about where you’ll be showing off your nails. Are you attending a casual holiday party or a formal gathering? Designs like glittery candy cane stripes or elegant red and gold combos can suit different events. For something more playful, whimsical red glitter hearts might be the way to go. Understanding the occasion helps narrow down your options.
2. Nail Length and Shape
Your natural nail shape and length play a significant role in how a design will look. Short nails can look stunning with simple styles like red sparkle French tips or a shimmering red glitter gradient. On the other hand, longer nails can handle more intricate designs, like a modern geometric red sparkle or dramatic red with black accents. Consider what you currently have or what you’re willing to achieve.
3. Personal Style
Think about what represents your personality. If you love bold and bright, opt for dramatic red with white polka dots or bold red with rhinestones. If you prefer subtle elegance, choose designs like elegant red with pearls or classic red sparkle with holiday icons. Reflecting your personal style will make you feel more confident and fabulous.
4. Nail Art Skills
Your comfort level with nail art will affect your choice. If you’re a DIY enthusiast, consider designs that match your skill level. Simple designs like cheery red glitter spirals or fun red glitter confetti are easier to achieve. More complex designs, like chic red marble or textured red glitter with velvet, may require a professional touch. Be honest with yourself about your abilities to avoid frustration.
5. Seasonal Trends
Stay in tune with current nail art trends. For this season, look out for festive styles that incorporate elements like snowflakes or tinsel effects. These trendy touches can make your nails feel fresh and up-to-date. Check social media and nail art blogs for inspiration and see what designs are gaining popularity.
6. Comfort and Wearability
Finally, consider how comfortable you will be with a particular design. Some nail art can feel heavy or cumbersome, especially if you add multiple embellishments. Ensure that whatever design you choose feels comfortable to wear throughout your festivities. Opt for styles that maintain both beauty and comfort.
Pro Tip: Before committing to a design, try out temporary nail stickers or press-ons. This lets you test the waters with different looks without long-term commitment. You might discover a style you love, or you may find that you prefer to keep it simple!
By keeping these factors in mind, you can confidently choose a red sparkle nails design that fits your needs and personality. Whether you go for classic elegance or bold playfulness, your festive nails will undoubtedly steal the show this season!
2. Festive Snowflake Accents

Transform your nails into a winter wonderland with festive red sparkle accented by delicate snowflakes. This design beautifully combines a vibrant red base with white or silver snowflakes, embodying the spirit of the holiday season.
The contrast of colors and textures creates an eye-catching look that will have everyone admiring your nail art.
To achieve this look:
– Use a fine brush for detailed snowflake designs.
– Add tiny rhinestones to the centers of the snowflakes for an extra touch of sparkle.
Follow these steps to create your festive nails:
1. Start with a red base coat and let it dry completely.
2. With a thin nail art brush, paint small snowflakes on alternating nails.
3. Place rhinestones in the center of each snowflake for a dazzling effect.
4. Finish with a topcoat to protect your design and enhance the shine.
3. Elegant Red and Gold Combo

Elevate your holiday look with a sophisticated mix of red sparkle nails and glamorous gold accents. This design exudes elegance, making it ideal for holiday parties or New Year’s celebrations.
The rich red pairs beautifully with gold, offering a classic yet modern vibe that captures attention.
To achieve this chic combo:
– Use gold foil for a trendy, textural finish.
– Ensure each layer dries before applying the next to avoid smudging.
Follow these steps for the perfect look:
1. Start with a base coat and let it dry.
2. Paint your nails with a vibrant red polish.
3. On one or two accent nails, apply gold foil using a topcoat as an adhesive.
4. Finish with a glossy topcoat for an eye-catching shine.
Fun fact: red sparkle nails with a gold accent grab attention at holiday parties—88% of people recall bold nail designs first. Pro tip: layer thin gold foil pieces over a red base and let each layer dry to avoid smudges.
4. Glittery Candy Cane Stripes

Capture the joyful spirit of the season with candy cane-inspired nail art. Red sparkle nails embellished with white stripes create a festive look that radiates holiday cheer.
This playful yet chic design is perfect for family gatherings or holiday outings, ensuring you’re always in the festive mood.
To create this look:
– Use striping tape for crisp lines.
– Play around with matte and glossy finishes for added visual interest.
Here’s how to achieve this design:
1. Start with a red base and allow it to dry.
2. Apply striping tape to form your desired stripe pattern.
3. Paint over with white polish, removing the tape while wet.
4. Top it off with a layer of glitter polish for extra sparkle and finish with a topcoat.
5. Textured Red Glitter with Velvet
For a unique take on festive nails, combine red sparkle with a plush velvet effect. This intriguing mix of textures ensures your nails stand out at any holiday gathering.
The soft velvet juxtaposed against sparkling red conveys sophistication and luxury.
To achieve this textured look:
– Use velvet powder for the perfect finish.
– Make sure your base color is completely dry before applying the velvet powder.
Here’s how to nail this trendy design:
1. Apply a base coat followed by a coat of red polish.
2. Once dry, apply another layer of red polish and immediately dip your nails into the velvet powder.
3. Press the powder gently to ensure it sticks.
4. Brush off any excess powder and seal with a topcoat to protect your design.
6. Glamorous Red Jewel Tones

Dive into the richness of jewel tones with striking red sparkle nails paired with deep emerald or sapphire accents. This luxurious combination will make your nails a centerpiece at any festive gathering.
The pairing of rich colors adds depth, giving your nails a regal look that stands out.
To create this stunning design:
– Opt for holographic or metallic polishes for unique finishes.
– Keep designs minimal to let the bold colors shine.
Follow these steps for jewel-toned elegance:
1. Start with a red base coat.
2. Choose two accent nails and paint them with deep emerald or sapphire polish.
3. Apply a sparkly topcoat over the red nails for added dimension.
4. Finish with a glossy topcoat to ensure a long-lasting shine.
📹 Related Video: Pomegranate Jewel Nail Tutorial
7. Whimsical Red Glitter Hearts
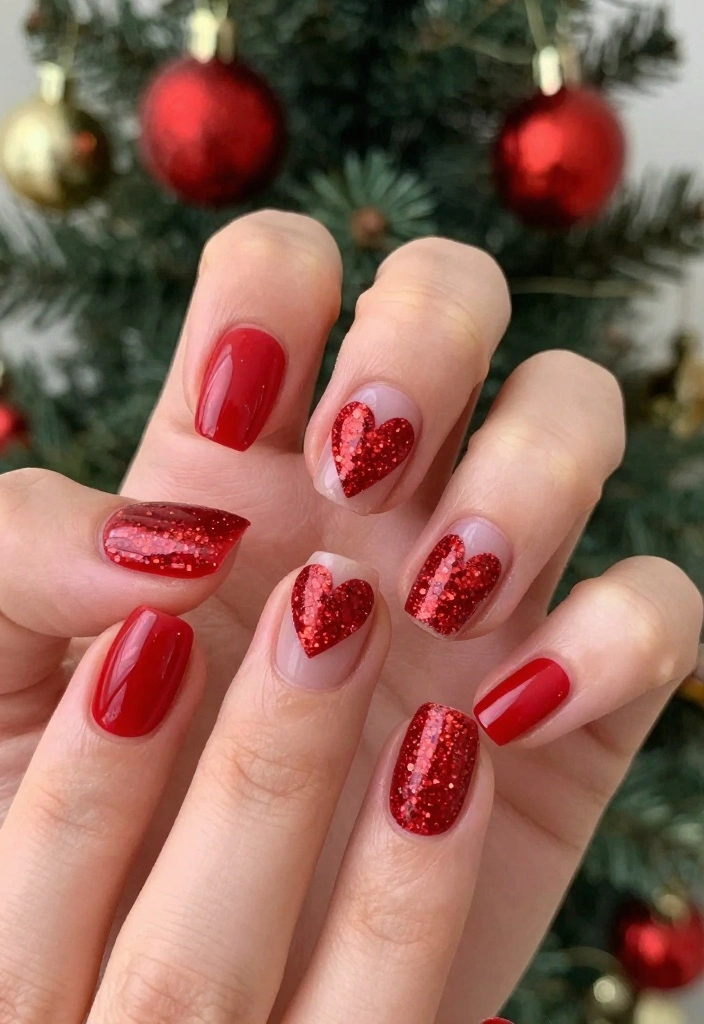
Bring sweetness to your nails with playful red glitter heart designs. This charming nail art is perfect for holiday dates, gatherings, or just to showcase your fun side.
Hearts add a romantic flair to your festive nails and are simple to create!
To achieve this look:
– Use a dotting tool for perfect heart shapes.
– Mix different glitter types for unique textures.
Steps to create whimsical hearts:
1. Apply a red base coat and let it dry.
2. With a dotting tool, create two small red glitter dots side by side, then connect them to form a heart shape.
3. Add smaller hearts to accent nails and finish with a glossy topcoat.
Did you know 9 out of 10 friends notice your red sparkle nails from across the room? Whimsical red glitter hearts make quick, playful statements—perfect for holiday dates and gatherings. Pro tip: use a dotting tool for neat heart shapes and mix glitter textures for depth.
8. Modern Geometric Red Sparkle

Step into contemporary nail art with striking geometric designs on red sparkle nails. This edgy approach is perfect for those who enjoy pushing traditional nail art boundaries.
Sharp lines and unique shapes provide a modern flair, making your nails an ideal fit for chic holiday parties.
For this design:
– Use nail tape for precision.
– Experiment with negative space for a trendy effect.
Creating modern geometric nails involves:
1. Start with a red base coat.
2. Once dry, use nail tape to create your geometric design.
3. Paint over with a contrasting color or leave some areas bare for a negative space look.
4. Remove tape while the polish is still wet and finish with a topcoat.
9. Elegant Red with Pearls

Elevate your festive look with elegant red sparkle nails adorned with pearls. The contrast between sparkly red and sophisticated pearls creates a stunning and luxurious appearance.
This design is perfect for holiday galas or special occasions when you want to shine brightly.
To achieve this look:
– Use nail glue to secure the pearls properly.
– Select pearls in varying sizes for added visual interest.
Steps to create elegant pearl nails:
1. Start with a red sparkle base coat and allow it to dry.
2. Apply small drops of nail glue where you’d like the pearls to go.
3. Place the pearls onto the glue and gently press to secure.
4. Finish with a clear topcoat to lock your design in place.
10. Festive Red Glitter French Tips
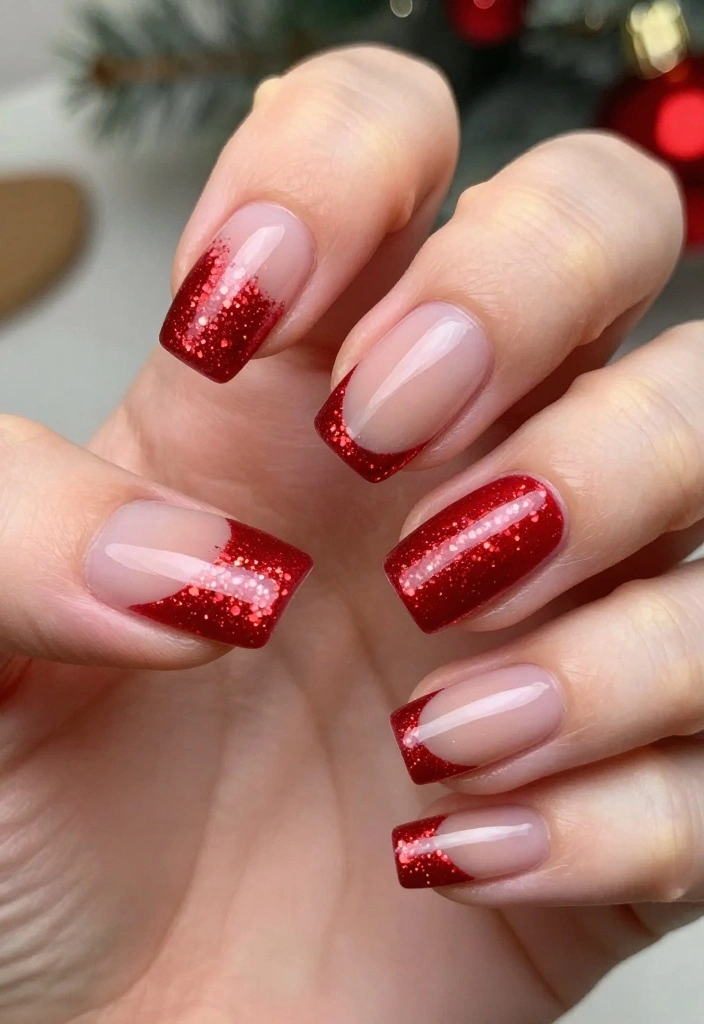
Reimagine the classic French manicure with a festive twist by adding red glitter to the tips. This trendy take on a timeless style adds holiday cheer while maintaining elegance.
Perfect for both casual and formal occasions, these nails are guaranteed to catch the eye.
For this style:
– Use a fine brush for clean lines.
– Layer different shades of red glitter for added depth.
To achieve this look:
1. Start with a clear base coat.
2. Paint your nails with a nude or soft pink polish for the base.
3. Use a fine brush to apply red glitter along the tips.
4. Finish with a topcoat for a polished, glossy finish.
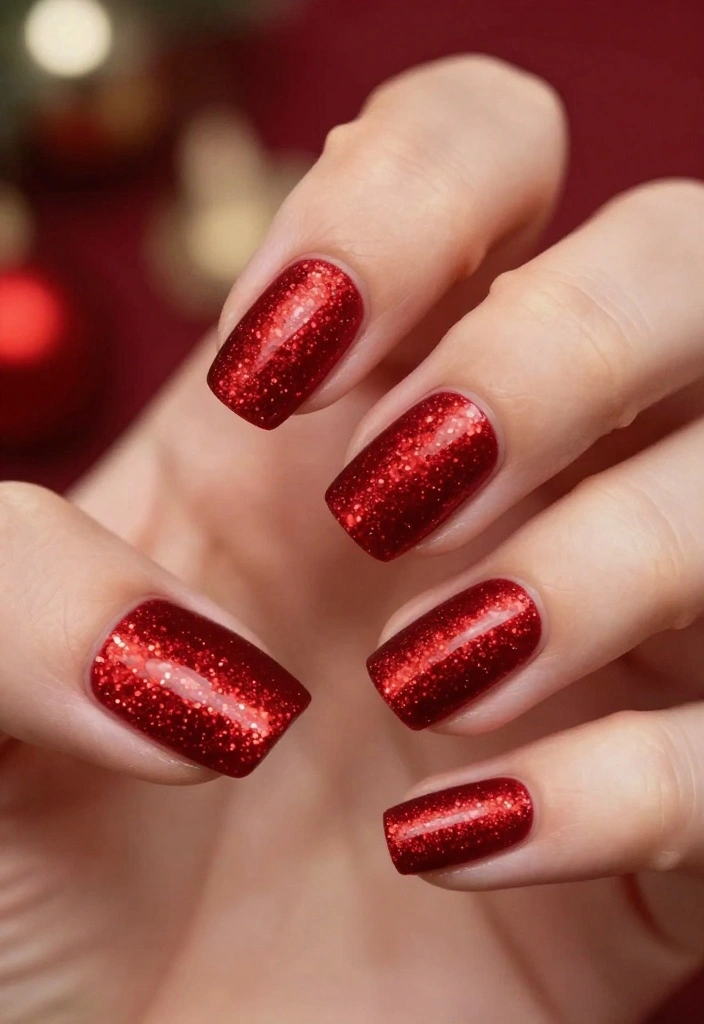
11. Shimmering Red Glitter Gradient
If you love sparkle, a shimmering red glitter gradient is a must-try! This design adds a playful twist to traditional red nails, making them perfect for any holiday party.
The gradient effect creates a magical transition from deep red to a dazzling finish.
For this look:
– Use a cosmetic sponge for a flawless gradient.
– Layer different sizes of glitter for added dimension.
Follow these steps:
1. Apply a red base coat and let it dry completely.
2. On a sponge, apply red glitter polish, focusing more on the tips.
3. Gently press the sponge onto your nails to blend the colors.
4. Seal with a topcoat to add extra sparkle.
12. Dramatic Red with Black Accents

Make a bold statement with dramatic red sparkle nails paired with black accents. This striking contrast is an excellent way to stand out during the festive season.
The combination of colors creates an edgy vibe that suits those who love to make an impression.
For this design:
– Use matte black for a trendy contrast.
– Adding nail art stickers can elevate the design.
To achieve this look:
1. Start with a red sparkle base coat.
2. Use a fine brush to add black accents, like stripes or dots, on one or two nails.
3. Optionally, apply nail stickers for added flair.
4. Finish with a glossy topcoat for shine.
Did you know 72% of festive looks feel bolder when wearing red sparkle nails with black accents? The edgy contrast pops in photos and boosts confidence. For a quick win, start with a red sparkle base and add matte black accents.
13. Sweet Red Candy Glitter

Channel your inner child with sweet red candy glitter nails. This fun design mimics the sugary charm of holiday treats, perfect for those who enjoy a lighthearted approach to nail art.
The vibrant red combined with candy-inspired glitter is sure to spread holiday cheer wherever you go.
For this playful look:
– Use chunky glitter for a whimsical appearance.
– Pair with candy-themed nail art stickers for extra charm.
Here’s how to create this sweet design:
1. Apply a bright red base coat.
2. While the polish is still tacky, apply chunky candy glitter to the tips.
3. Add nail art stickers featuring candy designs for added sweetness.
4. Seal with a topcoat for a glossy finish.
14. Red Sparkle with Tinsel Effect

Add a fun twist to your red sparkle nails with a tinsel effect that captures the eye. This whimsical design brings a festive and cheerful vibe, perfect for holiday celebrations.
The tinsel effect gives your nails a unique look that’s sure to spark conversation.
For this design:
– Use nail foils for a lightweight tinsel effect.
– Mix and match different glitter colors for a unique touch.
Steps to achieve this whimsical look:
1. Start with a red sparkle base coat.
2. Cut nail foils into thin strips and apply them over wet polish.
3. Press down gently to secure the foils.
4. Finish with a clear topcoat to hold everything in place.
15. Bold Red with White Polka Dots

For a classic yet playful holiday look, paint bold red nails with cheerful white polka dots. This design embodies a fun spirit while remaining stylish and festive.
The polka dots are easy to create and can be adapted to any nail length.
For this design:
– Use a dotting tool for perfect circles.
– Experiment with different dot sizes for added interest.
To create this playful design:
1. Apply a rich red base coat and allow it to dry.
2. Using a dotting tool or toothpick, apply white dots randomly on each nail.
3. Finish with a glossy topcoat to seal your cheerful design.
16. Textured Red Glitter with Rhinestones
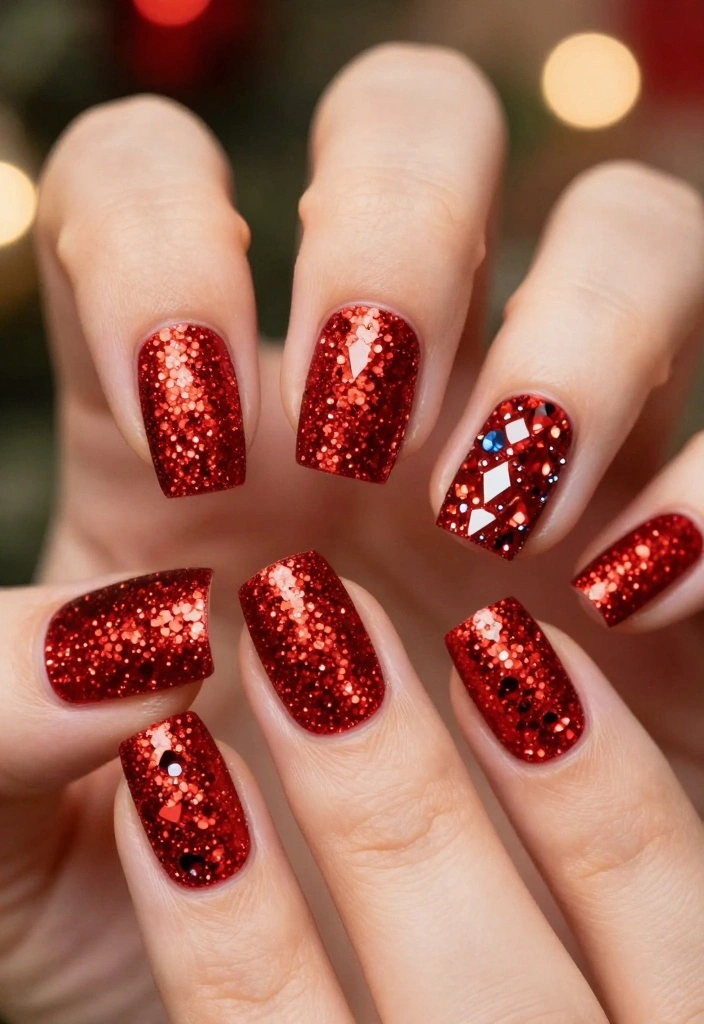
Make a dazzling statement with textured red glitter nails adorned with rhinestones. This luxurious design perfectly captures the festive spirit, making it ideal for glamorous holiday events.
The combination of texture and sparkle creates an eye-catching effect that’s hard to ignore.
For this design:
– Use different sizes of rhinestones for a dynamic look.
– Strategically place them to create a focal point.
To achieve this glamorous design:
1. Begin with a red glitter base coat.
2. Once dry, use nail glue to apply rhinestones in your desired patterns.
3. Gently press to secure and finish with a topcoat for durability.
17. Cheery Red Glitter Spirals
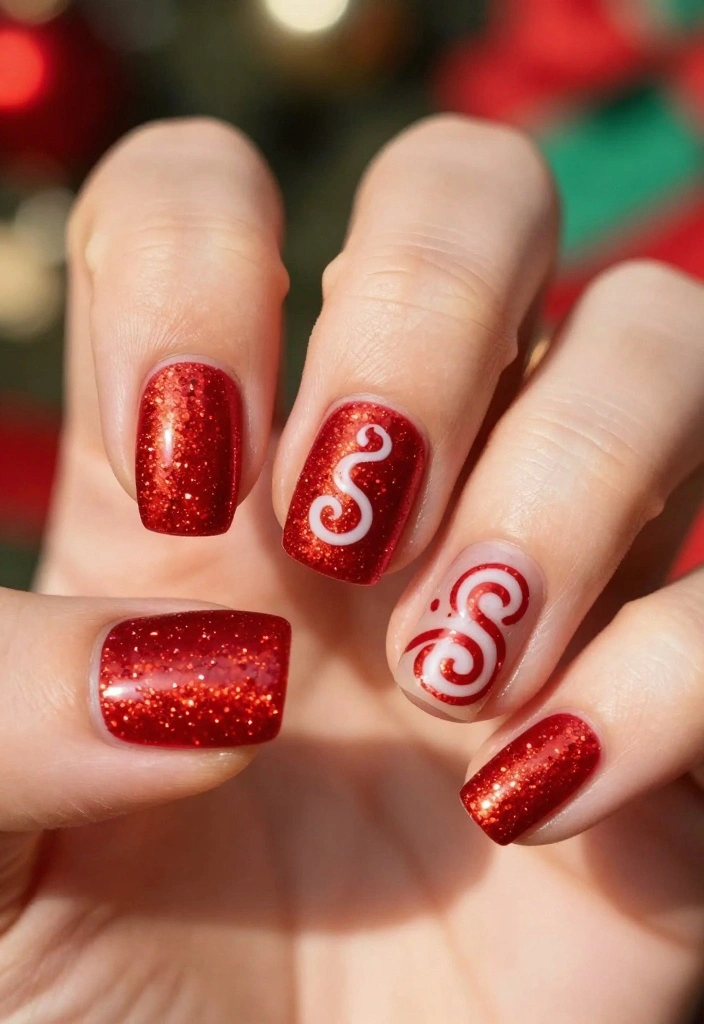
Add a whimsical flair to your festive nails with cheery red glitter spirals. This fun design features lively swirls that catch the light, adding a dynamic element to your look.
Perfect for those wanting a playful and festive touch, these spirals are easy to create and will surely bring smiles.
For this design:
– Use a thin brush for precise spirals.
– Experiment with different types of glitter for various effects.
To create spiral nails:
1. Start with a red base coat.
2. Once dried, use a thin brush to draw spirals starting from the cuticle toward the tips.
3. Fill in the spirals with glitter polish for added sparkle.
4. Top with a clear topcoat to enhance the shine.
18. Chic Red Marble Design
Achieve a sophisticated look with a chic red marble design that combines the elegance of marble with festive red sparkle. This design exudes luxury while being perfectly festive.
The blend of colors creates a unique style for the holiday season and is ideal for artistic nail art lovers.
For creating this design:
– Use a water marbling technique to achieve the perfect look.
– Experiment with different shades of red for added depth.
Steps to create a chic marble design:
1. Apply a base coat and allow it to dry.
2. Drop various shades of red polish into a cup of water.
3. Use a toothpick or small tool to swirl the colors together.
4. Dip your nails into the pattern and finish with a protective topcoat.
19. Fun Red Glitter Confetti
Light up your holiday season with playful red glitter confetti nails. This lively design captures the joy of the holidays, making your nails a conversation starter at any gathering.
The sparkly red combined with colorful confetti adds an element of fun and surprise.
For this design:
– Use fine glitter for a smooth finish.
– Mix different types of glitter for a unique dimension.
To create confetti nails:
1. Start with a base coat of red polish.
2. While it’s still wet, sprinkle confetti glitter on top.
3. Press gently to adhere and finish with a topcoat to seal in the design.
20. Classic Red Sparkle with Holiday Icons
Celebrate the season with classic red sparkle nails adorned with holiday icons like Christmas trees, ornaments, or stars. This design beautifully captures the essence of the season and is sure to spread festive cheer.
Adding these fun icons creates a joyful flair that showcases your holiday spirit.
For this design:
– Use nail art pens for detailed designs.
– Choose icons that resonate with your personal holiday traditions.
To create this iconic look:
1. Apply a red sparkle base coat.
2. Once dry, use a nail art pen to draw your favorite holiday icons on the tips or randomly on your nails.
3. Finish with a clear topcoat to protect your designs.
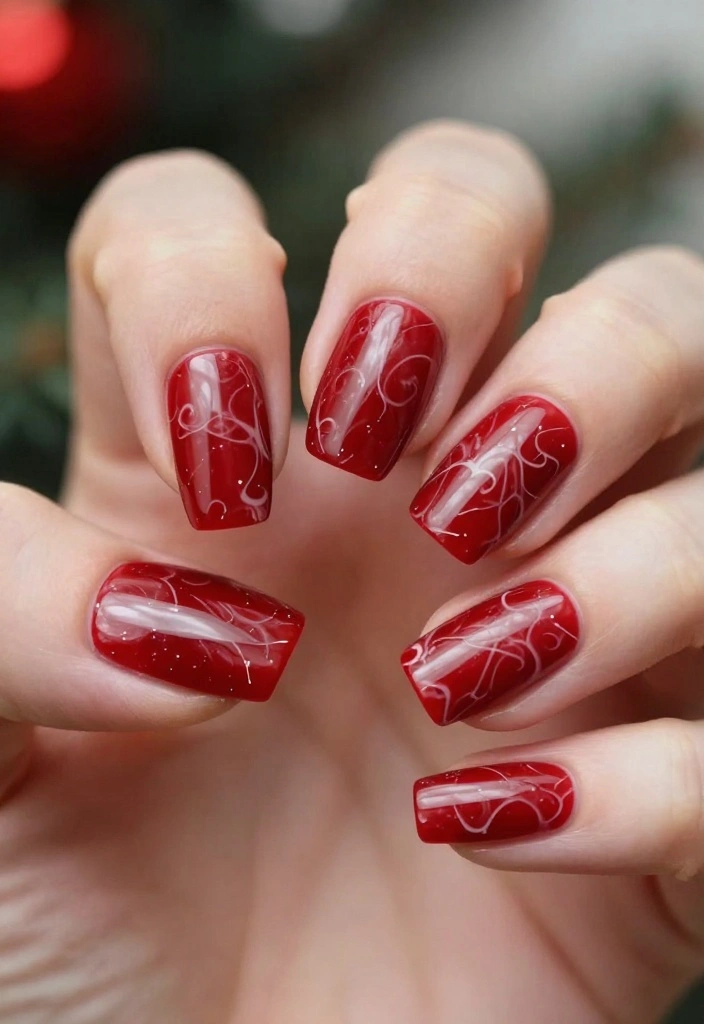
21. Sparkly Red with Negative Space

For a modern twist on festive nails, try sparkly red with negative space. This chic design highlights the beauty of red glitter while allowing some of your natural nail to show through.
It’s a stylish choice that’s unique yet still festive, perfect for the fashion-forward individual.
For this design:
– Use nail tape to create clean edges.
– Consider mixing different colors of glitter for a playful effect.
To create this look:
1. Start with a base coat and a clear polish.
2. Use nail tape to section off the areas you want to leave bare.
3. Apply red glitter polish to the exposed areas, ensuring clean edges.
4. Remove the tape and finish with a topcoat for shine.
Conclusion
This holiday season, let your nails shine with these fabulous red sparkle designs. From classic looks to modern twists, there’s a style for everyone to enjoy.
Don’t be afraid to mix and match these ideas or add your personal touch to make them truly your own. Happy nail art, and may your holiday celebrations be as bright as your nails!
Frequently Asked Questions
What are the best red sparkle nails designs for the holidays?
Here are some crowd-pleasing ideas for red sparkle nails that shine during the holidays.
Try a classic red base with a full-glitter gradient on the tips for a festive look and holiday nails. Or go bold with a red sparkle nails base accented by gold foil or metallic shards to steal the show. You can also do negative-space nails with a red glitter overlay, or create candy-cane stripes on a red field for extra festive looks. To recreate at home: start with a clean base, apply a thin coat of red polish, add a red glitter top coat or mix fine red glitter into clear polish, and seal with a durable top coat. If you are using gel, cure between layers to maximize wear and shine.
How can I make red sparkle nails last longer during all-day holiday events?
Want your red sparkle nails to stay flawless from brunch to midnight? Prep is everything: clean, dry nails; push back cuticles; lightly buff the surface. Use a strong base coat and apply two thin coats of red polish, curing between coats if you are using gel. Apply a glitter top coat in thin layers, sealing the tip edges with each layer. Finish with a high-gloss top coat and reapply every few days for protection. Dry time matters—avoid water contact for the first hour after painting. For extra longevity, consider gel polish or a sealing top coat designed for long wear.
What tools and polishes do I need to recreate red sparkle nails at home?
Here’s a practical starter kit for red sparkle nails at home: base coat, two coats of red polish, a red glitter top coat or fine red glitter, and a strong top coat. Optional extras: nail tape for sharp lines, a thin nail-art brush or dotting tool for glitter placement, and a gel top coat if you want longer wear. Add gold foil flakes or metallic studs for a luxe touch. Pro tip: prep nails well and work in thin layers to prevent bulk, then cap the free edges to reduce chipping.
How can I pair red sparkle nails with outfits for festive looks?
Red sparkle nails make a statement—plan your outfit around them. Let holiday nails pop by pairing with classic black, white, or nude ensembles. Add metallic touches—gold or rose gold jewelry and accessories—to echo the sparkle. For festive looks, try a deep green or emerald dress for a bold, luxe vibe, or keep a busy outfit balanced with a simpler nail design. If the outfit is loud, opt for a more subtle red glitter fade on the nails. For makeup harmony, a crimson lip or a soft shimmer eye can complete the look.
Are red sparkle nails suitable for all nail lengths and shapes?
Yes—red sparkle nails work on short or long nails and in many shapes. For short nails, consider a soft gradient from clear to red with a fine red glitter to keep them chic. For longer nails, full-coverage red sparkle nails or a glitter accent nail look stunning. Shapes like square, oval, or almond complement glitter well; stiletto can be dramatic but needs careful application to prevent snagging. If you are unsure, start with a classic rounded or square shape and adjust as your nails grow.
Related Topics
red sparkle nails
holiday nails
festive looks
nail art designs
glamour nails
easy nail art
seasonal trends
sparkle manicure
beginner friendly
party ready nails
trendy nail styles
quick nail ideas
I absolutely love the red sparkle nail designs! They remind me of the time I tried to do glitter nails for a holiday party and ended up with sparkles all over my face. What’s your favorite design from the list?
These nail designs are so cute! I tried doing something similar last year, but I think I ended up looking more like a Christmas ornament than a chic nail model. Why did the nail polish break up with the topcoat? It found someone more ‘toppin’!
Wow, did you know that red is often seen as a color of luck in many cultures? These nails are not just festive, they might bring some good vibes too! I’m definitely trying out that glitter ombre look.