Nail art has taken the beauty world by storm, and it’s no wonder why. It adds a splash of personality and creativity to your everyday look. This time of year always reminds me of those fun summer days spent experimenting with colors and designs. If you’re someone who loves expressing yourself through art, this post is for you. Whether you want to impress your friends or simply enjoy some “me time,” DIY cute nail art can be a perfect outlet.
I put this together because I know how satisfying it can be to create something beautiful with your own hands. You don’t need to be a professional to get stunning results! You’ll find 22 easy nail art tutorials that are not only adorable but also perfect for a cozy day at home. Get ready to discover designs that will make your nails the talk of the town—trust me, you’ll be amazed by #5!
Key Takeaways
– Variety of Designs: From colorful polka dots to dreamy cloud nails, this post offers a wide range of styles to cater to every taste and occasion.
– Step-by-Step Guides: Each tutorial includes clear, easy-to-follow instructions, making it simple for anyone to nail their desired look.
– Affordable Materials: Most designs use common nail polish and tools, so you won’t need to break the bank to create fabulous nails.
– Skill Level for All: Whether you’re a novice or have some experience, these tutorials are designed for every skill level, ensuring everyone can join in the fun.
– Boost Your Creativity: Engaging in DIY nail art not only beautifies your nails but also serves as a great way to express your unique style and unleash your creative side.
Contents
- 1. Colorful Polka Dots
- 2. Striped Elegance
- 3. Floral Fantasy
- 4. Geometric Patterns
- 5. Ombre Delight
- 6. Glitter Glam
- 7. Rainbow Connection
- 8. Cute Animal Faces
- 9. Marble Magic
- 10. Textured Patterns
- 11. Negative Space Art
- 12. Sweet Candy Stripes
- 13. Zodiac Sign Designs
- 14. Tie-Dye Fun
- 15. Dreamy Cloud Nails
- 16. Seasonal Nail Art
- 17. Inspirational Quotes
- 18. Beach Vibes
- 19. Mixed Media
- 20. Minimalist Art
- 21. Doodle Art
- 22. Classic French Manicure with a Twist
1. Colorful Polka Dots

Kick off your nail art adventure with playful colorful polka dots! This design is not only fun but also gives you the freedom to mix and match your favorite hues. The lightheartedness of this pattern makes every glance at your nails a joyful experience.
It works brilliantly because the contrast of colors creates a lively and cheerful vibe. Plus, it’s versatile enough for casual outings or festive gatherings.
Outfit Pieces:
– Base coat in white or light pastel
– Bright nail colors like red, yellow, and blue for dots
– Dotting tool or toothpick for creating dots
Styling Tips:
– Start with a solid base color for a clean look.
– Use a toothpick for tiny dots or a dotting tool for larger ones.
– Leave space between the dots for a more whimsical appearance.
– Seal with a glossy top coat for longevity and shine.
Perfect for any occasion, this design will surely add a splash of joy to your day!
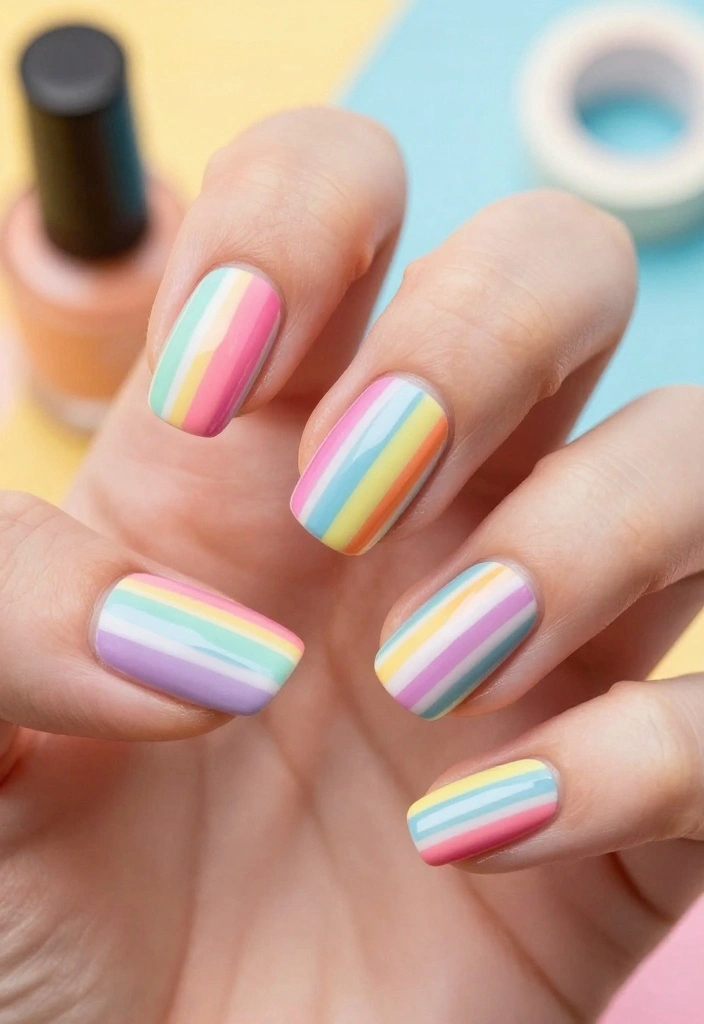
2. Striped Elegance
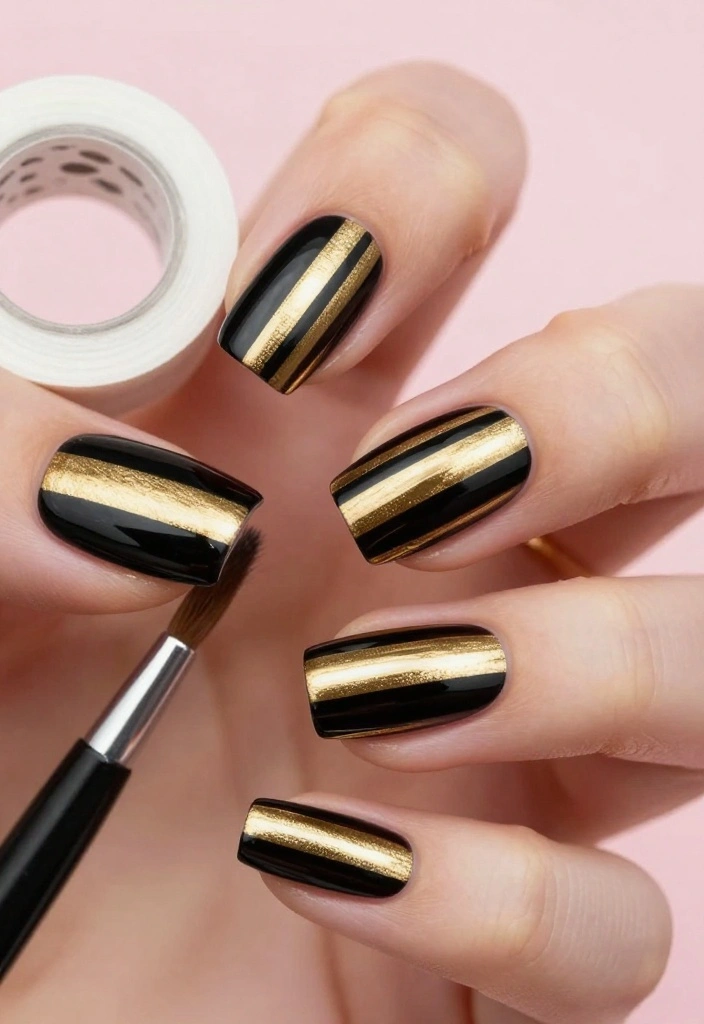
Stripes bring a timeless elegance to your nails that’s both chic and versatile! This style can effortlessly transition from casual brunches to formal dinners, making it a go-to choice for many. Its clean lines and bold contrasts always make a statement.
Stripes work so well because they can be customized in terms of color and width, allowing for a personal touch. You can play with various colors to suit your mood or the season.
Outfit Pieces:
– Base coat in a neutral shade like beige or light pink
– Contrasting colors like navy and white or black and gold
– Striping tape or a fine nail art brush for precision
Styling Tips:
– Use striping tape to achieve straight lines effortlessly.
– Mix and match thick and thin stripes for added visual interest.
– Finish with a top coat to ensure your design stays vibrant.
This elegant design is perfect for any occasion, accentuating your style beautifully!
📹 Related Video: DOs & DON’Ts: striping tape nail art | how to use striping tape
3. Floral Fantasy
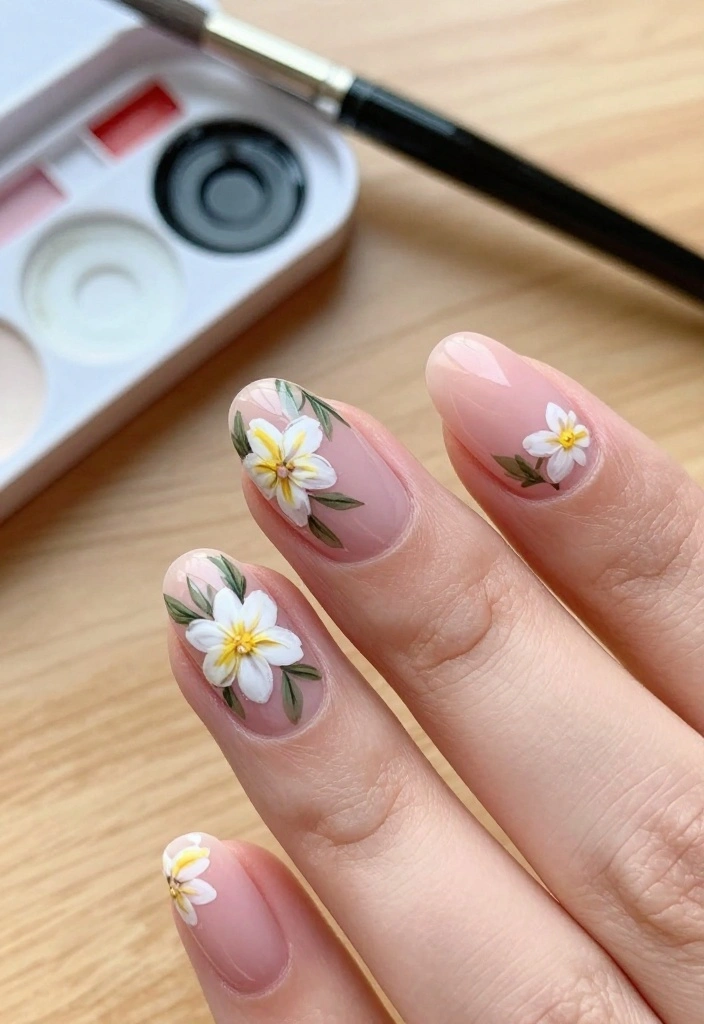
Add a touch of nature with charming floral designs on your nails! Floral patterns are especially delightful in spring and summer, bringing a fresh and vibrant feel. You can choose how intricate or simple you want your flowers to be, giving you ample creative freedom.
This design shines because it captures the essence of blooming flowers, making your nails look lively and inviting. They are also great for casual outings or special events.
Outfit Pieces:
– Base coat in a soft pink or mint green
– Nail colors like white, yellow, and lavender for the flowers
– Fine brush for detailing petals and leaves
Styling Tips:
– Use soft, complementary colors for a lovely, harmonious look.
– Practice your flower designs on paper to build confidence.
– Seal your artwork with a top coat for durability.
Floral nails are not only beautiful but also bring a cheerful vibe to any ensemble!
How To Choose the Right Cute Nail Art Supplies
When you embark on your DIY nail art journey, having the right supplies is essential. It can make the difference between a fun project and a frustrating experience. Here’s how to choose the best supplies for your cute nail designs.
1. Nail Polish Selection
Choose high-quality nail polish in various colors. Look for brands known for their durability and vibrant pigments. If you plan to use specific techniques like ombre or marbling, opt for polishes that dry quickly; this will help prevent smudging and enable you to layer colors without waiting long.
2. Nail Art Tools
Invest in essential nail art tools like dotting tools, striping brushes, and nail art pens. These tools will help you create intricate designs, from simple dots to detailed lines. If you’re just starting, a basic set of tools is enough. As you progress, consider adding more specialized tools, like stencils or sponges for gradient effects.
3. Nail Art Accessories
Explore various accessories to enhance your nail designs. Think about glitter, rhinestones, and stickers. These items can add a unique flair to your nail art. Make sure to pick accessories that are easy to apply and remove, especially if you like to change your designs regularly.
4. Base and Top Coats
Never underestimate the importance of base and top coats. A good base coat protects your nails and helps the polish adhere better, preventing chipping. A top coat provides a glossy finish and adds extra durability to your design. Look for quick-drying options to save time and ensure your design lasts longer.
5. Nail Care Products
Healthy nails are the perfect canvas for your nail art. Choose nail care products like cuticle oil, nail strengtheners, and moisturizers. These products nourish your nails and surrounding skin, ensuring they remain healthy and vibrant. Regular care makes a big difference in how your nail art looks.
Pro Tip: Keep your workspace organized. Use containers or trays to store your tools and supplies. This will make it easier to find what you need quickly and help keep your nail art projects fun and stress-free.
By choosing the right supplies for your DIY nail art, you’re setting yourself up for success in creating stunning cute nails. Each element plays a role in the overall impact of your designs, so take the time to select items that inspire your creativity and fit your personal style. Happy painting!
4. Geometric Patterns
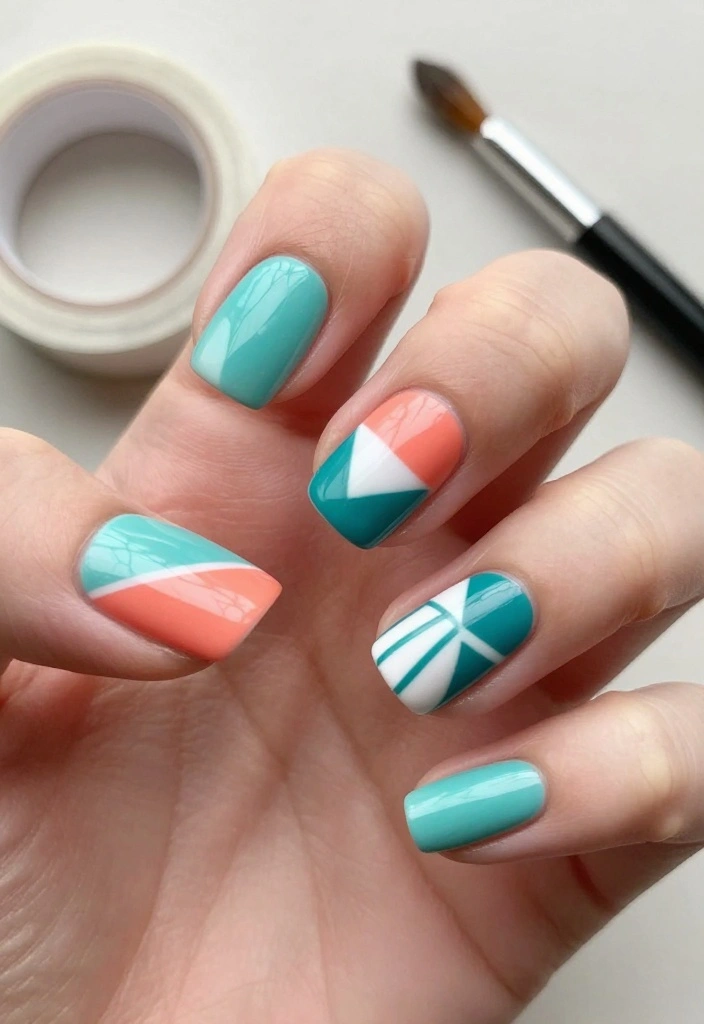
Get modern and edgy with geometric nail designs! These patterns are perfect for those who wish to express their artistic flair while keeping things chic. You can create striking visuals that stand out on any occasion.
Geometric designs work beautifully because they combine clean lines and bold colors, offering a contemporary aesthetic. They are versatile enough for both casual wear and stylish events.
Outfit Pieces:
– Base coat in a solid color like black or white
– Contrasting colors for shapes, such as bright red or teal
– Tape for sharp edges or a fine brush for freehand shapes
Styling Tips:
– Use tape to create sharp lines and avoid smudging.
– Experiment with different shapes and sizes for a unique look.
– Balance designs across your nails for an even distribution.
This striking design is a fun way to showcase your unique style!
Fun fact: 72% of nail art fans say geometric patterns instantly elevate a cute nail look, pairing clean lines with bold color blocks. It’s a simple trick: start with a solid base, then add precise shapes for drama you can wear.
💅 Nail Art Made Easy!
Transform your nails with our DIY Nail Art Guide designed especially for busy moms looking to impress.
5. Ombre Delight
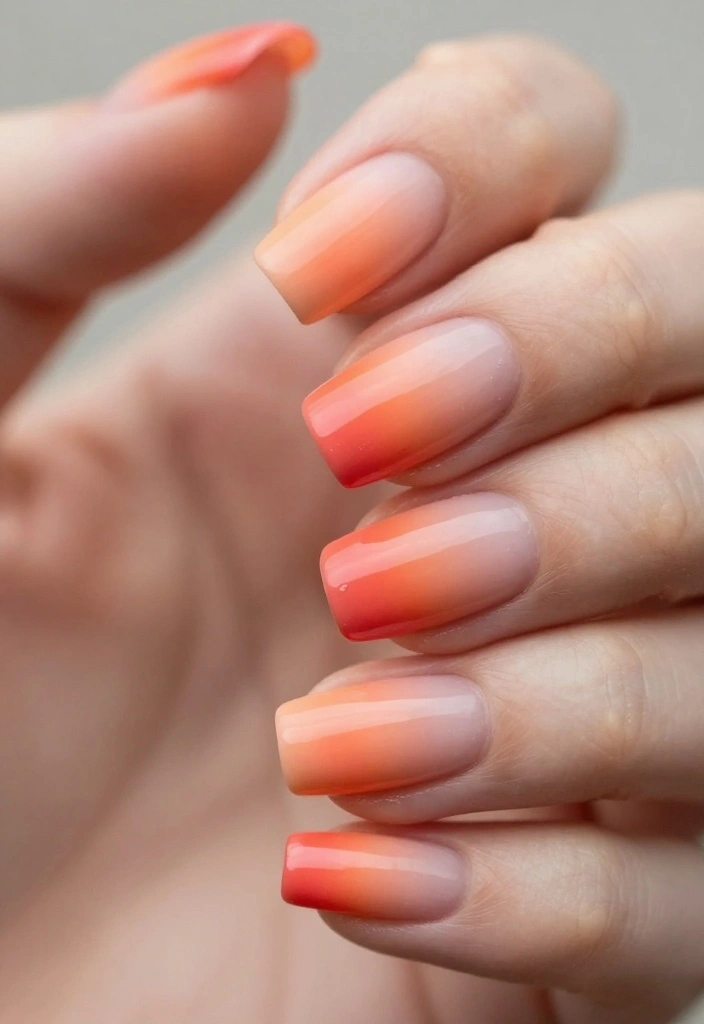
Ombre nails are a stunning way to create a seamless blend of colors! This gradient effect is super trendy and adds an effortlessly chic touch to your look. You can mix and match various shades to achieve a soft or bold finish.
This style works well because it allows for a beautiful transition between colors, adding depth and dimension to your nails. It’s also perfect for any occasion, from casual outings to fancy events.
Outfit Pieces:
– Base coat in a light color like white or nude
– Two or three complementary nail colors (like pink, purple, and blue)
– Makeup sponge for blending colors
Styling Tips:
– Use a sponge to blend colors smoothly for the ombre effect.
– Pick colors that harmonize well, like sunset shades.
– Seal your design with a top coat for a polished finish.
Ombre nails not only look beautiful but also offer endless possibilities to match any outfit!
6. Glitter Glam
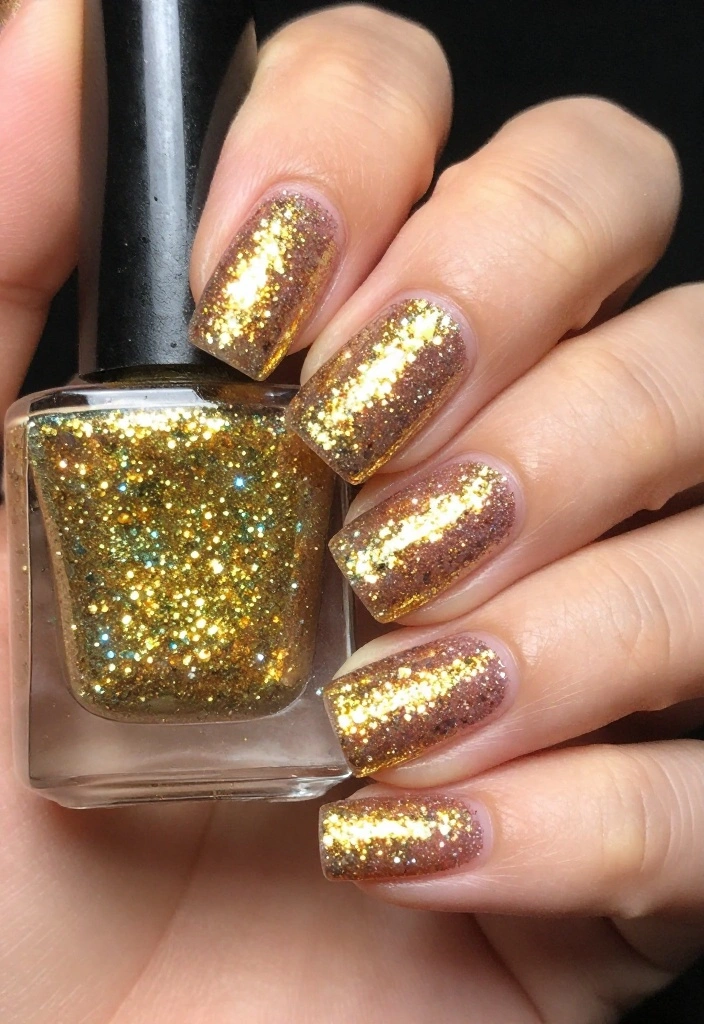
Add some sparkle to your life with dazzling glitter nails! This fun design is perfect for those who love to shine bright and make a statement. Glitter can transform your nails into a glamorous accessory for any celebration.
Glitter works so well because it catches the light beautifully, creating a captivating effect that draws attention. It’s ideal for parties, weddings, or any occasion where you want to shine.
Outfit Pieces:
– Base coat in a solid color like black or deep blue
– Glitter polish or loose glitter in various colors
– Top coat for sealing and shine
Styling Tips:
– Layer multiple coats of glitter for an intense sparkle.
– Combine matte and glitter finishes for added dimension.
– Apply glitter gently to avoid clumping.
This design is perfect for any special occasion where you want to dazzle!
7. Rainbow Connection

Celebrate color with vibrant rainbow nails! This design is cheerful and sure to brighten any day. It’s perfect for those who love a splash of fun on their nails year-round.
Rainbow designs work wonderfully because they bring together a spectrum of colors, creating a lively and joyful effect. They are great for casual days out or festive events.
Outfit Pieces:
– Base coat in white or clear
– Bright nail colors for the rainbow (like red, orange, yellow, green, blue, and purple)
– Thin brush or sponge for applying colors
Styling Tips:
– Use bright colors to make the design pop!
– Experiment with patterns, such as stripes or dots.
– Practice on paper to perfect your technique before applying.
Rainbow nails are sure to spread joy and positivity wherever you go!
8. Cute Animal Faces
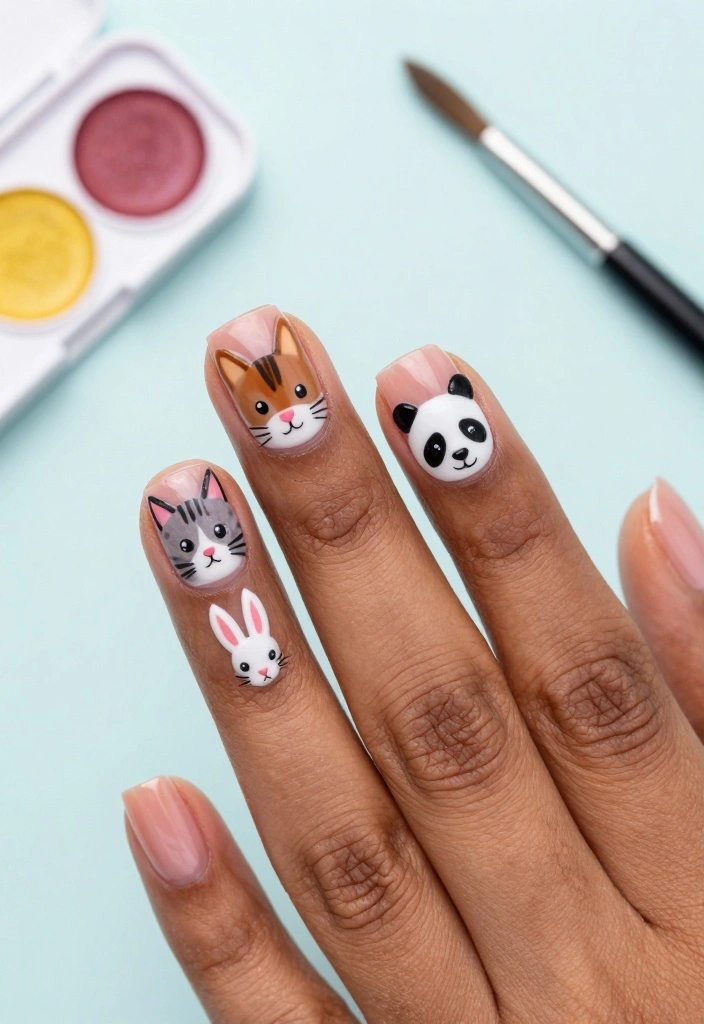
Bring your nails to life with adorable animal faces! This playful design can showcase your personality and love for cute creatures. From kittens to pandas, the options are endless and bound to make you smile.
An animal-themed design works well because it adds whimsy to your look, making your nails a delightful conversation starter. They are perfect for casual outings or themed parties.
Outfit Pieces:
– Base color in a soft shade like pastel pink or baby blue
– Fine brush for drawing faces or animal patterns
– Nail stickers for a quicker option
Styling Tips:
– Start with simple designs for easier application.
– Mix and match different animals for a fun twist.
– Apply a shiny top coat to keep your design looking fresh.
These nails are playful and sure to bring joy to anyone who sees them!
9. Marble Magic

Elevate your style with stunning marble nails! This elegant design mimics the look of real marble stone, making it perfect for sophisticated occasions. You can create a chic effect that looks effortlessly classy.
Marble designs work beautifully because they combine a clean base with flowing patterns, adding a touch of luxury to your look. They are ideal for formal events or when you want to feel extra special.
Outfit Pieces:
– Base coat in white or light gray
– Contrast colors like black or deep blue for marbling
– Thin brush or toothpick for swirling
Styling Tips:
– Use a light touch to create soft, flowing swirls.
– Experiment with colors beyond classic black and white for a fresh take.
– Practice on paper before applying to your nails for confidence.
Marble nails are timeless and perfect for any elegant event!
10. Textured Patterns
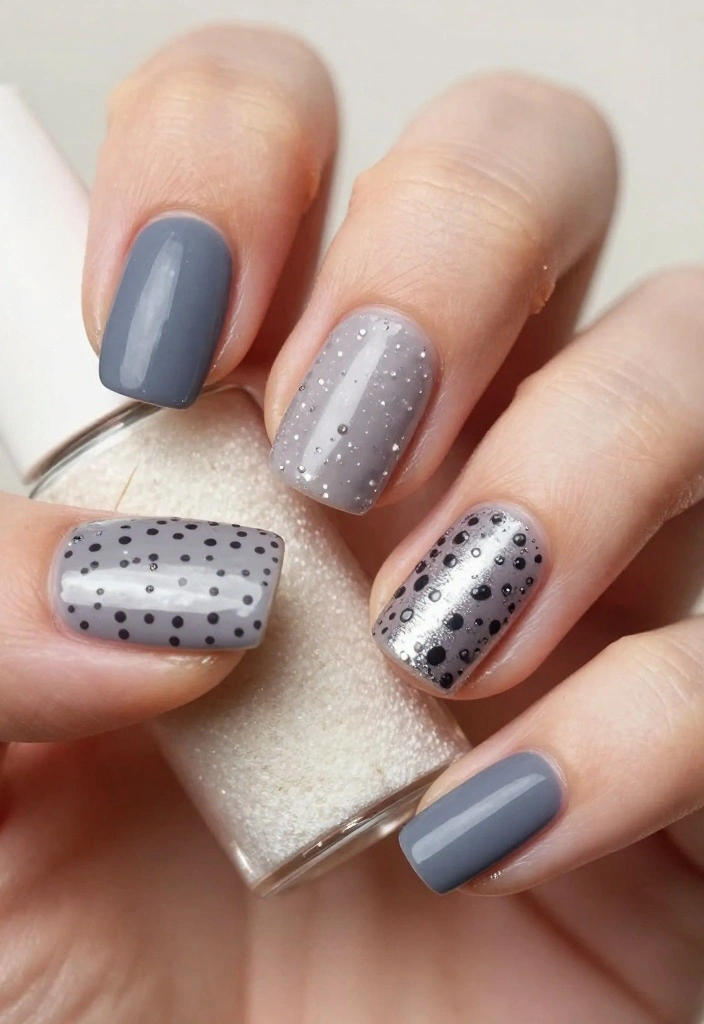
Why not add some excitement with textured patterns on your nails? This design creates visual interest and can be achieved using various techniques, making it a fun choice for nail art lovers. Textures can transform your nails into a stunning canvas of creativity.
Textured designs work well because they add depth and dimension, making your manicure stand out. They are great for casual outings or creative events.
Outfit Pieces:
– Base coat in a solid color like coral or mint
– Contrasting color for texture application
– Texture tools like sponges or nail stickers
Styling Tips:
– Experiment with different sponges for unique patterns.
– Layer different textures by combining matte and shiny polishes.
– Allow each layer to dry properly to avoid smudging.
Textured nails are a fun way to express your personal style and creativity!
11. Negative Space Art
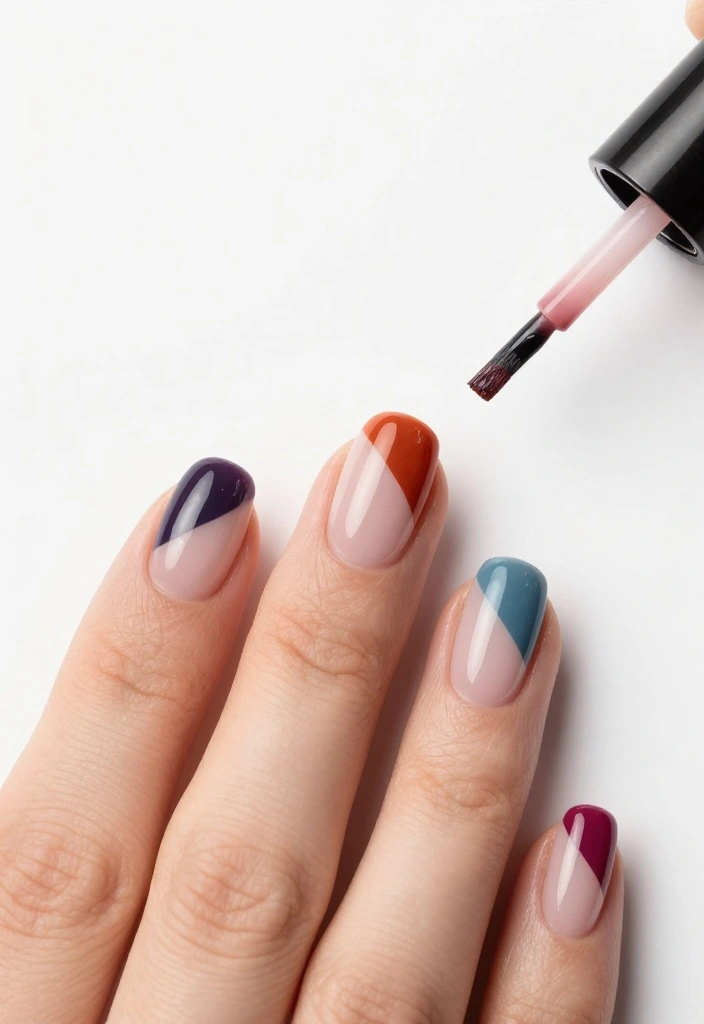
Embrace a modern aesthetic with negative space nail art! This minimalist approach uses the natural nail as part of the design, creating stunning and unique effects. It’s perfect for those who love clean lines and contemporary styles.
Negative space works beautifully because it allows for creativity while keeping things simple. It’s suitable for both casual outings and professional settings.
Outfit Pieces:
– Base coat in clear or nude
– Contrasting nail color for designs
– Fine brush for creating shapes and patterns
Styling Tips:
– Plan your design on paper before applying it to your nails.
– Use a steady hand for sharp lines and shapes.
– Keep the design simple for a sleek look.
Negative space nails are perfect for anyone who loves a clean and modern style!
12. Sweet Candy Stripes
Brighten your style with delightful candy stripe nails! This design is inspired by colorful sweets and brings a cheerful vibe to your look. It’s as fun to create as it is to wear, perfect for showing off your playful side.
Candy stripes work well because they add a burst of color and energy to your nails. They are ideal for festive occasions or just to uplift your mood.
Outfit Pieces:
– Base coat in a solid color like pale blue or white
– Bright pastel colors for the stripes (like pink, yellow, and green)
– Tape for straight lines or a fine brush
Styling Tips:
– Use tape to create straight lines for a cleaner look.
– Choose colors that evoke your favorite candies for a personal touch.
– Keep your strokes light to avoid smudging.
Candy stripe nails are colorful and perfect for adding joy to your style!
13. Zodiac Sign Designs

Show your astrological flair with personalized zodiac nail art! This design is perfect for astrology enthusiasts, allowing you to express your personality through your nails. It adds a unique touch that’s all your own.
Zodiac designs work wonderfully because they combine personal meaning with creativity. They’re great for casual wear or special gatherings where you want to stand out.
Outfit Pieces:
– Base coat in a neutral shade like beige or soft gray
– Nail colors representing your zodiac sign
– Fine brush for painting symbols or constellations
Styling Tips:
– Choose colors that resonate with your zodiac sign for a personal touch.
– Keep designs simple if you’re a beginner.
– Practice on paper for precision before applying.
Zodiac sign nails not only look cool but also tell a personal story!
14. Tie-Dye Fun
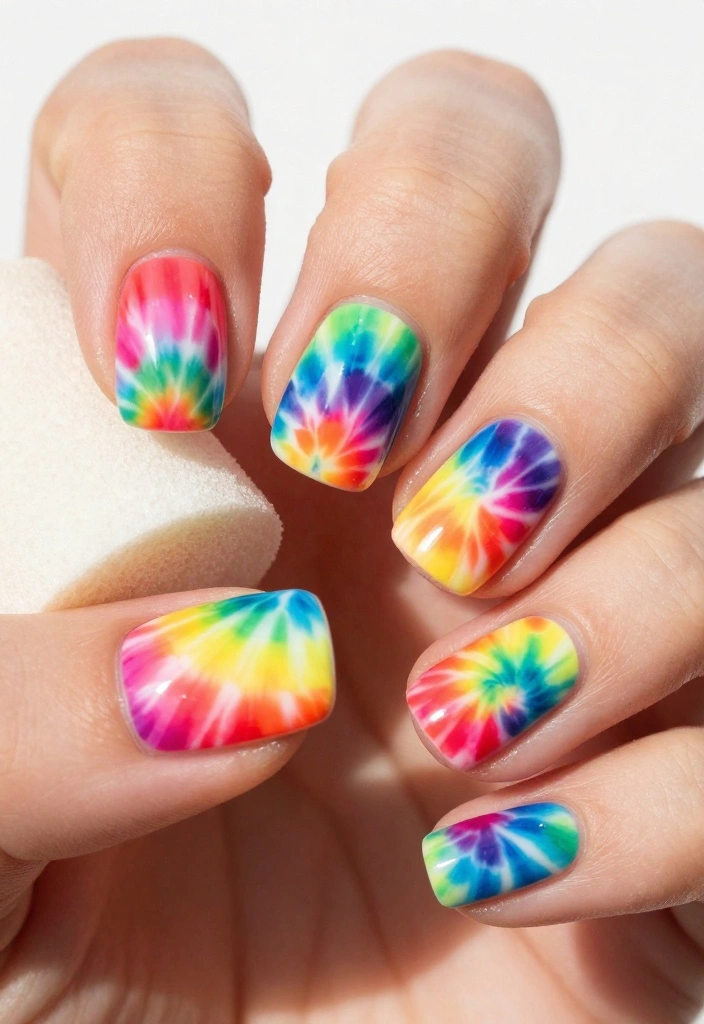
Bring back the groovy vibes with fun tie-dye nails! This colorful design is playful and perfect for those who love to express their creativity. It’s a fantastic way to add a splash of color to your nails.
Tie-dye works beautifully because it combines multiple colors in a whimsical way, creating unique patterns. It’s ideal for casual outings or festivals where you want to stand out.
Outfit Pieces:
– Base coat in white or light pastel
– Bright colors like red, blue, and yellow for the tie-dye effect
– Makeup sponge for blending colors
Styling Tips:
– Choose vibrant colors for a bold tie-dye effect.
– Blend gently to avoid muddying the colors.
– Experiment with different patterns until you find your favorite.
Tie-dye nails are not only fun to create but also a great way to showcase your artistic flair!
Fun fact: 63% of nail art lovers say tie-dye nails instantly boost mood and creativity. For best impact, layer bright colors on a white base; it’s easier to mix patterns and still keep cute nail vibes.
15. Dreamy Cloud Nails

Create a whimsical look with dreamy cloud nails! This soft design is perfect for those who love a touch of fantasy and charm. The fluffy clouds can make your nails feel light and airy, adding a sense of calm to your style.
Cloud designs work beautifully because they evoke a serene feeling, making your nails a delightful accessory. They’re perfect for everyday wear or casual outings where you want to feel relaxed.
Outfit Pieces:
– Base coat in a soft blue or lavender
– White polish for creating clouds
– Dotting tool or thin brush for detailing
Styling Tips:
– Keep the clouds soft and airy for a dreamy effect.
– Try different backgrounds, like sunset colors, for a unique twist.
– Practice cloud shapes on paper to build your confidence.
These nails are enchanting and perfect for adding a whimsical touch to your look!
16. Seasonal Nail Art
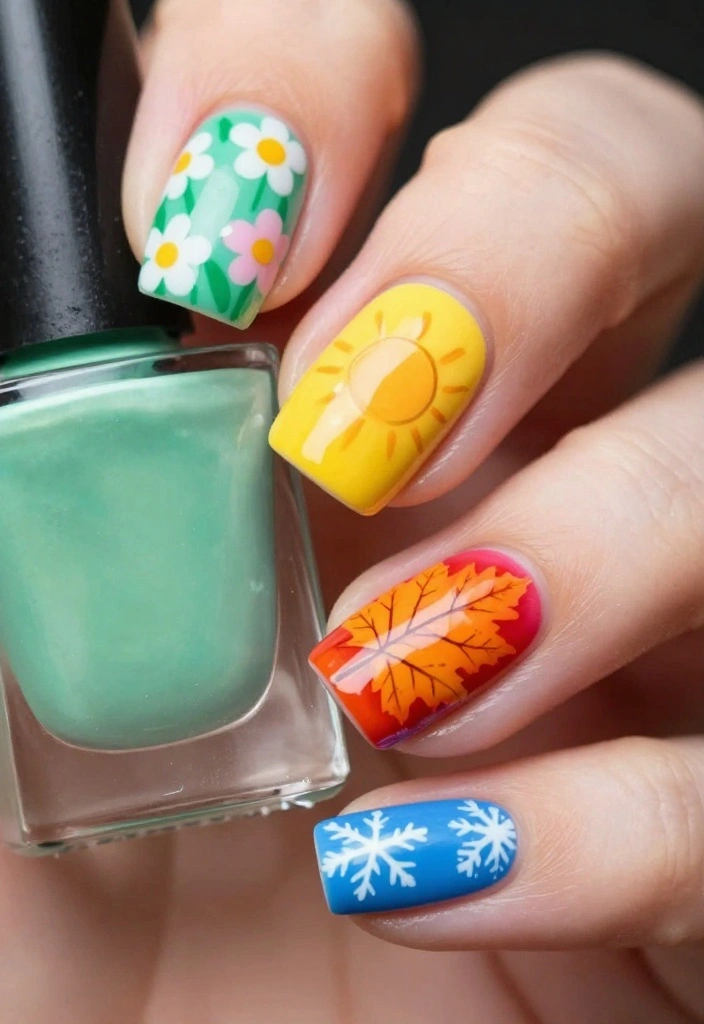
Celebrate the beauty of nature with seasonal nail art! Whether it’s autumn leaves or winter snowflakes, this design lets you express your love for the changing seasons. It’s a wonderful way to keep your nails fresh and relevant throughout the year.
Seasonal designs work wonderfully because they capture the essence of each season, adding a festive touch to your nails. They’re perfect for any occasion, from casual gatherings to holiday celebrations.
Outfit Pieces:
– Base color representing the season (like pastel for spring, deep red for fall)
– Nail colors for seasonal designs (like green for summer leaves)
– Fine brush for painting details
Styling Tips:
– Plan your designs to reflect the season’s colors and motifs.
– Use a steady hand for detailing to ensure crisp designs.
– Seal your artwork with a top coat for durability.
Seasonal nail art is a fantastic way to express your style and embrace the beauty around you!
17. Inspirational Quotes
Add a touch of positivity to your nails with inspirational quotes! This design is perfect for anyone who enjoys a little motivation at their fingertips. Each glance at your nails can serve as a reminder to stay positive and strong.
Quote designs work beautifully because they blend creativity with meaning, offering personal significance. They are great for casual outings or moments when you need a boost of encouragement.
Outfit Pieces:
– Base coat in a color of your choice
– Fine brush for painting words or phrases
– Top coat for sealing and shine
Styling Tips:
– Keep the quotes short for easy readability.
– Choose contrasting colors to ensure visibility.
– Practice your handwriting on paper for precision before applying.
Inspirational quote nails are not just a design but a daily reminder of your own strength and positivity!
18. Beach Vibes
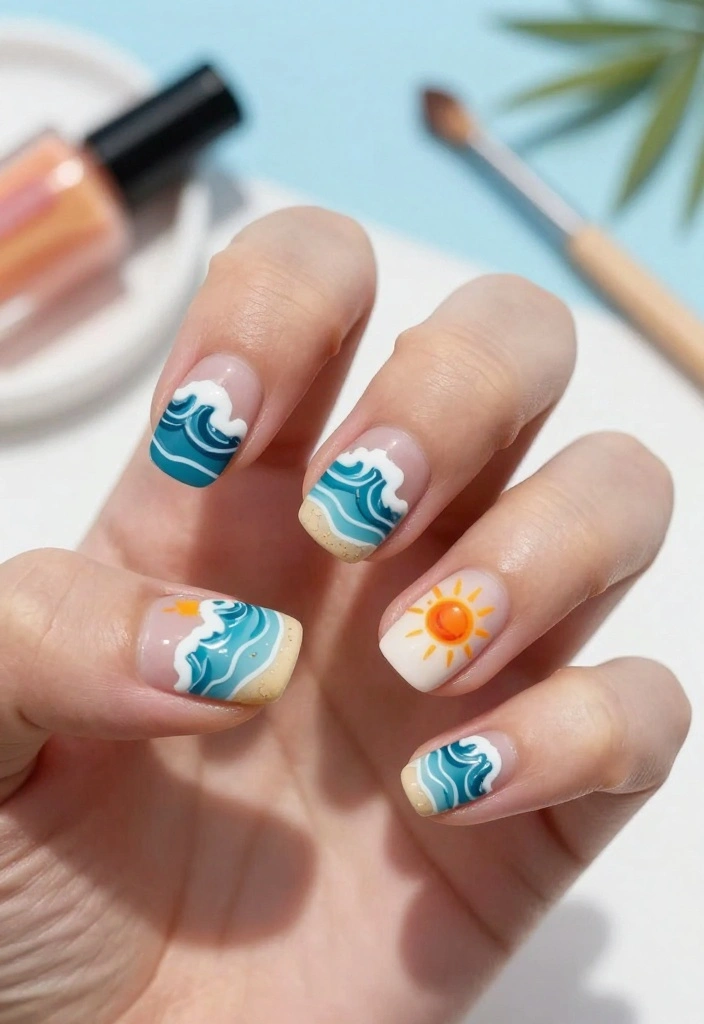
Capture the essence of summer with beach-themed nail art! This design brings fun and sunny vibes to your nails, perfect for anyone who loves the beach. It’s a delightful way to express your love for sunny days and relaxation.
Beach designs work well because they incorporate bright colors and playful motifs, reflecting the joy of summer. They’re ideal for vacations, beach parties, or any day that needs a little sunshine.
Outfit Pieces:
– Base coat in sandy beige or bright blue
– Nail colors for waves, sun, and seashells
– Fine brush for detailing
Styling Tips:
– Use bright colors to mimic the sunny beach atmosphere.
– Add glitter for a sandy effect or to represent sparkling water.
– Practice designs on paper to perfect your technique.
Beach-themed nails are perfect for summer trips or to bring a touch of sunshine to your everyday style!
19. Mixed Media
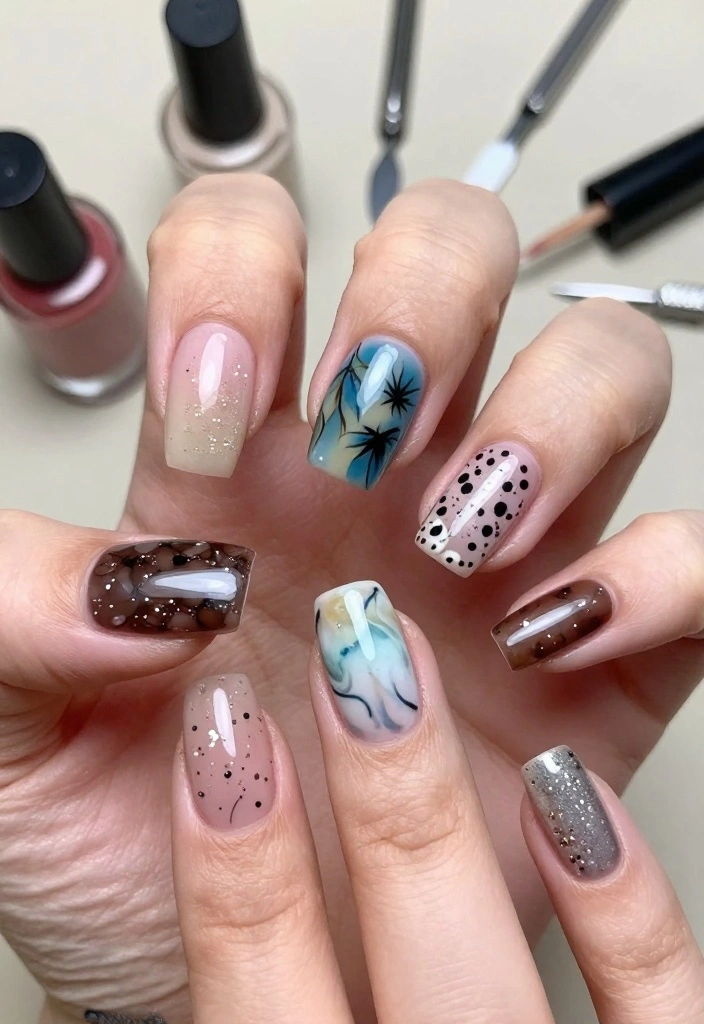
Get creative with mixed media nail art! By combining different techniques, you can create truly unique designs that reflect your personality. This approach is perfect for those who love to experiment and push the boundaries of traditional nail art.
Mixed media works beautifully because it allows for endless possibilities, blending textures and colors to create something one-of-a-kind. It’s suitable for casual outings or creative events where you want to stand out.
Outfit Pieces:
– Base coat in a solid color like white or black
– Various polishes including glitter, matte, and shiny finishes
– Nail stickers or stamps for added texture
Styling Tips:
– Be experimental: Mix different techniques for a unique look.
– Balance textures and colors for a cohesive design.
– Allow each layer to dry properly to avoid smudging.
Mixed media nails are a fun way to showcase your artistry without limits!
20. Minimalist Art

Less is more with minimalist nail art! This design is simple yet striking, perfect for those who prefer a clean and chic aesthetic. You can create a polished look that is both sophisticated and easy to achieve.
Minimalist designs work beautifully because they highlight simplicity, allowing the beauty of each element to shine. They are versatile enough for both casual and formal occasions.
Outfit Pieces:
– Base coat in a nude or clear shade
– Fine brush or nail tape for creating shapes
– Top coat for a glossy finish
Styling Tips:
– Keep shapes small to maintain the minimalist vibe.
– Choose colors that complement each other for a cohesive look.
– Practice steady hands for clean lines and edges.
Minimalist art on your nails is a statement of elegance and style, making it perfect for any occasion!
21. Doodle Art
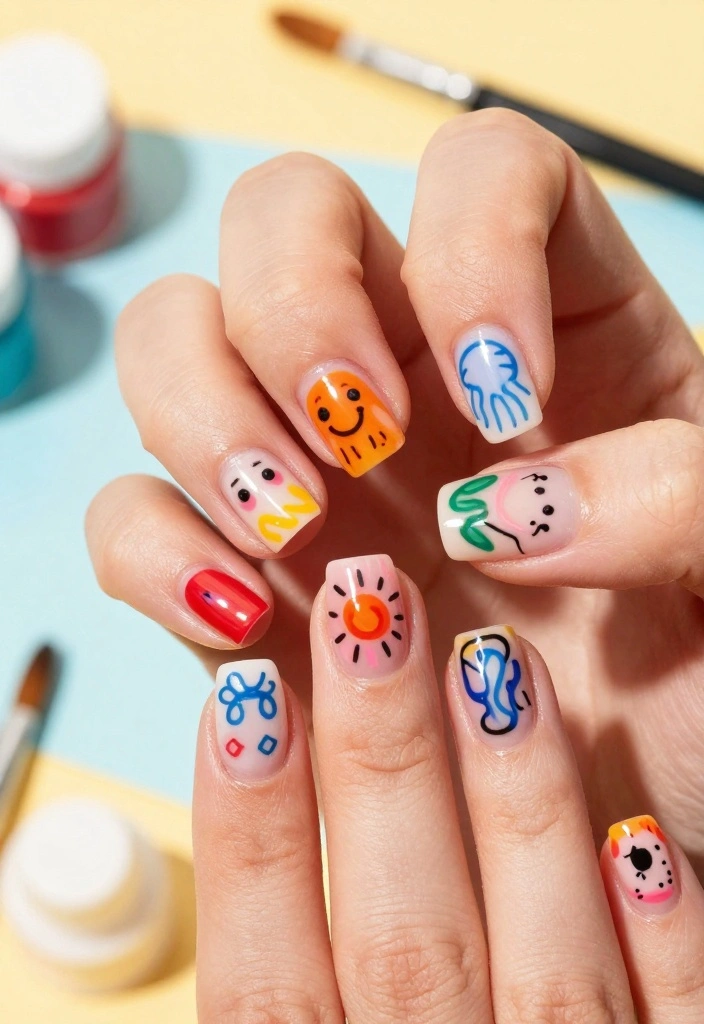
Unleash your creativity with whimsical doodle art on your nails! Doodle designs are playful and fun, allowing you to express your artistic side without constraints. This style invites imagination and makes your nails a canvas for your thoughts.
Doodle art works well because it embraces imperfection and spontaneity, turning your nails into unique pieces of art. They’re perfect for casual outings or when you want to showcase your personality.
Outfit Pieces:
– Base coat in a neutral shade like white or light gray
– Fine brush for drawing doodles
– Top coat for sealing your artwork
Styling Tips:
– Let your creativity flow without worrying about perfection.
– Experiment with different doodle ideas for variety.
– Use a steady hand and practice on paper first for confidence.
Doodle art is a great way to have fun and spark conversations wherever you go!
Doodle art on nails is your tiny, wearable sketchbook—start with one playful motif and let your imagination run wild. Imperfection is intentional here, turning simple nails into a personal expression you can show off anytime.
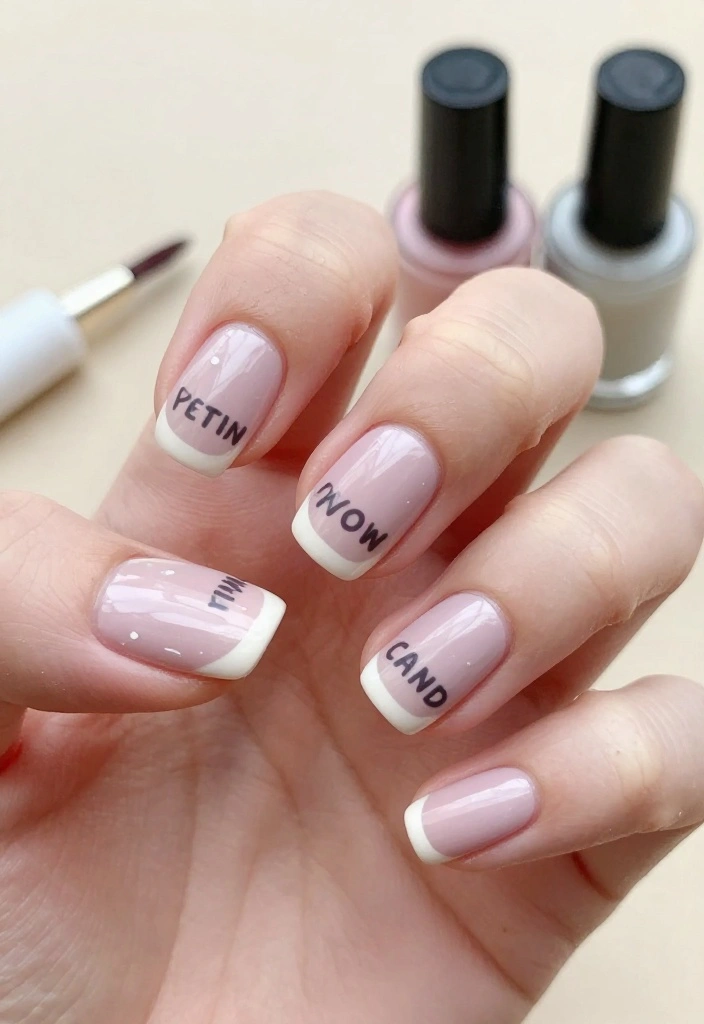
22. Classic French Manicure with a Twist

Elevate the classic French manicure with a vibrant twist! This timeless design can be personalized with fun colors or playful patterns, adding a modern touch to a beloved style. It’s perfect for anyone who wants to keep it classy yet fresh.
This updated French manicure works beautifully because it combines traditional elegance with a splash of creativity, making it suitable for any occasion. You can have fun with colors while maintaining the sophisticated feel of the classic look.
Outfit Pieces:
– Base coat in sheer pink or nude
– Colorful tips in shades of your choice (like bright blue or glitter)
– Top coat for a polished finish
Styling Tips:
– Experiment with colors beyond white for a modern vibe.
– Incorporate small patterns or dots for a unique flair.
– Keep it neat using tape for clean lines.
This updated version of a classic will have you looking effortlessly stylish on any occasion!
Conclusion

Your nails are a wonderful canvas for creativity, and these 22 DIY nail art tutorials are sure to inspire your next manicure.
Whether you prefer playful patterns, elegant designs, or a touch of whimsy, there’s a style here for everyone. Remember, practice makes perfect, so don’t be afraid to experiment and have fun with your nail art!
Get started today and let your creativity shine!
Frequently Asked Questions
What is the easiest DIY cute nail design to start with from this article?
If you’re just getting into cute nail art, start with a simple dot or stripe design—it’s perfect for beginners exploring nail art tutorials. Here’s a quick setup:
1) Prep nails: file, buff, push back cuticles, and wipe clean.
2) Apply a base coat and let it dry.
3) Paint a solid base color.
4) Create tiny dots or a single stripe using a dotting tool, toothpick, or bobby pin.
5) Finish with a top coat and clean the edges.
Pro tip: keep your color palette cohesive to get the most out of these nail art tutorials for cute nail at home.
What tools and supplies do I need to get started with these DIY nails at home?
To nail these DIY nails at home, you’ll want a small kit: base coat, top coat, a few polishes in your favorite colors, an accent color for details, a dotting tool or alternative (toothpick, hairpin), a thin striping brush or tape for clean lines, a cleanup brush and remover, and optionally nail stickers for easy patterns. If you’re on a budget, you can substitute a toothpick for dots and use tape to guide lines. With these essentials, you can recreate most of the nail art tutorials in the article and keep your cute nail game strong.
Can these tutorials work on short nails, or are they only for long nails?
Yes—these tutorials are great for all nail lengths. For short nails, choose designs with small details that fit on the nail plate, like tiny dots, simple lines, or negative-space shapes. Use a fine brush or dotting tool for precision, and consider nail stickers or tape to create crisp patterns. With the right approach, you’ll still achieve a cute nail look using these nail art tutorials at home.
How long does it typically take to complete one tutorial, and how can I speed things up?
Most tutorials in the article take about 20–40 minutes depending on the detail. To speed things up: prep everything before you start, pick a simple color palette, use a fast-drying top coat, and allow short dry intervals with a fan or cool air. Practicing common patterns (dots, stripes, and simple geometric shapes) will also make future nail art tutorials for DIY nails quicker and easier.
What makes the #5 design in the article stand out, and how can I nail it at home?
The #5 tutorial stands out for its bold color contrast and clean lines with a playful twist that remains easy to master. To nail it: plan your color palette first, use a dotting tool or fine brush for accent details, apply thin, even layers, and seal with a top coat. Clean up the edges for a flawless finish. It’s a standout cute nail design you can confidently recreate with these nail art tutorials at home.
Related Topics
cute nail
nail art tutorials
DIY nails
beginner friendly
easy designs
trendy nail art
5-minute manicures
colorful patterns
seasonal nail trends
minimalist nail art
creative nail ideas
home spa day
I love the idea of doing my own nail art at home! It sounds like a fun way to express my creativity. What’s your favorite design from the list?
I tried a DIY nail art tutorial once, and let’s just say my nails looked like they were painted by a toddler! 😂 Any tips for keeping it neat?
Did you know that nail polish was used in ancient China as early as 3000 BC? It’s amazing how this art form has stood the test of time! What’s your favorite historical nail trend?
I remember trying to do polka dots on my nails and ended up with a splatter effect instead! It was a mess, but we laughed about it for days. Have you had any funny nail mishaps?