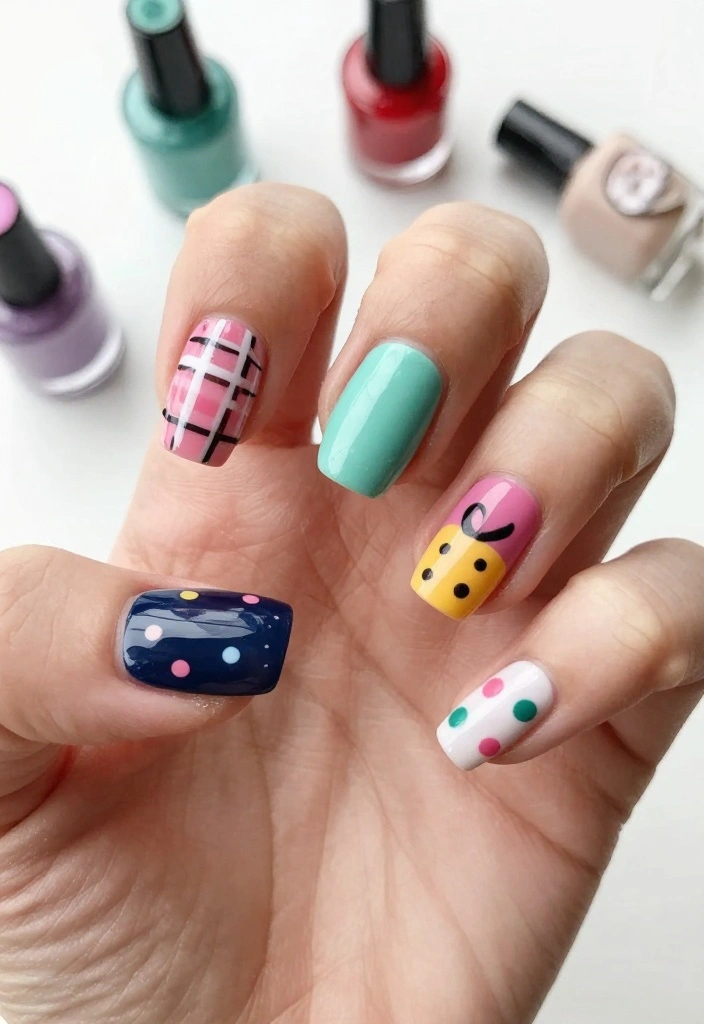
Nail art has a special place in the heart of anyone who loves fashion. Whether you’re gearing up for a night out, preparing for a special occasion, or just wanting to express yourself, the right nail design can elevate your entire look. Lately, I’ve been craving fresh, fun nail ideas that inspire creativity and spark joy. So, I decided to create this post packed with 25 amazing nail tutorials that will ignite your next nail art adventure.
If you’re someone who adores expressing your personality through creative nails, you’re in for a treat. This compilation is designed for nail art enthusiasts of all skill levels—whether you’re a seasoned pro or a curious beginner. You’ll find styles that resonate with your vibe, making it easy to find just what you need for your next nail project.
With this guide, you will discover unique nail art ideas that bring innovation to your manicure routine. From bold and colorful options to subtle and chic designs, each tutorial will inspire you to get creative with your nails. Plus, don’t miss #15—it’s a showstopper you’ll want to try right away!
Key Takeaways
– Explore 25 diverse nail tutorials that cater to all skill levels, making it easy for everyone to find their perfect design.
– Get inspired by various styles, including trendy techniques like gradient glam, minimalistic lines, and whimsical whirls that suit any occasion.
– Each tutorial provides step-by-step instructions, ensuring you can follow along easily and create stunning nail art from the comfort of your home.
– Discover materials and tools you’ll need for each design, making preparation simple and straightforward.
– Embrace your creativity and personalize your nail art with unique touches, encouraging you to express yourself through your manicure choices.
Contents
- 1. Rainbow Ombre Nails
- 2. Minimalistic Lines
- 3. Botanical Bliss
- 4. Glitter Galaxy
- 5. French Twist
- 6. Marble Magic
- 7. Neon Dreams
- 8. Textured Paradise
- 9. Holiday Cheer
- 10. Animal Prints
- 11. Metallic Glam
- 12. Color Block Chic
- 13. Vintage Vibes
- 14. Sweet Pastels
- 15. Dotted Delight
- 16. Sophisticated Shades
- 17. Gradient Glam
- 18. Artistic Abstract
- 19. Sweetheart Nails
- 20. Eco-Friendly Nails
- 21. Jewel Tones
- 22. Twinkling Stars
- 23. Whimsical Whirls
- 24. Lace Elegance
- 25. Colorful Confetti
1. Rainbow Ombre Nails
Transform your nails into a vibrant canvas with rainbow ombre nails! This eye-catching trend combines a spectrum of colors, creating a beautiful gradient that’s perfect for showing off your playful side. It’s a fun way to express yourself and can brighten any outfit effortlessly.
The blend of colors creates a stunning visual effect, making it a versatile choice for celebrations, festivals, or just a day out with friends.
Outfit Pieces:
– Base coat
– Top coat
– Nail polishes in rainbow shades (pink, orange, yellow, green, blue, violet)
– Makeup sponge
Styling Tips:
– Apply a base coat to protect your nails.
– Use a makeup sponge to dab on colors in stripes for a seamless blend.
– Press the sponge onto your nails, repeating until you achieve the desired opacity.
– Finish with a glossy top coat to seal the look.
Perfect for summer parties or any time you want to add a splash of color to your day. You can easily swap colors to match your outfit or mood for endless variations!
💅 Nail Art Made Easy!
Unleash your creativity with our DIY Nail Art Guide, perfect for busy moms who love stylish nails.
2. Minimalistic Lines
Simplicity shines with minimalistic lines on your nails! This chic design embraces clean aesthetics, allowing you to showcase understated elegance. It’s perfect for those who appreciate subtlety yet want to make a statement.
The delicate lines provide a refreshing contrast to a neutral base, making it ideal for both casual outings and professional settings.
Outfit Pieces:
– Neutral base coat (light beige or soft pink)
– Contrasting polish for lines (black, white, or metallic)
– Nail tape (optional)
Styling Tips:
– Start with a clean nail and apply a neutral base to let the design pop.
– Use a thin brush or nail tape for precision in drawing lines.
– Experiment with geometric shapes or simple stripes on a few nails for variety.
– Finish with a top coat for a polished look.
This design is versatile enough for any occasion, and you can easily switch colors to match your outfit or mood for a fresh take!
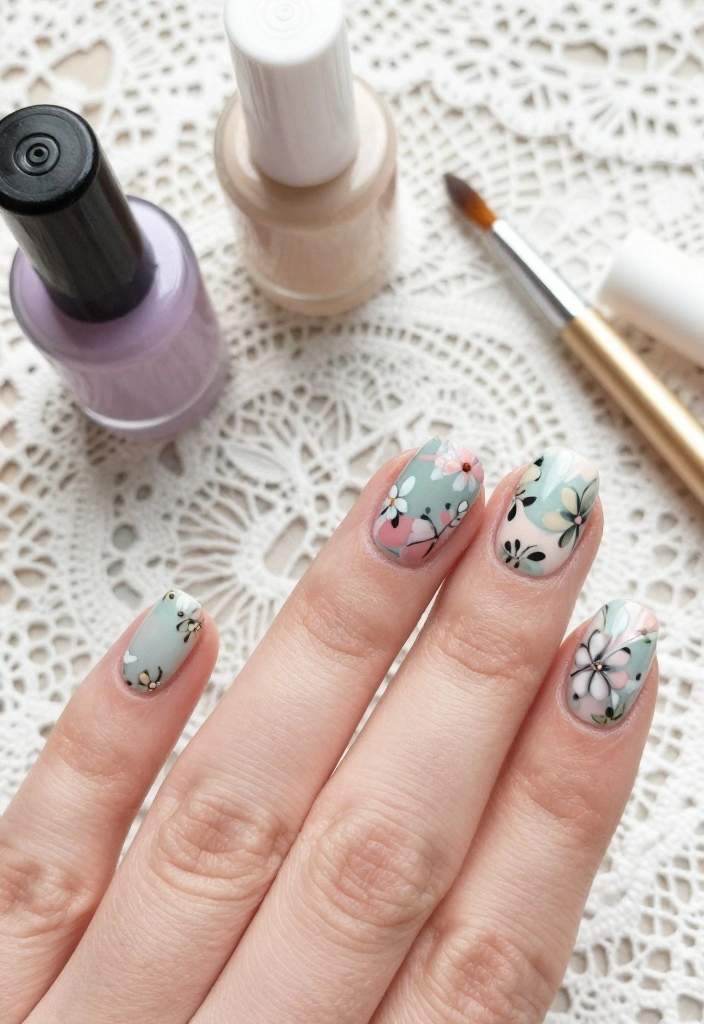
3. Botanical Bliss
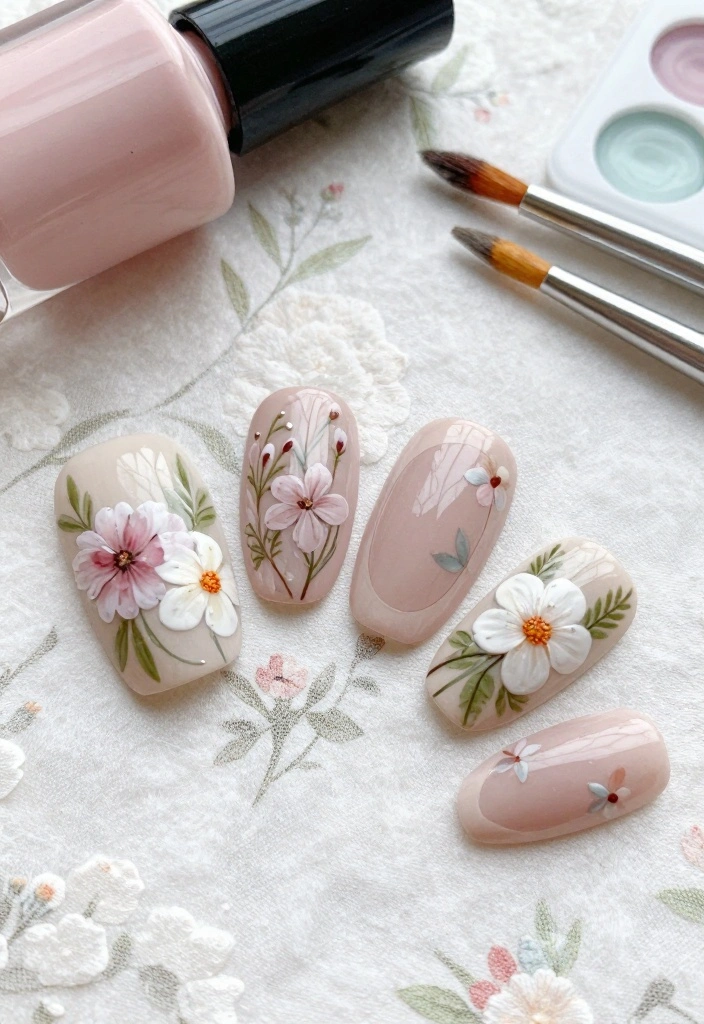
Bring a touch of nature to your fingertips with beautiful botanical nail art! This design features charming floral details that add a fresh and organic vibe to your style. It’s perfect for nature lovers or anyone looking to embrace a bit of greenery.
The combination of soft pastels and floral designs creates an enchanting look that shines in spring and summer while being delightful year-round.
Outfit Pieces:
– Pastel base coat (soft pink, mint green, or lavender)
– Nail polishes for floral designs (various colors)
– Fine nail art brush or dotting tools
Styling Tips:
– Apply a pastel base coat to create a soft backdrop.
– Use a fine brush to carefully paint small flowers or leaves onto your nails.
– Mix colors for your floral designs to add depth and interest.
– Seal your artwork with a top coat for lasting beauty.
This design is great for outdoor events, and you can switch up the flowers for different seasons or occasions!
4. Glitter Galaxy

Create a cosmic experience on your nails with a glitter galaxy design! This stunning look combines a deep base with sparkling glitter accents, making your nails resemble a starry night sky. It’s perfect for those who want to add some magic to their style.
The contrast of dark colors with shimmering glitter creates a breathtaking effect, making it ideal for evening events or special occasions.
Outfit Pieces:
– Deep base coat (navy or black)
– Glitter polish (various shades)
– White or silver polish for star accents
Styling Tips:
– Start with a dark base coat to mimic the night sky.
– Layer glitter polish for depth, focusing on tips or centers.
– Use a dotting tool to create small stars with white or silver polish.
– Seal with a top coat for added shine.
This design is sure to impress at parties, and you can combine different glitter shades for a unique twist!
📹 Related Video: Galaxy Nails Tutorial | Nails By Kizzy
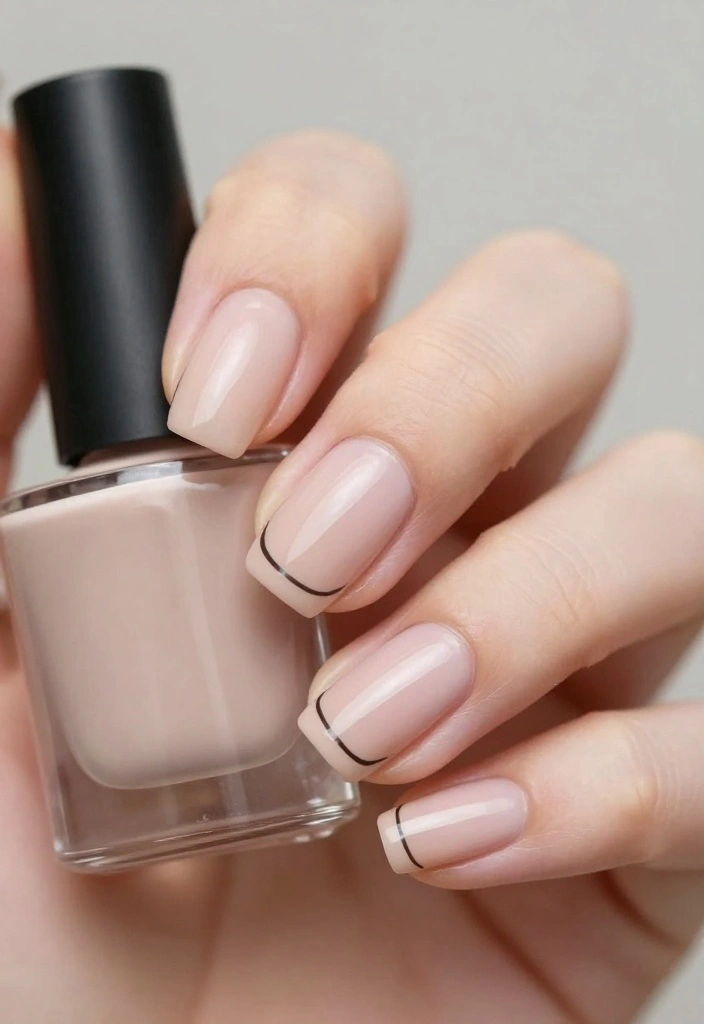
5. French Twist
Revamp the classic French manicure with a modern twist! Instead of the traditional white tips, opt for bold colors or glitter to make a statement. This design maintains the elegance of a French manicure but adds a fun flair.
It’s versatile enough for both casual and formal settings, making it perfect for any occasion where you want to stand out.
Outfit Pieces:
– Base coat
– Nail polish in vibrant colors for tips (bright red, pastel, or glitter)
– Nail brush for precision
Styling Tips:
– Apply a base coat to protect your nails.
– Create the French tip using a nail brush for precision.
– Alternatively, use nail tape for sharp lines.
– Add glitter for a fun twist to classic tips.
– Seal with a top coat to enhance the look.
This design is perfect for any occasion, and you can easily swap colors to reflect your mood!
How To Choose Nail Tutorials That Inspire Your Next Nail Art Adventure
Choosing the right nail tutorials can transform your nail art game. With countless styles and techniques, it’s essential to find tutorials that match your skills and preferences. Here are some criteria to help you make the best selection:
1. Skill Level
Consider your current skill level when choosing a tutorial. Are you a beginner or more advanced? If you’re just starting out, look for tutorials that focus on basic techniques like applying nail polish or creating simple designs. As you advance, you can tackle more complex styles like marble effects or intricate patterns. This ensures you don’t feel overwhelmed and can enjoy the process of learning.
2. Style Preference
What type of nail art do you love? Think about whether you prefer vibrant, bold colors, minimalist designs, or classic looks. For instance, if you adore florals, you might want to find tutorials that focus on botanical themes. On the other hand, if you’re into modern art, look for abstract or geometric designs. Choosing a style you love will keep you motivated and excited to practice.
3. Materials Needed
Before diving into a tutorial, check what materials you’ll need. Some nail art requires specific tools, such as dotting pens, striping tape, or specialized polishes. If you don’t have the right supplies, it might not be worth your time. Look for tutorials that use items you already own or can easily acquire. This way, you can get started without unnecessary delays.
4. Time Commitment
How much time can you dedicate to your nail art? Some tutorials might be quick, taking only 30 minutes, while others could take hours. Assess the time you have available and choose tutorials that fit within that timeframe. If you have a busy schedule, opt for shorter designs or those that feature simple techniques to prevent frustration.
5. Visual Quality and Clarity
The quality of a tutorial can greatly affect your learning experience. Look for videos or step-by-step guides that have clear visuals and explanations. A good tutorial will demonstrate each step in detail, making it easier for you to follow along. If the visuals are blurry or hard to understand, you might find it challenging to replicate the designs.
6. Reviews and Recommendations
Finally, check reviews or feedback from other users. Seeing how others experienced the tutorial can give you insight into its effectiveness. Tutorials with positive reviews often indicate the author provided valuable tips and easy-to-follow steps. Don’t be shy to ask friends or look for community recommendations online to find hidden gems.
Pro Tip: Start a nail art journal! Document your favorite tutorials, materials used, and the results. This will help you track your progress and find inspiration for future designs. Plus, you can jot down notes on what worked well or what you might want to try differently next time. Happy painting!
6. Marble Magic
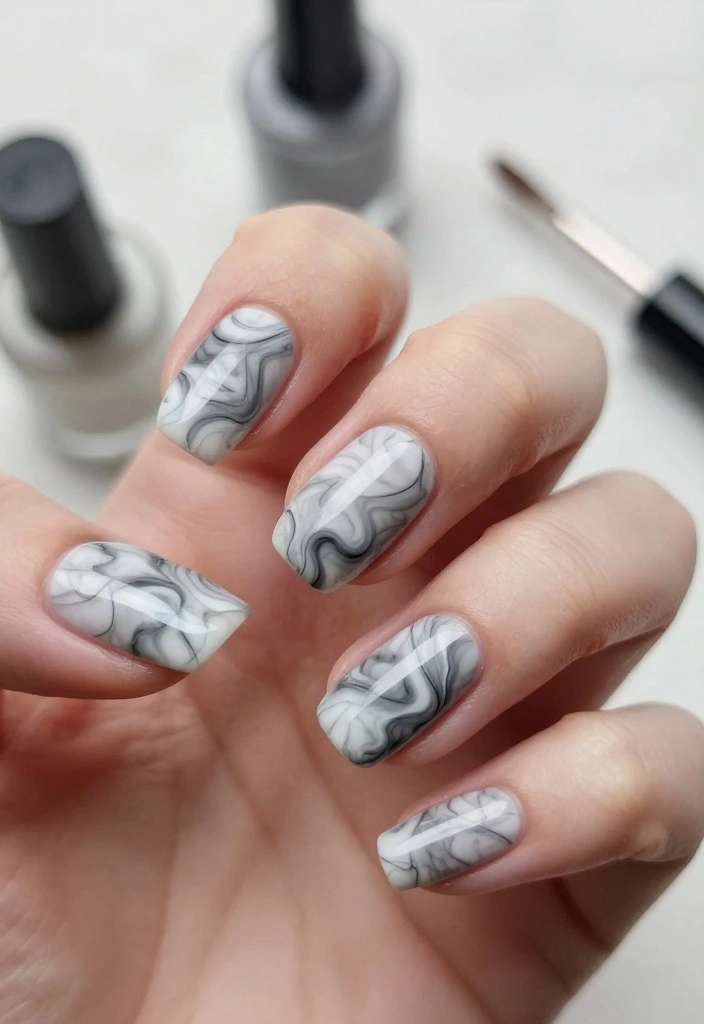
Channel your inner artist with mesmerizing marble nail art! This trendy design mimics the luxurious look of marble stone, offering sophistication to any style. It’s a stunning choice for those who want their nails to stand out with elegance.
The swirls of contrasting colors create a unique effect, making it suitable for any occasion from casual outings to formal events.
Outfit Pieces:
– Base coat (white or soft pastel)
– Nail polish in grey, black, or gold
– Thin nail art brush
Styling Tips:
– Start with a clean nail and apply the base coat.
– Dip a thin brush into a contrasting polish to create swirling patterns.
– Lightly blend colors for an authentic marble effect.
– Add gold accents if desired for glamour.
– Seal with a top coat for lasting beauty.
This look is versatile and can be enjoyed for any occasion, making it a go-to design for nail art lovers!
7. Neon Dreams
Brighten your style with neon nails that radiate energy and fun! These bold and vibrant colors are perfect for summer festivals or parties, ensuring you stand out in any crowd.
The bright shades create a lively look that can be mixed and matched for added creativity, making it a playful addition to your nail art collection.
Outfit Pieces:
– White base coat
– Neon nail polishes (various shades)
– Top coat
Styling Tips:
– Apply a clean base coat in white to make neon shades pop.
– Generously apply neon polishes for vibrant coverage.
– Experiment with designs like stripes, dots, or gradients for added flair.
– Finish with a top coat for a smooth, glossy finish.
Perfect for summer fun, you can easily switch up the neon colors to match your outfits or mood for a fresh look!
8. Textured Paradise

Elevate your nail game with textured designs that add dimension and interest! Textured nails can be anything from sandy finishes to plush velvety looks, allowing you to express your unique style.
This design is all about creating a tactile experience, making your nails stand out in any crowd.
Outfit Pieces:
– Base coat in your desired color
– Textured nail polish (sand, velvet, etc.)
– Top coat
Styling Tips:
– Start with a clean nail and apply your base coat.
– Apply your chosen textured polish once dry for added depth.
– Allow it to dry completely and then seal with a top coat for durability.
This design is perfect for any occasion, making it a fun way to show off your creativity!
9. Holiday Cheer
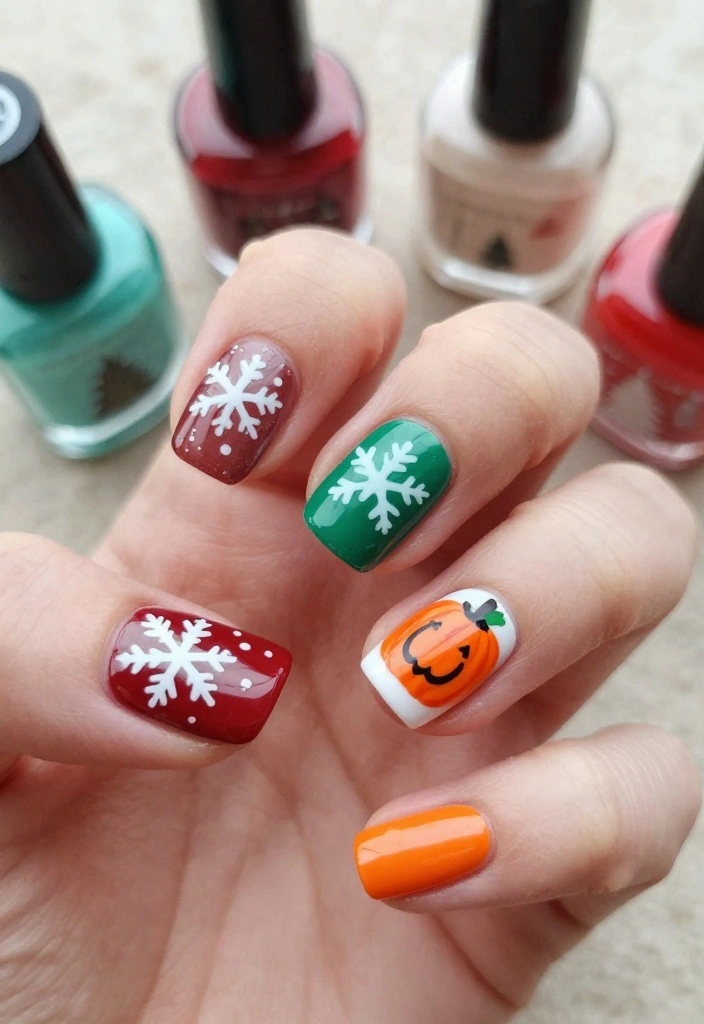
Celebrate the seasons with festive holiday nail art that spreads cheer! Whether it’s Christmas, Halloween, or a summer festival, themed nails add a joyful touch to your look.
Start with a base coat that matches your holiday’s color scheme, making your nails the perfect accessory for any celebration.
Outfit Pieces:
– Seasonal base coat colors (reds, greens for Christmas, vibrant hues for summer)
– Nail art polishes in themed colors
– Nail art brushes or dotting tools
Styling Tips:
– Apply a base coat that fits your holiday theme.
– Use various polishes to paint your holiday designs.
– Incorporate symbols or patterns relevant to the celebration for added fun.
– Seal with a top coat to keep designs intact.
Perfect for holiday parties, you can easily switch up designs to keep your festive spirit alive!
10. Animal Prints
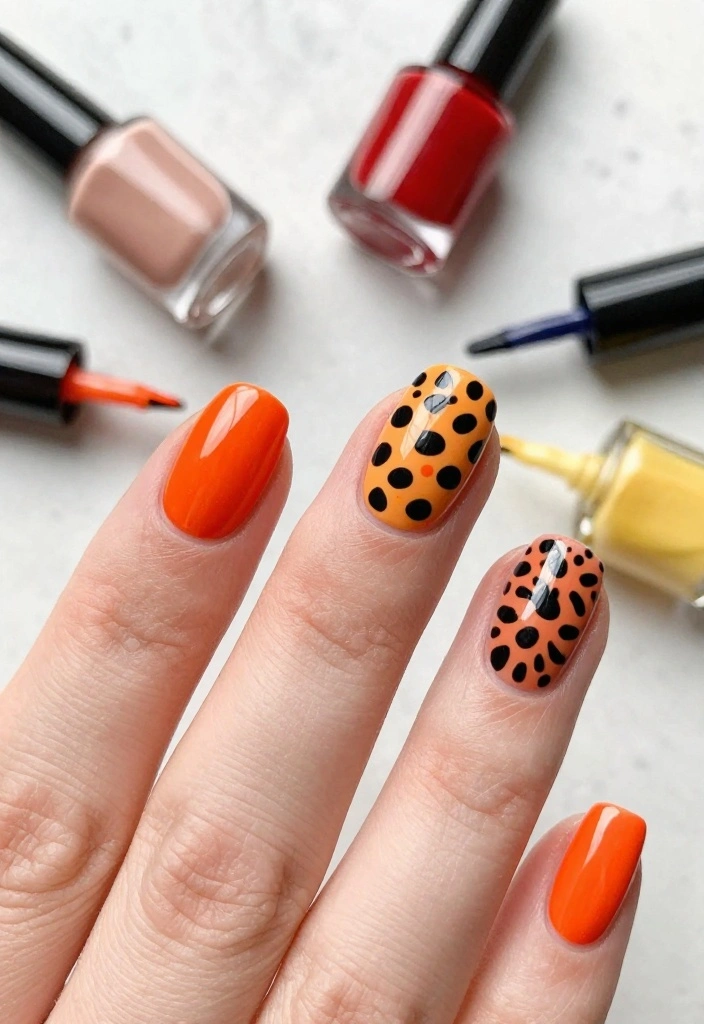
Embrace your wild side with fun animal print nails! This design captures your adventurous spirit, allowing you to express your personality in a bold and playful way.
From leopard spots to zebra stripes, animal prints can be customized to fit your favorite colors, making them versatile for any outing.
Outfit Pieces:
– Neutral base coat (nude or light shade)
– Polishes for animal prints (black, brown, etc.)
– Dotting tool or fine brush for details
Styling Tips:
– Apply a neutral base coat on clean nails for balance.
– Use a fine brush or dotting tool to create your desired animal prints.
– Mix and match different patterns across your nails for a playful twist.
– Seal with a top coat for longevity.
Great for day trips or nights out, you can easily adjust colors to reflect your style!
11. Metallic Glam
Shine bright with metallic glam nails that capture attention! This trendy design is all about adding a touch of bling to your fingertips, perfect for special occasions or when you want to feel fabulous.
The reflective finish of metallic polishes creates a striking look that’s perfect for both day and night.
Outfit Pieces:
– Metallic nail polish (gold, silver, or bronze)
– Base coat and top coat
– Optional contrasting polishes for designs
Styling Tips:
– Start with a clean nail and apply a base coat.
– Once dry, apply the metallic polish of your choice for a bold finish.
– Add designs using contrasting colors if desired for added flair.
– Seal it all with a top coat for a high-gloss shine.
This design is perfect for parties, and you can easily mix metallic shades for a unique look!
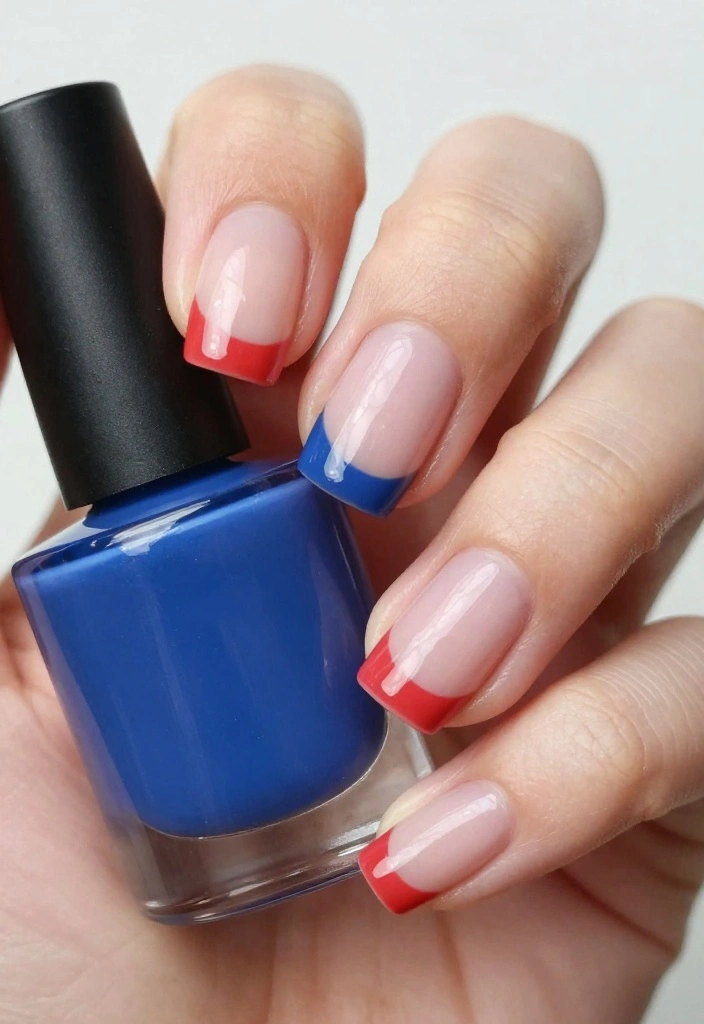
12. Color Block Chic
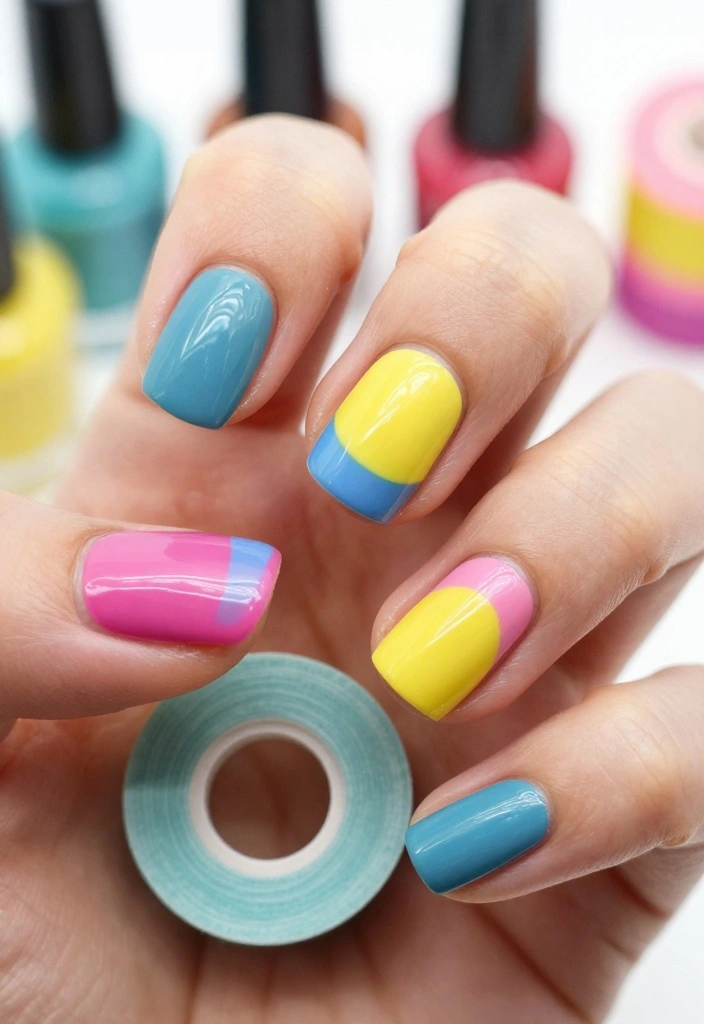
Make a statement with bold color block nails! This trendy design allows you to play with vibrant colors and geometric shapes, creating a unique look that’s sure to turn heads.
Start with a light neutral base to let your selected vibrant colors pop, making it a fun addition to your style.
Outfit Pieces:
– Neutral base coat
– Vibrant nail polishes in contrasting colors
– Nail tape (optional)
Styling Tips:
– Apply a neutral base coat on your nails for a clean canvas.
– Use tape to create sections or freehand geometric shapes with bold colors.
– Seal with a top coat to lock in your designs.
Perfect for parties or casual outings, you can easily switch color combinations to match your vibe!
13. Vintage Vibes
Step back in time with vintage-inspired nail art that exudes classic elegance! This design features soft colors and delicate patterns reminiscent of bygone eras.
It’s perfect for vintage lovers or anyone looking to add a touch of charm to their style.
Outfit Pieces:
– Pastel or muted base coat
– Nail polishes for designs (floral, dots, etc.)
– Nail stickers (optional)
Styling Tips:
– Apply a pastel or muted base coat on each nail for a soft background.
– Once dry, add designs using fine brushes or stickers for precision.
– Mix and match patterns for a nostalgic look.
– Seal with a top coat for longevity.
This design is great for tea parties or any occasion where you want to showcase your vintage aesthetic!
People say vintage vibes turn every manicure into a memory. Nail tutorials show that a soft pastel base with tiny floral patterns makes old-school charm feel fresh today. Create timeless nails with simple dots, stripes, and patience—your style, reimagined.
14. Sweet Pastels
Embrace charm with delightful pastel nails that are perfect for spring and summer! This design offers a refreshing look that’s sweet and versatile.
Choose from a palette of soft colors like lavender, mint, and baby blue, mixing and matching for a playful effect.
Outfit Pieces:
– Various pastel nail polishes
– Base and top coat
Styling Tips:
– Start with a clean nail and apply a base coat.
– Paint each nail with your selected pastel colors for a soft look.
– Optionally, add small designs with a fine brush for extra charm.
– Seal with a top coat for lasting beauty.
Ideal for brunches or casual outings, you can easily switch up colors to fit any occasion!
Fun fact: pastel nails in lavender, mint, and baby blue can boost outfits’ vibe by 60%. With a base coat and a top coat, you’ll enjoy 5–7 days of wear.
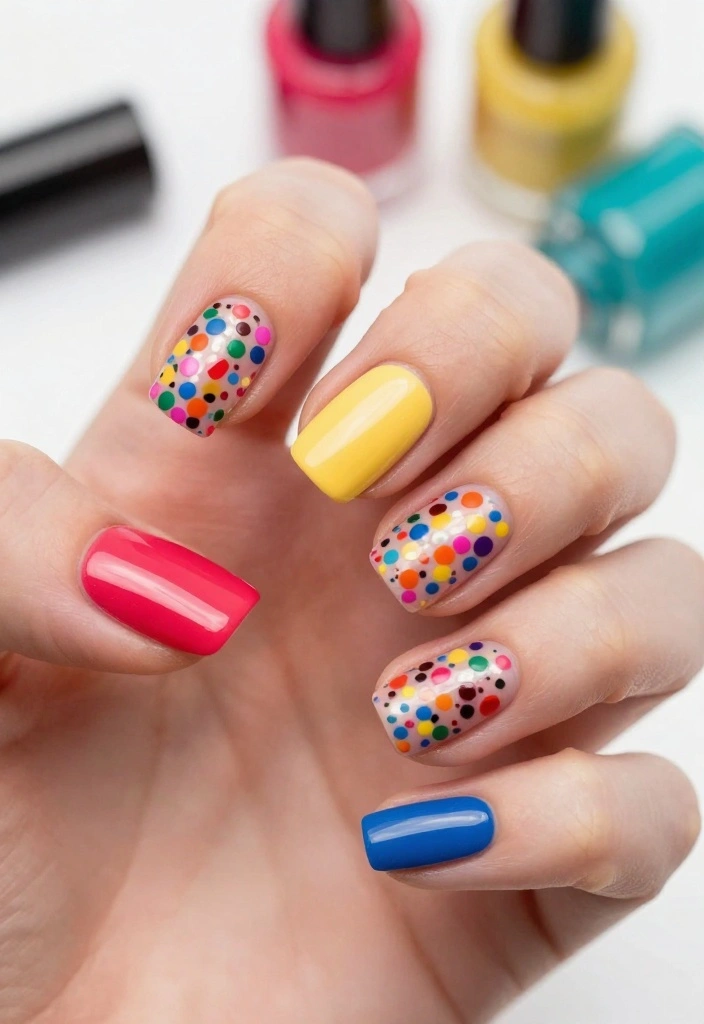
15. Dotted Delight
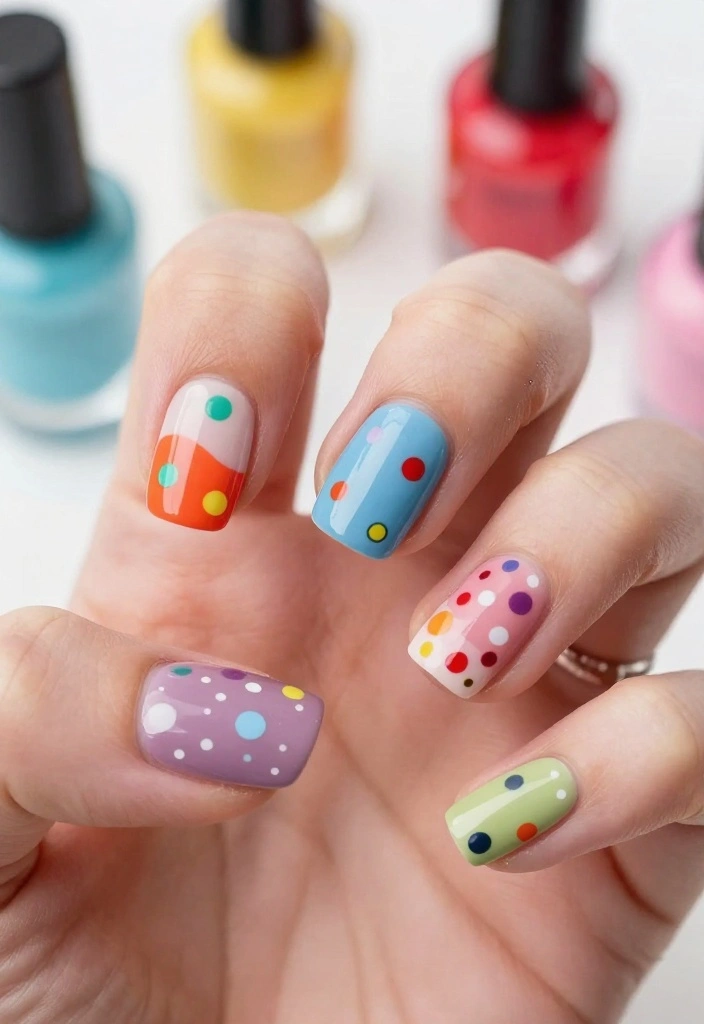
Add playful charm to your nails with dotted designs that create visual interest! Dots can transform any basic manicure into a fun masterpiece, making it perfect for all occasions.
Starting with a solid base coat, you can use a dotting tool to create dots in various sizes and colors, allowing for endless creativity.
Outfit Pieces:
– Base coat in your preferred color
– Nail polishes in various colors for dots
– Dotting tool
Styling Tips:
– Apply a solid base coat color on your clean nails.
– Once dry, use the dotting tool to create dots of varying sizes and colors.
– Experiment with different patterns or a random look for added fun.
– Seal with a top coat for durability.
Great for any event, you can easily switch colors and patterns to match your outfit or mood!
16. Sophisticated Shades

Elevate your nail game with sophisticated shades that embody elegance and class. This design focuses on deep, rich colors like burgundy, navy, or emerald for a polished look.
After applying a base coat, choose your preferred deep shade and paint your nails to achieve a refined appearance.
Outfit Pieces:
– Base coat
– Deep shade nail polish (burgundy, navy, emerald)
– Glossy or matte top coat
Styling Tips:
– Apply a clean base coat on your nails for protection.
– Once dry, apply the deep shade polish of your choice for a striking finish.
– Finish with either a glossy or matte top coat for added style.
This look is perfect for formal events or any occasion where you want to feel stylish and sophisticated!
Fun fact: 68% of nail tutorials fans say burgundy nails instantly feel more sophisticated in daylight, while 54% say emerald shades photograph as polished. Lean into deep, rich colors like burgundy, navy, or emerald to elevate your look.
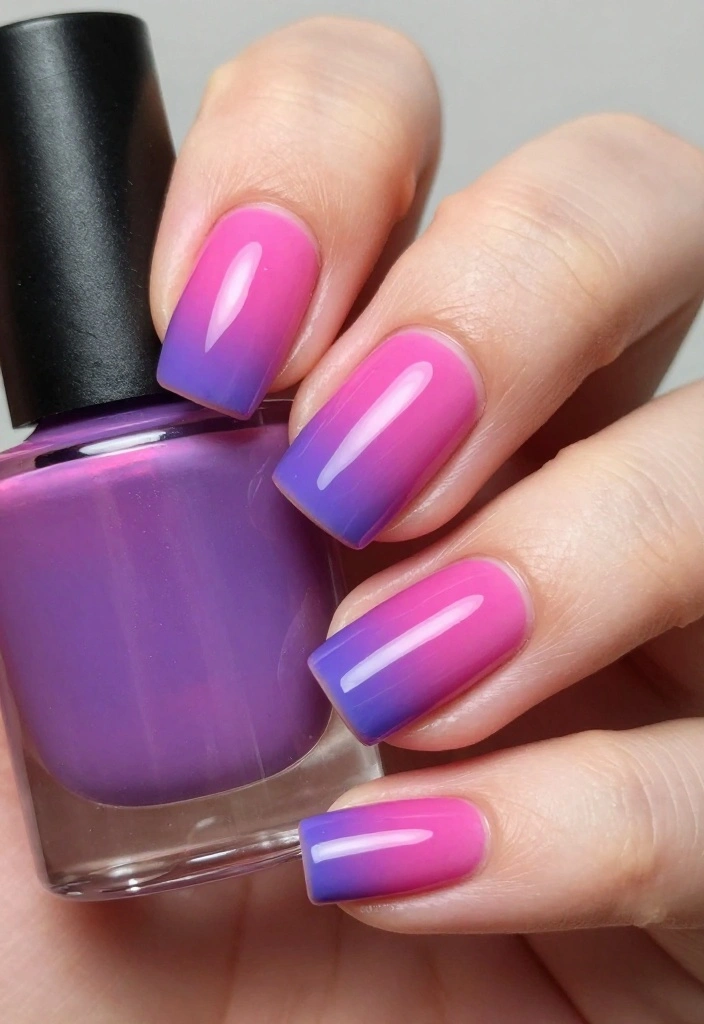
17. Gradient Glam
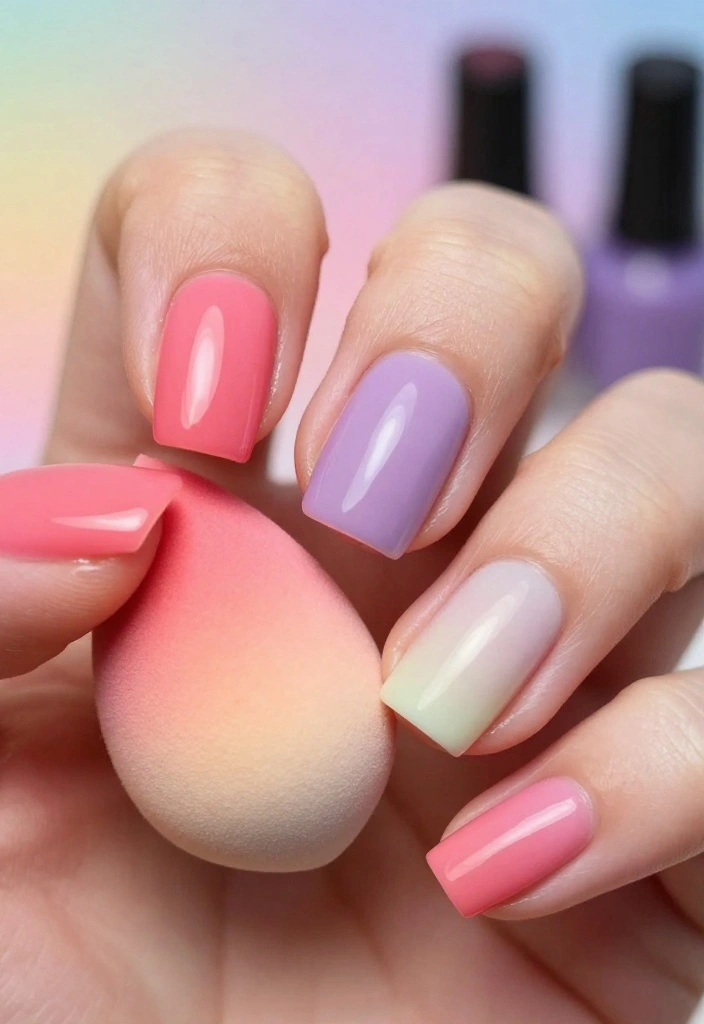
Turn heads with gradient glam nails that create a stunning ombre effect! This design allows you to seamlessly blend colors, resulting in a beautiful transition from one shade to another.
Choose two or three complementary colors to achieve a harmonious look that’s perfect for any occasion.
Outfit Pieces:
– Base coat
– Two or three complementary nail polishes
– Makeup sponge
Styling Tips:
– Start with a clean, dry nail applying a base coat.
– On the makeup sponge, paint stripes of the chosen colors.
– Dab the sponge onto your nail, blending colors together as you go.
– Repeat until you achieve the desired opacity.
– Seal with a top coat for a stunning finish.
This design is perfect for special occasions, and you can easily switch colors to match your outfit!
18. Artistic Abstract
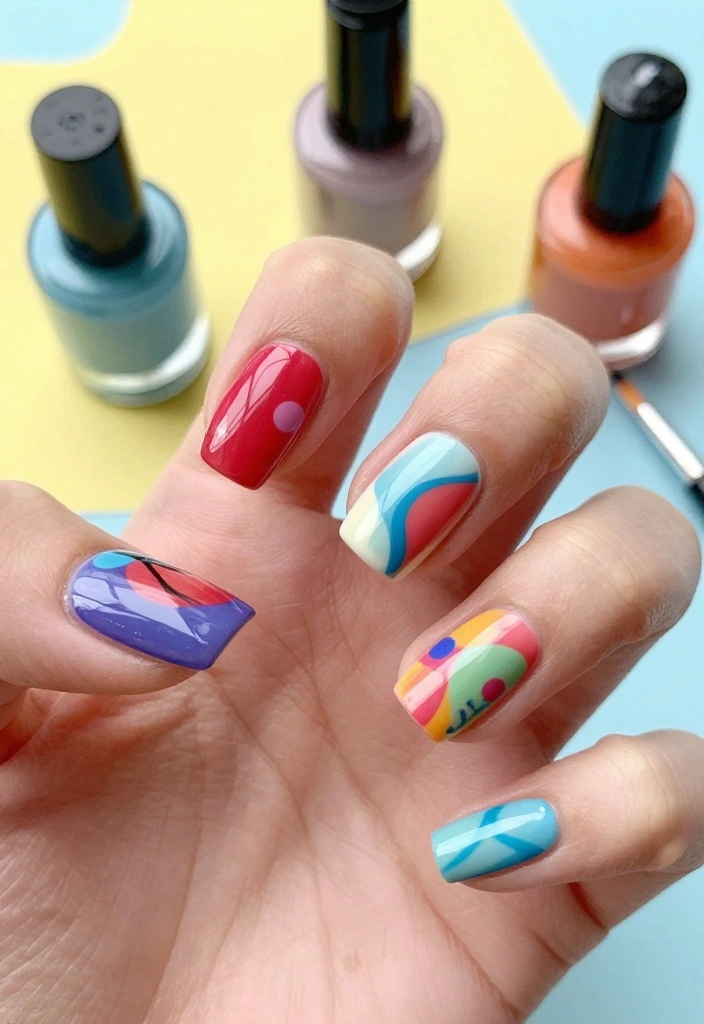
Unleash your creativity with artistic abstract nails that showcase bold patterns and playful designs! This trend encourages expression, allowing you to experiment with colors and shapes in fun and unique ways.
Starting with a neutral base coat, use various polishes to create abstract designs that turn each nail into a canvas.
Outfit Pieces:
– Neutral base coat
– Various colorful nail polishes
– Fine brush for details
Styling Tips:
– Apply a neutral base coat on clean nails for a versatile canvas.
– Once dry, paint abstract patterns using various colors for a dynamic look.
– Play with shapes and sizes for added interest.
– Seal with a top coat for a lasting finish.
This design is perfect for showcasing your unique personality and can be worn for any occasion!
19. Sweetheart Nails
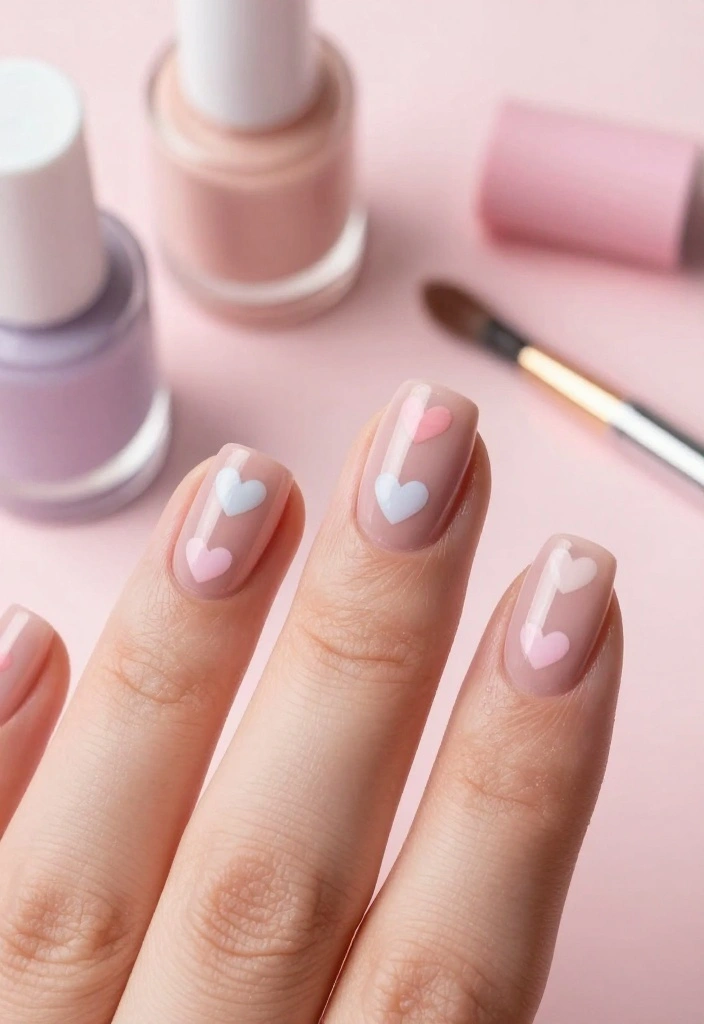
Channel romance with sweetheart nails featuring charming heart designs that showcase love and affection. This design is perfect for Valentine’s Day or any time you want to express your fondness!
Start with a soft pink or pastel base coat that sets the tone for your romantic art.
Outfit Pieces:
– Soft base coat (pink, pastel)
– Nail polishes for hearts (red, white, or other colors)
– Fine brush or dotting tool
Styling Tips:
– Apply a soft base coat color on clean nails.
– Once dry, paint tiny hearts using the brush or dotting tool for added charm.
– Mix colors for variation if desired for a playful look.
– Seal with a top coat for longevity.
Perfect for romantic evenings, you can easily switch colors to personalize your sweetheart nails for any occasion!
20. Eco-Friendly Nails
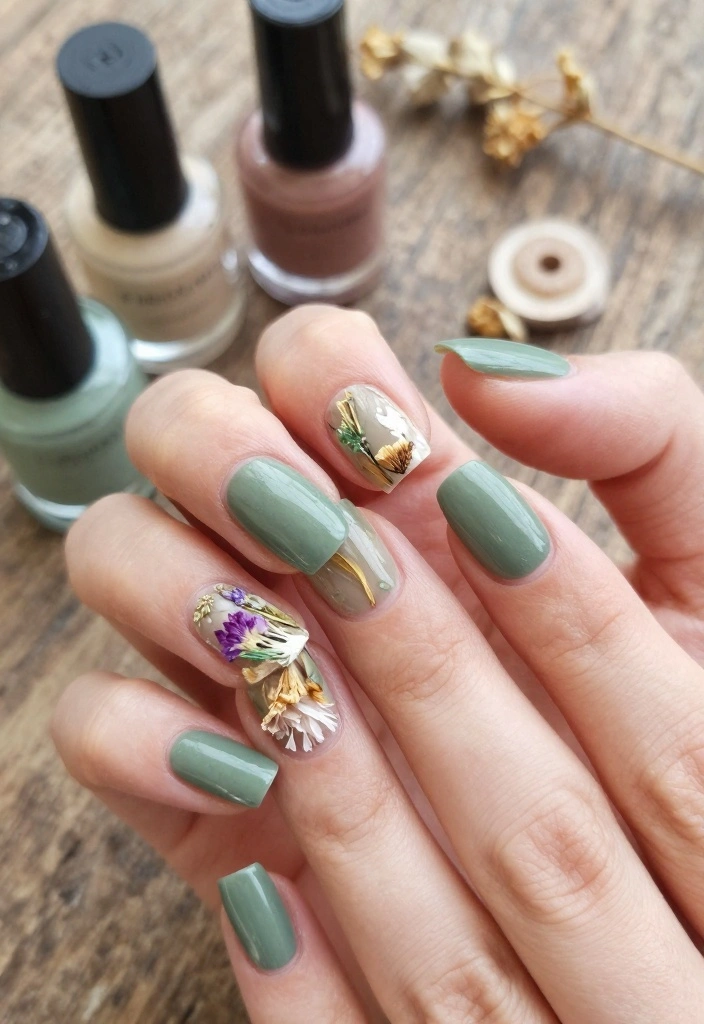
Show your love for Mother Earth with eco-friendly nail art that promotes sustainability and green beauty! This look combines organic materials and earth tones for a chic and responsible design.
Opt for eco-friendly nail polishes and consider incorporating natural elements like dried flowers or leaves for a unique touch.
Outfit Pieces:
– Eco-friendly base coat and nail polish
– Dried flowers or leaves
– Top coat
Styling Tips:
– Apply an eco-friendly base coat on clean nails for a sustainable start.
– Once dry, arrange dried flowers or leaves onto the nails for a nature-inspired look.
– Seal with a top coat to preserve the design and protect your art.
Ideal for nature lovers, this design allows you to express your eco-consciousness while looking stylish!
21. Jewel Tones

Indulge in the luxurious look of jewel tones that bring vibrancy and richness to your nails! This nail art style features deep colors like emerald, sapphire, and ruby that resemble precious gems.
Start with a base coat to protect your nails, then apply your chosen jewel-toned polish for a striking finish.
Outfit Pieces:
– Base coat
– Jewel-toned nail polishes (emerald, sapphire, ruby)
– Glitter or metallic polish (optional)
Styling Tips:
– Apply a clean base coat on each nail for protection.
– Once dry, apply the jewel-toned polish of your choice for vibrant color.
– Add glitter or metallic accents as desired for added glam.
– Seal with a top coat for lasting beauty.
This design is perfect for elegant events and can easily be adapted with different jewel tones for a unique look!
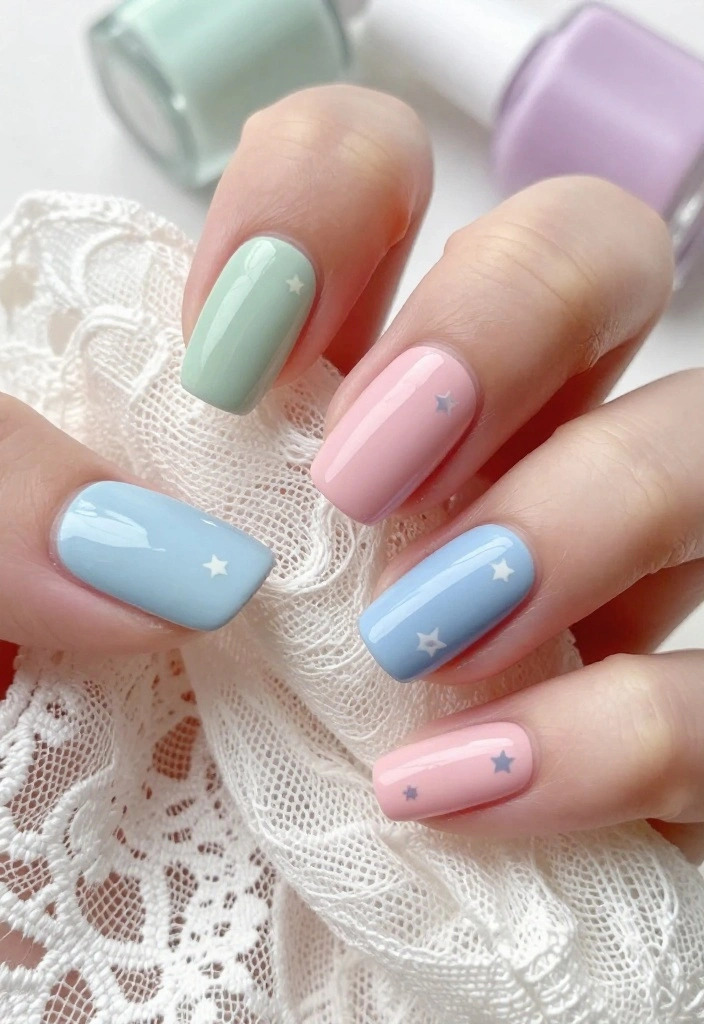
22. Twinkling Stars
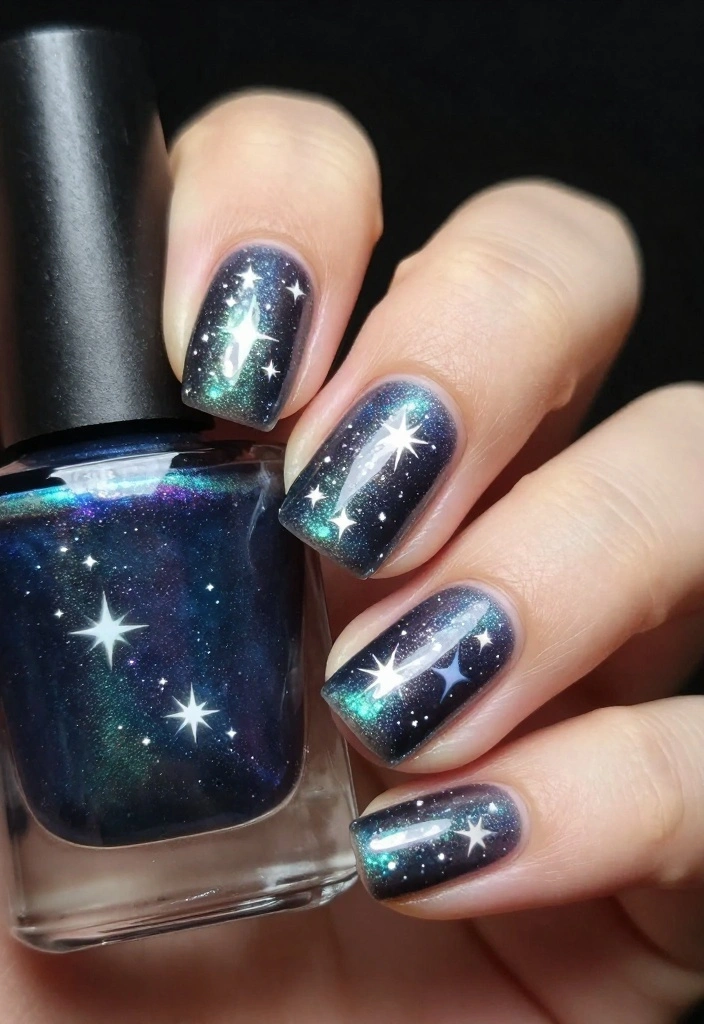
Bring the night sky to your nails with twinkling stars nail art that adds a whimsical touch to your style! This enchanting design features tiny stars scattered across your nails, perfect for dreamers and stargazers.
Start with a dark base like navy or black to mimic the night sky, creating a stunning backdrop for your starry accents.
Outfit Pieces:
– Dark base coat (navy or black)
– White or metallic polish for stars
– Glitter (optional)
Styling Tips:
– Apply a dark base coat on clean nails for a dramatic effect.
– Once dry, paint tiny stars using the fine brush or dotting tool for added charm.
– Optionally, add glitter to enhance the starry effect for extra sparkle.
– Seal with a top coat for lasting beauty.
Perfect for evening events, you can easily adjust the colors to suit your style!
23. Whimsical Whirls
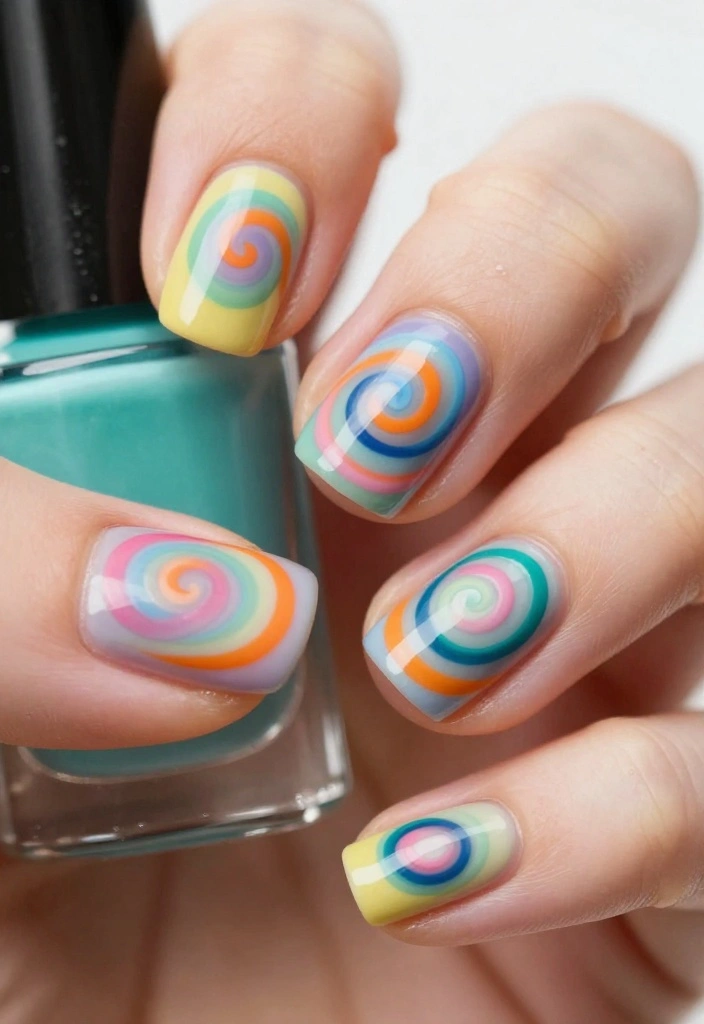
Add a playful twist to your style with whimsical whirls nail art! This design combines swirls and loops to create fun patterns that are full of personality.
Start with a base coat of your favorite shade, then experiment with contrasting colors to create swirling designs that reflect your creativity.
Outfit Pieces:
– Base coat in your preferred color
– Nail polishes in contrasting colors for swirls
– Fine brush for details
Styling Tips:
– Apply a base coat of your chosen nail polish for a vibrant backdrop.
– Once dry, create swirling patterns using the fine brush for added fun.
– Experiment with colors and shapes to make each nail unique.
– Seal with a top coat for durability.
This design is perfect for playful outings, and you can easily switch color combinations for a fresh look!
24. Lace Elegance
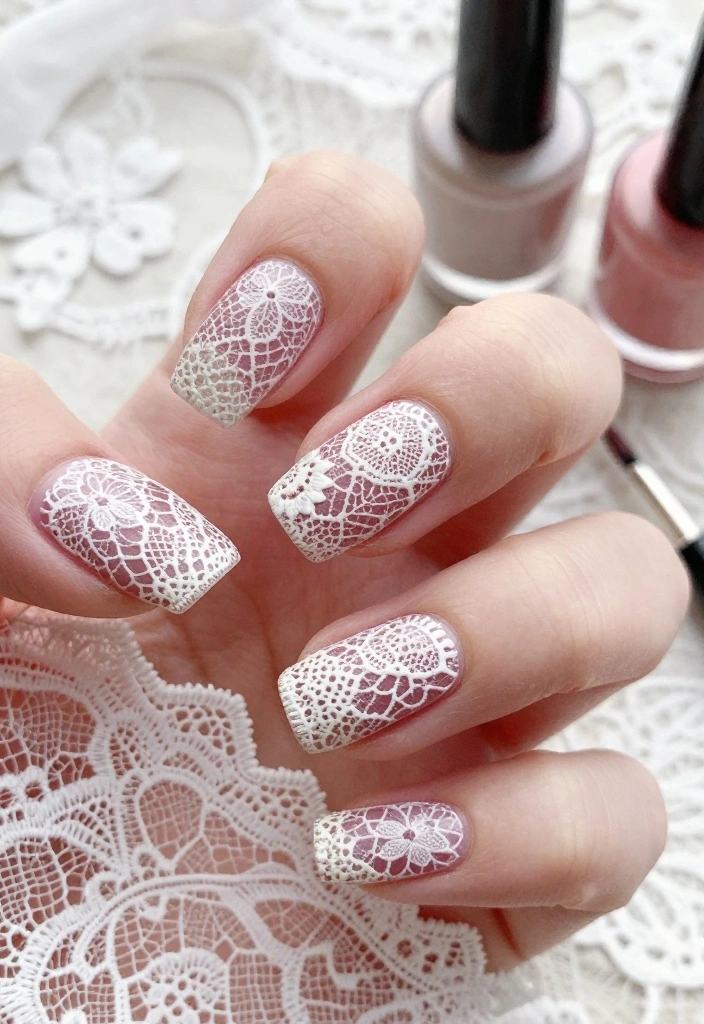
Embrace sophisticated beauty with lace elegance nail art that brings a touch of romance to your fingertips! This design mimics delicate lace patterns, perfect for weddings or special occasions.
Start with a light base coat in soft shades like white, pink, or beige, creating a perfect canvas for your intricate designs.
Outfit Pieces:
– Light base coat (white, pink, beige)
– Nail polish for lace designs
– Fine brush or stamping tools
– Glitter top coat (optional)
Styling Tips:
– Apply a light base coat on clean nails to set the tone.
– Once dry, create lace patterns using a fine brush or stamping tools for precision.
– Optionally, apply a glitter top coat for extra elegance.
– Seal with a top coat for lasting beauty.
This design is ideal for special occasions, and you can easily customize lace patterns to fit your style!
25. Colorful Confetti
Celebrate your style with colorful confetti nails that are as fun as they are eye-catching! This design adds a festive flair to your manicure, making it perfect for parties or celebrations.
Start with a solid base coat color, then use a dotting tool to add vibrant dots across your nails that mimic confetti.
Outfit Pieces:
– Solid base coat in your chosen color
– Various nail polishes for confetti
– Dotting tool
Styling Tips:
– Apply a solid base coat on clean nails for a vibrant backdrop.
– Once dry, use the dotting tool to add colorful dots across the nails for a fun effect.
– Experiment with color combinations for added flair.
– Seal with a top coat for a glossy finish.
Perfect for celebrations, you can easily adjust colors to reflect your festive spirit!
Conclusion
With these 25 nail tutorials, your next nail art adventure is sure to be an exciting one! Each design offers a chance to express yourself and showcase your individuality.
Don’t hesitate to mix and match ideas to create something uniquely yours. Whether you’re someone who loves bold colors or prefers subtle elegance, there’s a design here for every style. Dive in and have fun creating your next nail masterpiece!
Frequently Asked Questions
Question: Which nail tutorials are the easiest for beginners, and how can I start practicing today?
Answer: If you’re new to nail tutorials, start with simple looks and gradually move to more creative nails ideas. Try a solid color with a single accent nail, simple dots, or thin stripes. Here’s how to begin:
1) Gather essentials: base coat, top coat, 2–3 solid polishes, a dotting tool or a bobby pin, striping tape, and a nail file. These basics keep nail tutorials approachable and let you explore nail art ideas without overwhelm.
2) Prep nails: shape, buff, push back cuticles, and clean. 3) Apply thin base coats, let dry, then add the design in light layers. 4) Create simple designs: solid with an accent nail, dots, or stripes using tape. 5) Seal with top coat to protect your design and keep your creative nails looking fresh. 6) Practice on swatches first to build confidence before trying designs on your actual nails.
Question: Which nail tutorial is #15 in the list, and how can I recreate it at home?
Answer: The article’s standout #15 design is a bold, eye-catching example of creative nails that you can recreate with everyday tools. To replicate it:
1) Gather: a couple of complementary polishes, thin striping tape, a dotting tool (or a toothpick), and a top/base coat. 2) Prep nails as usual. 3) Apply a clean base color and let it dry. 4) Use tape to block areas for color blocking, then paint the second color on the exposed sections. 5) Use a dotting tool or toothpick for tiny details or dots. 6) Remove tape carefully and finish with top coat. 7) If you don’t have striping tape, you can use a fine brush or make a DIY tape-free version with a steady hand. Practice on a swatch nail before applying to your real nails.
Question: What tools and nail art ideas are essential to try multiple nail tutorials on a budget?
Answer: You don’t need a huge kit to explore nail tutorials and nail art ideas. Start with these essentials: base coat, top coat, 2–4 polishes, a dotting tool or bobby pins, tape for clean lines, a small nail brush for details, and a kitchen sponge for gradients.
Budget-friendly tactics: use peel-off tape and household items as substitutes, repurpose old polish bottles into mini nail art tools, and watch for drugstore sales. Practice small designs on swatches first, then apply to nails.
Question: How long do these nail tutorials typically take, and how can I speed up the process without sacrificing quality?
Answer: Most beginner-friendly designs take about 20–40 minutes per hand, while more complex creative nails may push to 60 minutes. To speed up: 1) prep nails in advance (shape, buff, cuticles) so you can dive into design without backtracking. 2) Use thin coats and let each layer dry to avoid smudges. 3) Group tasks by pass: base color on all nails, then do accents on each nail, then seal with top coat. 4) Keep a quick-dry nail art ideas set: top coat near the end, and use a fast-drying top coat. 5) Practice makes faster, so repeat designs on swatches before your nails.
Question: How can I adapt these nail tutorials to match outfits and seasons with creative nails?
Answer: Great question. Your nails are the tiniest accessory and can echo your wardrobe with nail art ideas that stay fresh. Try seasonal palettes (pastels for spring, bolds for summer, warm neutrals for fall, moody tones for winter) and coordinate with outfits. For daily versatility, pick a base color and add a flexible accent, like one nail with a simple design that can pair with multiple looks. Accessorize with subtle creative nails elements (dots, lines, or a small geometric shape) that can be swapped as your outfits change.
Related Topics
nail tutorials
creative nails
nail art ideas
beginner friendly
easy designs
trendy nail art
seasonal styles
advanced techniques
minimalist nails
colorful patterns
quick nail art
themed nail designs
I loved this post! I’ve been looking for new nail designs to try, and these tutorials are so inspiring. Which design do you think is the easiest for a beginner like me?
These nail ideas are fabulous! I once tried to do a galaxy design and ended up with nails that looked like a toddler’s art project. What a mess! 😂