Winter is here, and with it comes the delightful charm of the holiday season. This time of year always reminds me of cozy evenings, warm drinks, and, of course, the sweet treats that make this season so magical. If you’re someone who loves to embrace winter vibes through your style, you’re in for a treat with this post on peppermint nails. Nothing captures the spirit of the season quite like nail art inspired by candy canes and peppermint treats.
Whether you’re attending holiday parties or just want to feel festive in your everyday life, this post is for you. You’ll find the perfect nail inspiration to elevate your look. I pulled together 25 peppermint nail designs that are fun, trendy, and perfect for showcasing your holiday spirit. From classic candy cane stripes to whimsical peppermint characters, there’s something here to please every nail art enthusiast.
Get ready to unleash your creativity and add some sweet flair to your winter look! With these ideas, you can easily transform your nails into a festive masterpiece that reflects your personality. Let’s dive into this delightful world of winter nails and find the perfect design for you!
Key Takeaways
– Discover 25 unique peppermint nail designs that capture the holiday spirit and winter vibes.
– Explore styles ranging from classic candy cane stripes to whimsical peppermint characters, ensuring there’s something for every taste.
– Get practical tips on how to recreate these designs at home or ideas for your next salon visit.
– Learn how to incorporate seasonal colors and patterns into your nail art to keep it fresh and festive.
– Find inspiration that not only brightens your nails but also uplifts your winter wardrobe.
Contents
- 1. Classic Candy Cane Stripes
- 2. Minty Fresh Ombré
- 3. Peppermint Swirls
- 4. Glittery Peppermint Bliss
- 5. Peppermint French Tips
- 6. Icy Peppermint Drapes
- 7. Peppermint Themed Nail Art
- 8. Peppermint Dots
- 9. Peppermint Plaid
- 10. 3D Peppermint Candy
- 11. Frosted Peppermint Tips
- 12. Peppermint Animal Print
- 13. Peppermint Hearts
- 14. Whimsical Peppermint Characters
- 15. Snowy Peppermint Delight
- 16. Layered Peppermint Designs
- 17. Snow Globe Peppermint
- 18. Peppermint Holiday Wishes
- 19. Peppermint Affair
- 20. Peppermint Sparkle
- 21. Peppermint Mosaic
- 22. Peppermint Frosted Ombre
- 23. Peppermint Ribbon
- 24. Peppermint Gifts
- 25. Peppermint Wonderland
1. Classic Candy Cane Stripes
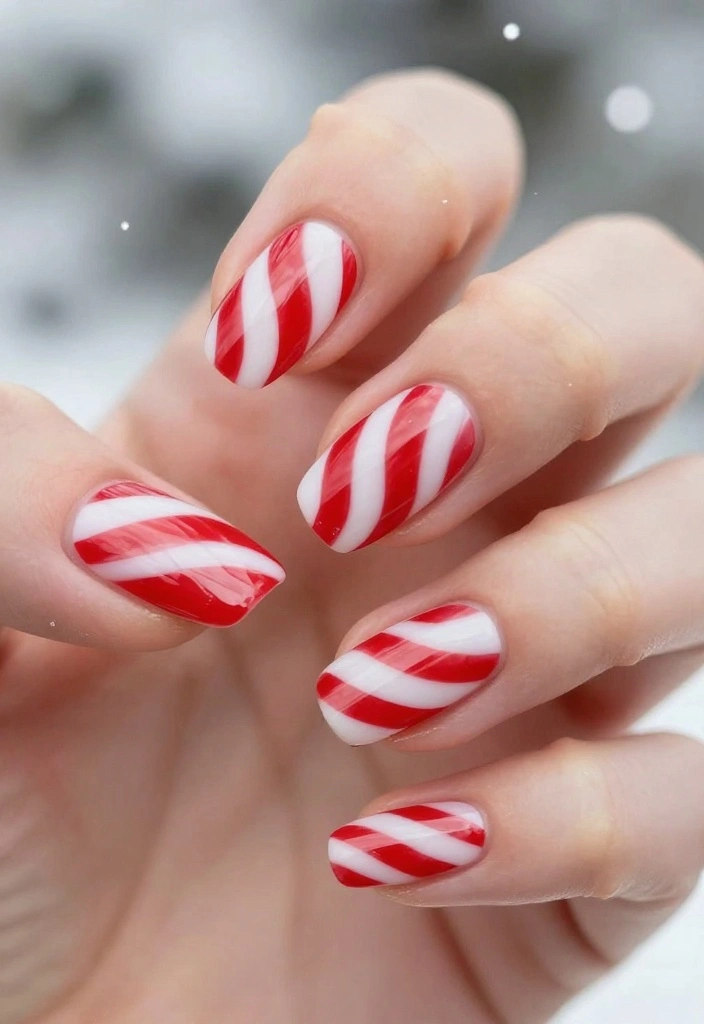
Dive into the festive spirit with the classic candy cane stripes! This design showcases striking red and white diagonal stripes that instantly invoke holiday cheer. The bold contrast makes it a standout choice for any occasion, ensuring your nails are as festive as your spirit.
Achieving this look is simple. You can create these stripes by alternating colors or using tape for precision. The result is a playful yet elegant nail art that captures the essence of the season.
Start with a base coat and let it dry completely.
Paint two coats of white polish on your nails.
Once dry, tape off diagonal sections and paint the exposed areas with red polish.
Remove the tape carefully before the polish dries for clean lines.
Finish with a glossy topcoat.
Absolutely! Acrylic paint is perfect for fine lines and intricate details.
2. Minty Fresh Ombré
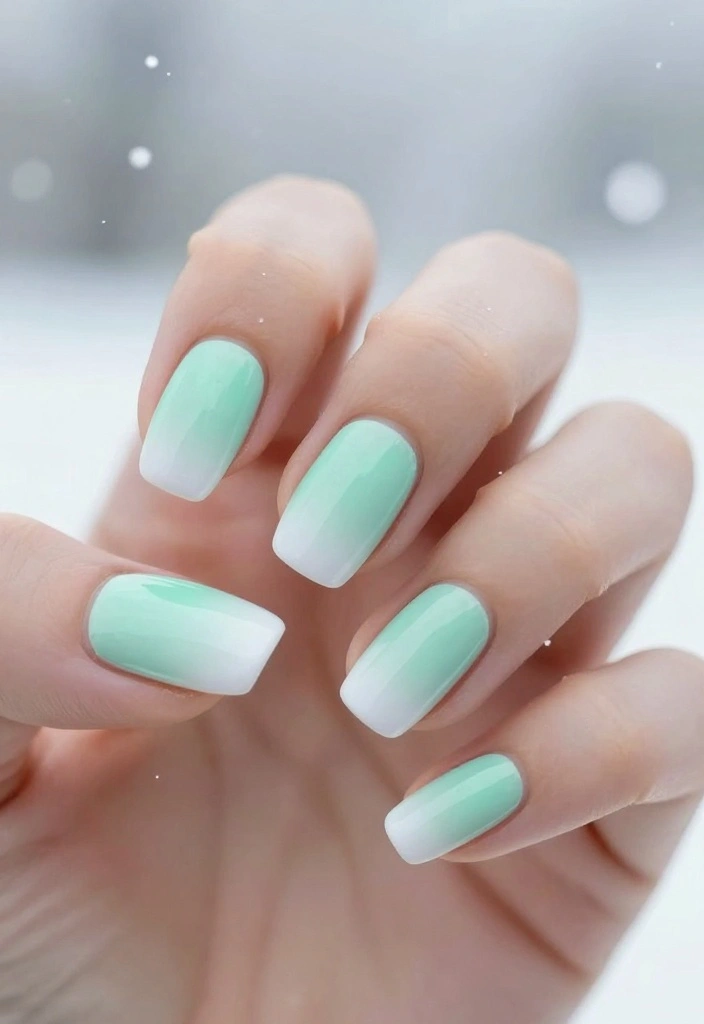
Introduce a cool twist to your peppermint nails with a minty fresh ombré design! This stunning look transitions from soft peppermint green at the cuticle to a crisp white tip, perfectly mimicking the chill of winter. The gradient effect not only looks fresh but also provides an elegant touch for any festive gathering.
To achieve the best blended effect, use a makeup sponge for a smooth transition. This technique will leave you with a dreamy ombré that’s both chic and festive.
Start with a sheer base coat to prepare your nails.
Paint your nails with a coat of white polish as the base.
On a makeup sponge, apply mint green and white polish in stripes.
Dab the sponge on your nails, blending the two colors together.
Seal with a topcoat for a glossy finish.
With a good topcoat, it can last up to a week without chipping!
Did you know a flawless ombré starts with tiny, quick stipples? Using a makeup sponge, you can blend peppermint green into white in under 5 minutes, achieving peppermint nails that look polished and festive.
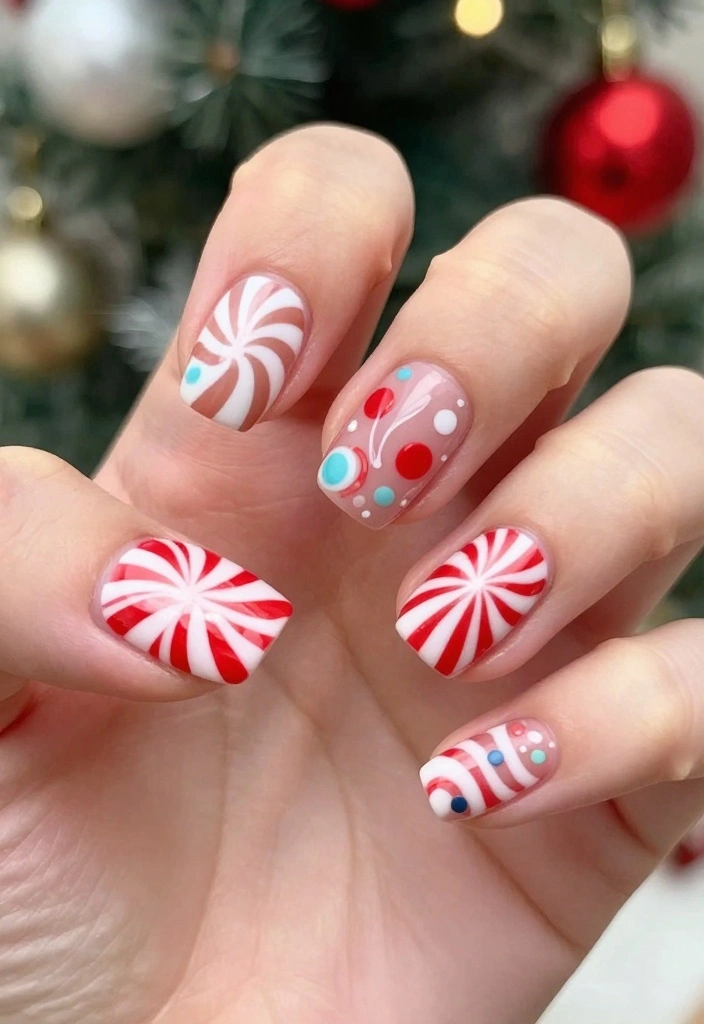
3. Peppermint Swirls
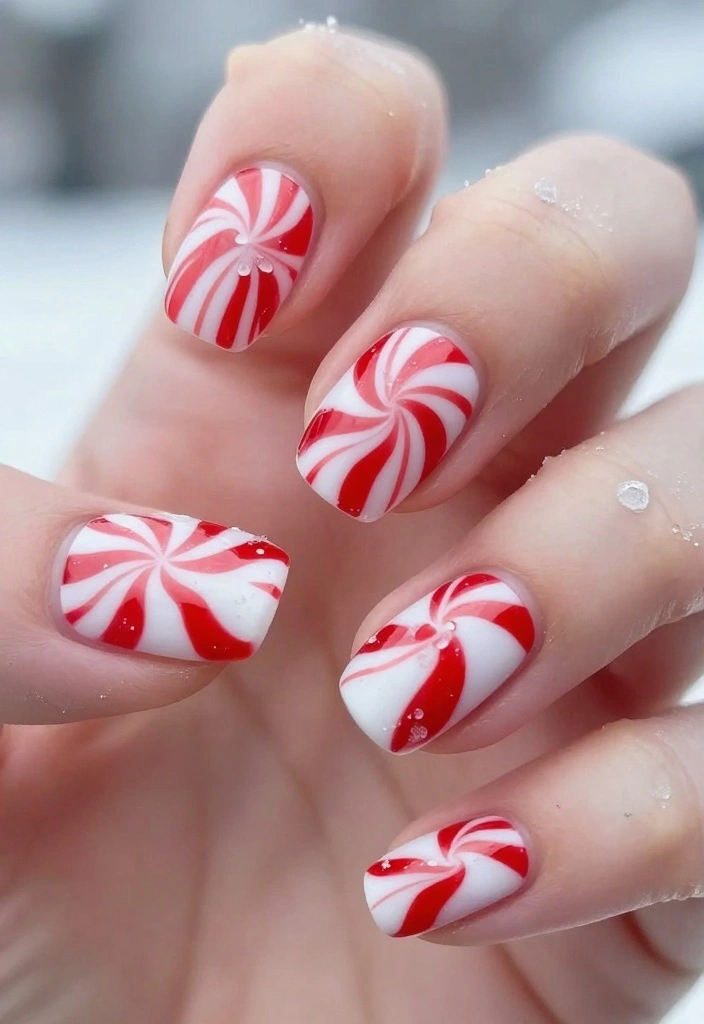
For a fun and whimsical design, peppermint swirls are the perfect choice! These delightful swirls can be created with a brush or dotting tool, forming playful patterns that resemble traditional peppermint candies. This design not only brings joy but also adds a unique flair to your holiday look.
Using a small nail art brush allows for better control over your swirls, and playing with sizes adds an exciting dynamic to your nails.
Start with a base color of white or light pink.
Using a fine brush, start drawing swirls in red polish on top.
Add smaller swirls or dots in between to fill the space.
Finish with a topcoat to protect your art.
While tape is typically used for straight lines, freehanding the swirls gives a more organic feel!
4. Glittery Peppermint Bliss

If you adore sparkle, glittery peppermint bliss will be your go-to! This design combines classic peppermint colors with glitter for a dazzling effect, perfect for festive celebrations. Starting with a white base and layering red glitter on top gives your nails that magical holiday vibe.
For the best results, apply glitter polish while the base coat is still tacky. This ensures the glitter adheres well and shines brightly.
Start with a clean base coat.
Apply two coats of white polish.
While the last coat is wet, apply red glitter polish generously over the top.
Pat down with a makeup sponge for even coverage.
Seal with a topcoat.
It can be tricky! Use a foil method with acetone for easier removal.
📹 Related Video: Glittery Peppermint Swirl Nails ❄️✨ | Easy Holiday Nail Art Tutorial
5. Peppermint French Tips
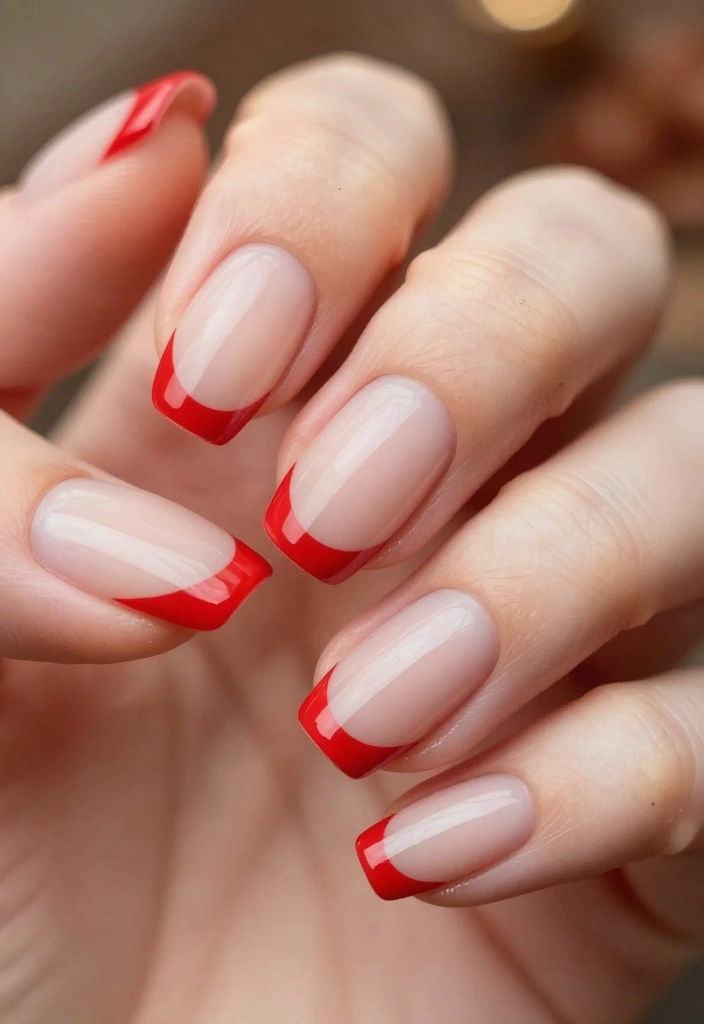
Put a festive spin on the classic French manicure with peppermint French tips! This design swaps the traditional white tips for bright red, bringing a fun candy cane vibe to your nails. It’s a perfect blend of elegance and holiday spirit, making it suitable for any occasion.
Ensure your nails are well-shaped for a neat finish, and consider using a matte topcoat for an updated look.
Start with a base coat and allow to dry.
Paint the entire nail with a nude or soft pink base.
Once dry, use striping tape or freehand to paint the tips red.
Seal with a clear topcoat for durability.
Using a good base and topcoat will help prolong the life of your manicure.
💅 DIY Nail Art Made Easy
Transform your busy schedule with this guide to stunning nail art that fits your lifestyle effortlessly.
6. Icy Peppermint Drapes
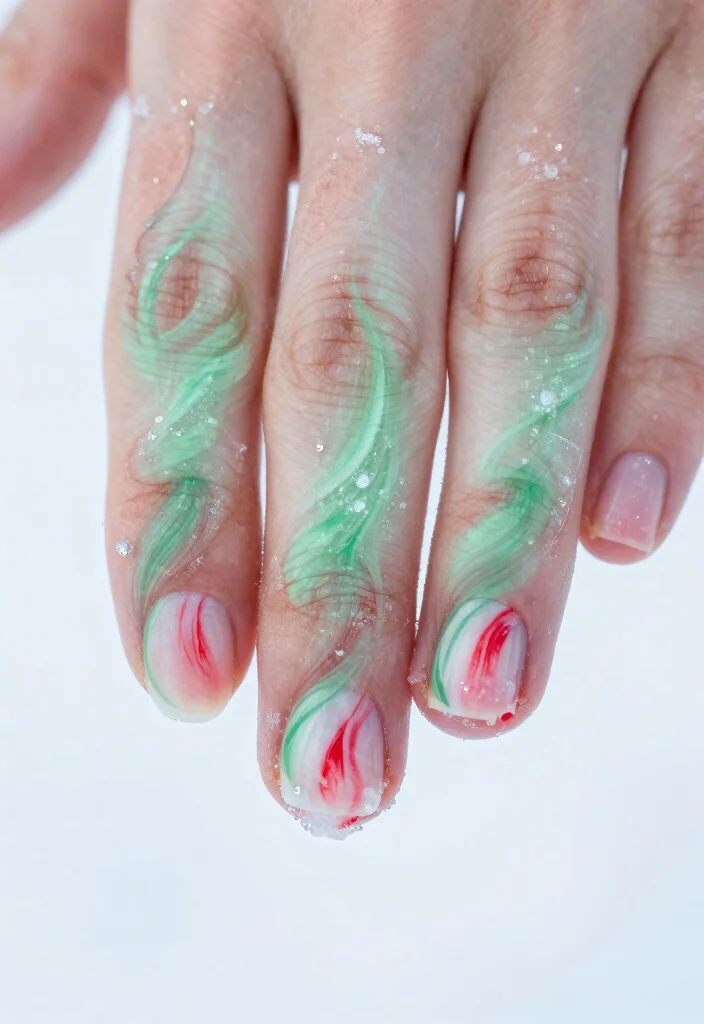
For a soft and frosty appearance, icy peppermint drapes are the way to go! This design showcases a white base adorned with gentle green and red accents, resembling delicate draped fabric. It’s a romantic style that captures the essence of winter beauty.
A fan brush is ideal for creating the drapery effect, allowing for intricate details that elevate your nail art.
Start with a clean base and apply white polish.
Use a fan brush to apply soft green and red strokes across the nail.
Blend slightly for a smooth drapery effect.
Seal with a glossy topcoat.
Yes! Just keep the drapes smaller for a balanced look.
7. Peppermint Themed Nail Art

Ready to go all out? Try a peppermint-themed nail art set! This design combines various peppermint elements such as candy canes, swirls, and candies on each nail, creating a festive and playful look. It’s a perfect way to showcase your holiday spirit and creativity.
Nail stamping plates can help you achieve precise designs, ensuring clear details without any hassle.
Prepare your nails with a base coat.
Apply a neutral polish for a clean canvas.
Utilize stamping plates or hand paint designs onto each nail.
Seal with topcoat.
With practice, you can achieve great results in less than 30 minutes!
8. Peppermint Dots
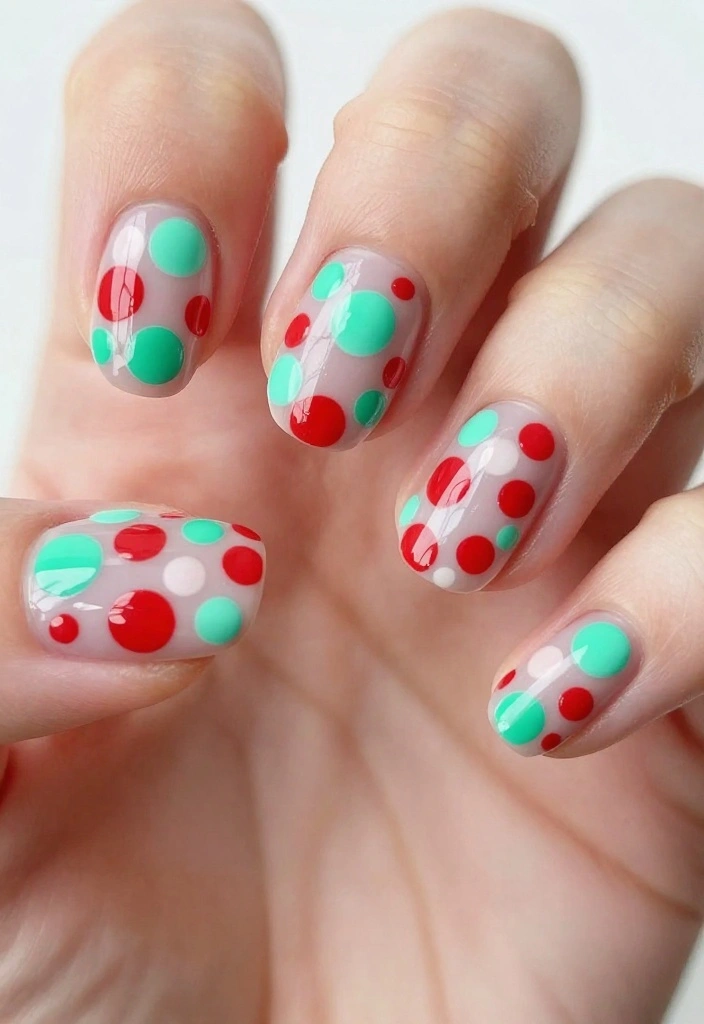
Add a fun twist to your nails with peppermint dots! This playful design features various sizes of red and green dots over a white or pale background, making for a cheerful and vibrant look. It’s an easy way to embrace the holiday spirit without being too over-the-top.
A dotting tool or even a bobby pin can help you create perfectly sized dots, simplifying the process.
Apply a solid base coat and let dry.
Use a dotting tool to create clusters of dots in alternating colors.
Play with sizes for added fun.
Seal with a clear topcoat.
No worries! You can always add more dots to cover them up.
How To Choose the Right Peppermint Nail Art Design
Choosing the perfect peppermint nail design can be a fun yet challenging task. With so many options available, it’s essential to consider a few key factors that will help you nail the look you desire. Here are some essential tips to guide your selection process:
1. Consider the Occasion
Think about where you’ll be showing off your peppermint nails. Are you attending a holiday party, or are you looking for something more casual? If it’s a formal gathering, you might lean towards elegant designs like Peppermint French Tips or Glittery Peppermint Bliss. For everyday wear, playful designs such as Peppermint Dots or Whimsical Peppermint Characters might suit you better.
2. Choose Your Style
Do you prefer a classic or trendy look? Classic designs, like Classic Candy Cane Stripes, offer timeless appeal. In contrast, more modern styles, such as Peppermint Mosaic or 3D Peppermint Candy, can add a contemporary twist. Think about your personal style and what makes you feel confident.
3. Nail Length and Shape
Your nail length and shape can significantly impact how a design looks. Longer nails may allow for intricate designs like Layered Peppermint Designs or Peppermint Plaid, while shorter nails might benefit from simpler patterns such as Peppermint Dots or Frosted Peppermint Tips. Choose a design that complements your natural nail shape for the best effect.
4. Color Palette
While peppermint nails primarily feature red and white, don’t hesitate to get creative. Consider incorporating shades of green for a mintier look or adding glitter for extra sparkle. Look at your wardrobe and determine which colors you wear most often; matching your nails to your outfits can create a cohesive look.
5. Skill Level
Assess your nail art skills. If you’re a beginner, you might want to start with simpler designs like Peppermint Hearts or Peppermint Dots. Advanced nail artists can tackle more complex designs such as Peppermint Swirls or Peppermint Animal Print. Remember, practice makes perfect, so don’t be afraid to experiment!
6. Time Commitment
Consider how much time you want to invest in your nail art. Some designs, like Snow Globe Peppermint or Layered Peppermint Designs, may take longer to complete, while others, like Peppermint French Tips or Peppermint Gifts, can be done in a shorter time frame. Choose a design that fits your schedule.
Pro Tip: If you’re feeling creative but unsure where to start, browse through Pinterest or Instagram for peppermint nail inspiration. Save your favorite designs to create a mood board that captures your desired look. This can be a great way to visualize how everything will come together!
By keeping these factors in mind, you’ll be well on your way to choosing the perfect peppermint nail design for a sweet winter look! Happy nail painting!
9. Peppermint Plaid
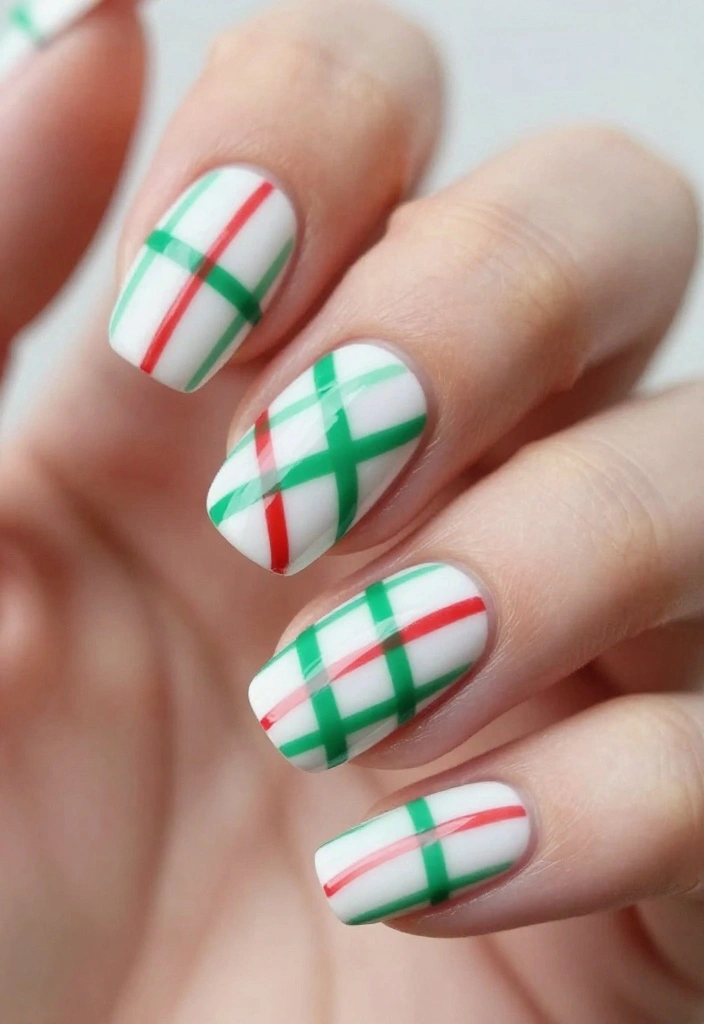
For a chic and trendy look, peppermint plaid is a stylish choice! This design incorporates the classic plaid pattern using peppermint colors, offering a fresh take on a timeless style. It’s perfect for winter without being overly festive, making it versatile for various settings.
Nail tape can help you achieve clean lines, and flat brushes are great for precision when painting the plaid pattern.
Start with a white base coat.
Carefully apply red stripes using tape and then fill in with green stripes.
Finish with a topcoat to add gloss and protect your design.
It takes a bit of practice, but once you master the tape technique, it’s a breeze!
10. 3D Peppermint Candy

If you want to make a statement, 3D peppermint candy nails are a must! This design features tiny 3D embellishments mimicking real peppermint candies, creating a playful and interactive look. It’s all about texture and fun, perfect for holiday parties and special occasions.
Using nail glue will help securely attach the embellishments, and choosing a contrasting base color will make them pop even more.
Start with a solid base coat and let dry.
Apply a layer of color polish.
Use glue to attach 3D candy pieces and let dry thoroughly.
Finish with a topcoat to secure everything in place.
With proper care, it can last several days without any issues!
11. Frosted Peppermint Tips
Frosted peppermint tips elevate the classic French manicure with a wintery twist! This design features soft minty green tips that create a frosted sheen, bringing a chill to your nails that’s perfect for the season. It’s a subtle yet festive option for those who prefer understated nail art.
Using a frost or shimmer polish adds an extra touch, enhancing the frosty look.
Apply a base coat and let dry.
Paint your nails with a nude polish.
Use minty green polish to create a frosted tip, blending slightly for a gradient.
Finish with a glossy topcoat for shine.
With a good topcoat, it should last just as long!
12. Peppermint Animal Print
Mix fun with festive by trying peppermint animal print! This design incorporates classic animal print patterns in peppermint tones, merging wild styles with holiday cheer. It’s a unique way to showcase your personality while embracing the spirit of the season.
A thin nail art brush is ideal for detailed designs, and taking your time will help perfect the patterns.
Apply a solid base coat with a white or nude polish.
Use a fine brush to create animal print patterns in red and green.
Seal with a topcoat to protect your art.
Yes! Stickers can be a great way to achieve the animal print look without painting freehand.
13. Peppermint Hearts

Celebrate the sweetness of the season with peppermint hearts! This charming design features heart shapes in red and white, creating a romantic yet festive aesthetic perfect for winter gatherings. It’s a delightful way to bring love into your holiday nail art.
A dotting tool works wonders for precise heart shapes, and mixing colors adds a playful touch.
Start with a white base coat.
Use a dotting tool to create heart shapes in red polish.
Fill in the hearts and let them dry completely.
Seal with a topcoat for a glossy finish.
Absolutely! They can save time and provide a neat look.
14. Whimsical Peppermint Characters

Unleash your creativity with whimsical peppermint characters! These designs can feature holiday favorites like snowmen, reindeer, or gingerbread men, all adorned with peppermint colors. It’s a fun and festive way to express yourself during the holidays.
Fine brushes are essential for detail work, and taking your time will yield the best results.
Start with a neutral base coat.
Paint your favorite character using a fine brush and peppermint-inspired colors.
Add details like eyes, a smile, and accessories.
Seal with a topcoat for durability.
Yes! Simple shapes work just as well and can be just as cute!
15. Snowy Peppermint Delight
Embrace the wonder of winter with snowy peppermint delight! This design features a pristine white base adorned with soft peppermint swirls and delicate snowflakes sprinkled around. It combines the charm of snowflakes with the joy of peppermint, making it a perfect holiday choice.
Use a small brush for the snowflakes to achieve a delicate, whimsical look that complements the swirls beautifully.
Paint your nails white as a base coat.
Use a fine brush to create peppermint swirls in red and green.
Add delicate snowflakes around the swirls.
Seal everything with a topcoat for a smooth finish.
Consider using a shimmery topcoat to give extra sparkle!
16. Layered Peppermint Designs

Layered peppermint designs bring depth and dimension to your nails! This style features a creative mix of peppermint elements, such as stripes, dots, and swirls stacked for a unique effect. It’s an exciting way to experiment with colors and patterns while celebrating the season.
Make sure each layer dries completely before adding the next to avoid smudging and ensure a clean finish.
Start with a base coat of your choice.
Apply white polish and let dry.
Layer different peppermint elements using red and green, allowing each to dry in between.
Finish with a topcoat to lock in your masterpiece.
Don’t panic! You can always paint over it after it fully dries.
Layering peppermint nails is half art, half science—let each layer dry fully. Start with a base coat, then white, then color your stripes and dots in peppermint hues. It’s a sweet, easy way to upgrade winter nails.
17. Snow Globe Peppermint
For a touch of magic, snow globe peppermint nails are a whimsical choice! This design features a transparent glitter topcoat over peppermint designs, mimicking the enchanting effect of a snow globe. It’s a fun and festive way to celebrate the season while showcasing your nail art skills.
Choosing a chunky glitter will enhance the snow globe appearance, capturing the light beautifully for a stunning effect.
Start with a white base coat and let dry.
Create peppermint designs using red and green polish.
Apply a layer of glitter polish on top to mimic the snow globe effect.
Seal everything with a topcoat for shine.
Tap your fingers gently while the polish is still wet.
18. Peppermint Holiday Wishes

Spread holiday cheer with peppermint holiday wishes! This design showcases cheerful words like ‘Joy’ or ‘Peace’ painted in peppermint colors, surrounded by festive accents. It’s a personalized touch that makes your manicure special for the season.
Using a fine brush for lettering ensures simplicity and readability, making the message clear and festive.
Start with a white base coat.
Use a fine brush to paint your chosen words in peppermint colors.
Add small decorations like snowflakes or hearts around the words.
Finish with a topcoat for durability.
Yes! Nail stickers can be an easy alternative.
19. Peppermint Affair
For a romantic winter look, the peppermint affair design combines soft pink and red with mint accents, creating a harmonious blend of colors. This design is perfect for cozy date nights or winter gatherings, adding a touch of elegance to your look.
Using a matte topcoat gives a modern twist to the traditional shine, making your nails stand out subtly.
Start with a clear base coat.
Apply a soft pink polish and let dry.
Create peppermint elements using red and green accents.
Finish with a matte topcoat.
Simply brush it over your finished design and let it dry!
20. Peppermint Sparkle

Add a glamorous touch with peppermint sparkle! This design features glittery peppermint swirls that are sure to catch the eye and draw compliments. It’s a festive choice for parties where you want your nails to shine bright and showcase your holiday spirit.
Choosing fine glitter will provide a more subtle shimmer, while chunkier glitter makes for a bolder statement. Both options are fun and festive!
Start with a base coat of white polish.
Create peppermint swirls using red and green polish.
Apply a layer of glitter on top of the swirls for a sparkly finish.
Seal everything with a topcoat for shine.
Yes! Just apply a layer of clear polish and sprinkle the glitter on before sealing it with a topcoat.
21. Peppermint Mosaic
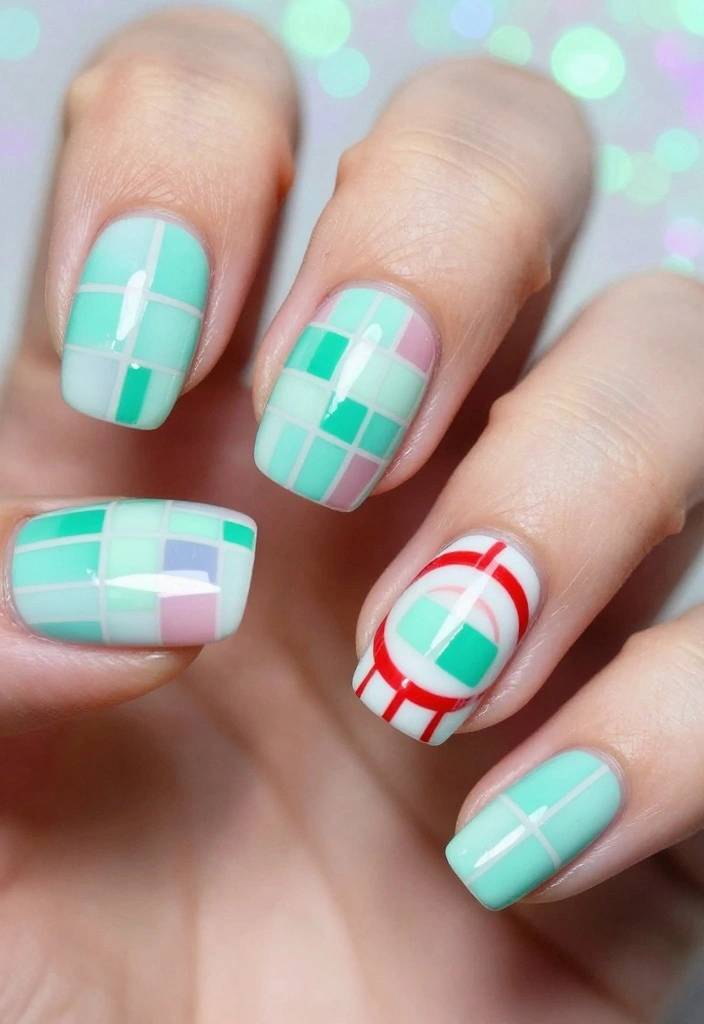
Try something unique with a peppermint mosaic! This nail design features small tiles or sections of peppermint patterns arranged in a mosaic style, creating a visually stunning effect. It allows for endless creativity and personalization, perfect for showcasing your holiday spirit.
Nail tape is essential for clean sections, and mixing different peppermint designs in each tile adds to the fun.
Start with a clean base coat.
Apply white polish and let dry completely.
Use tape to create sections and fill each with different peppermint designs.
Finish with a topcoat to lock in your art.
It may take a little longer, but the results are worth it!
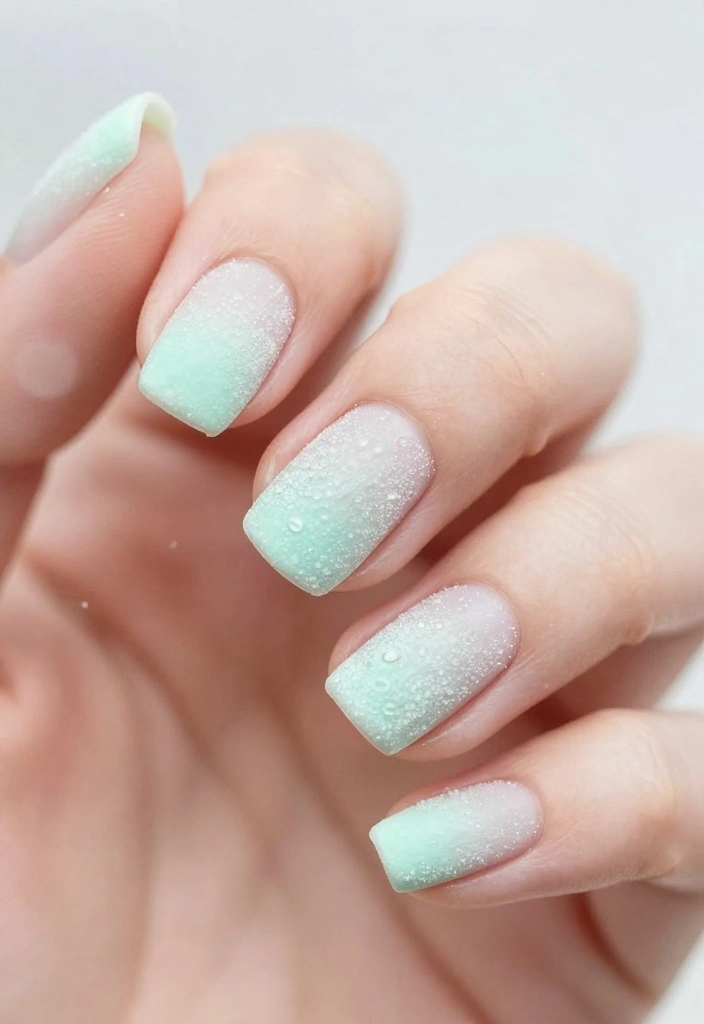
22. Peppermint Frosted Ombre
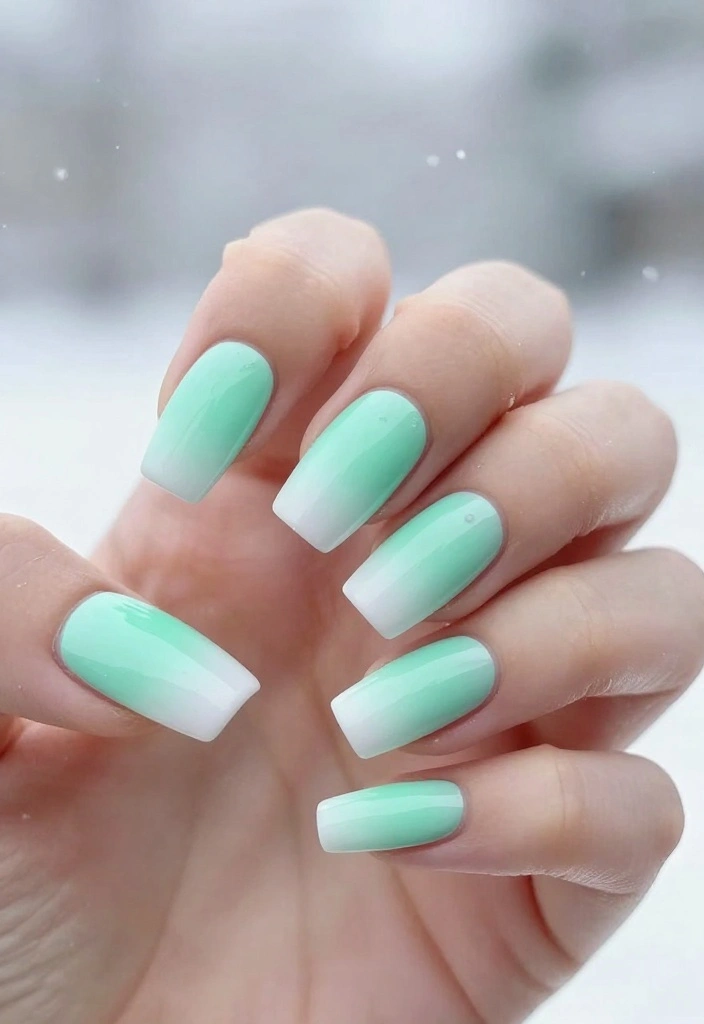
Combine the beauty of an ombré effect with peppermint charm in a frosted ombré design. This style offers a stunning gradient paired with frosty tips, resulting in a whimsical winter look that’s perfect for the holidays.
A sponge applicator will help achieve a smooth ombré effect, enhancing the overall appearance.
Start with a white base coat and let dry.
Use a sponge to apply a gradient of mint green to white.
Add a frosted topcoat for a wintery feel.
Seal with a clear topcoat to finish.
With proper care, it can last over a week without chipping!
23. Peppermint Ribbon
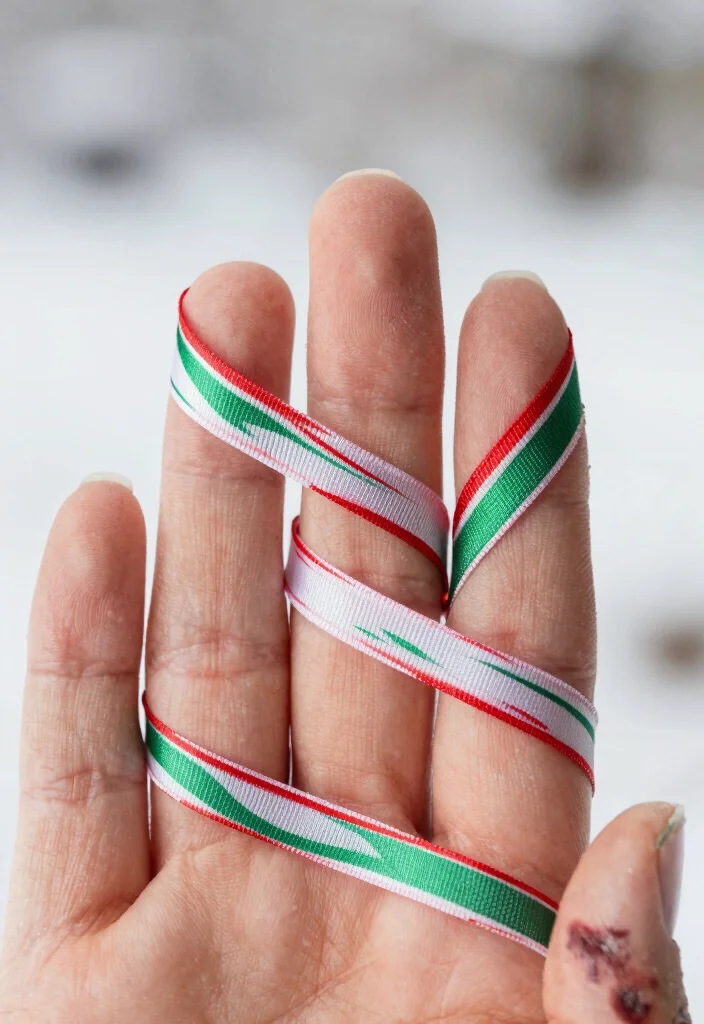
Create an elegant look with peppermint ribbon designs! This style features delicate ribbons in peppermint colors that weave beautifully across a neutral base. It’s a sophisticated choice that can be worn for any winter occasion, adding a touch of class to your nails.
A fine nail brush will help create smooth, flowing lines, enhancing the overall design.
Start with a nude or white base coat.
Use a fine brush to paint elegant ribbons in red and green.
Add little embellishments like dots for a polished look.
Seal with a glossy topcoat.
Absolutely! Get creative with different shades for a unique twist.
24. Peppermint Gifts
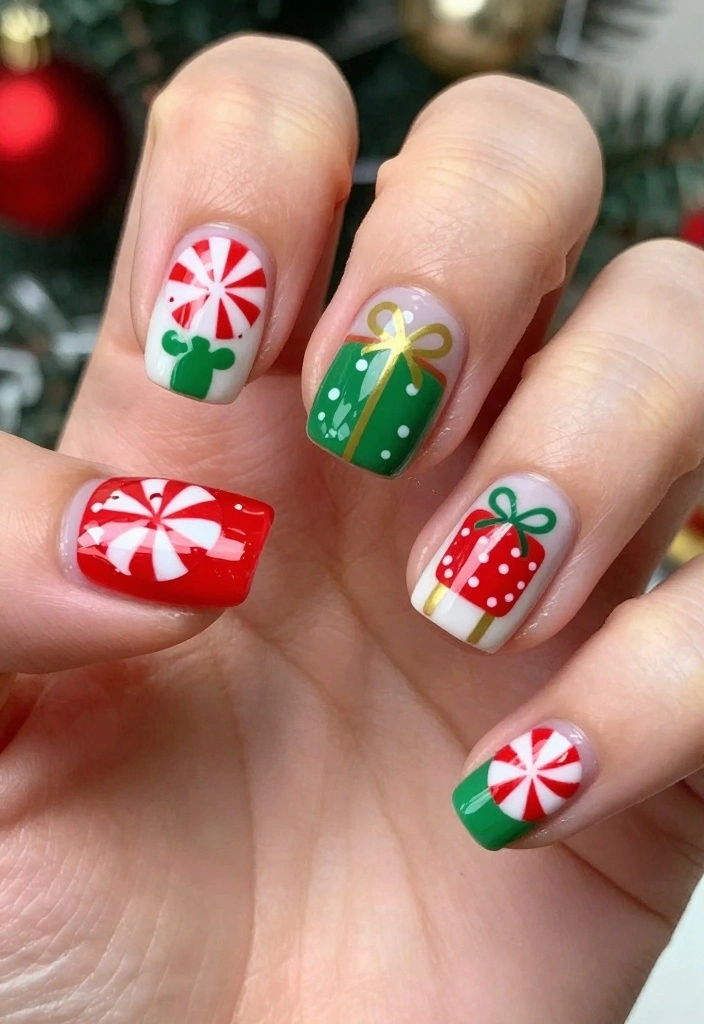
Celebrate the spirit of giving with peppermint gifts on your nails! This design features small gift boxes in peppermint colors, bringing a cheerful charm to your manicure. It’s perfect for holiday parties, adding a festive touch to your look.
A dotting tool allows for simple gift box shapes, making the design both fun and whimsical.
Start with a white or light base coat.
Using a dotting tool, create small gift box shapes in red and green.
Add ribbons and bows with a fine brush for detail.
Seal everything with a topcoat for longevity.
Yes! Stickers are a great quick alternative.
25. Peppermint Wonderland
Complete your peppermint journey with a full peppermint wonderland design! This style features an array of peppermint elements like swirls, stripes, and dots, creating a festive atmosphere that fully embraces the season. It’s ideal for those who want to stand out and showcase their love for peppermint.
Get creative and layer different techniques to create a vibrant look that’s uniquely yours!
Start with a solid base coat.
Mix different peppermint patterns across each nail.
Use a variety of colors and techniques for an eye-catching design.
Finish with a glossy topcoat.
Allow each layer to dry completely before applying the next.
Fun fact: Peppermint nails thrive when you mix 2–3 techniques—swirls, stripes, and dots—on every nail. Layering patterns creates a festive peppermint wonderland that reads bold on camera and stays fresh for days.
Conclusion

These 25 peppermint nail inspirations offer something for everyone, whether you prefer bold designs or subtle hints of holiday spirit. Each style reflects the joy and magic of the winter season, ensuring your nails are just as festive as your wardrobe. So grab your nail polish and get creative, because there’s no better time than now to show off your peppermint pride!
Happy nail painting!
Frequently Asked Questions
What exactly are peppermint nails, and how can I recreate the look from the 25 peppermint nail inspirations for a sweet winter look?
Peppermint nails are candy-cane inspired nail designs featuring red and white stripes, perfect for a cozy winter vibe and a fresh nail inspiration. To recreate the look, start with clean nails and a solid base color, then paint crisp red and white stripes using striping tape or a fine brush. Finish with a glossy top coat and let it dry fully. With one of the 25 peppermint nail inspirations as your guide, you can tailor the stripe thickness and placement to suit your style.
Try pairing a white base with red stripes for a classic peppermint effect, or switch to a red base with white stripes for a bolder twist. This classic peppermint nails look is a timeless winter nails idea that fits everyday outfits or party vibes.
What tools and products do I need to achieve crisp peppermint stripes at home?
Gather a base coat, two nail polishes (white and red), a top coat, and one of your favorite striping tools—striping tape or a thin nail art brush. A small dotting tool helps with clean edges, and a cleanup brush with polish remover keeps lines sharp.
Prep nails, apply base coat, paint your base color, then lay striping tape to guide the red and white stripes. Remove tape carefully, let dry, and seal with top coat. For a beginner-friendly approach, you can also use peppermint nail stickers, then layer with top coat for lasting shine. This is a practical, at-home way to achieve the classic peppermint nails look and build a cute winter nails collection.
How can I make peppermint nails last through the winter without chipping?
Longevity starts with a solid base. Use a good base coat, apply thin coats of your red and white polish, and finish with a durable top coat. Reapply the top coat every 2–3 days and seal the edges to prevent chipping. Wear gloves for chores like washing dishes or cleaning to protect your manicure in dry winter air. Keep nails moisturized with cuticle oil to prevent peeling. With these simple steps, your peppermint nails stay fresh longer as part of your winter nails routine.
Which nail shapes and base colors pair best with peppermint nails for a sweet winter vibe?
For a cozy winter look, try squoval or almond shapes—they balance the stripes nicely and feel sturdy. A white base with red stripes gives a classic peppermint feel, while a red base with white stripes creates a bold, candy-cane twist. If you want a subtler approach, use one accent nail with peppermint stripes on a neutral background. Finish with a glossy top coat to enhance the winter nails sparkle and keep the vibe fresh and playful.
Can peppermint nails be customized for short nails or nail art beginners?
Absolutely. Short nails shine with simple, clean peppermint designs. Use a single accent nail with stripes or keep the stripes on all nails but in thinner lines. For beginners, consider using peppermint nail stickers or decals to get crisp edges, then top coat to seal. Practice makes perfect: start with white and red stripes on a neutral base, and gradually try varying stripe thickness. This flexible approach keeps the peppermint nails idea accessible for anyone.
Related Topics
peppermint nails
winter nails
nail art inspiration
festive nail designs
holiday nail trends
easy nail art
colorful nail ideas
beginner friendly
cute nail styles
seasonal nail looks
DIY nail designs
trendy nail art
I love all the peppermint nail designs you shared! They make me want to try something festive for the holidays. Have you ever tried doing nail art with a friend? It’s so much fun!
These peppermint nails are too cute! I tried a candy cane design last year, but it ended up looking more like a jumbled mess. I guess my nails just wanted to be abstract art instead! Speaking of which, how many candy canes do you think you can eat while doing your nails?
Did you know that peppermint oil is great for soothing headaches? I might just paint my nails while keeping a bottle nearby for when the holiday stress kicks in! What’s your favorite scent to use during winter?