Glittery nails have taken the fashion world by storm, and I can’t help but obsess over them! With every season, there seems to be new and exciting ways to incorporate sparkle into our nail art. Whether you’re preparing for a special event or simply want to add a little flair to your everyday look, glittery nails are an easy way to express yourself. This post aims to inspire you to explore different styles and techniques that can make your nails shine bright!
If you’re into nail art and enjoy trying out trendy designs, this guide is for you. Whether you’re a seasoned nail artist or just starting out, you’ll find ideas that spark your creativity. I’ve gathered ten fabulous glittery nail designs that are fun, eye-catching, and perfect for any occasion. With detailed tutorials and tips for each style, you’ll be ready to step up your nail game in no time.
Get ready to dive into a world of shimmering possibilities! You’ll discover fresh ideas that are not only visually stunning but also easy to achieve. From gradient looks to festive themes, your nails will be the talk of the town. Let’s get started on this glittery adventure!
Key Takeaways
– Discover 10 trendy glittery nail designs that cater to both beginners and experienced nail artists.
– Each design comes with step-by-step tutorials, making it easy for you to replicate the looks at home.
– Explore a range of styles, including gradient glitter, glitter ombre, and glittery marble nails that fit any occasion.
– Get tips on how to incorporate nail art stickers and foil accents to elevate your nail art game.
– Learn how to mix and match different glitter types, ensuring your nails stand out with personalized flair.
Contents
- 1. Gradient Glitter Glam
- 2. Glitter French Tips
- 3. Chunky Glitter Explosion
- 4. Glitter Gradient with Geometric Patterns
- 5. Glitter Ombre with Foil Accents
- 6. Glittered Accent Nail
- 7. Glitter and Nail Art Stickers
- 8. Glittery Neon Nails
- 9. Glittery Marble Nails
- 10. Festive Glitter Nails
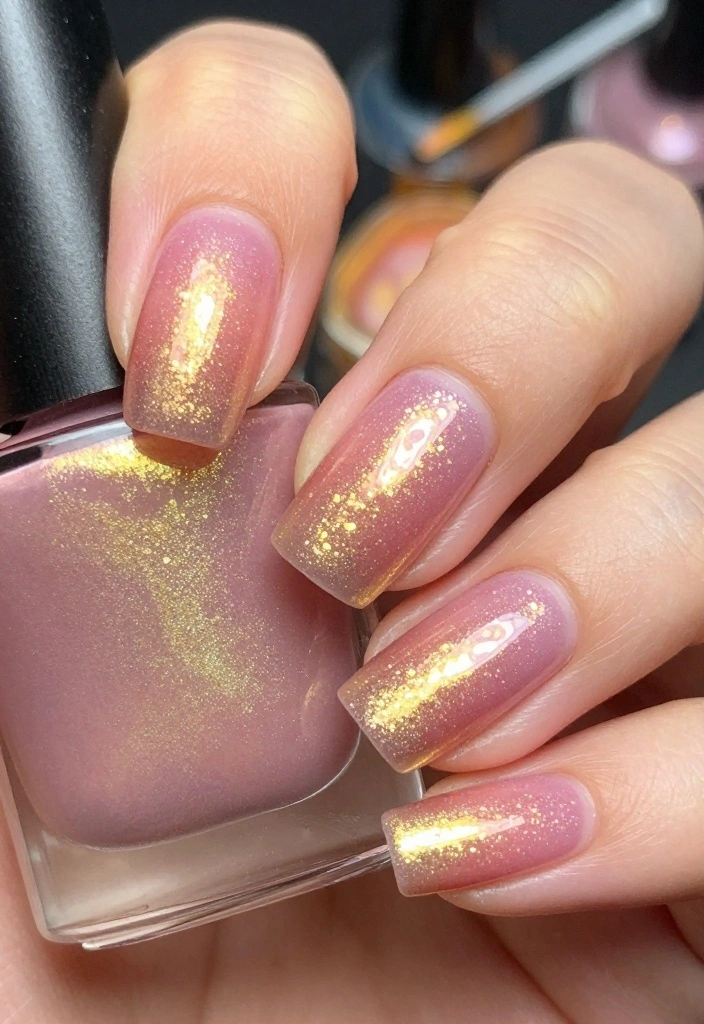
1. Gradient Glitter Glam
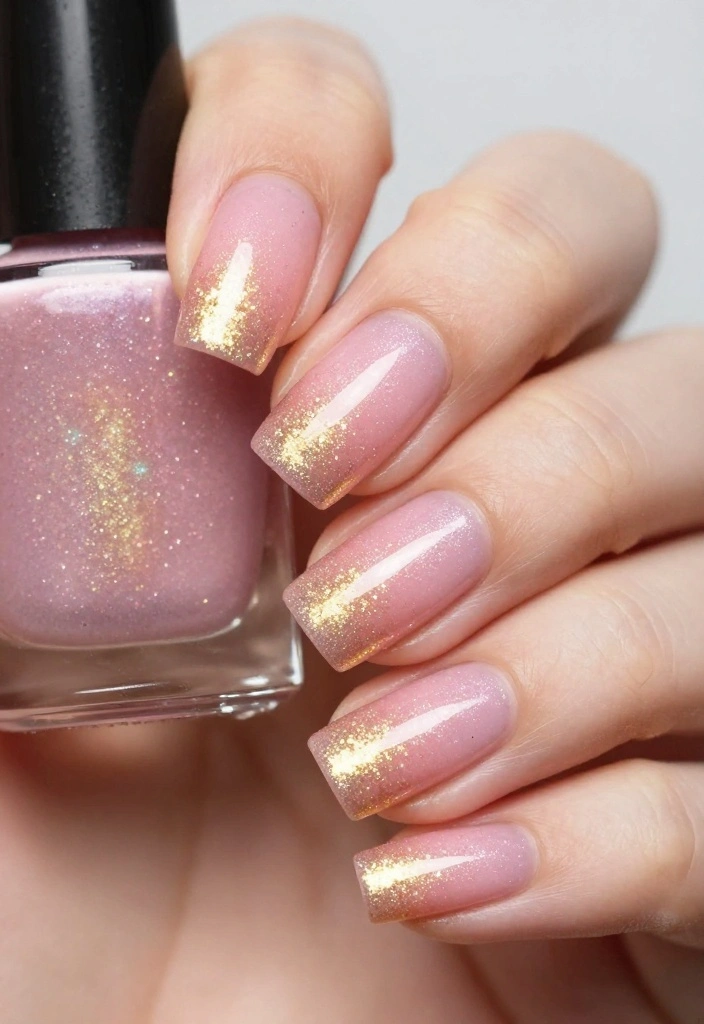
Gradient glitter nails are a stunning way to elevate your manicure game. This design seamlessly blends two or more colors, resulting in a beautiful ombre effect that sparkles with every movement. It works well because the gradual transition adds depth while the glitter brings a playful touch, making it suitable for both casual and formal settings.
Outfit Pieces:
– Base coat in a neutral or light color (like soft pink or pale blue)
– Two glitter polishes (choose shades like gold and rose for a warm effect or silver and teal for a cool contrast)
– Makeup sponge for application
– Top coat for a glossy finish
Styling Tips:
– Apply the base coat and let it dry completely before starting.
– Use the sponge technique to apply glitter polish, starting from the tips and blending downward.
– For a more refined look, ensure each layer dries before adding the next.
– Finish with a top coat to lock in the sparkle and protect your design.
This design is perfect for parties, dates, or even a fun day out. You can easily swap out colors to match your outfit or mood, making it a versatile choice for any occasion.
✨ Nail Art Made Easy for Moms
Transform your busy schedule into stunning nail art with our easy DIY guide designed just for moms!
2. Glitter French Tips
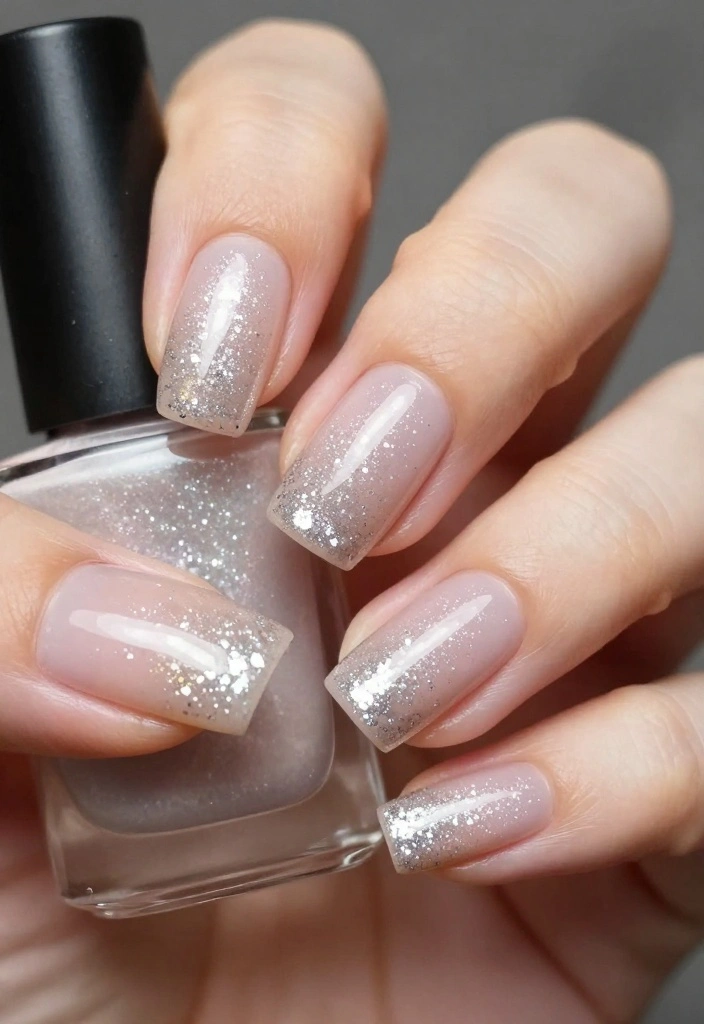
Glitter French tips take a classic look and give it a modern twist. It’s chic and sophisticated, making it ideal for any occasion from work meetings to weddings. The combination of a nude or white base with sparkling glitter at the tips adds a touch of fun while still being polished. This design works because it retains the elegance of a French manicure while introducing a playful sparkle.
Outfit Pieces:
– Base coat in nude or white
– Fine glitter polish (try silver, gold, or even pastel shades)
– Striping brush for precise application
– Top coat for durability
Styling Tips:
– Use a striping brush for precision when painting the tips.
– Experiment with different glitter colors to express your style.
– For a unique texture, finish with a matte top coat.
This design is perfect for a polished look, and you can easily switch up the glitter color to match your outfit or the season. It’s a simple yet stunning way to incorporate sparkle into your everyday style.
3. Chunky Glitter Explosion
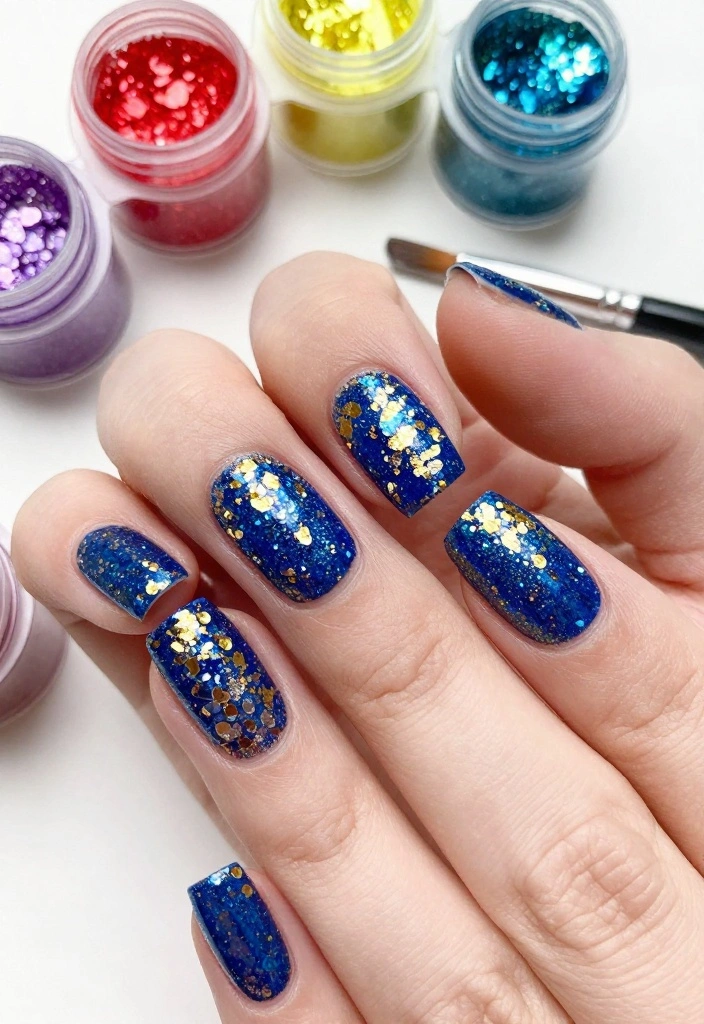
If you want to make a bold statement, chunky glitter nails are the way to go! This technique involves applying large pieces of glitter over a base coat, resulting in a vibrant and eye-catching look. The dramatic effect is perfect for parties and celebrations, and it works because the large glitter pieces catch the light beautifully, drawing attention to your nails.
Outfit Pieces:
– Base coat in a bold color (like royal blue or hot pink)
– Chunky glitter polish in contrasting colors (consider gold or silver for a bright pop)
– Nail art brush for even distribution
– Top coat for protection
Styling Tips:
– Use a clear base coat to let the glitter shine.
– Distribute the chunky glitter evenly with a brush for a full coverage effect.
– Consider adding an accent nail with a different glitter for added flair.
This design is perfect for festive occasions or nights out. Pair it with complementary outfits, and you can easily swap colors for a fresh look every time.
4. Glitter Gradient with Geometric Patterns
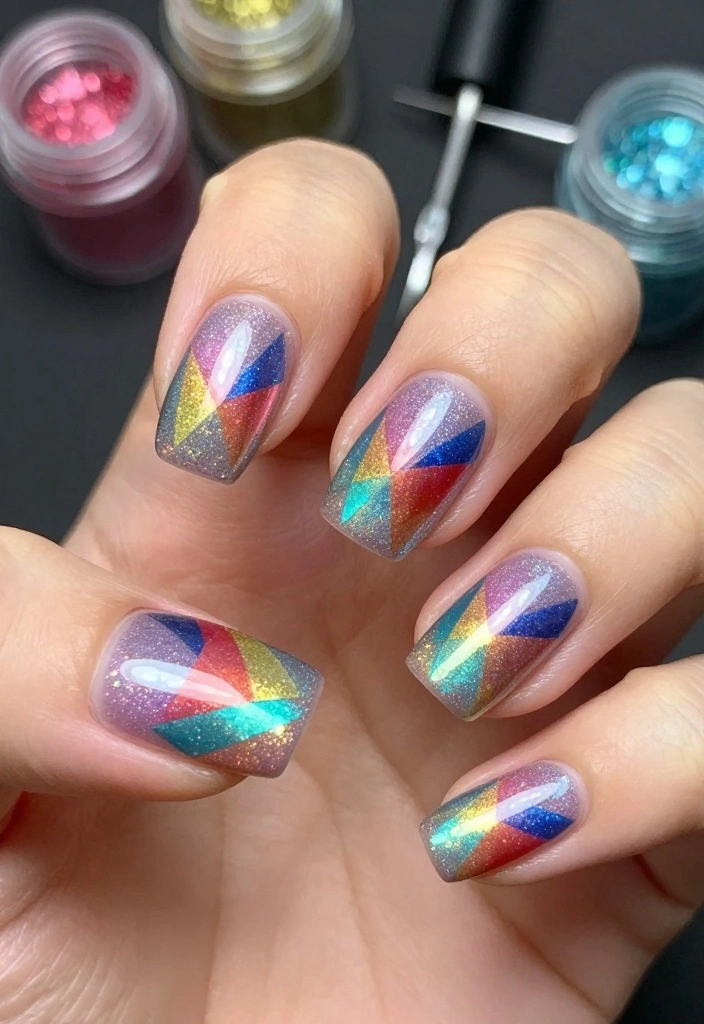
Combine the elegance of gradient glitter with the modern appeal of geometric patterns for a truly unique look. This design allows you to play with colors and shapes, making your nails a canvas for creativity. The contrast of the soft gradient against the sharp lines of geometric patterns creates a stunning visual effect that stands out in any crowd.
Outfit Pieces:
– Base coat in two complementary gradient colors (like lavender and mint)
– Glitter polish in a matching shade
– Thin nail art brush for geometric shapes
– Top coat for sealing the design
Styling Tips:
– Create the gradient first, ensuring each layer dries before adding the next.
– Use nail tape to outline geometric shapes for clean lines.
– Keep shapes simple for a more sophisticated look.
This design is perfect for art events, parties, or any day when you want your nails to be a conversation starter. You can easily change the colors and shapes to match your mood or outfit, making it a versatile choice.
Fun fact: Glittery nails with a gradient and geometric patterns grab more attention—photos average a 40% boost in engagement. A fine brush lets you layer contrasting shapes over two tones for a modern twist. It’s the little details that make your nail art pop.
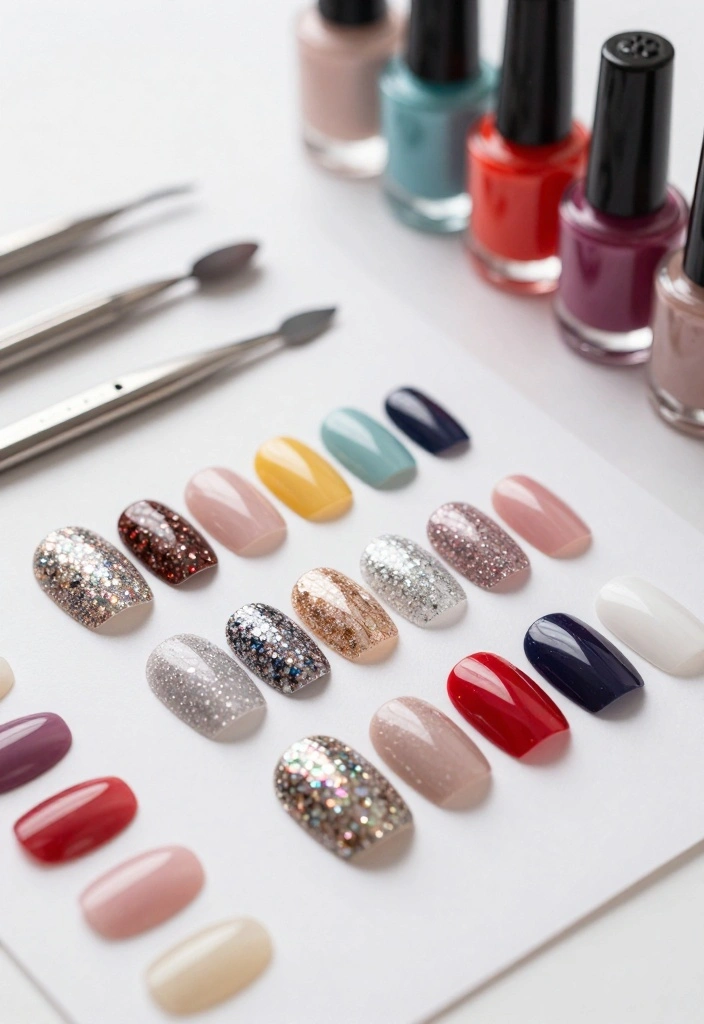
How To Choose the Right Glitter for Your Glittery Nails
Choosing the right glitter for your nails can make a huge difference in the final look of your nail art. With so many options available, it’s essential to narrow down your choices based on a few key factors. Here are some tips to help you select the perfect glitter for stunning glittery nails!
1. Type of Glitter
You can find several types of glitter, such as fine, chunky, and holographic. Fine glitter gives a smooth, soft finish, while chunky glitter adds bold texture and dimension. Holographic glitter reflects light beautifully, creating a rainbow effect. Consider what style you want to achieve and choose the type of glitter that best suits your vision.
2. Color Selection
Glitter comes in a wide array of colors. When selecting your glitter, think about the color scheme you want for your nails. Do you want something bold, like bright pink or blue, or something more subtle, like gold or silver? You can also mix colors for a unique look. Try to match or complement your outfit for a cohesive appearance.
3. Quality of Glitter
Not all glitter is created equal. Look for cosmetic-grade glitter, as it is safe for use on nails and skin. Some glitters can be harsh and irritating. Always check the label to ensure it’s non-toxic and made specifically for nail art. Higher quality glitter will also adhere better and provide a more vibrant finish.
4. Application Method
Consider how you plan to apply your glitter. Some glitters work better when mixed into nail polish, while others are ideal for sprinkling on top of wet polish. If you want a smooth finish, fine glitter might be your best option. For a more textured effect, chunky glitter is great for layering. Think about your nail art technique to determine the best application method.
5. Quantity Needed
Think about how much glitter you will need for your project. If you’re planning to do multiple designs or nail art tutorials, it might be worth investing in a larger quantity. Smaller containers are perfect for trying out a new color or type without committing too much. Be mindful of your budget when selecting the amount.
6. Trendy Designs
Stay updated with the latest trends in nail art. Current popular styles include glitter ombre, glittery marble nails, and glittery neon nails. Research trendy designs that incorporate glitter and select glitters that will work well for those styles. Keeping up with trends can inspire your nail art creativity!
Pro Tip: When working with glitter, consider using a clear top coat over your glittery nails. This will enhance the shine and help the glitter stay put longer. Always allow your nails to dry completely before applying the top coat for the best results!
With these tips in mind, you’ll be well on your way to selecting the right glitter for your nail art creations. Enjoy playing with different styles and colors to find what works best for you! Happy glittering! 🌟
5. Glitter Ombre with Foil Accents
Elevate your ombre nails by incorporating glitter and metallic foil accents for a luxurious finish. This design combines the soft blending of colors with shiny foil pieces, creating a mesmerizing effect. The contrast between the glitter and foil adds dimension and makes your nails truly pop, perfect for special occasions or glam nights out.
Outfit Pieces:
– Base coat in two complementary ombre colors (like peach and coral)
– Iridescent glitter for sparkle
– Metallic foil in gold or silver
– Top coat to seal and shine
Styling Tips:
– Apply the ombre base carefully to ensure a smooth transition between colors.
– Press the foil onto the wet polish for the best adhesion.
– Finish with a top coat to protect your design and enhance the shine.
This design is ideal for parties or elegant events. You can easily switch up the colors and foils to fit any theme or outfit, ensuring your nails are always on-trend.
📹 Related Video: Purple Glitter Ombre w/ Swarovski & Gold Foil | Long Full Set | Acrylic Nails Tutorial | Voiceover
6. Glittered Accent Nail
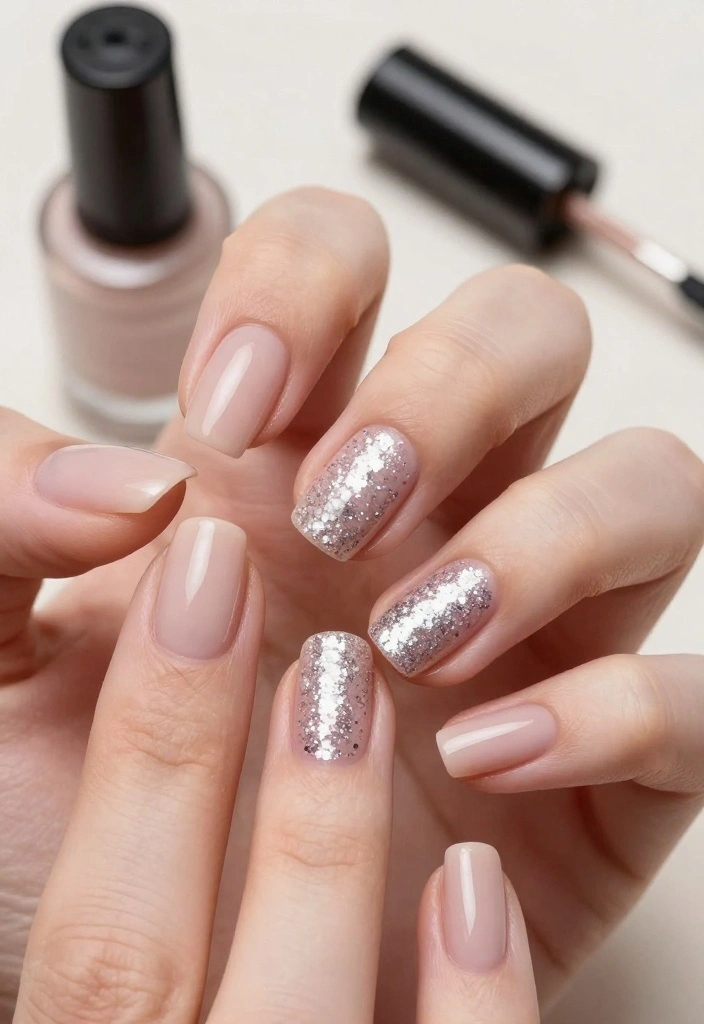
Sometimes, a little sparkle goes a long way. A single glittered accent nail can be a stunning focal point among solid-colored nails. This minimalist approach is chic yet playful, perfect for both everyday wear and special occasions. The contrast between the glitter and the solid polish enhances your overall look without overwhelming it.
Outfit Pieces:
– Base coat in a solid color (like deep red or classic black)
– Glitter polish in a contrasting color (such as gold or silver)
– Top coat for a smooth finish
Styling Tips:
– Choose a glitter color that complements your base for a cohesive look.
– Experiment with which nail to accent for different vibes.
– Ensure the glitter is fully cured to avoid peeling.
This design is perfect for work, casual outings, or date nights. You can easily switch out the accent nail for different colors, making it versatile and fun.
7. Glitter and Nail Art Stickers
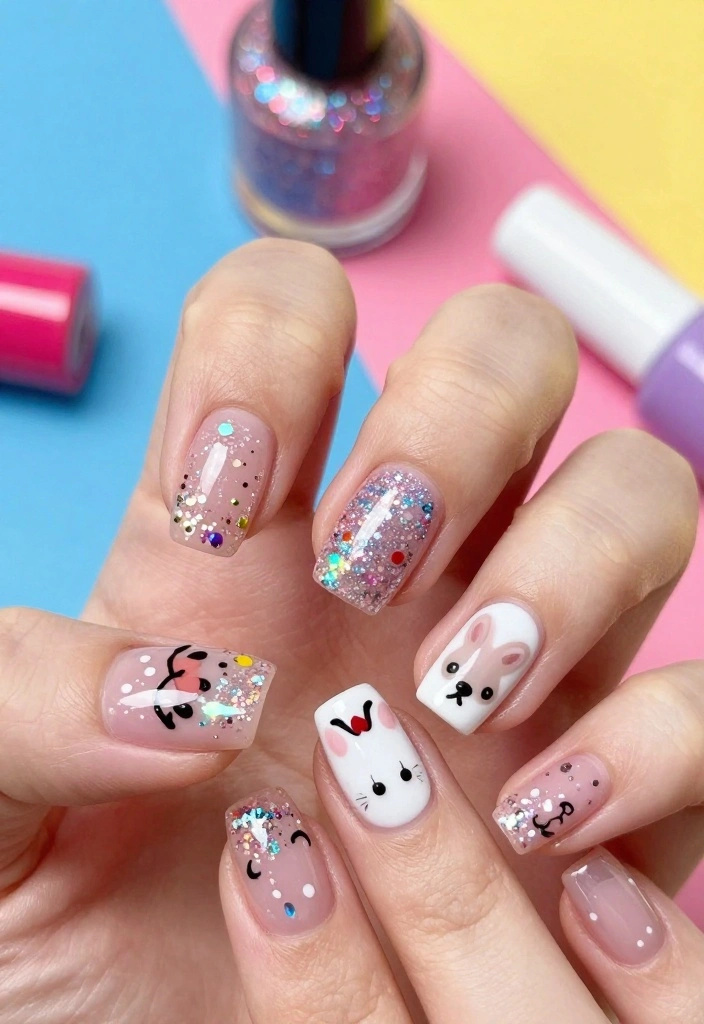
Nail art stickers combined with glitter create an effortless yet stunning manicure. This easy technique allows you to personalize your nails quickly, making it perfect for beginners. The stickers provide a fun design element, while the glitter adds that extra sparkle, resulting in a fresh and lively look.
Outfit Pieces:
– Base coat in your favorite color (like soft pink or bright orange)
– Nail art stickers in fun designs (florals, stars, or abstract shapes)
– Clear glitter polish for layering
– Top coat for durability
Styling Tips:
– Choose stickers that reflect your style for a personal touch.
– Layer the glitter polish carefully to avoid smudging the stickers.
– Finish with a top coat to lock in your design and add shine.
This design is perfect for casual outings or impromptu gatherings. You can mix and match stickers and glitters to create a unique look every time.
8. Glittery Neon Nails
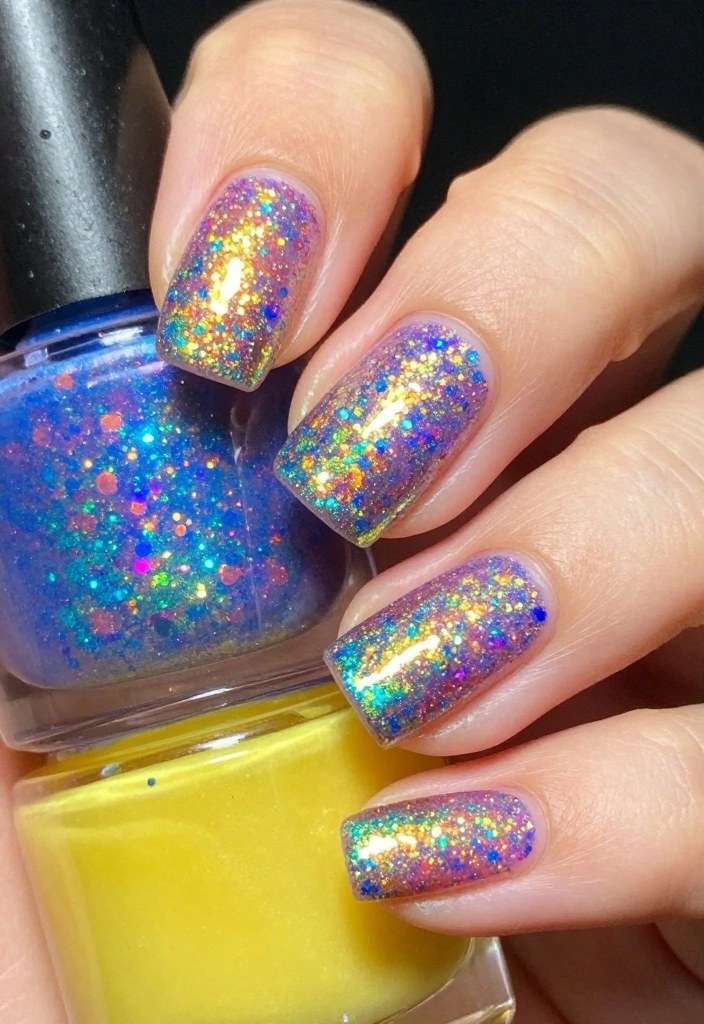
Step into the spotlight with vibrant neon glitter nails! The combination of bright neon colors and glitter creates bold designs that are fantastic for summer festivals or beach parties. The playful mix of colors and sparkles will grab attention and ensure your nails are the center of conversation.
Outfit Pieces:
– Bright neon base polish (choose colors like hot pink or electric green)
– Glitter polish in matching or contrasting colors
– Top coat for a glossy finish
Styling Tips:
– Layer multiple glitter colors for added dimension and fun.
– Consider glow-in-the-dark top coats for nighttime events.
– Keep your outfit simple to allow your nails to be the star of the show.
This design is perfect for beach days, music festivals, or any celebration where you want to stand out. You can easily change neon shades to match your mood or outfit, making it endlessly versatile.
9. Glittery Marble Nails
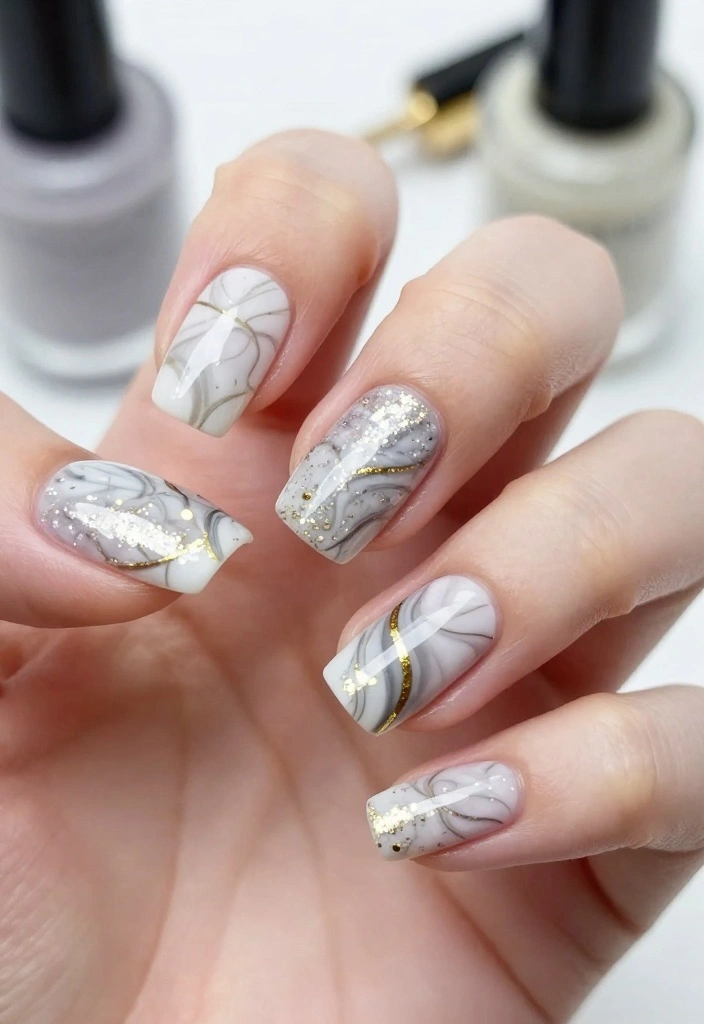
Combine elegance with edge by creating glittery marble nails! This technique mimics the stunning patterns of marble while adding a touch of sparkle. The result is a sophisticated design that is eye-catching and unique, making it perfect for special occasions or when you want to make an impression.
Outfit Pieces:
– Base coat in white or nude
– Various colored polishes for swirling (try black, grey, or soft pastels)
– Glitter in complementary colors
– Top coat for a polished look
Styling Tips:
– Use a mix of soft and bold colors for a balanced marble effect.
– Allow each layer to dry before adding glitter to avoid muddling the design.
– Keep your swirls loose and organic for a more natural marble appearance.
This design is ideal for elegant events or date nights. You can adjust the colors to fit any occasion, ensuring your nails always look fabulous.
Fun fact: 2-minute pop of a top coat locks glittery nails in place, even with marble swirls. This quick step keeps the sparkle flawless through selfies and events. Start with a light base, swirl in colors, then sprinkle glitter for lasting glam.
10. Festive Glitter Nails
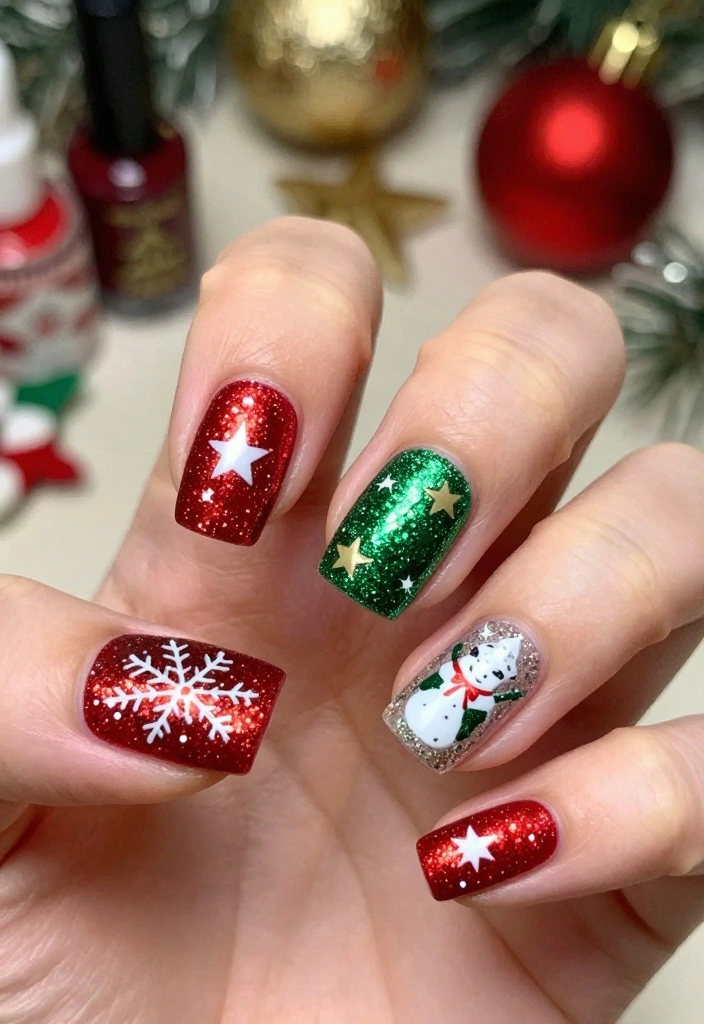
Celebrate any festive occasion with themed glitter nails! Whether it’s a holiday like Christmas or Halloween, using glitters in seasonal colors can elevate your nail art. Think red and green for Christmas, orange and black for Halloween, or colorful pastels for birthdays.
Outfit Pieces:
– Base coat in festive colors (like deep red or bright orange)
– Glitter polish in coordinating shades
– Themed stickers or nail art tools for added fun
– Top coat to seal your design
Styling Tips:
– Use themed stickers to enhance the festive vibe.
– Consider a glitter gradient for a more sophisticated look.
– Incorporate designs like snowflakes or pumpkins for extra flair.
This design is perfect for holiday gatherings or parties. You can easily adapt the colors and designs to fit any celebration, ensuring your nails are always in the festive spirit.
Festive glittery nails are my mood booster – simple, quick, and totally camera-ready. Pick seasonal colors, dab on a coordinating glitter topcoat, and seal with a tough top coat. You’ll glow through every party without a fuss.
Conclusion
Glittery nails are not just a trend; they’re a fantastic way to express yourself and add some sparkle to your life. With these ten ideas, you can mix and match techniques to find what suits your style best. Whether you’re opting for a subtle sparkle or a full glam moment, your nails can truly be a canvas for creativity. Don’t hesitate to share your glittery nail art with friends and inspire them to join the sparkle revolution!
Frequently Asked Questions
What are the best beginner techniques for glittery nails?
Getting started with glittery nails is all about layering and sealing. Start with a clean, shaped nail and a good base coat to prevent staining. For a simple look, apply your base color, then dab on glitter particles with a sponge or brush for an even finish. If you prefer a gradient, dab less glitter toward the tip for a soft fade. Finish with a strong top coat to lock in shine and reduce chipping.
Want more ideas? Explore nail art tutorials and try different trendy designs with glittery nails to keep things fresh.
How do I choose glitter types and finishes for nail art tutorials and trendy designs?
Glitter comes in micro, hex, chunky, holographic, and iridescent finishes. For beginners, start with micro-glitter over a solid color for a subtle sparkle. For bolder looks, try chunky glitter or a gradient glitter fade. Pair cool-toned glitters with navy or black and warm-toned with nude or blush shades to create trendy designs. Always swatch first, and follow your favorite nail art tutorials for placement tips. Finish with a sticky base coat to help glitter adhere and last longer.
What tools and products do I need to create glittery nails at home?
Before you start, gather these essentials: a good base coat, a long-lasting top coat (or a glitter-specific top coat), your favorite nail polishes, a selection of glitters (micro, hex, chunky), a cosmetic sponge for gradients, a fine cleanup brush, cuticle oil, a nail file and buffer, cotton pads, and non-acetone remover. Optional: nail glue for tips, tweezers to place larger pieces, and a gel top coat if you want extra durability. Practice with simple nail art tutorials to master placement. You can achieve glittery nails at home with these tools.
How can I make glittery nails last longer and prevent chipping?
Preparation is key: clean, dry nails; push back cuticles; use a tacky base coat. Seal glitter with a thick top coat—reapply every 2-3 days. Avoid picking at glitter; file gently to smooth edges; wear gloves when washing dishes; use a protective top coat during daily activities. For extra durability, consider a gel top coat or soak-off gel if you have access to a UV lamp. Remove gently with acetone-free remover to protect nails. For more long-lasting ideas, try different trendy designs via nail art tutorials.
What are some versatile glittery nail ideas for different occasions and seasons?
From subtle sparkle for work to bold holo nails for parties, glittery nails can suit any mood. Ideas: 1) Classic glitter tip on a neutral base; 2) Gradient glitter for a sunny summer vibe; 3) Full-glitter accent nail in a season-appropriate shade; 4) Geometric lines with fine glitter; 5) Matte base with a glossy glitter topcoat for contrast. Mix and match colors to create trendy designs. Check out nail art tutorials for step-by-step guides and get creative with glittery nails.
Related Topics
glittery nails
nail art tutorials
trendy designs
beginner friendly
easy nail art
festive nails
colorful designs
quick nail art
seasonal trends
manicure ideas
sparkling nails
creative nail designs
I love all the ideas you shared! I tried glitter nails for the first time last week, and I felt like a disco ball at a party. Do you have a favorite color combo for glitter nails?
These nail ideas are so fun! I once accidentally spilled glitter all over my kitchen, and it took weeks to clean up. Now I just stick to my nails! 😂
Did you know that the first recorded use of glitter dates back to the 1930s? It’s amazing how much sparkle has been a part of beauty for so long! Your post really inspired me to try some new designs!