Unlocking the secrets to beautiful acrylic nails is a journey many of us embark on, eager to express our style and creativity. The right nail forms can revolutionize your nail game, taking your acrylic nails from basic to breathtaking. This post is designed to guide you through twelve unique nail forms that not only enhance the appearance of your nails but also cater to your personality and lifestyle.
If you love nail art, fashion, or just want to elevate your manicure game, this guide is for you. Whether you’re a seasoned nail technician or a DIY enthusiast, understanding different nail forms is essential. You’ll discover shapes that suit every occasion, mood, and personal taste. This isn’t just about aesthetics; it’s about finding the perfect fit for your nails that allows you to express who you are.
Get ready to explore twelve nail forms that will inspire your next manicure. From the classic coffin shape to the modern edge look, you’ll learn what makes each style unique and how to achieve it. By the end of this post, you’ll have actionable insights to transform your acrylic nails into stunning works of art that turn heads and spark conversations.
Key Takeaways
– Explore Unique Shapes: Discover twelve diverse nail forms and how each can enhance your overall look.
– Tailored for Every Style: Learn which nail shapes align with different personalities and occasions, from the bold stiletto to the subtle round.
– DIY or Professional: Get tips on how to achieve these nail forms yourself or what to ask for at the salon for the best results.
– Creative Expression: Understand the impact of nail shapes on self-expression and how they can reflect your individual style.
– Trend Insights: Stay updated on current nail trends and timeless shapes that will keep your acrylic nails fashion-forward.
Contents
- 1. The Classic Coffin Shape – Perfect for Elegance
- 2. The Stiletto Shape – For Bold Statements
- 3. Square Shape – Timeless and Practical
- 4. Almond Shape – Soft and Feminine
- 5. Ballerina Shape – Modern and Unique
- 6. Lipstick Shape – Fun and Quirky
- 7. Round Shape – A Gentle Touch
- 8. Edge Shape – The Futuristic Look
- 9. Sharp Shape – Pure Drama
- 10. French Tip – The Classic Twist
- 11. Glitter Shape – Sparkle and Shine
- 12. Textured Nails – A New Dimension
1. The Classic Coffin Shape – Perfect for Elegance
Coffin nails are a stylish choice that seamlessly blend modern aesthetics with a chic edge. Their flat tips and tapered ends create a sophisticated silhouette, making them perfect for showcasing stunning nail art. This shape appeals to those who appreciate elegance with a touch of boldness.
What makes coffin nails so desirable is their adaptability. You can go for a sparkly design or keep it understated with a nude polish. They flatter various hand shapes, making them a popular pick for many nail enthusiasts.
Here’s why you should consider coffin nails:
– Stylish Aesthetic: They exude glam, perfect for any event.
– Design Opportunities: Their ample surface allows for creativity, from intricate art to bold colors.
– Length Variations: They can be short or long, catering to your personal style.
For optimal results, keep these tips in mind:
– Proper Length: Avoid overly long nails to reduce the risk of breakage.
– Regular Maintenance: Schedule fill-ins every few weeks to maintain a polished look.
2. The Stiletto Shape – For Bold Statements
Stiletto nails are the ultimate choice for making a bold fashion statement. Their sharp points and dramatic lengths add a fierce touch, making your fingers appear elongated and elegant. This style is for those who embrace their confidence and love to stand out.
Stiletto nails can be personalized with vibrant colors, metallic shades, or even 3D embellishments, allowing for endless creativity.
Here’s why stiletto nails are a must-try:
– Eye-Catching: Their unique shape grabs attention immediately.
– Personal Expression: They serve as a canvas for artistic designs, from abstract to floral.
– Trend-Setting: Celebrities often showcase stiletto nails, making them a fashionable choice.
To rock these nails effectively:
– Focus on Strength: Use high-quality acrylic for durability.
– Be Mindful of Length: Choose a length that suits your lifestyle to avoid breakage.
– Regular Care: Keep them polished and shaped to maintain their striking appearance.
💅 Nail Art Made Easy!
Transform your nail game with this DIY guide perfect for busy moms craving stunning acrylic designs.
3. Square Shape – Timeless and Practical
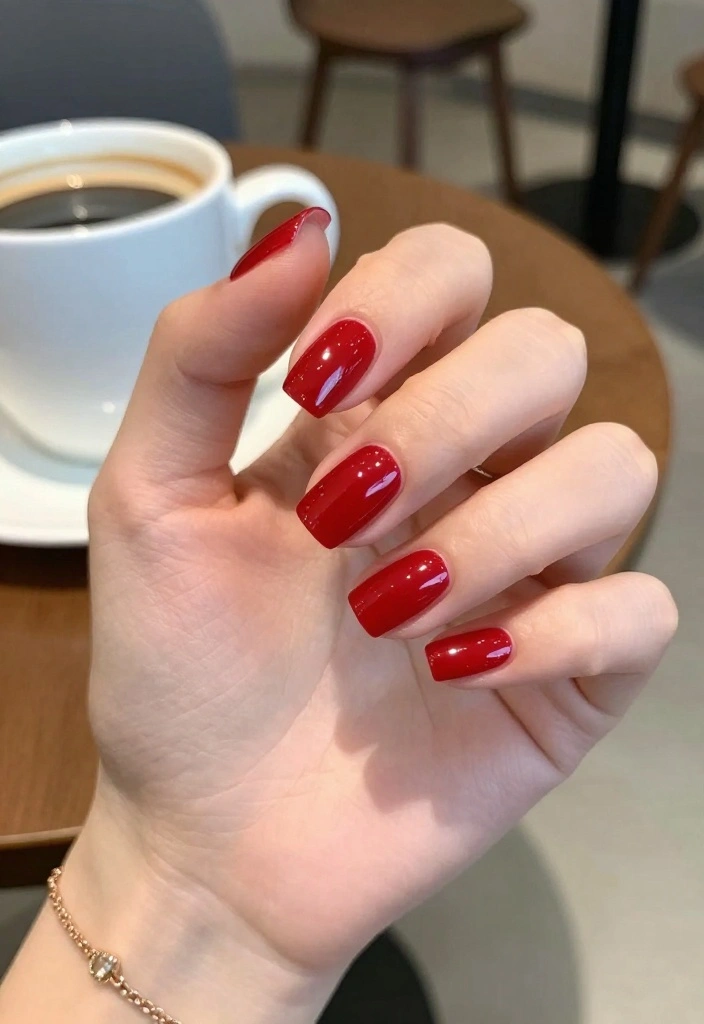
Square nails are a classic and practical choice that never goes out of style. Their straight edges and flat tips make them easy to maintain while providing a sturdy base, ideal for those with an active lifestyle. This shape is versatile enough for both casual and formal settings.
You can pair square nails with any color or design, making them a go-to for various occasions.
Reasons to love square nails include:
– Versatility: They transition well from everyday looks to glam styles.
– Easy Maintenance: Their shape reduces snagging, making them low-maintenance.
– Ideal for Any Length: They can be short or long, depending on your preference.
To achieve the best square nails:
– File Carefully: Maintain straight edges for a clean appearance.
– Buff Regularly: Smooth surfaces contribute to a polished finish.
– Explore Designs: Experiment with nail art, from classic French tips to vibrant patterns.
📹 Related Video: Full set of short square acrylic nails for beginners
4. Almond Shape – Soft and Feminine
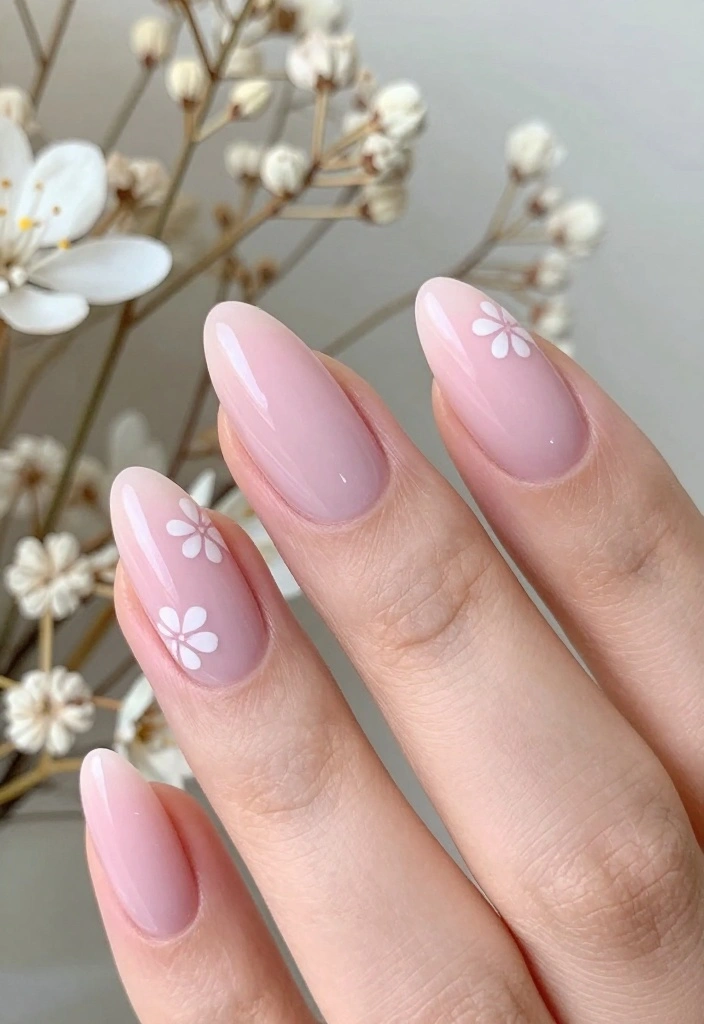
Almond-shaped nails combine elegance with a soft, feminine touch. Their tapered design elongates the fingers while remaining chic and understated, making them perfect for everyday wear or special occasions. This shape is versatile and works well with various nail enhancements and designs.
Almond nails provide a stylish yet subtle vibe that appeals to many.
Reasons to choose almond nails:
– Flattering Shape: They enhance most hand shapes beautifully.
– Design-Friendly: The curved surface allows for detailed nail art without overwhelming the design.
– Elegant Length: They achieve a length that’s stylish without being too dramatic.
For maintaining almond nails:
– Keep the Length Balanced: Avoid extreme lengths to preserve the shape.
– Regular Fill-Ins: Schedule appointments to keep nails looking fresh.
– Experiment with Colors: Soft pastels or bold shades highlight the elegance beautifully.
5. Ballerina Shape – Modern and Unique

Ballerina nails offer a contemporary twist on the classic coffin shape. With a pronounced taper and flat edge, they create a striking silhouette that stands out. This form is perfect for those seeking a unique yet stylish option without going overboard.
Ballerina nails provide a chic canvas for nail art and embellishments, making them ideal for creative expression.
Here are compelling reasons to try ballerina nails:
– Stylish Edge: They emanate a modern feel that’s trendy and fresh.
– Artistic Potential: Their ample surface area allows for creative nail designs.
– Balanced Look: They strike a great balance between length and strength.
To rock ballerina nails:
– Length Considerations: Longer nails are stunning, but ensure they’re manageable.
– Keep Them Strong: Use quality products to prevent breakage.
– Play with Colors: Ballerina nails shine in ombre effects or bold patterns.
6. Lipstick Shape – Fun and Quirky
Lipstick-shaped nails offer a playful twist for those wanting to add a fun element to their manicure. With a rounded top and tapered sides, they resemble a lipstick bullet, perfect for showcasing bright colors or whimsical nail art. This style caters to creative individuals who love to experiment.
Lipstick nails provide a delightful way to express personality while remaining stylish.
Highlights of lipstick-shaped nails:
– Unique Look: They stand out, making a bold statement.
– Perfect Canvas: Ideal for nail art lovers to showcase their creativity.
– Fun Colors: They allow vibrant designs that reflect your mood.
To maximize lipstick nails:
– Length Management: Keep them at a practical length to maintain the shape.
– Creative Designs: Use glitter or 3D decorations for an eye-catching effect.
– Regular Maintenance: Schedule fill-ins to prevent chipping and breaking.
7. Round Shape – A Gentle Touch
Round-shaped nails are the quintessential choice for those who prefer a softer aesthetic. Their gentle curvature is easy to maintain, reducing the risk of snagging or breaking, making them practical for daily wear. This shape adds a subtle elegance, suitable for various lengths and designs.
Round nails can be polished in any color or adorned with intricate designs, providing versatility.
Reasons to consider round nails:
– Low Maintenance: They require less upkeep compared to sharper shapes.
– Finger-Flattering: This shape can make fingers appear shorter and delicate.
– Versatile Style: Perfect for both simple and intricate nail art.
To achieve perfect round nails:
– File Regularly: Ensure to file in one direction for smooth edges.
– Keep Them Clean: Regular cleaning helps maintain shape and shine.
– Experiment with Colors: Bright shades and soft pastels look lovely on round nails.
How To Choose The Right Nail Forms
Choosing the right nail forms is vital for achieving stunning acrylic nails. With so many options available, it’s important to understand what to look for. Here are some key criteria to help you make the best choice:
1. Shape
The shape of your nail forms can drastically affect the final look of your acrylic nails. Common shapes include coffin, stiletto, and almond. Think about your personal style and the look you want to achieve. For instance, stiletto nails are bold and dramatic, while almond shapes are softer and more feminine. Knowing the shape you want will guide your selection process.
2. Size
Size matters when it comes to nail forms! You’ll want to choose forms that fit your natural nail size. Most nail forms come in various sizes, ranging from small to large. Measure your nails and compare them with the size options available. A good fit is crucial for a flawless application and a comfortable wear.
3. Material
Nail forms can be made from different materials, such as plastic or paper. Plastic forms are reusable and often more durable, while paper forms are disposable and may be easier for beginners. Consider your skill level and how often you plan to use the forms. If you’re new, disposable paper forms may be a great start, but if you’re experienced, durable plastic forms could be a better investment.
4. Adhesive Quality
The adhesive quality of the nail forms plays a significant role in how well they stick to your nails. Look for forms that use strong, reliable adhesive to prevent lifting during the application. This ensures that your acrylic nails last longer without any mishaps. Check reviews or ask professionals about the best brands that offer good adhesive quality.
5. Ease of Use
Consider how easy the nail forms are to use, especially if you’re a beginner. Some forms are easier to mold and shape than others. Look for forms that come with clear instructions or are user-friendly. Additionally, watch online tutorials to see how different forms are applied. This will help you gauge which ones you feel most comfortable working with.
6. Design Features
Some nail forms come with unique design features, like built-in guides or measurements. These can help you achieve even more precise shapes and lengths. If you’re looking to experiment with different styles, choose forms that offer extra features for easier application. Consider what features matter the most to your nail art journey.
Pro Tip: Once you’ve selected your nail forms, practice applying them a few times to get the hang of it! This will help you gain confidence and perfect your technique before doing a full set on yourself or clients.
By keeping these criteria in mind, you can confidently choose the right nail forms to revolutionize your acrylic nails. Remember, practice makes perfect, and soon you’ll be creating stunning nail art that turns heads!
8. Edge Shape – The Futuristic Look
Edge nails feature a sharp, angular design that makes a bold statement. This modern style is growing in popularity among those who want to stray from traditional shapes. Edge nails are ideal for fashion-forward individuals who love experimenting with their looks.
They can be styled with dramatic colors and nail art for an avant-garde vibe.
Here’s why edge nails are trending:
– Bold Statement: They elevate any outfit instantly.
– Innovative Designs: The unique shape allows for creative artistic interpretations.
– Length Flexibility: Choose shorter versions for practicality or longer ones for a dramatic touch.
To rock edge nails:
– Focus on Precision: Shape each angle carefully for a clean finish.
– Be Adventurous with Colors: Use daring hues to match the boldness of the shape.
– Regular Touch-ups: Keep them well-maintained for an edgy look.
Fun fact: Edge nails surged 60% in fashion-forward salons this year, proving bold nail forms are trending. When you pair the sharp, angular shape with dramatic color, you get an instant futuristic vibe.
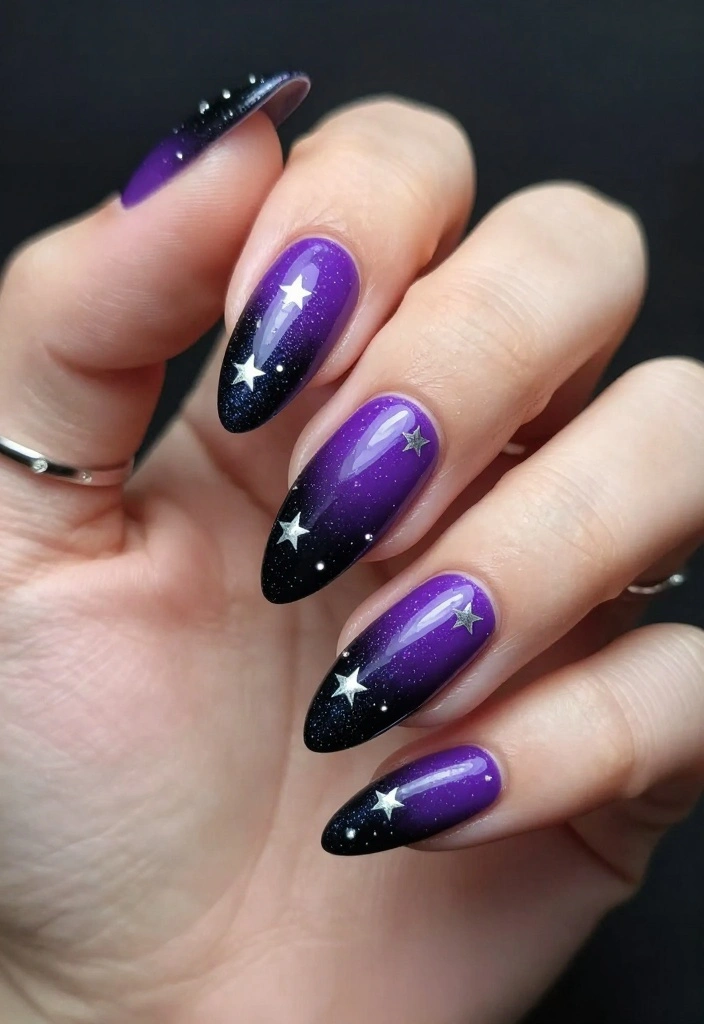
9. Sharp Shape – Pure Drama
Sharp-shaped nails are all about drama and flair. With their pointed tips and bold lengths, they’re perfect for anyone looking to make a statement. Although they might not be a daily choice for everyone, sharp nails can be incredibly striking when styled correctly.
This shape is perfect for intricate designs that can be highlighted by the sharp tip, making them ideal for fashion-forward individuals.
Reasons to try sharp nails include:
– Show-Stopping Appearance: They grab attention and stand out uniquely.
– Ideal for Nail Art: This shape accommodates intricate designs beautifully.
– Fashion-Forward: Sharp nails are often the choice of trendsetters and celebrities.
For the best results:
– Take Care with Length: Keep them manageable to avoid breaks.
– Emphasize Design: Use bold colors and geometric patterns for added drama.
– Regular Maintenance: Schedule fills and shaping to keep them fresh.
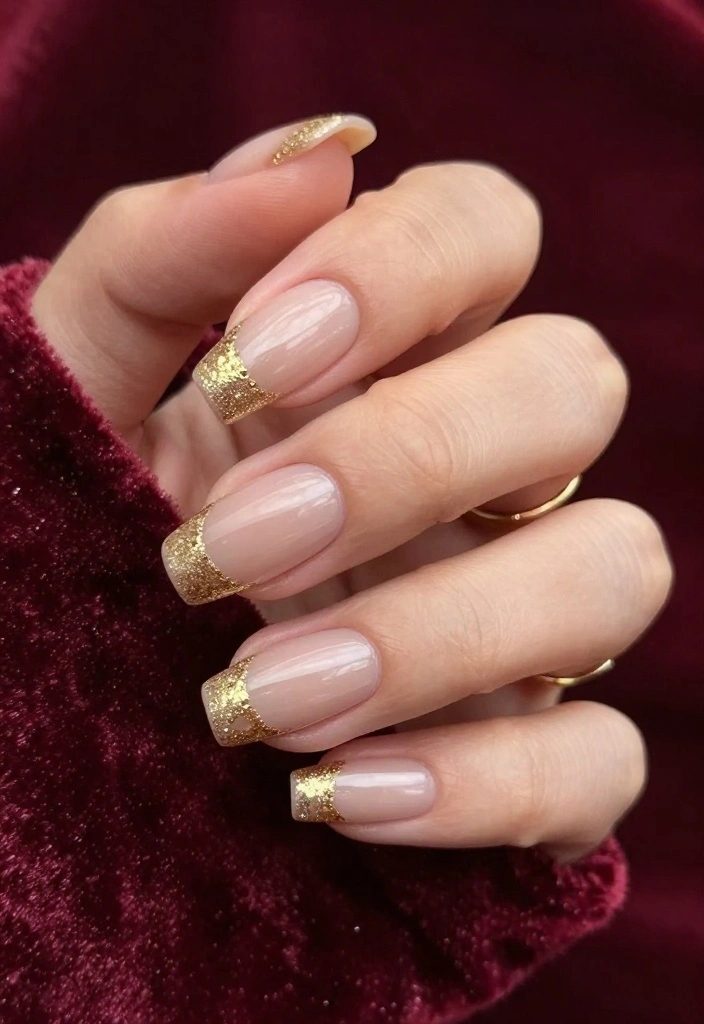
10. French Tip – The Classic Twist
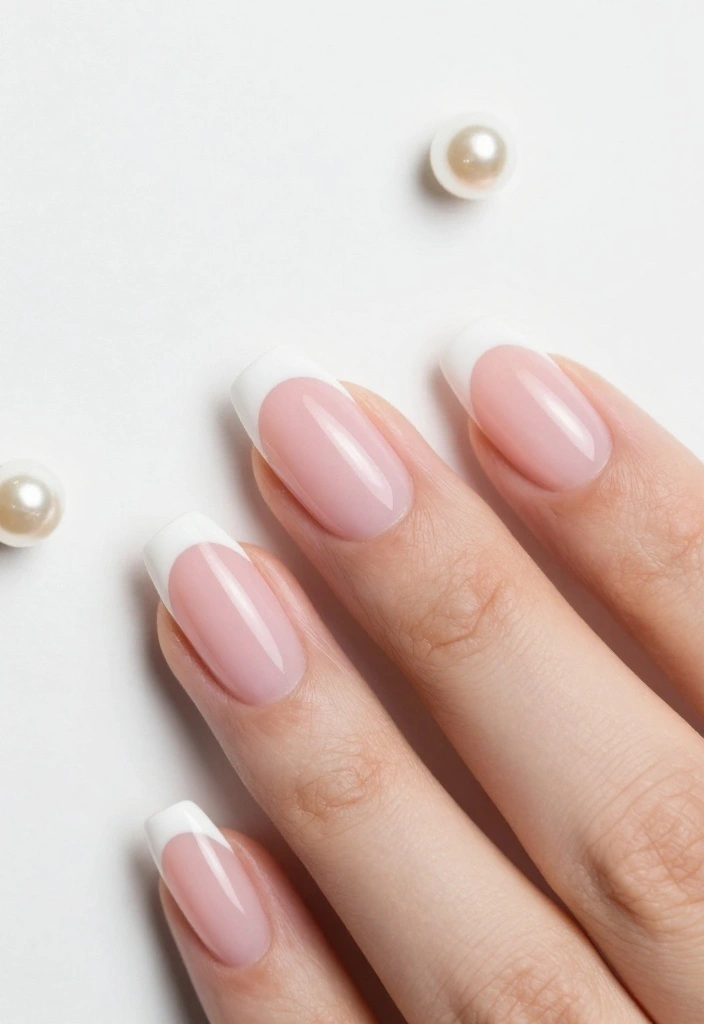
The French tip design has long been a classic staple in nail art, providing a timeless and polished look. With a nude or pale base and white tips, this style offers versatility for any occasion—from casual outings to formal events.
The appeal of French tips lies in their adaptability and universal charm.
The charm of French tips includes:
– Timeless Appeal: They remain stylish and chic across seasons.
– Customizable Options: Play with colors to add personal flair, from pastels to bold hues.
– Flattering for All: They suit various nail shapes and sizes, making them widely loved.
To achieve the perfect French tip:
– Use Quality Products: Invest in good polishes for a smooth finish.
– Precision is Key: Use tape or stencils for clean lines.
– Experiment with Variations: Try colored tips or ombré effects for a trendy twist.
Fun fact: 78% of clients still choose the French tip for its timeless appeal. With nude bases and crisp white tips, it stays chic across seasons. Pro tip: use nail forms to contour the tip for a flawless, adjustable fit.
11. Glitter Shape – Sparkle and Shine
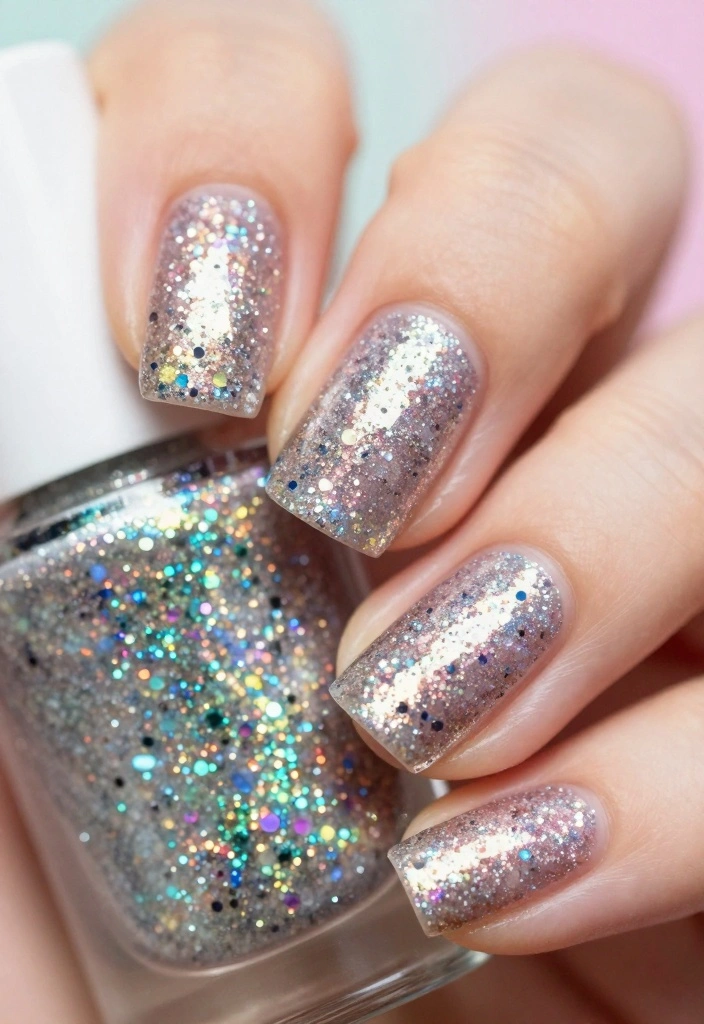
If you’re looking to add fun to your nails, glitter shapes are the way to go. Whether opting for a full glitter design or accenting a base color, these nails are all about creativity and excitement. Perfect for special occasions, glitter nails beautifully reflect light, making your hands sparkle.
Glitter nails are ideal for those who want to celebrate with a touch of joy.
What makes glitter nails stand out:
– Playful Vibe: They bring joy and excitement to any look.
– Variety of Options: Glitter mixes well with different colors, allowing for versatile styles.
– Confidence Booster: Sparkly nails can uplift your mood instantly!
For the best glitter nails:
– Layer Carefully: Use a base color for a cohesive appearance.
– Choose Quality Glitter: Fine glitter offers a more polished look.
– Seal it Right: A good topcoat helps maintain sparkle longer.
12. Textured Nails – A New Dimension
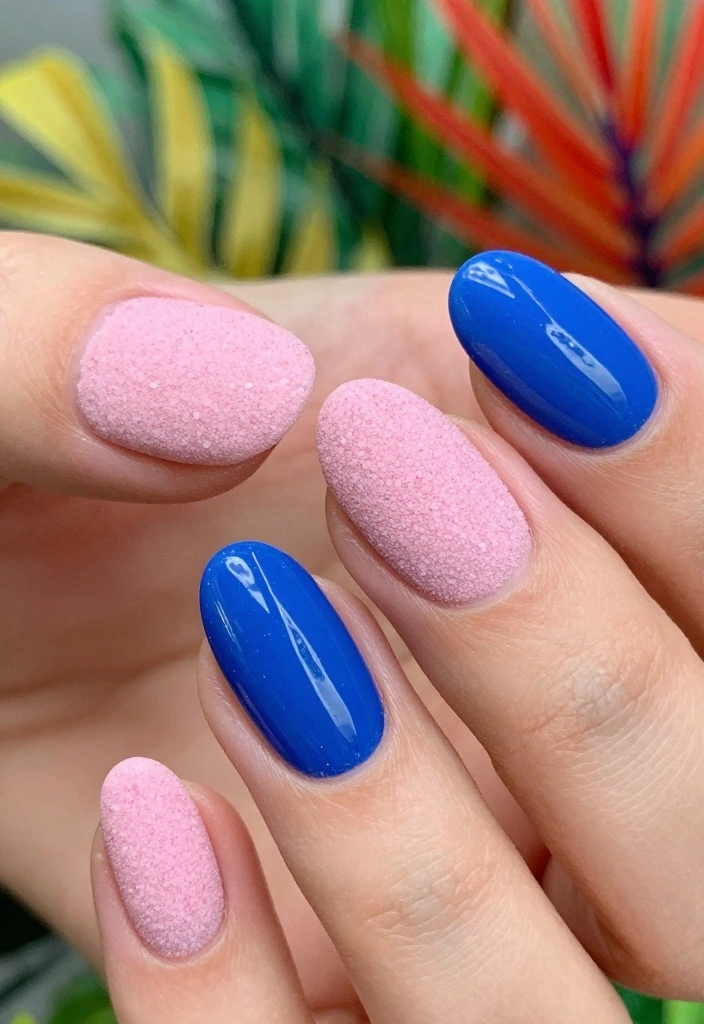
Textured nails are an exciting trend that adds depth to your manicure. This style employs various techniques, including matte finishes, sand textures, or 3D decorations. Textured nails are a fun way to express individuality and creativity.
When done correctly, textured nails enhance any shape, making them a unique choice for nail lovers.
The appeal of textured nails lies in:
– Tactile Experience: They provide a different feel compared to smooth nails.
– Visually Striking: The texture draws attention and can spark conversations.
– Creative Opportunities: Experiment with various techniques, from sponge effects to stud embellishments.
Here’s how to achieve stunning textured nails:
– Choose a Base Color: Start with a solid color as a foundation.
– Experiment with Techniques: Use sand polish or foils for unique textures.
– Finish with a Topcoat: Depending on the texture, select matte or glossy to seal your design.
Textured nails turn a simple manicure into a mood—matte, sandy, or jeweled accents everyone notices. With the right nail forms, you get depth you can feel and style you can wear daily. Dare to texture your nails and express your personality.
Conclusion
Exploring various nail forms can truly elevate your acrylic nails to a whole new level. Each shape brings its unique flair and personality, allowing you to express yourself in countless ways.
Whether you prefer the classic elegance of coffin nails or the bold statement of stiletto shapes, there’s something for everyone. Experiment with different styles to discover what resonates with your personality and aesthetic.
The world of nail enhancement is vast, and with the right forms, your creativity can run wild!
Frequently Asked Questions
What are nail forms and why are they essential for acrylic nails?
Nail forms are flexible templates you wrap around the fingertip to guide your nail extensions when sculpting with acrylic nails. They give you control over length, curve, and the final shape, helping you achieve professional-looking extensions without relying on tips alone.
Used correctly, nail forms create a strong apex and smooth sidewalls, whether you want square, almond, or stiletto shapes. Start by choosing a form size that hugs the nail bed, prep and push back cuticles, secure the form along the sides, and apply your acrylic over the form to sculpt the extension. Once set, remove the form and file to finish.
What are the different types of nail forms and when should you use each for different shapes?
There are a few common types: disposable paper forms that are quick and affordable, and reusable metal or silicone forms for more control and consistency. Paper forms are great for beginners and quick sets, while metal or silicone forms excel for longer-lasting extensions and more complex curves.
For final shapes—square, round, almond, stiletto—choose a form with the right curve and width to match the shape you want. Align the form along the nail bed, ensure a snug fit at the sidewalls, and build up the acrylic to create a clean, even edge.
Can I DIY nail forms at home, or should I see a pro for acrylic nails?
You can absolutely start at home, especially with practice on swatches or practice nails. Mastering nail forms for flawless acrylic nails takes time, patience, and good sanitation.
Begin with simple shapes, follow trusted tutorials, and keep your workspace clean. If you’re aiming for long-lasting extensions or tricky shapes (like coffin or stiletto), consider a pro’s guidance to avoid lifting or bulky acrylic.
How do I apply nail forms correctly to avoid lifting and get a smooth, durable nail extension?
Prep the nail: sanitize, push back cuticles, and dehydrate the nail bed. Choose a form that fits from side to side with no gaps, then secure it firmly around the finger. Align the form to your desired free edge length and gently guide the acrylic over the form, building a strong apex and keeping sidewalls sealed. Allow it to set, then remove the form and file to a mirror-smooth edge. Finish with a top coat for lasting shine.
What are common mistakes when using nail forms with acrylic nails and how can I fix them quickly?
Common mistakes include using the wrong size form (too loose or too tight), not sealing the sidewalls (causing lifting), applying too much product at once (bulky surface), misaligning the form (uneven edges), and skipping dehydration (poor adhesion). Fixes: swap to the correct size, re-seat the form securely, work in thinner beads and build gradually, align the form with the natural nail and apex, and re-dehydrate and refile the surface before finishing.
Related Topics
nail forms
acrylic nails
nail extensions
nail art
fashion tips
beginner friendly
advanced techniques
trendy nails
nail enhancement
DIY nails
gel vs acrylic
nail care
Wow, I had no idea there were so many nail forms! I usually just stick to the same one, but now I’m curious to try a few others. Which one do you think is the easiest for beginners?
This post is great! I tried doing my nails with a new form last week, and let’s just say I ended up with more glitter on my cat than on my nails! 😂